MD, USA
|
Posted: 2/25/2012 7:38:36 AM EDT
[Last Edit: heymannicegun]
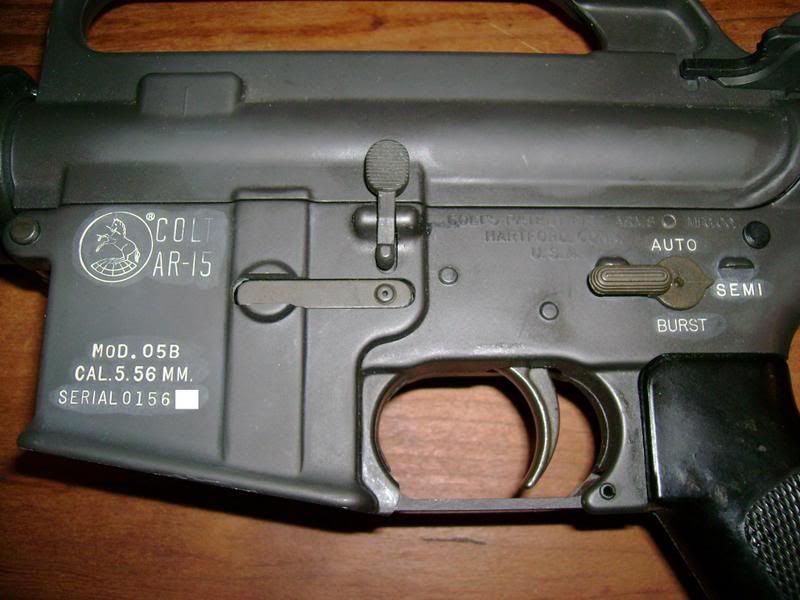
M16 4-Way Selector Install
and everything you ever wanted to know about 3 and 4-way burst kits Warning: You must have a BATFE Form 4 with tax stamp to legally own a machine gun. National Firearms Act (NFA) rules apply and you can do hard prison time for violating the law. I own a National Firearms Act registered M16 and wanted to install a 4-way selector (SAFE, SEMI, 3-round BURST, full AUTO). The 3-round burst comes in handy when running a high cyclic rate upper such as 22LR or 9mm. I couldn't find any info on the web about the 4-way kits and it took me forever to track down someone that sold the kit. I finally found Specialized Armament that sells a Colt 4-Way Lower Parts Kit for $295 and the individual parts. DSKArmory.com sells the DPMS 4-Way Kit for $150. Other M16 owners have expressed concern with removing the selector stops from their very valuable M16 lower receivers and the added complexity of the 4-way system and its effect on reliability. The trigger pull on a 4-way fire control group is also slightly heavier in SEMI & AUTO due to the extra disconnector spring which is compressed during the trigger pull. If you already have a 3-way burst kit you can convert it to a 4-way by installing the four 4-way specific parts: Auto Sear, both Disconnectors and the Selector for $145. If you are interested in installing this kit in a semi-auto AR-15 it is not only illegal but impossible due to the differences in the fire control group wells––there is no room for the auto sear. The Colt 4-Way Selector 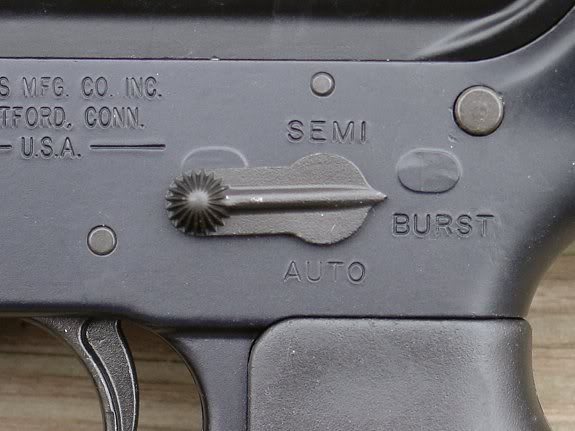
How the 4-Way Selector Works The Colt 4-way selector has SAFE and SEMI in the standard positions, 9 o'clock and 12 o'clock respectively. BURST is at the 3 o'clock position and AUTO is at 6. For the SAFE position the 4-way selector works the same as all AR-15s, the selector cam contacts the trigger and prevents it from moving. In SEMI the selector cam rotates the auto sear away from the hammer so it will not capture it. The selector cam also contacts the burst disconnector's tail locking it out. This prevents movement of the burst cam and reduces the likelihood of getting a less than 3-round burst with the first burst trigger pull. This is different from the 3-way burst fire control group where the burst disconnector is always free to ratchet the burst cam, even when firing semi-auto. The semi-auto disconnector is free to move with the trigger so it can capture the hammer and end the firing sequence if the trigger remains to the rear. Note that during a SEMI trigger pull you have to overcome the tension of the burst disconnector spring which adds to the trigger pull. This is different from the 3-way burst fire control group where the burst disconnector is never locked out. 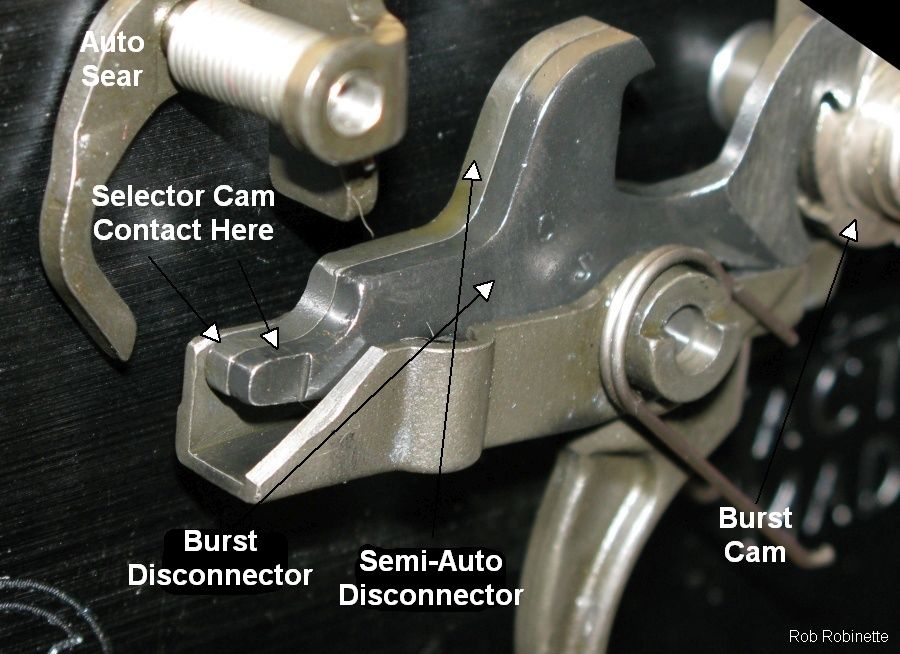
When BURST is selected the selector cam rotates the auto sear into position to capture the hammer. The selector cam also contacts the semi-auto disconnector and locks it out. The burst (right) disconnector is free to move with the trigger and ratchets the burst cam 1/6 of a turn each time the hammer goes forward. Every 3/6 of a turn (3 shots) a low spot on the cam allows the burst disconnector to move forward and capture the hammer if the trigger remains to the rear. Note: The first trigger pull when BURST is selected may fire 1, 2 or 3 shots depending upon the starting position of the burst cam, but all subsequent trigger pulls will fire 3 rounds while the trigger is held to the rear. Also, if you release the trigger quickly it is possible to fire less than 3 rounds. If you do fire less than 3 rounds the next trigger pull will complete the 3 round burst. For example, if you pull the trigger quickly and fire only 1 round, the next trigger pull will fire no more than 2 rounds. Colt 3-Way Burst Disconnectors on Left, Colt 4-Way on Right 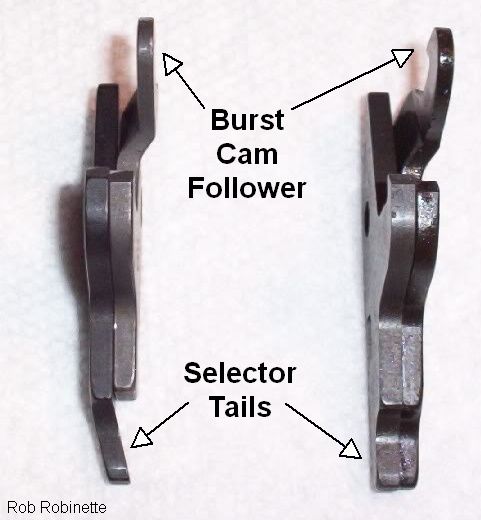
In full AUTO the selector cam rotates the auto sear into position to capture the hammer. The selector cam also contacts both disconnector tails locking them out and prevents them from capturing the hammer so the rifle will continue to fire while the trigger is pulled to the rear. The already heavy AUTO trigger pull is even heavier because both disconnector springs are compressed during the trigger pull. In summary, when the burst disconnector is locked out you get semi-auto fire. Lock out the semi-auto disconnector and you get burst fire. Lock out both disconnectors and you get full auto. Burst Disconnector on Low Cam & Engaged 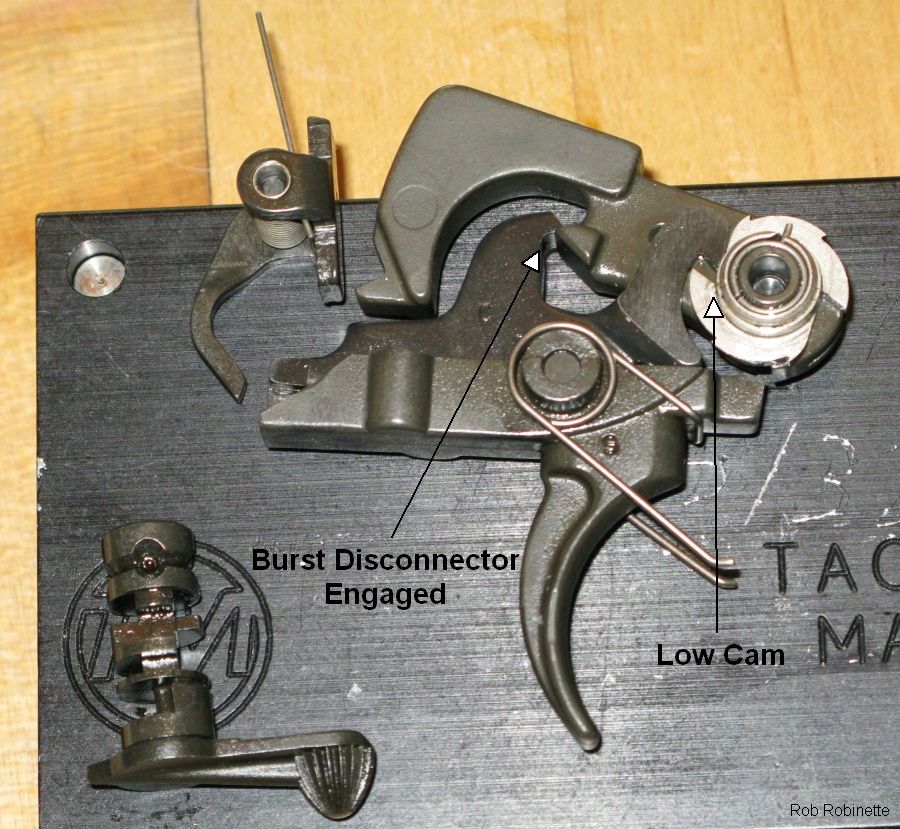
The M16A2 uses a burst 3-way selector with SAFE, SEMI, and BURST positions. It differs from the 4-way kit in three ways. A 3-way burst kit uses a standard full auto selector so it has no 4th position, the burst disconnector has no "tail" to ride the selector cam (so the burst disconnector is always free to ratchet the burst cam and engage the hammer) and the auto sear is slightly different––the 4-way auto sear has a thin, curved selector cam follower. You can convert an M16A2 to normal full-auto mode by following the instructions in the next section. –––––––––––––––––––––––––––––––––––––––––––––––––––––– Convert 3-Round Burst to Standard Full-Auto You can convert a burst 3-way selector (SAFE, SEMI, and BURST) to a normal full-auto selector (SAFE, SEMI, AUTO) by simply grinding off the burst disconnector's hammer engagement hook. Burst Disconnector Hammer Hook 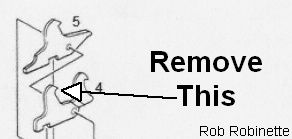
The BURST position will then function as full-auto because the burst disconnector will never capture the hammer and the rifle will fire as long as the trigger is held to the rear. The SEMI function is not affected by this modification. I recommend you purchase a replacement burst disconnector for the modification and leave your original burst disconnector alone so you can switch back to 3-round burst. Specialized Armament sells the 3-way burst disconnector. Convert 3-Way Burst to 4-Way If you already have a 3-way burst kit you can convert it to a 4-way by installing the four 4-way specific parts: Auto Sear, both Disconnectors and the Selector for $145. –––––––––––––––––––––––––––––––––––––––––––––––––––––– Installing the 4-Way Fire Control Group Removing the Selector Stops I knew the standard M16 selector stops were a problem because they prevent the selector from traveling to the 6 o'clock position which is required to get to AUTO, the 4th selector position. I saw pictures on the web of the DPMS 4-way kit that does not require the removal of the selector stops. It comes with a spacer that fits under the selector knob to extend the knob out to clear the selector stops––it's not a good looking solution (see pic below) but the kit is only $150 shipped from DSK Armory. DSK requires you fax or email a copy of your M16 BATF Form 4 to purchase the 4-way kit. Note the DPMS selector positions are different than the Colt's. It may be possible to swap out the extended DPMS 4-way selector to a flush fitting Colt 4-way selector ($45) but no one has confirmed if this will work or if the Colt 4-way auto sear ($35) is required too. DPMS 4-Way Kit with Spacer to Raise Knob Above Selector Stops The Colt 4-way kit requires the removal of at least one of the selector stops. Luckily I have a milling machine in the shop so I carefully milled off both stops using a 1/2 inch end mill. The end mill left perfectly smooth, shiny ovals where the selector stops were removed. My M16 lower is in mediocre shape and I plan to have it refinished anyway. I used some Birchwood Casey Aluminum Black to temporarily cover the bare metal where the selector stops were. Assembling the 4-Way Fire Control Group Start by assembling the trigger assembly. The silver disconnector spring goes on the right side of the trigger, the black disconnector spring goes on the left. The double hook disconnector goes on the right side of the trigger, the single hook goes on the left. You can cut a spare trigger pin in half to make an assembly pin to hold the trigger and disconnectors together during assembly. This makes it much easier to drive the trigger pin through the trigger and disconnectors. As you drive the trigger pin in during assembly the half-pin will be driven out the other side of the receiver. Next assemble the hammer assembly. Put the burst cam spring inside the burst cam. The spring extension goes into the slot in the burst cam. The spring extension goes in first so it will fit deep into the burst cam slot. Make sure the cam spring is fully seated at least flush with the cam. The ridge on the burst cam goes outward. With the cam installed install the hammer spring. Burst Kit Assembly Instructions 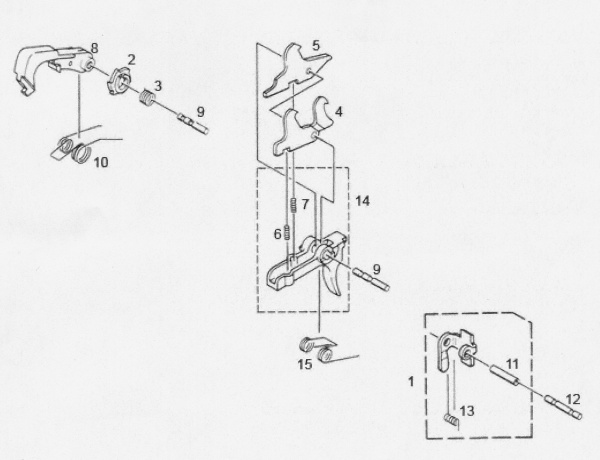
1 Auto Sear Assembly (4-way specific) [diagram above shows 3-way burst auto sear] 2 Burst Cam (burst specific) 3 Burst Cam Spring (burst specific) 4 Burst Disconnector (right, 4-way specific) [diagram above shows 3-way burst disconnector] 5 Semi-Auto Disconnector (left, burst specific) 6 Burst Disconnector Spring (right, silver, burst specific) 7 Semi-Auto Disconnector Spring (left, black, burst specific) 8 Hammer (burst specific) 9 Hammer & Trigger Pins (standard) 10 Hammer Spring (burst specific) 12 Auto Sear Pin (standard 1/8" pin) 14 Trigger (burst specific) [the Colt trigger had to be modified to function with a 4-way selector, see text below] 15 Trigger Spring (standard) 16 Selector (not shown, 4-way specific) Note that only 4 parts are different from a 3-way burst kit: Auto Sear, both Disconnectors and the Selector Installing the 4-Way Fire Control Group Assemblies The 4-way trigger is a little more difficult to install because the trigger pin has to get through two disconnectors. Using a short assembly pin (1/2 of a trigger pin) to hold the trigger and disconnectors together will make the install easy. If you don't use an assembly pin insert a punch through one of the lower receiver's trigger holes and through the trigger assembly to hold everything in place while you fit the trigger pin in from the other side. Take your time and move the punch around while pushing the trigger pin and it will eventually slide through. Applying some downward pressure with a finger on the disconnectors will often help get the trigger pin through. Put the selector in place. The burst disconnector's forward hook makes the hammer install a little more difficult. Use a thin punch to depress the rear of the burst disconnector to move the burst disconnector's cam follower to the rear to give you room to fit the hammer in front of it. Install the auto sear using a 1/8 inch sear pin. Ideally the only modification to an M16 lower receiver required to install this Colt 4-way selector kit is to remove one or both selector stops. Due to differences in manufacturer specifications your M16 may or may not need additional modifications. I installed the trigger assembly in my David Company M16 lower and found my first serious problem. A burst trigger is wider than a normal trigger to make room for the two disconnectors. My M16's trigger well wasn't wide enough to accommodate the extra wide trigger. It rubbed the right side of the well. I had to widen the trigger well by milling out a few hundredths using a 1/2 inch end mill. When I installed the hammer I realized I had another problem. The burst cam on the right side of the hammer was jammed against the forward corner of the fire control group well. It was so tight the cam would not turn. I had to mill out the right front corner of the fire control group well to make room for the burst cam. A 3/8 inch end mill did the trick by making the corner a smaller radius. I got all the parts installed and ran the function check and found problem # 3. I could not pull the trigger when AUTO was selected. After closely examining the trigger to selector interface I realized the selector cam had a small nub that was hitting the right side of the trigger. DSK Armory confirmed that about 25% of their stock had the defective selector. Colt has been informed of the milling defect. Defective 4-Way Selector on Left, Correct Selector on Right 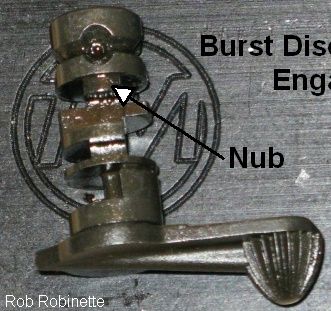 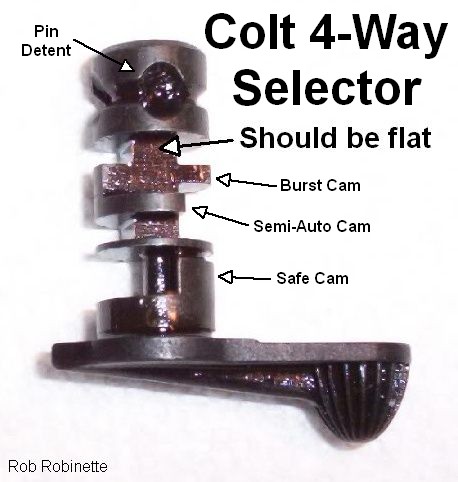
If your 4-way selector is defective and has the nub you can replace it, mill off the nub, or simply remove some metal from the right side of the trigger where it meets the selector to allow the trigger to be pulled (see photo below). A grinding wheel did the trick in short order. The left side of the trigger was left unmolested because it contacts the selector in the SAFE position to lock the trigger. 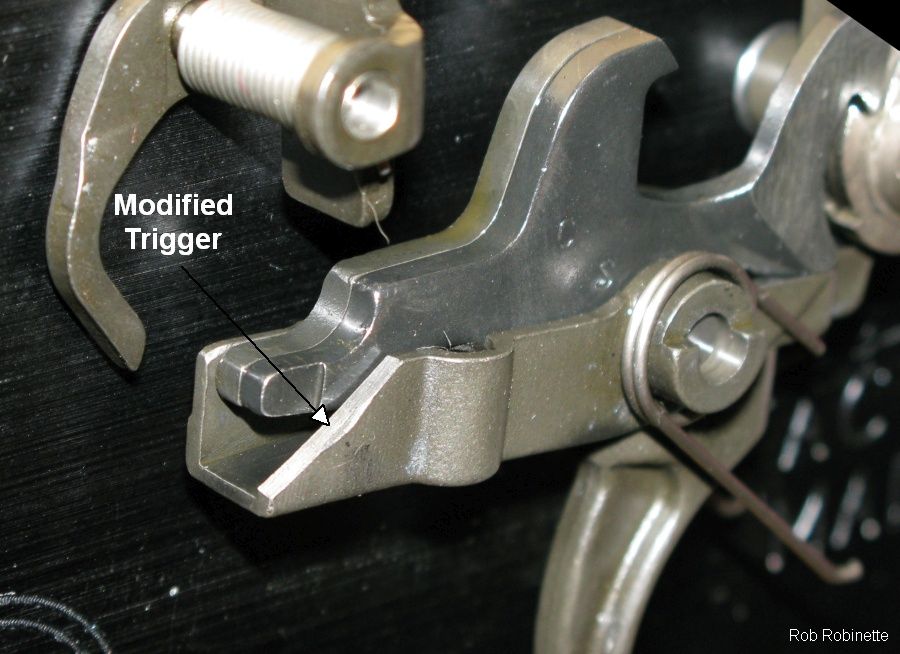
–––––––––––––––––––––––––––––––––––––––––––––––––––––– 4-Way Function Check Performed on the Lower Receiver (no upper in place) SAFE 1. Push the hammer back and down to the cocked position. The trigger sear should engage and hold the hammer. 2. Place the selector lever on SAFE. Pull the trigger to the rear, the hammer should NOT fall. SEMI 1. Place the selector lever on SEMI. 2. Pull the trigger to the rear and hold. The hammer should fall. Don't allow the hammer to strike the forward edge of the fire control group well. Install a hammer block or carefully control the hammer's forward movement with a gloved hand. 3. While holding the trigger to the rear, push the hammer back and down to the cocked position. The semi-auto disconnector should capture the hammer. 4. Release the trigger. You should see the hammer jump from the disconnector to the trigger sear as the trigger resets. 5. Pull the trigger to the rear. The hammer should fall. BURST 1. Push the hammer back and down to the cocked position. The trigger sear should engage and hold the hammer. 2. Place the selector lever on BURST. Pull the trigger to the rear and hold. The hammer should fall. 3. While holding the trigger to the rear, cycle the hammer back and down. The burst disconnector or auto sear should capture the hammer. A. If the auto sear captures the hammer release it by hand. The purpose of the auto sear is to hold the hammer until the bolt closes. Releasing the auto sear by hand simulates the bolt moving forward and releasing the auto sear. The hammer should fall. B. Repeat this up to 3 times until the burst disconnector captures the hammer. 4. With the hammer captured by the burst disconnector release the trigger. You should see the hammer jump from the burst disconnector to the auto sear. 5. Release the auto sear by hand. The hammer should jump to the trigger sear. 6. Pull the trigger to the rear and hold. The hammer should fall. 7. While holding the trigger to the rear, cycle the hammer back and down, the auto sear should capture the hammer so release it by hand and the burst disconnector should capture the hammer on the third cycle. This simulates firing the 3-round burst. 8. Release the trigger. You should see the hammer jump from the burst disconnector to the auto sear. 9. Release the auto sear by hand. The trigger should jump to the trigger sear as the trigger resets. 10. Pull the trigger. The hammer should fall. AUTO 1. Push the hammer back and down to the cocked position. The auto sear should capture the hammer. 2. Release the auto sear by hand. This simulates the bolt moving forward and releasing the auto sear. The hammer should jump from the auto sear to the trigger sear. 3. Place the selector lever on AUTO. 4. Pull the trigger to the rear and hold. The hammer should fall. 5. While holding the trigger to the rear, cycle the hammer back and down, the auto sear should capture the hammer so release it by hand and the hammer should fall. Repeat this at least 4 times. This ensures the burst disconnector does not capture the hammer. Neither of the disconnectors should capture the hammer while the trigger is held to the rear. 6. Push the hammer back and down to the cocked position. The auto sear should capture the hammer. 7. Release the trigger. 8. Release the auto sear by hand. The hammer should jump from the auto sear to the trigger sear as the trigger resets. 9. Pull the trigger. The hammer should fall. –––––––––––––––––––––––––––––––––––––––––––––––––––––– After modifying the trigger the function check worked properly in all 4 positions. I haven't fired it with the 4-way kit yet but it should do fine since the function checks are perfect. After such a painful installation I understand why there's so few M16s with 4-way selectors but It's pretty cool to have semi-auto, 3-round burst and full-auto a thumb flick away. I hope this helps anyone that's been contemplating a 4-way fire control group. Sourcing the Parts The easy way is to order the complete (small pin) Colt 4-Way Lower Parts Kit from Specialized Armament for $295 http://www.specializedarmament.com/products/LOWER_REC_PARTS_KIT_COLT_0_155_4_WAY-259-4.html The hard way, order just the 4-Way specific parts: AUTOMATIC SEAR ASSY, 4-WAY (with spring & pin) Product ID : SP63712 $35.00 DISCONNECTOR, (0.155), 4-WAY, (LEFT/SEMI) Product ID : SP63716 $30.00 DISCONNECTOR SPRING, AUTO, SEMI, BURST, (LEFT/SEMI) - BLACK Product ID : SP63026 $2.00 DISCONNECTOR, (0.155), 4-WAY, (RIGHT/BURST) Product ID : SP63715 $35.00 DISCONNECTOR SPRING, BURST, (RIGHT/BURST) Product ID : SP64568 $2.00 HAMMER & HAMMER PIN RETAINER ASSY, (0.155), BURST & 4-WAY Product ID : SP64561 $68.50 HAMMER SPRING, BURST & 4-WAY Product ID : SP64558 $5.50 SELECTOR, 4-WAY Product ID : SP63714 $45.00 TRIGGER, (0.155), BURST & 4-WAY Product ID : SP64641 $53.00 Individual Parts Subtotal $276 (for $19 more it makes sense to order the complete 4-Way Lower Parts Kit above) Here's the link to the individual parts: http://www.specializedarmament.com/catalog/AR_15_Parts-4-0.html Convert a 3-Way Burst Kit to 4-Way If you already have a 3-way burst kit you can convert it to a 4-way by installing the four 4-way specific parts: Auto Sear, both Disconnectors and the Selector for $145. AUTOMATIC SEAR ASSY, 4-WAY (with spring & pin) Product ID : SP63712 $35.00 DISCONNECTOR, (0.155), 4-WAY, (LEFT/SEMI) Product ID : SP63716 $30.00 DISCONNECTOR, (0.155), 4-WAY, (RIGHT/BURST) Product ID : SP63715 $35.00 SELECTOR, 4-WAY Product ID : SP63714 $45.00 Here's the link to the individual parts: http://www.specializedarmament.com/catalog/AR_15_Parts-4-0.html DPMS 4-Way Selector Kit Available at DSKArmory.com for $150 shipped. DSK Armory will require a copy of your M16 BATF Form 4. Warning: You must have a BATFE Form 4 with tax stamp to legally own a machine gun. National Firearms Act (NFA) rules apply and you can do hard prison time for violating the law. |
|
|
|
[#1]
So that is what the red plate was for. Interesting.
Too bad I'll probably never get a chance to own an M16 due to the cost. |
|
|
|
|
[#2]
 |
|
|
|
|
[#3]
Ok, but wouldn't this be better posted here.
|
|
|
|
|
[#4]
Cool, never saw that before
|
|
|
|
|
[#5]
Nice flexibility. Add an adjustable gas screw & gas up on 3 round, gas down on auto.
Thanks for posting & doing the hard work. Gig 'em, backbencher |
|
|
|
OH, USA
|
[#6]
Yup! Triger control. |
|
|
|
[#7]
There had been requests that we produce a 4 way selector. Our opinion is largely gleaned and based from folks opinion of it here, which is that it seems those that switched to a 4 way, very soon switched back.
The burst mechanism doesn't reset, and it messes with the trigger pull, so it's an easy button with unacceptable penalties 
|
|
|
|
OH, USA
|
[#8]
Originally Posted By Duffy:
There had been requests that we produce a 4 way selector. Our opinion is largely gleaned and based from folks opinion of it here, which is that it seems those that switched to a 4 way, very soon switched back. The burst mechanism doesn't reset, and it messes with the trigger pull, so it's an easy button with unacceptable penalties I would like to hyjack this thread and request a ROF lower parts kit be made! |
|
|
|
[Last Edit: Duffy]
[#9]
Maybe Bill (Geissele) can make one? We can't begin to tinker with triggers/hammers a master like Bill can
|
|
|
|
MD, USA
|
[#10]
The burst mechanism doesn't reset
On the 4-way the burst cam doesn't turn during semi-auto or auto fire so if you fire a complete 3-round burst then switch to semi or auto when you come back to burst you will get a full 3-round burst. But the semi trigger pull is heavier due to the compression of the burst disconnector spring. |
|
|
AL, USA
|
[Last Edit: Shermantor-AR15]
[#11]
Originally Posted By Duffy:
There had been requests that we produce a 4 way selector. Our opinion is largely gleaned and based from folks opinion of it here, which is that it seems those that switched to a 4 way, very soon switched back. The burst mechanism doesn't reset, and it messes with the trigger pull, so it's an easy button with unacceptable penalties I was the one that requested the production of the 4 way selector that could be used with the Colt 4 way set up, so I wouldn't have to grind off the stops on my Transferable Lower. The only option I see right now would be to get the colt 4 way selector and modify it so it would stick out far enough to clear the stops when being rotated. So for now I'm hoping BAD inc will eventually make one so I won't have to modify anything |
|
|
|
[#12]
Originally Posted By Shermantor-AR15:
Originally Posted By Duffy:
There had been requests that we produce a 4 way selector. Our opinion is largely gleaned and based from folks opinion of it here, which is that it seems those that switched to a 4 way, very soon switched back. The burst mechanism doesn't reset, and it messes with the trigger pull, so it's an easy button with unacceptable penalties I was the one that requested the production of the 4 way selector that could be used with the Colt 4 way set up, so I wouldn't have to grind off the stops on my Transferable Lower. The only option I see right now would be to get the colt 4 way selector and modify it so it would stick out far enough to clear the stops when being rotated. So for now I'm hoping BAD inc will eventually make one so I won't have to modify anything Couldn't you just gring off the underside of the selector switch to clear the stops? |
|
|
|
|
[#13]
Well that answers my question of is it possible. But it is a moot point because I will never be able to afford it.
|
|
|
|
MD, USA
|
[Last Edit: heymannicegun]
[#14]
Couldn't you just gring off the underside of the selector switch to clear the stops?
The way the Colt 4-way selector is designed would make for a very thin selector lever if you ground the underside to clear the selector stops. |
|
|
|
[Last Edit: CAR-AR-M16]
[#15]
Originally Posted By shrikefan:
Originally Posted By Shermantor-AR15:
Originally Posted By Duffy:
There had been requests that we produce a 4 way selector. Our opinion is largely gleaned and based from folks opinion of it here, which is that it seems those that switched to a 4 way, very soon switched back. The burst mechanism doesn't reset, and it messes with the trigger pull, so it's an easy button with unacceptable penalties I was the one that requested the production of the 4 way selector that could be used with the Colt 4 way set up, so I wouldn't have to grind off the stops on my Transferable Lower. The only option I see right now would be to get the colt 4 way selector and modify it so it would stick out far enough to clear the stops when being rotated. So for now I'm hoping BAD inc will eventually make one so I won't have to modify anything Couldn't you just gring off the underside of the selector switch to clear the stops? Not really enough meat on the selector to put a clearance cut to clear the selector stops (see pic below, 4-Way on right). 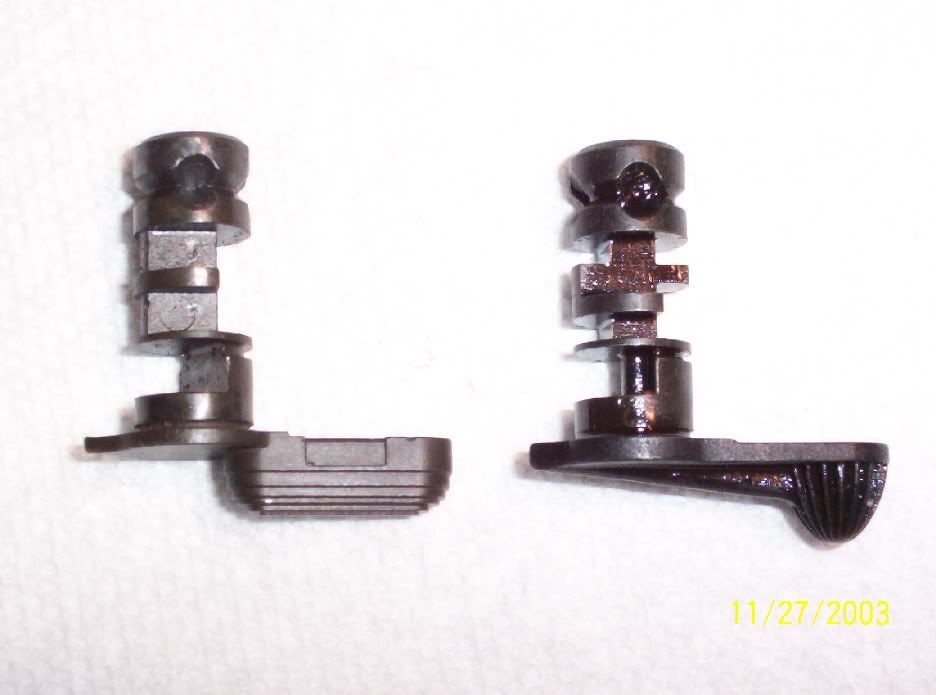
|
|
|
|
|
[Last Edit: CAR-AR-M16]
[#16]
OP, I had the Colt 4-Way parts installed in my RR years ago, but I did not have any of the issues you described (my RR does not have any selector stops, so that was never an issue). Sounds like your internal dimensions must have been off. Also, I did not have to remove any material from the trigger to get mine to work. Lastly, like most other folks, I ended up removing the 4-Way parts and putting the standard safe-semi-full FCG back in the gun.
|
|
|
|
MD, USA
|
[#17]
Also, I did not have to remove any material from the trigger to get mine to work
Was the rear of your trigger symmetrical or did the right side near the selector have an indentation? For me the selector was blocking the right side of the trigger. The trigger was locked as if it were in the SAFE position. |
|
|
|
[#18]
Originally Posted By heymannicegun:
Also, I did not have to remove any material from the trigger to get mine to work
Was the rear of your trigger symmetrical or did the right side near the selector have an indentation? For me the selector was blocking the right side of the trigger. The trigger was locked as if it were in the SAFE position. I do not remember. It was almost 8 years ago when I had those parts. I know I did not have to modify them in anyway. |
|
|
|
MD, USA
|
[#19]
I forgot to mention this, if you already have a 3-way burst kit you can convert it to a 4-way by installing the four 4-way specific parts: Auto Sear, both Disconnectors and the Selector for $145.
|
|
|
|
[#20]
Originally Posted By heymannicegun:
I forgot to mention this, if you already have a 3-way burst kit you can convert it to a 4-way by installing the four 4-way specific parts: Auto Sear, both Disconnectors and the Selector for $145. That is exactly what I did. |
|
|
|
MD, USA
|
[Last Edit: heymannicegun]
[#21]
Update on the problem with the locked trigger in the AUTO position. Dan at DSK Armory found that about 25% of the Colt 4-Way selectors he had in stock had a milling defect. There's a nub on the selector that will prevent trigger movement. If your 4-way selector is defective and has the nub you can replace it, mill off the nub, or simply remove some metal from the right side of the trigger where it meets the selector to allow the trigger to be pulled.
Here's a pic from Dan at DSK Armory that shows a correctly milled 4-way selector:
I also found a source for the DPMS 4-Way Selector Kit. DSKArmory.com has the kit available for $150 shipped. Here's another reason not to install a 4-way selector––Geissele Super Select-Fire (SSF) Trigger with two stage semi-auto and single stage full auto trigger. It's available from http://www.botachtactical.com/ for $300 shipped. |
|
|
VA, USA
|
[Last Edit: JeffKnox]
[#22]
––––––––––––––––––––––––––––––––––––––––––––––––––––––
Convert 3-Round Burst to Standard Full-Auto You can convert a burst 3-way selector (SAFE, SEMI, and BURST) to a normal full-auto selector (SAFE, SEMI, AUTO) by simply grinding off the burst disconnector's hammer engagement hook. Burst Disconnector Hammer Hook http://robrobinette.com/images/M16/M16-Convert.jpg The BURST position will then function as full-auto because the burst disconnector will never capture the hammer and the rifle will fire as long as the trigger is held to the rear. The SEMI function is not affected by this modification. I recommend you purchase a replacement burst disconnector for the modification and leave your original burst disconnector alone so you can switch back to 3-round burst. Specialized Armament sells the 3-way burst disconnector. Convert 3-Way Burst to 4-Way Excellent write-up, pictures, and information. Thank you. As to converting a 3-round burst system to full auto, I would go a little farther than just grinding off the hammer hook of the Burst Disconnector. One of the annoyances of the burst system is that the trigger pull in Semi is lighter on every third shot because the cam hook of the Burst Disconnector exerts less tension on the Disconnector's spring in the back of the Trigger when the hook is in the deep cam notch. Typically the trigger pull will be around 7lbs when the hook is in the deep notch of the cam and can be over 10lbs when in one of the shallow notches. To get full-auto, and consistent trigger pull, you can either grind off both hooks or make a simple spacer with which to replace the Disconnector. Keep in mind that if you use a spacer, you will either want it to be of a size and shape to effectively capture and retain the Disconnector Spring in the Trigger, or you will need to remove that spring. (Note these springs are a pain to get back in properly.) Also, if you grind off the front hook, you want to leave the smooth radiased portion of the hook to maintain contact with the cam and keep the Disconnector from flopping around in the trigger and possibly allowing the spring to escape. That spring must be either effectively captured or removed otherwise it will undoubtedly decide to come out at the most inopportune moment and get lodged in the most inconvenient location possible - like under the front of the trigger - resulting in failure to fire when you need it to fire. Thanks again for the excellent write-up. Jeff www.FirearmsCoalition.org www.GunVoter.org |
|
|
|
[#23]
Originally Posted By JeffKnox:
–––––––––––––––––––––––––––––––––––––––––––––––––––––– Convert 3-Round Burst to Standard Full-Auto You can convert a burst 3-way selector (SAFE, SEMI, and BURST) to a normal full-auto selector (SAFE, SEMI, AUTO) by simply grinding off the burst disconnector's hammer engagement hook. I did it by just making a new burst cam with no notches. |
|
|
|
VA, USA
|
[#24]
A notchless burst cam replacement will work too. A short piece of pipe (or stack of washers) with an ID slightly bigger than the shaft of the hammer and an OD about the same as the deep notch of the burst cam would probably suffice. I'd have a little worry about the hammer spring getting cock-eyed, but it probably wouldn't really be an issue - or one easily dealt with.
I think grinding the hooks is the easiest (and after looking at it again, my comment about radiasing the front hook is BS. There is a shoulder at the front that will keep it from flopping). Making a spacer by grinding a washer some and pulling the disconnector spring, or just following the lines of the lower half of the disconnector and cutting it out of plate wouldn't be too hard. I really don't understand why the Army is replacing everything in converting M4s to M4A1s when they could just replace the Burst Cam or the Burst Disconnector. That would make it easy to switch a gun back to burst if the command saw a need for that capability. Oh well, who said the Army should make sense? Knowledge is Power. www.FirearmsCoalition.org www.GunVoter.org |
|
|
USA
|
[#25]
Nice! Is there a semi/auto version of this??
|
|
|
AL, USA
|
[#26]
Well I purchased the 4-way kit from SAW. Also I ordered a DPMS Semi-Selector. My plan is to modify the 4-way selctor by cutting off the lever and then cutting down the DPMS selector and using JB-Weld to combine them so that it will make a lever that sticks out far enough to clear the selector stops on my Receiver.
Will probably be the end of May before I complete this project and get a chance to goto the range and try it out. Will post pictures later too. |
|
|
AL, USA
|
[#27]
Well, finally got out to the range today and I must say the colt 4-way worked with no problems put about 300-400 rounds through it with semi, burst, and auto. The burst was 1,2, or 3 rounds first pull and 3 after that until the end of the mag or you switched to another setting. So far I'm happy with it.
Below are pictures I did to modify the selector so it would clear my selector stops and also interesting enough to also clear my KNS rear pivot pin that sticks out too. I took a DPMS semi selector cut it off part way down and JB welded it to the top of the colt 4 way which I had to cut the tail offf and grind down the ridge that was on the 4way to get the dpms one to fit flat. 4 way selector after the tail was cut off. 
The modified 4 way and DPMS selectors before I JB Welded them together. 
The completed modfied selector 
Selector installed top view 
Selector installed side view clears stop and KNS rear pivot pin 
|
|
|
|
[#28]
Wow, that's ugly!
But if it works and you're happy with it, then good job, and enjoy it! |
|
|
|
AL, USA
|
[#29]
Originally Posted By Circuits:
Wow, that's ugly! But if it works and you're happy with it, then good job, and enjoy it! I agree it is ugly, but I am very happy with it, as it does work as it is supposed too. I know that TonyK always post the picture of how someone used the DPMS/TAPCO 4-way system and went back to a regular set up. However I think the Colt 4-way system is probably top notch. The main thing keeping most of us from trying it is because we have selector stops on our transferable receivers and prevents us from being able to just plug and chug. |
|
|
|
[#30]
Originally Posted By Shermantor-AR15:
I agree it is ugly, but I am very happy with it, as it does work as it is supposed too. I know that TonyK always post the picture of how someone used the DPMS/TAPCO 4-way system and went back to a regular set up. However I think the Colt 4-way system is probably top notch. The main thing keeping most of us from trying it is because we have selector stops on our transferable receivers and prevents us from being able to just plug and chug. I run 4-pos on both my 22 and 9mm dedicated guns, and it's useful given their higher rates of fire. For me, the DPMS arrangement (0-A-1-3, down for auto, up for 3rb) is very functional and preferable to the 0-1-3-A Colt. |
|
|
|
UT, USA
|
[#31]
This thread is invaluable IMO, too bad the OP hasn't been on here in so long as I'd like to thank him immensely for his great initial post. My SOT argued with me back and forth that the DPMS solution was the only one available until I was able to point him here and shut him up for good.
Three things: 1. Specialized Armament is no longer selling the 4 way parts as a complete kit. They do still sell the individual parts, just a little more work. Wanted to let people know that since if you follow the OPs links you might assume it is no longer available at all but it is, a la carte, just go through the main page at SA. 2. DSK's DPMS kit is available contrary to what their web page says as well, just email them. It is now $195, but the real kicker is it is made to order and takes nearly 2.5 months to receive. That seems very strange to me and couldn't get a straight answer if that means DPMS builds them on a per order basis for customers or does DSK now put these together from DPMS parts now. Previously it appeared to be a DPMS packaged item, maybe that has now changed? No idea. 3. Several folks who have installed the 4 way made comments that shortly after installing it, they took it out and went back to whatever setup they had prior. Would any of those folks that have these "left over" 4 way parts be willing to let me borrow it so I can see if it is something I want to invest in? Would prefer the Colt 4 way, but more than happy to try the DPMS. Normally I would buy parts and if I didn't like them I would stick them in the cabinet for a rainy day or sell them but I'm under New Year's Resolution "wife microscope" for the foreseeable future and cannot afford any non-essential firearms related purchases and I don't see much of a secondary market for this at all so I might get stuck with a bad purchase I cannot afford to get stuck with. I'd be more than happy to pay a large deposit to try yours out. Along those lines, if anyone wants to sell their dusty, mothballed 4 way selector parts, let me know as I might be interested after I hopefully enjoy the 4 way after demoing it. |
|
|
TX, USA
|
[#32]
Can someone please explain to me why there is this perceived avoidance to 4 position selectors? It seems they do run, but people change back? What exactly is the reason? Is it the inconvenience of having the selector in different locations?
|
|
|
|
[#33]
Originally Posted By FleischPfeif:
Can someone please explain to me why there is this perceived avoidance to 4 position selectors? It seems they do run, but people change back? What exactly is the reason? Is it the inconvenience of having the selector in different locations? The presence of two disconnectors and disconnector springs makes the trigger heavier and grittier than a regular 3-pos FCG. Some have issues with the DPMS selector positions. Seems like most just figure it's not worth the additional parts and heavier trigger feel, except in special applications (like my 22 and 9mm guns). |
|
|
|
TX, USA
|
[#34]
Originally Posted By Circuits:
The presence of two disconnectors and disconnector springs makes the trigger heavier and grittier than a regular 3-pos FCG. Some have issues with the DPMS selector positions. Seems like most just figure it's not worth the additional parts and heavier trigger feel, except in special applications (like my 22 and 9mm guns). Originally Posted By Circuits:
Originally Posted By FleischPfeif:
Can someone please explain to me why there is this perceived avoidance to 4 position selectors? It seems they do run, but people change back? What exactly is the reason? Is it the inconvenience of having the selector in different locations? The presence of two disconnectors and disconnector springs makes the trigger heavier and grittier than a regular 3-pos FCG. Some have issues with the DPMS selector positions. Seems like most just figure it's not worth the additional parts and heavier trigger feel, except in special applications (like my 22 and 9mm guns). Couldnt that mostly be worked out with a little stoning and polishing? ? 22, 9, and 45 uppers are the reason im interested. If im going to do it, I need to decide beforr I anodize my lower whether or not to mill the stops off. |
|
|
|
[#35]
Originally Posted By FleischPfeif:
Couldnt that mostly be worked out with a little stoning and polishing? ? 22, 9, and 45 uppers are the reason im interested. If im going to do it, I need to decide beforr I anodize my lower whether or not to mill the stops off. Grittiness might be addressable, but not heavier pull - you'd have to screw with the disconnector springs for that. If you get the DPMS style, it doesn't need the selector stops milled off. If you want the Colt, guess you'd better decide. |
|
|
|
TX, USA
|
[#36]
Originally Posted By Circuits:
Grittiness might be addressable, but not heavier pull - you'd have to screw with the disconnector springs for that. If you get the DPMS style, it doesn't need the selector stops milled off. If you want the Colt, guess you'd better decide. Originally Posted By Circuits:
Originally Posted By FleischPfeif:
Couldnt that mostly be worked out with a little stoning and polishing? ? 22, 9, and 45 uppers are the reason im interested. If im going to do it, I need to decide beforr I anodize my lower whether or not to mill the stops off. Grittiness might be addressable, but not heavier pull - you'd have to screw with the disconnector springs for that. If you get the DPMS style, it doesn't need the selector stops milled off. If you want the Colt, guess you'd better decide. Are they equally reliable? |
|
|
|
[#37]
Originally Posted By FleischPfeif:
Are they equally reliable? I've only ever used the DPMS style, and those have been 100% for me. |
|
|
|
USA
|
[#38]
So I got my DPMS 4 way kit and installed it tonight. It failed the function check on the bench. Auto seemed like it was in burst mode. Burst mode was inconsistent at best, seemingly firing 1,2,2,1,2,2,1, and never 3 shots consecutively. Semi auto seemed 50% the disconnector would actually catch the hammer.
Looking closer, we noticed the selector never manipulates the burst disconnector. Is that correct? Seems as if one of the parts is out of spec. I emailed DSK, but in the meantime I'm looking for all the help I can get. Not even sure where to begin |
|
|
|
[Last Edit: Circuits]
[#39]
Originally Posted By scooper999:
So I got my DPMS 4 way kit and installed it tonight. It failed the function check on the bench. Auto seemed like it was in burst mode. Burst mode was inconsistent at best, seemingly firing 1,2,2,1,2,2,1, and never 3 shots consecutively. Semi auto seemed 50% the disconnector would actually catch the hammer. Looking closer, we noticed the selector never manipulates the burst disconnector. Is that correct? Seems as if one of the parts is out of spec. I emailed DSK, but in the meantime I'm looking for all the help I can get. Not even sure where to begin In the DPMS kit, safe is safe. next click (down) is auto, and should retard BOTH disconnectors next click (forward)) is semi, and should retard neither disconnector. next click (up) is burst, and should retard the auto disconnector, but not the burst disconnector. next click (back) is right back onto safe. A peculiarity of the 4-pos kits is the auto sear, which has a severely shortened front leg, compared to a standard GI auto sear, in order to leave some meat on the selector body to provide two sear-forward positions for the auto and burst modes, without compromising too badly the strength of the selector as a whole. ETA used with a DIAS, the auto sear is immaterial, as the DIAS does not require or even try to hold the auto sear back when in semi or safe modes. |
|
|
|
USA
|
[#40]
after my post I got a response from the seller. Compared my parts with pics of how the parts should look and realized I have the wrong parts. I believe both disconnectors are for a 3 way kit (burst).
shipping back to get a new set. |
|
|
ID, USA
|
[#41]
Sure makes me sorry I sold my factory Colt Commando with four position fire control. I bought an almost NIB "Enhanced Commando" (actually roll marked as such). Story was it was part of a special run of 11.5" guns that were built for the country of Greece. Supposedly there were a couple of rifles left over after the contract was filled and Colt sold them. This was around 1997'ish IIRC and it was of course a post 86 dealer sample. Ran great except as this original post mentioned the trigger pull really sucked. I could easily bump off a two round burst in the third position (BURST) and the next time I pulled the trigger I was rewarded with a pathetic 1 round "burst"! It had what's know as a non-resetting burst cam. Plus when fired in Semi the trigger pull would actually get heavier for the next two semi auto shots. Apx 6 pounds for round number one, apx 8 pounds for shot number two, then apx 9 pounds for shot number three (for clarity: this was all fired in the semi position. The complex 4-way FCG was awful in straight semi auto mode.
For the record it was one hell of a rifle as no one I ever showed it too had ever seen one like it, pretty rare gun. It was a lot of fun dispite the heavy trigger pulls and it always ran 110%. Kept it about a year and sold it for $2000.00. That was almost three times the cost of a Colt M16-A2 at that time. I just had to have a Pre-86 dealer sample H&K MP5 keeper, so out the door it went. So there my little contribution to the excellent story above. Good fire control group but not great, though it did work reliably always. |
|
|
ID, USA
|
[Last Edit: openbolt]
[#42]
Double tap.
|
|
|
|
[#43]
The Colt Model 605B had a 4-Way FCG, with the relief for the selector stops cut out of the selector lever itself, so no need to mill down the stops.


Notice the priority of the 1st fire control positions being either AUTO or BURST. You could rotate the selector to either one out of the gate from SAFE. |
|
|
|
USA
|
[#44]
So is there any viable 4 way switch these days?
|
|
|
|
[#45]
Originally Posted By TimelinexAZ: So is there any viable 4 way switch these days? Same two styles as always. Specialized Armament and some other Colt parts sellers can sell you a Colt 4-pos group, and there are NOS DPMS/Tapco 4-way kits, and both are also available on the used market if you post WTB and/or look/wait long enough. At least one manufacturer has come up with a resetting burst FCG, but it's integrated into a cassette-style full auto group, and is not available as individual FCG parts. |
|
|
|
 Win a FREE Membership!
Sign up for the ARFCOM weekly newsletter and be entered to win a free ARFCOM membership. One new winner* is announced every week!
You will receive an email every Friday morning featuring the latest chatter from the hottest topics, breaking news surrounding legislation, as well as exclusive deals only available to ARFCOM email subscribers.

AR15.COM is the world's largest firearm community and is a gathering place for firearm enthusiasts of all types.
From hunters and military members, to competition shooters and general firearm enthusiasts, we welcome anyone who values and respects the way of the firearm.

Subscribe to our monthly Newsletter to receive firearm news, product discounts from your favorite Industry Partners, and more.
Copyright © 1996-2024 AR15.COM LLC. All Rights Reserved.
Any use of this content without express written consent is prohibited.
AR15.Com reserves the right to overwrite or replace any affiliate, commercial, or monetizable links, posted by users, with our own.


