|
[#1]
Quoted:
There's definitely a learning curve with it but it's fun. I haven't done much sand casting but I was able to work with someone who has. There are lots of little tricks that make it easier. |
|
|
|
[#2]
Quoted:
I should have explained further. After the first temper, counter bend against the warp on a piece of angle iron or something with wire or clamps and temper it again while clamped. https://www.AR15.Com/media/mediaFiles/125898/SmartSelect_20190615-183853_Samsung_Notes_jpg-980796.JPG |
|
|
|
[#3]
Quoted: I LOVE this picture!!! I'm still waiting on his picture explanation of grinding plunges. Here's the finished cast aluminum heart from earlier. |
|
|
|
[#4]
That cleaned up nice.
I'm sure it made a little girl very happy. |
|
|
|
[#5]
Thanks. She had a good time"helping" me, she might have forgotten that we actually made something. Lol
She's out right now, but I'll give it to her when she gets home tonight. I got started on this knife again. I tried matching the angle on the front of the scales with the one on the back vs the front being rounded like it was on my last one. Something seems a little "off" about it, but I'm not sure what. I'll post this pic in the blade porn thread for suggestions also. |
|
|
|
[#6]
Looks fine to me.
|
|
|
|
[#7]
I decided to make another handle out of the same material as I'm planning on using on the little wharncliffe that I posted above.
The material is new to me. I got it from a customer at work. It's a paper laminate used in cutting boards, ramp surfaces and industrial jigs/fixtures. (Might be the best thing since they started bottling snake oil. Lol) the price was right ($0) so I figured I'd try to use the stuff. I had a chef's knife of unknown origin that came from my in-laws because the wood scales were trashed from years of trips through the dishwasher. I knocked out the scales and glued them on with copper pins and sharpened the knife up. I'll use it in the kitchen for a bit to see how the handles hold up. The material is nice to work with as it pretty much acts like plastic, being very consistent in density and texture. You just have to make sure the back side is supported when you're drilling or it'll tear out around the holes when the bit punches through. It polishes nicely without putting any other finish on it too, which is nice. |
|
|
|
[#8]
looks nice.
kinda sounds like warwood. |
|
|
|
[#9]
Thank you.
I have a knife from buck knives with a similar product for scales too. Buck calls it "paperstone" or something like that. |
|
|
|
[#10]
I have heard if that. I think KME and maybe wicked edge offers it for sharpener bases.
|
|
|
|
[#11]
For this mornings project I present the mother in law's "could you please sharpen a couple of my knives?" Collection.
|
|
|
|
[#12]
"I like the pull through sharpener on the knife block, but the knives got full fast."
Those things are trash. I had to use a 120 grit belt on some of these things to get past the gouges from the "sharpener" |
|
|
|
[#13]
Throw them all out, make her a new set, endear yourself to her further.
|
|
|
|
[#14]
I'd have a hard time making her a knife. She is terrible with knives.
I'd probably lose my mind the first time I came over and saw her put it in the dishwasher. I believe she has a glass cutting board too. I am leaving her the chef's knife that I recently put the handle on, just because I want to see how the handle material deals with being abused. Lol |
|
|
|
[#15]
Quoted:
Throw them all out, make her a new set, endear yourself to her further. Let those types use the cheap knives... |
|
|
|
[#16]
I went to blade show west and got some things.
The thing I'm most excited about is enough steel to make ~30 knives. It's all 3/32" and 1/8" 1084, and one lonely piece of .065" 15n20 for when I get brave enough to try welding up a small billet of Damascus. I also got some handle material and pins. I should have bought more of the carbon fiber because it was only $4 a piece. I got one knife profiled and holes drilled from the 3/32 1084 and am heat treating it along with one I made from O1. Here they are going in to their first temper at 375° |
|
|
|
[#17]
I think I'm going to stick with 375° for the second temper. I used the same file that I checked these blades with and tested it on my esee izula and it skates on it the same as it did on these.
I cleaned the blades up on a 120 grit belt this morning and I'll try to get them in the oven again today. If I can do that I should be able to get at least one mostly finished this weekend, provided that actual responsibilities don't get in the way. Lol |
|
|
|
[#18]
I've been pretty lucky getting time to work on these this weekend.
I got them tempered again yesterday afternoon. I went with 375° again and when they came out this time they had a very slight bronze color to them. They are still too hard to cut with a file. I'm not sure if that's going to be too hard or not. I'll probably wait to get handles on the one that's mostly ground until I'm sure it won't need to be tempered again at a higher temp. Sorry to bother, but @kuraki , does it seem like these will be too hard to you? |
|
|
|
[#19]
This is the one that had the primary grinds started before HT. I decided to put my big boy pants on and not use my jigs to grind the rest of it. It took me a few slip ups to get the feel for keeping it on the grinds, but I got it down pretty well. Probably my biggest mistakes in cleaning up the grinds was when I switched from my 120grit ceramic belt to the silicon carbide 220. The 220 is much more flexible than the 120. I will track the belt slightly off the side of the platen so I can get into the plunge better. The 120 belts will stop you when you hit the plunge. The 220 is flexible enough that it flexed and kind of ramped the blade up onto the flat. That took a little bit for me to figure out how to fix it. I can still tell what happened when I look at it, but I'm looking for it. There's just a bit more cleanup and then putting the handle scales on. I'm thinking kydex will be the way to go for a sheath on this one. |
|
|
|
[#20]
Those are looking good. Free hand grinding takes a lot of practice, but it does get easier. One thing I do is when putting the blade to the belt, use a light touch and you can feel when the bevel is flat on the belt, then apply pressure. I don't pay too much attention to the evenness of the bevels until I get to 120 grit. And, like you, I use 220 to even my plunge lines.
On your tempering, 375 may be a little too low. I usually go 400 with 1084. One suggestion, I would use an oven thermometer when tempering. Kitchen ovens and toaster ovens are notorious for having a wide temperature range, mine varies 30 - 40 degrees. When I use either, I use my thermocoupler to make sure the temperature I want is at the top of the variance of the oven. |
|
|
|
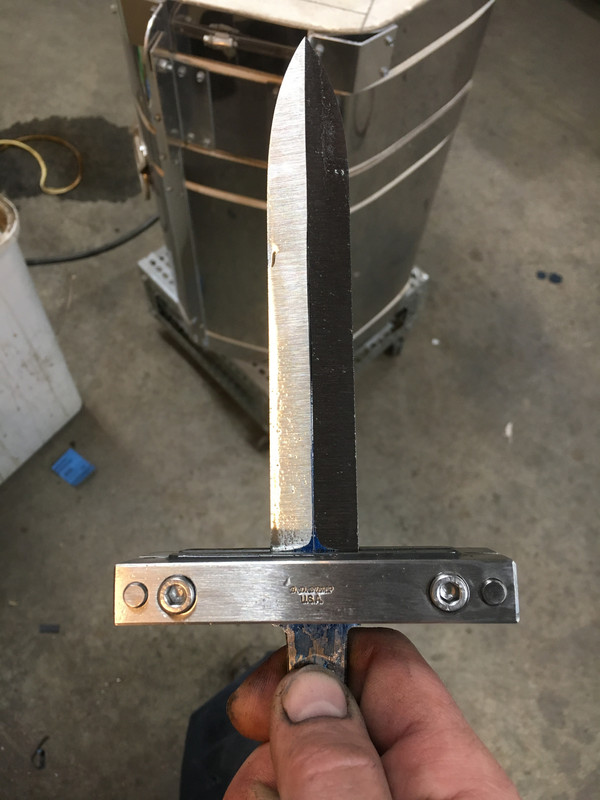
[#21]
Thanks for the info. I'll definitely start using a thermometer in oven. The last one I posted a picture of is O1. I have one that's 1084 that's next in line, and most likely the next several will be as well. Mistakes are about half the price vs the precision ground O1 that I started with.
This one is so close to being done (with the metal work anyway) but I noticed that the angle of the plunge line is different. They meet at the bottom but the top of the side that you can see in the last pic is farther forward than the other side, which sucks because I like the angle on that side vs the more vertical line on the other side. I know that I can bump the corner back to match the other side (provided that I don't mess up. Lol) but I'm at the point where I'm happy enough with it that I'm scared to mess it up. |
|
|
|
[#22]
One thing you can use to keep your plunge lines even is a carbide file guide.
 I used one on this damascus blade to make sure all 4 plunges came out the same. I don't normally use one, but I was afraid not to on this one. |
|
|
|
[#23]
Quoted:
I've been pretty lucky getting time to work on these this weekend. I got them tempered again yesterday afternoon. I went with 375 again and when they came out this time they had a very slight bronze color to them. They are still too hard to cut with a file. I'm not sure if that's going to be too hard or not. I'll probably wait to get handles on the one that's mostly ground until I'm sure it won't need to be tempered again at a higher temp. https://www.AR15.Com/media/mediaFiles/78442/KIMG0156_JPG-1156220.JPG Sorry to bother, but @kuraki , does it seem like these will be too hard to you? Hard to say without knowing the files hardness or your aus temp. |
|
|
|
[#24]
Quoted:
One thing you can use to keep your plunge lines even is a carbide file guide. https://i.postimg.cc/fRmR0rK3/2019-03-29-21-19-22.jpg I used one on this damascus blade to make sure all 4 plunges came out the same. I don't normally use one, but I was afraid not to on this one. I'll have to look into one of those. Quoted:
1500 aus temp and 400 temper is the standard 1084 HT and produces 60-61 RC. Hard to say without knowing the files hardness or your aus temp. I understand that I'll have some reasonably unpredictable results doing things this way but it uses the equipment that I have now which is nice because HT ovens are expensive (as you know). Some way to test hardness will probably help me get a process nailed down though so I'll probably invest in that before an oven. Thank you guys very much for the help. |
|
|
|
[#25]
Look into a set of hardness chisels. I think matt Parkinson was making them.
Basically a set of scribes at different hardness, if it leaves a scratch it's harder than the knife, if it doesn't its softer. Less expensive than hardness files and can be sharpened forever. |
|
|
|
[#26]
I was only able to find the hardness chisels on Etsy for $225 a set. It looks like a set of files is $80 on Amazon.
I'll just use the blades I have now and see how they do for now and adjust from there. I'll probably invest in some kind of tester when I get closer to trying to sell knives.(if I get to that point) |
|
|
|
[#27]
So I figured that I'd be making some mistakes at every step of knife making so I'd go ahead and try to clean up the plunge lines a little bit and it actually went ok. I did it all on a 400grit belt so metal wouldn't leave too fast if I slipped up.
I noticed that I have an issue on both sides though and was wondering if anyone could offer some ideas on what might be going on and how I can fix it. The part that's bugging me is the little downward bend at the end of the primary grind. I think it's a high spot but I have tried compensating for it by applying more pressure on that spot and moving the blade side to side on the belt(thinking that I might have been missing that spot somehow) but I can't seem to get them to go away. Any ideas on how to fix that would be awesome. Thanks again |
|
|
|
[#28]
lines are looking generally better
|
|
|
|
[#29]
Thanks. I think I'm starting to get a better feel for the grinder so it's not as much of a surprise each time I pull the knife away from the belt.

|
|
|
|
[#30]
Well, it looks like I ruined this one before I really got started but I didn't find out until it was pretty much finished.
I finished the handles last night and spent the morning thinning the primary grind. I should have made sure that the thickness at the edge was where I wanted it before putting the handles on, as I ended up grinding on the flats in a couple of spots where I'd pretty much have to hand sanding it out. This one is made of O1 and the HT was heated a bit past non magnetic and quenched in warm peanut oil then two temper cycles at 375°. I was warned that it was too low for the 1084 blade that I did at the same time but I just went with it instead of tossing it in with the 1084 one to temper again at 400°. The problem didn't reveal itself until I was almost done sharpening it. The edge started chipping out instead of making a wire edge. I went ahead and took it to 1000 grit because it only took a couple of minutes to get there from the course stone. I can chip the edge away with my fingernail. I started at 20° inclusive and when it started chipping I tried a 25° micro bevel to see it it helped. It didn't. I might try a convex edge but I'm not hopeful. I feel like I learned a lot on this one, especially when it comes to grinding. I started it with a jig and finished it up free hand. I feel like I have more control without the jig. I'm excited to see how the 1084 blade turns out after everything I learned from this one. |
|
|
|
[#31]

it looks good in pics |
|
|
|
[#32]
It's a good 5 footer. Lol
|
|
|
|
[#33]
I might have been a little early to call it garbage.
I sharpened it again but I did it on a 400 grit belt and polished the wire edge off with a paper wheel. I whittled all this stuff including a twist in the wood to break the curls off and it stayed sharp enough that it still shaves hair (but I wouldn't want to shave my face with it). I'll probably go ahead and make a sheath and use it. Is it possible that the metal that was on the edge when it was heat treated was weakened and grinding past it took care of it? |
|
|
|
[#34]
It's never a waste of time to learn something.
|
|
|
|
[#35]
I didn't feel like messing with kydex tonight.
This one is 3/32" 1084. It got tempered two times at 375° then once at 400°. It's a little softer than the last one. A file will bite into this one. No grinding jigs this time! All the grinding work done to this point is free hand on a 36 grit belt. I definitely got "the feel" much better after the last one. |
|
|
|
[#36]
Quoted:
It's never a waste of time to learn something. |
|
|
|
[#37]
I may have been a bad combination of overly confident and tired when I started grinding this one last night. I chased my grinds side to side so much that a full height grind was about the only option I had left. I think starting with jigs gave me a leg up on the last one. I'm not sure if I'll go back or not. The ffg was nerve wracking because I didn't want to actually break the spine with the grind so I had to be super accurate. I bounced back and forth between 150 and 220 belts a lot getting the grinds evened out. I'm finding that fresh belts are easier to be accurate with than more worn belts for some reason. I figured worn belts would remove material more slowly but they just seem really inconsistent, not removing material when I want it to and really digging in when I don't. |
|
|
|
[#38]
Quoted:
Well, it looks like I ruined this one before I really got started but I didn't find out until it was pretty much finished. https://www.ar15.com/media/mediaFiles/78442/KIMG0177_JPG-1163314.JPG I finished the handles last night and spent the morning thinning the primary grind. I should have made sure that the thickness at the edge was where I wanted it before putting the handles on, as I ended up grinding on the flats in a couple of spots where I'd pretty much have to hand sanding it out. This one is made of O1 and the HT was heated a bit past non magnetic and quenched in warm peanut oil then two temper cycles at 375°. I was warned that it was too low for the 1084 blade that I did at the same time but I just went with it instead of tossing it in with the 1084 one to temper again at 400°. The problem didn't reveal itself until I was almost done sharpening it. The edge started chipping out instead of making a wire edge. I went ahead and took it to 1000 grit because it only took a couple of minutes to get there from the course stone. I can chip the edge away with my fingernail. I started at 20° inclusive and when it started chipping I tried a 25° micro bevel to see it it helped. It didn't. I might try a convex edge but I'm not hopeful. https://www.ar15.com/media/mediaFiles/78442/KIMG0178_JPG-1163317.JPG I feel like I learned a lot on this one, especially when it comes to grinding. I started it with a jig and finished it up free hand. I feel like I have more control without the jig. I'm excited to see how the 1084 blade turns out after everything I learned from this one. What did you do wrong to cause this to happen? Thanks |
|
|
|
[#39]
I'm still a noob myself so this is just a wild guess.
Since I had started grinding it pre heat treat the edge was thinner than the rest of the blade so I think I may have overheated the steel on the edge during the heat treat. I sharpened it on my grinder and it seems to be keeping it's edge now, so that's the theory I'm running with. |
|
|
|
[#40]
I'm back on saddle work for a bit. I've got 3 to work on.  this one is the only one they're in a hurry for though so I should still get to do some knife work this weekend. this one is the only one they're in a hurry for though so I should still get to do some knife work this weekend.I have liners drying on the scales for the next knife right now and I hope to get it finished this weekend. |
|
|
|
[#41]
Honey do sidetrack-
She wanted a better solution for hanging the broom/mop and aprons than the thumbtacks we were using. A quick trip to the hardware store and a chunk of an old pallet later and she's happy. Back to the knife work now. |
|
|
|
[#42]
Between other responsibilities and projects, this was all I was able to get done this weekend.
I need to glue it up and finish cleaning up the edges then its just a sharpening away from being done. I also picked up a bigger pulley for my grinder (4" vs 2.75") this weekend also. I'm hoping that slowing the belt down some will help me make mistakes more slowly during the finishing steps. |
|
|
|
[#43]
Since this is the last car I own that hasn't had the muffler replaced in the last year I'm hoping I'm done messing with exhaust for a while.
|
|
|
|
[#44]
Muffler went on without issue, so I got some time to finish this guy up.
I'm liking the full flat grind and the thinner handles on this one. I'm thinking that these last two knives will get kydex sheaths. |
|
|
|
[#45]
Is that a hand rubbed mirror finish?
|
|
|
|
[#46]
No, just crappy lighting.
It's 400 grit on the flats and 220 on the bevels. No hand sanding at all except for a small spot on the bottom of the handle behind the choil because I can't get a belt in there. I think I'm going to give the scotchbrite/surface conditioning belts a try next time I order belts. I'm not a huge fan of hand sanding. |
|
|
|
[#47]
who is?
|
|
|
|
[#48]
I'm sure there are some masochists out there.
|
|
|
|
[#49]
Looking good! I love a full flat grind.
I have to admit most of my knives get a hand sanded finish. Just don"t like the looks of a belt finish unless I can grind them lengthways like my chef knives. I have gotten my belt progression down to where it only takes 10 -15 minutes to hand sand a blade. |
|
|
|
[#50]
Thanks.
I need to start playing with hand sanding, but I don't like the looks of a mirror polished blade. I think I'd be much more likely to do a sanded finish if I could get a decent satin finish. I even tried media blasting a piece of O1 to see how it looks. I kinda like the way it looks but I'm guessing that a finish that rough on a high carbon steel is going to rust very quickly. |
|
|
 Win a FREE Membership!
Sign up for the ARFCOM weekly newsletter and be entered to win a free ARFCOM membership. One new winner* is announced every week!
You will receive an email every Friday morning featuring the latest chatter from the hottest topics, breaking news surrounding legislation, as well as exclusive deals only available to ARFCOM email subscribers.

AR15.COM is the world's largest firearm community and is a gathering place for firearm enthusiasts of all types.
From hunters and military members, to competition shooters and general firearm enthusiasts, we welcome anyone who values and respects the way of the firearm.

Subscribe to our monthly Newsletter to receive firearm news, product discounts from your favorite Industry Partners, and more.
Copyright © 1996-2024 AR15.COM LLC. All Rights Reserved.
Any use of this content without express written consent is prohibited.
AR15.Com reserves the right to overwrite or replace any affiliate, commercial, or monetizable links, posted by users, with our own.


