|
[Last Edit: SWIRE]
[#1]
On the solar project, putting in the 4x6 posts took a whole lot longer and was more work than expected. I dug the holes 4' deep with the backhoe and they ended up being about 3 feet wide. Which means I had to fill back in and compact all that dirt. A post hole auger for the tractor would be a much better way of doing that. But both posts are in the ground now. I also rented a trencher and made a 125 foot trench from the house to the first solar array. Now to get the conduit laid in it.
I'm also considering running electric to the middle of the property by the shed. That would let me put up additional motion lights and cameras. I can also run other lights for lighting up the yard at night when I want it. My goal at some point is the expand the shed so that I have room for the tractor and mower. Having power in the shed would be great. This is the last picture before I started working on the solar project. The lumber and the Ironridge racks are pictured. |
|
|
|
|
[#2]
Give a shout next time you need a 3pt auger.
|
|
|
|
|
[#3]
Originally Posted By kallnojoy:
Give a shout next time you need a 3pt auger. |
|
|
|
|
[#4]
I'm going to wait until the solar project is done to give a complete update. In the meantime here are some pictures.
Putting the 4x6 posts 48 inches deep Lots of clay to work with. Got it stuck right at the start. Had to use the bucket on the tractor to lift it out. |
|
|
|
|
[Last Edit: SWIRE]
[#5]
Can you fit 250 feet of 3" conduit in a Yukon XL. Yes you can.
Making progress but it is taking a lot longer than expected. Weather was a big factor in that. |
|
|
|
|
[#6]
Other than getting mired down, how did the DW work for you?
Noticed the retaining wall work at your other place too... is that a good thing or more shenanigans? |
|
|
|
|
[#7]
Originally Posted By kallnojoy:
Other than getting mired down, how did the DW work for you? Noticed the retaining wall work at your other place too... is that a good thing or more shenanigans? It rained 2 1/2" on Saturday and tried to finish trenching on Sunday. I had previously been trenching about 32 inches deep and had to raise it up to only 24 inches as the machine could not handle the wet clay. This was a 24 hp model that can go 36 inches. They make a larger model that can go 48 inches deep. But if you need to go that deep I would recommend getting one of the riding units that has about twice the power and weights 3 times as much. The model I had weighs just over 1,000 pounds but the tracks would spin and get stuck easily when it was wet or uneven ground. The other house is a combination of fixing the hole in the sidewalk from the waterline and adding steps so I can get down to the street. My contractor had his identity stolen right before Thanksgiving and all his accounts and cards are frozen which has slowed him down. He has some health problems as well, so things are just dragging on. He was supposed to have everything framed up today but I doubt he will. |
|
|
|
|
[Last Edit: SWIRE]
[#8]
I'm trying to take advantage of the warm weather and get a patch put in on the rubber roof. This patch is at the corner of a wall that has been leaking. There are so many problems with how the wall and roof were built it isn't even funny. Then as I was working on it I found even more things wrong.
I forgot to take a before picture but took one right after I got started. Here is the corner. How many problems can you identify? 1. The 10 year life span EPDM rubber roof is installed behind the permanent stucco. 
2. The stucco comes down the rubber roof deck. That lets water absorb into the stucco and behind the wall. 3. The stucco is one coat about 3/8 an inch thick. Should be 3 coats and around 3/4 an inch. Closer look at the corner. Notice the flat bar on the left that goes up into the stucco? See the screw hole at the level of the roof. But wait, it gets even worse! Not only does it have screws going into the house but there are screws coming out of the house and through the rubber at the roof deck. How is that even possible? What did they do on the inside that would put screws all the way through the exterior wall? In 12 inches from the corner I found 3 holes through the rubber membrane. |
|
|
|
|
[#9]
Originally Posted By SWIRE:
I'm going to wait until the solar project is done to give a complete update. In the meantime here are some pictures. Putting the 4x6 posts 48 inches deep https://www.AR15.Com/media/mediaFiles/680/h1_JPG-1185349.JPG Lots of clay to work with. https://www.AR15.Com/media/mediaFiles/680/h2_jpg-1185350.JPG https://www.AR15.Com/media/mediaFiles/680/h3_jpg-1185351.JPG Got it stuck right at the start. Had to use the bucket on the tractor to lift it out. https://www.AR15.Com/media/mediaFiles/680/h8_jpg-1185353.JPG Pretty scary that you got that ditch witch stuck! |
|
|
|
|
[#10]
Originally Posted By SWIRE:
I'm trying to take advantage of the warm weather and get a patch put in on the rubber roof. This patch is at the corner of a wall that has been leaking. There are so many problems with how the wall and roof were built it isn't even funny. Then as I was working on it I found even more things wrong. I forgot to take a before picture but took one right after I got started. Here is the corner. How many problems can you identify? 1. The 10 year life span EPDM rubber roof is installed behind the permanent stucco.
2. The stucco comes down the rubber roof deck. That lets water absorb into the stucco and behind the wall. 3. The stucco is one coat about 3/8 an inch thick. Should be 3 coats and around 3/4 an inch. https://www.AR15.Com/media/mediaFiles/680/r2_jpg-1188632.JPG Closer look at the corner. Notice the flat bar on the left that goes up into the stucco? See the screw hole at the level of the roof. https://www.AR15.Com/media/mediaFiles/680/r3_jpg-1188638.JPG But wait, it gets even worse! Not only does it have screws going into the house but there are screws coming out of the house and through the rubber at the roof deck. How is that even possible? What did they do on the inside that would put screws all the way through the exterior wall? https://www.AR15.Com/media/mediaFiles/680/r4_jpg-1188643.JPG In 12 inches from the corner I found 3 holes through the rubber membrane. https://www.AR15.Com/media/mediaFiles/680/r6_JPG-1188675.JPG Never even mind the penetrations, just the whole process of that installation seems wrong to me, and that's with me being completely ignorant. |
|
|
|
|
[#11]
Originally Posted By Kitties-with-Sigs: I know nothing about rubber roofs, but shouldn't it wrap up and onto the stucco? With some kind of mechanism to drain water onto it? This image shows the termination bar and sealant. 
|
|
|
|
|
[#12]
Here is my quick repair. It uses a black contact adhesive on both the old roof and the new piece of EPDM that is going on. At the current temps it takes about 2 hours for solvent to flash off, while waiting for that I posted the first set of pictures. Hopefully this patch will help. It is just temporary as I plan on removing 6" of stucco and fixing the EPDM part of the roof next year.
|
|
|
|
|
[#13]
Originally Posted By Kitties-with-Sigs: Pretty scary that you got that ditch witch stuck! |
|
|
|
|
[#14]
I'll just leave this picture here. Still need to do the conduit, combiner, manual disconnect, and all the wiring. Plus I need to put up the second array. A tip for installing mounting posts, don't do it at night. I thought I would pretty close to straight south but I'm by about 10 degrees pointing to the west. Not a big deal but I don't like messing up.
|
|
|
|
|
[#15]
Originally Posted By SWIRE:
I'll just leave this picture here. Still need to do the conduit, combiner, manual disconnect, and all the wiring. Plus I need to put up the second array. A tip for installing mounting posts, don't do it at night. I thought I would pretty close to straight south but I'm by about 10 degrees pointing to the west. Not a big deal but I don't like messing up. https://www.AR15.Com/media/mediaFiles/680/solar1_JPG-1188834.JPG Maybe you need to come down here and dig my electrical and water ditches. 
|
|
|
|
|
[#16]
@swire
Wasting time looking through some old Journal of Light Construction emails and found this. Made me think of you, but no idea if anything in here is useful or not. Low Slope Roofs |
|
|
|
|
[#17]
Originally Posted By Kitties-with-Sigs:
@swire Wasting time looking through some old Journal of Light Construction emails and found this. Made me think of you, but no idea if anything in here is useful or not. Low Slope Roofs It also shows how a stucco roof should be done. They have the proper 4" to 6" spacing from the roof to the stucco but they still show the membrane, flashing, anchor behind the stucco. No easy way to to replace the membrane. |
|
|
|
|
[#18]
Originally Posted By SWIRE:
Thank you for the link. It does have good information in it such as steep slope to low slope transitions. I have about 50 feet of transition between those two. It also shows how a stucco roof should be done. They have the proper 4" to 6" spacing from the roof to the stucco but they still show the membrane, flashing, anchor behind the stucco. No easy way to to replace the membrane. https://www.AR15.Com/media/mediaFiles/680/st_JPG-1197414.JPG It's freaking rubber. It's GOING to fail, so why do it in such a way that so much tearout is required? |
|
|
|
|
[#19]
Originally Posted By Kitties-with-Sigs:
No. That seems like a dumb way to build. It's freaking rubber. It's GOING to fail, so why do it in such a way that so much tearout is required? Originally Posted By Kitties-with-Sigs:
Originally Posted By SWIRE:
Thank you for the link. It does have good information in it such as steep slope to low slope transitions. I have about 50 feet of transition between those two. It also shows how a stucco roof should be done. They have the proper 4" to 6" spacing from the roof to the stucco but they still show the membrane, flashing, anchor behind the stucco. No easy way to to replace the membrane. https://www.AR15.Com/media/mediaFiles/680/st_JPG-1197414.JPG It's freaking rubber. It's GOING to fail, so why do it in such a way that so much tearout is required? I'm planning a different approach for when I finally get around to replacing the rubber. |
|
|
|
|
[Last Edit: SWIRE]
[#20]
I'm still working on the solar system but I have one array connected and working. The utility company accepted my application for net metering and my solar plan but I haven't had the meter changed out yet. I was advised to turn off the solar system after checking it as I might be charged for the power that I'm generating while the regular meter still installed.
But I am making power! |
|
|
|
|
[#21]
Originally Posted By SWIRE:
I'm still working on the solar system but I have one array connected and working. The utility company accepted my application for net metering and my solar plan but I haven't had the meter changed out yet. I was advised to turn off the solar system after checking it as I might be charged for the power that I'm generating while the regular meter still installed. But I am making power! https://www.AR15.Com/media/mediaFiles/680/power_jpg-1204009.JPG 
|
|
|
|
|
[Last Edit: SWIRE]
[#22]
I still don't have the second array connected but the electric company swapped out my meter today! I have a new net meter that records not only how much I use but how much extra I might generate back to them. The new meter says "rEC 00000" which means they have received 0 KW from me. That is to be expected since I had my system off until they replaced the meter. The system is on now and tomorrow is supposed to be sunny.
Closer look at my new NET meter. |
|
|
|
|
[Last Edit: SWIRE]
[#23]
My system is starting to wake up on the first day fully connected to the grid. I'm curious to see what a full day of production is. My solar array is designed so that I can change the angle of the panels to account for the sun being lower in the sky in the winter and higher during the summer. Right now I have it set at the mid point angle. I need to change the angle by about 30 degrees to account for the position of the winter sun.
At 9:30 six of the ten panels were producing. At 9:45 all 10 panels were producing. 5pm and the panels are going to sleep. It was a cloudy day so not much power generation occurred. |
|
|
|
|
[Last Edit: SWIRE]
[#24]
The image below is from the Enlighten software package that works with my solar array. I lowered the angle of the solar panels from 55 degrees to 34 degrees, the ideal angle right now is 30 degrees but I don't have my adjustment system completely built yet and 34 is as low as I can go right now.
It was supposed to be cloudy all day today but the sun has come out for a bit. I've already produced half the power I did all day yesterday and it is only 11am. Each panel has it's own microinverter and reports how much power it generates. The numbers on the panel are the total for the day. This is the previous angle of the array. Current angle of the array. |
|
|
|
|
[#25]
Originally Posted By SWIRE:
The image below is from the Enlighten software package that works with my solar array. I lowered the angle of the solar panels from 55 degrees to 34 degrees, the ideal angle right now is 30 degrees but I don't have my adjustment system completely built yet and 34 is as low as I can go right now. It was supposed to be cloudy all day today but the sun has come out for a bit. I've already produced half the power I did all day yesterday and it is only 11am. Each panel has it's own microinverter and reports how much power it generates. The numbers on the panel are the total for the day. https://www.AR15.Com/media/mediaFiles/680/1228_solar_JPG-1211444.JPG This is the previous angle of the array. https://www.AR15.Com/media/mediaFiles/680/solararray_121919_jpg-1211446.JPG Current angle of the array. https://www.AR15.Com/media/mediaFiles/680/solararray_122819_jpg-1211448.JPG
|
|
|
|
|
[#26]
Here is how the system ended the day. Panel 3 seems ok. With the bottom panels all lower in value I'm going to assume they are getting a slight bit of shade from the trees.
|
|
|
|
|
[#27]
Despite having only half my panels up and it being partly cloudy today, it appears that I have sent my first KWh to the utility company. I'm not sure on how they calculate that, if it only shows a number after receiving a KW or if it rounds up a partial for the display. Either way it indicates that I generated more power than I used today. Tomorrow we are supposed to get up to 2 inches of rain. There will be little if any production.
|
|
|
|
|
[#28]
Originally Posted By SWIRE:
Despite having only half my panels up and it being partly cloudy today, it appears that I have sent my first KWh to the utility company. I'm not sure on how they calculate that, if it only shows a number after receiving a KW or if it rounds up a partial for the display. Either way it indicates that I generated more power than I used today. Tomorrow we are supposed to get up to 2 inches of rain. There will be little if any production. https://www.AR15.Com/media/mediaFiles/680/solar_sent_1228_JPG-1212022.JPG I may have missed this in your earlier discussion. If so, I apologize. I'm very interested in what you've done, and cost vs benefit. |
|
|
|
|
[#29]
Originally Posted By Kitties-with-Sigs:
@SWIRE Do you have to adjust the angle of the panels manually? Or do you have some kind of automatic adjustment built in? I may have missed this in your earlier discussion. If so, I apologize. I'm very interested in what you've done, and cost vs benefit. Originally Posted By Kitties-with-Sigs:
Originally Posted By SWIRE:
Despite having only half my panels up and it being partly cloudy today, it appears that I have sent my first KWh to the utility company. I'm not sure on how they calculate that, if it only shows a number after receiving a KW or if it rounds up a partial for the display. Either way it indicates that I generated more power than I used today. Tomorrow we are supposed to get up to 2 inches of rain. There will be little if any production. https://www.AR15.Com/media/mediaFiles/680/solar_sent_1228_JPG-1212022.JPG I may have missed this in your earlier discussion. If so, I apologize. I'm very interested in what you've done, and cost vs benefit. Once I get the whole system online I will provide more details. |
|
|
|
|
[#30]
Originally Posted By SWIRE:
I really haven't posted details about my solar project yet. I've been scrambling trying to get it put together and verified that my plan worked before posting all the details. As for the tilt I have to adjust mine manually. They do make tracking systems. A 2 axis system is needed to maximize production but they really aren't worth it. A fixed system will generate around 70% efficiency. Adjusting the angle of the panels 4 times a year will boost that to 74%. A two axis system will result in 100% efficiency; however, those trackers will double the cost of the solar array. Doubling your cost to get a 30% gain is not a good solution. You would be better off doubling the panels and keeping them in a static array for a 70% gain. Once I get the whole system online I will provide more details. Cool to see the pics of your startup with the meters. |
|
|
|
|
[#31]
|
|
|
|
|
[#32]
Originally Posted By SWIRE:
It was dark and raining all day today, not a good day for solar production. https://www.AR15.Com/media/mediaFiles/680/solararray_122919day_jpg-1213522.JPG Looks like some relief from the cloud cover tomorrow. |
|
|
|
|
[#33]
Just started the thread; one page in so far and very interesting.
|
|
|
|
|
[Last Edit: SWIRE]
[#34]
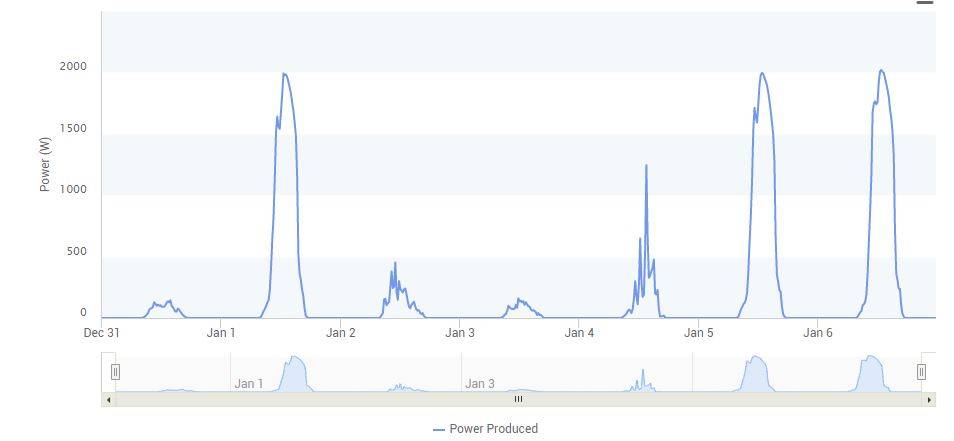
The sun finally came out today. Even with an electric heater running I still managed to generate enough power to sell some to the electric company. The second array is still not connected. I am dealing with a nightmare contractor at another house. A week long project has turned into 7 weeks, is only half way done, and the contractor has been MIA for 2 weeks. That has thrown in wrench into everything I do at the moment.
I'm now up to 5kW sent to the electric company. Over 9 kilowatt hours produced today and 4 of those were sent to the electric company. Peak power is almost 2 kilowatts which is really good considering the panels max production is 2.8 kilowatts and winter solar generation is always less as the sun is further away. Solar hours by month for Kentucky. We are starting to come out of the lowest period of sunlight. |
|
|
|
PA, USA
|
[#35]
Good news on the solar setup!
I completely understand the frustration with the contractor. I have been in that situation before and it sucked. I finally found a reliable guy/company and they are all I will use now if possible |
|
|
|
[#36]
Originally Posted By everready73:
Good news on the solar setup! I completely understand the frustration with the contractor. I have been in that situation before and it sucked. I finally found a reliable guy/company and they are all I will use now if possible |
|
|
|
|
[#37]
Originally Posted By SWIRE:
The sun finally came out today. Even with an electric heater running I still managed to generate enough power to sell some to the electric company. The second array is still not connected. I am dealing with a nightmare contractor at another house. A week long project has turned into 7 weeks, is only half way done, and the contractor has been MIA for 2 weeks. That has thrown in wrench into everything I do at the moment. I'm now up to 5kW sent to the electric company. https://www.AR15.Com/media/mediaFiles/680/solar_sent_11_JPG-1216957.JPG Over 9 kilowatt hours produced today and 4 of those were sent to the electric company. Peak power is almost 2 kilowatts which is really good considering the panels max production is 2.8 kilowatts and winter solar generation is always less as the sun is further away. https://www.AR15.Com/media/mediaFiles/680/solar_gen_11_JPG-1216963.JPG https://www.AR15.Com/media/mediaFiles/680/solar_gen_graph_JPG-1217257.JPG Solar hours by month for Kentucky. We are starting to come out of the lowest period of sunlight. https://www.AR15.Com/media/mediaFiles/680/ky_solar_hours_JPG-1217259.JPG I mean, I know it makes sense logically, but seeing it on a graph like that, in real life with what you were generating, is something else. It was sunny here today too. I was glad for it. Very interesting to see how your system is performing. I can tell the days are getting a tad longer already. Not much, but when you get depressed in the winter, every minute counts. |
|
|
|
|
[#38]
Originally Posted By SWIRE:
The contractor started out ok, he was a bit off being a former Marine but was in a bad car wreck that gave him some slight brain damage where it took him a year to learn to walk again. He had some fraudulent charges on his bank accounts a couple weeks into the project and that seemed to flip his world upside down. He just couldn't handle it and has barely shown up to work since. Then his behavior changed dramatically the last time I saw him. I know he is taking opiod pain killers due to injuries from his wreck but I'm thinking the struggle of his hacked accounts pushed him to the point where he was taking more than he should. Sadly I have first hand experience with someone who was doing that. The behaviors of these two people are almost identical. Now I'm scrambling to get the project done before the city starts putting the screws to me. I was told there have been several complaints due to the length of time the sidewalk has been tore up. Dealing with all of that steals time away from the solar project. I really hope he gets his act together, but you can't wait for his timeline. Certainly you should not feel guilty about that. City notifications and red tape are never fun. Fingers crossed that you can find somebody to do it in good timing. Just the paperwork to end a contract like that would make me spend a lot of money on alcohol. |
|
|
|
|
[#39]
Awesome thread. Thanks for sharing.
|
|
|
|
|
[#40]
I've had a few good days of power generation. I'm trying to figure out why I have a dip in production every morning. Maybe there is a tree that shades the array for a little bit. If that dip disappears in the coming weeks as the sun gets higher in the sky that is what it must be.
|
|
|
|
|
[Last Edit: SWIRE]
[#41]
I do have a shading problem with my solar array. I was playing around with the Enlighten software that Enphase has and found a screen that shows production for each panel. The image below shows how a shadow hits the left side of the array first and then as the sun moves West the shadow moves across the array reducing the output of specific panels. It starts at 11:20am and lasts until 12:30pm. Now I just have to figure out which tree it is.

|
|
|
|
|
[#42]
I had my best power generation to date, 10.51kWh. That is coming from 10 panels that are rated at a max 285 watts.

|
|
|
|
|
[#43]
Originally Posted By SWIRE:
I had my best power generation to date, 10.51kWh. That is coming from 10 panels that are rated at a max 285 watts. https://www.AR15.Com/media/mediaFiles/680/solar116_JPG-1237278.jpg |
|
|
|
|
[#44]
I'm still around but haven't done anything related to this property lately. I'm dealing with a contractor at my other house that did half a project and then disappeared. Now the city is citing me for violations because of what the contractor did.
|
|
|
|
|
[#45]
Originally Posted By SWIRE:
I'm still around but haven't done anything related to this property lately. I'm dealing with a contractor at my other house that did half a project and then disappeared. Now the city is citing me for violations because of what the contractor did. What a pita. |
|
|
|
|
[#46]
@SWIRE
Long shot/short notice but looks like I may be headed to your AO on Tuesday. No idea how your day job meshes with that. Don't make any special arrangements unless it's easy for you. I likely won't get into town until late afternoon. Staying in Lexington for training/test I have to take early Wed morning. |
|
|
|
|
[#47]
Originally Posted By Kitties-with-Sigs:
@SWIRE Long shot/short notice but looks like I may be headed to your AO on Tuesday. No idea how your day job meshes with that. Don't make any special arrangements unless it's easy for you. I likely won't get into town until late afternoon. Staying in Lexington for training/test I have to take early Wed morning. Late afternoon on Tuesday will work. I may or may not be getting back into a fitness/self defense class that night in Lexington. The way the last 3 months have been going problem not. But either way I will be around and be in either Georgetown or Lexington. If nothing else I will make the effort to get you the tomato seeds that produced near the walnut trees just to have someone else test them out. If you want a tour of the property it takes about an hour to cover all of the house and grounds. Everything is dirty and muddy, so keep that in mind. I should be back in Georgetown by 4pm that day. |
|
|
|
|
[#48]
Originally Posted By SWIRE:
@Kitties-with-Sigs Late afternoon on Tuesday will work. I may or may not be getting back into a fitness/self defense class that night in Lexington. The way the last 3 months have been going problem not. But either way I will be around and be in either Georgetown or Lexington. If nothing else I will make the effort to get you the tomato seeds that produced near the walnut trees just to have someone else test them out. If you want a tour of the property it takes about an hour to cover all of the house and grounds. Everything is dirty and muddy, so keep that in mind. I should be back in Georgetown by 4pm that day. |
|
|
|
|
[Last Edit: SWIRE]
[#49]
I ran a seed germination test on the tomato seeds that I harvested last year. These are the seeds from the plants that produced tomatoes all summer long and did display any major effects of growing in soil with juglone. There were two other varieties planted with this variety. The first died off early summer and never produced anything. Thsecond made it to mid-summer before dying off and then the leaves started to deform and curl, the plants had fruit but they never grew larger than a golf ball.
Anyone that would like to test out the seeds and grow them in the Walnut soil send me a PM with your address. @Kitties-with-Sigs I know you were interested. Let me know where you would like me to send the seeds. Also I have Rudbeckia seeds from a variety that grows about 4 feet tall, picture is below. Germination test. Seeds are good.  Variety that died early summer.  Variety that died mid-summer. You can see the tall healthy plants to the right and behind these. That is the variety that I harvested seeds from.  Rudbeckia 
|
|
|
|
|
[#50]
The trees I bought at the end of the season last year and never got around to planting seemed to have made it through the winter ok. Now I need to figure out where they should go and get them in the ground.
 |
|
|
|
 Win a FREE Membership!
Sign up for the ARFCOM weekly newsletter and be entered to win a free ARFCOM membership. One new winner* is announced every week!
You will receive an email every Friday morning featuring the latest chatter from the hottest topics, breaking news surrounding legislation, as well as exclusive deals only available to ARFCOM email subscribers.

AR15.COM is the world's largest firearm community and is a gathering place for firearm enthusiasts of all types.
From hunters and military members, to competition shooters and general firearm enthusiasts, we welcome anyone who values and respects the way of the firearm.

Subscribe to our monthly Newsletter to receive firearm news, product discounts from your favorite Industry Partners, and more.
Copyright © 1996-2024 AR15.COM LLC. All Rights Reserved.
Any use of this content without express written consent is prohibited.
AR15.Com reserves the right to overwrite or replace any affiliate, commercial, or monetizable links, posted by users, with our own.


