|
Posted: 5/28/2011 6:47:08 PM EDT
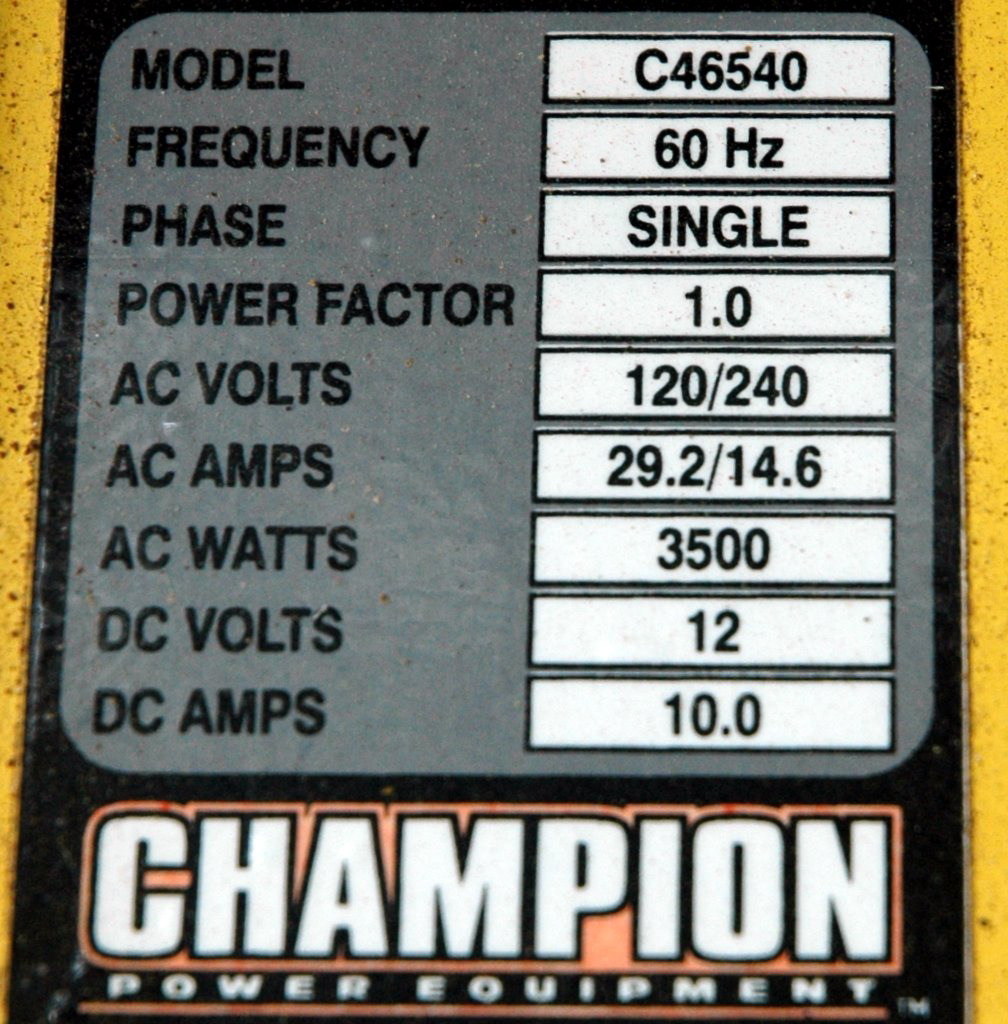
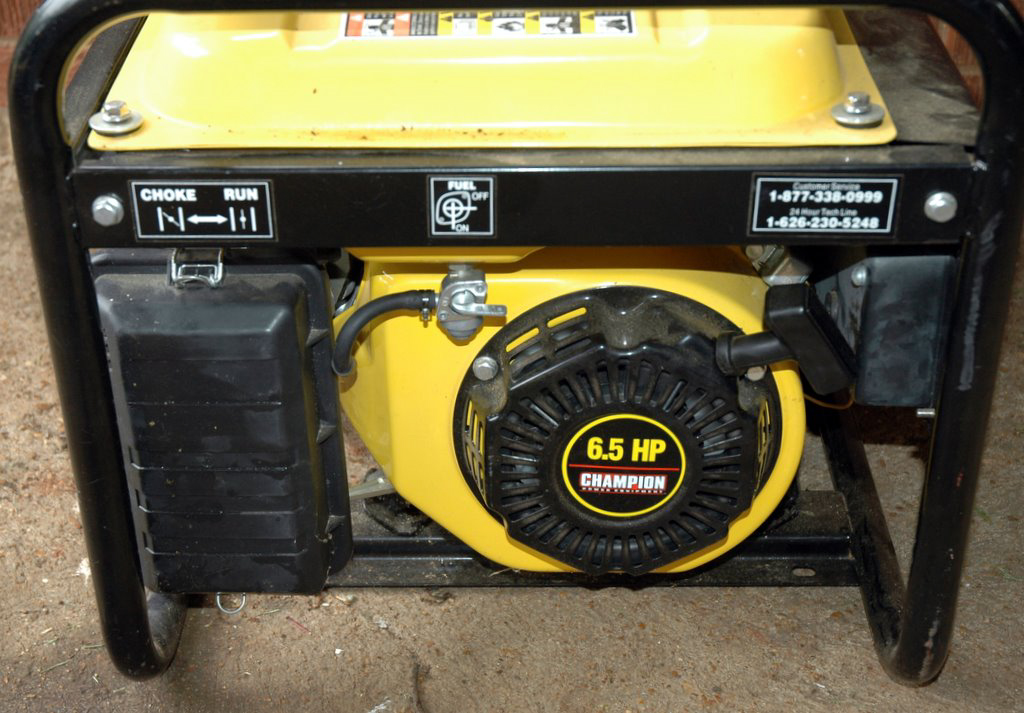
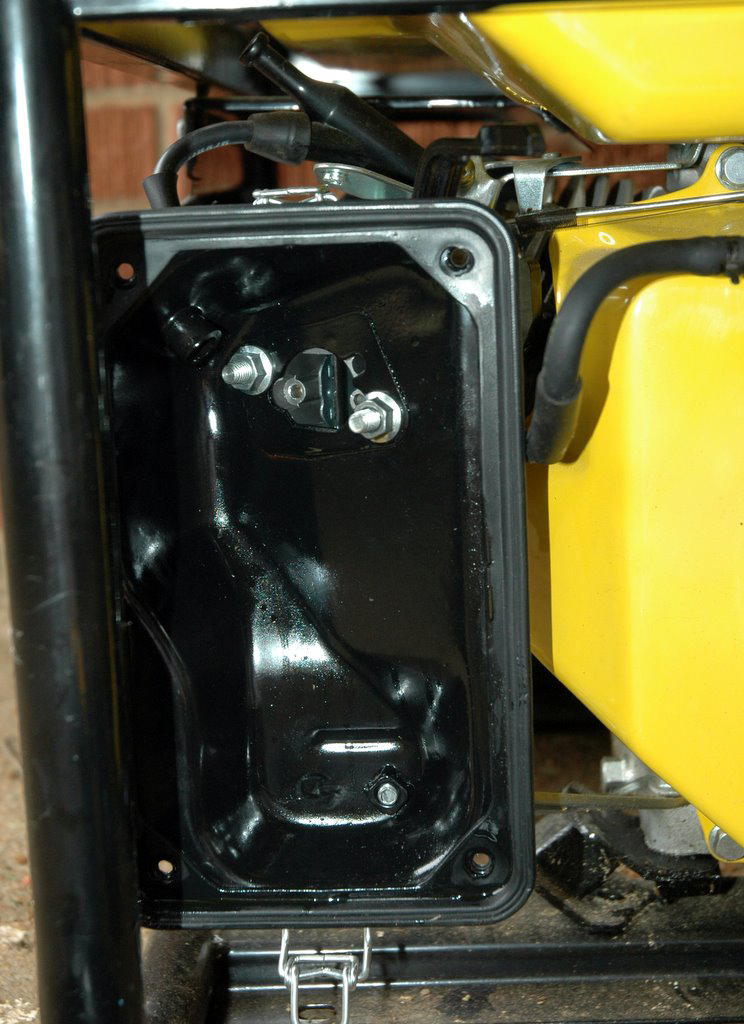
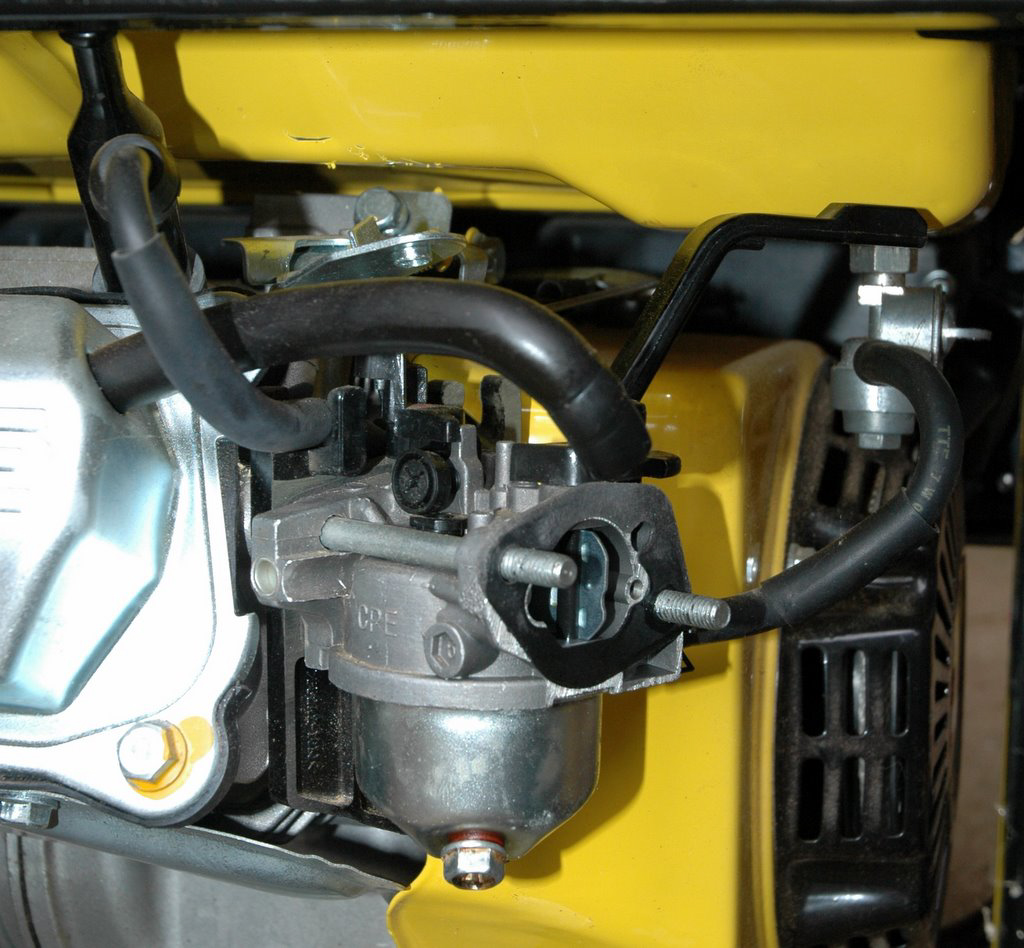
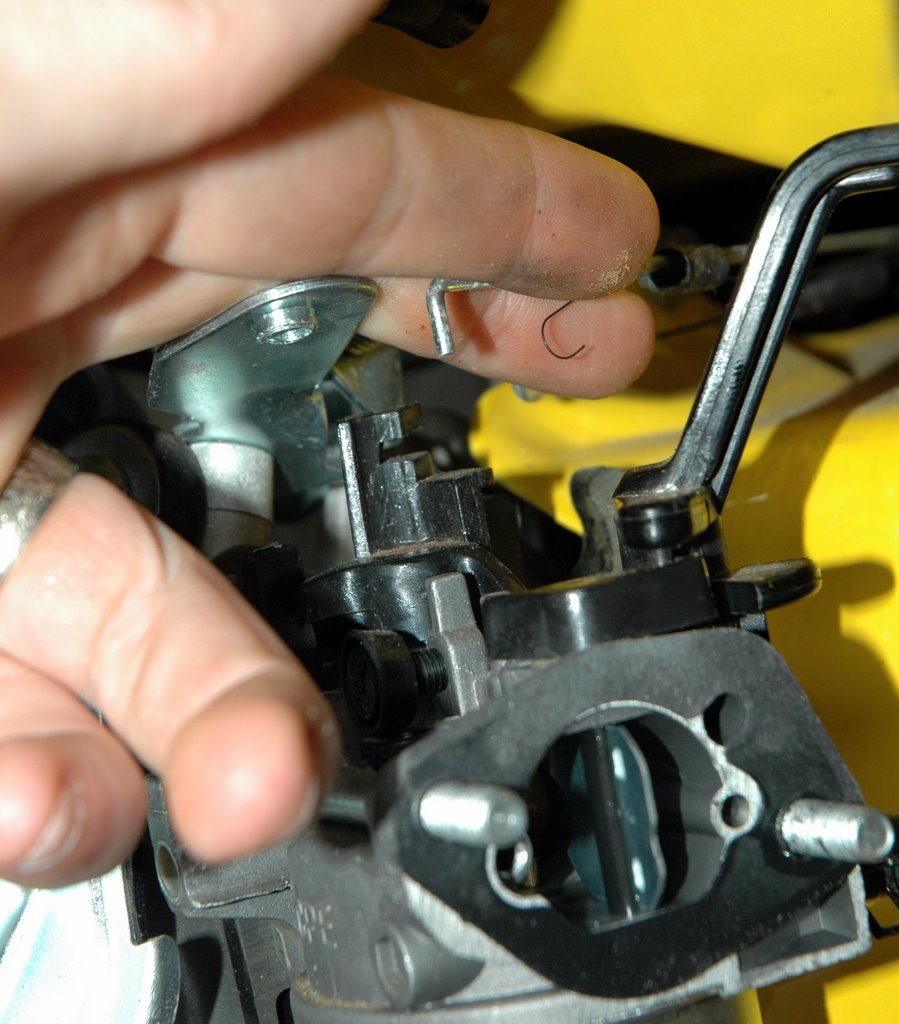
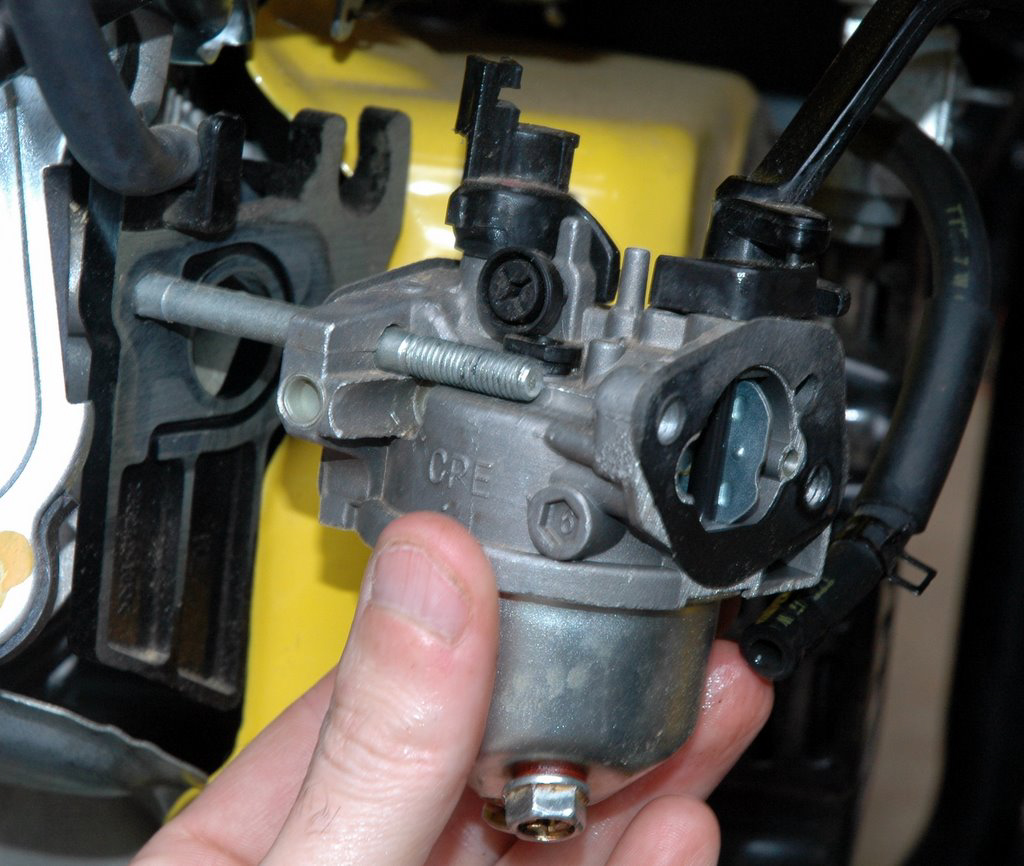
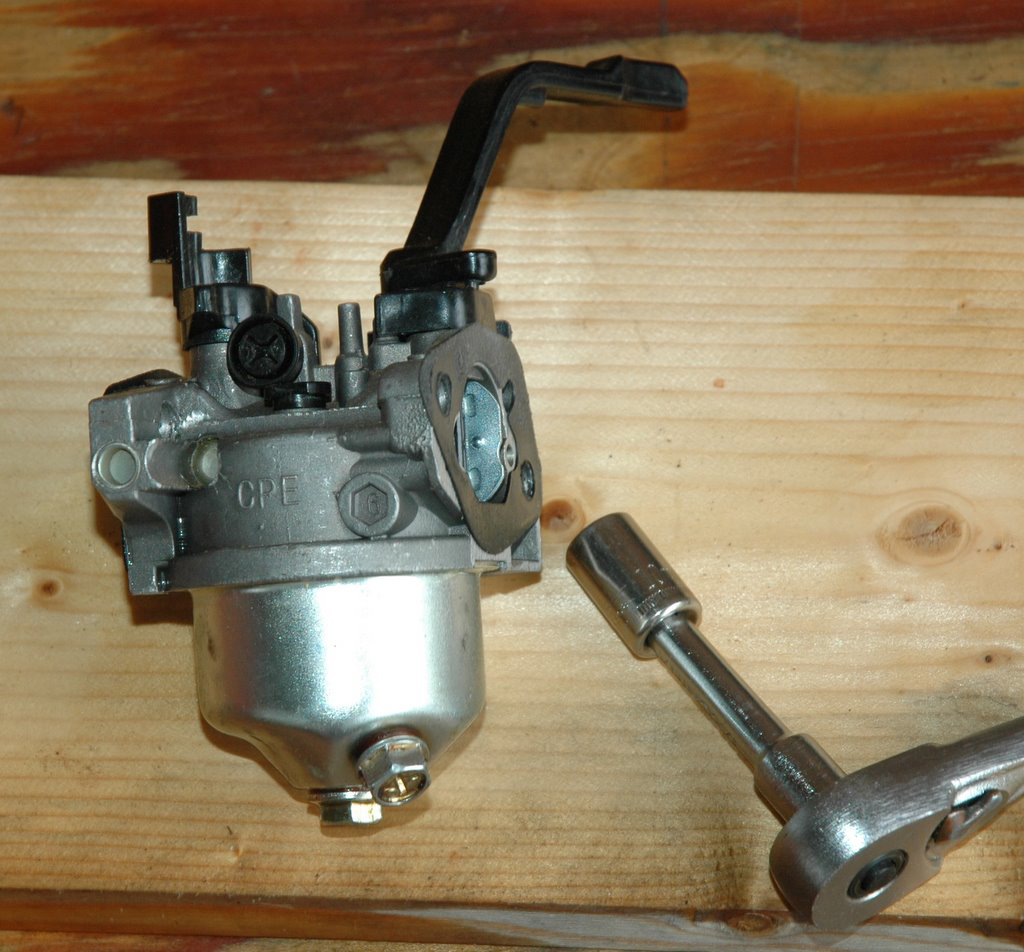
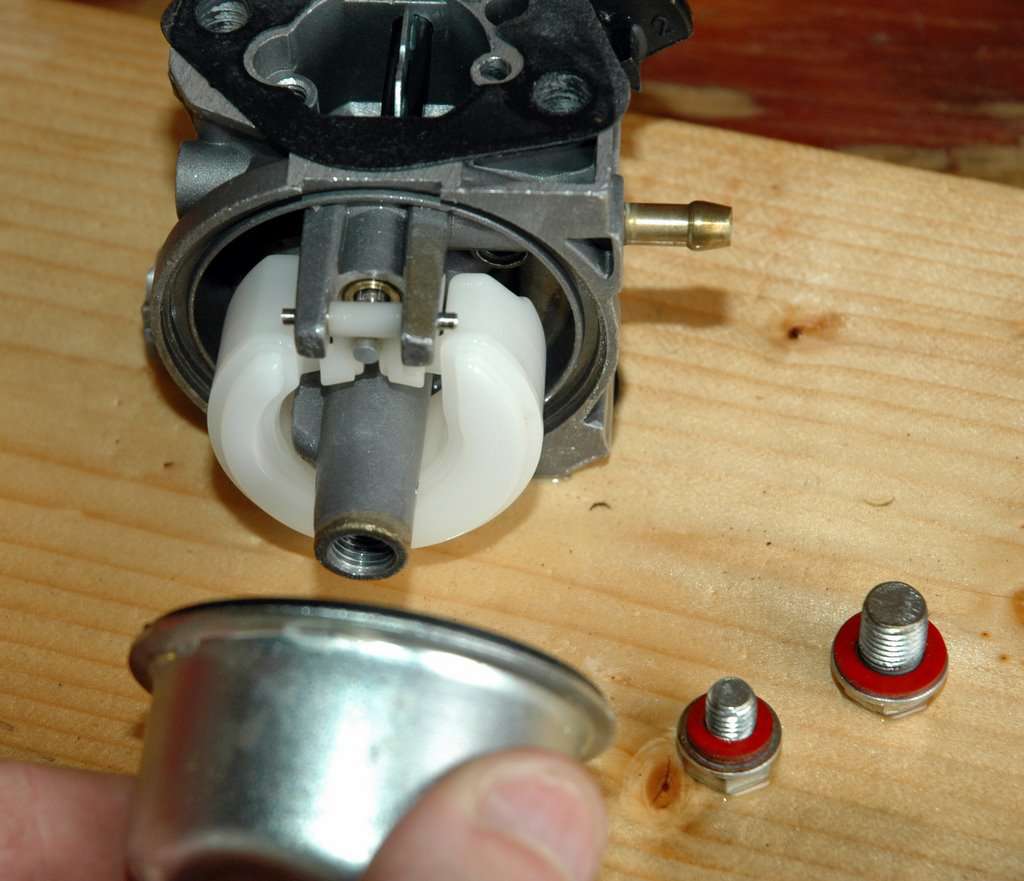
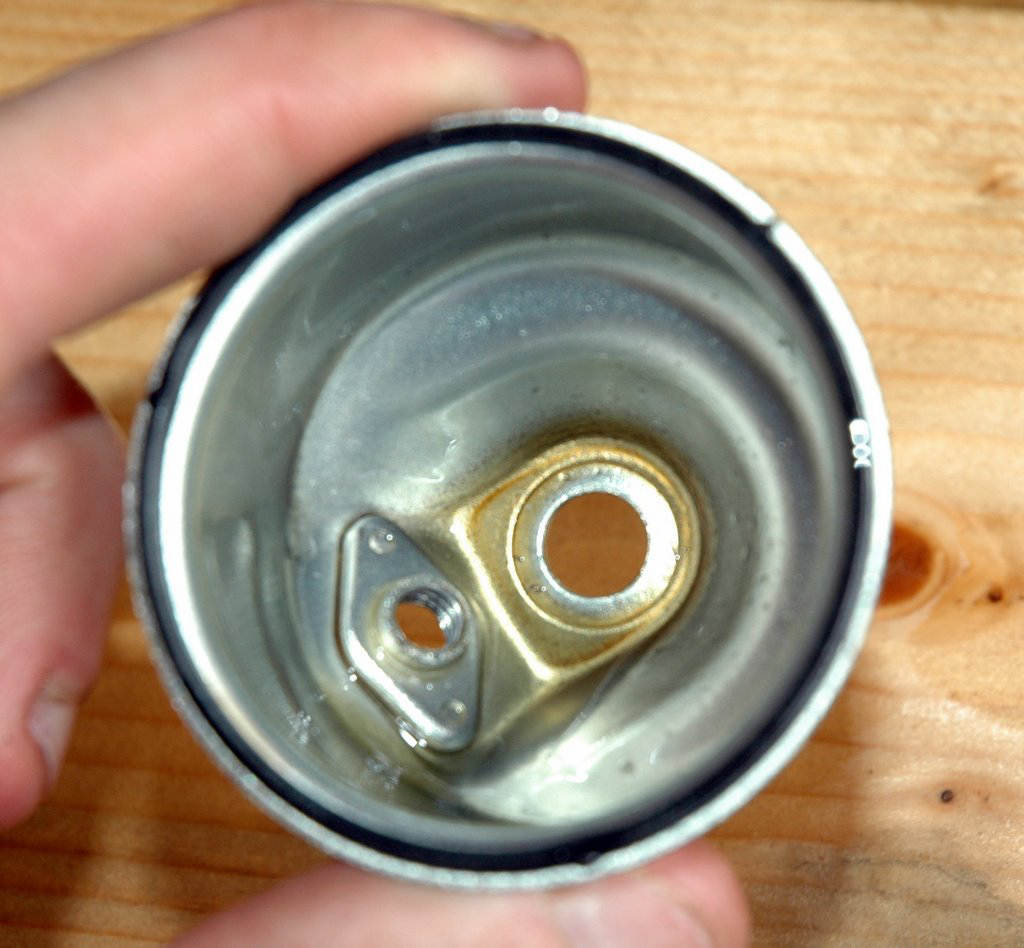
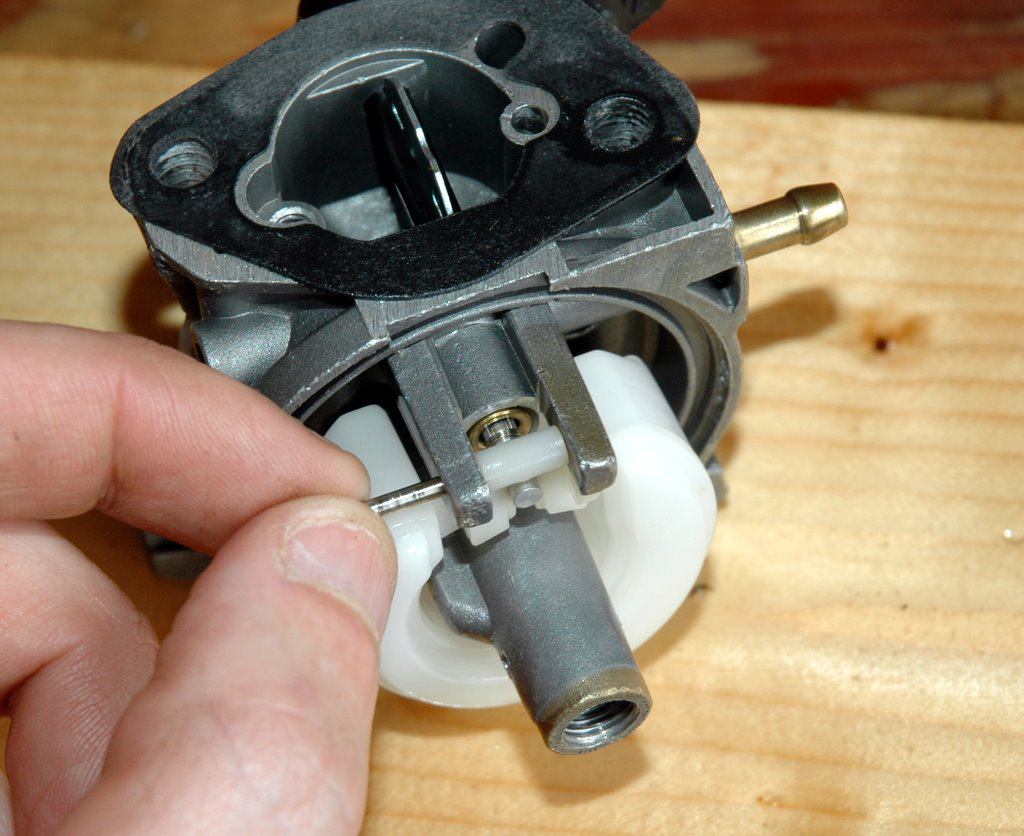
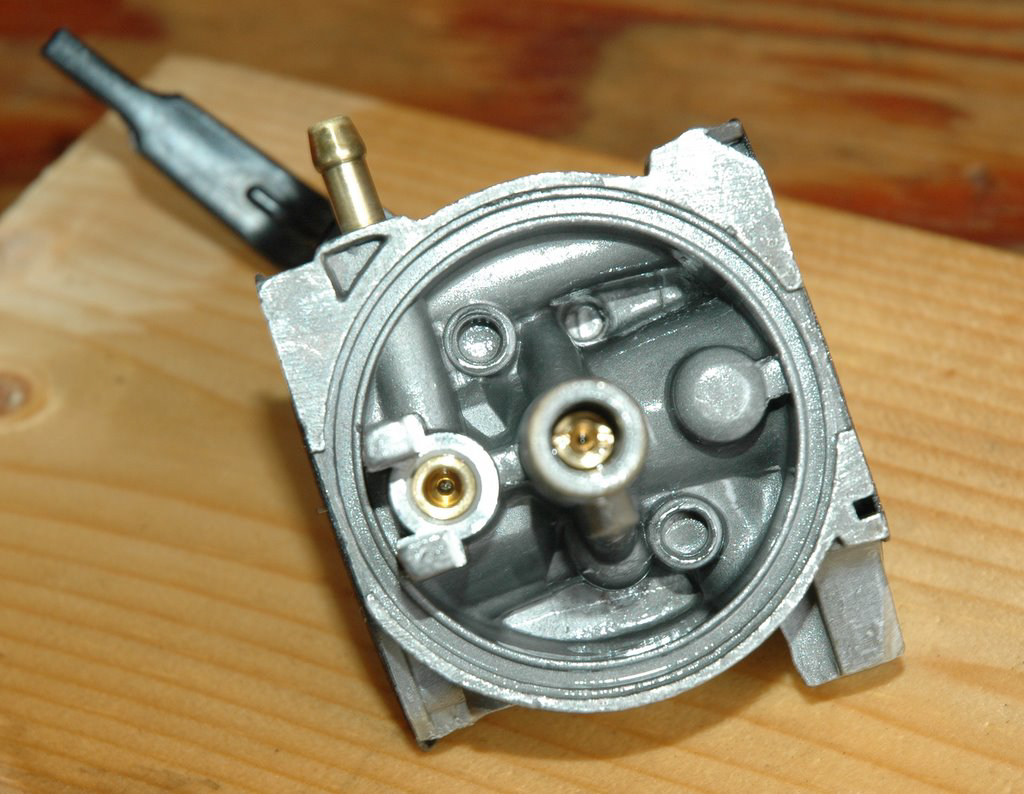
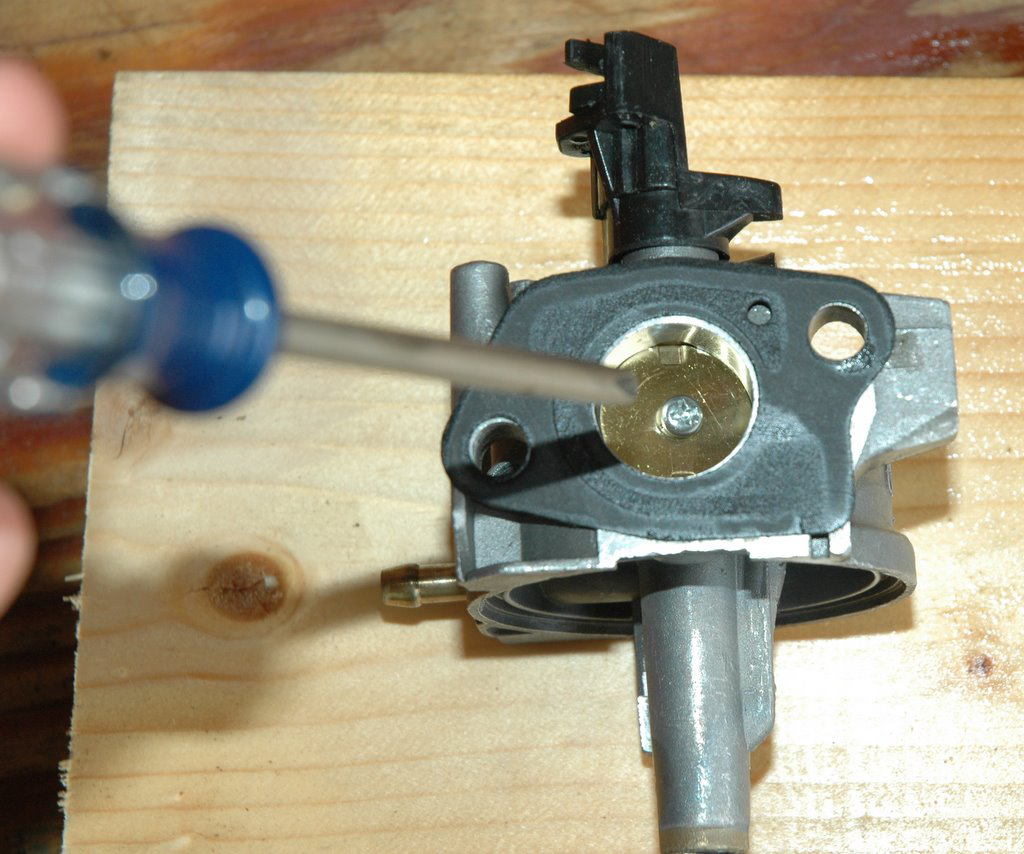
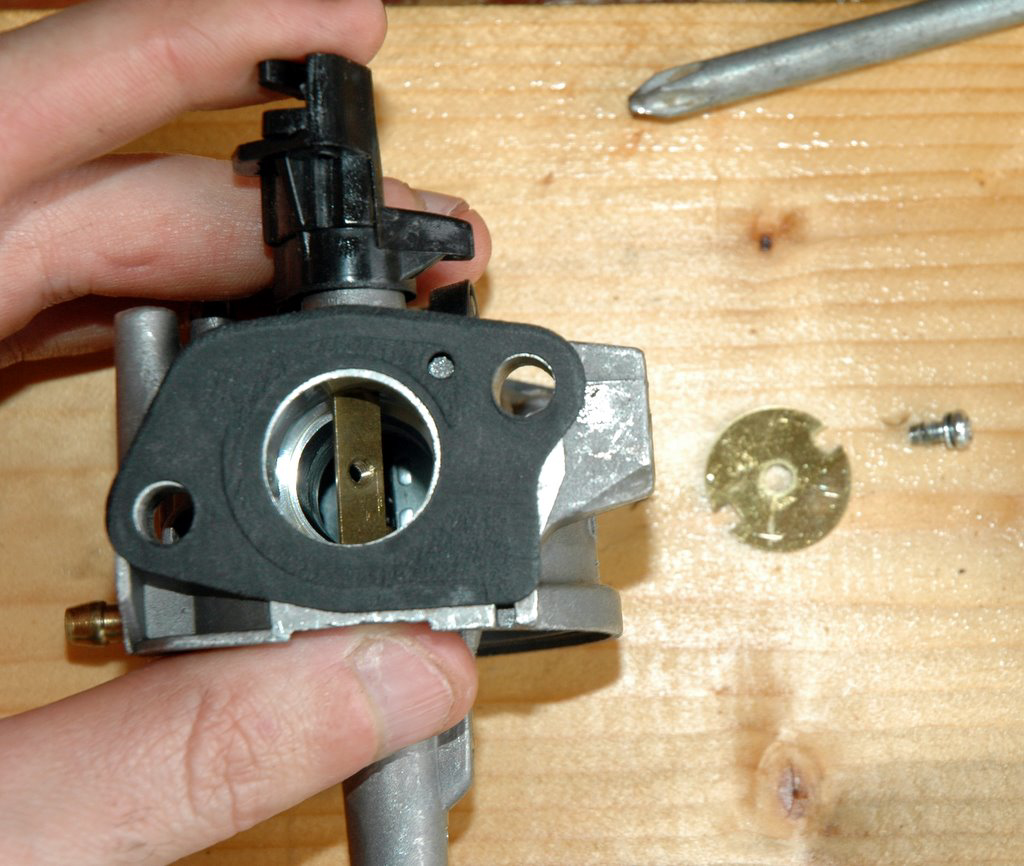
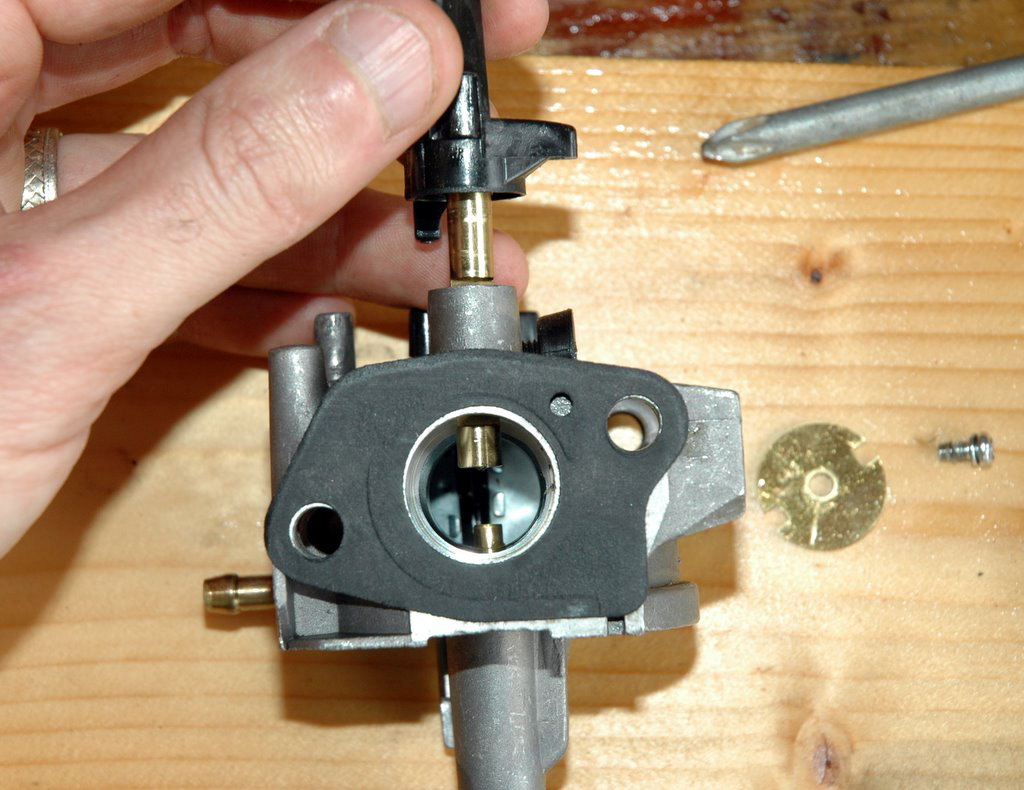
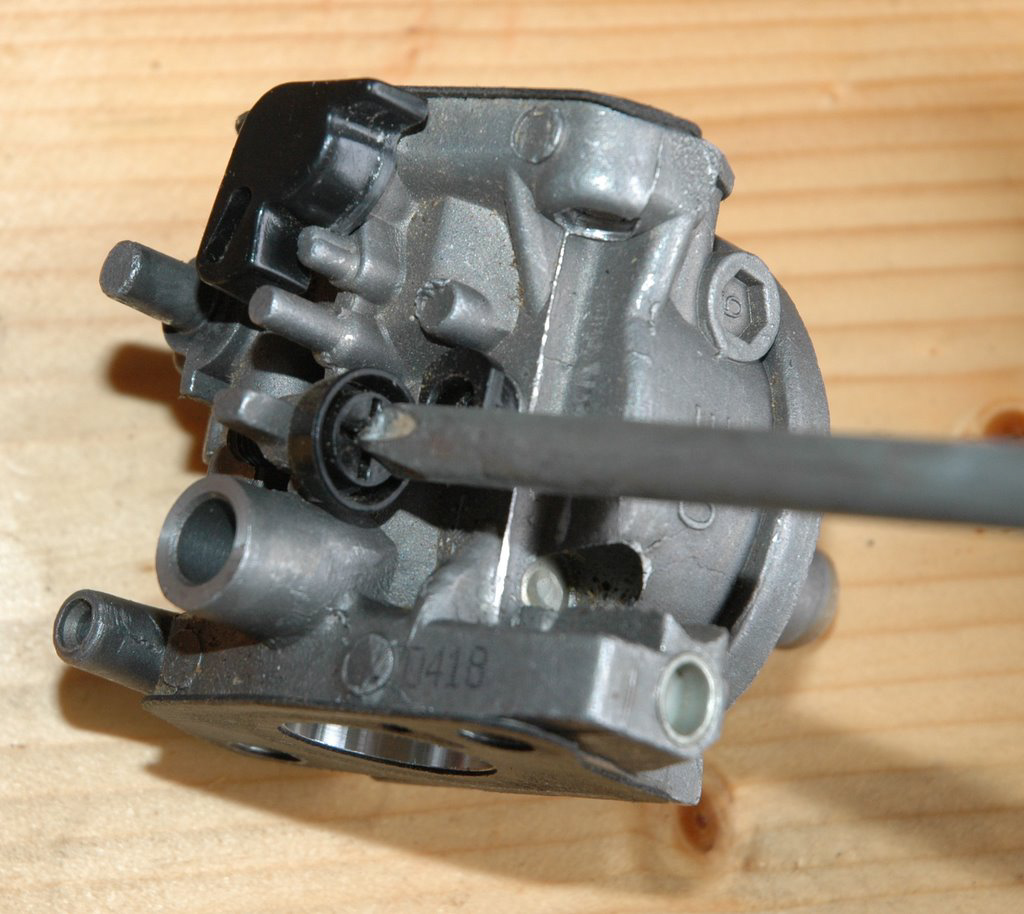
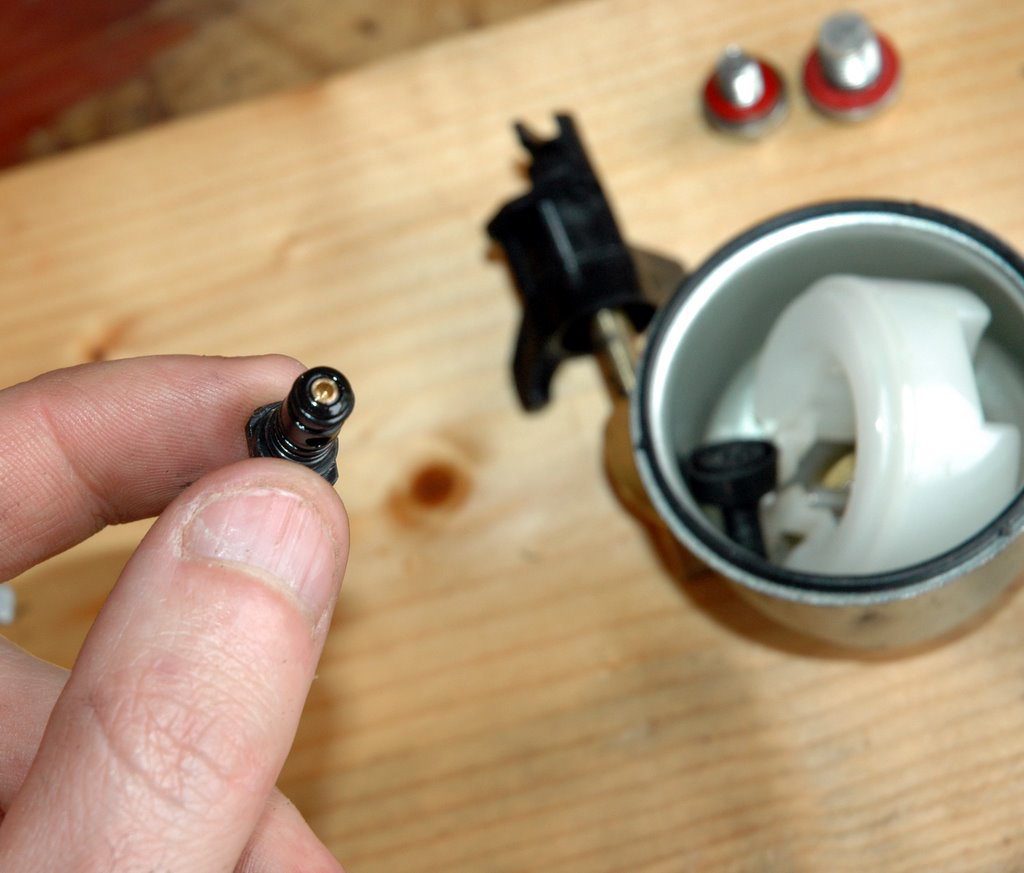
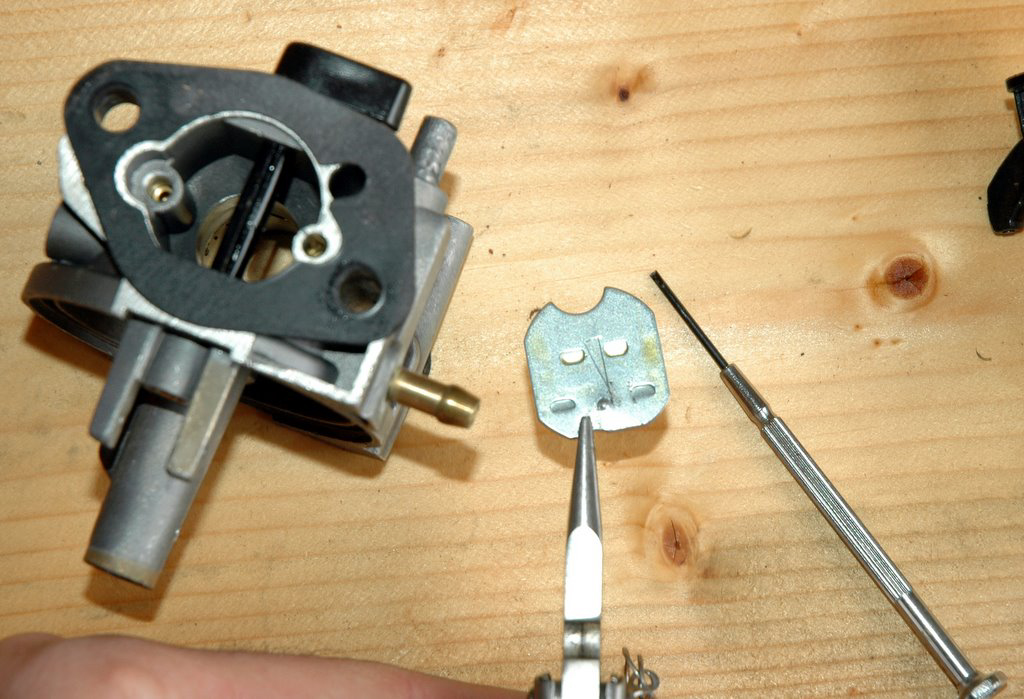
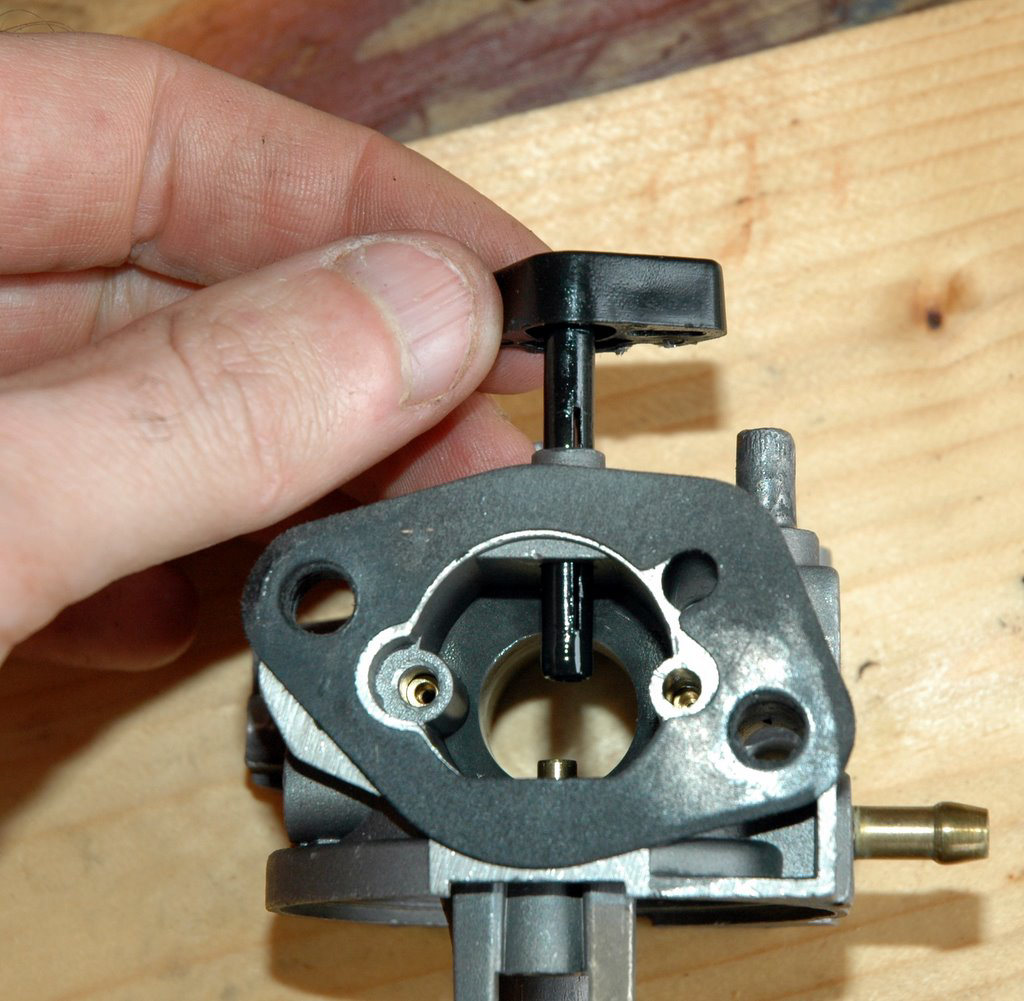
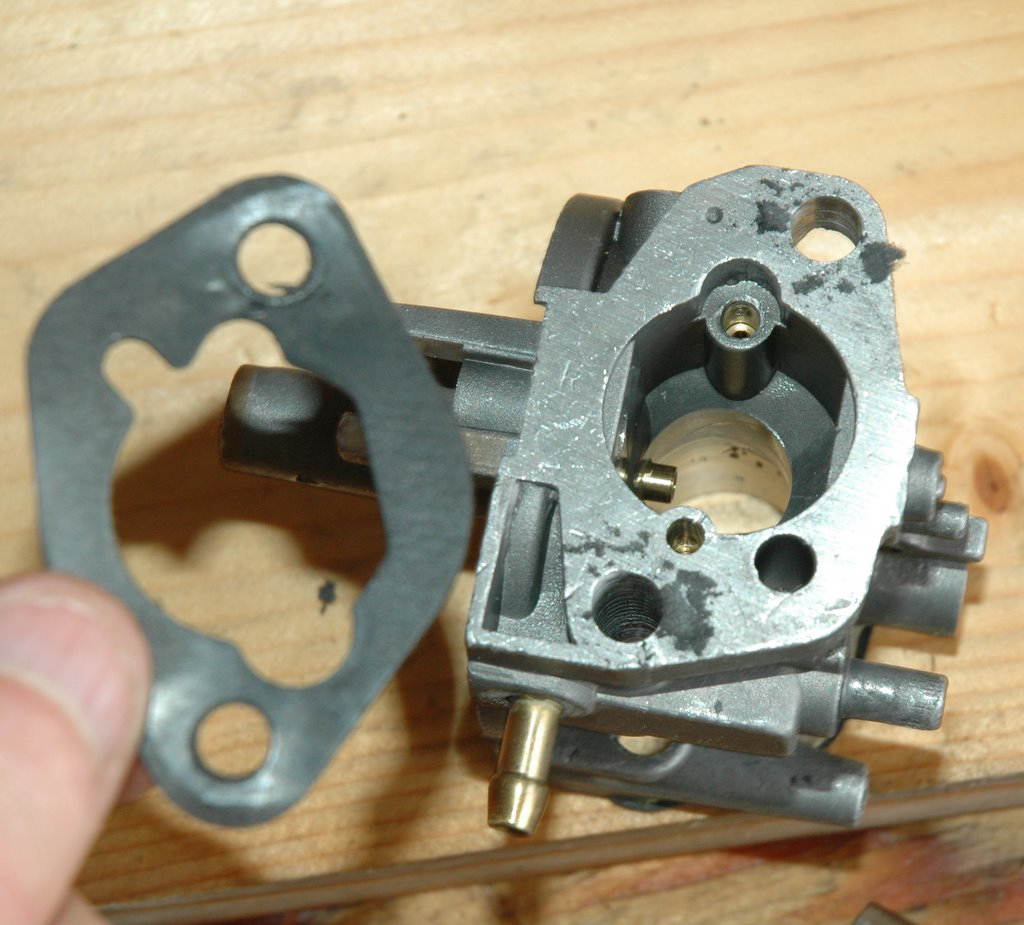
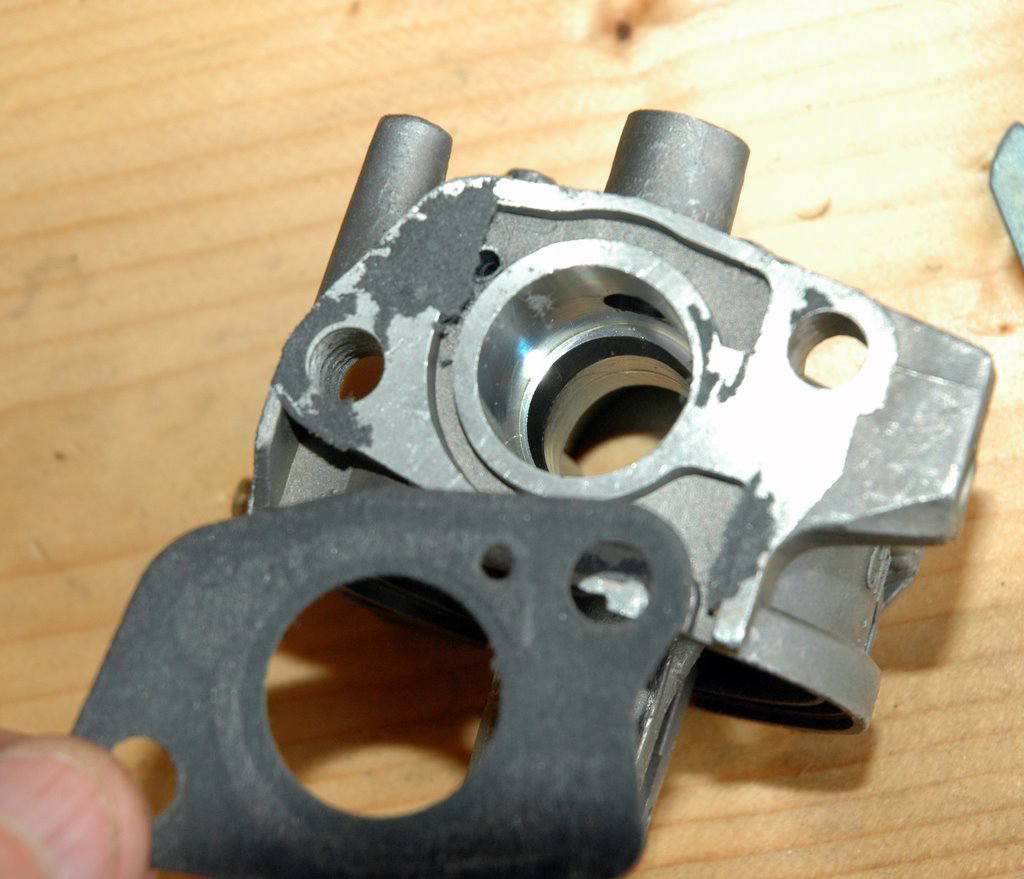
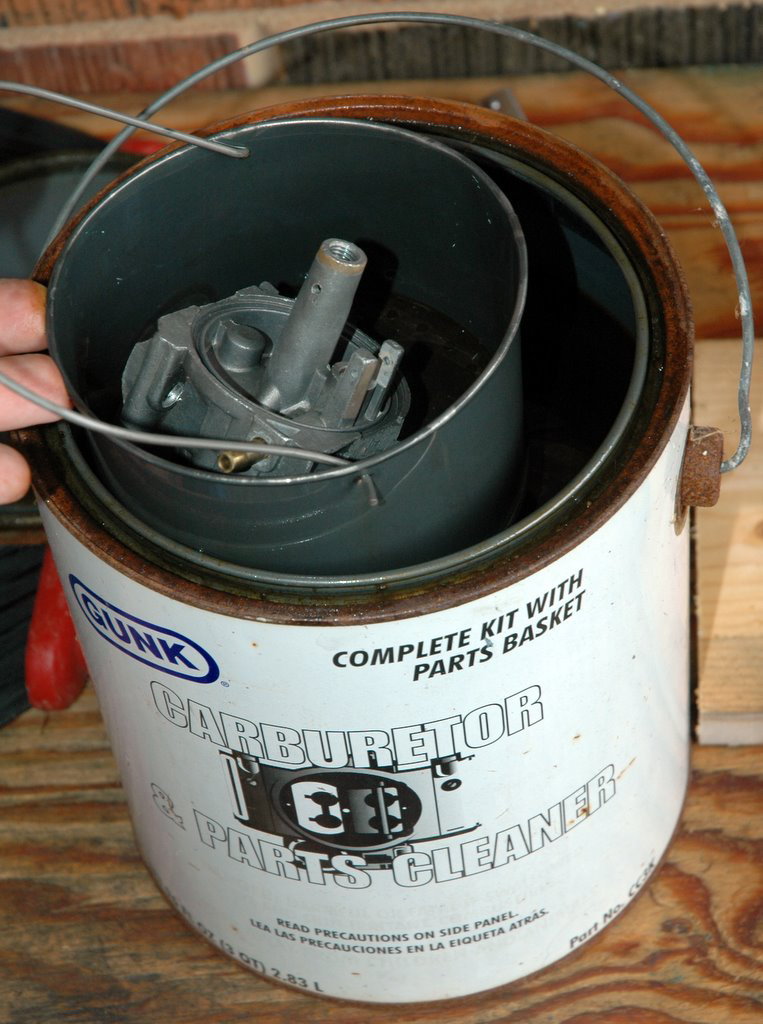
This guide is now available as a PDF for download from http://losdos.dyndns.org/public/misc/Generator_Carb_Guide.pdf courtesy of AR-Jedi. Introduction There’s been a lot of talk in the SF lately about generators. The discussions have been timely for me because our town just went through a week-long outage caused by the April 25-28 tornado superoutbreak (http://en.wikipedia.org/wiki/April_25%E2%80%9328,_2011_tornado_outbreak). My wife and I ran our generator a few hours a day to chill our refrigerator and a neighbor’s, run a few fans, charge electronics, and take hot showers with our tankless natural gas water heater. For the most part it worked out very well. I did have to tear-down the carburetor mid-way through the outage to clean some debris out of it, but once that was done we had no more trouble with it. That small hiccup left me wondering how others would handle a carburetor failure with no available help. I've played shade-tree mechanic and I once stayed at a Holiday Inn Express, so I decided I would put together a guide to cleaning a carburetor for the SF. I know there are more knowledgeable posters here than myself concerning these matters, so, please, if you are one of those guys, by all means correct any errors I make and add any tips of your own that might help someone out down the road. Enough of the talky stuff. What follows is a brief and general description of how a carburetor works, some common problems, and a step-by-step walkthrough of removal, disassembly, and cleaning of the carburetor on a Champion C46540 generator with a Honda GX200-clone engine. At the end is a short list of things you should have on hand to fix your generator when you can’t just run down the street to the parts store. How Carburetors Work Carburetors are simple devices for metering fuel and mixing it with air as it is inducted into the engine’s intake. They function on Bernoulli’s principle, which is the same bit of fluid dynamics that an airplane’s wing is designed to exploit. Bernoulli tells us that when air flows through a pipe and meets a constriction the air inside the constriction flows at a higher velocity but has a lower static pressure than the air outside the constriction. Basically, the air in the constriction speeds up and generates a vacuum. On an airplane wing (which is like a constricted pipe that’s cut down the middle and then rolled-out flat) this is how lift is generated. Inside a carburetor this is how a vacuum is created to draw fuel through a small jet’s orifice so that it is carefully metered and well-mixed with the air it is ejected into. Now, for this to work properly you need a few things to work together. First, you need an adequate fuel supply flowing into the carburetor and held at a proper level. Fuel flows from your fuel tank through your fuel line and filter to reach your carburetor. It enters the carburetor through a barbed inlet and flows past an open needle valve to pour into the carburetor’s bowl. When the fuel reaches the proper level in the bowl the float puts pressure on the base of the needle and the needle seals against its seat to prevent additional fuel flow. As fuel is used, the level begins to drop in the bowl and thus relieves the float’s pressure on the needle which falls back to allow fuel to flow again until the proper level is again reached. With fuel at the proper level, the jet’s job is simply to accurately meter the correct amount of fuel for healthy engine operation. Too much fuel will foul the sparkplug and cause smokey exhaust. Too little fuel can result in excessive heat buildup and engine damage. Neither condition is a good thing. To summarize, the jet(s) meter fuel in the carburetor but they can only meter it accurately if the needle and seat hold the fuel level at precisely the correct point. There are two variable controls on the carburetor— the choke and the throttle. The choke normally only has two or three positions so that it can be turned on, off, and maybe somewhere half-way in between. The choke’s job is to allow cold starts by adding extra fuel to the mix. It ‘chokes’ most air flow through the carburetor while the engine vacuum sucks fuel through the jet. If an engine only runs with the choke engaged, even part way, that means your engine is starving for fuel and there’s a problem in the carburetor. Like the choke, the throttle varies air flow through the carburetor, but it is continuously variable from fully open to almost fully closed. Rather than allow you to start a cold engine, the throttle varies air flow to change engine speed or power. For a generator engine the throttle is connected to an engine governor that maintains a consistent engine speed, so the throttle and governor in this case is actually varying power output rather than engine speed. (Inverter generators operate differently in that they actually throttle engine speed to allow for more efficient operation. They are able to do this because the inverter-generator head regulates the output frequency independent of engine speed whereas in traditional generators output frequency is strictly dependent upon engine speed. Both types of generator regulate voltage independent of engine speed.) Common Carb Problems There are two common sources of trouble in the carb: the needle-seat interface and the jets. Don’t start working on an engine by fiddling with the governor or adjusting the idle speed screw. Those things rarely go wrong. If it’s a fuel problem, check the needle, seat, and jets first. The needle and seat can cause trouble in two ways. They can either let too much fuel into the bowl or too little. If a piece of varnish, rust, or debris gets between the needle and seat it can prevent them from sealing. A damaged needle or seat can do the same thing. This will overfill the bowl to the point that it will overflow through the jet orifices into the air filter housing and/or into the engine intake. You can often see this fuel dripping out of the carb when this happens, though on some engines fuel flows instead through the intake into the cylinder, flows past the rings, and collects in the crankcase. This can be harder to spot and will manifest as too much very thin oil in the crankcase. Oil that smells like gasoline is a telltale sign, and the net effect is a thinning of the oil which can result in ring and bearing failure. The opposite happens when the needle and seat don’t allow sufficient fuel flow to fill the carb. Then the engine will often start up ok after sitting for a while, but will run for only a short time before it sputters and dies. In this case there are two likely causes. Either the seat is clogged with debris or, in the case of carbs with solid needles and an o-ring for a seat, the o-ring may be swollen to the point that the passage through it is the size of a pinhole. With the bowl removed from the carb you should see fuel dripping out at a decent rate if you turn on the fuel, and then it should stop entirely with gentle upward pressure applied to the float. If fuel flow is very slow or if it doesn’t stop with pressure on the float, you’ve found a problem. The second common source of trouble is the jets and their orifices. These can get badly clogged if varnish is allowed to form in the bowl or if the carb gets really dirty. The only cure for this is a thorough cleaning, and sometimes mechanical removal of built-up varnish is required. As I will describe below, I like to use a small copper wire to carefully clean each brass jet and cast aluminum orifice. Then I blast canned carb cleaner through all orifices and passages both to remove garbage and to test flow through them. Soaking metal parts in carb dip overnight helps with deep, hard-to-reach parts clogged with gunk. It will remove stuff that the canned spray cleaners won’t touch. You can also boil aluminum carb castings or brass jets in a weak solution of baking soda and water. This works ok, but I prefer a good bucket of carb dip. Removal, Disassembly, and Cleaning of the Carb Here’s the genset I worked on. I ran it about twenty hours over a week of outage and it did well for the most part. On the evening it malfunctioned it started-up alright but would only run with the choke engaged halfway. This indicated that it was starving for fuel (remember: the choke increases the fuel in the fuel-air mix), so I suspected a problem in the needle and seat. On the night in question I tore it down just far enough to remove the float and needle, and then I sprayed it out with carb cleaner. Sometimes this works, but it’s not a sure thing. You really need to clean a malfunctioning carburetor better than that, but it was late and I wanted a hot shower. It ran fine for the next few days, so after power was fully restored I set out to do a proper job of cleaning and inspecting the carb. The following is a walk-through of that process. 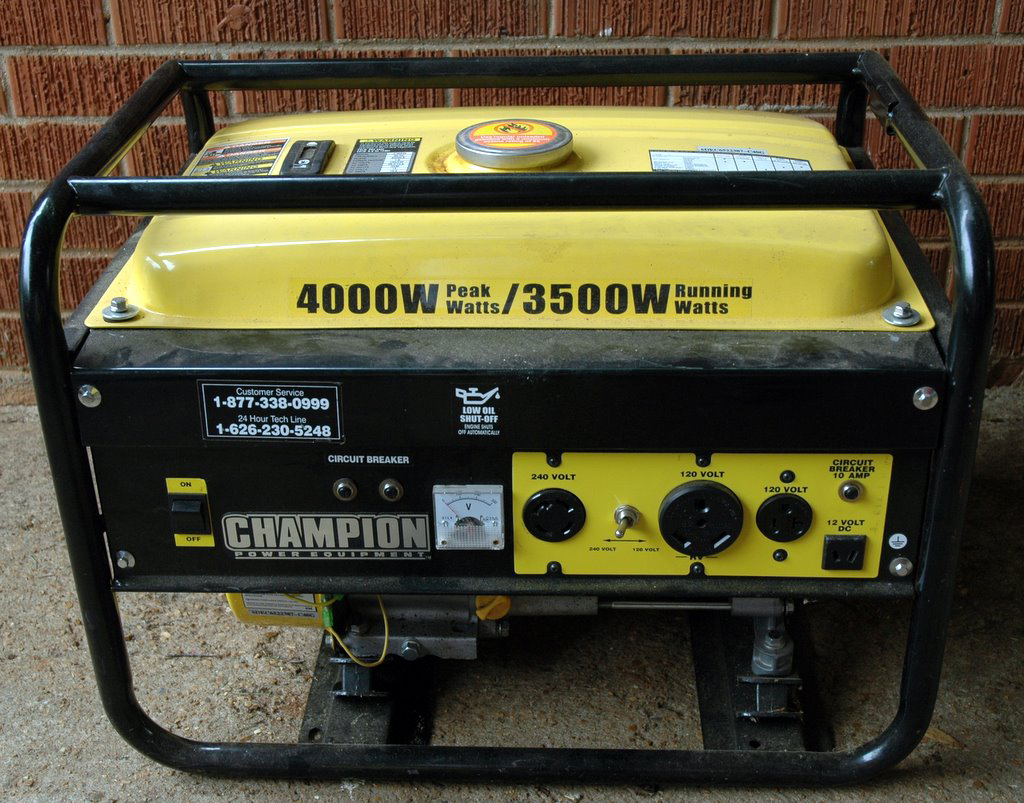 The 240V <–> 120V toggle switches between a single 120V 30A output through the three-pin RV plug or split-phase 240V 15A output via two 120V feeds 180-degrees out of phase and fused 15A each. Either way you end up with a maximum continuous power of 3500W (where 240V x 15A = 120V x 2 x 15A = approx. 3500W). Note that the 12V DC output is only 10A, or 120W total. That’s because the DC alternator section is a relatively puny stator cage built around the flywheel. DC is generated as the permanent magnet in the flywheel spins past several sets of field coils whose output is then rectified. Here’s a shot of my generator’s data plate in case anyone is interested. Looking at the generator from the side you’ll see the air filter box directly below the choke/run label and the fuel shutoff valve between the air filter and the flywheel cover. The carburetor sits directly behind the air filter box. The air filter cover pops off with the two visible wire clasps on top and bottom, then four screws come out to allow removal of the foam filter element.  With the filter out of the way you can now see the carburetor air inlet with studs on each side of it. The two nuts on the carb mounting studs come out from the front... 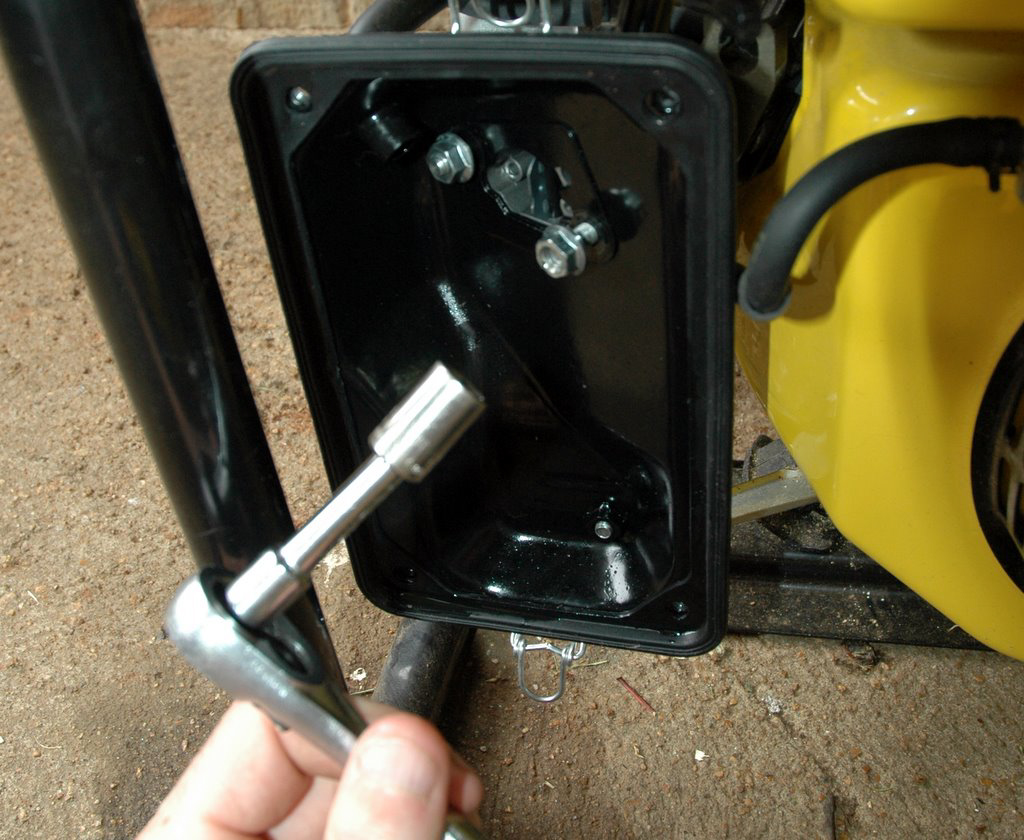 " />" /> " />" /> ...then the bolt fastens the bottom of the filter box to a metal bracket comes out from the back. Here you can see the carburetor from the side, mounted between the filter box and the engine. Slide the filter box off the studs to expose the front of the carb. The breather house (top left) will pull out of the box without too much trouble. The choke lever is visible above the air inlet and fuel line inlet. Just behind the choke lever you can see the thin rod and spring linkage to the governor. 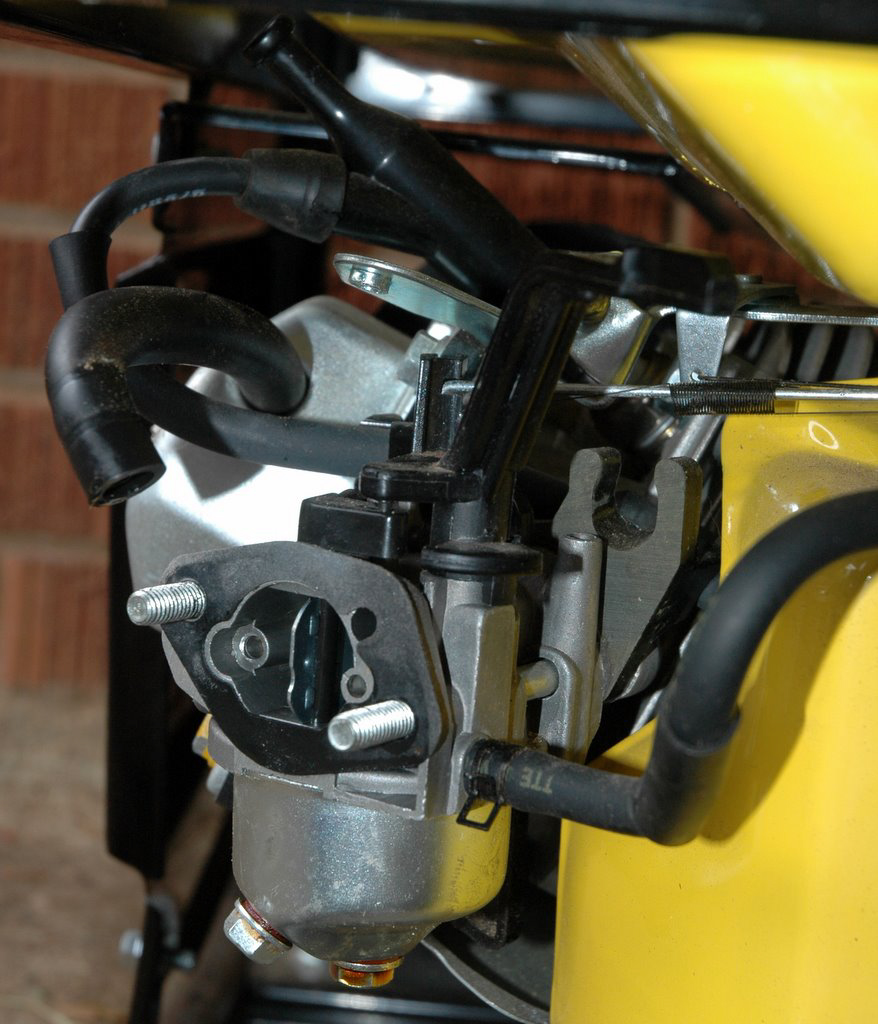 Here’s a side view with the filter box off. You can see (starting from the right) the fuel shutoff valve and fuel line, carburetor with breather hose hanging overhead, valve cover with breather fed into it, and, above that, the sparkplug wire and boot. Turn the throttle carefully by hand until its slot lines up with the long axis of the governor rod, unhook the spring, and carefully lift out the governor rod. Make sure you’ve turned off the fuel at the fuel shutoff valve. If you forget you’ll soon be reminded. 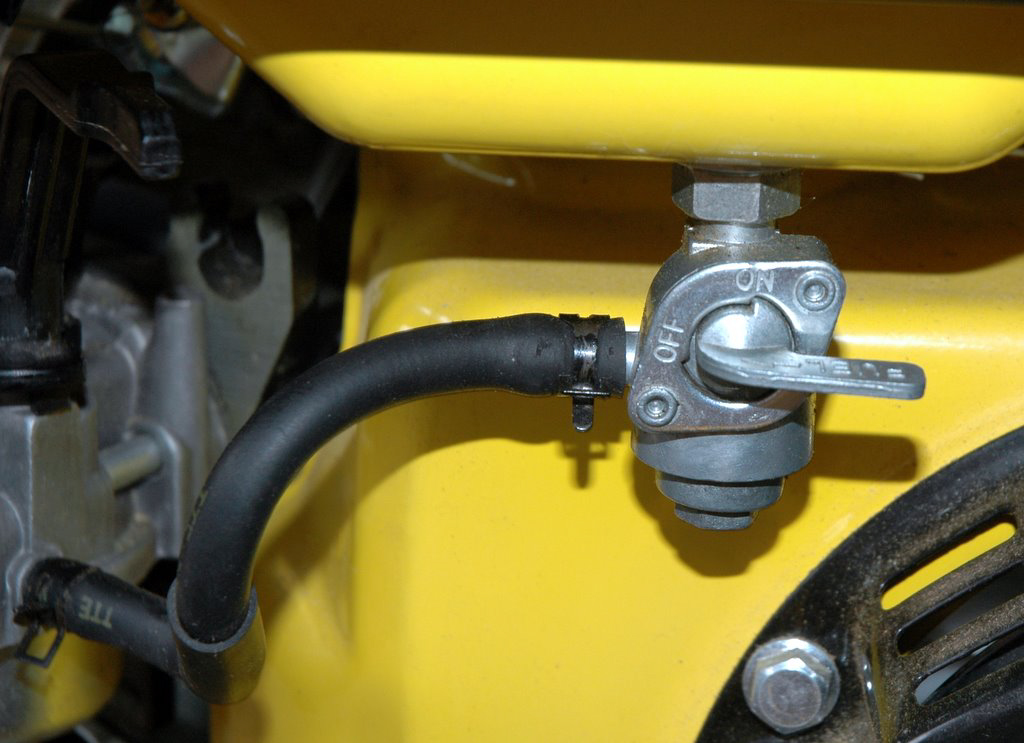 Use a pair of pliers to compress the tabs of the fuel hose clamp on the fuel inlet and slide the clamp back up the hose away from the carb, then pull the hose off of the fuel inlet barb. then slide it carefully off the mounting studs. Tip the inlet barb side towards a waste container to drain some of the fuel from the bowl. of trouble in carburetors. The last thing you want to do now is to introduce more of them into the carb.) residual fuel into a waste container. Then remove the larger screw on the bottom. 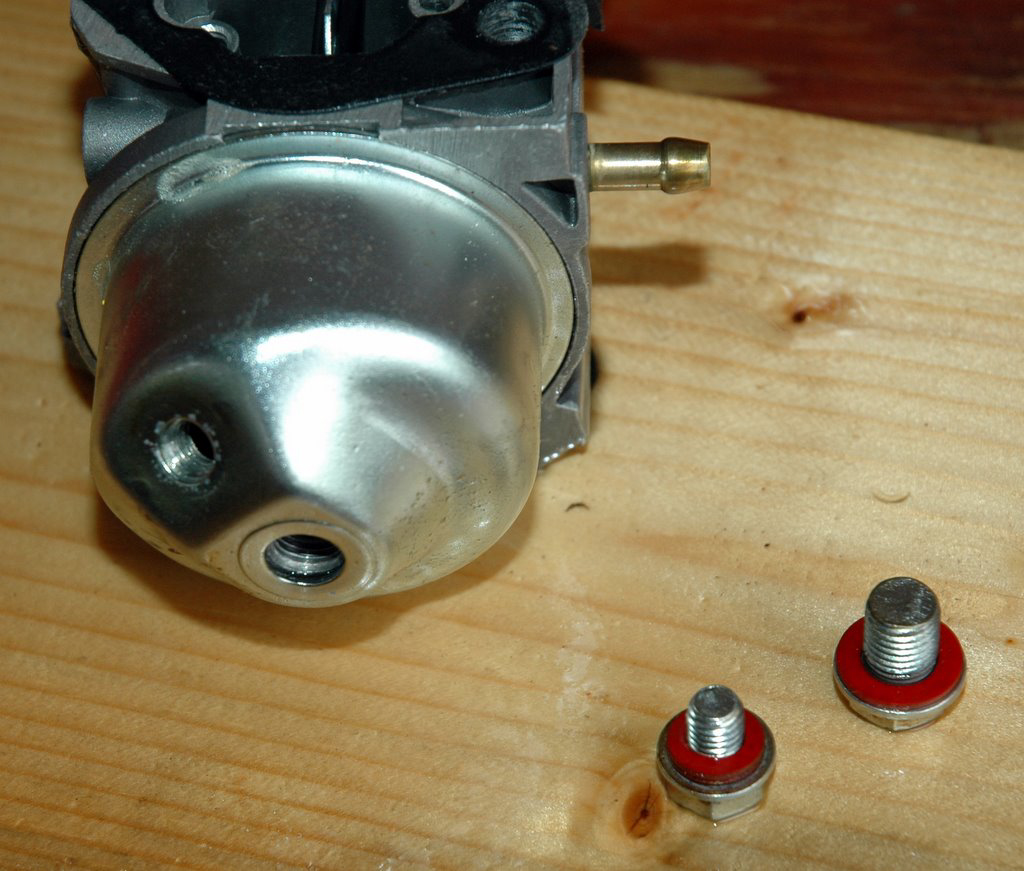 Carefully pull the bowl down away from the carb. You may have to rock it or tap it, but be gentle. Don’t pry at it or pound on it. The goal here is to remove the bowl without warping it or damaging its gasket. Inspect the bowl and clean it well. Varnish, rust, debris, and junk of all sorts can collect in here. Even the smallest flakes of rust or varnish can get stuck in the jets or the needle and seat. The large white plastic donut here is the float. You can see the pin running through it and you can just make out the bottom of the needle surrounded by the brass seat insert. ready to catch the needle and a tiny wire retaining clip, if installed. Lift off the float and don’t lose that needle! In this carburetor the seat is solid brass and the needle has a soft plastic coating that forms the seal. That’s the black tip you see. Don’t scratch that coating or use any harsh chemicals on it. 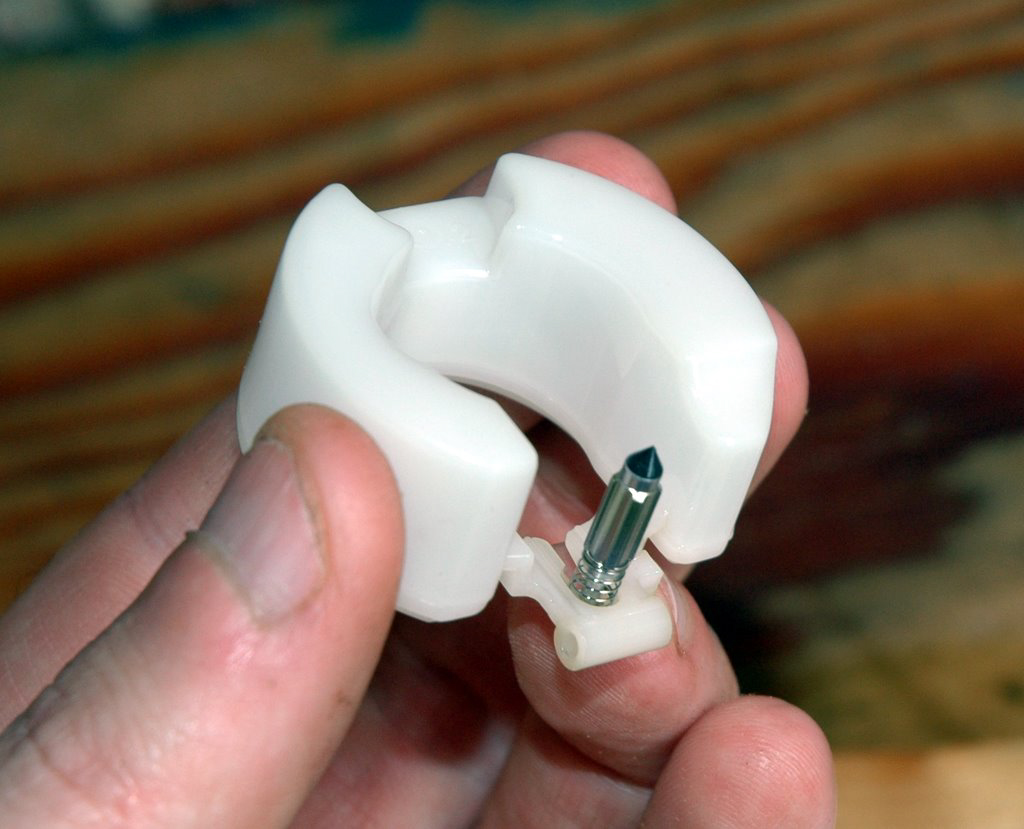 Looking down into the brass seat (left) and main jet (center). The main jet is slotted for a screwdriver, but be careful if you try to remove it. In the case of my carb it couldn’t easily be removed, so I cleaned it in place. In carbs with a solid metal needle with no plastic tip you’ll see a seat o-ring in the bore on the left. You’ll need to remove that o-ring before dipping the carb (because the dip will dissolve it or cause it to swell). Don’t try to remove it if you don’t have a spare! They’re easy to damage during removal. If you don’t have a spare, try blowing air or gasoline into the inlet barb and through the seat o-ring before using a spraycan of carb cleaner because that stuff might harm the o-ring. I wanted to dip the entire carb overnight in cleaner, so I had to remove all gaskets and soft parts. The cleaning dip is not friendly towards plastic or rubber. Unfortunately, the throttle and choke on this carb have a lot of plastic on them. I removed the phillips head screw on the throttle plate... ...then I removed the throttle plate from its shaft. With the throttle plate removed the throttle shaft pulls out through the top of the carb. Stop and read carefully before going any further! This is the idle speed screw and it acts as a stop to prevent the throttle from closing too far with the engine under no load. You need to know where it is set before you remove it because it’s really frustrating to find the right setpoint with no reference. I carefully counted the number of turns to turn it all the way IN until it stopped against the body of the carb, then I removed it. Later, when I reinstalled it, I turned it all the way in and then counted the number of turns out to match its previous setting. I only removed it because it is plastic on my carburetor. If yours is metal, leave it alone! The carb dip won’t hurt a metal screw. Remove this plug. It functions as a stop and also houses a small idle jet. 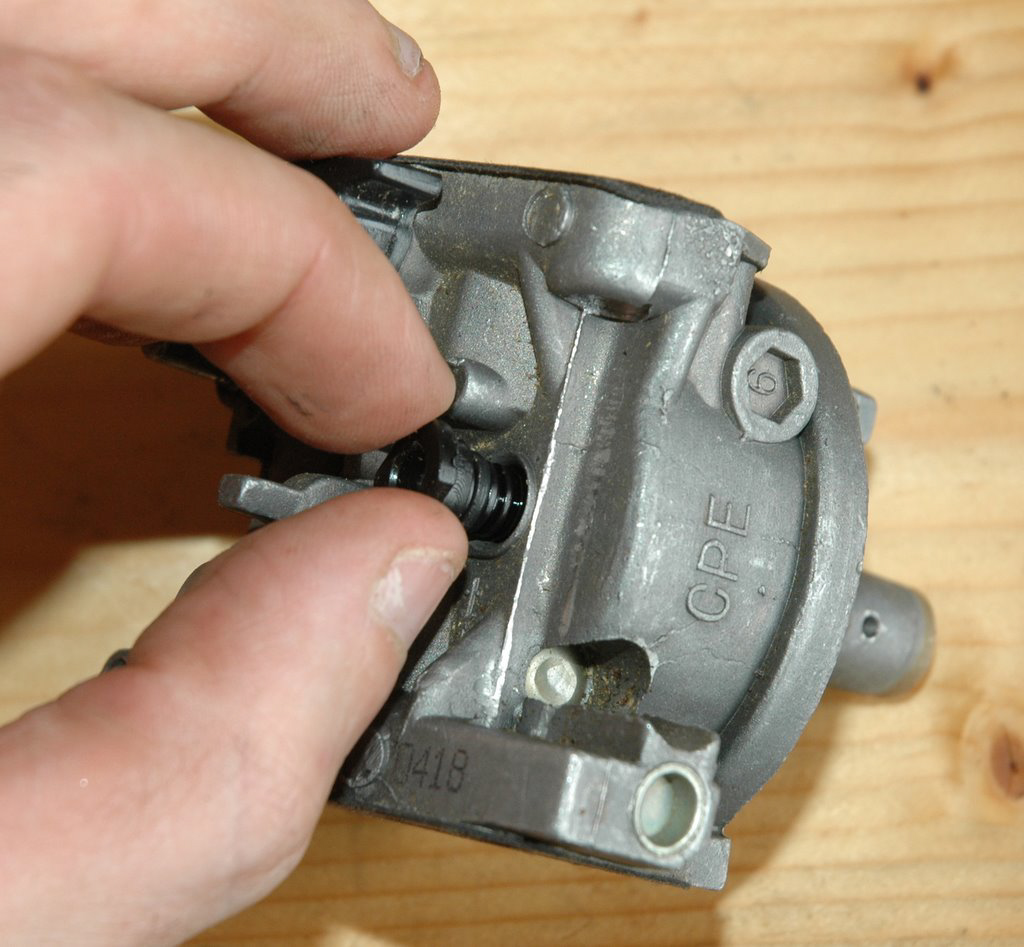 Here’s the idle jet after removal. Don’t put this in the carb dip because it has lots of plastic and a rubber o-ring on it. Remove the choke plate from its shaft. To do this, use a small flat head screwdriver to pry the half of the plastic shaft away from the scallops in the choke plate, then slide the plate out. Be careful doing this—don’t bend, break, or otherwise damage the plastic shaft. This is a little precarious. Slide the plastic choke shaft out of the carb body. Carefully remove the gaskets from the two mounting flanges of the carb. Here’s one side after carefully sliding a razor underneath. As you can see, I tore it up a bit, but it will still seal ok. Determined to do a better job on the other side, I did exactly what should have expected. I royally screwed it up. However, it will also still seal ok. Try to do a better job of removing gaskets than I did. Old gaskets that have been in place for a long time are often unsalvageable, so be prepared to replace them. This may mean cutting new ones from sheets of gasket material. You should buy a few sheets and stick them in your tool box. Or, keep a rebuild kit for your carb on hand and always have a spare set of good gaskets. These gaskets are actually pretty important. Remember that the carb meters fuel and mixes it with air to get the right fuel-air mix. The performance and health of your engine depends on that mix being correct within very tight margins. Air leaks around these gaskets allow more air into the engine to make it run lean (if at all). Lean running on a small, air-cooled engine can quickly cause irrepairable damage due to overheating and detonation. Here you can see the main jet orifice (brass stub in the middle), two other orifices, and the bulged venturi constriction in the middle at the main jet orifice. The whole carb body, the bowl, and any other solid metal parts go into the dip. I leave them overnight and agitate by shaking the bucket a few times. The whole carb body, the bowl, and any other solid metal parts go into the dip. I leave them overnight and agitate by shaking the bucket a few times. When the dip is finished, take out each part and spray it off with a can of carb cleaning spray. I clean every orifice with a small piece of copper wire. Rebuild guides normally tell you not to do anything to the orifices, but I find that a badly clogged orifice can’t always be cleaned just by dipping alone. Copper wire is soft enough to be reasonably safe for this, but go slow and be careful. If you scratch or gouge an orifice or jet it may not meter fuel correctly. Don’t use anything hard for this like steel wire—it will easily gouge cast aluminum. Reassembly is the reverse of removal. I know, I know. Nobody likes to hear that, but it’s true. Don’t overtighten things. Make sure your gaskets and sealing surfaces are clean and look ok. Try not to end up with a handful of parts left over at the end. About reassembling the throttle shaft: ColtRifle has correctly pointed out that a lock washer or thread-locker like Loc-Tite must be used here. If this screw loosens very bad things can happen, including valve, cylinder, and piston damage from inducting metal parts. Also, governor failure could conceivably occur since the governor will no longer be able to vary the air flow through the carb. Doesn't really matter which happens first–– either one will scrap your generator's engine. Simply tightening the screw may not be enough here because small engines are prone to shaking things apart. They are quite capable of vibrating their own fasteners loose if they aren't secured properly. Before you reconnect your fuel line, check the fuel in your tank. Stick the fuel line into a glass jar and open the shutoff valve long enough to collect a few ounces. Look at fuel and smell it. If you see lots of particulate stuff, rust flakes, or other solid contaminants it should be drained. If it smells like varnish, drain it. If there’s water in the fraction you drained, drain more until you get to pure gasoline. (Gas, diesel, and oils are about 75% as dense as water, so they float on top of it.) I drain and discard any fuel I find with water in it. In fact, while you’re at it and have things apart you should consider installing a fuel filter if your generator doesn’t have one. Buy one with two barb fittings of the right size for your fuel line. Buy one with a horsepower rating equal to or greater than the horsepower rating of your generator’s engine. Clear plastic filters are especially nice because they let you see fuel flowing and they let you see how much debris is in your fuel. To install your filter, use a sharp knife to cleanly cut your fuel line between the fuel shutoff valve and your carb. Make sure the cut is square. Then, take your filter and look to see if it has a flow direction marked. Align the mark to the direction your fuel should flow and push the two ends of the fuel line firmly onto the barbs. That’s it. Pretty easy, huh? Now go buy a spare filter and throw it in your toolbox. (There’s more on things to keep on hand at the end of the write-up.) How to Avoid Future Problems The biggest thing you can do to avoid trouble is to use good gas. I only run pure gasoline and avoid E-10 like the plague because I have seen too many problems caused by ethanol. You may have to look around for real gas, but it’s worth it, especially for small engines. Secondly, don’t use the ignition killswitch. When you’re done running your generator, turn off the fuel at the fuel shutoff valve and let it run until it dies. This uses most of the fuel in the carburetor and prevents spoiled fuel from forming varnish in your carb bowl or clogging your needle and seat. It also prevents fuel in the bowl from sitting and absorbing water from the atmosphere if you are running E-10. (Seriously—don’t use that crap in your generator!) Lastly, if you’re putting your generator up for a while drain the fuel from the tank. Just pop the hose off the carb and stick it into a container to catch the fuel, then open the shutoff valve. It takes a little time to do, but it will save you down-time later. Things to Have on Hand for a Generator Failure - Spray-cans of carb cleaner - Bucket of carb cleaning dip - Small copper wire (I use a single wire out of a twisted automotive wire) - Wrenches, screwdrivers, utility knife, and needlenose pliers - Spare carb rebuild kit (including jets, gaskets including bowl gasket, needle, set o-ring if applicable, etc.) - Tube of fuel- and oil-resistant RTV for repairing or replacing torn gaskets (use sparingly and only if needed!) - Sheet of gasket material for cutting gaskets - Spare length of fuel line - Spare fuel filter - Good, clean fuel that hasn’t sat around for the last two years - Extra sparkplug - Multimeter and circuit schematic(s) for your generator (Edited to fixed a duplicated photo) (Edited again to add Jedi's download link for the PDF and update original post content to reflect minor revisions and additions in new PDF.) (Edited again to add ColtRifle's comment that the throttle plate screw must be secured with Loc-Tite or a lock washer.) |
|
|
|
[#1]
(reserved for major additions, edits, revisions, and apologies) |
|
|
|
[#2]
Nicely done! Thanks for taking the time to put this together. Very useful info here.

|
|
|
|
[#3]
Thanks for the write up! I'm going to bookmark this and save it as a text.
Now that my wife and I own a genny, carb rebuilding is going to be a skill we will learn. Semper Fi |
|
|
|
[#4]
Quoted: Thanks for the write up! I'm going to bookmark this and save it as a text. Now that my wife and I own a genny, carb rebuilding is going to be a skill we will learn. Semper Fi You guys are welcome. It's always better to stay ahead of things by storing your genny dry and making sure the fuel you do put in is fresh and clean, but things still break and it's good to know how to fix them. If you IM me your email address I'll print the write-up to a PDF with pics embedded and send it to you. ETA: I've got the whole thing formatted nicely in a PDF now. If you'd like a copy just IM your email address to me. |
|
|
|
[#5]
Very nice post- good job OP
|
|
|
|
[#6]
Thank you very much for taking the time to do this. It is a very well done write-up. I've never taken a carb apart, but I feel I could do this pretty easily now because you didn't just tell us what to do, but why. For me, understanding the underlying principles in a piece of equipment makes working on it a lot easier.
|
|
|
|
[#7]
Thank you for taking the time to write this up with the photos. It helps to make things more understandable, and I plan on using it to show my boys as I think you explained it better than I could have.
IM also sent for PDF. |
|
|
|
[#8]
Quoted:
The biggest thing you can do to avoid trouble is use good gas. I only run pure gasoline and avoid E10 like the plague. You may have to look around for real gas, but it’s worth it, especially for small engines. Since you're in Alabama like me, got any suggestions on where to get this real gas? |
|
|
|
[#9]
Quoted:
Quoted:
The biggest thing you can do to avoid trouble is use good gas. I only run pure gasoline and avoid E10 like the plague. You may have to look around for real gas, but it’s worth it, especially for small engines. Since you're in Alabama like me, got any suggestions on where to get this real gas? http://pure-gas.org/index.jsp?stateprov=AL |
|
|
|
[#10]
Thank you for the excellent topic Red/Black!
Today I did a Honda 2000EU carb today and there are many similarities between your's and the Honda. One thing I did was to install a small fuel filter in the line right after the vacuum fuel pump. Wish it didn't take so long to put up pix or I would show the filter. One of the reasons for the filter is to see if the gas is going bad and causing this one to start messing up every few months or if there is some dirt in the fuel. I'm anxious to see the outcome. One other comment––- I was thinking today, as I put my genny back together, that the folks who depend on magic fuel potions to keep their gennys running ––-and don't take the time to dig into their machines––- may find themselves behind the 8-ball at a critical time when having a working genny is important. It would be wise to learn the simple procedure to clean your carb. |
|
|
|
[#11]
Great write up!
|
|
|
|
[#12]
Excellent write up and pics, thanks!
LOl, Friday I had to mess with the carb on the tiller. Today, it's a go cart. Never used to have to fool with carbs near this much (except for Q-jets, "back in the day And I run most everything dry after use, unless it's something that gets used a LOT. I HATE ethanol! |
|
|
|
[#13]
Quoted: Quoted: Quoted: The biggest thing you can do to avoid trouble is use good gas. I only run pure gasoline and avoid E10 like the plague. You may have to look around for real gas, but it’s worth it, especially for small engines. Since you're in Alabama like me, got any suggestions on where to get this real gas? http://pure-gas.org/index.jsp?stateprov=AL Yeah, this is the website I use. It's not always 100% up-to-date, though. One good place to look is your local marina or marine engine shop. A lot of marinas have pure gas pumps because boat engines are particularly prone to getting water in fuel containing ethanol. A boat shop won't likely sell gas, but they may be able to tell you where to find it. In Huntsville I buy it at a station on Drake and Patton. Don't go there after dark.  |
|
|
|
[#14]
Quoted: Today I did a Honda 2000EU carb today and there are many similarities between your's and the Honda. I've been wondering what those look like on the inside. I haven't gotten to play with an inverter genset yet. One thing I did was to install a small fuel filter in the line right after the vacuum fuel pump. ... One of the reasons for the filter is to see if the gas is going bad and causing this one to start messing up every few months or if there is some dirt in the fuel. This is an excellent idea. It's on my list of things to do, and for someone like me who has a nice exposed fuel line with no filter it would only take a few minutes to turn off the fuel, cut the line, and insert an inline barbed filter. When choosing a filter for a genny without one, just go by the HP rating on your engine and the HP rating on the filter. It's ok to get a filter rated for more HP but not less. One other comment––- I was thinking today, as I put my genny back together, that the folks who depend on magic fuel potions to keep their gennys running ––-and don't take the time to dig into their machines––- may find themselves behind the 8-ball at a critical time when having a working genny is important. It would be wise to learn the simple procedure to clean your carb. I always hear things like, "My carb isn't working. I think I'll spray some cleaner through the filter." The intent is good, but the execution is terrible. Folks don't realize that the things that need to be cleaned are too deep in the carb for a surface cleaning. Then when they spray cleaner into the filter and it doesn't work they decide that cleaning the carb is pointless and what they really need is to take it to a small engine shop. It takes more time to do it right, but it still isn't rocket surgery. It's a good thing to learn, especially these days with the garbage that is sold at the E10 pumps. |
|
|
|
[#15]
Quoted: LOl, Friday I had to mess with the carb on the tiller. Today, it's a go cart. You have a tiller AND a go kart? You're doing it wrong. Go get a big TroyBilt rear-tine. Put it on hard clay, turn the throttle up to its stop, and push down hard on the handles. It won't steer very well, but I guarantee it will fly! I HATE ethanol! I swear ethanol must be the reason for 80% of small engine failures these days. Any small engine guys out there? I'd love to hear your take on this. |
|
|
|
[#16]
Awesome job on the write-up. Thanks for posting it.
|
|
|
|
[#17]
Well done, Man. Well done. I own this same model of Champion. I will school my self and get a list together from your hard work. I'll probably add this info to my ICE folder. Nice work.
|
|
|
|
[#18]
"I've been wondering what those look like on the inside. I haven't gotten to play with an inverter genset yet."
Similar but the Honda has a stepper motor servo on top of the carb to manage speed control. This is true of all the EU Honda inverter gennys. [that I've looked at] The cable to the motor is long enough to make it easy to service the carb without removing the servo. I was able to remove the couple screws holding the servo to the carb on a 1000EU but couldn't get them loose on a 2000EU. |
|
|
|
[#19]
Thank you red_on_black, well done |
|
|
|
[#20]
Thank you, thank you, thank you.
|
|
|
|
[#21]
Quoted:
Quoted:
LOl, Friday I had to mess with the carb on the tiller. Today, it's a go cart. You have a tiller AND a go kart? You're doing it wrong. Go get a big TroyBilt rear-tine. Put it on hard clay, turn the throttle up to its stop, and push down hard on the handles. It won't steer very well, but I guarantee it will fly!
I HATE ethanol!
I swear ethanol must be the reason for 80% of small engine failures these days. Any small engine guys out there? I'd love to hear your take on this. LOL, I've got an older Troybilt Horse AND hard clay. And forearms like Popeye! |
|
|
|
[#22]
LOL, I've got an older Troybilt Horse AND hard clay. And forearms like Popeye! When I first got my Horse I was a bit too enthusiastic with the depth gauge while breaking some hard Tennessee clay. It took off, I tried to hang on, and when I finally got the idea of lifting up on the handles I slammed into it hard enough to crack a tibia. It hurt like mad and I ended up literally crawling back into the house. I remember two things very clearly: the pain of smacking a shin into a heavy cast iron thing and the breathtaking land-speed of an angry tiller. |
|
|
|
[#23]
Fantastic tutorial. Thanks.
Stay Safe, AGreyMan |
|
|
|
[#24]
Regarding the Honda carbs...
On several Honda EU's I've cleaned the carb on, both friends and mine [and most of them multiple times], there has been a 'deposit' in the bowl with sort of a tannish, crusty appearance. [reminds me of a kidney stone... In those, fuel has been left in the bowl and seems to have reacted w/ the metal rather than just 'drying'. On another EU2000 that I've had to repeatedly clean the carb [and have left fuel stand in it often, ––the one I did yesterday] the carb bowl was spotless. Since no magic potion additive was used on these engines, I have to think the bowl material is different. This genny is also about 1 1/2 years newer. The usual problem on all the engines whether or not the tan 'crust' was in the bowl, has been something partially 'clogging' the carb besides the jet or the 'diffuser' tube [with multiple tiny holes opposed to each other, located inline with the jet -in Hondas]. When I spray brake cleaner [ trichloroethene] into the carb openings and ports, the engines run fine afterwards, even though no obstruction has been determined. So keep a spray can of trichlor handy to quickly clean your carb in addition to all the other stuff. Another thing I've found is to get the correct size slotted type screwdriver to remove the jet w/out damaging the threads or the jet slots. A number "1" slotted driver bit works well on the Hondas. Once you pull the carb and clean it a couple times, you'll probably find it only takes a few minutes. You can write with a marker what size wrench, etc, you find best to use to R & R everything so you don't have to waste time each time you clean yours. Some people will get their engine running ––poorly––- and then put magic stablizers into the fuel and go pedal to the metal and really run the risk of screwing up their equipment. Best to respect the mechanical things that go round and round and do it right by a quick disassembly and through cleaning. |
|
|
|
[#25]
AWESOME Write-up.
I have this genny also and will be saving these in my ICE folder as well. I vote for a genny repair sticky. |
|
|
|
[#26]
excellent writeup –– this is the kind of useful info that the ARFCOM SF should be made out of. ar-jedi |
|
|
|
[#27]
Quoted: AWESOME Write-up. I have this genny also and will be saving these in my ICE folder as well. I vote for a genny repair sticky. OS, Glad I could help. IM me your email address and I'll send you the PDF. It's a lot easier to put on a disk or print it out that way. |
|
|
|
[#28]
Quoted:
Glad I could help. IM me your email address and I'll send you the PDF. It's a lot easier to put on a disk or print it out that way. i can host it if you want. ar-jedi |
|
|
|
[#29]
Quoted: Quoted: Glad I could help. IM me your email address and I'll send you the PDF. It's a lot easier to put on a disk or print it out that way. i can host it if you want. ar-jedi You are a scholar and a gentleman, sir. Would you be so kind as to IM me your email address? Also, the file stands at 1.3MB at present. Should I try to compress it down a bit further before I send it? Thanks! |
|
|
|
[#30]
Quoted:
good stuff folks, below is the PDF version of the info red_on_black posted: http://losdos.dyndns.org/public/misc/Generator_Carb_Guide.pdf regards, ar-jedi ETA: r_o_b, thought came to mind –– for the next (inevitable |
|
|
|
[#31]
Quoted: folks, below is the PDF version of the info red_on_black posted: http://losdos.dyndns.org/public/misc/Generator_Carb_Guide.pdf regards, ar-jedi ETA: r_o_b, thought came to mind –– for the next (inevitable Thanks, Jedi. The OP is now edited to include your link at the bottom and also incorporates the edits and revisions present in the PDF I gave you. Adding a version number is a great idea. I'll do that next time I have the doc open. |
|
|
|
[#32]
Good write up. I'm going to be rebuilding another Tecumseh HH60 over the next couple of weeks, so I'll try to document the process.
A couple of things though- 1. Buy a few rebuild kits for the carbs, along with the right gaskets and replacement floats. If you can't get gaskets, you can usually make your own from gasket material(I believe autozone carries it, if not, check small engine parts catalogs). Every carb I've torn down has ended up with destroyed gaskets, but, they had been assembled for quite some time. If the fuel has any water in it, and that water gets into the carb, then sits for any length of time chances are good that the needle will be corroded and need replacement. The same goes for that tiny little wire hanger for the needle, and the brass floats that were common in older engines. With many of the newer engines/carbs, it isn't such a big deal because the needles are often rubber tipped(as yours is), and the floats are plastic. Older engines had steel needles, and used a rubber o-ring as a seat. 2. ALL engines should have an inline fuel filter. All of the gensets I have feature a small screen over the fuel line in the gas tank, but I install a white inline filter anyway. White filters have a finer mesh than the red ones. 3. The float has to be set correctly or you'll end up with either too much or too little fuel. Turn the carb upside down with the float installed. The float should set level, or the free end should be slightly high. You have to bend the metal tab that the needle bears against to adjust the float. Even if you haven't replaced it, it's still a good idea to check since you've got it apart anyway. Your carb doesn't appear to have an adjustable float...I've never torn down one that didn't. 4. Removal of the throttle and choke shafts is not required for the majority of carb rebuilds. The screws that hold the butterfly on the throttle shaft are tiny, and have correspondingly tiny threads. They will strip very easily. If removing the shaft is absolutely required, then be sure to install the butterfly exactly the same way it was removed...and be sure that the shaft can be turned to the "closed" position in order to align the butterfly properly with the bore before tightening the screws. 5. For main jet removal, grind the screwdriver ROUND on the sides. If you don't, you'll often damage the threads in the main jet bore...possibly beyond the point of being usable. I know squat about the chinese engines or carbs, same goes for the honda engines. If they're similar to domestic small engines, start with the idle mix screw about 1.25 turns out from bottom. IOW, turn the screw in lightly until it bottoms, and then back it out 1.25 turns or so. Adjust as required after getting the engine running. Some engines also have a high speed mix adjustment, and IME, you'll have to set the idle mix properly before adjusting the high speed. Use the same general rule of 1.25 turns out from bottom for the high speed screw. |
|
|
|
[#33]
Machinist, my responses are in blue below. You make some really good points. My comments aren't aimed at educating you (because you obviously know what you're talking about) but are intended to add a little more info. Thanks for taking the time to write that stuff up! Quoted:
Every carb I've torn down has ended up with destroyed gaskets, but, they had been assembled for quite some time. >>> This is very true. Gaskets harden and adhere when they ago. Sometimes no matter what you do the gasket will disintegrate in your hands when you try to remove it. Some are easy to make out of sheets of gasket material, like the little fiber washer gaskets that seal the bottom of the bowl. Others are a little harder. To make a gasket to seal the carb against the engine's intake you'll need to carefully scribe around the carb and mark the inside of the bore on the material, too. This can be done on soft material by placing the carb flange against the material, placing a wood block on the other flange, and tapping with a hammer. Tap gently! When you're done you'll have a light imprint of the flange, bore, and mounting holes. Compare it with the old gasket scraps and with the carb flange itself. Be particularly careful not to cover any orifice that isn't supposed to be covered. The hardest gasket to make is the long, thin bowl gasket that goes between the carb body and bowl. You might get away with using fuel-resistant RTV. A better option is to have this gasket on hand, either from a spare carb kit or a handful of identical spare gaskets. If the fuel has any water in it, and that water gets into the carb, then sits for any length of time chances are good that the needle will be corroded and need replacement. The same goes for that tiny little wire hanger for the needle, and the brass floats that were common in older engines. With many of the newer engines/carbs, it isn't such a big deal because the needles are often rubber tipped(as yours is), and the floats are plastic. Older engines had steel needles, and used a rubber o-ring as a seat. >>> This is why I advise that folks try to avoid gas with ethanol if at all possible and also run the carb dry (using the fuel shutoff valve to kill the engine) because these two measures go a long way towards preventing corrosion and other problems. Alcohol and aluminum really aren't a good mix, and moisture and steel are even worse. Folks, remember that ethanol absorbs water from the atmosphere (eg, it is hygroscopic) and will literally accumulate water in the fuel in your carb as it sits there. ALL engines should have an inline fuel filter. All of the gensets I have feature a small screen over the fuel line in the gas tank, but I install a white inline filter anyway. White filters have a finer mesh than the red ones. >>>Agree 100%. I didn't know about the different colors of filters–– that's useful. I normally use clear filters designed for small engines, mowers, and tractors. For the uninitiated, it doesn't matter how big your machine is. What matters is that you size the filter to the power output (and thus the fuel flow requirement.) A 16hp farm tractor like a Farmall A needs the same amount of fuel flow as a 16hp generator engine, despite the 2000 lb weight difference between the two. The float has to be set correctly or you'll end up with either too much or too little fuel. Turn the carb upside down with the float installed. The float should set level, or the free end should be slightly high. You have to bend the metal tab that the needle bears against to adjust the float. Even if you haven't replaced it, it's still a good idea to check since you've got it apart anyway. Your carb doesn't appear to have an adjustable float...I've never torn down one that didn't. >>>That's correct, and unfortunately it is very common for recent carbs to lack many of the adjustments older carbs had. On the plus side, these floats aren't supposed to fall out of adjustment. On the negative, of course there will sometimes be float problems. The most common float problem these days with plastic floats is a perforated or leaky float that fills up with fuel and then won't float up to apply pressure to the needle. When you take apart a carb, remove the float and shake it. If it sloshes it's toast. There cannot be any fluid in the float if it is to operate correctly. In a pinch, you might be able to find the crack or hole and seal it as a temporary fix. I'd drill a hole in the top, then blow air into the hole while holding the float under water to find the leaky spot, then seal the hole I drilled and the hole I found. Obviously this is a very temporary fix and you'd need a new float ASAP. In my experience, plastic floats fail less often than soldered brass floats, but anything is possible. As an aside, for a carb with a level specified in fractions of an inch you can use a drill bit of the proper size as a feeler gauge to set the float height. Works great. Removal of the throttle and choke shafts is not required for the majority of carb rebuilds. The screws that hold the butterfly on the throttle shaft are tiny, and have correspondingly tiny threads. They will strip very easily. If removing the shaft is absolutely required, then be sure to install the butterfly exactly the same way it was removed...and be sure that the shaft can be turned to the "closed" position in order to align the butterfly properly with the bore before tightening the screws. >>>This is a good point. If the throttle plate can't close the engine will run away and destroy itself when you start it up, just like a malfunctioning governor. I like to dip the carb for a long time in really nasty chemicals, so I remove any plastic parts. I miss carbs that were made of all metal parts with a few soft seals. They were much easier to dip. For main jet removal, grind the screwdriver ROUND on the sides. If you don't, you'll often damage the threads in the main jet bore...possibly beyond the point of being usable. >>>This one really surprised me. It was really, really tight, and there's no heavy corrosion or varnish inside to cause it. I suspect it was either cross-threaded or permanently thread-locked (maybe to get through emissions rules for imports?) I've never had one this tight before. If it ever gets badly gunked-up I'll be in trouble. I know squat about the chinese engines or carbs, same goes for the honda engines. If they're similar to domestic small engines, start with the idle mix screw about 1.25 turns out from bottom. IOW, turn the screw in lightly until it bottoms, and then back it out 1.25 turns or so. Adjust as required after getting the engine running. Some engines also have a high speed mix adjustment, and IME, you'll have to set the idle mix properly before adjusting the high speed. Use the same general rule of 1.25 turns out from bottom for the high speed screw. >>>Along the same lines as the non-adjustable float, many newer carbs don't have adjustable idle or main jets. Older carbs have needle screws that can be tightened or loosened to adjust fuel flow throw that particular jet, but that has mostly gone away due to EPA environmental crap. Also, newer carbs are set to run leaner than they really should and it is often not straightforward to correct this. For example, the adjustment screws on new Walbro carbs for chainsaws, weedeaters, etc. have plastic cam guards on them that only allow maybe 30 degrees of adjustment. In order to get a rich enough mix on my saw (after seeing evidence of detonation), I had to pull off the guards, make the adjustment, and then press the guards back on. This is all really ridiculous. The carb in this write-up also has no adjustments on the main or idle jets. They are preset at the factory based solely on the jet diameter. There is literally no way to adjust them without boring them out or replacing them. |
|
|
|
[#34]
Older carbs have needle screws that can be tightened or loosened to adjust fuel flow throw that particular jet, but that has mostly gone away due to EPA environmental crap. Yep, the econazies have ruined just about everything that works. 
|
|
|
|
[#35]
Quoted:
Older carbs have needle screws that can be tightened or loosened to adjust fuel flow throw that particular jet, but that has mostly gone away due to EPA environmental crap.
Yep, the econazies have ruined just about everything that works. And we keep happily voting for them -guaranteed. Crazy aren't we? |
|
|
|
[#36]
Excellent write up.
Quick comment to add. When you put the throttle plate screw back in, I highly recommend using some loctite and if originally equipped...I'd use a new lockwasher. I've worked on quite a few engines in my lifetime that had a screw come out of the throttle plate. It immediately gets sucked into the head. If you are lucky, it gets stuck in the intake valve and damages the valve. I've seen them get past the valve (damaging it) then into the head. If there isn't a lot of clearance between the head and the piston, usually the screw gets imbedded in either the head or the top of the piston. Rarely but occasionally, the screw punctures the piston itself. |
|
|
|
[#37]
Quoted:
recommend using some loctite Loctite BLUE, to be specific. use RED and you are going to be cursing the next time you have to take it apart. ar-jedi |
|
|
|
[#38]
Quoted: Quoted: recommend using some loctite Loctite BLUE, to be specific. use RED and you are going to be cursing the next time you have to take it apart. ar-jedi If you're talking actual LocTite brand, absolutely. Other brands do not necessarily use the same color coding though, unfortunately. I have some medium strength threadlocker of a different brand that is red. IIRC, the blue stuff was high strength. |
|
|
|
[#39]
Quoted: Quoted: Quoted: recommend using some loctite Loctite BLUE, to be specific. use RED and you are going to be cursing the next time you have to take it apart. ar-jedi If you're talking actual LocTite brand, absolutely. Other brands do not necessarily use the same color coding though, unfortunately. I have some medium strength threadlocker of a different brand that is red. IIRC, the blue stuff was high strength. The thread-locker is a really good point and I should have included that in the writeup. I'll rectify that shortly. For anyone not too familiar with small engines, these things make great miniature dynamic test stands. They'll shake anything insubstantial to pieces in short order. They can definitely loosen a threaded fastener. ETA: I've added a note about using thread-locker here and an explanation of why. Thanks, ColtRifle and everyone else. |
|
|
|
[#40]
This is an awsome write up! Thanks for taking the time. I am cursed when it comes to small engines and carbs. I have never had any luck with them.
Question.. I have a old (25-30 yrs old) craftsman 5000k with a 10 horse Tecumseh. HM100. Bought a new carb for it years ago and installed it during the power outage due to the storms. (Im in N.AL also) Ran like a dream for a week. LOUD but was glad to have it. Had a one gallon tank was the only problem. So after power was restored I decided to be better prepaired for the next time and ordered a larger tank from suplus supply and installed it. Poured some bad gas in it (water).  Drained tank, flushed line, replaced fuel filter, opened up carb, removed neddle cleaned, replaced fuel filter. Cranks and Runs GREAT! However after running for about 10-15 mins it leans out and dies. Im baffled! When the sputtering starts after 10-15 min I can keep it running by playing with the choke. This tells me it is leaning out, correct? Let it sit for a while and it will crank right up and run another 10-15 min and die. Drained tank, flushed line, replaced fuel filter, opened up carb, removed neddle cleaned, replaced fuel filter. Cranks and Runs GREAT! However after running for about 10-15 mins it leans out and dies. Im baffled! When the sputtering starts after 10-15 min I can keep it running by playing with the choke. This tells me it is leaning out, correct? Let it sit for a while and it will crank right up and run another 10-15 min and die.
Any ideas on what would cause it to run great for 10-15 mins and then lean out and die? Thanks in advance for any advice! |
|
|
|
[#41]
Check your fuel supply. Make sure that you have good flow to the carb. As long as the carb is clean and working correctly, I would check the fuel lines and filter to make sure that they aren't plugged up. Also, something that interests me...you said that you put a new tank on it. Check the tank cap. The tank must be vented to allow the fuel to flow. If the cap is plugged, as the fuel runs out of the tank, vacuum will build up in the tank preventing proper running.
|
|
|
|
[#42]
Quoted:
This is an awsome write up! Thanks for taking the time. I am cursed when it comes to small engines and carbs. I have never had any luck with them. Glad to help. Your luck just changed. Question.. I have a old (25-30 yrs old) craftsman 5000k with a 10 horse Tecumseh. HM100. Bought a new carb for it years ago and installed it during the power outage due to the storms. (Im in N.AL also) Ran like a dream for a week. LOUD but was glad to have it. Had a one gallon tank was the only problem.
So after power was restored I decided to be better prepaired for the next time and ordered a larger tank from suplus supply and installed it. Poured some bad gas in it (water). Drained tank, flushed line, replaced fuel filter, opened up carb, removed neddle cleaned, replaced fuel filter. Cranks and Runs GREAT! However after running for about 10-15 mins it leans out and dies. Im baffled! When the sputtering starts after 10-15 min I can keep it running by playing with the choke. This tells me it is leaning out, correct? Let it sit for a while and it will crank right up and run another 10-15 min and die.
Any ideas on what would cause it to run great for 10-15 mins and then lean out and die? Yeah, that sounds a lot like fuel being consumed from the carb bowl faster than it can be replaced by fuel from the inlet through the needle valve and seat. I had the same problem with Briggs motor on a lawnmower this Spring. It was an eight year old mower with the old seal materials that were not compatible with ethanol. My seat o-ring (which on that Briggs acted as a seal for a solid metal needle) swelled until the inlet was only a pinhole and not enough fuel could come through. If the motor sat for a while the slow drip of fuel through that pinhole opening would fill the carb, so it would start and run ok for a short time, but when the fuel in the bowl was depleted the engine would go lean, lose power, and vary its running speed in galloping spurts before dying. Then, once dead, it's difficult or impossible to restart unless you walk away for a period of time long enough for the bowl to refill. You can tear it down and check the seals on the carb for swelling, particularly that o-ring if that carb uses one. If it uses a plastic-tipped needle sealing against a brass seat you might have varnish, dirt, or other stuff clogging that seat. I like to test fuel flow through the seat by doing the following: 1. Make sure the fuel shut-off valve is turned to 'off'. 2. Remove the bowl from the carb, but leave the float, float pin, and needle installed. 3. Put a small bucket or tub under the carb to catch spilled fuel. 4. Push the float upwards gently to close the needle and seat, then turn on the fuel at the shut-off valve while holding the float up. No fuel should flow. 5. Let the float all the way down and check to see that there is a decent amount of flow. It should be a fast drip, at least, to a small trickle. It should not be a slow drip. If you get to step 5 and find no flow or very slow flow, check the seat o-ring or plastic-coated needle tip. Either can swell and slow down flow. You can also get blockages around the needle and seat, or the float may be stuck in the 'up' (fuel flow shut-off) position. Another consideration here since you replaced your fuel tank–– is the carb getting sufficient fuel pressure? There is no pump or other driving mechanism to create fuel pressure, so gravity does the work. If you set the new tank at a lower level than the old tank there may be too little fuel pressure. I'm betting these things only need a few ounces of pressure to work since fuel flow is very small and the fuel lines are relatively large (similar to natural gas plumbing with very low pressure). If the tank is too low you could have a net negative fuel pressure, where fuel would flow away from the carb and back into the tank. I doubt this is the problem since your engine runs some of the time, but I thought I'd mention it. PS - We're in Huntsville, so if you're a local and want a hand troubleshooting some time give me a yell via IM. (edited for spelling) |
|
|
|
[#43]
Outstanding. Thanks.
The article mentioned a copper wire strand as an orifice cleaning tool. The easiest/best thing I have found has been a bread bag twist tie. Burn an inch of the paper material off one end. Seems to be just the right size for that real tiny hole in the main jet. |
|
|
|
[#44]
Here's something out of left field about bad/torn carb gasket material and field expedient fixes –– you can call me stupid if you want. Piston airplanes have been using an assembly lube/gasket material replacement/general avgas-safe stick-um called "fuel lube" for all of my life (that I was paying any attention). Hylomar (a UK company) developed it for Rolls Royce (turbine engine use, I think) and it wound up being used as a gasket material by RR motor cars as well as lots of people in general aviation. Permatex sold it in the US until recently, and now Hylomar USA sells it directly. There is a similar product called EZ Turn. You can even put it on cork gaskets to make them last longer.
Would this be good to have around in case you needed to make a gasket? I can tell you that 100LL avgas (which can be 20% toluene) doesn't do a thing to it. I can get part numbers if anyone is curious. |
|
|
|
[#45]
Quoted:
Here's something out of left field about bad/torn carb gasket material and field expedient fixes –– you can call me stupid if you want. Piston airplanes have been using an assembly lube/gasket material replacement/general avgas-safe stick-um called "fuel lube" for all of my life (that I was paying any attention). Hylomar (a UK company) developed it for Rolls Royce (turbine engine use, I think) and it wound up being used as a gasket material by RR motor cars as well as lots of people in general aviation. Permatex sold it in the US until recently, and now Hylomar USA sells it directly. There is a similar product called EZ Turn. You can even put it on cork gaskets to make them last longer. Would this be good to have around in case you needed to make a gasket? I can tell you that 100LL avgas (which can be 20% toluene) doesn't do a thing to it. I can get part numbers if anyone is curious. I'm not going to call you stupid. I like having extra tools in my toolbox. I'm not familiar with that one. I know there's an aviation gasket sealer that some guys really love that's more like a lacquer or paint than RTV. Does that sound like the stuff? The guys that use it swear it makes the best seal but also say it's a pain in the neck to remove. Like sanding or scraping paint vs. scraping RTV. I'm partial to ultra black or ultra grey RTV, and particularly the stuff Honda sells as Hondabond and a different product that Toyota sells as FIP Gasket (Form In Place). Hondabond and FIP are the two best RTVs I've used. I really don't like using any sort of sealant on small engine carbs if I can help it. I do keep a roll of resin-impregnated paper gasket material for cutting my own gaskets. It comes in handy often. There are three places I can foresee needing a gasket in a pinch: 1. At the junction between carburetor and engine intake port. A bad seal here would cause a lean running condition. 2. Where the bowl seals around the carb. This is a tough one because it's normally a large diameter, thin gasket or o-ring. It would be difficult to cut one of these from sheet. I've always thought I could seal this with RTV, but it would make a mess and you'd have a lot of clean-up when you went back with the correct gasket. These can be very easy to tear during disassembly, particularly if it has any age on it. 3. The bottom of the bowl where the screw attaches the bowl to the carb. This is an easy one–– cut it from a sheet or even substitute an o-ring. These are often reusable anyway. (edited for spelling and bullet spacing) |
|
|
|
[#46]
Quoted:
Outstanding. Thanks. The article mentioned a copper wire strand as an orifice cleaning tool. The easiest/best thing I have found has been a bread bag twist tie. Burn an inch of the paper material off one end. Seems to be just the right size for that real tiny hole in the main jet. That will work, and I've used similar, but be careful not to scratch or gouge small aluminum orifices. If you enlarge them even a little it can change your mix. I only recommend copper wire because I think it's more difficult to mess up your aluminum carb body with it by accident. It's also easy to get a piece of the right size by stripping the insulation off of a spare piece of stranded automotive electric wire. |
|
|
|
[#47]
Quoted:
Check your fuel supply. Make sure that you have good flow to the carb. As long as the carb is clean and working correctly, I would check the fuel lines and filter to make sure that they aren't plugged up. Also, something that interests me...you said that you put a new tank on it. Check the tank cap. The tank must be vented to allow the fuel to flow. If the cap is plugged, as the fuel runs out of the tank, vacuum will build up in the tank preventing proper running. I did do that. Waited till it was running rough and opened cap. No change. Also pulled the line off the carb and noticed no flow difference between cap on and cap off. Good Eye though! Im sure its something simple that I have missed. |
|
|
|
[#48]
Great idea! never thought to pull the bowl with carb attached. I will give that a try tomorrow.
When took the carb off I removed the bowl, float, and needle. the needle is shiny metal, and I didn't see any oring down in the hole where the needle goes. Hmmmm. Also tank is mounted on top like a standard genny set up so it is well above the carb. Actually the bottom of the tank is 6-8 inches above the carb. I added this tank...http://cgi.ebay.com/4-5-GALLON-GENERATOR-UNIVERSAL-FUEL-GAS-TANK-28-1783-R-/270695482592?pt=LH_DefaultDomain_0&hash=item3f06b544e0 Then found out that it had a metric thread on the port. So i ordered a Briggs fuel shut off that fit it. It had a tiny hole for fuel to pass thru, barely a dribble. Drilled it out to a 3/16, now it is just a fitting, no shutoff capability anymore, . Im getting pretty good flow at the carb when I pull the hose off. I think it is a carb/trash problem, but what do I know.
Thanks again for the tips. |
|
|
|
[#49]
Quoted:
Quoted:
Here's something out of left field about bad/torn carb gasket material and field expedient fixes –– you can call me stupid if you want. Piston airplanes have been using an assembly lube/gasket material replacement/general avgas-safe stick-um called "fuel lube" for all of my life (that I was paying any attention). Hylomar (a UK company) developed it for Rolls Royce (turbine engine use, I think) and it wound up being used as a gasket material by RR motor cars as well as lots of people in general aviation. Permatex sold it in the US until recently, and now Hylomar USA sells it directly. There is a similar product called EZ Turn. You can even put it on cork gaskets to make them last longer. Would this be good to have around in case you needed to make a gasket? I can tell you that 100LL avgas (which can be 20% toluene) doesn't do a thing to it. I can get part numbers if anyone is curious. I'm not going to call you stupid. I like having extra tools in my toolbox. I'm not familiar with that one. I know there's an aviation gasket sealer that some guys really love that's more like a lacquer or paint than RTV. Does that sound like the stuff? The guys that use it swear it makes the best seal but also say it's a pain in the neck to remove. Like sanding or scraping paint vs. scraping RTV. I'm partial to ultra black or ultra grey RTV, and particularly the stuff Honda sells as Hondabond and a different product that Toyota sells as FIP Gasket (Form In Place). Hondabond and FIP are the two best RTVs I've used. I really don't like using any sort of sealant on small engine carbs if I can help it. I do keep a roll of resin-impregnated paper gasket material for cutting my own gaskets. It comes in handy often. There are three places I can foresee needing a gasket in a pinch: 1. At the junction between carburetor and engine intake port. A bad seal here would cause a lean running condition. 2. Where the bowl seals around the carb. This is a tough one because it's normally a large diameter, thin gasket or o-ring. It would be difficult to cut one of these from sheet. I've always thought I could seal this with RTV, but it would make a mess and you'd have a lot of clean-up when you went back with the correct gasket. These can be very easy to tear during disassembly, particularly if it has any age on it. 3. The bottom of the bowl where the screw attaches the bowl to the carb. This is an easy one–– cut it from a sheet or even substitute an o-ring. These are often reusable anyway. (edited for spelling and bullet spacing) If it's blue, that's the one. |
|
|
|
[#50]
Outstanding!
Thanks for the tutorial.
|
|
|
 Win a FREE Membership!
Sign up for the ARFCOM weekly newsletter and be entered to win a free ARFCOM membership. One new winner* is announced every week!
You will receive an email every Friday morning featuring the latest chatter from the hottest topics, breaking news surrounding legislation, as well as exclusive deals only available to ARFCOM email subscribers.

AR15.COM is the world's largest firearm community and is a gathering place for firearm enthusiasts of all types.
From hunters and military members, to competition shooters and general firearm enthusiasts, we welcome anyone who values and respects the way of the firearm.

Subscribe to our monthly Newsletter to receive firearm news, product discounts from your favorite Industry Partners, and more.
Copyright © 1996-2024 AR15.COM LLC. All Rights Reserved.
Any use of this content without express written consent is prohibited.
AR15.Com reserves the right to overwrite or replace any affiliate, commercial, or monetizable links, posted by users, with our own.