|
Posted: 1/8/2009 12:52:06 PM EDT
Maybe this is common knowledge, but I figured I'd post a quick how to.
Feel free to contact the mods to have it deleted if you like. Anyway, Here is how I build a beer (or soda) can alcohol stove that performs pretty well, being able to heat a pint of water in just a few minutes. You'll need: - 2 beer or soda cans of the same manufacturer - a scrap piece of 2x4 - Thumbtack - Utility knife blade - A Penny - A Nail (I used a 12d this time... What I had handy) - about a 4-5 inch piece of aluminum foil - A hammer, rock or some other bashing device - A can of dry gas. Other fuels will work, try them. This is what I had on hand. - Some 400 grit sandpaper helps, but with patience, isn't necessary. 
Start by drinking two beers or sodas (No, wait, use empties from last night since you want to be sober for the cutting of the cans.). Lay the razor blade on top of the 2x4 so you are cutting the bottom of the can at a height of 1 3/4 inches. Turn the can slowly and steadily to cut all the way through the can. 
Once both cans are cut, slice a small wedge out of the remains. This will be used as a 'shim' to help join the top and bottom section. 
Here's where the sandpaper comes in... Carefully (as you'll have very sharp edges on the two pieces or can) sand the inside of one can and the outside of the other. This will help to remove any burrs and will also flare the lips of the cans in opposite directions. This is the tricky part. Insert one can into the other. When you first try this you will swear a lot and say it can't be done. Use the 'shim' to help coax the two together. the top and bottom section have to be <i>almost</i> flat to accomplish this. IT CAN BE DONE (no pun intended). 
Once the inner is seated inside the outer can, simply push the two together until fully seated. 
Take your nail and punch a hole in the center of what is now the "top". This will be the inside can. Use the sandpaper to remove any burrs from the sharp edge of the outside can if you like. 
The thumbtack is now used to poke holes in the 'burner surface'. I put 4 holes in the uppermost rim (i.e. what the can rests on as it was sitting on your coffee table) at the 12, 3, 6, and 9 o'clock positions. Now, on the inside of the rim, 4 more holes between each of the holes you just poked. Finally, a series of 8 holes around the outside of the rim spaced between each of the already poked holes. When finished, you should have 16 holes in the burner surface of your stove. When making these holes, it is best to start small and gradually work them bigger by trial and error. 
Fold your tinfoil into a rough square. Center a tuna can on this square and fold up the sides of the foil and sort of 'mold' the foil to the shape of the can. Or, just open the tuna can and eat it. Wash the can and dry it. This will become the base / preheater for your stove. 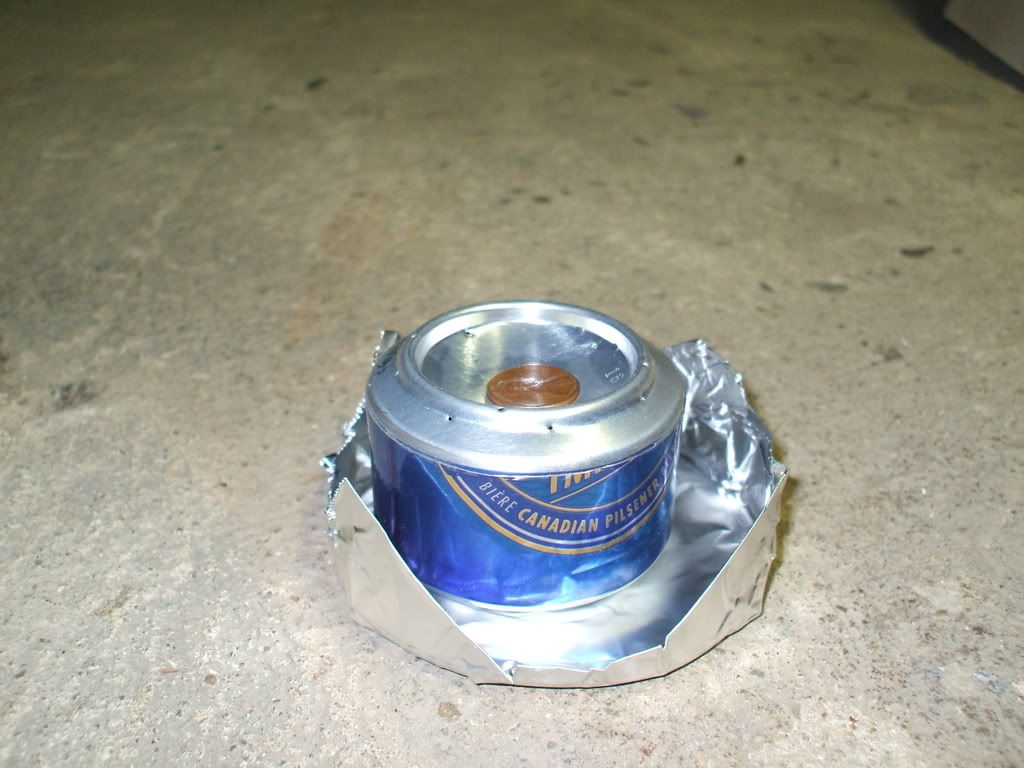
Place the stove in the center of the base and pour about 1 oz of drygas into the hole poked with the nail. Set the penny on top of the burner as to cover the hole. A self tapping screw can also be used for this, but I think pennies are a bit easier to come by... I have also used the gelled alcohol used in fondue pots and am going to try hand sanitizer as this is mostly alcohol. Pour a 'splash' of alcohol into the base. Light with a bic or match and keep the stove out of the wind. A windscreen is very helpful for this. Within about 30 seconds or so, the base alcohol will heat the stove and begin to vaporize the alcohol contained within. Since the penny is covering the large hole, the alcohol vapors are forced out the small thumbtack burner holes and ignited. Now, the stove is self-perpetuating and will continue to vaporize, eject and burn the alcohol. Burn time on 1 oz of drygas is like 6-7 minutes. I'll get back to you on boil times and capacities... Arrange tent stakes, EMPTY mags, or whatever you have available to support your cooking vessel and make your self some warm water. I have been able to boil with one of these, but the water has to be not almost freezing to begin with... And, not a lot of it. This stove in no way compares to an MSR Pocket Rocket or a Coleman White Gas Stove, but in a pinch, it will work for a small amount of ambient heat or to heat water for cooking. Bottom line, beer or soda cans can be found anywhere. With a little patience, and minimal tools, you CAN (again, no pun intended) heat water field expediently. Please let me know if I left anything unexplained or you have a question. I have made several of these little stoves and would be more than happy to help!! Thanks for looking. Drew |
|
|
|
[#1]
looks like someone was flipping throught the clips in the Israeli girl post haha
|
|
|
|
[#2]
some other good examples and methods of this here: Xcolony
|
|
|
|
[#3]
Quoted:
looks like someone was flipping throught the clips in the Israeli girl post haha Just putting out some info that I had and thought others could use, Dick. |
|
|
|
[#4]
Quoted:
Quoted:
looks like someone was flipping throught the clips in the Israeli girl post haha Just putting out some info that I had and thought others could use, Dick. yeah...dick 
thanks for the how to...the beer/soda can deal comes and goes but its a good topic helps folks get a good,lightweight cheap stove for their BOB's! |
|
|
|
[#5]
Nice writeup.
Just need some pictures of the stove lit. |
|
|
|
[#6]
How does this measure up to the heineken penny stove? I made one of those a while back and it easily boiled a pot of water. I even cooked a cup of rice with it (real rice not instant) and it handled it great. A little aluminum tubing and a wire hanger are all you need to make a pot stand to cook on. Cut the top and bottom off of another can and split it down the middle to make a windscreen. All of this will easily fit inside of a cooking pot in your bob.
|
|
|
|
[#7]
If you want to avoid cutting- I find it tedious and unnecessary- use an empty Sterno can (or something similar with a removable top) drill 16-24 holes with a sewing needle .025-.030 in diameter around the top or side, fill, prime...you know the drill.
|
|
|
|
[#8]
I boiled a cup of water in about 5 minutes in a soup can @1 inch above the flame. No windscreen as there was no wind in the basement... Pot holder, just a bent piece of wire coat hanger. I think with a wider based can such as a tomato sauce can or something similar would decrease the boil time and (definitely) increase the capacity. I'll let you know.
PYRO: Sorry, my camera wont let me get a good pic of the flame. Flash drowns it out, no flash and it isn't visible in the pic. I would imagine that it is comparable to the heineken stove. Same concept. I have read elsewhere that it should be packed with fiberglass insulation. Never tried that, might have to. Yes, the sterno can stove saves the cutting and fitting, but for the sake of survivalism, I posted this as a SHTF sort of idea. I guarantee you can look in any trash can and find soda cans. Even in the unFree state of NY, where there is a deposit on cans, they are easy to find. I put this one together in about 20 minutes with stuff that was lying around. |
|
|
|
[#9]
I've never seen mention of this priming operation before and have never done anything with my Svea alchohol stove but shake it up and light it. Is this absolutely necessary as it looks like a good way to catch some stuff on fire.
Seems like I've also seen this done using fiberglass insulation inside as a wick. |
|
|
|
[#10]
Finally! a good reason to keep beer in my BOB
|
|
|
|
[#11]
Quoted:
Finally! a good reason to keep beer in my BOB +1 on that. |
|
|
|
[#12]
Super Cat Alcohol stove are much easier to make and they work just as well!
Super Cat Alcohol stove rocks |
|
|
|
[#13]
I went ahead and made one and tested it out with the cooking kit that I keep in my BOB. It fits perfectly under the pot stand. I filled the pot up and the water was boiling within 5 minutes. It's been going for a good 10 minutes or so and it's still burning. I used maybe a shot of everclear. One thing you should keep in mind when you're making one of these stoves is whether or not your can has a number stamped to the bottom of it. It can kill the seal that the penny makes. The one that I used is now warped because I didn't bother to sand down those numbers. Here's the setup in action:

And in the dark (sorry for the crappy pic): 
Not being one to let a perfectly good shot of everclear go to waste I threw some ramen, celery and carrots into the pot. 
|
|
|
|
[#14]
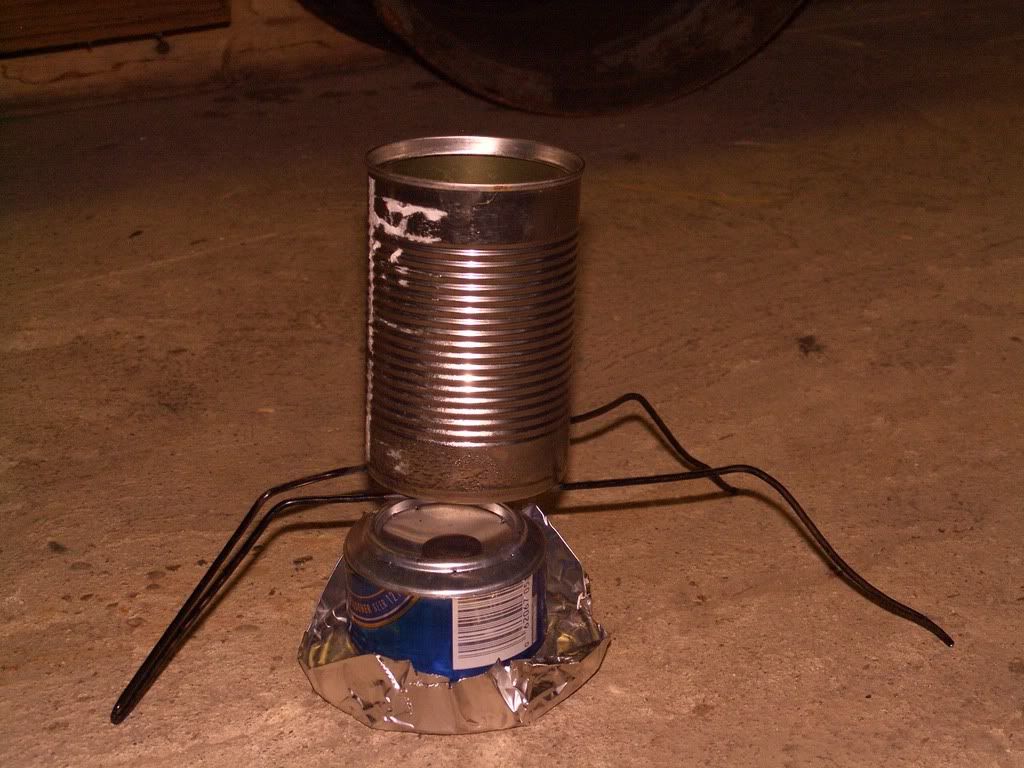
Heres a "poor mans beer and bean can cooking kit" made for me by "Beater AR"
This is what it looks like when you pull it out. It fits good in a TT large utility pouch with a little room to spare. 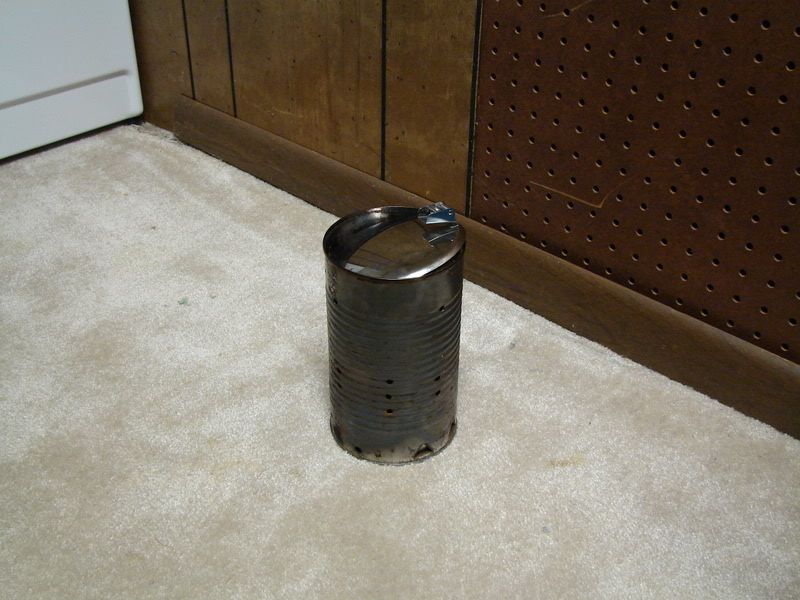
Heres the contents, I think that is an 8oz water bottle we got out of some vending machine. Fit in there pretty good still allowing room for the stove, a wider and flater means of carrying the fuel would be better. Besides it doesnt carry enough fuel for more than 2 or 3 cooks in my opinion. The rag is mostly there to keep the contents from jingling around. 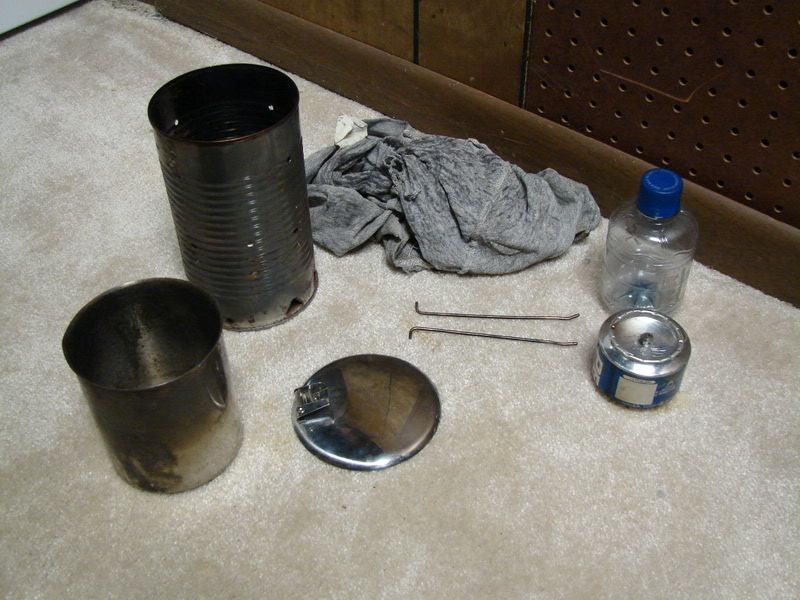
The stove is built just like the at the top. But a screw is used as a plug instead of a penny. 
The can, if I remember correctly, is a large bush's baked beans can. Vents in the bottom and holes in side for adjusting the heat by rising or lower the "cook pot". The "cook pot" was a grease strainer I got from wallmart that had a wire handle and a strainer that slipped into the top of it. I orginally intending to use it like a canteen cup but the wire handle broke off the first time I tried heating it. I ditched the strainer part but kept the lid, it helps heat stuff up quicker. 
Heres how you use it. Fill the stove up and set in the bottom. Splash just a little bit of extra fuel on top of the stove and around the sides. Two pieces of coat hanger go through the holes in the side of the can. Then you light it through the vent hole in the bottom. 
Put the "cook pot" in 
Put the lid over it... 
... and in about 2 or 3 minutes you have boiling water Very windproof, and lets out very little light The best fuel we have found to use is "Heet" in the yellow bottles (not the red ones) does not burn sooty like isopropyl and its only about $1.25 a bottle 
|
|
|
|
[#15]
arfarf
That's a great looking setup from found goods!! Albeit, only a single person operation. I like the windscreen and adjustability of the pot above the flame. Are you able to simmer on yours?? Also, the fact that it cuts on the light thrown is nice... My only fear is that you might get a "flare up" kind of like when the gas range is on for a second before the igniter kicks on... Any problems with this??  Thanks for a great looking BOB cook set! |
|
|
|
[#16]
Alcohol stoves FTW!
OpusxKC got into making those things like crazy, and then he and I both wound up buying several Swedish mess kits from SG. While being pretty heavy, the Swedish mess kit is the way to rock an alcohol stove. When you run out of fuel, you can use that stainless steel pot over a campfire real easy. |
|
|
|
[#18]
I still have not built one of these yet... I need to give it a go, perhaps this weekend with the kids?
|
|
|
|
[#19]
Quoted:
arfarf That's a great looking setup from found goods!! Albeit, only a single person operation. I like the windscreen and adjustability of the pot above the flame. Are you able to simmer on yours?? Also, the fact that it cuts on the light thrown is nice... My only fear is that you might get a "flare up" kind of like when the gas range is on for a second before the igniter kicks on... Any problems with this??
Thanks for a great looking BOB cook set! There is holes near the very top of the can, somewhat of a simmer setting. Mostly we used it to heat up water for mountain house meals, mashed potatos and heating pork and beans. If I remember correctly it took about 2-3 minutes to boil water in a cold enviroment. You do get somewhat of a flare up when first started, its not very big though. Never burned my eyebrows off lol Depends on how much fuel you splash in there. ETA: I havent used this thing in like a year, so one of these nights that Im not working I'll fire it up and get some pics and time a boil |
|
|
|
[#20]
Rock and roll!! I am going to try and replicate the setup you have. Seem a lot more efficient way to get the "Home (away from home) Fires Burning"....
Sorry. No really. That can setup looks great. I'll keep you posted. |
|
|
|
[#21]
Those aluminum beer bottles must be location specific- I cant find them anywhere.
I wanted to make a 'Whitebox" clone as well. |
|
|
|
[#22]
tagaroo!
|
|
|
 Win a FREE Membership!
Sign up for the ARFCOM weekly newsletter and be entered to win a free ARFCOM membership. One new winner* is announced every week!
You will receive an email every Friday morning featuring the latest chatter from the hottest topics, breaking news surrounding legislation, as well as exclusive deals only available to ARFCOM email subscribers.

AR15.COM is the world's largest firearm community and is a gathering place for firearm enthusiasts of all types.
From hunters and military members, to competition shooters and general firearm enthusiasts, we welcome anyone who values and respects the way of the firearm.

Subscribe to our monthly Newsletter to receive firearm news, product discounts from your favorite Industry Partners, and more.
Copyright © 1996-2024 AR15.COM LLC. All Rights Reserved.
Any use of this content without express written consent is prohibited.
AR15.Com reserves the right to overwrite or replace any affiliate, commercial, or monetizable links, posted by users, with our own.


