|
[#1]
1. If the transfer switch is install properly, the circuit breaker in the main panel handles the circuit regardless whether it is being fed from the power company or the generator. At the transfer switch, you select which source (utility or generator) you want to supply the power. The power is then fed to the circuit breaker at the main panel.
2. I would think that using Panel B would place 2 breakers on the circuit and would seem to be redundant. I'm sure there are cases where this might be required, but under normal situations it would probably be overkill. ETA: I have Panel A installed and it works just fine. |
|
|
|
[#2]
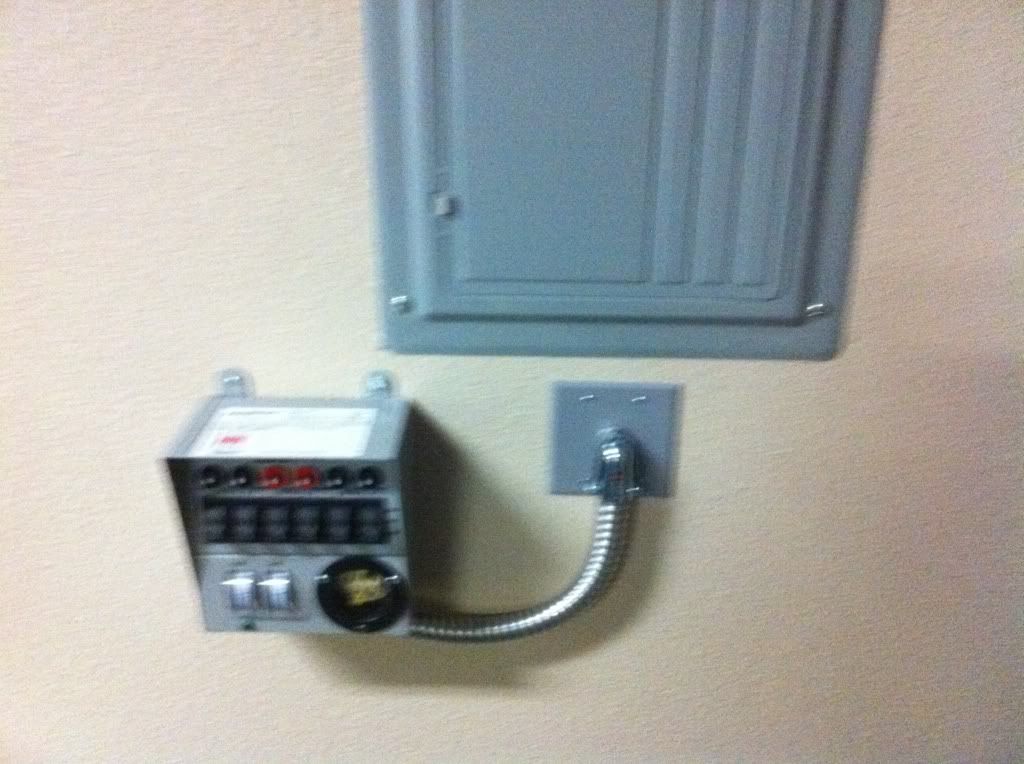
I installed this, I'll write more when I get time.
|
|
|
|
[#3]
Quoted:
I installed this, I'll write more when I get time. http://i299.photobucket.com/albums/mm297/hero2three/7b9924cb.jpg What is behind that cover plate? OP, as an electrician in NJ I have installed countless portable generator connections. I find limited circuit transfer panels to be an extremely poor value for my customers. Install an inlet on the outside of your house, run a 10-3 romex from the inlet to a 30A breaker inside of your panel, then install an interlock on your panel cover. I average 5 of these installations per week. Often the manufacturer of your panel will make an interlock and it will be inexpensive. If not you can order one from a third party such as interlockkit.com They are very good interlock but cost more ($165 shipped, still a great deal compared to a transfer panel). If you are going to have a generator running, why be limited to 6 or 10 circuits? If you are worried about overloading the generator, just shut off some breakers. It's still nice having the option to turn them on. Why not have all the lights in your house energized? All the receptacles? Why still have to use extension cords and flashlights? The generator is running so use it. My customers are always amazed at how much their small generator can power. And they always thank me for talking them into paying less for an interlock that provides a much greater value. Post pics of your panel and I'll let you know what interlock will work for it. |
|
|
|
[#4]
Quoted:
What is behind that cover plate? OP, as an electrician in NJ I have installed countless portable generator connections. I find limited circuit transfer panels to be an extremely poor value for my customers. Install an inlet on the outside of your house, run a 10-3 romex from the inlet to a 30A breaker inside of your panel, then install an interlock on your panel cover. I average 5 of these installations per week. Often the manufacturer of your panel will make an interlock and it will be inexpensive. If not you can order one from a third party such as interlockkit.com They are very good interlock but cost more ($165 shipped, still a great deal compared to a transfer panel). If you are going to have a generator running, why be limited to 6 or 10 circuits? If you are worried about overloading the generator, just shut off some breakers. It's still nice having the option to turn them on. Why not have all the lights in your house energized? All the receptacles? Why still have to use extension cords and flashlights? The generator is running so use it. My customers are always amazed at how much their small generator can power. And they always thank me for talking them into paying less for an interlock that provides a much greater value. Post pics of your panel and I'll let you know what interlock will work for it. Quoted:
Quoted:
I installed this, I'll write more when I get time. http://i299.photobucket.com/albums/mm297/hero2three/7b9924cb.jpg What is behind that cover plate? OP, as an electrician in NJ I have installed countless portable generator connections. I find limited circuit transfer panels to be an extremely poor value for my customers. Install an inlet on the outside of your house, run a 10-3 romex from the inlet to a 30A breaker inside of your panel, then install an interlock on your panel cover. I average 5 of these installations per week. Often the manufacturer of your panel will make an interlock and it will be inexpensive. If not you can order one from a third party such as interlockkit.com They are very good interlock but cost more ($165 shipped, still a great deal compared to a transfer panel). If you are going to have a generator running, why be limited to 6 or 10 circuits? If you are worried about overloading the generator, just shut off some breakers. It's still nice having the option to turn them on. Why not have all the lights in your house energized? All the receptacles? Why still have to use extension cords and flashlights? The generator is running so use it. My customers are always amazed at how much their small generator can power. And they always thank me for talking them into paying less for an interlock that provides a much greater value. Post pics of your panel and I'll let you know what interlock will work for it. The cover plate attached to the flex? Nothing is behind it. That's how I ran the wires up into my panel. |
|
|
|
[#5]
Quoted:
The cover plate attached to the flex? Nothing is behind it. That's how I ran the wires up into my panel. Is there a box behind the cover plate? Or did you just run the individual THHN conductors in the wall cavity and into a hole in the bottom of the panel? |
|
|
|
[#6]
Quoted:
Quoted:
I installed this, I'll write more when I get time. http://i299.photobucket.com/albums/mm297/hero2three/7b9924cb.jpg What is behind that cover plate? OP, as an electrician in NJ I have installed countless portable generator connections. I find limited circuit transfer panels to be an extremely poor value for my customers. Install an inlet on the outside of your house, run a 10-3 romex from the inlet to a 30A breaker inside of your panel, then install an interlock on your panel cover. I average 5 of these installations per week. Often the manufacturer of your panel will make an interlock and it will be inexpensive. If not you can order one from a third party such as interlockkit.com They are very good interlock but cost more ($165 shipped, still a great deal compared to a transfer panel). If you are going to have a generator running, why be limited to 6 or 10 circuits? If you are worried about overloading the generator, just shut off some breakers. It's still nice having the option to turn them on. Why not have all the lights in your house energized? All the receptacles? Why still have to use extension cords and flashlights? The generator is running so use it. My customers are always amazed at how much their small generator can power. And they always thank me for talking them into paying less for an interlock that provides a much greater value. Post pics of your panel and I'll let you know what interlock will work for it. Tried tha route already. My municipality electrical inspector said they do NOT approve the add-on interlock kits for thes reasons: 1) NEC requires the panelboard to be UL listed. 2) Interlock.com kits are not UL-listed - turns out they are merely tested to UL standards by Wyle Lab. 3) Wyler Lab lost its certification from OSHA. He said I could go with the transfer switch or buy a OEM cover with interlock from the factory that is UL approved. When I got my estimates these folks all quoted me and a OEM factory UL panel cover with a interlock. I have a Cutler Hammer panel and they make them, but to have been quoted $350 to $400, plus the breaker ($10-$20), 6' 10-3 in romex and inlet box ($100) and then $600-$900 to do the install puts me at $1100 to $1400 for what I was told would take less than 2 hours and has $350 in supplies is complete and utter BS. I don't pay my lawyer $350 a hour, I am sure as hell not paying an electrician that especially when the prevailing wage in NJ for an electrician foreman is $98 an hour. |
|
|
|
[#7]
Quoted:
Tried tha route already. My municipality electrical inspector said they do NOT approve the add-on interlock kits for thes reasons: 1) NEC requires the panelboard to be UL listed. 2) Interlock.com kits are not UL-listed - turns out they are merely tested to UL standards by Wyle Lab. 3) Wyler Lab lost its certification from OSHA. He said I could go with the transfer switch or buy a OEM cover with interlock from the factory that is UL approved. When I got my estimates these folks all quoted me and a OEM factory UL panel cover with a interlock. I have a Cutler Hammer panel and they make them, but to have been quoted $350 to $400, plus the breaker ($10-$20), 6' 10-3 in romex and inlet box ($100) and then $600-$900 to do the install puts me at $1100 to $1400 for what I was told would take less than 2 hours and has $350 in supplies is complete and utter BS. I don't pay my lawyer $350 a hour, I am sure as hell not paying an electrician that especially when the prevailing wage in NJ for an electrician foreman is $98 an hour. Your first mistake was telling an inspector Which model panel do you have? I just bought two different CH covers with interlocks for $136 and $150. I can hep you find what you need, I am in NJ as well. As for what the electrician charges, that's not an hourly wage, it's what the business charges. You need to pay the man that $98hr plus all the company overhead, and then the "evil" profit The inlet is $50: http://www.amazon.com/Reliance-Controls-PB30-Generator-Generators/dp/B000BQT47S/ref=sr_1_5?ie=UTF8&qid=1378905818&sr=8-5&keywords=inlet Don't forget the cord, here is a 10': http://www.amazon.com/Reliance-PC3010-Generator-7500-Watt-Generators/dp/B000HS2LBQ/ref=pd_sim_lg_1 Or a 20': http://www.amazon.com/Reliance-Controls-PC3020-Generator-Generators/dp/B000HS0HKI/ref=pd_sim_lg_2 The prices that you got do seem to be a bit high if the inlet is so close to the panel. Typically I start at $900 when the inlet is near the panel and no special fishing is required. That includes everything, all material and the cord. THat price goes up to $1,000 if the inlet is going to be further away and even higher if I need to spend time fishing the wire thru walls. But for what you've explained (6' of 10-3) it is very basic and easy. Like I said, give me your panel model number. |
|
|
|
[#8]
My older panel doesn't have a main breaker to switch off service power so I used a transfer switch and I installed it myself. it was easy and pretty quick. but I did play as a commercial apprentice electrician in a previous life.
to shut power off a circuit when running off Grid power, you would flip the breaker in your original panel or toggle the transfer switch to off or gen. I would probably pick "b" in your choices. although either would be fine. mine is like choice "A" though eta, the 6 circuits run the light and outlets in all but two bedrooms of my house. It also controls the Furnace and fridge. I have a portable A/C for the master bed room. 6 circuits has been enough. |
|
|
|
[#9]
Quoted:
to shut power off a circuit when running off Grid power, you would flip the breaker in your original panel or toggle the transfer switch to off or gen. I would probably pick "b" in your choices. although either would be fine. mine is like choice "A" though. and I installed it myself. it was easy and pretty quick, but I did play as a commercial apprentice electrician in a previous life. http://bat-caveonline.com/miscpics/transferswitch2.jpg http://bat-caveonline.com/miscpics/transferswitch1.jpg How much did you "play"? That flex isn't even connected correctly to your panel. |
|
|
|
[#10]
Quoted: How much did you "play"? That flex isn't even connected correctly to your panel. Quoted: Quoted: to shut power off a circuit when running off Grid power, you would flip the breaker in your original panel or toggle the transfer switch to off or gen. I would probably pick "b" in your choices. although either would be fine. mine is like choice "A" though. and I installed it myself. it was easy and pretty quick, but I did play as a commercial apprentice electrician in a previous life. http://bat-caveonline.com/miscpics/transferswitch2.jpg http://bat-caveonline.com/miscpics/transferswitch1.jpg How much did you "play"? That flex isn't even connected correctly to your panel. So, it is just a grommet. the box is too close for a connector. it a short piece to protect wire from the edges.  |
|
|
|
[#11]
That's the second incorrect and illegal installation shown in this thread.
Those bare THHN conductors can only be ran in an approved raceway, not free-air thru your wall cavity and a piece of flex duct is certainly not the way to bring those conductors into a metal enclosure. If people are going to post pictures, please put in large letters "THIS IS THE WRONG WAY TO DO THIS" so that no one else follows what they see in the pictures. |
|
|
|
[#12]
the metal flex comes with the transfer switch, it is prewired. mine uses a junction box to make the bend into the panel. it isn't just run into the wall.
there is nothing illegal or dangerous about it |
|
|
|
[#13]
Quoted:
the metal flex comes with the transfer switch, it is prewired. mine uses a junction box to make the bend into the panel. it isn't just run into the wall. there is nothing illegal or dangerous about it I've installed around 70-80 of those panels, I am aware of the pre-wired flex whip. You don't make bends with junction boxes and you don't use plastic flex duct as gaskets for conductors run free-air thru the wall. That installation requires approved raceways and connectors, which you haven't used. Your installation is illegal, dangerous, and just plain wrong. It's a "homeowner hack job". BTW, I see the orange low voltage ring behind the cover plate. That's not a "junction box", it's just a bracket to screw the cover plate into. |
|
|
|
[#14]
It's a low voltage junction box. comes in blue too, but they were out. using a junction box as a transitional raceway poses no hazards. the grommet vs. a connector isn't the best, but again. there is no danger in doing so. |
|
|
|
[#15]
Quoted:
It's a low voltage junction box. comes in blue too, but they were out. using a junction box as a transitional raceway poses no hazards. the grommet vs. a connector isn't the best, but again. there is no danger in doing so. Low voltage boxes are not rated for high voltage applications and for good reason, they are not fully enclosed. Junction boxes are not raceways. You have conductors running free-air in your wall cavity and coming thru a LO in the panel with only a piece of plastic flex-duct. For the last time, what you did is illegal, dangerous, and wrong. I just hope that people don't follow in your lead |
|
|
|
[#16]
 same plastic, different color. eta, except I don't have any conductors exposed in my wall. they are more protected than romex. I made a ~ 1/4" grommet out of plastic tubing to protect from the sharp edges. yes a connector would have been better. I set the box to close. |
|
|
|
[#17]
Those aren't UL listed. You didn't purchase those here anyway.
$50 says you installed one of these to hold the cover plate: http://knoji.com/images/user/low-voltage-open-box.jpg Even if you didn't, the installation is still illegal, dangerous, and wrong because you have bare THHN conductors coming out of a KO in the box, running thru the wall cavity, and then coming into a KO in panel- without using a raceway or connectors. You could try to justify your installation as much as you want, it's only you and your family that it effects. But I don't want to see someone copy it and get themselves or their family hurt or fail an inspection and cost themselves more money. joeyd16779, I am sorry for doing this in your thread, but when I see a dangerous and illegal homeowner hack job being promoted to other people, I simply can't ignore it. |
|
|
|
[#18]
Believe what you want. I didn't use a trim ring. there are no exposed wires in my installation and I never suggested doing so. eta, no that isn't the box I bought. just an easy picture. |
|
|
|
[#19]
Quoted: Believe what you want. I didn't use a trim ring. there are no exposed wires in my installation. He's being mean... By exposed wires he's talking about the individual red/black/white/ground inside the whip. Once it's inside you junction box, how do you transition up to the panelboard? If you just exit the junction box into the wall cavity, those wires are "bare"; they need to be inside an additional enclosure like more flex, rigid conduit, or romex... Without further reason to doubt you, I'll assume you knew what you where doing and installed your wiring in a safe manner as listed. |
|
|
|
[#20]
OP:
Both of those transfer boxes are really the same thing with a slightly different implementation. Panel A uses pop-up type circuit breakers (those little round button looking things), where Panel B uses traditional circuit breakers that you're used to seeing. Both do the same thing and offer the same protection. Both will offer redundant protection; the feed breaker in the main panel will provide protection for the entire circuit fed to your transfer switch sub-panel, the individual breakers in the transfer switch will provide smaller protection values for the individual circuits they feed. |
|
|
|
[#21]
Quoted:
He's being mean... By exposed wires he's talking about the individual red/black/white/ground inside the whip. Once it's inside you junction box, how do you transition up to the panelboard? If you just exit the junction box into the wall cavity, those wires are "bare"; they need to be inside an additional enclosure like more flex, rigid conduit, or romex... Without further reason to doubt you, I'll assume you knew what you where doing and installed your wiring in a safe manner as listed. Quoted:
Quoted:
Believe what you want. I didn't use a trim ring. there are no exposed wires in my installation. He's being mean... By exposed wires he's talking about the individual red/black/white/ground inside the whip. Once it's inside you junction box, how do you transition up to the panelboard? If you just exit the junction box into the wall cavity, those wires are "bare"; they need to be inside an additional enclosure like more flex, rigid conduit, or romex... Without further reason to doubt you, I'll assume you knew what you where doing and installed your wiring in a safe manner as listed. I'm not being mean. I could clearly see, without a doubt, that his installation is illegal. There are no questions about it. You can see the THHN entering the panel thru a piece of plastic flex-duct that was just shoved in there, so your assumption that he "installed his wiring in a safe manner as listed" is wrong. Any licensed master electrician will tell you the same thing. So when he posts it as an example to thousands of people that may view this thread, I feel it's my duty to inform everyone that it is absolutely NOT the way to do this installation. |
|
|
|
[#22]
Quoted: I'm not being mean. I could clearly see, without a doubt, that his installation is illegal. There are no questions about it. You can see the THHN entering the panel thru a piece of plastic flex-duct that was just shoved in there, so your assumption that he "installed his wiring in a safe manner as listed" is wrong. Any licensed master electrician will tell you the same thing. So when he posts it as an example to thousands of people that may view this thread, I feel it's my duty to inform everyone that it is absolutely NOT the way to do this installation. Quoted: Quoted: Quoted: Believe what you want. I didn't use a trim ring. there are no exposed wires in my installation. He's being mean... By exposed wires he's talking about the individual red/black/white/ground inside the whip. Once it's inside you junction box, how do you transition up to the panelboard? If you just exit the junction box into the wall cavity, those wires are "bare"; they need to be inside an additional enclosure like more flex, rigid conduit, or romex... Without further reason to doubt you, I'll assume you knew what you where doing and installed your wiring in a safe manner as listed. I'm not being mean. I could clearly see, without a doubt, that his installation is illegal. There are no questions about it. You can see the THHN entering the panel thru a piece of plastic flex-duct that was just shoved in there, so your assumption that he "installed his wiring in a safe manner as listed" is wrong. Any licensed master electrician will tell you the same thing. So when he posts it as an example to thousands of people that may view this thread, I feel it's my duty to inform everyone that it is absolutely NOT the way to do this installation. For some reason I was thinking that was the other guy who posted pics... My bad. I thought you were arguing about the fact he had an orange junction box. Typically those are LV, but I have started to see a few old work boxes that were orange at Lowes. |
|
|
|
[#23]
Quoted:
For some reason I was thinking that was the other guy who posted pics... My bad. I thought you were arguing about the fact he had an orange junction box. Typically those are LV, but I have started to see a few old work boxes that were orange at Lowes. Quoted:
Quoted:
Quoted:
Quoted:
Believe what you want. I didn't use a trim ring. there are no exposed wires in my installation. He's being mean... By exposed wires he's talking about the individual red/black/white/ground inside the whip. Once it's inside you junction box, how do you transition up to the panelboard? If you just exit the junction box into the wall cavity, those wires are "bare"; they need to be inside an additional enclosure like more flex, rigid conduit, or romex... Without further reason to doubt you, I'll assume you knew what you where doing and installed your wiring in a safe manner as listed. I'm not being mean. I could clearly see, without a doubt, that his installation is illegal. There are no questions about it. You can see the THHN entering the panel thru a piece of plastic flex-duct that was just shoved in there, so your assumption that he "installed his wiring in a safe manner as listed" is wrong. Any licensed master electrician will tell you the same thing. So when he posts it as an example to thousands of people that may view this thread, I feel it's my duty to inform everyone that it is absolutely NOT the way to do this installation. For some reason I was thinking that was the other guy who posted pics... My bad. I thought you were arguing about the fact he had an orange junction box. Typically those are LV, but I have started to see a few old work boxes that were orange at Lowes. If they were at Lowes then they were Carlon. Carlon's orange boxes are only rated for low voltage AFAIK. Look, I know I am being a bit of a dick here. But this hits home to me. It's like watching someone tell everyone else how you should clear a firearm by looking down the barrel. |
|
|
|
[#24]
Quoted: If they were at Lowes then they were Carlon. Carlon's orange boxes are only rated for low voltage AFAIK. Look, I know I am being a bit of a dick here. But this hits home to me. It's like watching someone tell everyone else how you should clear a firearm by looking down the barrel. Quoted: Quoted: Quoted: Quoted: Quoted: Believe what you want. I didn't use a trim ring. there are no exposed wires in my installation. He's being mean... By exposed wires he's talking about the individual red/black/white/ground inside the whip. Once it's inside you junction box, how do you transition up to the panelboard? If you just exit the junction box into the wall cavity, those wires are "bare"; they need to be inside an additional enclosure like more flex, rigid conduit, or romex... Without further reason to doubt you, I'll assume you knew what you where doing and installed your wiring in a safe manner as listed. I'm not being mean. I could clearly see, without a doubt, that his installation is illegal. There are no questions about it. You can see the THHN entering the panel thru a piece of plastic flex-duct that was just shoved in there, so your assumption that he "installed his wiring in a safe manner as listed" is wrong. Any licensed master electrician will tell you the same thing. So when he posts it as an example to thousands of people that may view this thread, I feel it's my duty to inform everyone that it is absolutely NOT the way to do this installation. For some reason I was thinking that was the other guy who posted pics... My bad. I thought you were arguing about the fact he had an orange junction box. Typically those are LV, but I have started to see a few old work boxes that were orange at Lowes. If they were at Lowes then they were Carlon. Carlon's orange boxes are only rated for low voltage AFAIK. Look, I know I am being a bit of a dick here. But this hits home to me. It's like watching someone tell everyone else how you should clear a firearm by looking down the barrel. Maybe they are, I've never examined them. I've just seen them in passing and noted they were full-enclosure and in the column of line-voltage boxes. |
|
|
|
[#25]
Just to throw out another option, what I was going to do at my house was a single circuit transfer switch that will handle 200amp utility and 60amp generator. That would have allowed me to use all of the circuits in my house without dealing with the fact that I have no main breaker.
|
|
|
|
[#26]
Quoted:
Just to throw out another option, what I was going to do at my house was a single circuit transfer switch that will handle 200amp utility and 60amp generator. That would have allowed me to use all of the circuits in my house without dealing with the fact that I have no main breaker. A transfer switch like that is expensive, starting at over $300 for cheap models. It's also a lot of work to install, for all intents and purposes you are doing a service change. You will have to re-route your service raceway and conductors thru the transfer panel. That transfer switch will become the new service disconnect for the house which means all the grounding will have to be moved to it and any neutral-ground bond in the old main panel will have to be separated. Sometimes this could be a big pain in the butt when you have 40 ground wires and 40 neutrals landed on the same neutral bars behind 40 branch circuits in a tight panel. The interlock is almost always the easiest way. Even if you had to pay $300 for the panel cover with the interlock, you still save on all the work that you don't have to do. I'm curious about your house, you say that you have no main breaker. I assume you mean that your main panel doesn't have a main breaker? If so, then there is most likely a main outside. You may be able to install an interlock on that main disconnect. I have done that a couple dozen times. |
|
|
|
[#27]
I have a surface mounted Cutler Hammer CH32B150J.
Eight breakers on the left (2 pairs of double pole)...........nine breakers on the right. I assume I would need a CH8KSM for a OEM interlock to be compliant? And basically then I: 1) move the top two right side breakers down. 2) insert a 2 pole 30 amp CH breaker in the top right 3) mount & wire the outlet box with 10/3/ground and run it in conduit (loca code) to the panel... 3) in the it has a combo ground/neutral bar so I would connect white to the neutral bar, red & black or red & red to to the breaker and ground to the neutral bar and pop the breaker in. 4) replace the cover with the new cover that has the integrated interlock |
|
|
|
[#28]
Quoted:
I have a surface mounted Cutler Hammer CH32B150J. Eight breakers on the left (2 pairs of double pole)...........nine breakers on the right. I assume I would need a CH8KSM for a OEM interlock to be compliant? And basically then I: 1) move the top two right side breakers down. 2) insert a 2 pole 30 amp CH breaker in the top right 3) mount & wire the outlet box with 10/3/ground and run it in conduit (loca code) to the panel... 3) in the it has a combo ground/neutral bar so I would connect white to the neutral bar, red & black or red & red to to the breaker and ground to the neutral bar and pop the breaker in. 4) replace the cover with the new cover that has the integrated interlock That's pretty much it, you already know what to do, no need to pay an electrician. That would give you the best value for your dollar. "it in conduit (loca code) to the panel..." I assume you mean that where you are going to be running the romex may be subject to physical damage? If so, you can sleeve it in a piece of PVC pipe. But don't complete the pipe because then it becomes a raceway and you can't run romex in it. The CH8KSM is correct and it sells for $169 from here: http://www.munroelectric.com/silvereclipse/index.jsp?path=product&part=628100 I'm not sure where you are in NJ, but see if there is a Turtle and Hughes close by and give them a call, they could usually get any CH panel cover for a reasonable price. Also, to be code compliant, you need to install a retainer for the breaker you are backfeeding, because that is going to be considered the main breaker when the generator is on. It's part number CH125RB and can be purchased here: http://www.elliottelectric.com/Products/Detail.aspx?v=CHD&c=CH125RB |
|
|
|
[#29]
I installed option B last year, just so I had a couple spare circuits, and used real breakers. I removed the 220 breakers and replaced with single 20 amp, wired in the circuits I wanted, Heat, fridge, freezer, lights, kitchen outlets, etc. Tried to balance the load the best I could. After testing I came real close on the balancing. Outside I mounted a generator input box, and poured a cement pad and installed one of those small plastic sheds. I did not do the full DIY generator house, I figured I could leave the shed open, or roll the gen out if needed.
Install of the panel was under two hours. When normal, the breaker in the panel box handles the load, when on Gen, the breaker in the panel handles the load. Panel B also gives you a "off" setting. |
|
|
|
[#30]
In my opinion and experience, there are only 2 benefits of using a limited circuit transfer switch opposed to an interlock system.
First is that the transfer switch is universal, you can connect it to just about any house. That means that if you are in a rush to get going before a storm you can pick one up at the store and connect it. For me, that means I only have to stock 1 item. I order them from Amazon and keep about a dozen in the shop at all times and 2 in the truck. When a storm rolls around, I can install them on the spot on anyone's panel. An interlock needs to be ordered for that specific panel which might take a week or two. Many panels won't have available interlocks. Often panels don't have enough space for the generator breaker. In these situations I'll install a new panel with interlock for the customer if they want to pay the added expense. The second benefit of a transfer switch is that it's more foolproof than an interlock. This doesn't apply to most people here because you have the basic knowledge to understand that you may have to shut some things off in order to not overload your generator. Typically I'll put a red dot next to larger loads like central AC units so that the customer could shut those breakers off too. When dealing with older people or people without any type of electrical inclination, the transfer panel is often a better value to them because those 6-10 circuits will limit how much they can power which also limits their chances of overloading the generator. The downfall is that they have a generator running which most likely has plenty of capacity to run other items in their house, but it's not connected to them so it's a waste. |
|
|
|
[#31]
Quoted:
Which model panel do you have? I just bought two different CH covers with interlocks for $136 and $150. I can hep you find what you need, I am in NJ as well. Like I said, give me your panel model number. you offered... post-Sandy, i have done two SquareD panels (mom's and sister's) using OEM interlock kits and they worked out great. installation was straightforward, the kits are relatively inexpensive, and it all just works. see the finished photos #2 and #3 at http://www.ar15.com/forums/t_1_5/1528213_Cheap_generator_to_home_connection_question_.html&page=1#i42525724 BUT: my brother has a CH panel and he's up next, and i'd like to use an OEM CH setup for him as well. so... what do i need? also, in an OEM CH setup, what panel positions does the backfed breaker (2 pole) occupy? ar-jedi 


|
|
|
|
[#32]
ps:
Quoted:
The CH8KSM is correct and it sells for $169 from here: http://www.munroelectric.com/silvereclipse/index.jsp?path=product&part=628100 btw, your link points to a CH8JSM, not a CH8KSM. ar-jedi |
|
|
|
[#33]
Quoted:
A transfer switch like that is expensive, starting at over $300 for cheap models. It's also a lot of work to install, for all intents and purposes you are doing a service change. You will have to re-route your service raceway and conductors thru the transfer panel. That transfer switch will become the new service disconnect for the house which means all the grounding will have to be moved to it and any neutral-ground bond in the old main panel will have to be separated. Sometimes this could be a big pain in the butt when you have 40 ground wires and 40 neutrals landed on the same neutral bars behind 40 branch circuits in a tight panel. The interlock is almost always the easiest way. Even if you had to pay $300 for the panel cover with the interlock, you still save on all the work that you don't have to do. I'm curious about your house, you say that you have no main breaker. I assume you mean that your main panel doesn't have a main breaker? If so, then there is most likely a main outside. You may be able to install an interlock on that main disconnect. I have done that a couple dozen times. Quoted:
Quoted:
Just to throw out another option, what I was going to do at my house was a single circuit transfer switch that will handle 200amp utility and 60amp generator. That would have allowed me to use all of the circuits in my house without dealing with the fact that I have no main breaker. A transfer switch like that is expensive, starting at over $300 for cheap models. It's also a lot of work to install, for all intents and purposes you are doing a service change. You will have to re-route your service raceway and conductors thru the transfer panel. That transfer switch will become the new service disconnect for the house which means all the grounding will have to be moved to it and any neutral-ground bond in the old main panel will have to be separated. Sometimes this could be a big pain in the butt when you have 40 ground wires and 40 neutrals landed on the same neutral bars behind 40 branch circuits in a tight panel. The interlock is almost always the easiest way. Even if you had to pay $300 for the panel cover with the interlock, you still save on all the work that you don't have to do. I'm curious about your house, you say that you have no main breaker. I assume you mean that your main panel doesn't have a main breaker? If so, then there is most likely a main outside. You may be able to install an interlock on that main disconnect. I have done that a couple dozen times. It was a weird setup. There was a panel outside with six breakers for the 220v circuits. There was another panel inside that ran the 110v circuits. I was told that since there were only six circuits that it didn't require a main. |
|
|
|
[#34]
that is a fubar method of installation if there are individual THHN wires in behind the sheetrock and they are not contained in a raceway. when you go to sell, the buyer's home inspector is going to bounce that as non-compliant to the NEC, and afterward you or an actual electrician will be reworking it. ar-jedi ETA the author of this thread, http://www.ar15.com/forums/t_10_17/644329__ARCHIVED_THREAD____DIY_Generator_Power_Cables_and_Install.html&page=1 had a similar situation (finished wall, and transfer switch panel) and his solution worked out nicely. (= code compliant and a clean install) there are tons of pictures along the way in that thread. 
|
|
|
|
[#35]
Quoted:
ps: btw, your link points to a CH8JSM, not a CH8KSM. ar-jedi Quoted:
ps: Quoted:
The CH8KSM is correct and it sells for $169 from here: http://www.munroelectric.com/silvereclipse/index.jsp?path=product&part=628100 btw, your link points to a CH8JSM, not a CH8KSM. ar-jedi I don't know why that happened. This should be correct: http://www.munroelectric.com/silvereclipse/index.jsp?path=product&part=44376&process=search&ds=dept&text=CH8KSM |
|
|
|
[#36]
ar-jedi.
Some manufacturers like SquareD and CH put the model of the panel itself inside of the panel back-box instead of on the cover. To be sure, you are going to have to take that cover off and look for the label, it's probably on the right side. That panel looks like a BR4040B200 which would use the Interlock cover BRCOV40L1FM Let me know the model number and I will tell you for sure. Turtle and Hughes is all over NJ and they may have the cover, altho it's harder to find the CH-BR series than the CH-CH series at local supply houses. You can order it: https://www.platt.com/platt-electric-supply/Transfer-Equipment-Mechanical-Interlock-Covers/Eaton/BRCOV40L1FM/product.aspx?zpid=566800 or http://www.elliottelectric.com/Products/Detail.aspx?v=CHD&c=BRC0V40L1FM Also, you asked about the spaces the generator breaker would use, if it's the interlock that I am assuming it is, then it would use 2 and 4 (the top two on the right). Here's a pic of a similar panel to you brothers that I recently got a cover for: 
You can see the CAT number inside, that is what you need to know in order to find the right cover. 
Also, as you could see from inside of your panel cover, you will need the breaker hold down kit BRHDK125. |
|
|
|
[#37]
Quoted:
Let me know the model number and I will tell you for sure. ok, good stuff above, i'll be over his place tomorrow for beer and will get the complete model number (before the beer... thanks for your assistance. ar-jedi |
|
|
|
[#38]
Quoted:
To be sure, you are going to have to take that cover off and look for the label, it's probably on the right side. That panel looks like a BR4040B200 which would use the Interlock cover BRCOV40L1FM Let me know the model number and I will tell you for sure. Turtle and Hughes is all over NJ and they may have the cover, altho it's harder to find the CH-BR series than the CH-CH series at local supply houses. You can order it: https://www.platt.com/platt-electric-supply/Transfer-Equipment-Mechanical-Interlock-Covers/Eaton/BRCOV40L1FM/product.aspx?zpid=566800 or http://www.elliottelectric.com/Products/Detail.aspx?v=CHD&c=BRC0V40L1FM Also, as you could see from inside of your panel cover, you will need the breaker hold down kit BRHDK125. good call on the panel type! i have a question though... what mounting cover type is this setup? do i need a "flush cover" like the BRCOV40L1FM, or do i need something different? from this search, http://www.elliottelectric.com/Products/SearchResults.aspx?s=BR4040B200 it looks like the BRCOV40L1FM is the only type available for this breaker panel but i want to make sure. ar-jedi 


|
|
|
|
[#39]
That's a flush cover. But, as you found, that's all Cutler Hammer makes for most (or all) of their BR panels. The CH line of panels has a surface mount cover which is the same as the flush accept for the lack of the lip around the edge that overlaps the side panel and would hide the messy cut-out around the panel if surface mounted.
So the BRCOV40L1FM cover is what you need. I have ordered a lot of material from Platt Electric over the years and they are very good, unfortunately they are across the country but the material always comes in 1 piece. Elliot Electric is cheaper for the panel, but I haven't used them all that much. They also tried to charge me tax when pricing the panel even tho they don't appear to be in NJ. So it's a toss up. But before ordering it online, be sure to call Turtle and Hughes to see if they have it locally. And don't forget to order the breaker hold-down. ETA: It looks like you are going to have to extend that AC condensing unit circuit. Wirenutting is fine but for something like that I would look to pull a couple inches of slack down from the ceiling first. |
|
|
|
[#40]
Quoted:
So the BRCOV40L1FM cover is what you need. I have ordered a lot of material from Platt Electric over the years and they are very good, unfortunately they are across the country but the material always comes in 1 piece. Elliot Electric is cheaper for the panel, but I haven't used them all that much. They also tried to charge me tax when pricing the panel even tho they don't appear to be in NJ. So it's a toss up. But before ordering it online, be sure to call Turtle and Hughes to see if they have it locally. And don't forget to order the breaker hold-down. i'm on it boss! ar-jedi ETA: only $13 shipping! 
http://www.amazon.com/EATON-CUTLER-HAMMER-BRCOV40L1FM-MECHANICAL/dp/B00DKYNMKI |
|
|
|
[#41]
Quoted:
ETA: It looks like you are going to have to extend that AC condensing unit circuit. Wirenutting is fine but for something like that I would look to pull a couple inches of slack down from the ceiling first. yup, i was already looking at the best way to to that, and i may just have enough slack. ar-jedi |
|
|
|
[#42]
On new panel installations, I always leave the top 4 spaces empty for a future interlock and a surge suppressor.
|
|
|
|
[#43]
Quoted:
On new panel installations, I always leave the top 4 spaces empty for a future interlock and a surge suppressor. when my mom's house was completely rewired after Sandy, that's what i did. my brother's place, no one had that foresight... while i have you on the hook here... (Columbo: "i got just one more question, you see, ...") in my basement, i have a box from before there was electricity. the prior owner ding-dongs who expanded/rehab'd the place couldn't be bothered to put a modern service panel in with, know, more than 24 positions. they installed gorgeous all-wood top of the line Anderson windows and a completely custom (built on site) maple kitchen; but no new circuit panel. 
it's a Murray LC224EC, and the inspection tag is from 1972. 150A main, 24 positions. underground POCO service. when i moved in there were tandems in places that tandems should not be installed, etc. -- and there is a bunch of stupid shit as well, like the sump pump in the basement is on the same branch circuit as my study upstairs. next winter/spring i would like to improve the basement situation (example: there are almost no outlets in the basement, which makes working down there a pain in the ass) and in the process fix some things that should be fixed (example: 2nd sump, slop sink ejector pump, and washer/dryer (gas) all on same branch circuit). as you can already tell running NMB isn't the problem; landing it on open service panel locations is. my question to you is whether certain brands/styles of service panels are "better" for doing panel upgrades than others. i look at my brother's setup above and for a new install it's great; tons of open space and such. but in my case with the "short" box in place now i would have to wirenut a hella lot of branch circuits to make it work out. i would think i would want a panel with the main higher up and the entirety of the branch breakers higher up. thoughts on this? ar-jedi 

|
|
|
|
[#44]
Quoted:
Is there a box behind the cover plate? Or did you just run the individual THHN conductors in the wall cavity and into a hole in the bottom of the panel? Quoted:
Quoted:
The cover plate attached to the flex? Nothing is behind it. That's how I ran the wires up into my panel. Is there a box behind the cover plate? Or did you just run the individual THHN conductors in the wall cavity and into a hole in the bottom of the panel? There is a box behind that plate, with conduit going up through a knock out in the panel. I say "I" but should have said "I had" an electrician came out and wired/installed the transfer switch. He is a captain on my shift at the FD. I trust my life with him and trust he installed it correctly. |
|
|
|
[#45]
Ost
|
|
|
|
[#46]
The six circuit manual transfer switch does a great job - we used one for 15 years.
We decided to go have our electrician pull it out and replace it with a Square-D Generator Interlock kit. Provides power to the whole house. |
|
|
|
[#47]
Quoted:
when my mom's house was completely rewired after Sandy, that's what i did. my brother's place, no one had that foresight... while i have you on the hook here... (Columbo: "i got just one more question, you see, ...") in my basement, i have a box from before there was electricity. the prior owner ding-dongs who expanded/rehab'd the place couldn't be bothered to put a modern service panel in with, know, more than 24 positions. they installed gorgeous all-wood top of the line Anderson windows and a completely custom (built on site) maple kitchen; but no new circuit panel.
it's a Murray LC224EC, and the inspection tag is from 1972. 150A main, 24 positions. underground POCO service. when i moved in there were tandems in places that tandems should not be installed, etc. -- and there is a bunch of stupid shit as well, like the sump pump in the basement is on the same branch circuit as my study upstairs. next winter/spring i would like to improve the basement situation (example: there are almost no outlets in the basement, which makes working down there a pain in the ass) and in the process fix some things that should be fixed (example: 2nd sump, slop sink ejector pump, and washer/dryer (gas) all on same branch circuit). as you can already tell running NMB isn't the problem; landing it on open service panel locations is. my question to you is whether certain brands/styles of service panels are "better" for doing panel upgrades than others. i look at my brother's setup above and for a new install it's great; tons of open space and such. but in my case with the "short" box in place now i would have to wirenut a hella lot of branch circuits to make it work out. i would think i would want a panel with the main higher up and the entirety of the branch breakers higher up. thoughts on this? ar-jedi http://wopr.losdos.dyndns.org/gallery2/d/24486-1/DSCN6273.JPG http://wopr.losdos.dyndns.org/gallery2/d/37659-2/DSCN8442.JPG Quoted:
Quoted:
On new panel installations, I always leave the top 4 spaces empty for a future interlock and a surge suppressor. when my mom's house was completely rewired after Sandy, that's what i did. my brother's place, no one had that foresight... while i have you on the hook here... (Columbo: "i got just one more question, you see, ...") in my basement, i have a box from before there was electricity. the prior owner ding-dongs who expanded/rehab'd the place couldn't be bothered to put a modern service panel in with, know, more than 24 positions. they installed gorgeous all-wood top of the line Anderson windows and a completely custom (built on site) maple kitchen; but no new circuit panel.
it's a Murray LC224EC, and the inspection tag is from 1972. 150A main, 24 positions. underground POCO service. when i moved in there were tandems in places that tandems should not be installed, etc. -- and there is a bunch of stupid shit as well, like the sump pump in the basement is on the same branch circuit as my study upstairs. next winter/spring i would like to improve the basement situation (example: there are almost no outlets in the basement, which makes working down there a pain in the ass) and in the process fix some things that should be fixed (example: 2nd sump, slop sink ejector pump, and washer/dryer (gas) all on same branch circuit). as you can already tell running NMB isn't the problem; landing it on open service panel locations is. my question to you is whether certain brands/styles of service panels are "better" for doing panel upgrades than others. i look at my brother's setup above and for a new install it's great; tons of open space and such. but in my case with the "short" box in place now i would have to wirenut a hella lot of branch circuits to make it work out. i would think i would want a panel with the main higher up and the entirety of the branch breakers higher up. thoughts on this? ar-jedi http://wopr.losdos.dyndns.org/gallery2/d/24486-1/DSCN6273.JPG http://wopr.losdos.dyndns.org/gallery2/d/37659-2/DSCN8442.JPG Panel changes and service upgrades is a big part of my business, it's one of my favorite things to do since it's so profitable In all honesty, I've never looked for a panel that had the guts up higher. I've also never seen that talked about by other electrician on electrical forums, so I can't recommend any panels that would work for that purpose. I just work on the assumption that some circuits are going to have to be spliced. In your case, a lot of those circuits are coming in the side and bottom, so they will be able to make it. The ones that come in the top may be short but they may reach the highest breakers. One thing you could do, since it's your own house and taking some extra time won't hurt, is install a trough above the panel and have all the cables enter into it. Then run a short pair of pipes down from the trough to each side of the panel, make sure the pipes are 24" or less so that you don't have to derate. It's more splicing, but it's a neater look and the splicing is in the trough and not the panel (some people feel better about that). |
|
|
|
[#48]
Quoted:
One thing you could do, since it's your own house and taking some extra time won't hurt, is install a trough above the panel and have all the cables enter into it. Then run a short pair of pipes down from the trough to each side of the panel, make sure the pipes are 24" or less so that you don't have to derate. It's more splicing, but it's a neater look and the splicing is in the trough and not the panel (some people feel better about that). ok, you've given me some good ideas to contemplate. i'm thinking that i will pull a permit for this, i want to do it "above board" so i don't have any issues down the road. that, and find the right panel. all else being equal, i like the Square-D QO series (copper bus) but they don't seem to make a pre-built 150A setup (or at least HD/Lowes don't have it, although i have not checked the electrical supply houses and only wandered around a little bit online). so if there is no 150A main Square-D QO solution for me i'll probably go C-H with the copper backside as well. ar-jedi |
|
|
|
[#49]
AV18, question for you if you don't mind. I have a Honda 4500 running watt generator that I would like the ability to connect to my first floor panel the way you recommended. I have the Amazon links you provided for the inlet and cable (thank you). Here is a description of my main and 1st floor panels for reference (I only want to be able to have generator power for the first floor panel):
Main: very old 400A Zinsco panel on side of house, it has breakers for the 1st floor and 2nd floor panels. 1st floor panel: GE PowerMark Gold (Front Cat No: TM32FCD) What would I need to get to be able to connect with an interlok the way you mentioned? Much appreciated. |
|
|
|
[#50]
Quoted:
ok, you've given me some good ideas to contemplate. i'm thinking that i will pull a permit for this, i want to do it "above board" so i don't have any issues down the road. that, and find the right panel. all else being equal, i like the Square-D QO series (copper bus) but they don't seem to make a pre-built 150A setup (or at least HD/Lowes don't have it, although i have not checked the electrical supply houses and only wandered around a little bit online). so if there is no 150A main Square-D QO solution for me i'll probably go C-H with the copper backside as well. ar-jedi Quoted:
Quoted:
One thing you could do, since it's your own house and taking some extra time won't hurt, is install a trough above the panel and have all the cables enter into it. Then run a short pair of pipes down from the trough to each side of the panel, make sure the pipes are 24" or less so that you don't have to derate. It's more splicing, but it's a neater look and the splicing is in the trough and not the panel (some people feel better about that). ok, you've given me some good ideas to contemplate. i'm thinking that i will pull a permit for this, i want to do it "above board" so i don't have any issues down the road. that, and find the right panel. all else being equal, i like the Square-D QO series (copper bus) but they don't seem to make a pre-built 150A setup (or at least HD/Lowes don't have it, although i have not checked the electrical supply houses and only wandered around a little bit online). so if there is no 150A main Square-D QO solution for me i'll probably go C-H with the copper backside as well. ar-jedi SquareD QO and CH-CH are said to be the best panels. CH-CH now has trip indicators on the breakers like QO has had for a while. But they are both expensive, the breakers cost twice as much as normal 1" breakers. 150A panels are hard to find which is why I (and most other electrician) only install either 100A or 200A services. Since your panel is old, how is your the rest of your service? Since you're doing the work yourself, upgrading the entire service would be pretty cheap. The meter pan is free. The aluminum conductors are inexpensive. And this will give you a chance to bring your grounding up to current code if it isn't already. |
|
|
 Win a FREE Membership!
Sign up for the ARFCOM weekly newsletter and be entered to win a free ARFCOM membership. One new winner* is announced every week!
You will receive an email every Friday morning featuring the latest chatter from the hottest topics, breaking news surrounding legislation, as well as exclusive deals only available to ARFCOM email subscribers.

AR15.COM is the world's largest firearm community and is a gathering place for firearm enthusiasts of all types.
From hunters and military members, to competition shooters and general firearm enthusiasts, we welcome anyone who values and respects the way of the firearm.

Subscribe to our monthly Newsletter to receive firearm news, product discounts from your favorite Industry Partners, and more.
Copyright © 1996-2024 AR15.COM LLC. All Rights Reserved.
Any use of this content without express written consent is prohibited.
AR15.Com reserves the right to overwrite or replace any affiliate, commercial, or monetizable links, posted by users, with our own.


