|
Posted: 4/27/2015 10:58:05 AM EDT
A little hint:
This is a part from a US military rifle. Breakage of this part is fairly common and they are unobtainium. So, a friend asked me to reproduce a couple of them, going off of an original he had borrowed. This is the original and my reproduction (before heat treat). Notice the "teeth" of the original are gone. This is common as well as breaking in the middle. 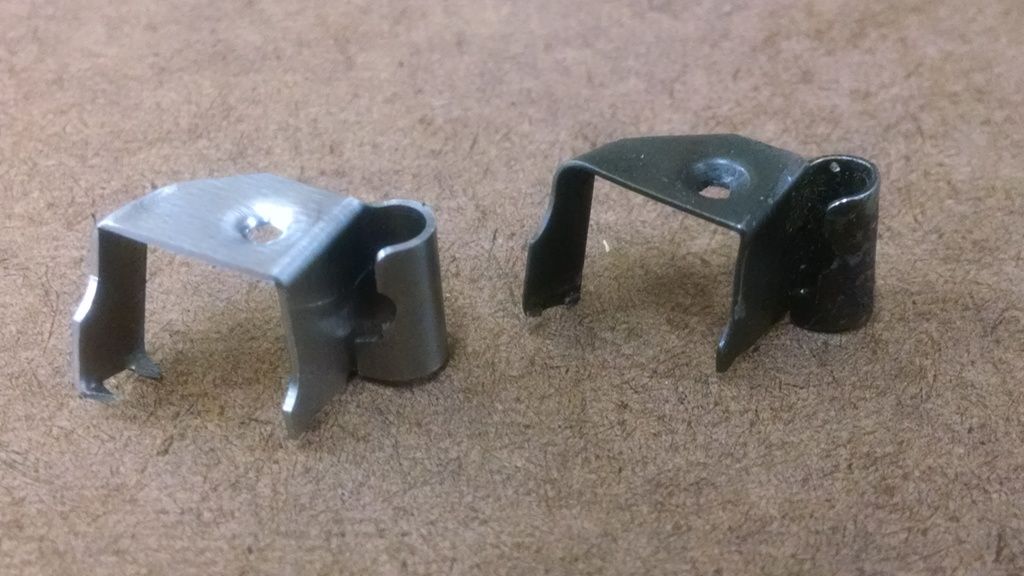 </a>" /> </a>" />
First, a part print was made (not shown). Then the blank is figured. Notice the form at the bottom of the blank is not machined. This area is left long so the length can be determined after a test piece is bent. It's kind of cheating but, for a one off, it's the quickest way.  </a>" /> </a>" />
Then, a fixture print is sketched. (not shown) This is the blank, in the fixture. A test piece has already been bent and the length for the contoured part has been established. The fixture is used to hold the part to machine this feature.  </a>" /> </a>" />
This is the first bend. The machine is two axis CNC controlled and is used to trace the path around the fixture with a mandrel. It "wipes" the part blank around the fixture. This is 1074 steel which is very forgiving with very little "spring back". That means no over bend is really needed. 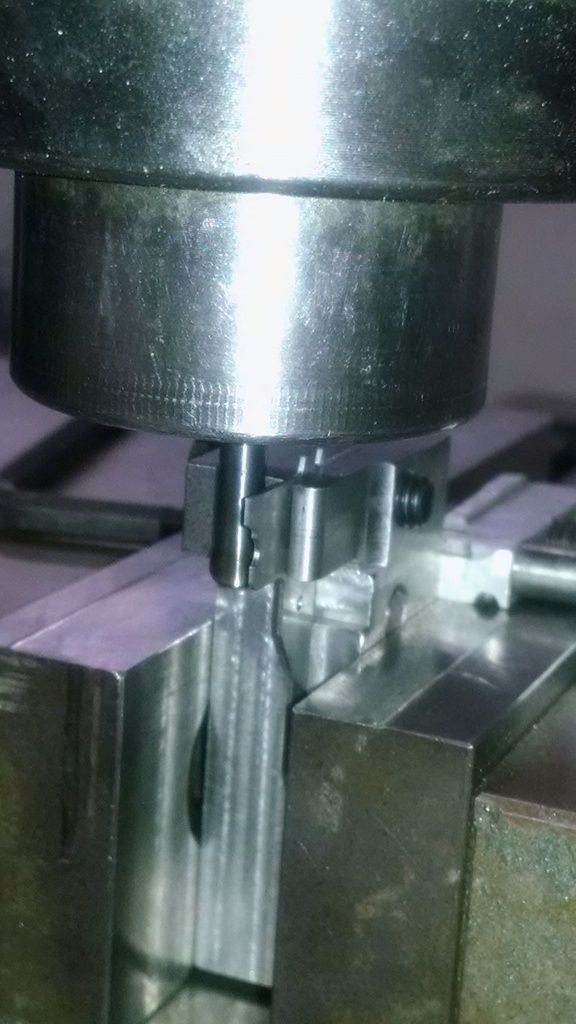 </a>" /> </a>" />
This is the second bend.  </a>" /> </a>" />
This is what the blank looks like after completing all operations on that fixture. 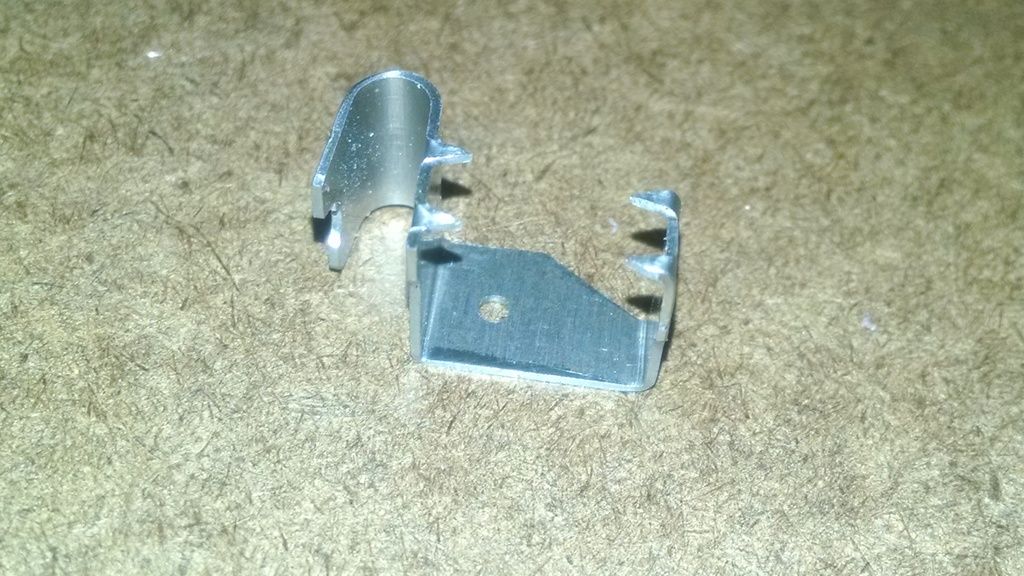 </a>" /> </a>" />
Yet to show is the finishing of the enclosed loop, the dimpling of the hole and the bending of the "arm" to the odd angle and heat treat (of which I didn't get any pics cause I was holding a torch and the part.  ) )
I'll try to get those posted tonight. Photobucket and my phone take forever to upload pics. So, who's got a guess what it goes to? ETA: I know the one corner is much sharper than the original. I have modified my blank print and the next one will be precisely identical to the original bend. |
|
|
|
[#1]
Shot in the dark. M3 grease gun.
|
|
|
|
[#2]
damn, I feel pretty confident on most military issued weapons today. But I got no idea
|
|
|
|
[#3]
M1 carbine? Not sure I can name the part.
|
|
|
|
[#4]
Quoted:
damn, I feel pretty confident on most military issued weapons today. But I got no idea It is a little obscure because it's an odd part. One more hint. .30-06 |
|
|
|
[#5]
I keep wanting to say it's a sling mount or something that mounts on a stock because of the teeth, but it just doesn't make sense with the shape.
|
|
|
|
[#6]
M1919, keep it going if I got it right. It was a guess based on the drawing, not the part.
|
|
|
|
[#7]
That's the clip that holds the throttle cable to my lawn mower
|
|
|
|
[#8]
Quoted:
It is a little obscure because it's an odd part. One more hint. .30-06 Quoted:
Quoted:
damn, I feel pretty confident on most military issued weapons today. But I got no idea It is a little obscure because it's an odd part. One more hint. .30-06 M1903 |
|
|
|
[#9]
Your handwriting is as shitty as mine is. I'm so glad I didn't have to do board drafting lol. YAY CAD!
|
|
|
|
[#10]
Could be part of a Johnson, because I would have no clue about it in that case.
|
|
|
|
[#11]
Quoted:
M1903 Quoted:
Quoted:
Quoted:
damn, I feel pretty confident on most military issued weapons today. But I got no idea It is a little obscure because it's an odd part. One more hint. .30-06 M1903 Nope. Later. |
|
|
|
[#12]
Quoted: M1903 Quoted: Quoted: Quoted: damn, I feel pretty confident on most military issued weapons today. But I got no idea It is a little obscure because it's an odd part. One more hint. .30-06 M1903 Yep, it's a dickfer. |
|
|
|
[#13]
Johnson?
|
|
|
|
[#14]
Quoted:
Could be part of a Johnson, because I would have no clue about it in that case. |
|
|
|
[#15]
Part of a grenade launcher sight?
|
|
|
|
[#16]
Is it part of the Johnson Magazine Follower assembly?
|
|
|
|
[#17]
Quoted:
Johnson? Yep. Clips on the forestock and retains the retaining pin that holds basically the front of the rifle on. It doesn't show this part in the diagram but it retains part 187x. It fits inside the forearm behind the number 324. The little ear on 187x slides under the curved part of my part. |
|
|
|
[#18]
The little thingy next to the magazine below the ejection port?
|
|
|
|
[#19]
Quoted:
Quoted:
Quoted:
Could be part of a Johnson, because I would have no clue about it in that case. More interesting is the BOLT on the Johnson; anyone have a close up of it? 
|
|
|
|
[#20]
Quoted:
Your handwriting is as shitty as mine is. I'm so glad I didn't have to do board drafting lol. YAY CAD! I'm neat when necessary. Ain't got no time fo dat when doing a one off. I'm the only one who needs to understand it. You should see the part print and the fixture concept sketch.
|
|
|
|
[#21]
Quoted:
Yep. Clips on the forestock and retains the retaining pin that holds basically the front of the rifle on. It doesn't show this part in the diagram but it retains part 187x. It fits inside the forearm behind the number 324. The little ear on 187x slides under the curved part of my part. [url=https://www.gunandgame.com/attachments/johnson_semi-auto1941_schem-jpg.50113/]https://www.gunandgame.com/attachments/johnson_semi-auto1941_schem-jpg.50113/[/url] Quoted:
Quoted:
Johnson? Yep. Clips on the forestock and retains the retaining pin that holds basically the front of the rifle on. It doesn't show this part in the diagram but it retains part 187x. It fits inside the forearm behind the number 324. The little ear on 187x slides under the curved part of my part. [url=https://www.gunandgame.com/attachments/johnson_semi-auto1941_schem-jpg.50113/]https://www.gunandgame.com/attachments/johnson_semi-auto1941_schem-jpg.50113/[/url] Well there you go. |
|
|
|
[#22]
Quoted:
More interesting is the BOLT on the Johnson; anyone have a close up of it? http://www.gunpartscorp.com/pub/schematic/Johnson_Semi-Auto1941_schem.jpg Quoted:
Quoted:
Quoted:
Could be part of a Johnson, because I would have no clue about it in that case. More interesting is the BOLT on the Johnson; anyone have a close up of it? http://www.gunpartscorp.com/pub/schematic/Johnson_Semi-Auto1941_schem.jpg Hmm. They don't show it on yours, either. I think the diagram drawers just considered it part of the stock. Same alike they didn't draw the butt plate separately. It's meant to be shoved on the stock and left permanently (hence the little teeth). |
|
|
|
[#23]
Quoted: A little hint: This is a part from a US military rifle. Breakage of this part is fairly common and they are unobtainium. So, a friend asked me to reproduce a couple of them, going off of an original he had borrowed. This is the original and my reproduction (before heat treat). Notice the "teeth" of the original are gone. This is common as well as breaking in the middle. http://<a href=http://i1326.photobucket.com/albums/u660/ridgerunner9876/IMG_20150331_1339548081_zpsyqbxujof.jpg</a>" /> First, a part print was made (not shown). Then the blank is figured. Notice the form at the bottom of the blank is not machined. This area is left long so the length can be determined after a test piece is bent. It's kind of cheating but, for a one off, it's the quickest way. http://<a href=http://i1326.photobucket.com/albums/u660/ridgerunner9876/IMG_20150325_1530446291_zpspyfqyup8.jpg</a>" /> Then, a fixture print is sketched. (not shown) This is the blank, in the fixture. A test piece has already been bent and the length for the contoured part has been established. The fixture is used to hold the part to machine this feature. http://<a href=http://i1326.photobucket.com/albums/u660/ridgerunner9876/IMG_20150330_1404206281_zpstztpipwa.jpg</a>" /> This is the first bend. The machine is two axis CNC controlled and is used to trace the path around the fixture with a mandrel. It "wipes" the part blank around the fixture. This is 1074 steel which is very forgiving with very little "spring back". That means no over bend is really needed. http://<a href=http://i1326.photobucket.com/albums/u660/ridgerunner9876/IMG_20150330_1509081721_zpsgwb3pein.jpg</a>" /> This is the second bend. http://<a href=http://i1326.photobucket.com/albums/u660/ridgerunner9876/IMG_20150331_0917285461_zps9odacu3b.jpg</a>" /> This is what the blank looks like after completing all operations on that fixture. http://<a href=http://i1326.photobucket.com/albums/u660/ridgerunner9876/IMG_20150331_0921009371_zpsempsv0yb.jpg</a>" /> Yet to show is the finishing of the enclosed loop, the dimpling of the hole and the bending of the "arm" to the odd angle and heat treat (of which I didn't get any pics cause I was holding a torch and the part. )I'll try to get those posted tonight. Photobucket and my phone take forever to upload pics. So, who's got a guess what it goes to? ETA: I know the one corner is much sharper than the original. I have modified my blank print and the next one will be precisely identical to the original bend. |
|
|
|
[#24]
Here is a picture of a johnson. Is any part of your part exposed?

|
|
|
|
[#25]
Quoted:
Here is a picture of a johnson. Is any part of your part exposed? http://i1347.photobucket.com/albums/p712/waterglasss/johnson_zpsxwz3so1w.jpg See the little lever just underneath and in front of the charging handle and the round thing that it's under. My part is the round thing that retains the clip that is attached to a pin. I guess I was misremembering exactly how it fit in the forestock. But it's grabbing wood there with the teeth you saw in the first pic. |
|
|
|
[#26]
damn it my photobucket aint working right. But yeah I know what you mean. I had a time figuring out what you were talking about because the diagram was missing part of the assembly. |
|
|
|
[#27]
I don't have a way to put circles and arrows on the pic. It's the part you see just in front of the magazine opening and just below the charging handle. |
|
|
|
[#28]
Quoted:
damn it my photobucket aint working right. But yeah I know what you mean. I had a time figuring out what you were talking about because the diagram was missing part of the assembly. Yeah. Struck me as odd that they'd leave it off the diagram, too. |
|
|
|
[#29]
Quoted:
I don't have a way to put circles and arrows on the pic. It's the part you see just in front of the magazine opening and just below the charging handle. Quoted:
I don't have a way to put circles and arrows on the pic. It's the part you see just in front of the magazine opening and just below the charging handle. that is what i was trying to do. I got the picture edited on my bucket, but when I post the picture it is just the plain picture without the circle. edit picture added. 
|
|
|
|
[#30]
Quoted: The machine is two axis CNC controlled and is used to trace the path around the fixture with a mandrel. It "wipes" the part blank around the fixture. That's... genius. Well, I say genius, perhaps everyone with a bit of proper training behind them knows about it, but it's the first time I've come across it. This little snippet alone has just solved a handful of problems for me, assuming my little dinky machine can handle it |
|
|
|
[#31]
this is a cool thread. I'd have never guessed Johnson/
|
|
|
|
[#32]
Quoted:
That's... genius. Well, I say genius, perhaps everyone with a bit of proper training behind them knows about it, but it's the first time I've come across it. This little snippet alone has just solved a handful of problems for me, assuming my little dinky machine can handle it
Quoted:
Quoted:
The machine is two axis CNC controlled and is used to trace the path around the fixture with a mandrel. It "wipes" the part blank around the fixture. That's... genius. Well, I say genius, perhaps everyone with a bit of proper training behind them knows about it, but it's the first time I've come across it. This little snippet alone has just solved a handful of problems for me, assuming my little dinky machine can handle it
Glad to help. Leave your spindle in neutral so the pin will roll around the part rather than dragging on it. There are 100s if not 1000s of tips and tricks to this trade to make one's life easier or to enable some accomplishment that some may think impossible. Starting off doing prototype work in a job shop straight out of trade school and learning from an old British guy who knew his shit was a big leg up for me. I've done some pretty unorthodox stuff. |
|
|
|
[#33]
Quoted:
Glad to help. There are 100s if not 1000s of tips and tricks to this trade to make one's life easier or to enable some accomplishment that some may think impossible. Starting off doing prototype work in a job shop straight out of trade school and learning from an old British guy who knew his shit was a big leg up for me. I've done some pretty unorthodox stuff. Quoted:
Quoted:
Quoted:
The machine is two axis CNC controlled and is used to trace the path around the fixture with a mandrel. It "wipes" the part blank around the fixture. That's... genius. Well, I say genius, perhaps everyone with a bit of proper training behind them knows about it, but it's the first time I've come across it. This little snippet alone has just solved a handful of problems for me, assuming my little dinky machine can handle it
Glad to help. There are 100s if not 1000s of tips and tricks to this trade to make one's life easier or to enable some accomplishment that some may think impossible. Starting off doing prototype work in a job shop straight out of trade school and learning from an old British guy who knew his shit was a big leg up for me. I've done some pretty unorthodox stuff. We do some of the same sort of thing on some parts in my shop. When possible I try to employ a cam follower in the spindle but a job I had in here recently the bend was too tight for the cam follower to clear the fixture, it was a bit over 230 degrees. I programmed the spindle tool, a 0.375" dowel pin, to rotate at the surface speed dictated by the feed rate and the periphery of the radius, it minimizes wipe marks on the part. Sometimes you have to think outside the box to maintain a competitive edge. I like it, nice work. |
|
|
|
[#34]
Quoted:
We do some of the same sort of thing on some parts in my shop. When possible I try to employ a cam follower in the spindle but a job I had in here recently the bend was too tight for the cam follower to clear the fixture, it was a bit over 230 degrees. I programmed the spindle tool, a 0.375" dowel pin, to rotate at the surface speed dictated by the feed rate and the periphery of the radius, it minimizes wipe marks on the part. Sometimes you have to think outside the box to maintain a competitive edge. I like it, nice work. Thanks. You quoted before my edit. I just leave the spindle in neutral but I'm not sure a full blown cnc has that capability. It takes surprisingly little force for this size 1074. IIRC I finished the loop with an 1/8" dowel for a mandrel. Another trick (and nice thing to know) is you can program the machine to impinge on the material in certain spots, if necessary. You basically "coin" or pinch the material to get it to perform a certain way. Some guys really hate form work and it honestly can be very frustrating but I always enjoyed the challenge. I took this part print to a friend who works at a well known progressive die shop. He says, " I don't think I'd have quoted that one". 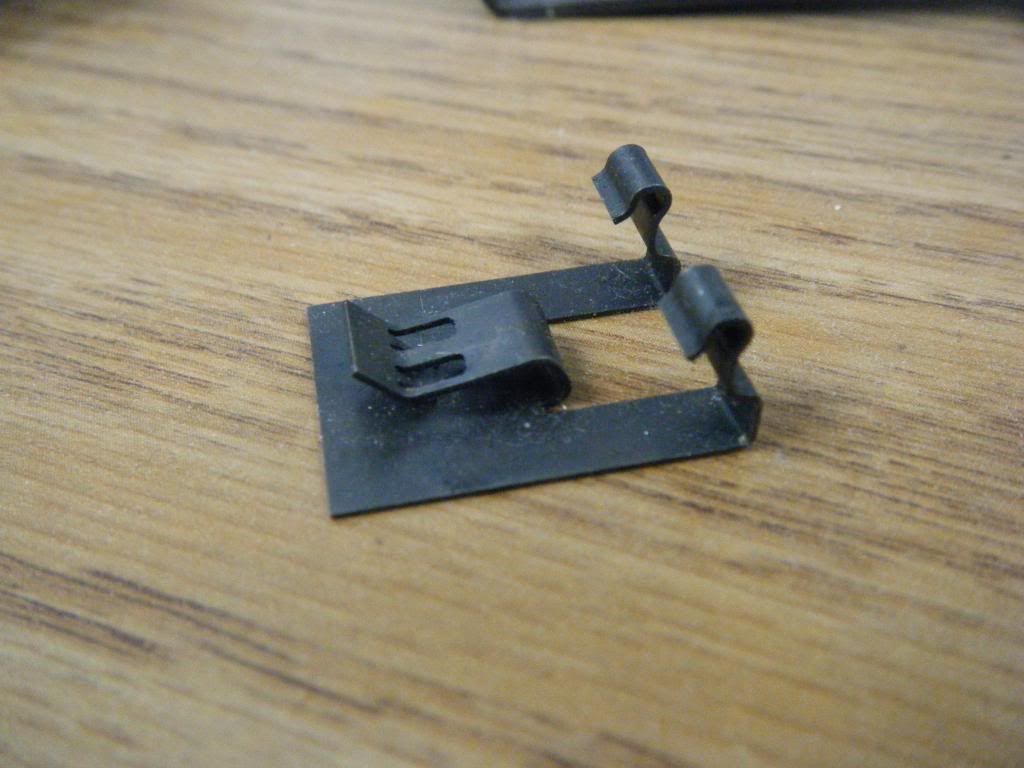 " /> " />
|
|
|
|
[#35]
thing for shoulder thing that goes up?
|
|
|
|
[#36]
Some night folks might enjoy this stuff.
|
|
|
|
[#37]
Very nice work. Good to see someone keeping an old war horse working.
|
|
|
|
[#38]
very nice
|
|
|
|
[#39]
Nice work OP..metal work intrigues me...
|
|
|
|
[#40]
Quoted:
Nice work OP..metal work intrigues me... Me too. Lucky enough to make a living at something I like. |
|
|
|
[#41]
Cool.
|
|
|
|
[#42]
Quoted: Starting off doing prototype work in a job shop straight out of trade school and learning from an old British guy who knew his shit was a big leg up for me. I've done some pretty unorthodox stuff. I started off with no idea what I was doing, getting my hands on an old broken benchmill, taking it apart and rebuilding it. Now I just make stuff up along the way. Still have no idea what I'm doing, but I enjoy the challenge of working out how to get from A to Z without a roadmap. Of course I'm not making fun stuff like you lot, because I really don't want to go to prison |
|
|
|
[#43]
Quoted:
Glad to help. Leave your spindle in neutral so the pin will roll around the part rather than dragging on it. There are 100s if not 1000s of tips and tricks to this trade to make one's life easier or to enable some accomplishment that some may think impossible. Starting off doing prototype work in a job shop straight out of trade school and learning from an old British guy who knew his shit was a big leg up for me. I've done some pretty unorthodox stuff. Quoted:
Quoted:
Quoted:
The machine is two axis CNC controlled and is used to trace the path around the fixture with a mandrel. It "wipes" the part blank around the fixture. That's... genius. Well, I say genius, perhaps everyone with a bit of proper training behind them knows about it, but it's the first time I've come across it. This little snippet alone has just solved a handful of problems for me, assuming my little dinky machine can handle it
Glad to help. Leave your spindle in neutral so the pin will roll around the part rather than dragging on it. There are 100s if not 1000s of tips and tricks to this trade to make one's life easier or to enable some accomplishment that some may think impossible. Starting off doing prototype work in a job shop straight out of trade school and learning from an old British guy who knew his shit was a big leg up for me. I've done some pretty unorthodox stuff. I've heard of people doing the bending and pressing using the spindle. I've never actuly seen it done before. I highly doubt they would let me pull a stunt like that at work. I'm sure spit and fists would fly. They'd probably sub it out to a forming shop. |
|
|
|
[#44]
Quoted:
Some night folks might enjoy this stuff. I certainly did. Thank you. |
|
|
|
[#45]
Quoted:
I've heard of people doing the bending and pressing using the spindle. I've never actuly seen it done before. I highly doubt they would let me pull a stunt like that at work. I'm sure spit and fists would fly. They'd probably sub it out to a forming shop. Quoted:
Quoted:
Quoted:
Quoted:
The machine is two axis CNC controlled and is used to trace the path around the fixture with a mandrel. It "wipes" the part blank around the fixture. That's... genius. Well, I say genius, perhaps everyone with a bit of proper training behind them knows about it, but it's the first time I've come across it. This little snippet alone has just solved a handful of problems for me, assuming my little dinky machine can handle it
Glad to help. Leave your spindle in neutral so the pin will roll around the part rather than dragging on it. There are 100s if not 1000s of tips and tricks to this trade to make one's life easier or to enable some accomplishment that some may think impossible. Starting off doing prototype work in a job shop straight out of trade school and learning from an old British guy who knew his shit was a big leg up for me. I've done some pretty unorthodox stuff. I've heard of people doing the bending and pressing using the spindle. I've never actuly seen it done before. I highly doubt they would let me pull a stunt like that at work. I'm sure spit and fists would fly. They'd probably sub it out to a forming shop. I wouldn't do it with any material thicker than what would simulate normal side load on the spindle. But, yeah, with the bigger shops, there is so much control from above that creativity is quashed. That manifests in a general lack of guys who do shit like what I do....good for me. I'm quoting a job right now because nobody else wants it. That = high price. (also a high degree of risk). I don't remember if I mentioned it before. I made a set of ceramic parts. Once they were fired, I gave them to the customer and said, "You now own them. You'll have to assemble them. I claim no guarantee on their performance and longevity". We knew it was a risky venture. They lasted .5 ops and broke (as I expected they would). Seven grand, out the window. Actually they paid $7k to know this method won't work, so it wasn't a total waste. |
|
|
 Win a FREE Membership!
Sign up for the ARFCOM weekly newsletter and be entered to win a free ARFCOM membership. One new winner* is announced every week!
You will receive an email every Friday morning featuring the latest chatter from the hottest topics, breaking news surrounding legislation, as well as exclusive deals only available to ARFCOM email subscribers.

AR15.COM is the world's largest firearm community and is a gathering place for firearm enthusiasts of all types.
From hunters and military members, to competition shooters and general firearm enthusiasts, we welcome anyone who values and respects the way of the firearm.

Subscribe to our monthly Newsletter to receive firearm news, product discounts from your favorite Industry Partners, and more.
Copyright © 1996-2024 AR15.COM LLC. All Rights Reserved.
Any use of this content without express written consent is prohibited.
AR15.Com reserves the right to overwrite or replace any affiliate, commercial, or monetizable links, posted by users, with our own.


