|
Posted: 3/4/2013 9:23:52 AM EDT
The Peltor military headsets are easily converted to drive consumer-grade radios. Nearly any ham radio or consumer-grade radio will work with the Peltor if you make the modifications I did.
If you are going into battle, buy the highest quality PTT you can get- one that is engineered for your tactical radio. THIS modification is suited to LESS SERIOUS activity and makes the Peltor or other military headset useful whatever you are doing. I have Yaesu VX-170 and VX-177 handheld radios. Tough rigs, water resistant, and many accessories such as batteries and alkaline battery packs and car chargers are available inexpensively. Here is how I did it: I picked up a NIB Peltor 88079-00000 ACH headset for $300 from eBay. This is a bargain price for this headset as it comes with gel earpads and comes with two MBITR PTT assemblies. Get a cheap remote speaker/mic with the threaded Yaesu waterproof audio connector, or with the correct connector for YOUR radio. Pick a speaker/mic with a cable that you like the looks of (useful length and a robust build). Note, please,that it is often best to carefully remove the earpiece and mic housings from these remote speaker/mics and unsolder the wires, rather than cut the cables. The reason is that some use wires that can be hard to strip (or dissolve enamel insulation), so it is very often MUCH easier to unsolder the ends and solder the prepared wire ends into the Peltor housing just as they are and stow excess lengths in the Peltor housing. Take the PTT enclosure assembly apart. You will see the audio interface board inside. In the MBITR version, the circuitry is complex enough that I didn't want to spend the time to reverse engineer it, so I de-soldered the six PTT-to-radio cable wires, removed the cable retaining strap (steel, 2 screws) and the PTT-to-radio cable from the PTT assy enclosure. The strain relief boot is grooved and slips into a slot in the PTT enclosure. That MBITR cable is a nice one, and with the U-229 connector attached is worth saving or you can sell it for a few bucks. Now remove the two screws that retain the circuit card. 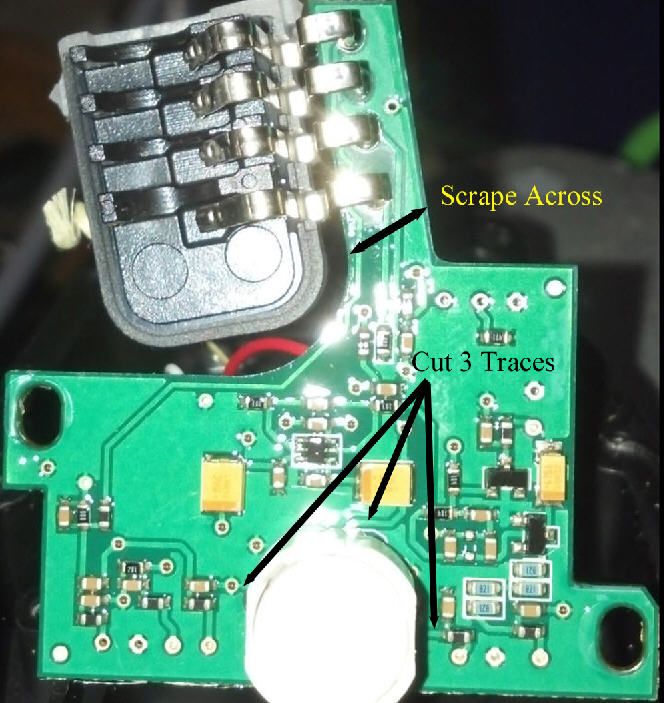

At this point the only thing holding the board in the housing is silicone sealant around the headset cable jack. The connector is a two-part assembly, with the "contact" part soldered to the circuit board, and the other part being molded into the housing itself. Mine was easily dislodged because the silicone does not stick well to the plastic of the enclosure. Gently free the board without even trying to remove the sealant, which will come out still stuck around the connector-half. The circuit card is a two layer board. Traces are on the top and bottom. There are no sandwiched layers - no inaccessible traces between the top and bottom surfaces. On the board extension that goes to the headset audio connector, scrape through the traces on both sides where shown on the photo. DO NOT scrape a deep trough into the substrate, as doing so would weaken the board, just be sure to clear a gap in the conductive traces. Do this on BOTH sides of the board. This procedure isolates the headset from the circuitry on the circuit card. The PTT switch is a double-pole single-throw switch. There are four pins from this switch. The photo shows which solder pads connect to each switch pair. Two are close together and close to the center axis of the switch. Two others are much further out toward the perimeter of the switch. The two close-together pins work together (they short when the switch is pressed), and the two outermost pins do the same, but the two sets of contacts are independent electrically. You can choose either set to activate the transmit PTT. There is NO NEED to remove the PTT push button switch. It is easy to figure out which tiny traces go to these switch pins. There are only three traces here to cut. Look at the picture and scrape through the tiny traces that go to the pins. If the pin is soldered to a wide patch of copper on the board, do nothing about that, because it will not matter. Just cut the tiny traces that go under the switch on top of the board, and cut the traces that obviously go to switch pins on the bottom. This procedure has isolated the PTT switch from the circuit card. Clean off the circuit card top and bottom with 91% alcohol and a toothbrush to get the solder flux off. That flux causes trouble by preventing sealants and glues from sticking, it can cause corrosion, and it can be conductive when wet. At this point, all of the headset connector contacts and the switch contacts are disconnected from the circuits on the board. If you wish, put a film of sealant on the thick sealant glob around the headset connector where you slid it out of the housing. Then re-install the circuit card in the housing. Take the Peltor PTT-to-Radio cable that you removed earlier. Cut the cable an inch or two from the "outside end" of the strain relief boot. Set the cable with U-229 connector aside for future use or to sell it. Hold the strain boot and pull the individual wires out of the short cable stub that remains in the strain boot, Pull the wires one at a time, and then pull out any paper or plastic wrap that surrounded the wires. The outer insulation jacket should still remain, and it runs through the boot like a drinking straw. Reinstall the boot in the PTT housing and run the replacement cable (from the speaker/mic you bought for the Yaesu) through this tube. Depending on the thickness of this replacement cable, knot it inside of the housing or cinch a couple small cable ties around it to prevent it pulling outward and breaking wires while in use. When you have determined how much cable you want inside the enclosure, pull the wire in further, goop the wire with sealant, and pull it back out a little, so the sealant is in the tube. Go to this web page and see the adapter for using a dynamic mic with a radio that expects to see an electret mic (most ham and consumer rigs want an electret mic): http://www.epanorama.net/circuits/dynamic_to_electretinput.html The adapter works so well that there have been nearly no "competing" designs posted since it appeared in the late '90s. The mic adapter is three components. Very simple. Anyone who can solder can build this. The author specifies a European transistor that is hard to find here in the U.S.. I use a 2N3904 which may be the cheapest and most common transistor here. He calls out a 220nF capacitor - that is 0.22 micro Farads. The resistor is 470kOhms. Get these parts from Radio Shack or Digikey or Mouser. They are so cheap that shipping will probably be more than the cost of the parts, so get a few sets of the parts in case you make a mistake or want to make more of these microphone adapters. There is ONE thing in his design I changed. I ran the lead from the collector of his transistor to one of the center two PTT switch pins, and the other of the PTT center switch pins to the "hot" radio mic lead - and I attached the "ground" mic lead to the emitter of the transistor. I included none of the suggested Yaesu PTT design, which involves grounding "mic hot" to ground through a 2kOhm resistor to place the radio in transmit mode. In this way, the PTT button connects and disconnects the entire adapter from the radio mic circuit, and the adapter itself, by its mere presence, switches the radio to transmit. In other words, the PTT button switch is in series with the collector "output" in the adapter, and pushing the button connects the adapter to the Yaesu mic lead "hot" wire, while the mic "ground" wire remains connected all the time. There is a lot of room in the Peltor PTT housing. I installed my components "dead bug" fashion near the headset connector. Dead-bug means that the parts are glued to the board with the wire leads floating in the air above the board. Just look at your parts and figure out which transistor leads are the emitter, base, and collector, lay out the parts wherever you like the look of it; where you have confidence that no wires will short out. Then solder the three components together, connect the radio and the headset, and run a function test with the radio. When it works, glue down the components to the circuit card with silicone or conformal coating, and let it dry. The silicone will insulate the new circuitry against short circuits, and prevent it shifting around, and keep water from getting to it. This adapter may be built into U-92A/U connectors (if you use a finger switch on the end of an extra cable) if you choose the parts carefully (small ones) or into a Nexus U-94A/U which has the built-in PTT switch. My headset works VERY well with the Yaesu radios and with various FRS and other sets. The mic is so sensitive that even a "silent whisper" is understandable over the air, which is the way I wanted it. The Peltor has a noise-cancelling dynamic mic, which means that there are 2 mic elements - one looking toward your mouth, and one looking away from your mouth. Ambient noise is cancelled out best when the mic is against the operator's lip where the voice power is highest. If your radio is being over-driven by mic audio from the modification, just shift the mic away from your lip and the mic will cancel some of the voice along with ambient noise. |
|
|
|
[#1]
Out of all the retarded bullshit that comes up in this forum, this might be one of the most useful blocks of instruction in years. Nicely done OP.
|
|
|
|
[#2]
Thanks for the kind remark, BD1a.
I thought that the subject would be useful to a wide range of the forum users. |
|
|
|
[#3]
Wow, thanks a ton! This is great info. Can you tell me if this same thing will work for the MSA Sordin headsets? I imagine it would, the PTT should be interchangeable, but I really don't have any experience with this stuff.
Again, thanks! |
|
|
|
[#4]
Will this mod work on a Comtac II headset that doesn't come with the boom mic or cables, but can have those parts added to it?
|
|
|
|
[#5]
Regarding the application of this adapter to headsets of various makes:
One reason I bought the Peltor in this model is that it comes with two of the very common and generally-useless MBITR PTT interfaces. These MBITR PTT interfaces are easy to find at very low prices, because nobody wants them. Any headset that has the TP120 type connector will plug into a Peltor MBITR PTT, and because the TP120 is the military standard, you see on the almost all of the MSA and other brands. The stubby 4 conductor phone plug. If the headset will plug into the Peltor PTT and it uses a dynamic mic (nearly ALL of the miliitary headsets DO), then it should work. SOME of the non-military Peltors (and a VERY few of the military models) come with microphones other than the dynamic type. Those will either NOT need the adapter (transistor amplifier) which I built into this PTT, or they may not work with the amplifier. Peltor has a good library of user documents, and that should tell you what kind of a Peltor mic you HAVE, or what type you want to ADD to your headset for the project. If you headset has no mic AND no cable for radio comms, you will probably be better off finding a headset that DOES have the cable, because the audio routing in the headset will be troublesome to configure. |
|
|
|
[#6]
Interesting. If there is sufficient interest, I will toggle non-archive status.
|
|
|
|
[#7]
Quoted:
Out of all the retarded bullshit that comes up in this forum, this might be one of the most useful blocks of instruction in years. Nicely done OP. First post got it. You have balls my man for doing that on a brand new set muffs. This was not a tag. |
|
|
|
[#8]
husker77c, I have been modifying electronics since I was 13. I am now significantly older. They pay me money to do this kind of thing at work.
I intentionally sought out the headset kit by Peltor that includes the dual MBITR PTT accessories so I COULD convert those without any risk - I have no MBITR and never will, unless someone GIVES me an MBITR, and since I am old and disinterested in enlisting, that is not likely.. Had the internal assembly of the PTT been inaccessible at the TP120 jack and the PTT button switch, then I would have thrown those in the trash and simply used U-94A/U PTT buttons for the job. Since the Peltor MBITR PTTs were essentially free, I used one of those. THIS, is the making of a silk purse from a sow's ear, and anyone can do it. If anyone is confused after browsing the essay, I can post more pictures of the PTT with the adapter built in it. I thought it was wordy and complex enough already, considering how simple the project actually is. So I stopped, out of fear that I would frighten off inexperienced builders. My suggestion is that you jump in, especially if you have NEVER done this sort of thing. Here is a chance for you to get your feet wet while making your Peltors useful for more activities than they are now. I use miy Peltors to listen to AM radio while on the tractor, with the Yaesu radios and a police scanner simultaneously when something is wrong, with the Yaesu alone when I want to be in touch with my wife while working in the woods. If it has an earphone jack, you can plug in the Peltors and listen.It has an earphone jack and a mic jack you can make the Peltors work with it. All you must do first is adapt the plugs and condition the Peltor's microphone audio. Nothing magic or secret about it. |
|
|
|
[#9]
somebody buy this man a membership!
Seriously, very thoughtful of you to share your knowledge and experience with us, bravo. |
|
|
|
[#10]
Quoted:
husker77c, I have been modifying electronics since I was 13. I am now significantly older. They pay me money to do this kind of thing at work. I intentionally sought out the headset kit by Peltor that includes the dual MBITR PTT accessories so I COULD convert those without any risk - I have no MBITR and never will, unless someone GIVES me an MBITR, and since I am old and disinterested in enlisting, that is not likely.. Had the internal assembly of the PTT been inaccessible at the TP120 jack and the PTT button switch, then I would have thrown those in the trash and simply used U-94A/U PTT buttons for the job. Since the Peltor MBITR PTTs were essentially free, I used one of those. THIS, is the making of a silk purse from a sow's ear, and anyone can do it. If anyone is confused after browsing the essay, I can post more pictures of the PTT with the adapter built in it. I thought it was wordy and complex enough already, considering how simple the project actually is. So I stopped, out of fear that I would frighten off inexperienced builders. My suggestion is that you jump in, especially if you have NEVER done this sort of thing. Here is a chance for you to get your feet wet while making your Peltors useful for more activities than they are now. I use miy Peltors to listen to AM radio while on the tractor, with the Yaesu radios and a police scanner simultaneously when something is wrong, with the Yaesu alone when I want to be in touch with my wife while working in the woods. If it has an earphone jack, you can plug in the Peltors and listen.It has an earphone jack and a mic jack you can make the Peltors work with it. All you must do first is adapt the plugs and condition the Peltor's microphone audio. Nothing magic or secret about it. I figured it wasn't your first rodeo. 
I have a Yaesu VX-8 that I may be taking your advice on, just have to get the headset. |
|
|
|
[#11]
How does the routed audio sound compared to regular headphones attached to the radio?
I'm looking to get a Sordin with the standard 6 pin audio connector that I can use for shooting, and as a transmits/receive headset for one of my mil radios. Listening through a H-250 is tiring and would rather be hands free. |
|
|
|
[#12]
The radio audio in my headset is very good. However, I like to crank up the Peltor ambient audio amplification, and I like to run the radio audio at a lower level than the ambient audio. This makes the radio audio sound a little clipped to me, but others who have listened said it sounds good.
I blame my own bad hearing. When I reduce the ambient audio amplification back down to "normal levels" the radio sounds better to my ear. The Peltor has an equalizer function built in, and this might eliminate the effect I suffer, but I haven't fooled with it because I want the ambient audio to taper off at my own ear's usual rate. In both cases the radio is clearly understandable. I can imagine how awkward holding an H-250 to your ear in a fight would be. |
|
|
|
[#13]
For what it is worth, there is a decent supply of U92A/U connectors available on eBay these days. I have found them at $20 each with free shipping. In my opinion that is a very good price for a top quality connector, especially an oddball like these.
These mate with the TP120 just fine. |
|
|
|
[#14]
Quoted:
husker77c, I have been modifying electronics since I was 13. I am now significantly older. They pay me money to do this kind of thing at work. I intentionally sought out the headset kit by Peltor that includes the dual MBITR PTT accessories so I COULD convert those without any risk - I have no MBITR and never will, unless someone GIVES me an MBITR, and since I am old and disinterested in enlisting, that is not likely.. Had the internal assembly of the PTT been inaccessible at the TP120 jack and the PTT button switch, then I would have thrown those in the trash and simply used U-94A/U PTT buttons for the job. Since the Peltor MBITR PTTs were essentially free, I used one of those. THIS, is the making of a silk purse from a sow's ear, and anyone can do it. If anyone is confused after browsing the essay, I can post more pictures of the PTT with the adapter built in it. I thought it was wordy and complex enough already, considering how simple the project actually is. So I stopped, out of fear that I would frighten off inexperienced builders. My suggestion is that you jump in, especially if you have NEVER done this sort of thing. Here is a chance for you to get your feet wet while making your Peltors useful for more activities than they are now. I use miy Peltors to listen to AM radio while on the tractor, with the Yaesu radios and a police scanner simultaneously when something is wrong, with the Yaesu alone when I want to be in touch with my wife while working in the woods. If it has an earphone jack, you can plug in the Peltors and listen.It has an earphone jack and a mic jack you can make the Peltors work with it. All you must do first is adapt the plugs and condition the Peltor's microphone audio. Nothing magic or secret about it. If you could post some pics that would be very very helpful. |
|
|
|
[#15]
leo84, what other pictures would you like to see?
What sorts of things do you need after seeing the pictures I did post and reading the essay? I will provide whatever details you would like. |
|
|
|
[#16]
As someone who has always just changed the microphone in the sordins I'm gonna have to give that amp setup a try. Thanks.
Been thinking about leaking the information to convert the sordins mic and lemo cable. You might motivate me to do so. |
|
|
|
[#17]
Hope you do ssgtcarroll
When I get time, I will build this into a U-92A/U and a U-94A/U and post sketches of that. |
|
|
 Win a FREE Membership!
Sign up for the ARFCOM weekly newsletter and be entered to win a free ARFCOM membership. One new winner* is announced every week!
You will receive an email every Friday morning featuring the latest chatter from the hottest topics, breaking news surrounding legislation, as well as exclusive deals only available to ARFCOM email subscribers.

AR15.COM is the world's largest firearm community and is a gathering place for firearm enthusiasts of all types.
From hunters and military members, to competition shooters and general firearm enthusiasts, we welcome anyone who values and respects the way of the firearm.

Subscribe to our monthly Newsletter to receive firearm news, product discounts from your favorite Industry Partners, and more.
Copyright © 1996-2024 AR15.COM LLC. All Rights Reserved.
Any use of this content without express written consent is prohibited.
AR15.Com reserves the right to overwrite or replace any affiliate, commercial, or monetizable links, posted by users, with our own.


