|
[#1]
One of my students wanted to paint his rifle stock as a project in class. He wanted to do a snow camo sceme. He had a couple pictures of what he wanted and I showed him this thread. He decided to try this technique with snow camo colors.
Didn't take him too long, and he had to so a bit of rework, dusting the white, gray, and blue back over at times, then reapplying sponges. 


|
|
|
|
[#2]
That stock looks really nice. Does he know he attends the best HS art class in the country?
|
|
|
|
[#3]
Quoted:
That stock looks really nice. Does he know he attends the best HS art class in the country? |
|
|
|
[#4]
Thanks to your excellent write-up, I figured I had nothing to lose.
My first sponge-paint / rattle can attempt. 
I have always like the early 'chocolate chip' desert camo, which is what I was kinda going for here. |
|
|
|
[#5]
Quoted:
Thanks to your excellent write-up, I figured I had nothing to lose. My first sponge-paint / rattle can attempt. https://i.vgy.me/ODrqc5.jpg I have always like the early 'chocolate chip' desert camo, which is what I was kinda going for here. |
|
|
|
[#6]
I am extremely interested in this, particular the snow camo. I'm putting together a 6.5 Grendel for hunting coyotes in the mountains around here and, well, it's snowy.
Do I need to do a base coat? Is it ridiculous to try snow colors over a purple anodized rail? |
|
|
|
[#7]
Quoted:
I am extremely interested in this, particular the snow camo. I'm putting together a 6.5 Grendel for hunting coyotes in the mountains around here and, well, it's snowy. Do I need to do a base coat? Is it ridiculous to try snow colors over a purple anodized rail? Snow colors should be fine over anything. |
|
|
|
[#8]
My friend took this pic Thursday. We were out practicing "room clearing" with PDWs, pistols and carbines.
This target was at 40yrds, and that is an extremely lucky double tap from my PDW......it blends in with my sweatshirt pretty well.  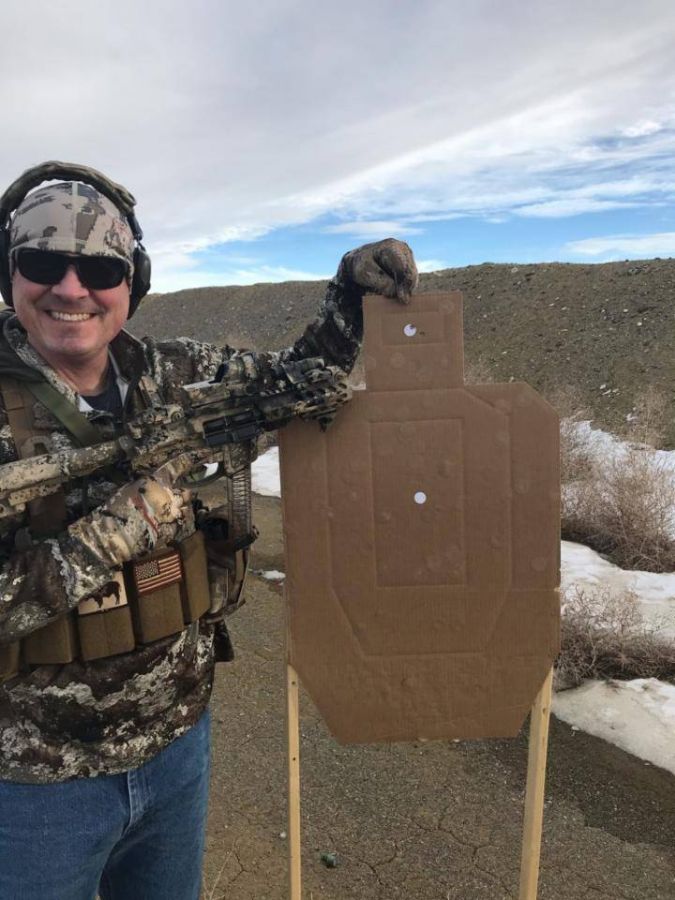
|
|
|
|
[#9]
Quoted: Do I need to do a base coat? Is it ridiculous to try snow colors over a purple anodized rail? Takes a few minutes and gets you a fresh surface to work with |
|
|
|
[#10]
Quoted:
My friend took this pic Thursday. We were out practicing "room clearing" with PDWs, pistols and carbines. This target was at 40yrds, and that is an extremely lucky double tap from my PDW......it blends in with my sweatshirt pretty well. https://www.AR15.Com/media/mediaFiles/1292/35934-1208126.jpg |
|
|
|
[#11]
Quoted:
Thanks to your excellent write-up, I figured I had nothing to lose. My first sponge-paint / rattle can attempt. https://i.vgy.me/ODrqc5.jpg I have always like the early 'chocolate chip' desert camo, which is what I was kinda going for here. |
|
|
|
[#12]
Tagged for Reference
|
|
|
|
[#13]
Here’s my sponge-camo rifle I posted about earlier at the range today. The paint job has held up to this season’s hunting.
I clearly made mistakes, but the deer haven’t complained
|
|
|
|
[#14]
I stumbled across this thread this past weekend and figured I’d give it a shot. Here are my results


|
|
|
|
[#15]
Quoted:
I stumbled across this thread this past weekend and figured I’d give it a shot. Here are my results https://i.ibb.co/CMDG2pp/6-D77-B55-E-2201-428-B-829-B-E0-B8-BD259979.jpg https://i.ibb.co/VHnXxjH/F6-F594-DD-B2-C4-477-F-94-EB-BA22-CE134-C48.jpg Excellent work! Love the color choices. |
|
|
|
[#16]
Looks good!
|
|
|
|
[#17]
Quoted:
I stumbled across this thread this past weekend and figured I’d give it a shot. Here are my results https://i.ibb.co/CMDG2pp/6-D77-B55-E-2201-428-B-829-B-E0-B8-BD259979.jpg https://i.ibb.co/VHnXxjH/F6-F594-DD-B2-C4-477-F-94-EB-BA22-CE134-C48.jpg Now I want one! |
|
|
|
[#18]
Thanks everyone, it was a pain finding natural sponges, but hobby lobby saved the day. I figured I’d do a test run on a sig grip module before I go all out and do my Fal...
|
|
|
|
[#19]
Tag
|
|
|
|
[#20]
Damn, I never really cared for sponge camo jobs but what Ive seen from OP and other posters in this thread, I think Im going to make my first camo job a sponge job! Really nice work guys.
|
|
|
|
[#21]
This is so cool
|
|
|
|
[#22]
Quoted:
I stumbled across this thread this past weekend and figured I’d give it a shot. Here are my results https://i.ibb.co/CMDG2pp/6-D77-B55-E-2201-428-B-829-B-E0-B8-BD259979.jpg https://i.ibb.co/VHnXxjH/F6-F594-DD-B2-C4-477-F-94-EB-BA22-CE134-C48.jpg |
|
|
|
[#23]
Quoted: What colors/sequence is this? I've been looking for a more woodland type camo pattern. I think this pattern most closely resembles the color of my AO. |
|
|
|
[#24]
So I’m 99% certain these are the colors I used. (I cleaned up my mess and put everything back) The base is the krylon OD. I then took sponges I picked up from hobby lobby, sprayed paint on a paper plate and went to work, unsure of what I was doing. The strip of khaki you see on the frame of the pistol is because I messed up and didn’t gently press down on the sponge. Other than that, I’m not sure what else to say. I think I need to practice more with the technique because although I don’t mind how it turned out, I think it could be better.

|
|
|
|
[#25]
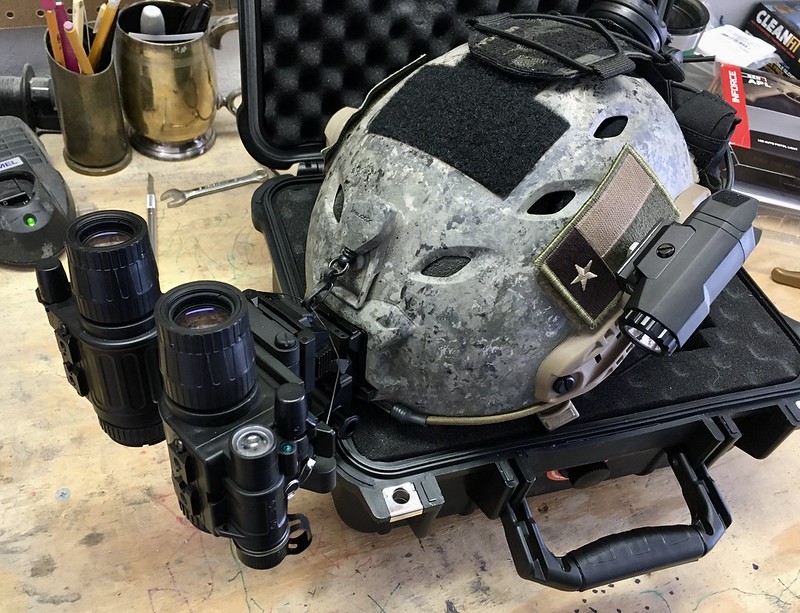
@guns762
Your thread inspired me to repaint my NV helmet. My 4yo and 6yo boys had a blast helping me with the camo work! The pattern is pretty small since they went to town with the sponges, but I really like how it came out. Thanks for the writeup. 
Here are a few pics. The first couple are right after removing the masking tape: 

And with all the accoutrements de guerre: 

|
|
|
|
[#26]
Quoted:
@guns762 Your thread inspired me to repaint my NV helmet. My 4yo and 6yo boys had a blast helping me with the camo work! The pattern is pretty small since they went to town with the sponges, but I really like how it came out. Thanks for the writeup.
Here are a few pics. The first couple are right after removing the masking tape: https://live.staticflickr.com/65535/49650733942_1f6e7cf079_c.jpg https://live.staticflickr.com/65535/49650460911_49ecc3498c_c.jpg And with all the accoutrements de guerre: https://live.staticflickr.com/65535/49650460926_6f0981349d_c.jpg https://live.staticflickr.com/65535/49650460916_f8fb2d6663_c.jpg https://live.staticflickr.com/65535/49649921108_f1c2e03d49_c.jpg Not to derail this thread, but how much did that setup cost you? I've always wanted a NV setup like that but really have no idea what it would cost. It looks absolutely bad ass though, great job! |
|
|
|
[#27]
Quoted:
@guns762 Your thread inspired me to repaint my NV helmet. My 4yo and 6yo boys had a blast helping me with the camo work! The pattern is pretty small since they went to town with the sponges, but I really like how it came out. Thanks for the writeup.
Here are a few pics. The first couple are right after removing the masking tape: https://live.staticflickr.com/65535/49650733942_1f6e7cf079_c.jpg https://live.staticflickr.com/65535/49650460911_49ecc3498c_c.jpg And with all the accoutrements de guerre: https://live.staticflickr.com/65535/49650460926_6f0981349d_c.jpg https://live.staticflickr.com/65535/49650460916_f8fb2d6663_c.jpg https://live.staticflickr.com/65535/49649921108_f1c2e03d49_c.jpg |
|
|
|
[#28]
Quoted:
@DJ_Skinny Not to derail this thread, but how much did that setup cost you? I've always wanted a NV setup like that but really have no idea what it would cost. It looks absolutely bad ass though, great job! Y'know it's funny I was thinking about how much I had into this setup while I was painting it. I'm trying to ball on a budget over here, so be aware there are plenty of members that have spent waaay more $$ than I have on this stuff. I've been piecing this together over a long time and buying a part here and there. With that said, I'll try to break down what I have into my particular rig. - Obviously, the biggest expense was the NODs themselves ~ $2700 off the EE; gen 2+ tubes with some minor blems. Nothing fancy, but I'm not fast-roping into combat or anything. - The helmet is an OpsCore bump helmet ~ $225 off the EE (with Wilcox lanyard/tether thing included) - The mount afixing the NODs to the helmet is a Wilcox G22 clone ~$150 purchased from the EE - Rail adapters for the earmuffs are Peltor clones ~$25 on Amazon - Earmuffs (not visible in pics) are just Howard Leight sports that I cut off the headband to mount on the rail adapters ~$50 - Counterweight is a TNVC Mohawk in multicam black ~$70 on their site - Also have some 4G pads installed you can't see in the photos ~$90 on TNVC's website as well - VIP strobe on the back ~$25 on the EE - Inforce APL mounted on a homemade bracket via a small piece of rail section ~$90 (light was a gift) So, I've probably got around $3400 invested without accounting for shipping, taxes, etc. Not to further derail the thread, but you could probably get a "starter" setup going for around $2k. A single PVS14 monocular with a decent get 2+ tube can be had for around $1800 if you look around on the EE. Throw in a used Norotos Rhino mount ($75) + surplus j-arm ($25) + cheap Amazon helmet, and you're right in that ballpark; you don't even really need a counterweight to begin with. This is kind of where I got started and then traded/sold stuff to get my current rig. Lots of good info in the NV section of the armory too. Feel free to IM or email me if you have more questions. Cheers! |
|
|
|
[#29]
Quoted:
Well, that turned out awesome! Nice! |
|
|
|
[#30]
@guns762
If I got long strips of natural sponge and laid them down in a diagonal uniformish pattern while sponging it... do you think it would make a decent tiger stripe? |
|
|
|
[#31]
Quoted:
@guns762 If I got long strips of natural sponge and laid them down in a diagonal uniformish pattern while sponging it... do you think it would make a decent tiger stripe? |
|
|
|
[#32]
Quoted:
I'll bet it would work, but you will have to make sure you spin the stripes so they dont make the exact same stripe each time(same direction, but spun along its axis). Also, think about adding as little pressure to the sponges as possible, so it doesn't looked mashed in application. Quoted:
Quoted:
@guns762 If I got long strips of natural sponge and laid them down in a diagonal uniformish pattern while sponging it... do you think it would make a decent tiger stripe? When I get to black, the final color, I just outline the previous layers of colors edges to create depth. See my post on previous page for how to. 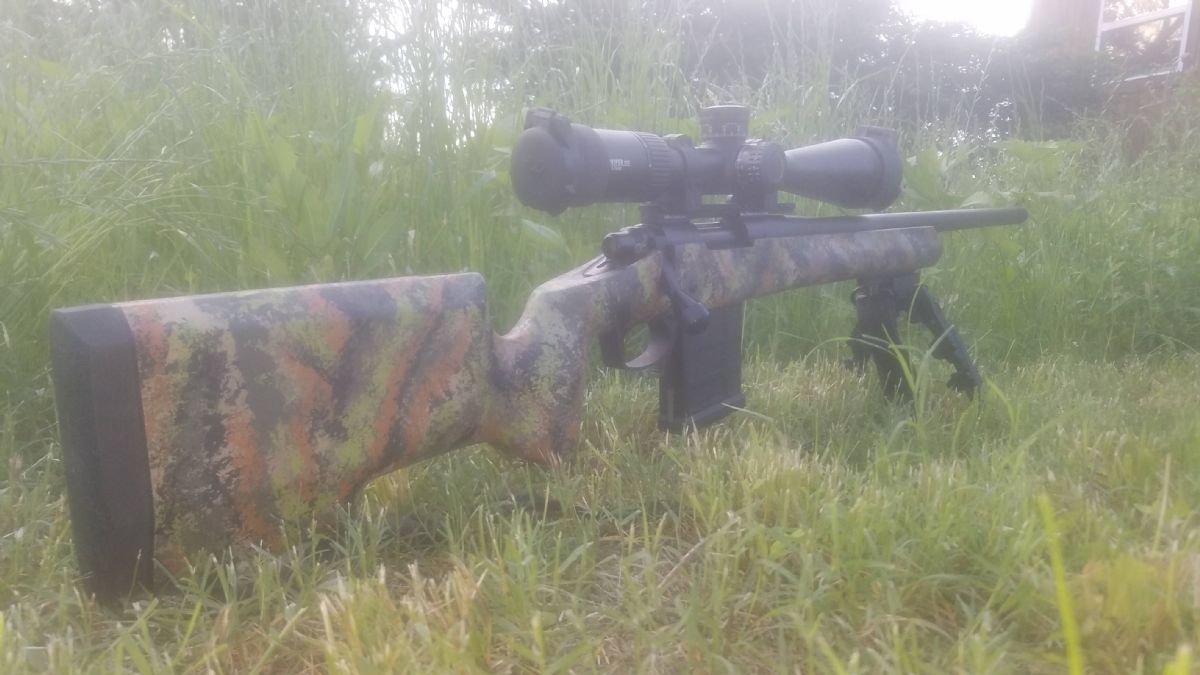

|
|
|
|
[#33]
OP I want you to know I very much appreciate you making this post. It’s been invaluable to a noob like me.
Did my first gun today. Literally never tried to sponge paint anything before today. Had plans to practice before I tried it on a gun but cabin fever drove me outside to do it. Keep in mind that I could care less about it being a super high and tight job. This is a hard use gun so mostly concerned with function. Not 100% happy with the pattern, think I need to add more “splotches”. But a good start. Next one I’d use a lighter base coat. It’s all alumahyde  
|
|
|
|
[#34]
In hindsight I probably should have used the sand color as the base coat and then used the others for the “splotching”
|
|
|
|
[#35]
Quoted: In hindsight I probably should have used the sand color as the base coat and then used the others for the “splotching” That turned out very nicely! I wouldn't be too concerned about a single color base coat. Using all of the colors in an angled pattern, as a base coat seems to work best for me. In that, I mean, light colored area, dark area, medium area, and even an almost black area.....allowing them to fade into each other. By doing that, the splotches of each color stand out better, as they will contrast in some areas, and other areas not so much. I think that is why the pattern tends to work so well in the wild, as well as aesthetically. This reminds me I need to place an order for some more Alumahide. ETA: Where are your sites and optic????  You painted your supressor.... do the optic too. You painted your supressor.... do the optic too. |
|
|
|
[#36]
Quoted: That turned out very nicely! I wouldn't be too concerned about a single color base coat. Using all of the colors in an angled pattern, as a base coat seems to work best for me. In that, I mean, light colored area, dark area, medium area, and even an almost black area.....allowing them to fade into each other. By doing that, the splotches of each color stand out better, as they will contrast in some areas, and other areas not so much. I think that is why the pattern tends to work so well in the wild, as well as aesthetically. This reminds me I need to place an order for some more Alumahide. ETA: Where are your sites and optic???? You painted your supressor.... do the optic too.This is my hog hunting rifle so I don’t use an optic on it, only a Peq15. I did use a few different base coat colors but I think they are so close together in tone that it’s hard to tell |
|
|
|
[#37]
Just tried out your method with a more desert pattern for here in Texas.
It was a bit daunting since this is the only gun I own and I didn’t want to screw anything up. But it ended up being a rather simple process, and mistakes are easy to cover up by nature of its pattern. I think it turned out pretty well. The barrel, buffer tube, trigger, and my 2.5-8x Leopoldo Mk4 are all unpainted and black. It’s a 6.5G Larue UU on a mega arms lower. |
|
|
|
[#38]
Quoted: Just tried out your method with a more desert pattern for here in Texas. It was a bit daunting since this is the only gun I own and I didn’t want to screw anything up. But it ended up being a rather simple process, and mistakes are easy to cover up by nature of its pattern. I think it turned out pretty well. The barrel, buffer tube, trigger, and my 2.5-8x Leopoldo Mk4 are all unpainted and black. It’s a 6.5G Larue UU on a mega arms lower. https://www.AR15.Com/media/mediaFiles/498570/image_jpg-1357687.JPG https://www.AR15.Com/media/mediaFiles/498570/7826AE53-C805-43FC-AF87-705104B1E133_jpe-1357690.JPG Hey! We've got the same UU! Mine is still waiting for an optic. I got a new batch of Alumahyde just sitting there waiting g to use. I really like your colors. |
|
|
|
[#39]
Quoted: Hey! We've got the same UU! Mine is still waiting for an optic. I got a new batch of Alumahyde just sitting there waiting g to use. I really like your colors. yeah they went together pretty well. Picked them out with a friend and he did his first gun as well. He went with slightly fewer and larger splotches and so they each have a unique look. Now that my father saw what this camo job looks like he wants to try it on his MK12 clone. |
|
|
|
[#40]
I tried your technique today. On a hipoint. Figured if I messed it up nothing of value would be lost.
Turned out pretty good, I'm happy 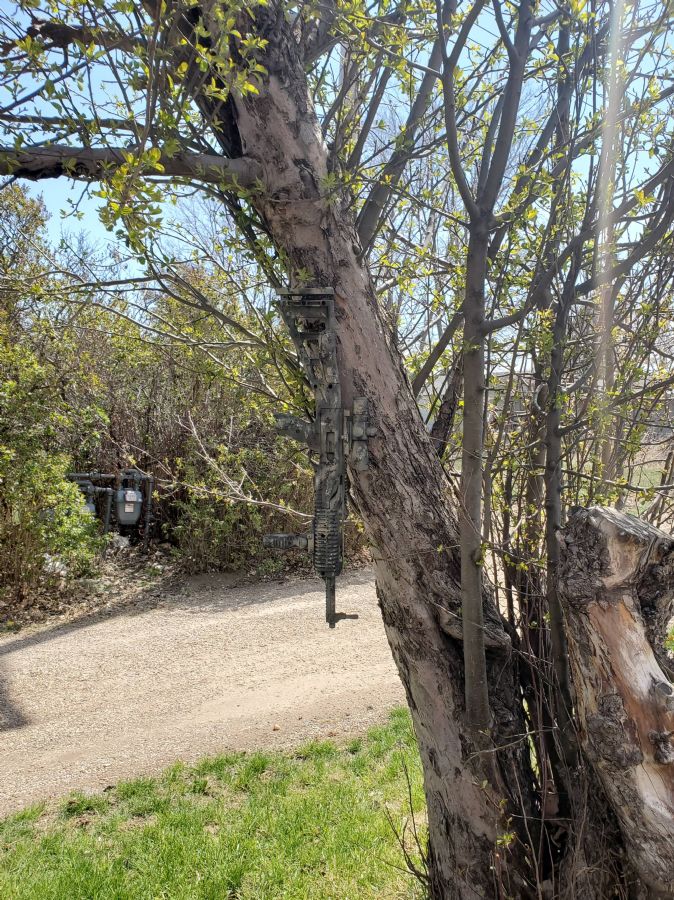 
|
|
|
|
[#41]
Quoted: I tried your technique today. On a hipoint. Figured if I messed it up nothing of value would be lost. Turned out pretty good, I'm happy https://www.AR15.Com/media/mediaFiles/373944/20200419_232055-1376818.jpg https://www.AR15.Com/media/mediaFiles/373944/20200419_232201-1376819.jpg Great job jake! It disappeared hanging from that tree. Your sponge marks look nicely varied and organic. |
|
|
|
[#42]
did these three sunday and yesterday. Not real happy with how the mp5 clone turned out. Pretty happy with the shotguns. Im probably going to strip the mp5 before the alumahyde cures and then repaint it in a few weeks.
 
|
|
|
|
[#43]
Quoted: did these three sunday and yesterday. Not real happy with how the mp5 clone turned out. Pretty happy with the shotguns. Im probably going to strip the mp5 before the alumahyde cures and then repaint it in a few weeks. https://www.AR15.Com/media/mediaFiles/62932/AA6526AA-6DFB-4A01-92C7-24D01C5821EB-1378819.jpg https://www.AR15.Com/media/mediaFiles/62932/7EE926E0-FDFC-4B2E-8BF7-1E07BBD3557C-1378818.jpg Best part about the sponge painting, is "fixing it" is as simple as just repainting. I don't think you need to strip the mp5. Lightly spray your light, med, and dark values over top, then re apply sponge marks. You don't even have to repaint the whole thing. Also, think less sponge marks. Some times less is more. Looks like you did fewer on the shotguns. I think the reason you like the shotgun results better is you varied the size and rotated the sponges in different directions so they don't make the same mark over and over. |
|
|
|
[#44]
Did my Benelli M1-S90 on Easter Sunday, couldn't get any natural sponges as anyone that may have them is closed due to the Wu Flu, so I cut up a paint roller and I like the way that it came out. This is about the 6th time painting it in its long life.
|
|
|
|
[#45]
I have a question for @guns762 and anyone else who has rattle canned a pistol.
I have Ruger LCP with a satin stainless slide. And for multiple reasons I really dislike the shiny slide. I had thought about having it Cerakoted, but after this thread and painting a stick I decided to save some cash on what us purely a working gun and just paint it. I have a can of Alumahyde flat black I plan to use. Since I’m just painting the slide, should I separate the slide from the pistol, mask off the internals and paint it standalone? Or leave it in the frame, mask off mask off muzzle and frame and paint in-situ? |
|
|
|
[#46]
Quoted: Did my Benelli M1-S90 on Easter Sunday, couldn't get any natural sponges as anyone that may have them is closed due to the Wu Flu, so I cut up a paint roller and I like the way that it came out. This is about the 6th time painting it in its long life. https://www.AR15.Com/media/mediaFiles/164162/73463032-B053-489F-AADB-2DC5A1D290A4_jpe-1382484.JPG https://www.AR15.Com/media/mediaFiles/164162/DB5D9C09-284C-485D-B0BD-03A1F062D0D9_jpe-1382487.JPG Nice job! |
|
|
|
[#47]
Quoted: I have a question for @guns762 and anyone else who has rattle canned a pistol. I have Ruger LCP with a satin stainless slide. And for multiple reasons I really dislike the shiny slide. I had thought about having it Cerakoted, but after this thread and painting a stick I decided to save some cash on what us purely a working gun and just paint it. I have a can of Alumahyde flat black I plan to use. Since I’m just painting the slide, should I separate the slide from the pistol, mask off the internals and paint it standalone? Or leave it in the frame, mask off mask off muzzle and frame and paint in-situ? I'd probably take the slide off and mask the internals off and do it that way. |
|
|
|
[#48]
Quoted: Did my Benelli M1-S90 on Easter Sunday, couldn't get any natural sponges as anyone that may have them is closed due to the Wu Flu, so I cut up a paint roller and I like the way that it came out. This is about the 6th time painting it in its long life. https://www.AR15.Com/media/mediaFiles/164162/73463032-B053-489F-AADB-2DC5A1D290A4_jpe-1382484.JPG https://www.AR15.Com/media/mediaFiles/164162/DB5D9C09-284C-485D-B0BD-03A1F062D0D9_jpe-1382487.JPG Great job, wow! Nice job using the rollers. |
|
|
|
[#49]
Out today celebrating the end of the semester for my youngest son.
We were running drills with pistol and carbines. I took my Arsenal AK as my stash of 7.62x39 is....expendable. This was done with Krylon. More bold contrast than the Alumahyde. I don't shoot it much, so I cant comment on its durability.   |
|
|
|
[#50]
This thread is great! I need to get going and sponge an AR. These guns posted look awesome.
|
|
|
 Win a FREE Membership!
Sign up for the ARFCOM weekly newsletter and be entered to win a free ARFCOM membership. One new winner* is announced every week!
You will receive an email every Friday morning featuring the latest chatter from the hottest topics, breaking news surrounding legislation, as well as exclusive deals only available to ARFCOM email subscribers.

AR15.COM is the world's largest firearm community and is a gathering place for firearm enthusiasts of all types.
From hunters and military members, to competition shooters and general firearm enthusiasts, we welcome anyone who values and respects the way of the firearm.

Subscribe to our monthly Newsletter to receive firearm news, product discounts from your favorite Industry Partners, and more.
Copyright © 1996-2024 AR15.COM LLC. All Rights Reserved.
Any use of this content without express written consent is prohibited.
AR15.Com reserves the right to overwrite or replace any affiliate, commercial, or monetizable links, posted by users, with our own.


