|
[#1]
Very nice, thanks for posting pics.
Quoted:
Don't know why powder scoop has a hole in bottom. My Lee .300 Blackout dies didn't come with a scoop at all. At least you got a conversation piece. |
|
|
|
[#2]
Quoted:
Don't know why powder scoop has a hole in bottom. From what I have read, when the 300BLK dies shipped, Lee had not done any load data on the cartridge yet. The hole in the scoop is to make sure you can't use the scoop. I guess they include it to make you ask or so you don't call asking them where it is or something. |
|
|
|
[#3]
Thanks for taking the time to post this helpful and informative DIY write-up.
I also don't have a .300 BLK upper yet, but I'm contemplating adding one to the stable... |
|
|
|
[#4]
Quoted: Thanks for taking the time to post this helpful and informative DIY write-up. I also don't have a .300 BLK upper yet, but I'm contemplating adding one to the stable... +1 There are so may calibers to choose from, I don't know where to start. We can suppressors in MI now so that makes the Blackout look more interesting now. |
|
|
|
[#5]
Great post, OP. While I'm not totally sold on the .300 Blk(I think the .338 Spectre is a better cartridge), I do like threads that show how easy cartridge conversions are.
|
|
|
|
[#6]
Nice post dryflash.
Do you use a 30 caliber 3 way cutter for the final trim? Seems it might speed up the process if you can trim, chamfer and deburr in one step. I think this is going to end up being my next project. |
|
|
|
[#7]
Great post been waiting for one.
What do you think about using a dremel to cut them down close then using a trimmer to do the rest? Now I need a 300 Blackout Upper |
|
|
|
[#8]
what is a good measurement to trim 5.56 brass before sizing with the 300blk die? I have Lyman case trimmer with a drill, it's pretty fast, not as good as a high speed trimmer but fast enough for my needs. I trimmed a few to 1.48, leaves just a tad of the shoulder, case mouth is around .30. I have dies ordered but would like to trim some cases while waiting on the dies. Thanks
|
|
|
|
[#9]
excellent write up dryflash3,
looks a lot like my 7.62x40. |
|
|
|
[#10]
Quoted:
Quoted:
Don't know why powder scoop has a hole in bottom. From what I have read, when the 300BLK dies shipped, Lee had not done any load data on the cartridge yet. The hole in the scoop is to make sure you can't use the scoop. I guess they include it to make you ask or so you don't call asking them where it is or something. I just thought it was  , thanks for the reason why. , thanks for the reason why.
|
|
|
|
[#11]
Quoted:
Nice post dryflash. Do you use a 30 caliber 3 way cutter for the final trim? Seems it might speed up the process if you can trim, chamfer and deburr in one step. I think this is going to end up being my next project. I have a 3 way in 22 cal. i don't have one in 30 cal. I plan on getting the set up for my Giraud instead. |
|
|
|
[#12]
Quoted:
what is a good measurement to trim 5.56 brass before sizing with the 300blk die? I have Lyman case trimmer with a drill, it's pretty fast, not as good as a high speed trimmer but fast enough for my needs. I trimmed a few to 1.48, leaves just a tad of the shoulder, case mouth is around .30. I have dies ordered but would like to trim some cases while waiting on the dies. Thanks Trim 223 case to the bottom of the shoulder. Then case will be long enough to trim to final length after forming in 300 blk sizing die. |
|
|
|
[#13]
Quoted:
Great post been waiting for one. What do you think about using a dremel to cut them down close then using a trimmer to do the rest? Now I need a 300 Blackout Upper Thank hrt4me, he asked me to post my pics in another thread, so I did. If you have lots of wheels go for it. Rough trim length is the bottom of the shoulder. |
|
|
|
[#14]
Quoted:
Quoted:
what is a good measurement to trim 5.56 brass before sizing with the 300blk die? I have Lyman case trimmer with a drill, it's pretty fast, not as good as a high speed trimmer but fast enough for my needs. I trimmed a few to 1.48, leaves just a tad of the shoulder, case mouth is around .30. I have dies ordered but would like to trim some cases while waiting on the dies. Thanks Trim 223 case to the bottom of the shoulder. Then case will be long enough to trim to final length after forming in 300 blk sizing die. Thanks, I'll adjust my trimmer |
|
|
|
[#15]
Dry, if you keep posting threads like this, showing 1050s and the the fun of forming 300 brass, my wife will really hate you. I will blame everything on you and the other ne'er-do-wells on this site that post these things!
|
|
|
|
[#16]
Quoted:
Dry, if you keep posting threads like this, showing 1050s and the the fun of forming 300 brass, my wife will really hate you. I will blame everything on you and the other ne'er-do-wells on this site that post these things! Just posting what was asked by hrt4me. Sic your wife on him. I have also loaded 223 on that 1050, I see why the people who have them like them. A 1050 is on my lottery list. |
|
|
|
[#17]
Quoted: Quoted: Dry, if you keep posting threads like this, showing 1050s and the the fun of forming 300 brass, my wife will really hate you. I will blame everything on you and the other ne'er-do-wells on this site that post these things! Just posting what was asked by hrt4me. Sic your wife on him. I have also loaded 223 on that 1050, I see why the people who have them like them. A 1050 is on my lottery list. I currently load on two Dillon 550s and three RCBS Rock Chuckers (two with Piggyback IIs), but two 1050s (one for .223 Rem and one for .40S&W) are on my list now due to threads such as this one, coupled with our plans for increased volume of shooting to support the multigun/3-Gun and local steel plate matches which both my wife and I do together! |
|
|
|
[#18]
Quoted:
Quoted:
Quoted:
Dry, if you keep posting threads like this, showing 1050s and the the fun of forming 300 brass, my wife will really hate you. I will blame everything on you and the other ne'er-do-wells on this site that post these things! Just posting what was asked by hrt4me. Sic your wife on him. I have also loaded 223 on that 1050, I see why the people who have them like them. A 1050 is on my lottery list. I currently load on two Dillon 550s and three RCBS Rock Chuckers (two with Piggyback IIs), but two 1050s (one for .223 Rem and one for .40S&W) are on my list now due to threads such as this one, coupled with our plans for increased volume of shooting to support the multigun/3-Gun and local steel plate matches which both my wife and I do together! Sounds like you wife needs a couple of new presses. |
|
|
|
[#19]
Well I got my 300blk dies yesterday and decided to play with them tonight.
Used the Lyman trimmer with a cordless drill and 22 pilot to trim to the base of the shoulder. Worked great and is pretty fast. After a quick cleanup of the case mouth I formed them in the dies with my homemade liquid lanolin spray lube. I was expecting some pressure on the handle during reforming but didn't really get any more than normal full length sizing. Then again I did this in my Classic Cast that has a 6 inch longer handle for swaging. Changed the pilot in the Lyman to a 30 and trimmed to length. I'm a bit surprised how easy it was. First time doing something like this so I guess I didn't know what to expect. Anyway, my post would be worthless without a pic so here it is. No bling since I just got done with them and they haven't been tumbled. Thanks for the tutorial dryflash, you make things like this easy for us beginners. Now I just need to get something to shoot them in. 

|
|
|
|
[#20]
Can one of you guy's post a pick of a new press formed case and a pick of a once fired case.
I was reading somewhere else about weird things like keyholing, large fps variations, pressure signs on press formed cases. Then after being fire formed the weird stuff stopped. |
|
|
|
[#21]
Quoted:
Well I got my 300blk dies yesterday and decided to play with them tonight. Used the Lyman trimmer with a cordless drill and 22 pilot to trim to the base of the shoulder. Worked great and is pretty fast. After a quick cleanup of the case mouth I formed them in the dies with my homemade liquid lanolin spray lube. I was expecting some pressure on the handle during reforming but didn't really get any more than normal full length sizing. Then again I did this in my Classic Cast that has a 6 inch longer handle for swaging. Changed the pilot in the Lyman to a 30 and trimmed to length. I'm a bit surprised how easy it was. First time doing something like this so I guess I didn't know what to expect. Anyway, my post would be worthless without a pic so here it is. No bling since I just got done with them and they haven't been tumbled. Thanks for the tutorial dryflash, you make things like this easy for us beginners. Now I just need to get something to shoot them in.
http://i19.photobucket.com/albums/b180/Jailer/Gun%20stuff/300Blk.jpg Nice pic, yes nothing magical about reforming cases. Just something new to learn. I just take a few pics while I'm doing what I normally do. AssaultRifler was the one who inspired me with his great tutorials. |
|
|
|
[#22]
Thanks dryflash. I'm contemplating this round next myself. Just going over in my head how I want to trim the brass down.I'll get the Giraud cutter, but I need to trim the majority off first before using the Giraud. The youtube video I saw of the HF cut off tool leaves a very clean cut. I'm surprised you didn't get more split cases sizing them first. I had a lot of split cases when making 7mmTCU. I'll have to try more lube inside the neck next time I make some.
|
|
|
|
[#23]
Going up from 22 cal to 30 cal is a huge jump, if you do it at once.
Steps would be; 22 to 6mm, 6mm to 7mm, 7mm to 30 cal would be considered a more normal sizing up operation. I just wanted to see what would happen. So I tried it. Imperial really is good stuff. I won't be doing that again, you really have to press down hard (two handed) on the Rockchuckers handle to make it work. Not something I recommend with a lighter weight (aluminum) press. Much better to trim cases to the bottom of the neck (rough trim), run case through sizing die and final trim. How you rough trim doesn't matter, drill press, cut off saw, bandsaw. Use the tools you have, or you feel comfortable with. Like so much in reloading, there are several ways "to get there". Try different techniques, find what works for you. I never got a 7mm TCU barrel for my Contender. I understand that you may have to anneal the case mouths with that conversion. I can see more splitting problems with that conversion as the whole case is used. 300 blk, we are cutting off the neck and possible brittle neck problems. Were you using once fired brass with your 7mm TCU case forming? Maybe consider annealing before case forming if you aren't. Good luck |
|
|
|
[#24]
I'm planning on using a drill press to trim .223 brass down prior to resizing the cases as shown in the pix. Any recommendations on how fast I should set the cutter to spin? Thanks!
|
|
|
|
[#25]
I have been using a Lyman trimmer with a drill, I have got the best results with fast. On low or med speed the cutter hangs up and rips the brass.
|
|
|
|
[#26]
Thanks for the good tips
Quoted: Going up from 22 cal to 30 cal is a huge jump, if you do it at once. Steps would be; 22 to 6mm, 6mm to 7mm, 7mm to 30 cal would be considered a more normal sizing up operation. I just wanted to see what would happen. So I tried it. Imperial really is good stuff. I won't be doing that again, you really have to press down hard (two handed) on the Rockchuckers handle to make it work. Not something I recommend with a lighter weight (aluminum) press. Much better to trim cases to the bottom of the neck (rough trim), run case through sizing die and final trim. How you rough trim doesn't matter, drill press, cut off saw, bandsaw. Use the tools you have, or you feel comfortable with. Like so much in reloading, there are several ways "to get there". Try different techniques, find what works for you. I never got a 7mm TCU barrel for my Contender. I understand that you may have to anneal the case mouths with that conversion. I can see more splitting problems with that conversion as the whole case is used. 300 blk, we are cutting off the neck and possible brittle neck problems. Were you using once fired brass with your 7mm TCU case forming? Maybe consider annealing before case forming if you aren't. Good luck |
|
|
|
[#27]
Quoted:
I'm planning on using a drill press to trim .223 brass down prior to resizing the cases as shown in the pix. Any recommendations on how fast I should set the cutter to spin? Thanks! On my drill press, the RPM is 1560. You could probably go a little faster but not too much. Use what you have is the theme of this thread. About 3 layers of tape on the vice grips. 2 layers of tape on the cutters threads, and only hand tighten the chuck. Good luck |
|
|
|
[#28]
Quoted:
Going up from 22 cal to 30 cal is a huge jump, if you do it at once. Steps would be; 22 to 6mm, 6mm to 7mm, 7mm to 30 cal would be considered a more normal sizing up operation. I just wanted to see what would happen. So I tried it. Imperial really is good stuff. I won't be doing that again... I never got a 7mm TCU barrel for my Contender. I understand that you may have to anneal the case mouths with that conversion. I can see more splitting problems with that conversion as the whole case is used. 300 blk, we are cutting off the neck and possible brittle neck problems. Were you using once fired brass with your 7mm TCU case forming? Maybe consider annealing before case forming if you aren't. Good luck May want to try a two-step neck-up operation using a 6.5 button and then the 308 button. I do this with my 7mm TCU AR, but I'm using the .257 button and then the 7mm, with no lube needed inside and no cleanup step later. New or old brass there are few that split in a two-step op - only around 5% are lost to the recycle bin. Also... inn before the powder scoop mod when you settle on a favorite load. |
|
|
|
[#29]
I'll be using a powder measure, not a scoop with a hole in it.
|
|
|
|
[#30]
Quoted: Quoted: Going up from 22 cal to 30 cal is a huge jump, if you do it at once. Steps would be; 22 to 6mm, 6mm to 7mm, 7mm to 30 cal would be considered a more normal sizing up operation. I just wanted to see what would happen. So I tried it. Imperial really is good stuff. I won't be doing that again... I never got a 7mm TCU barrel for my Contender. I understand that you may have to anneal the case mouths with that conversion. I can see more splitting problems with that conversion as the whole case is used. 300 blk, we are cutting off the neck and possible brittle neck problems. Were you using once fired brass with your 7mm TCU case forming? Maybe consider annealing before case forming if you aren't. Good luck May want to try a two-step neck-up operation using a 6.5 button and then the 308 button. I do this with my 7mm TCU AR, but I'm using the .257 button and then the 7mm, with no lube needed inside and no cleanup step later. New or old brass there are few that split in a two-step op - only around 5% are lost to the recycle bin. Also... inn before the powder scoop mod when you settle on a favorite load. DF that's how I got my feet wet with annealing about 20 years ago. I used the tunafish can and water method doing one case at a time. I even made some 7mmTCU from nickle 223 brass. My 7TCU is AR based too. 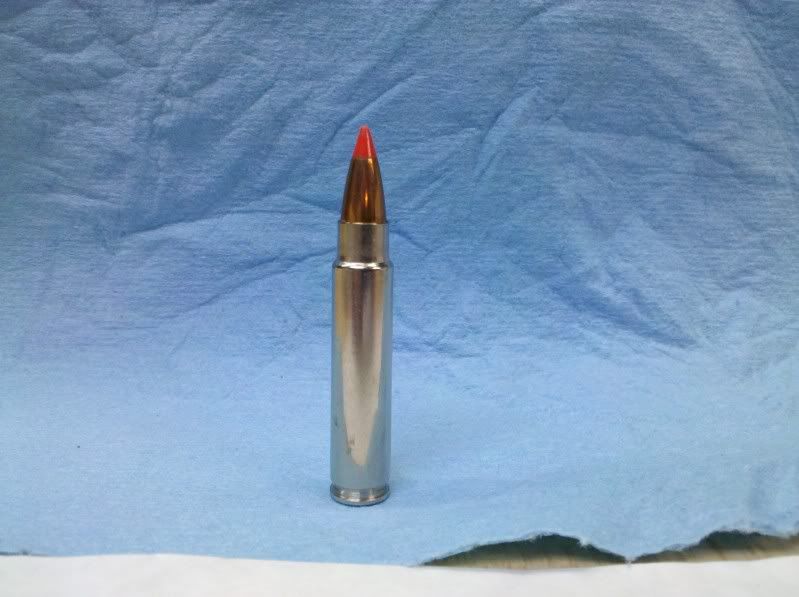 |
|
|
|
[#31]
Nice pic.
|
|
|
|
[#32]
I got my Harbor freight mini chop saw in the mail and got everything set up for trimming the necks off. I wanted a jig of some sorts too speed things up so I had a buddy of mine that has quite an extensive wood shop make me one. It works fantastic and I can trim about 8 to 10 per minute with it.
I'ts nothing more than a scrap piece of maple with a flat bottom hole bored for the brass to sit in. We sawed it down the middle of the hole lengthwise and added hinges so it would flip open to make brass insertion and removal easier. 

The first step buts up against the built in vise on the base. The small piece added to the front hangs over the edge and buts up against the front of the base. Having 2 contact points makes it real quick and easy to locate the jig each time to trim the brass. The middle step is for blade clearance and the top step is to clear the body of the saw. 

Brass is inserted and then the lid is closed. Once closed push in the brass lightly to bottom it in the hole and it's ready to trim. 


And a pic of the final product. It cuts clean enough that no duburring is needed to run it through the sizing die, another nice time saving measure. 
I made a short video of it in action if you want to click the link and watch it. I went quite a bit slower while trimming so it was easier to see what is going on. http://www.youtube.com/watch?v=5ukuy8CRfko&context=C30eb661ADOEgsToPDskIL1HOwy2gAiEJsn4U2H2kM |
|
|
|
[#33]
Quoted:
I got my Harbor freight mini chop saw in the mail and got everything set up for trimming the necks off. I wanted a jig of some sorts too speed things up so I had a buddy of mine that has quite an extensive wood shop make me one. It works fantastic and I can trim about 8 to 10 per minute with it. I'ts nothing more than a scrap piece of maple with a flat bottom hole bored for the brass to sit in. We sawed it down the middle of the hole lengthwise and added hinges so it would flip open to make brass insertion and removal easier. http://i19.photobucket.com/albums/b180/Jailer/Gun%20stuff/300blktrimming8.jpg http://i19.photobucket.com/albums/b180/Jailer/Gun%20stuff/300blktrimming7.jpg The first step buts up against the built in vise on the base. The small piece added to the front hangs over the edge and buts up against the front of the base. Having 2 contact points makes it real quick and easy to locate the jig each time to trim the brass. The middle step is for blade clearance and the top step is to clear the body of the saw. http://i19.photobucket.com/albums/b180/Jailer/Gun%20stuff/300blktrimming6.jpg http://i19.photobucket.com/albums/b180/Jailer/Gun%20stuff/300blktrimming5.jpg Brass is inserted and then the lid is closed. Once closed push in the brass lightly to bottom it in the hole and it's ready to trim. http://i19.photobucket.com/albums/b180/Jailer/Gun%20stuff/300blktrimming4.jpg http://i19.photobucket.com/albums/b180/Jailer/Gun%20stuff/300blktrimming3.jpg http://i19.photobucket.com/albums/b180/Jailer/Gun%20stuff/300blktrimming2.jpg http://i19.photobucket.com/albums/b180/Jailer/Gun%20stuff/300blktrimming1.jpg And a pic of the final product. It cuts clean enough that no duburring is needed to run it through the sizing die, another nice time saving measure. http://i19.photobucket.com/albums/b180/Jailer/Gun%20stuff/300blktrimming.jpg I made a short video of it in action if you want to click the link and watch it. I went quite a bit slower while trimming so it was easier to see what is going on. http://www.youtube.com/watch?v=5ukuy8CRfko&context=C30eb661ADOEgsToPDskIL1HOwy2gAiEJsn4U2H2kM That is pretty cool When I trimmed cases for my 300 whisper I used the HF 6" cut off saw. Same idea but yours leaves it a little smoother. |
|
|
|
[#34]
Nice Pics and jig, a great addition to this thread Jailer.
|
|
|
|
[#35]
Quoted:
I got my Harbor freight mini chop saw in the mail and got everything set up for trimming the necks off. I wanted a jig of some sorts too speed things up so I had a buddy of mine that has quite an extensive wood shop make me one. It works fantastic and I can trim about 8 to 10 per minute with it. I'ts nothing more than a scrap piece of maple with a flat bottom hole bored for the brass to sit in. We sawed it down the middle of the hole lengthwise and added hinges so it would flip open to make brass insertion and removal easier. http://i19.photobucket.com/albums/b180/Jailer/Gun%20stuff/300blktrimming8.jpg http://i19.photobucket.com/albums/b180/Jailer/Gun%20stuff/300blktrimming7.jpg The first step buts up against the built in vise on the base. The small piece added to the front hangs over the edge and buts up against the front of the base. Having 2 contact points makes it real quick and easy to locate the jig each time to trim the brass. The middle step is for blade clearance and the top step is to clear the body of the saw. http://i19.photobucket.com/albums/b180/Jailer/Gun%20stuff/300blktrimming6.jpg http://i19.photobucket.com/albums/b180/Jailer/Gun%20stuff/300blktrimming5.jpg Brass is inserted and then the lid is closed. Once closed push in the brass lightly to bottom it in the hole and it's ready to trim. http://i19.photobucket.com/albums/b180/Jailer/Gun%20stuff/300blktrimming4.jpg http://i19.photobucket.com/albums/b180/Jailer/Gun%20stuff/300blktrimming3.jpg http://i19.photobucket.com/albums/b180/Jailer/Gun%20stuff/300blktrimming2.jpg http://i19.photobucket.com/albums/b180/Jailer/Gun%20stuff/300blktrimming1.jpg And a pic of the final product. It cuts clean enough that no duburring is needed to run it through the sizing die, another nice time saving measure. http://i19.photobucket.com/albums/b180/Jailer/Gun%20stuff/300blktrimming.jpg I made a short video of it in action if you want to click the link and watch it. I went quite a bit slower while trimming so it was easier to see what is going on. http://www.youtube.com/watch?v=5ukuy8CRfko&context=C30eb661ADOEgsToPDskIL1HOwy2gAiEJsn4U2H2kM very nice
|
|
|
 Win a FREE Membership!
Sign up for the ARFCOM weekly newsletter and be entered to win a free ARFCOM membership. One new winner* is announced every week!
You will receive an email every Friday morning featuring the latest chatter from the hottest topics, breaking news surrounding legislation, as well as exclusive deals only available to ARFCOM email subscribers.

AR15.COM is the world's largest firearm community and is a gathering place for firearm enthusiasts of all types.
From hunters and military members, to competition shooters and general firearm enthusiasts, we welcome anyone who values and respects the way of the firearm.

Subscribe to our monthly Newsletter to receive firearm news, product discounts from your favorite Industry Partners, and more.
Copyright © 1996-2024 AR15.COM LLC. All Rights Reserved.
Any use of this content without express written consent is prohibited.
AR15.Com reserves the right to overwrite or replace any affiliate, commercial, or monetizable links, posted by users, with our own.


