|
Posted: 9/13/2008 9:45:24 AM EDT
I am building a rifle off of a Yugo Mauser action in .35 Whelen. I got the camera after I started the project so there are no pics of the chambering or barrel contouring but I have some pictures of the stock making process. Here you go.
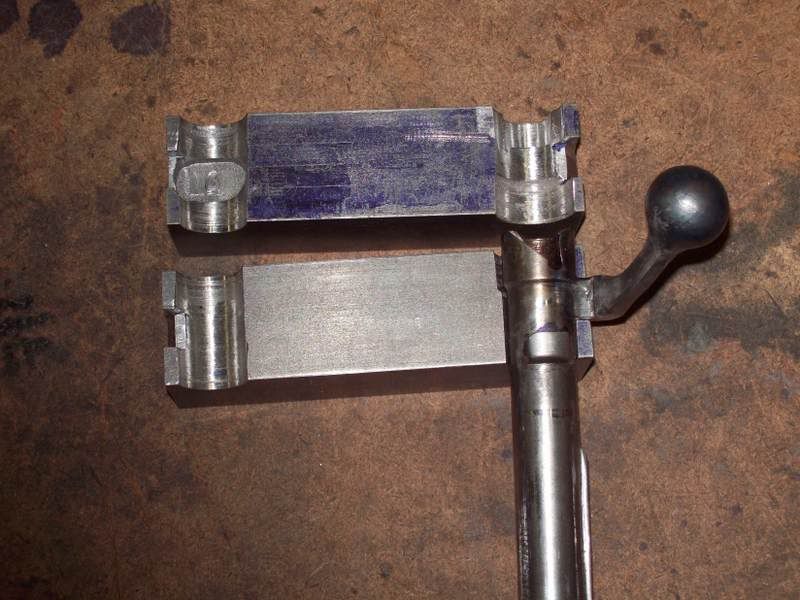
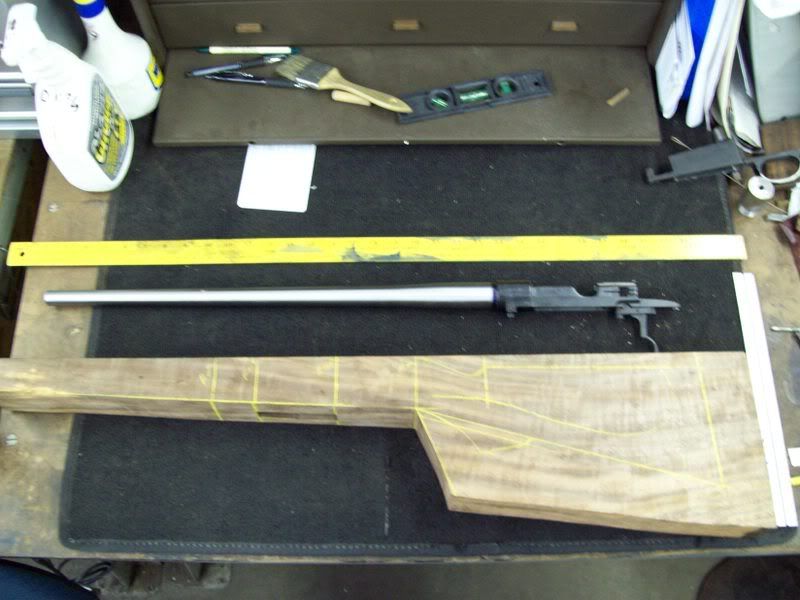 Claro walnut stock blank and barreled action, yard stick and 12"rule for scale  You start by inletting for the magazine box. A mill comes in handy for this step. Chisels are used for a perfect fit(hopefully  ) ) 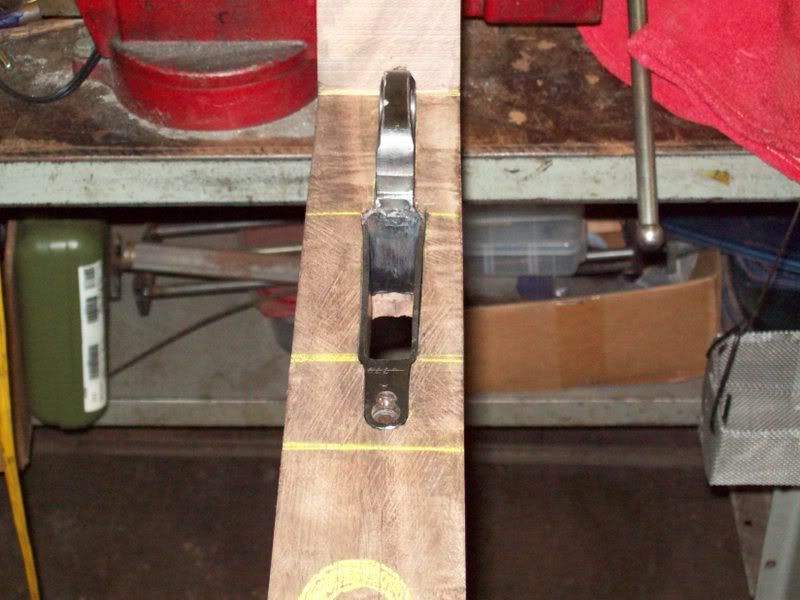 We stop here for now. and drill a hole for the front action screw. 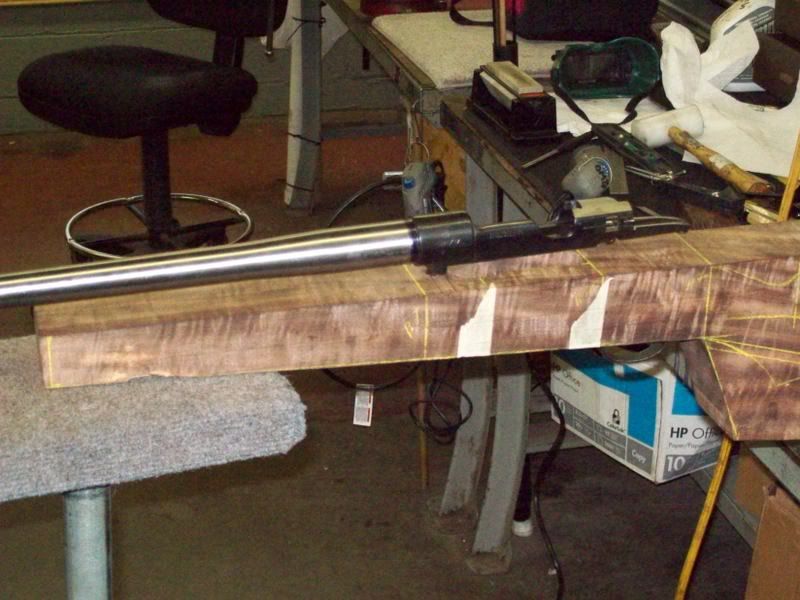 Here is the barreled action before inletting. You can also get a feel for the grain and fiddleback in the wood. You can also see where I recontoured the back of the receiver. 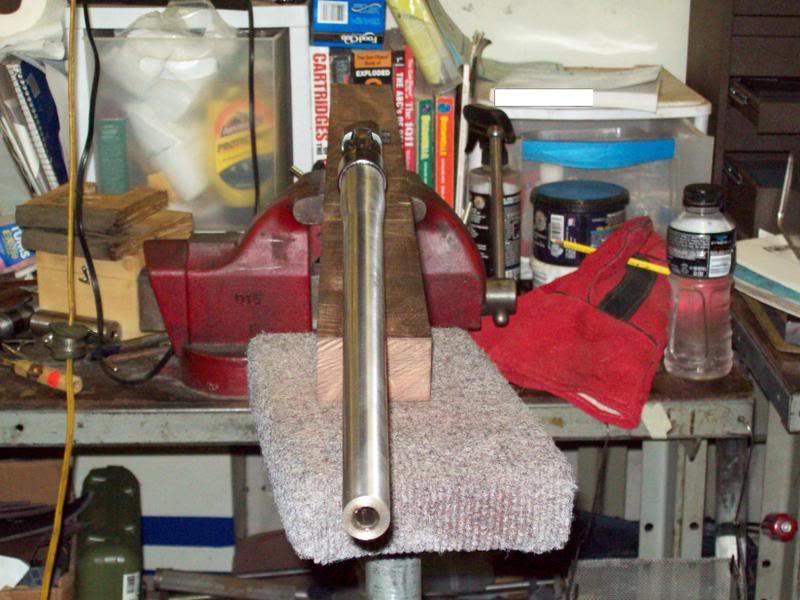 I have not cut the muzzle crown yet. Bore is .358 and barrel diameter at muzzle is .700 or .750 I don't remember.  Layout of the action and barrel channel.  After the mill 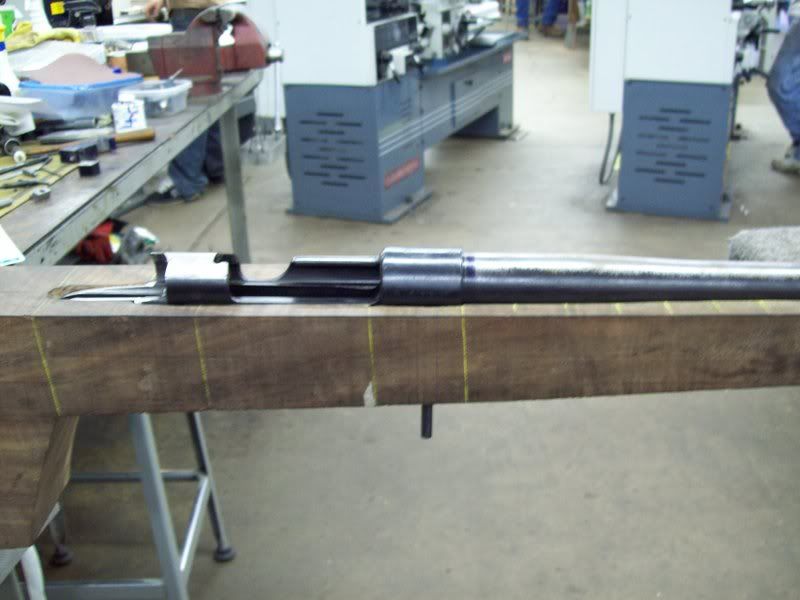 Getting there 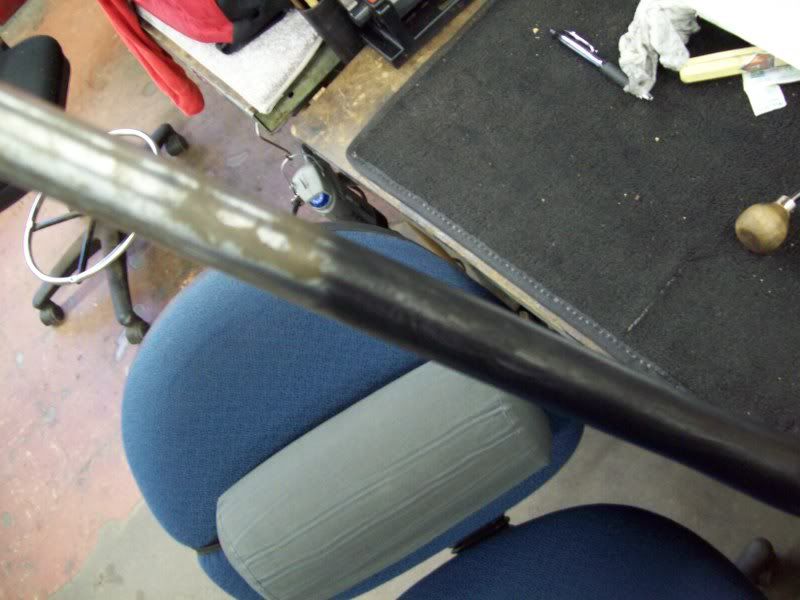  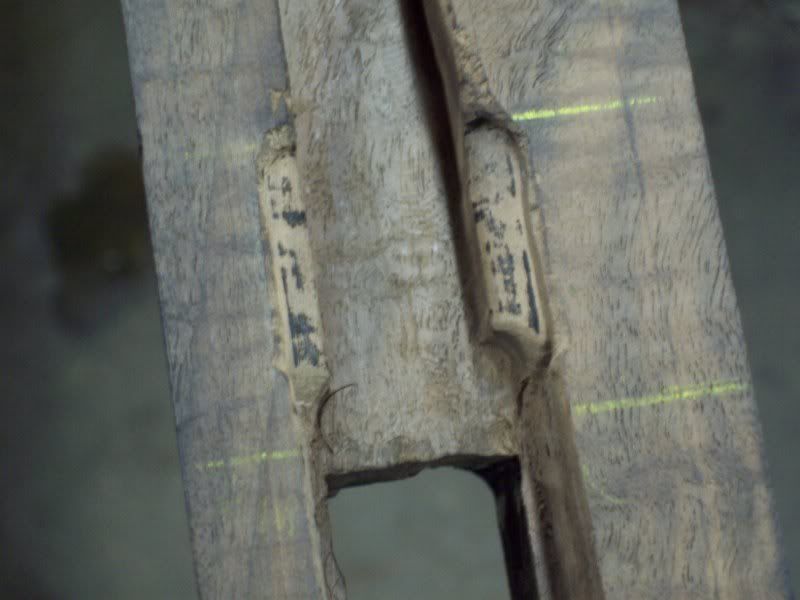 Inlet black is brushed onto the barrel and action, the old timers would hold it over a candle and get the soot to collect on the piece. Then it is placed in the wood and hit with a mallet. The black is transferred to the wood and is carefully removed. 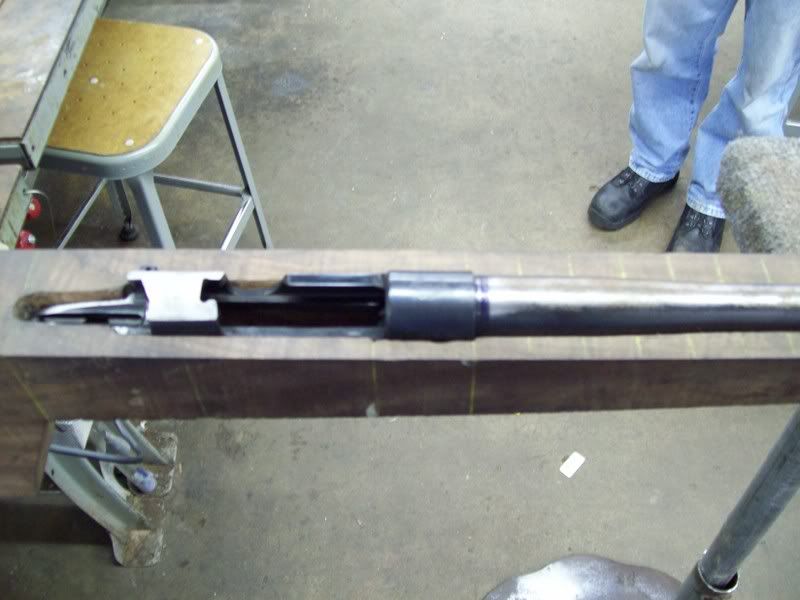 Where it needs to be, half way up the barrel and action with metal to wood contact in only a few key places. You can also see the rear of the action after reshaping. And here are the two stocks I built before this. 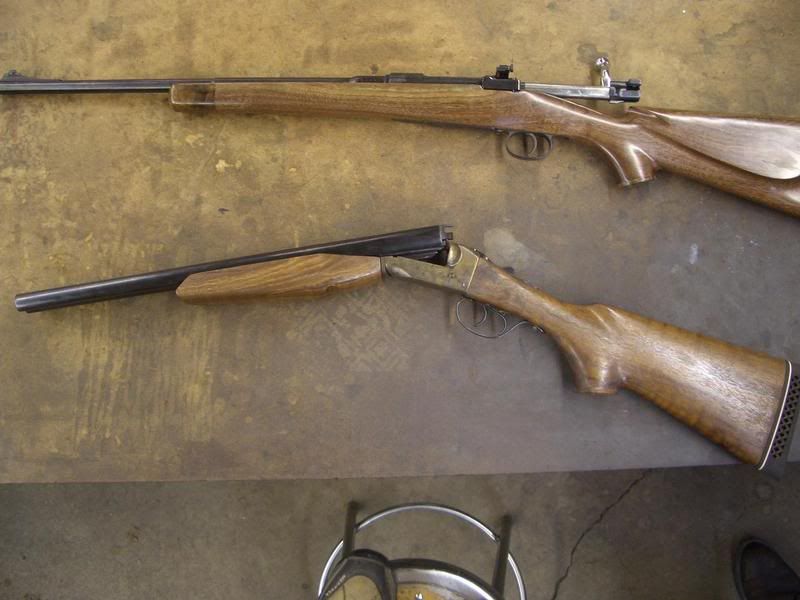 ETA: Photo taken by SchlaffTablett I have more pictures and the project is not finished yet so there is more to come |
|
|
|
[#1]
Thanks for posting.....I like DIY projects
|
|
|
|
[#2]
Awesome job. Those stocks are astounding.
|
|
|
|
[#3]
mill we did not get to use a mil...all by hand baby......
 are blanks were pre duplicated so we didnt need to mill them |
|
|
|
[#4]
No semi-inlet allowed here, must be done from a blank. It is very fun but takes a long time |
|
|
|
|
[#5]
Why is your action not polished?
I'm going to be taking that ooogly charger hump off mine and considering filling the thumb slot, too. +1 for inletting black, the soot lamps give me a headache. What do you you do about bolt handles and if you forge them, post pics plz. |
|
|
|
[#6]
Action is not polished because there is a good chance I will nick it with a rasp at some point in the shaping process, so I polish last. I don't have any pics of the bolt bending process. It was stretched slightly with a flat bar about a foot long with a rounded out notch in one end. I made a set of blocks that hold the bolt in the vise. They are large to take away heat, I also made a heat sink that threaded into the back of bolt. Polish you sledge hammer and get out your oxy-acetylene torch. Get it red where you want the bend and tap with the hammer until you have the shape you want. If someone else will be bending their bolt soon I will try to get pics, but I am done with school an a couple weeks. I'll get pics of the bending blocks I made if I remember The outside of the Mauser receiver is very hard and chances are you will not be able to file on it until you get through the hardened 'skin', diamond files, stones and a disk sander come in handy |
|
|
|
|
[#7]
We'll see what my carbide end mill thinks of it. |
||
|
|
|
[#8]
I would think that would work. The 'skin' is only .006"-.020". The annoying part is the final polish where you have the harder skin next to the softer inside. |
|||
|
|
|
[#9]
  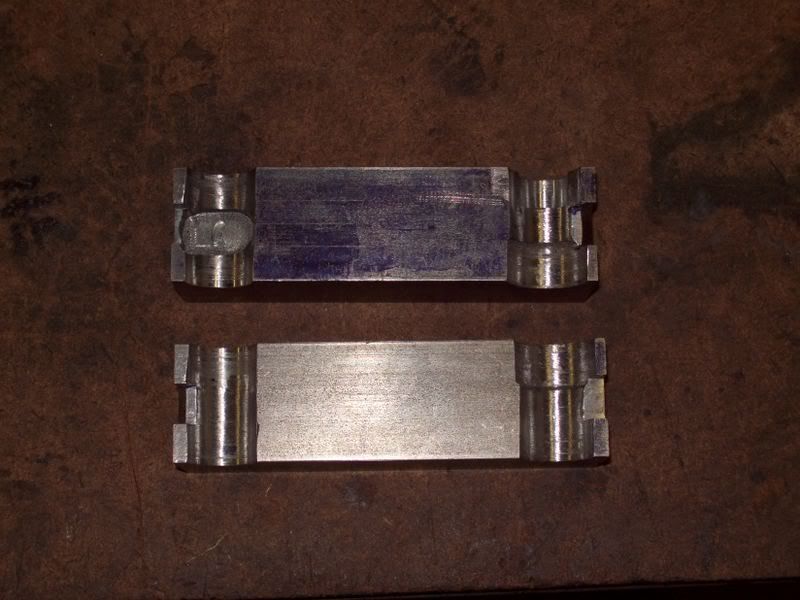 These are the bolt bending blocks. Mauser on one side Springfield on the other. Mine were put away and these were made by another student  Some of the tools I use 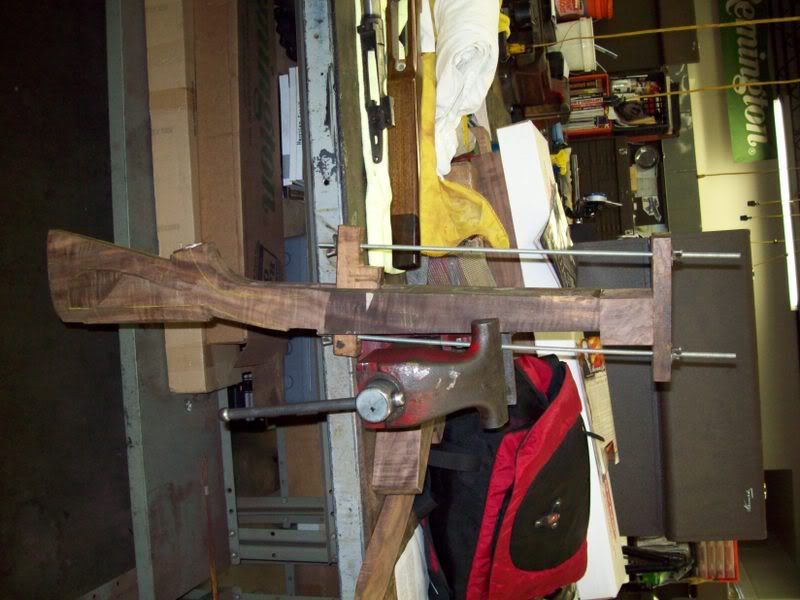 Installing the tip wood 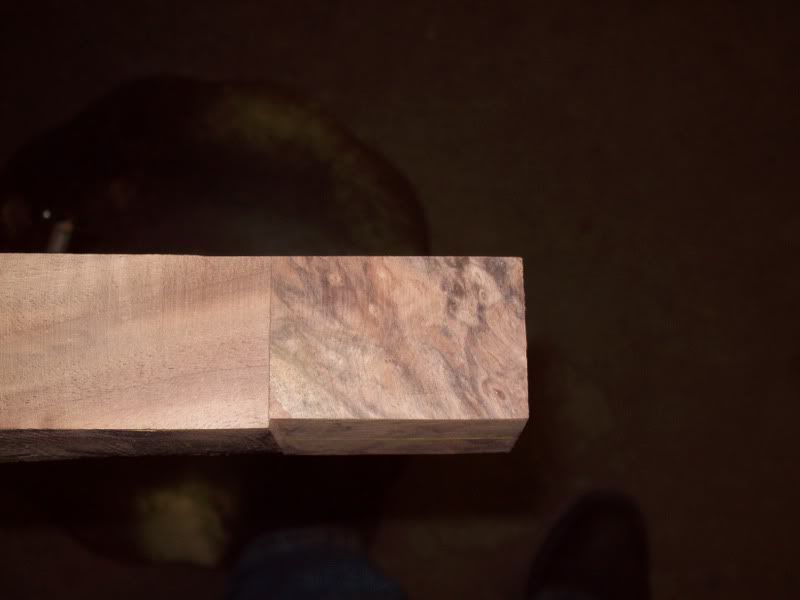 Close up of tip wood 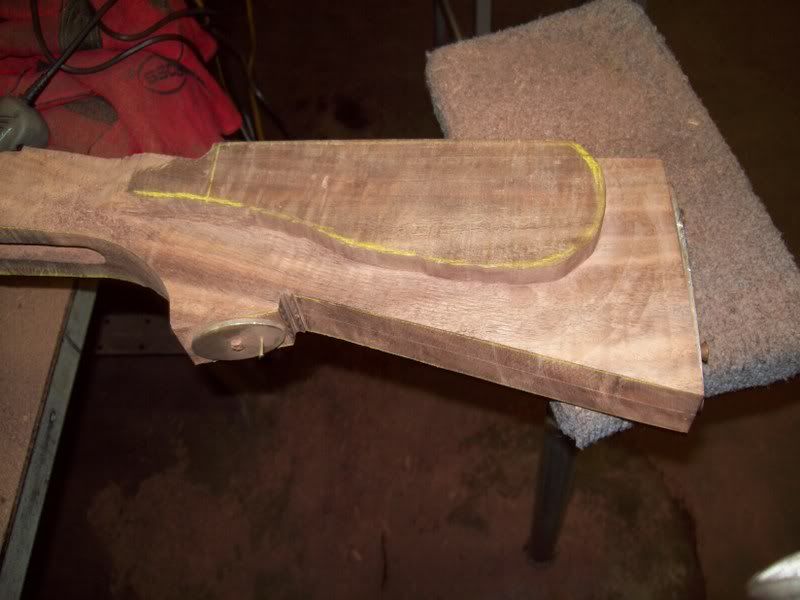 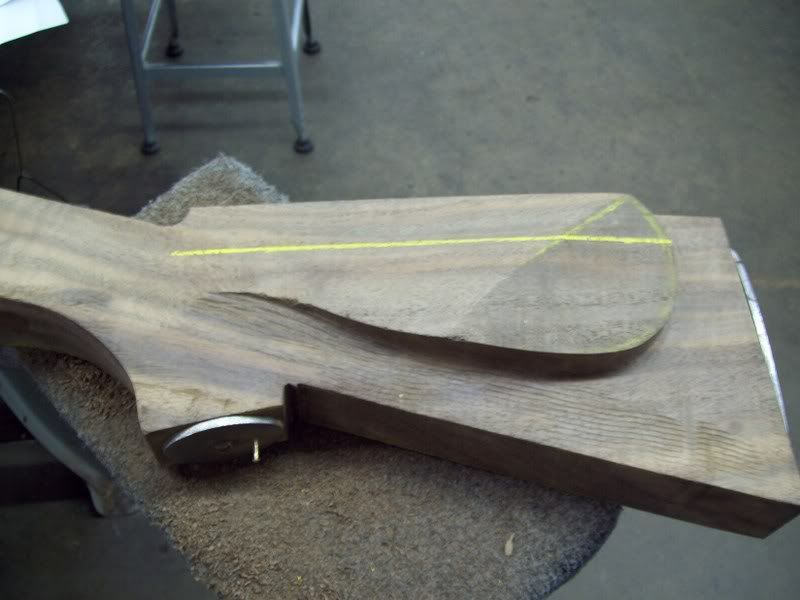 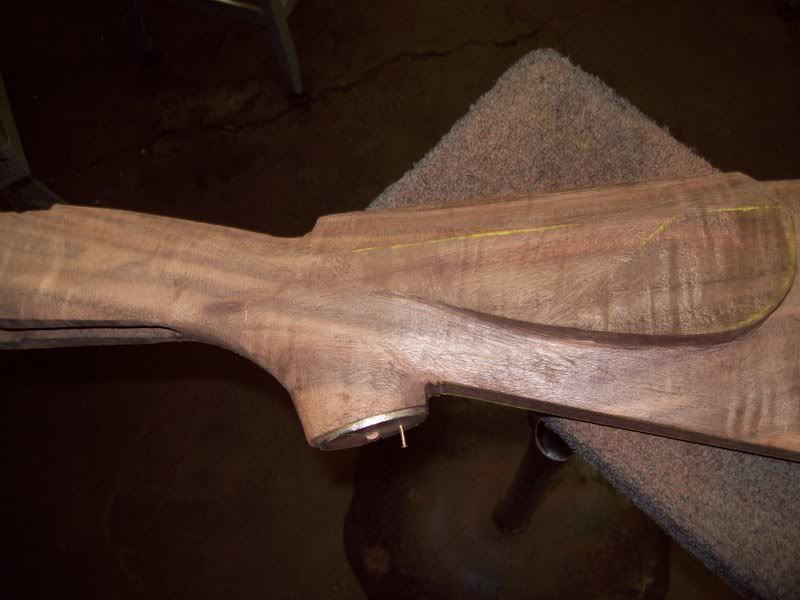 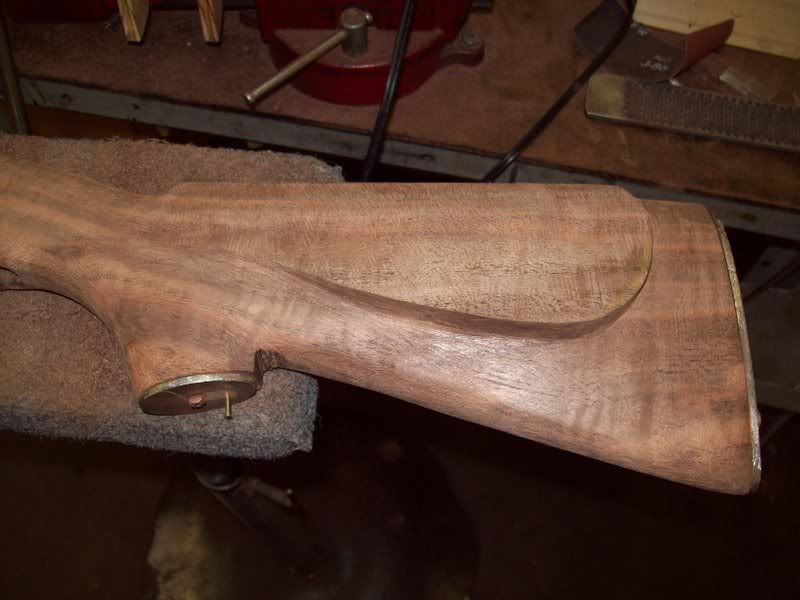 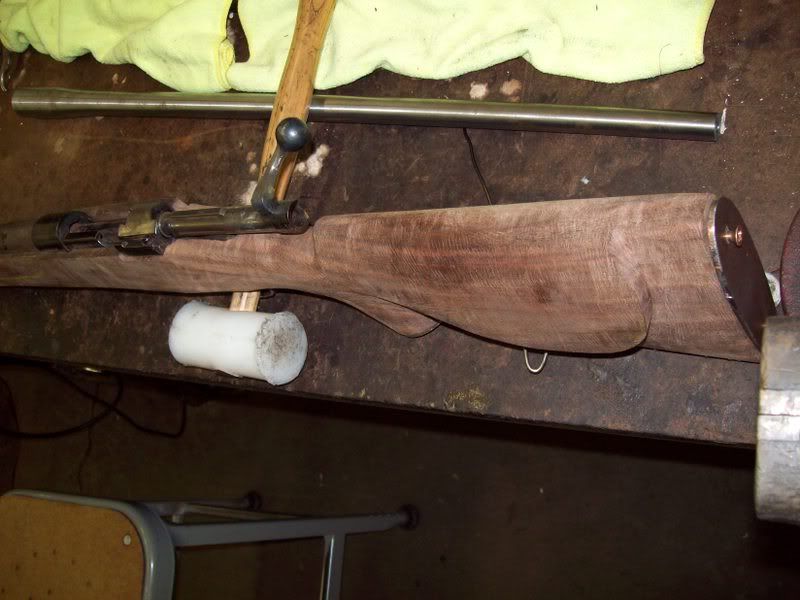 Butt stock, cheek piece, and grip area taking shape 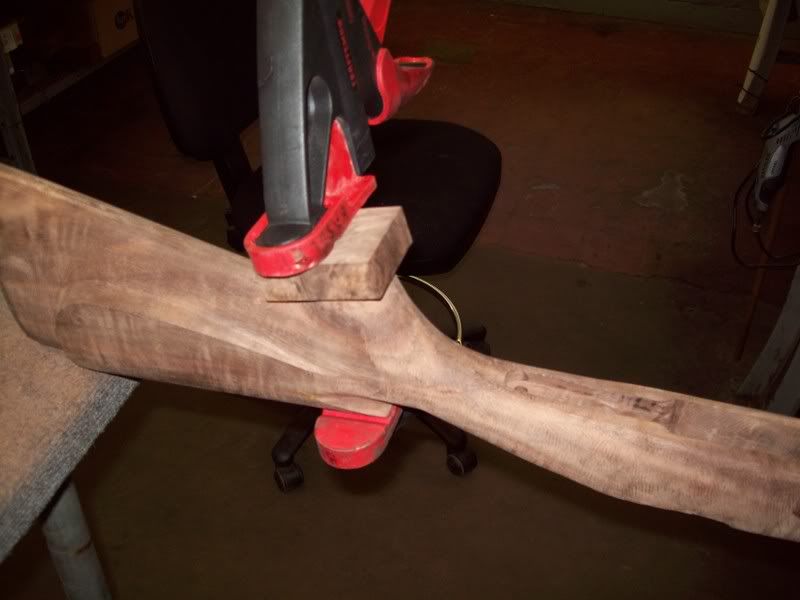 Grip cap from the same block of walnut as the tip wood 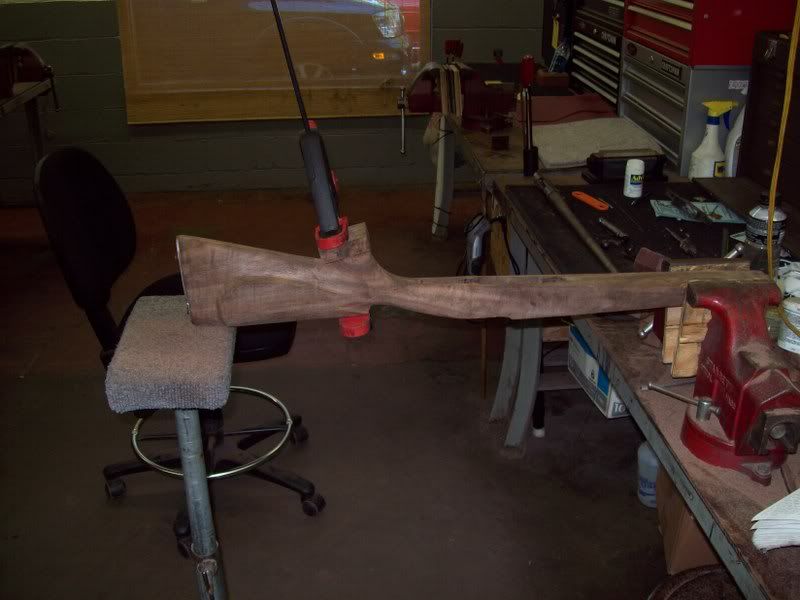 Starting to look like a stock now 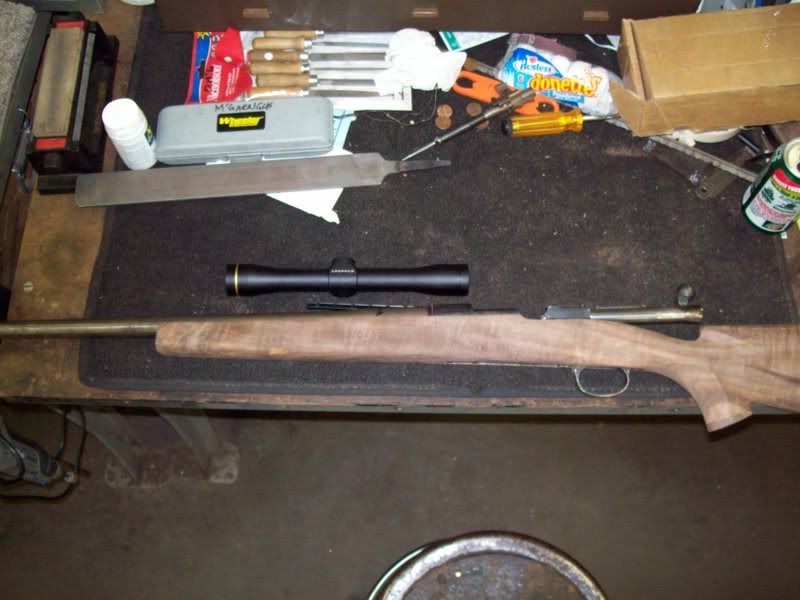 Almost done. Leupold FX-II 2.5 Scout scope about where it will sit on finished rifle. BONUS: Me doing some delicate work on a 1911  |
|
|
|
[#10]
What!? I don't get photo credit for the other Ma-sur and Mom's shotty pic?
|
|
|
|
[#11]
LOL! Fixed it for you 
|
|
|
|
|
[#12]
Who's barrel blank are you using? I just got done with a .35 Whelen project... rebarreled a .30-06 Vanguard.
- AG |
|
|
|
[#13]
It is a Shilen crome-moly barrel. I got an unturned blank and contoured it myself |
|
|
|
|
[#14]
me too..I went with a .30 cal bore...went .308 chamber and I contoured it to a "4 21.628" length....but I did not get a tacked thread....can I ad my pics here man? |
||
|
|
|
[#15]
I try to tack threads that show step by step detailed instruction for projects that might be of interest to firearms refinishers. If I missed your posts, send a link and I ll check them out
|
|
|
|
[#16]
i always hated shaping the cheek pieces. good looking work! it could be perfect and gary will still only give you a 3.5 for it. ask me how i know
|
|
|
|
[#17]
I posted it in GD originally....I figure if magurgle wants to share this post Ill add them here...we are both going to gunsmithing school but at different colleges ETA LINK |
|
|
|
|
[#18]
Yeah, that last 0.5 is tough to get. I hate the part between the bottom of the stock and the bottom of the cheek piece, very hard to get a rasp in there to do any work. I have a few more pics, but I had to stop working on the stock as I was running out of time. I shot it today though |
|
|
|
|
[#19]
(In referance to your last pic...) "Can't talk, too busy...."
|
|
|
|
[#20]
Any update?
|
|
|
|
[#21]
update kind of on mine
finished my fiberglass stock I built two stocks for my .308 a wood one almost done...and this fiberglass.... 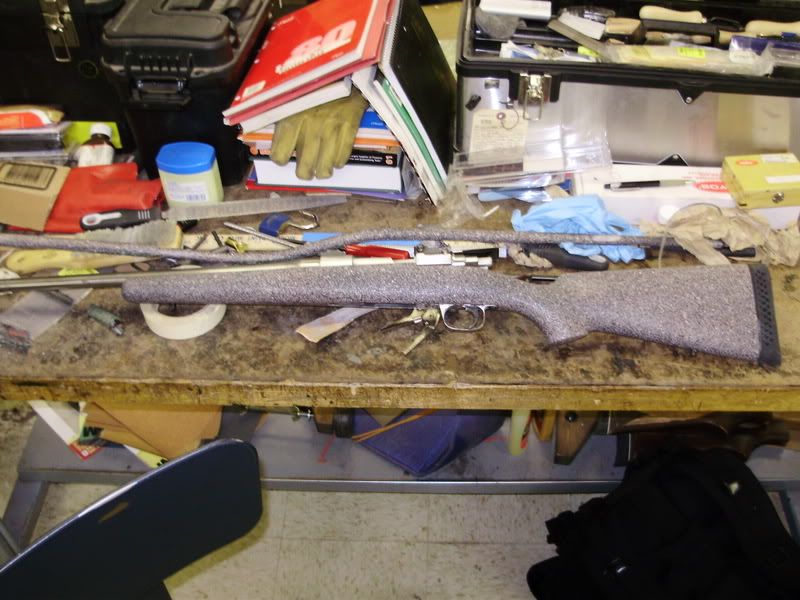


and the metal still needs to be blued |
|
|
|
[#22]
Sorry I haven't been back to this thread in a while, I've been busy with a job hunt and moving back home until I find one
|
|
|
|
[#23]
This is a pretty cool thread, I must say. Interesting to see how some of the stock making process takes place. I take it you go to the PA Gunsmithing School?
|
|
|
|
[#24]
Quoted:
This is a pretty cool thread, I must say. Interesting to see how some of the stock making process takes place. I take it you go to the PA Gunsmithing School? Yes, I graduated in October and have been too busy to work on it. |
|
|
|
[#25]
MARGURGLE!!!!!
mine is done http://www.ar15.com/forums/topic.html?b=1&f=5&t=797410&page=1&#-1 gut I put it in GD again before I thought about putting it here.... |
|
|
|
[#26]
Quoted:
Quoted:
This is a pretty cool thread, I must say. Interesting to see how some of the stock making process takes place. I take it you go to the PA Gunsmithing School? Yes, I graduated in October and have been too busy to work on it. The stockmaking process was one of the most relaxing, aggravating, interesting and stressful parts of the whole program. Nothing like taking a 300$ hunk of wood and milling the holy crap out of it. And once its finished, you start checkering and cut deep gouges into your beautiful shinny finished rifle. Good times. 

 yay for gunsmithin stuff. yay for gunsmithin stuff.
|
|
|
|
[#27]
HA! 1st one to page 2.
|
|
|
|
[#28]
I know the first post on this thread is over a year old, but does OP still have the original pics? Could we get them stored permanently?
Nice work! |
|
|
|
[#29]
Quoted:
I know the first post on this thread is over a year old, but does OP still have the original pics? Could we get them stored permanently? Nice work! I still have the pics, my photobucket got overrun when I posted pics of the transformers they guy across the street built. |
|
|
|
[#30]
Quoted:
Quoted:
I know the first post on this thread is over a year old, but does OP still have the original pics? Could we get them stored permanently? Nice work! I still have the pics, my photobucket got overrun when I posted pics of the transformers they guy across the street built. updates please... are/were you in a school when you built the rifles? and if so, which school? |
|
|
|
[#31]
Quoted:
Quoted:
Quoted:
I know the first post on this thread is over a year old, but does OP still have the original pics? Could we get them stored permanently? Nice work! I still have the pics, my photobucket got overrun when I posted pics of the transformers they guy across the street built. updates please... are/were you in a school when you built the rifles? and if so, which school? Oh I'll get the finished pics in a couple days. I actually just got the rifle from my mom's place a couple weeks ago. My roommate borrowed my camera and I haven't needed it yet. I was a student at the Pennsylvania Gunsmith School. |
|
|
|
[#32]
Not to stray too far from the subject, how was that school? Saw it advertised online but wasn't sure it would be worth the investment. Is it, as in have you been able to find work with your new degree? Any details you mind providing? Back on subject nice work on the stock!
|
|
|
|
[#33]
Quoted: Not to stray too far from the subject, how was that school? Saw it advertised online but wasn't sure it would be worth the investment. Is it, as in have you been able to find work with your new degree? Any details you mind providing? Back on subject nice work on the stock! Sorry, I have the finished rifle, but cannot find my camera, it is in the house but between me and my roommate we cannot remember where we put it. Ill get pics up as soon as I find the thing, thank you for the complement on the work! As to the school, you have to put in a lot of work, none of the work there done is for customers so that is a challenge, some people had no problems getting people to give them gun to work on, other had harder time to have enough projects. So keep that in mind. I didn't have much extra cash to work with so I had a hard time getting enough gun to work on. By old rusty rifles and a shotgun or 2 at gunshows, or find "gunsmith specials" that way you will have plenty to work on. As far as what you learn there it is a great school, and is almost 100% hand on experience. Lecture is 1-1.5 hours a week the rest is shop time with group instruction, and one on one time with the knowledgeable instructors. The students that are farther along also help the newer students and is beneficial for both. The older student for example can get credit for fixing an unseen problem in the newer students refinishing job, a new muzzle crown or something that would be beyond what the new student could do. The instructors do very well teaching people who have previous machining experience or a guy that doesn't know how to read a ruler. The standard that they hold you to right from the beginning are high, but not out of reach, with a focus on teaching high quality hand work. You first gun is done completely by hand, no buffers or anything like that. With close instruction and supervision the entire time. The support given makes reaching the high standard they set easy to achieve with the dedication, this is 40hours a week working at gunsmithing. By the end of the course I could, make stocks, as you see, do custom metal work, as you can see in the project as well, and hold your machine work to a very high tolerance. (down to .0001-4 of an in) and combine the much faster machine work with the considerably slower hand work to get a quality job in profitable time. For example the first couple of gun you do will take up a couple days each, by the end you could do 3-4 in a day, in the school environment making considerations for what the other students are doing, etc. The skills learned lend themselves to working on any gun and the school really over the entire course teaches you how to fix just about anything. If you have to make the part or tool then that is just a small apart of the process, this is what sets you apart from an armorer. You aren't a knowledgeable part swapper when you are done, you are a gunsmith. Can't find a replacement spring, screw, random other part then you have to make them, all of which I've personally done at the school. Including some welding that made my life long welder/step-dad go "WOW, you did that with a torch??!" As far as finding work, I've done some work in an unrelated field that used the skills I learned at the school, but I've been dealing with an illness for a couple of years now, including my time at school, thought it was several awful things for a while, including cancer, they all been ruled out for now and I'm working to get back on my feet. I haven't been able to keep any sort of steady work because of it and it has been hard for me personally. I would like to open my own shop and do custom work. Once I can get somewhere to set up a lathe and bluing tanks I'll get my FFL. Hell I'll sleep on a cot in the shop. I kept up with several friends that have found successful careers, from movie armorers, others working for several companies you'd know the names of, one of them came to the school with a $70,000 rifle to show us while looking for the guy with the right skills. Another I've heard is a civilian contractor over in one of those countries, doing quite well for himself. I've also heard of other guys that are working as gunsmith's in shops around the country. There are jobs out there to be had, but it won't make you rich, but it is a VERY satisfying job. When you hand you friend back his dead grandfathers pocket revolver, that was rusted to hell and didn't work, as a highly polished good looking revolver and you tell him it is safe to fire, that a good day for the both of you. I found a hidden compartment on my grandfathers rifle with a pay stub of his from 1956 to prove it was his, he's been long dead now but his rifle is prettier than it ever was and is still taking squirrels. Hope that covers it, if not ask away |
|
|
|
[#34]
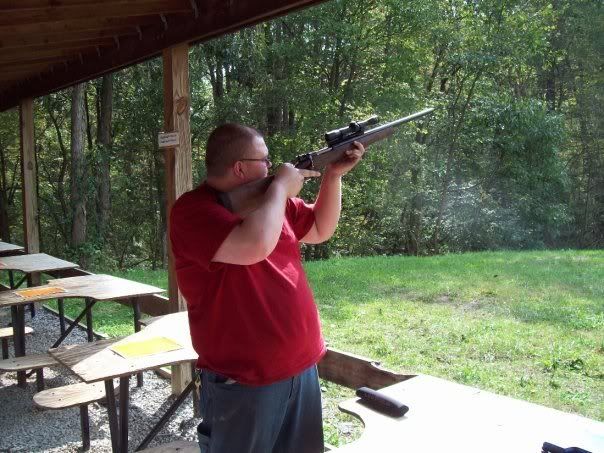
Here is a pic of me, 80+ lbs heavier, at least, but in full recoil. It is actually a pleasure to shoot, but not cheap
 |
|
|
|
[#35]
So, camera ended up being one of the things stolen from my roommates car, and I realized I don't have any pics of the "finished" rifle
Crappy camera pics  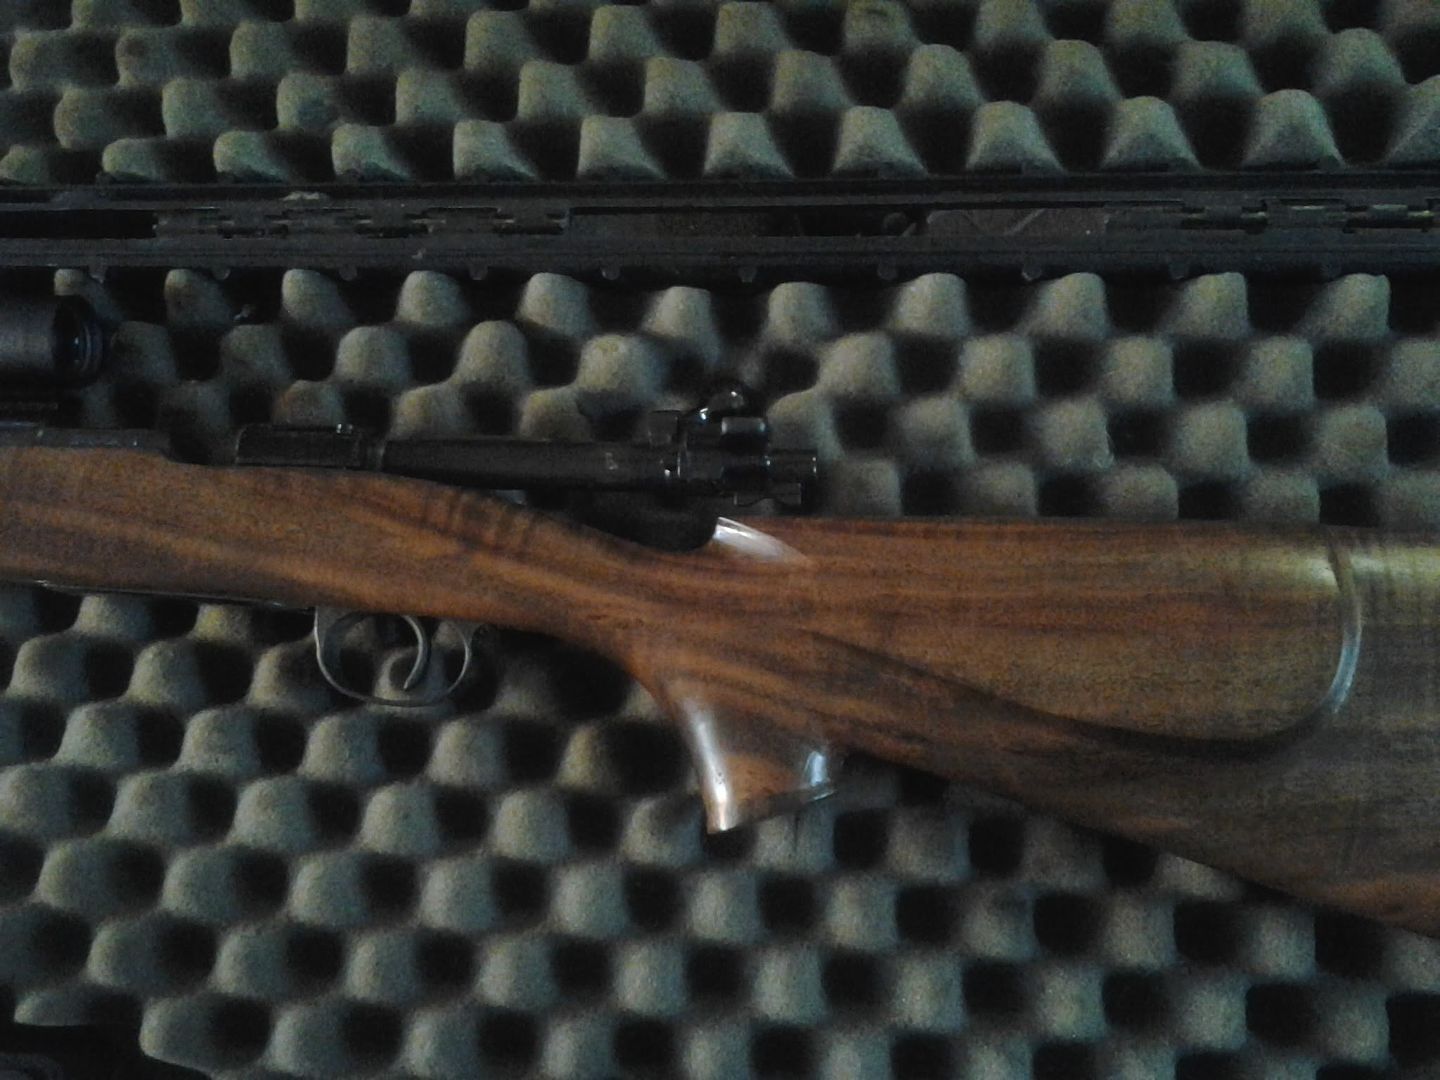 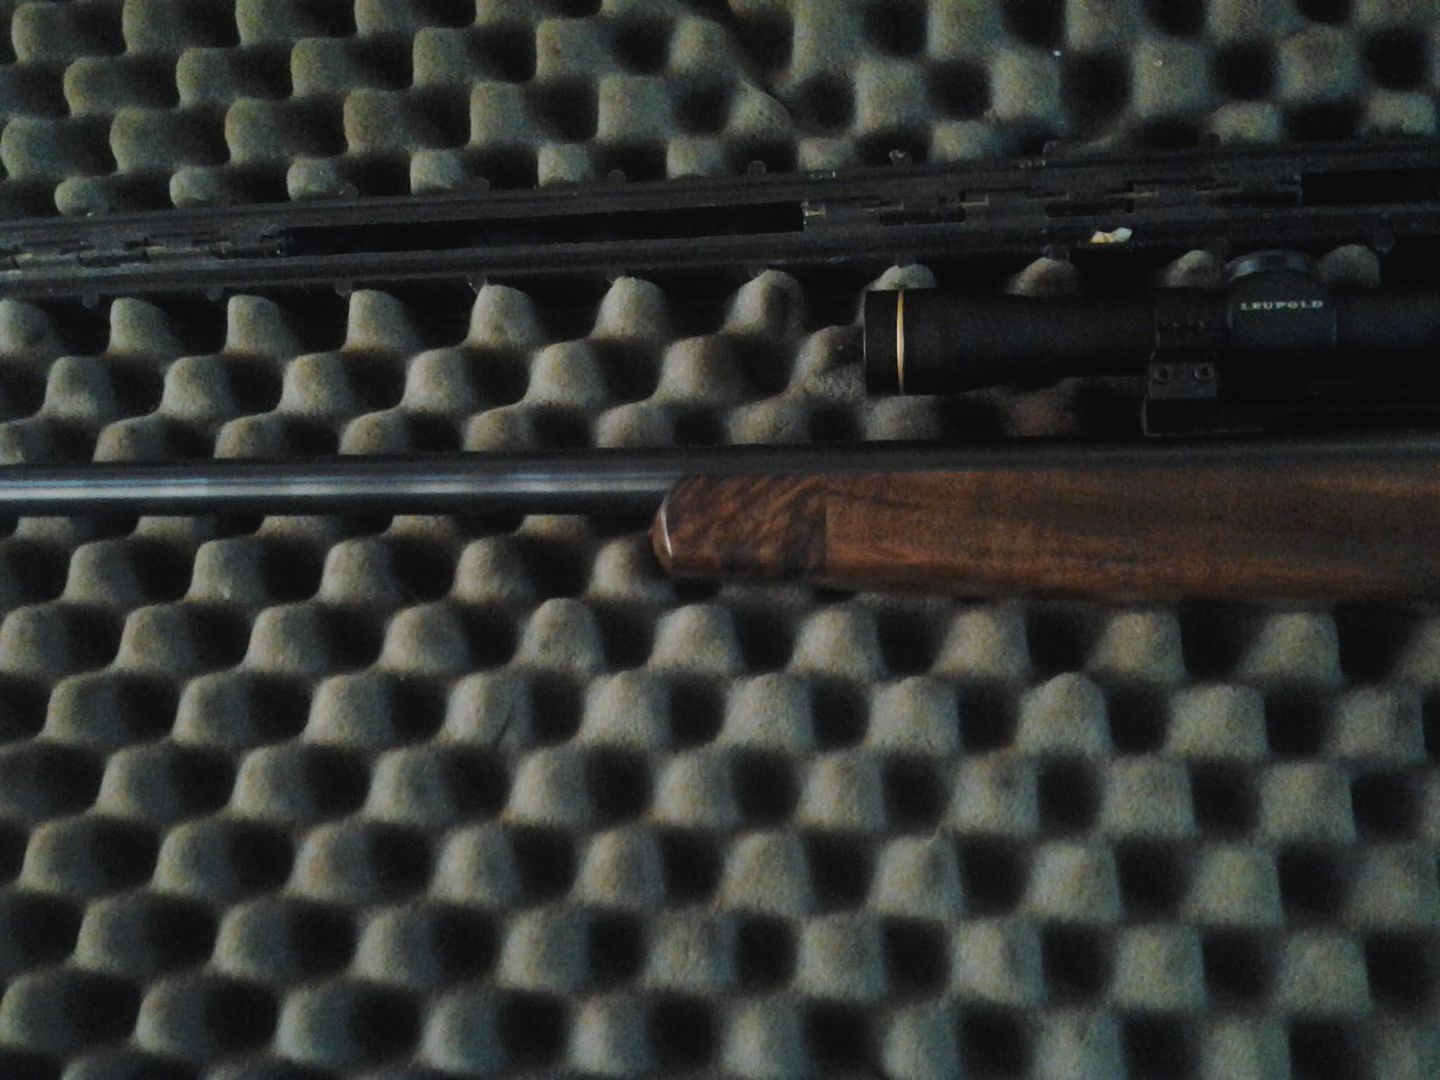 |
|
|
|
[#36]
Nice looking stick. 35 Whelen is one of my favorite rounds. 225gr ftw!
|
|
|
|
[#37]
I'm interested in making a 35 whelen out of a mauser action too. I saw Samco was selling the yugo 24/47 barreled actions, but they were listed as a "short" mauser. I'm not sure if they're talking about rifle length or action length. 35 whelen and 358 norma mag's all fit in an action made for the 30-06 right, so the yugo's are good to go for the whelen, or do you need to alter the bolt and feed ramps? You started with an 8mm action I assume. Thanks, btw I need to learn to do stock-work like that, it truly is beautiful to see nice wood.
|
|
|
|
[#38]
Quoted: I'm interested in making a 35 whelen out of a mauser action too. I saw Samco was selling the yugo 24/47 barreled actions, but they were listed as a "short" mauser. I'm not sure if they're talking about rifle length or action length. 35 whelen and 358 norma mag's all fit in an action made for the 30-06 right, so the yugo's are good to go for the whelen, or do you need to alter the bolt and feed ramps? You started with an 8mm action I assume. Thanks, btw I need to learn to do stock-work like that, it truly is beautiful to see nice wood. short refers to the action length, and without any reference material in front of me the .35 whelen is a bit longer than the .30-06 well, I had to modify the magazine box quite a bit, lots of machining and filing to get the .35 whelen to fit, and build up welds on the follower to fit the new longer box, of course shaping and contouring the new metal to feed smoothly, I was lucky and didn't have to modify the action, feed ramps etc. All of the modifications to the receiver itself were cosmetic, other than a little thread chasing and truing the face and stuff. I did clean up the bolt face a bit. I've thought about playing around with the feed ramps a bit, but it feeds so I have left it alone. Some of the things I did were because I was at school and wouldn't have done, like the bolt handle I would have left alone, or maybe put a slight bend in it, or butter knife it, but that would look out of place. As it is now it is bent for clearance on a standard scope mount, not the scout scope I've got (and love) Making a stock from a blank is very tedious work and a test of patience as well as ability, but it is also some of the most fun I've had working on guns, and some of the most satisfying work I've done in my life, except maybe the day I gave back my friend's great-grandfather's broken and rusted revolver, refinished and repaired, and safe to shoot. just grabbed the micrometer and a couple rounds, the Remington 250 grain .35 whelen I have on hand is 3.236" OAL and random 8mm I had is 2.865" |
|
|
|
[#39]
Good looking rifle and I hope your luck turns around
|
|
|
 Win a FREE Membership!
Sign up for the ARFCOM weekly newsletter and be entered to win a free ARFCOM membership. One new winner* is announced every week!
You will receive an email every Friday morning featuring the latest chatter from the hottest topics, breaking news surrounding legislation, as well as exclusive deals only available to ARFCOM email subscribers.

AR15.COM is the world's largest firearm community and is a gathering place for firearm enthusiasts of all types.
From hunters and military members, to competition shooters and general firearm enthusiasts, we welcome anyone who values and respects the way of the firearm.

Subscribe to our monthly Newsletter to receive firearm news, product discounts from your favorite Industry Partners, and more.
Copyright © 1996-2024 AR15.COM LLC. All Rights Reserved.
Any use of this content without express written consent is prohibited.
AR15.Com reserves the right to overwrite or replace any affiliate, commercial, or monetizable links, posted by users, with our own.


