|
Posted: 3/7/2016 8:41:22 AM EDT
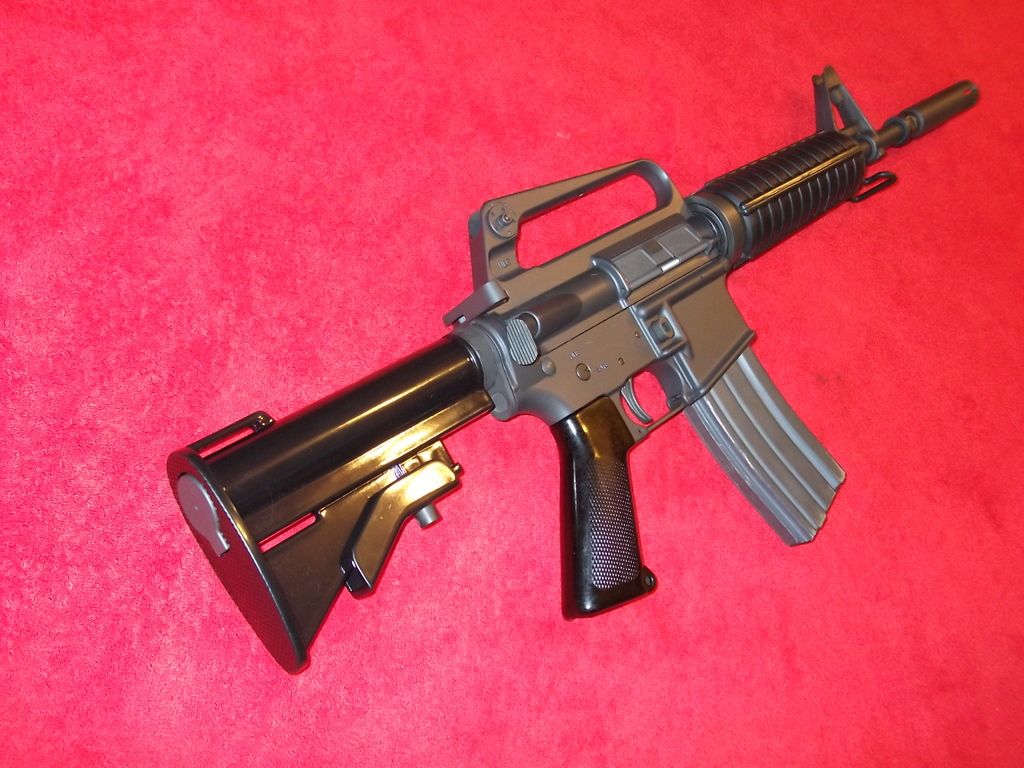
It's finally finished!
This is my very first AR, my very first AR build and my first retro. I am beyond happy with the way it came out. Upper is one of the new Brownell's A1 made from NDS forgings. Lower receiver, bolt, pins and other small bits are all Del-Ton (picked up a complete DTI Sport model for a good price a few months ago) Trigger group is a HyperFire EDT. Barrel is a J&T 11.5" lightweight with non-F marked FSB that had the bayo lug neutered. With the moderator pinned and welded, the barrel measures out to 16.125" Buttstock was a cheap plastic model found on ebay, finished with several coats of Rustoleum gloss black. 4 position, blemished Colt buffer tube was another ebay find. Faux moderator, grenade ring, teardrop FA, A1 pistol grip and repro 6 hole handguards all came from ar15sport.com. Port door is repro small pad from Rifle Supply (had to tweak it a little to get it to latch closed ) Finished it all up in Norrell's greyish black flat moly resin. 


I've never really been into AR's as I mostly enjoy my old school "wood and steel" guns. The whole "tacti-cool" thing never appealed to me. However, since I discovered retroblackrifle.com and the retro forum here, that has all changed. I think I may have caught that "RBRD" you guys are always talking about. Just this morning, I went out and purchased a couple more stripped lowers! I'm thinking my little XM177E2 wannabe needs a big brother. Now I just need to decide if it will be an M16A1, or a 605 like "Dissipator", or maybe something crazy, like a mid-length 607 "Air Force" mutant..........Oh boy, this is gonna get expensive! 
|
|
|
|
[#1]
Just wanted to add, does anyone know where to find a DOD acceptance stamp (the white one I see on some retro clones)?
Unfortunately, the Del-Ton lower had a laser engraved "DTI Sport" logo on the magwell that is still somewhat visible under the moly resin (that moly resin is super thin stuff!). I think adding the DOD stamp will draw the eye away from the logo, plus look super cool. |
|
|
|
[#2]
Beautiful, Congrats!
And welcome to the disease!
|
|
|
|
[#3]
That's a great looking AR you built and a Retro flavored one at that.
|
|
|
|
[#4]
Really nice job for your first retro. I like what you did to the butt stock, makes a convincing clone
|
|
|
|
[#5]
Quoted:
Just wanted to add, does anyone know where to find a DOD acceptance stamp (the white one I see on some retro clones)? Unfortunately, the Del-Ton lower had a laser engraved "DTI Sport" logo on the magwell that is still somewhat visible under the moly resin (that moly resin is super thin stuff!). I think adding the DOD stamp will draw the eye away from the logo, plus look super cool. First, I would like to say nice job. It look good. Secondly, I would say not to worry about the DoD stamp. If you were doing a truly correct clone of a model (that includes the correct lower) that had the stamp on it when issued, then that would be a different story. I would say to enjoy your build as it is. It looks good. For your next retro builds, I would recommend buying the correct lower for which ever clone you choose to do. It does add a lot more to the build. Nodak Spud is your best choice for your lower needs. |
|
|
|
[#6]
AWESOME first retro. You did a great job. I purchased my DOD stamps from a fellow member here. If you do an archive search for DOD stamps, I'm sure that you will find his info.
|
|
|
|
[#7]
Looks good! Only a retro head would know what is not correct and what is. This type of retro clone makes for a great shooter. The issue you will have is the worse your RBRD gets, the more you will either want to build a more historically accurate version or start replacing parts on this one. Do yourself a favor and just enjoy the very nice gun you have built. Try not to make yourself nuts finding all the correct parts, but as the RBRD gets worse, it will be hard to resist.
|
|
|
|
[#8]
My first AR15 was a retro rifle build as well. You did good!
|
|
|
|
[#9]
Quoted: Just wanted to add, does anyone know where to find a DOD acceptance stamp (the white one I see on some retro clones)? http://www.dwilsonmfg.com/store/p10/Rubber_DoD_Acceptance_Stamp.html |
|
|
|
[#10]
Looks great
|
|
|
|
[#11]
Great job!
|
|
|
|
[#12]
Awesome job.
There are a few schools of Retro from my view. Those that love the hunt for the obscure part. Those that love the build. Those that love the completed gun. And all those combined. I had a tear drop assist that I used to push start a M16A1 build. Used a fiber lite stock to push start a carbine build. My goal was the silhouette clone, looks retro but had modern barrel twist, FCG, carrier etc. I use some of the modern parts as "place holders" until I come across the true retro parts. Yeah, I say that and some of the placeholders have been "in place" for twenty years. Good luck, and never throw away worn parts, somebody will want the later. I'm always trying to find unserviceable parts to use in art projects. |
|
|
|
[#13]
Quoted:
It's finally finished! This is my very first AR, my very first AR build and my first retro. I am beyond happy with the way it came out. Wow, you didn't just get into AR's, you jumped right into the deep end! Very nice looking build! The lower is the main thing that would bug me, but I don't like logos on lowers period, so it isn't unique to retros. I do like what you did to the stock to give it the right look. Depending on how handy you are, have you considered taking the selector and filling the tick? You'd have to sand and re-do the finish on it afterwards, but it would be an easy change (at least I think so) that would give you a bit more clone. |
|
|
|
[#14]
Nice work!
|
|
|
|
[#15]
Yes, very nice job. You should be happy with that one for a while
|
|
|
|
[#16]
well done! nice effort :)
|
|
|
|
[#17]
Beautiful carbine! Excellent and convincing job on making a plastic stock like vinyl acetate, I never would have thought of that.
|
|
|
|
[#18]
OUTSTANDING! You should be proud of that one. The buttstock does look like a "real" one with that paint job; I had to go back and read it again (thought it was either vinyl acetate, or one from my pals in Krotz Springs La. Ohhhh, you,re "HOOKED" now, I see many more builds in the near future. Best get your wife to get in charge of the checking acct, or you,ll soon be broke. Keep the pics coming,,,,we love em here!
|
|
|
|
[#19]
Quoted: Yes, very nice job. You should be happy with that one for a while ....3....2....1....NEXT! |
|
|
|
[#20]
Congrats on a damned fine build!
|
|
|
|
[#21]
Fantastic work man!
|
|
|
|
[#22]
Great Job!
|
|
|
|
[#23]
Very nice.
|
|
|
|
[#24]
Just wondering........Did you paint the A1 grip also?
|
|
|
|
[#25]
Looks good OP
|
|
|
|
[#26]
Great build!
|
|
|
|
[#27]
Wow! Thanks for all the compliments!
After seeing all the beautiful retro builds on this forum, I was kind of worried you guys would pick it apart for inaccuracy. Special thanks to 37thguy for the link to a DOD stamp. I picked up the "large" stamp. (I think that the correct size for an xm177e2?) I wish I could take credit for the painted stock idea, but, I actually stumbled across that here in the archives while looking for info on vinyl acetate coated originals. After seeing the prices that they were getting for an original, the paint idea looked like a much better idea. LOL! jrs93accord, I know it’s not a historically correct build, what with the A2 lower and all, but, I think the addition of the stamp will add another layer of coolness to my project (and slightly hide the DTI logo). I have a TM 80% lower being shipped to me right now. I may work up the nerve to try my hand at reprofiling it, or send it off to someone to have it done. I’d really love to just purchase a correct lower from NDS, but, with the NDS wait times I’ve heard of and the impending anti-AR15 legislation here in Kommiefornia, I fear I may not have the time. ZMan, I like your idea for removing the “tick” from the selector. My brother is pretty good with a tig welder and I am pretty good with a file and sand paper (I pinned the moderator on this one and he welded it up for me). I’ve also done several home Parkerizing projects, so refinishing it won’t be a problem. I’m probably not going to bother with it on this build as the receiver still has the Safe & Fire engraving on the right side. However, I’ve got another two lowers coming that don’t have the right side engravings and may try it on one of those. Getchasum, I did not paint the A1 grip. All I did was give it a good cleaning and a light buffing with a soft cloth. Under the right lighting, you can see a bit of mottling on the surface. Ar15sport.com has two grades of A1 grips available, “good” and “fair”. This is one of the “good” conditioned ones. If you are looking for an A1 grip in good condition, they are available Here. I have learned much from this forum, and for this, I thank you all. I really enjoyed building this little carbine. So much so that I am already planning the next one! Just last night I purchased yet another reproduction A1 upper from Brownell’s! I’ve decided the next one will have a rifle stock and triangular handguards, but, just can’t decide on any other details. I may end up with an M16A1 clone, or maybe just end up doing a “no rules” retro-mutt build, that is not a clone of any particular rifle. Just kind of a mix of my favorite retro details. I believe you guys call it an “Air Force” rifle? |
|
|
|
[#28]
Nice little carbine. Congrats!
|
|
|
|
[#29]
Did a little accessorizing last night.
Got my DOD acceptance stamp from D. Wilson 
It took me a few tries to get it decent looking. I know some of you like them to look a little ragged and off centered for authenticity, but, my OCD just couldn't handle that. LOL! I used some Testor's brand flat white model paint and found that if you let it get a little tacky before dipping the stamp in it, the results were much better. Also picked up an unissued general purpose utility strap to use as a sling. 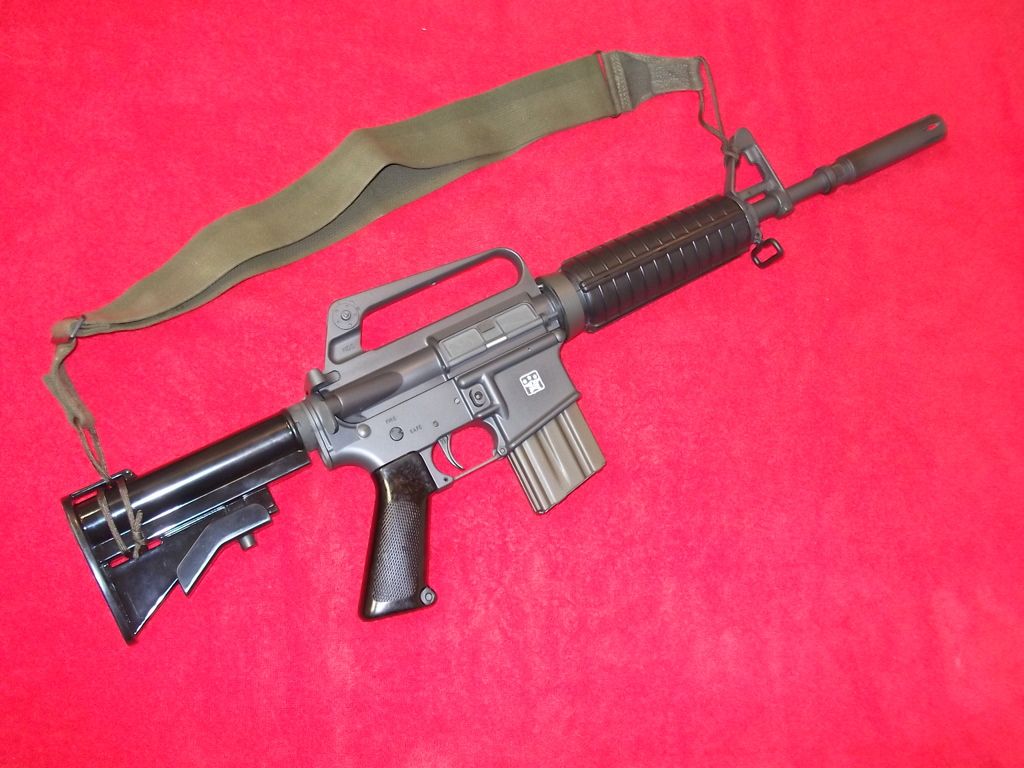
|
|
|
|
[#30]
You've got a really nice looking build there. I wouldn't worry about a few parts that aren't "correct" just shoot it and have fun.
Doc 
|
|
|
|
[#31]
That's a great looking carbine. Don't sweat the small stuff, unless that's your thing.
|
|
|
|
[#32]
Well, I've been really enjoying my little carbine.
It shoots great and out of the 500 or so rounds I've put through it, I haven't had a single hiccup. However, I feel something has been missing. A bayonet!! Hmm, can't attach a bayonet to a carbine........I got it! Build another one!! 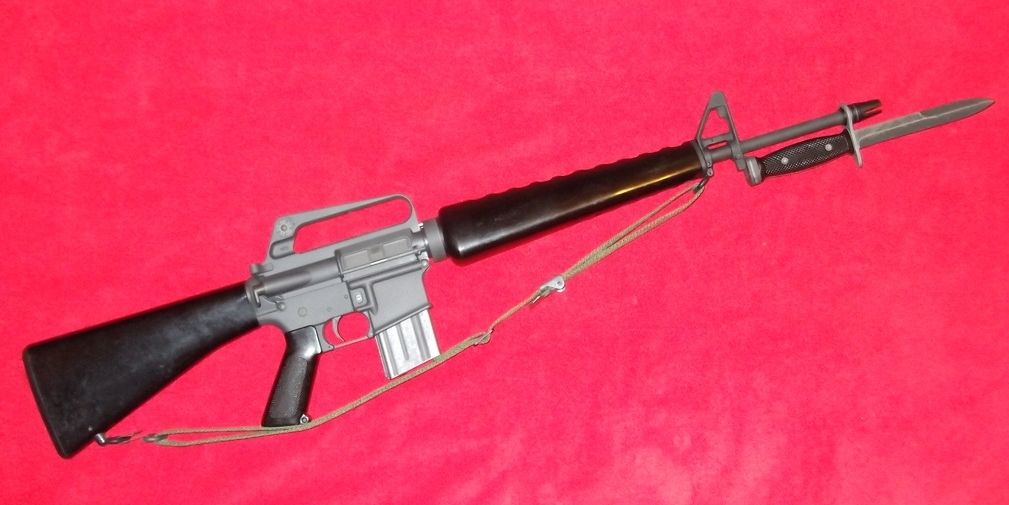
This time, I didn't have a specific model in mind, I just built a generic "retro" rifle. Upper is once again an A1 from Brownell's, mated to a 1:8 twist, 20" barrel from ar15sport.com. Handguards and grip are also from ar15sport, buttstock is a type D found on ebay. Lower and LPK are from Anderson Manufacturing (picked up a couple of the lowers on sale). The LPK contains one of the worst triggers I've ever found, however, it did come with a few cool parts like the dimpled pins, a selector that could be easily converted to "no tick" and it reacted very well to an application of naval jelly. Also, the lowers didn't come with any engravings on the right side. My technique for applying Norrell's has also greatly improved (with the help of a cheap airbrush), this time coming out very even and very flat. I like the way this one came so much, I'm thinking of refinishing the carbine (it came out a little too shiny). 
Here's my little carbine with it's new "big brother" 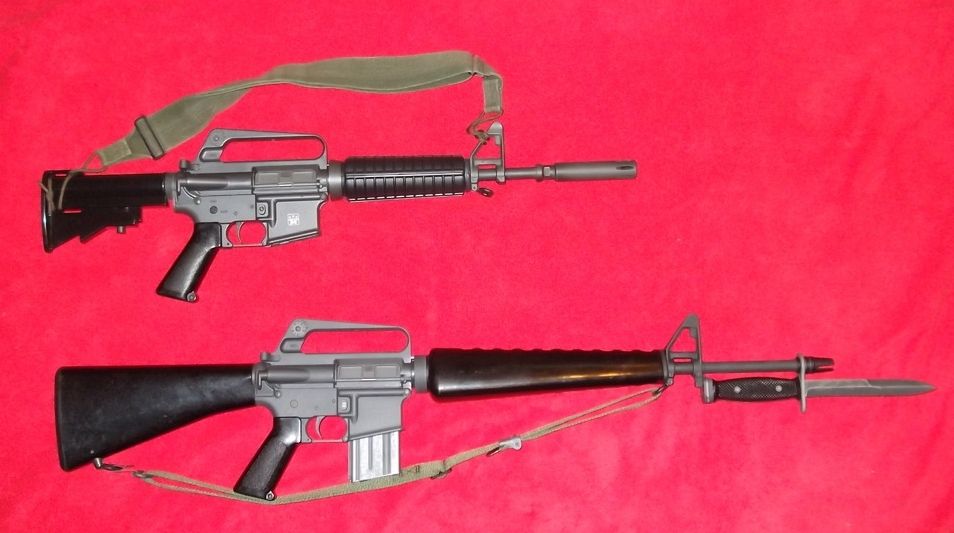
And here's a picture of the brothers getting "photo-bombed" by their cousin (the "black" sheep of the family), build number 3. 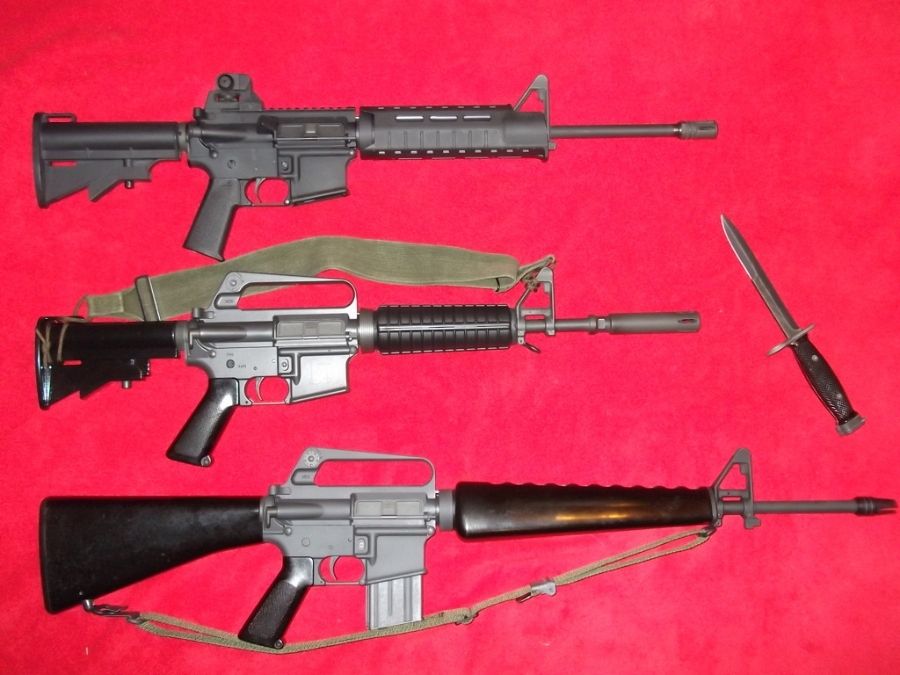
I really need to stop. I'm running out of money for ammo......
|
|
|
|
[#33]
WoW. That's very nice.
|
|
|
|
[#34]
Yes sir you have it bad.
Nice guns. Really like the way the stock came out on the car bean. |
|
|
|
[#35]
Did you have to use the crush washer with the ar15sports moderator to make it to 16"?
|
|
|
|
[#36]
Quoted:
Did you have to use the crush washer with the ar15sports moderator to make it to 16"? In order to get the barrel length to 16", I had to put a washer behind the grenade ring. I used one of those shim washer kits from ebay ( Here ) The thickest washer from the kit is the perfect size to fit in the back of the grenade ring and spacing the ar15sport moderator to just about 16.10". Without the washer, the barrel sits deeper into the grenade ring, bringing an 11.5" barrel to only about 15.90". A crush washer would also get you above 16", however, I didn't like the way the crush washer would stick out of the back of the grenade ring. Plus, I was going for as short as legally possible. |
|
|
 Win a FREE Membership!
Sign up for the ARFCOM weekly newsletter and be entered to win a free ARFCOM membership. One new winner* is announced every week!
You will receive an email every Friday morning featuring the latest chatter from the hottest topics, breaking news surrounding legislation, as well as exclusive deals only available to ARFCOM email subscribers.

AR15.COM is the world's largest firearm community and is a gathering place for firearm enthusiasts of all types.
From hunters and military members, to competition shooters and general firearm enthusiasts, we welcome anyone who values and respects the way of the firearm.

Subscribe to our monthly Newsletter to receive firearm news, product discounts from your favorite Industry Partners, and more.
Copyright © 1996-2024 AR15.COM LLC. All Rights Reserved.
Any use of this content without express written consent is prohibited.
AR15.Com reserves the right to overwrite or replace any affiliate, commercial, or monetizable links, posted by users, with our own.


