|
Posted: 4/11/2015 8:28:12 PM EDT
[Last Edit: Tbr1806]
PARTS LIST WITH LINKS:
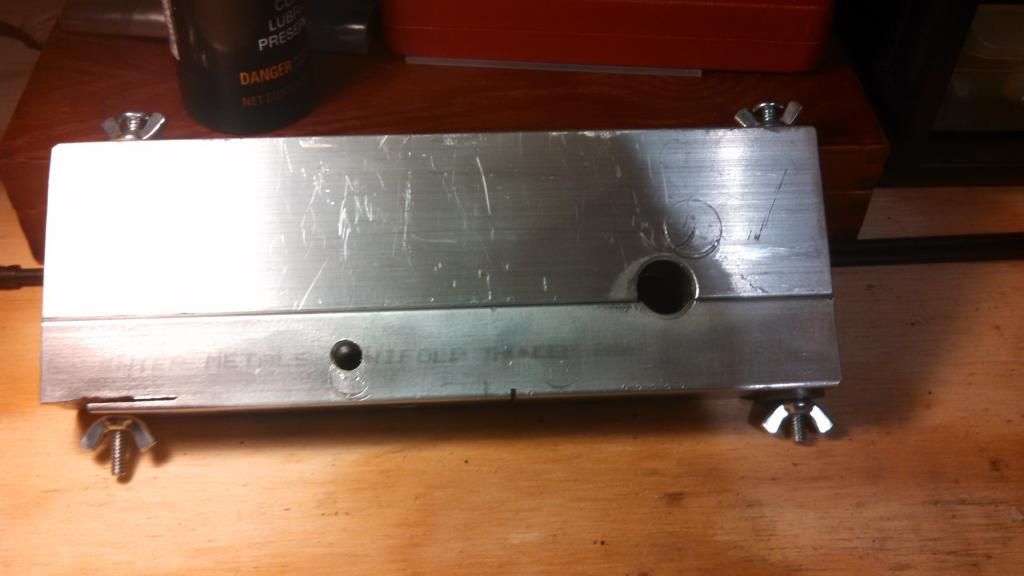
I got my parts from APEX GUN PARTS, this include FSB, muzzle detent pin, slant break, buttstock cleaning kit and cleaning rod. I used a Bulgarian FSB, Bulgarian FSB muzzle device detent pin/spring, Yugo slant break, Hungarian cleaning kit and Chinese cleaning rod costing around $50 shipped. Press plate for removing FSB: Click To View Spoiler FSB REPLACEMENT: Tools/ Equipment -WD40, Aero Kroil or lubricant of choice -Quality screw driver set for removing furniture -A Penny or copper washer -12ton shop press (I got mine at harbor frieght for $100 w/ a coupon) -5/8" deep socket -1/4" drive 5/16" deep socket -Punch Set 1/8"-1/4" -Brass & steel hammer - Something to hold FSB stable in press -Remove ALL furniture from your AK if you like the finish on it, you are better off safe than sorry. Apply lots of wd-40 or some other type of penetrating lubricant to the FSB, I use aero kroil, it doubles as a cosmoline remover 
-Press/punch out the 2 pins in the front sight block, this make take some force and a BFH but they will come out. - Put press block around the barrel and tighten screws, then set ontop of arbor plates on press. Make sure to use a penny or copper washer so you don't damage the crown of the barrel. 
-Start slowly pressing the sight off, it make a cracking and poping noise, this is normal. Just a quick shot of me pressing off the FSB pics to follow. Sorry for the crappy quility I was doing this by myself and it's not easy with only 2 hands 
-Once the barrel and FSB are flush you will not be able to press it any farther, I remove the penny and place a 1/4" drive 5/16" deep socket on the barrel and start to slowly press again. At this point the receiver will fall so be ready to catch it. The socket should not do any damage, at this point most of the resistance is gone. 
-Now that you have removed the old FSB you will now have to line up and install the new one. Make sure you look from all angles to make sure that the new FSB is installed as straight as possible, straightening them after they are on can be a bitch. I usually eye ball it as I can get them really close and check with a speed square. (Sorry I did not take pictures of this I will later and add them.) Once you ahve it on straight give it a few short wacks with a small hammer just to seat the FSB so it does not move around. Re-check and make sure it did not move. Put some oil on the inside of the FSB to make sure things move as easily as possible. -Now that the FSB is oiled and in line with the gas block and rear sight it is time to puch on the FSB. I support the firearm from the gasblock. I use the press block on the bottom edge of the gas block and an AR15 wrench and some washers to shim it on the gas port. 
-Start pressing on the new FSB, keep an eye on everything to make sure it is level and nothing is moving around. Give it a good 3-4 presses and then stop and check, you will only be able to get it so far before meeting the crown of the barrel. -When you get to the point where the FSB and the barrel crown are flush ( or close to flush, remember you DO NOT WANT TO MESS UP THE CROWN ) you will need a 5/8" deep socket to press it on the rest of the way. 
- When pressing on the FSB I keep an eye on the rear hole, once the rear groove in the barrel meets the rear hole on the FSB you have pushed it on all the way! Here is what it should look like 
- check to make sure everything is still in-line and has not moved, if it hasn't you can install the rear pin back into the FSB! You may need to press it in as they can be very tight sometimes. - You may need to drill the existing retaining pin holes larger if your FSB came canted from the factory or if the holes do not align perfectly. If you need to drill them out to a larger size just make sure it is aligned where you want it and use a 1/8" drill bit and carefully make the existing holes larger. It should not be too hard as the existing holes will act as a pilot hole and the bit will have a good guide. Then just use a set of 1/8" x 1/2" steel dowel pins instead of what came with the original. -DO NOT install the front pin into the FSB until you have installed the detent pin for the muzzle device (IF you are using a muzzle device) - Install muzzle device detent then front pin, this can be alittle tricky but it can be done. Here is the finished product, my buddy wanted his barrel threaded so I did that also. 

If you want to touch up the blueing on your FSB or muzzle device I recommend 44/40 a cold blueing solution that works amazing! You can find lots of youtube videos of people using the 44/40. I cut a channel in the gas block of my AK so the cleaning rod is now flush with the barrel instead of all bent and weird looking. 
Finished product 
|
|
|
|
|
[Last Edit: Tbr1806]
[#1]
Threading The Barrel:
I have a 14x1LH die set I am willing to lend out to the ARFCOM community, if you would like to borrow it shoot me a PM. I use a hand threading die, it will not get the threads as concentric to the bore as a lathe but it will work just fine for muzzle brakes and flash hiders. I use a 14x1 LH thread as it is what the chicom AKs originally came with, you can use 1/2x28 as well. You can thread your barrel with or without the FSB on, if you are already changing your FSB I recommend threading it before installing the new FSB. If you are not changing the FSB it is up to you as to how you would like to go about it. A 14mm crush washer can be used in place of the muzzle device detent that does not come on the MAK90's "debanned" FSB. -First start by measuring the size of your barrel at the muzzle end, anywhere between .546 and .550 is good enough for a 14x1LH (yes I have threaded barrels as small as .546 with 14x1LH). If it is smaller than that I would recommend 1/2x28. -You will need some kind of cutting oil or gear oil (I use Valvoline 90w because it is what I had laying around, any autoparts store will have it relatively cheap) to help keep things moving along and to extend the life of the die, more is better than less, it may get messy but can be cleaned up. - Put threading die in the handle with the number side facing away from the barrel and keep the handle so the smaller hole in the handle is facing up away from the barrel. -Remember you are "cutting threads" not just threading a muzzle nut or brake on, when cutting threads you want to be sure to make a 1/4-1/2 in the cutting direction and then back it off 1/4-1/2 turn, this will help things go along more smoothly and extend the life of the die. -When you are finished make sure to remove all metal chips and check the bore to ensure none fell down when you were threading. If there are metal chips in your bore the next time you shoot, it will not be a good thing. I recommend taking a cleaning patch and running it down the barrel to be sure they are all out, you could even go as far as blowing out the barrel with some compressed air after you run the patch through. <Pics/videos will be added when I have another barrel to thread, I will insert a youtube video that is not mine for now> |
|
|
|
|
[Last Edit: Tbr1806]
[#2]
If anyone can think of relevant to add, or you just want to show off your work please feel free, i would like this thread to be as helpful as possible for the new MAK owners.
|
|
|
|
|
[#3]
Great tutorial and pics. Looks good!
|
|
|
|
|
[#4]
Looks great thanks for posting.
|
|
|
|
|
[Last Edit: dryflash3]
[#5]
Originally Posted By Tbr1806: If anyone can think of relevant to add please feel free, i would like this thread to be helpful for the new MAK owners. I will be doing another deban with in the next 2 weeks so if you guys can think of anything you would like to see in deeper detail please let me know. So anytime you are in this forum, you can click on the MY TOPICS button and this thread will be there, as you are the OP. This makes it easy for you to find this thread after it slips off pg 1. So easy to find and post a link to help someone with a question.
eta, toggle set. |
|
|
|
|
[#6]
Good write up. Only thing I would add is if you are going to thread the barrel, thread it when the FSB is off the rifle and go down just below the top end of the FSB.
|
|
|
|
OK, USA
|
[#7]
swap out gas block?
|
|
|
|
[Last Edit: Tbr1806]
[#8]
Originally Posted By bushmaster069:
swap out gas block? I have not had to swap out a gas block yet but it us the same concept as the FSB. The maks I have worked on have all had the cleaning rod channel cut into them except one. The one in the OP I had to dremel a channel so it set nicely against the barrel. |
|
|
|
|
[#9]
Originally Posted By Farmer-Ted:
Good write up. Only thing I would add is if you are going to thread the barrel, thread it when the FSB is off the rifle and go down just below the top end of the FSB. I will add some pics/ information on threading. You don't need to remove the FSB to thread, you will just be 1-2 threads shy if you do it this was but it still comes out OK. I know a lot of people that chose to leave the FSB on due to lack of a shop press but in prefer to do it while the FSB is off. |
|
|
|
|
[#10]
Originally Posted By Tbr1806:
You don't need to remove the FSB to thread, you will just be 1-2 threads shy if you do it this was but it still comes out OK. I know a lot of people that chose to leave the FSB on due to lack of a shop press but in prefer to do it while the FSB is off. Correct, just mentioning if you're going to change out FSBs, it's best to thread when it's off. I've threaded quite a few with the FSB on and have had to clearance the brake threads to get it to go all the way.on. |
|
|
|
IN, USA
|
[#11]
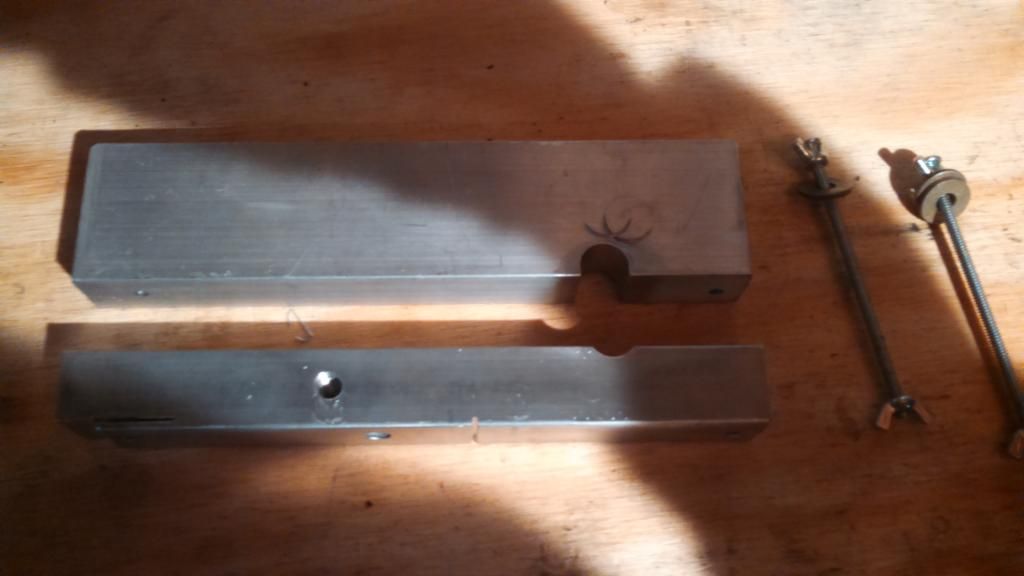
robertforbus.com makes a wide variety of tooling for pressing barrel components on and off. I have a set of his press blocks for the chinese AK and it makes removing all the barrel components very easy. I have yet to so much as scratch the finish using that tooling. Looking to pick up a set of pin press tooling from him shortly, This particular tooling allows you to press the pins out of the barrel pieces without resorting to a BFH and/or possibly damaging the pins and scratching up/gouging the finish.
|
|
|
|
[#12]
nice tutorial!
|
|
|
|
|
[#13]
Originally Posted By 56type:
robertforbus.com makes a wide variety of tooling for pressing barrel components on and off. I have a set of his press blocks for the chinese AK and it makes removing all the barrel components very easy. I have yet to so much as scratch the finish using that tooling. Looking to pick up a set of pin press tooling from him shortly, This particular tooling allows you to press the pins out of the barrel pieces without resorting to a BFH and/or possibly damaging the pins and scratching up/gouging the finish. I have seen those but when I "debanned" my first mak I thought I would only be debanning one so I didn't want to spend alot of money on tools and other things. That is why I made the press plate in the OP and it has held up very well. I had access to some aluminum barstock and it was alot cheaper but your option is great for people planning on working on ALOT of them. |
|
|
|
|
[#14]
Funny that someone other than me uses a cheapy AR wrench for barrel population.
The cheapy front sight tools work great for pressing trigger guard rivets too. Straddles the center support perfectly, but I only get a few uses out of them. |
|
|
|
|
[Last Edit: Tbr1806]
[#15]
Originally Posted By Hueto:
Funny that someone other than me uses a cheapy AR wrench for barrel population.
The cheapy front sight tools work great for pressing trigger guard rivets too. Straddles the center support perfectly, but I only get a few uses out of them. I had it laying around and it fit the job perfectly, I think shimming up an AK barrel in a press is the only thing it's good at. The AR wrench doesnt even fit a castle nut
|
|
|
|
|
[Last Edit: Dragynn]
[#16]
Awesome thread! The only thing I would add is the option of replacing the FSB with a spiker repro, Tortort makes some nice ones and the owner Ben is a great guy to deal with.
http://www.tortort.com/ ETA: Here's a pic of a Poly I did with the Tortort FSB: 

|
|
|
|
TX, USA
|
[#17]
I also went the route of the original style FSB. Sticking your gun in the freezer overnight then heating the new FSB in the oven can make it easier to slip on. I've never had to press one on with a press though...the worst case has been whacking it on with a hard face mallet.

|
|
|
|
[#18]
Originally Posted By Dragynn: Awesome thread! The only thing I would add is the option of replacing the FSB with a spiker repro, Tortort makes some nice ones and the owner Ben is a great guy to deal with. http://www.tortort.com/ ETA: Here's a pic of a Poly I did with the Tortort FSB: http://oi59.tinypic.com/2j13a0p.jpg http://oi62.tinypic.com/2vvq160.jpg |
|
|
|
|
[#19]
Originally Posted By Dragynn:
Awesome thread! The only thing I would add is the option of replacing the FSB with a spiker repro, Tortort makes some nice ones and the owner Ben is a great guy to deal with. http://www.tortort.com/ ETA: Here's a pic of a Poly I did with the Tortort FSB: http://oi59.tinypic.com/2j13a0p.jpg http://oi62.tinypic.com/2vvq160.jpg Thanks for adding that! That turned out beautifully! |
|
|
|
|
[#20]
Originally Posted By dryflash3:
Don't remember if I said it the first time you posted those pics, but your rifle turned out very nice. Originally Posted By dryflash3:
Originally Posted By Dragynn:
Awesome thread! The only thing I would add is the option of replacing the FSB with a spiker repro, Tortort makes some nice ones and the owner Ben is a great guy to deal with. http://www.tortort.com/ ETA: Here's a pic of a Poly I did with the Tortort FSB: http://oi59.tinypic.com/2j13a0p.jpg http://oi62.tinypic.com/2vvq160.jpg Thanks brother! I really enjoyed doing it, working on AK's is a real joy for me. @CarlosC: daaaaaaayyuuuummmm that's a nice one! Spiker chicoms are really in a league of their own. OP: thanks again for an excellent thread, I referred to it multiple times when I was doing my project and it helped a lot! 
|
|
|
|
|
[Last Edit: Tbr1806]
[#21]
Bump for barrel threading update.
|
|
|
|
|
[Last Edit: bending_rodriguez]
[#22]
nvm
|
|
|
|
|
[#23]
Nice.
|
|
|
|
IN, USA
|
[#24]
Decided to add the bayonet hooks and cleaning rod retaining notch to a MAK-90 FSB...
MAK-90 FSB restore |
|
|
|
[#25]
Originally Posted By 56type:
Decided to add the bayonet hooks and cleaning rod retaining notch to a MAK-90 FSB... MAK-90 FSB restore Damn, nice work! That came out awesome! |
|
|
|
SC, USA
|
[#26]
Very good info and just want I was looking for.
|
|
|
|
[#27]
Originally Posted By FrostedFlakes:
Very good info and just want I was looking for. |
|
|
|
IN, USA
|
[#28]
Originally Posted By Farmer-Ted:
Good write up. Only thing I would add is if you are going to thread the barrel, thread it when the FSB is off the rifle and go down just below the top end of the FSB. |
|
|
|
[#29]
Originally Posted By 56type:
Yup...Otherwise the "lead" in the die will leave a small shoulder that will keep the muzzle device from seating where it should. Usually 3 threads past where the FSB front face would be is sufficient. Originally Posted By 56type:
Originally Posted By Farmer-Ted:
Good write up. Only thing I would add is if you are going to thread the barrel, thread it when the FSB is off the rifle and go down just below the top end of the FSB. |
|
|
|
IN, USA
|
[#30]
Originally Posted By Tbr1806: I have done it both ways and never had an issue getting them as tight as they will go to the FSB. All of my muzzle devices are secured with a pin on the FSB, not by torque. All of mine are secured by the locking pin too. Never torqued one on. I've noticed a gap between the muzzle device and the FSB if I don't remove the FSB prior to threading. The die bottoms out against the FSB before cutting the threads all the way to the FSB face, leaving a small shoulder for the muzzle device to contact before getting to the FSB. I usually spin the muzzle device down until it contacts the FSB then back it off until the pin aligns with the notch in the muzzle device. If there's a large gap between the FSB & muzzle device I can file or face off the rear of the muzzle device in the lathe for a better fit. Maybe you have a better die than the one I'm using ??... |
|
|
|
[Last Edit: Tbr1806]
[#31]
Saw someone post with a question on debanning...so....bump.
|
|
|
|
|
[#32]
i love de banning.
|
|
|
|
 Win a FREE Membership!
Sign up for the ARFCOM weekly newsletter and be entered to win a free ARFCOM membership. One new winner* is announced every week!
You will receive an email every Friday morning featuring the latest chatter from the hottest topics, breaking news surrounding legislation, as well as exclusive deals only available to ARFCOM email subscribers.

AR15.COM is the world's largest firearm community and is a gathering place for firearm enthusiasts of all types.
From hunters and military members, to competition shooters and general firearm enthusiasts, we welcome anyone who values and respects the way of the firearm.

Subscribe to our monthly Newsletter to receive firearm news, product discounts from your favorite Industry Partners, and more.
Copyright © 1996-2024 AR15.COM LLC. All Rights Reserved.
Any use of this content without express written consent is prohibited.
AR15.Com reserves the right to overwrite or replace any affiliate, commercial, or monetizable links, posted by users, with our own.