AZ, USA
|
Posted: 11/7/2016 4:01:22 AM EDT
So I've been Reloading for about 5 years now. Well over 100k rounds under my belt. Well I decided to try this annealing thing. I saw some post on here and got that thermal paste stuff (name is slipping me). My question is, what step in the process is annealing? Tumble, size, deprime.... do i anneal b4 I size or after?
|
|
|
FL, USA
|
[#1]
before resizing.
annealing softens the brass that was work hardened and will prevent cracking of case necks. It also if do e properly will provide more consistent neck tension. |
|
|
AZ, USA
|
[#2]
do i need to size right after i anneal or can it wait y? and by right after, i mean after the case is able to be held w/o burning myself
|
|
|
|
[Last Edit: lizARdman15]
[#3]
Let it be room temp.
Some annealers drop them in water which will need to dry in order to prevent hydraulic dents. |
|
|
|
AZ, USA
|
[#4]
Originally Posted By lizARdman15:
Let it be room temp. Some annealers drop them in water which will need to dry in order to prevent hydraulic dents. awesome, thanks |
|
|
|
[Last Edit: AZ_Sky]
[#5]
After years of reloading, I just started annealing after getting into long range shooting with my Ruger Precision Rifle 6.5 Creedmoor.
I tried the 'case in the deepwell socket and torch' method, but I just couldn't get repeatable results and I ended up over-temping and ruining just as many cases as I successfully annealed so I abandoned that technique. I couldn't afford one of those fancy annealing machines so I went another direction that was inexpensive, works perfectly, it's easy, and absolutely repeatable for me. Following in the footsteps of fellow arfcomer (BattleRife), I built a salt bath annealing station following pictures of his from years ago. I now anneal my cases after every firing. When I come home from the range I use a universal decapper to de-prime the cases, then I anneal each case in a 500°C salt bath for 5 seconds. After that the cases go into my ultra-sonic cleaner, then resized, trimmed de-burred and chamfered, and then they are ready to reload. Here's the annealing station I built. I bought a Lee Precision Melter for $36 plus shipping. And some low temperature salts for $4 per pound plus shipping (I bought two pounds). Then I made a case holder that fits into the melter pot and it holds the cases during the annealing process.  Here's the setup. The case holder and melting pot:  Salts in the pot, I put in just enough salts to come half way up the shoulder when the case holder is inserted:  Salts at 500°C and cases being annealed.  I use a metronome cell phone app to count out the 5 second beat. At 500°C (932°F) the case neck is perfectly annealed and the case body doesn't exceed ~135°F. Doing two cases at a time I can anneal ~12 cases a minute, or about 100 cases in less than ten minutes. Here's a crummy video of me annealing a few cases and attempting to show that the case body doesn't exceed damaging temperatures. You can hear my cell phone ticking out the 5 second intervals - you might not be able to see the temp on the IR thermometer when I attempt to show the case body temp, but it is reading ~135.5°F. After annealing I drop the cases into a bucket of water, the salts are extremely water soluble and a dunk in the water bucket completely washes off the residual salts. Here is a pic of three 6.5 Creedmoor cases. The cases have all just been neck turned, the one on the left is cleaned and polished but not annealed, the one in the middle is cleaned and polished and annealed, the one on the right is cleaned but not polished and annealed. You can see that the annealing discoloration varies by what has been done to the cases - and why discoloration is NOT a good indication of when the annealing process is done properly. Imo - you really need to have a temperature measurement and timing system (unless you have done it enough to "do it by feel").  |
|
|
|
FL, USA
|
[#6]
Some wipe the dirt off and anneal before anything else Most deprime, clean and anneal before sizing and trimming Some do all case work including sizing and trimming and anneal last I anneal last, I just started that way, When I started annealing I annealed thousands of cases that were already processed for competition but needed to be annealed ( 2500- 3006, 2000-308, 3000-223 ) ( all fired 5 + times and accuracy had started to diminish ) Which way is correct ? ( every body argues for their way, because their way is best ) Each way works ( I tried each way, comes out the same ) So you choose your way ( pick the way that works best for you ) Start with odd ball brand cases to get the feel of it It is better to anneal to little and anneal again ( will not hurt the case ) If you over anneal ( get the case to hot ) That case is trash |
|
|
|
[#7]
Pretty slick, Sky.
|
|
|
|
|
[#8]
Originally Posted By AZ_Sky: After years of reloading, I just started annealing after getting into long range shooting with my Ruger Precision Rifle 6.5 Creedmoor. I tried the 'case in the deepwell socket and torch' method, but I just couldn't get repeatable results and I ended up over-temping and ruining just as many cases as I successfully annealed so I abandoned that technique. I couldn't afford one of those fancy annealing machines so I went another direction that was inexpensive, works perfectly, it's easy, and absolutely repeatable for me. You can hear my cell phone ticking out the 5 second intervals - you might not be able to see the temp on the IR thermometer when I attempt to show the case body temp, but it is reading ~135.5°F.Following in the footsteps of fellow arfcomer (BattleRife), I built a salt bath annealing station following pictures of his from years ago. I now anneal my cases after every firing. When I come home from the range I use a universal decapper to de-prime the cases, then I anneal each case in a 500°C salt bath for 5 seconds. After that the cases go into my ultra-sonic cleaner, then resized, trimmed de-burred and chamfered, and then they are ready to reload. Here's the annealing station I built. I bought a Lee Precision Melter for $36 plus shipping. http://www.midwayusa.com/product/476462/lee-melter-furnace-110-volt And some low temperature salts for $4 per pound plus shipping (I bought two pounds). http://www.hightemptools.com/Salts.html Then I made a case holder that fits into the melter pot and it holds the cases during the annealing process. http://m4.i.pbase.com/g9/72/325172/2/164385734.jWKSGUnV.jpg Here's the setup. The case holder and melting pot: http://m5.i.pbase.com/g9/72/325172/2/164385735.M2Ce5uk3.jpg Salts in the pot, I put in just enough salts to come half way up the shoulder when the case holder is inserted: http://m8.i.pbase.com/g9/72/325172/2/164385738.x1PAjIN7.jpg Salts at 500°C and cases being annealed. http://m7.i.pbase.com/g9/72/325172/2/164385737.lO2p2LoP.jpg I use a metronome cell phone app to count out the 5 second beat. At 500°C (932°F) the case neck is perfectly annealed and the case body doesn't exceed ~135°F. Doing two cases at a time I can anneal ~12 cases a minute, or about 100 cases in less than ten minutes. Here's a crummy video of me annealing a few cases and attempting to show that the case body doesn't exceed damaging temperatures. After annealing I drop the cases into a bucket of water, the salts are extremely water soluble and a dunk in the water bucket completely washes off the residual salts. Here is a pic of three 6.5 Creedmoor cases. The cases have all just been neck turned, the one on the left is cleaned and polished but not annealed, the one in the middle is cleaned and polished and annealed, the one on the right is cleaned but not polished and annealed. You can see that the annealing discoloration varies by what has been done to the cases - and why discoloration is NOT a good indication of when the annealing process is done properly. Imo - you really need to have a temperature measurement and timing system (unless you have done it enough to "do it by feel"). http://m6.i.pbase.com/g9/72/325172/2/164387066.4iUZAj5S.jpg Hmmmmm. . . . Winter project . In your opinion , is the pot deep enough for 50 BMG ? |
|
|
|
|
[Last Edit: AZ_Sky]
[#9]
Originally Posted By Skg_Mre_Lght: Originally Posted By Skg_Mre_Lght: <snip> Hmmmmm. . . . Winter project . In your opinion , is the pot deep enough for 50 BMG ? Yes, but I haven't yet built a case holder insert for my 50 BMG brass. And due to the mass of the brass I would probably limit the holder to one piece of brass to minimize the cool down on the salt bath - but who knows, it might be able to keep up with two at a time if done at a slower rate.
 |
|
|
|
AZ, USA
|
[#10]
wow AZ sky, i may have to borrow your idea for setup. mostly cause the cost of annealing machines are just insane. thanks for the steps/video.
|
|
|
|
[#11]
Did you is stainless for the case holder ? Where did you order the plates to drill through ?
|
|
|
|
|
[Last Edit: AZ_Sky]
[#12]
Originally Posted By Skg_Mre_Lght: Did you is stainless for the case holder ? Where did you order the plates to drill through ? One of my other hobbies is building sport aerobatic airplanes so I had a bunch of scrap aluminum laying around. I built the case holder top plate and the second plate down from some scrap .040" 2024 T3 aluminum as it isn't actually immersed in the salt bath. The lower plate needs to be made from something that can handle temps over 1000°F since it is submersed in the salt bath. In the pictures above, the lower plate was actually made from .025" 2024 T3 aluminum and it melted after the second use, I quickly replaced it with a piece of steel from the bottom of a soup can and that has been working fine since. I wanted to build the whole case holder out of .032" brass but I couldn't find any in town - you can build the plates out anything that can handle the heat. I used the free LibreCAD (http://librecad.org/cms/home.html) program to make my own CAD templates for making the plates and just cut and drilled them out in my garage. I can email you the simple LibreCAD .dxf file (if you want to modify it) or a pdf file of my templates if you like. |
|
|
|
VA, USA
|
[#13]
AZ_Sky could you do an experiment?
What is the equilibrium temperature of the case head? With a scrap case could you leave it in the salt bath for 60 seconds to see what max temperature the case head and body could possibly get. Thanks. Oh, one other question. How much salt do you lose after 100 rounds? |
|
|
|
[#14]
Originally Posted By AZ_Sky: One of my other hobbies is building sport aerobatic airplanes so I had a bunch of scrap aluminum laying around. I built the case holder top plate and the second plate down from some scrap .040" 2024 T3 aluminum as it isn't actually immersed in the salt bath. The lower plate needs to be made from something that can handle temps over 1000°F since it is submersed in the salt bath. In the pictures above, the lower plate was actually made from .025" 2024 T3 aluminum and it melted after the second use, I quickly replaced it with a piece of steel from the bottom of a soup can and that has been working fine since. I wanted to build the whole case holder out of .032" brass but I couldn't find any in town - you can build the plates out anything that can handle the heat. I used the free LibreCAD (http://librecad.org/cms/home.html) program to make my own CAD templates for making the plates and just cut and drilled them out in my garage. I can email you the simple LibreCAD .dxf file (if you want to modify it) or a pdf file of my templates if you like. Originally Posted By AZ_Sky: Originally Posted By Skg_Mre_Lght: Did you is stainless for the case holder ? Where did you order the plates to drill through ? One of my other hobbies is building sport aerobatic airplanes so I had a bunch of scrap aluminum laying around. I built the case holder top plate and the second plate down from some scrap .040" 2024 T3 aluminum as it isn't actually immersed in the salt bath. The lower plate needs to be made from something that can handle temps over 1000°F since it is submersed in the salt bath. In the pictures above, the lower plate was actually made from .025" 2024 T3 aluminum and it melted after the second use, I quickly replaced it with a piece of steel from the bottom of a soup can and that has been working fine since. I wanted to build the whole case holder out of .032" brass but I couldn't find any in town - you can build the plates out anything that can handle the heat. I used the free LibreCAD (http://librecad.org/cms/home.html) program to make my own CAD templates for making the plates and just cut and drilled them out in my garage. I can email you the simple LibreCAD .dxf file (if you want to modify it) or a pdf file of my templates if you like. I love how every SwiftKey update makes me sound more idiotic. *sigh* If they have dimensions, that would be sweet. I will be making them by hand, though. |
|
|
|
|
[#15]
Originally Posted By Happy2shoot: AZ_Sky could you do an experiment? What is the equilibrium temperature of the case head? With a scrap case could you leave it in the salt bath for 60 seconds to see what max temperature the case head and body could possibly get. Thanks. Oh, one other question. How much salt do you lose after 100 rounds? Dang, I wish I could be a little more scientific here. Right now I don't have any way to quickly or accurately measure the temperature (I'm ordering some Tempilaq next time I place a Midway USA order though). But I can tell you that I used the information from http://www.6mmbr.com/annealing.html to work up my time and temp. "The critical time and temperature at which the grain structure reforms into something suitable for case necks is 662 degrees (F) for some 15 minutes. A higher temperature, say from 750 to 800 degrees, will do the same job in a few seconds. If brass is allowed to reach temperatures higher than this (regardless of the time), it will be made irretrievably and irrevocably too soft." The time and temp will obviously change with different cases. Given different case wall thickness, brass mass, manufacturer, and thermal migration with time, you kind of have to experiment to dial in the exact time and temp. The good thing is that the brass neck can never get any hotter than the salt bath so thermal migration is probably one of the main variables in determining the time and temperature for the anneal. I have found that for my Hornady 6.5 CM brass that 5 seconds at 500°C seems to work fine for me. I can show you the following though - I didn't have any scrap 6.5 Creedmoor brass but I did have some scrap 22-250 brass (thinner walls and less mass than the 6.5 Creedmoor brass). I went ahead and brought the salt bath up to 500°C and annealed 5 separate pieces of brass starting at a time of 5 seconds and increasing the time by 5 seconds each up to a time of 25 seconds (I also included a piece of 6.5 Creedmoor brass that was annealed for 5 seconds). It is quite obvious that heat migration occurs rapidly enough that it is possible to ruin the brass if you aren't paying attention to the time in the bath as you never want to allow the temperature of the case body to exceed 450F degrees. The necks on the 22-250 brass could probably be annealed in about 3 instead of 5 seconds (or by dropping the bath temperature a bit).  This morning I just finished annealing some 6.5 Creedmoor brass. After adjusting the salt bath level to where I wanted it, I annealed 100 cases and then weighed the amount of salts required to bring the bath level back to the starting point - it required ~100 grains (about a level cereal spoon full), 100 cases is about the maximum I do before adjusting the level due to salt loss. There is 1.5 pounds of salts in the plastic bag:  |
|
|
|
UT, USA
|
[#16]
Is there any concerns for the salts causing corrosion to the case or rust if it was to migrate with the case to the firearm?
|
|
|
|
[#17]
Originally Posted By sigman68: Is there any concerns for the salts causing corrosion to the case or rust if it was to migrate with the case to the firearm? No, any residual salt is complete washed off when the case is dunked in the water bucket after the anneal. The salts are extremely water soluble and are still molten when tossed into the water bucket - they are completely rinsed off. I my case I anneal before I clean the brass anyway. |
|
|
|
|
[#18]
No problems with the crap in the neck bonding with the brass, and causing problems? I would like to anneal before cleaning as well.
PM sent. |
|
|
|
|
[Last Edit: AZ_Sky]
[#19]
Originally Posted By Skg_Mre_Lght: No problems with the crap in the neck bonding with the brass, and causing problems? I would like to anneal before cleaning as well. PM sent. I haven't had any problems at all with crap in the neck bonding with the brass. The "A" option would be to clean the brass first and then anneal, but I have found that de-priming with a universal (non-sizing) de-priming die, annealing, cleaning, and resizing in that order works well enough for me. I de-prime first so that the flash hole acts as an escape outlet for any blow off from inside the case as well as letting the molten salts easily flow on both the outside and inside of the case neck. The reason I use a universal non-sizing de-priming die is because after annealing you really need to resize the brass again anyway - you could use your resizing/depriming die before annealing but I would still resize again after annealing. |
|
|
|
CA, USA
|
[Last Edit: Blowout]
[#20]
Great information on a different technique for annealing. Thanks for sharing.
How do you determine the time in the salt to anneal the case properly? Edit: Think I get it now...since you have a constant bath temperature, you use the time it takes to get a visual the color change to just past the shoulder of the brass. |
|
|
VA, USA
|
[#21]
Originally Posted By AZ_Sky:
Dang, I wish I could be a little more scientific here. Right now I don't have any way to quickly or accurately measure the temperature (I'm ordering some Tempilaq next time I place a Midway USA order though). But I can tell you that I used the information from http://www.6mmbr.com/annealing.html to work up my time and temp. "The critical time and temperature at which the grain structure reforms into something suitable for case necks is 662 degrees (F) for some 15 minutes. A higher temperature, say from 750 to 800 degrees, will do the same job in a few seconds. If brass is allowed to reach temperatures higher than this (regardless of the time), it will be made irretrievably and irrevocably too soft." The time and temp will obviously change with different cases. Given different case wall thickness, brass mass, manufacturer, and thermal migration with time, you kind of have to experiment to dial in the exact time and temp. The good thing is that the brass neck can never get any hotter than the salt bath so thermal migration is probably one of the main variables in determining the time and temperature for the anneal. I have found that for my Hornady 6.5 CM brass that 5 seconds at 500°C seems to work fine for me. I can show you the following though - I didn't have any scrap 6.5 Creedmoor brass but I did have some scrap 22-250 brass (thinner walls and less mass than the 6.5 Creedmoor brass). I went ahead and brought the salt bath up to 500°C and annealed 5 separate pieces of brass starting at a time of 5 seconds and increasing the time by 5 seconds each up to a time of 25 seconds (I also included a piece of 6.5 Creedmoor brass that was annealed for 5 seconds). It is quite obvious that heat migration occurs rapidly enough that it is possible to ruin the brass if you aren't paying attention to the time in the bath as you never want to allow the temperature of the case body to exceed 450F degrees. The necks on the 22-250 brass could probably be annealed in about 3 instead of 5 seconds (or by dropping the bath temperature a bit). http://m1.i.pbase.com/o9/72/325172/1/164507751.4NUYFXPL.Anneal_T.jpg This morning I just finished annealing some 6.5 Creedmoor brass. After adjusting the salt bath level to where I wanted it, I annealed 100 cases and then weighed the amount of salts required to bring the bath level back to the starting point - it required ~100 grains (about a level cereal spoon full), 100 cases is about the maximum I do before adjusting the level due to salt loss. There is 1.5 pounds of salts in the plastic bag: http://m1.i.pbase.com/o9/72/325172/1/164507821.KSTzj1Cp.Anneal_Salts.jpg Originally Posted By AZ_Sky:
Originally Posted By Happy2shoot:
AZ_Sky could you do an experiment? What is the equilibrium temperature of the case head? With a scrap case could you leave it in the salt bath for 60 seconds to see what max temperature the case head and body could possibly get. Thanks. Oh, one other question. How much salt do you lose after 100 rounds? Dang, I wish I could be a little more scientific here. Right now I don't have any way to quickly or accurately measure the temperature (I'm ordering some Tempilaq next time I place a Midway USA order though). But I can tell you that I used the information from http://www.6mmbr.com/annealing.html to work up my time and temp. "The critical time and temperature at which the grain structure reforms into something suitable for case necks is 662 degrees (F) for some 15 minutes. A higher temperature, say from 750 to 800 degrees, will do the same job in a few seconds. If brass is allowed to reach temperatures higher than this (regardless of the time), it will be made irretrievably and irrevocably too soft." The time and temp will obviously change with different cases. Given different case wall thickness, brass mass, manufacturer, and thermal migration with time, you kind of have to experiment to dial in the exact time and temp. The good thing is that the brass neck can never get any hotter than the salt bath so thermal migration is probably one of the main variables in determining the time and temperature for the anneal. I have found that for my Hornady 6.5 CM brass that 5 seconds at 500°C seems to work fine for me. I can show you the following though - I didn't have any scrap 6.5 Creedmoor brass but I did have some scrap 22-250 brass (thinner walls and less mass than the 6.5 Creedmoor brass). I went ahead and brought the salt bath up to 500°C and annealed 5 separate pieces of brass starting at a time of 5 seconds and increasing the time by 5 seconds each up to a time of 25 seconds (I also included a piece of 6.5 Creedmoor brass that was annealed for 5 seconds). It is quite obvious that heat migration occurs rapidly enough that it is possible to ruin the brass if you aren't paying attention to the time in the bath as you never want to allow the temperature of the case body to exceed 450F degrees. The necks on the 22-250 brass could probably be annealed in about 3 instead of 5 seconds (or by dropping the bath temperature a bit). http://m1.i.pbase.com/o9/72/325172/1/164507751.4NUYFXPL.Anneal_T.jpg This morning I just finished annealing some 6.5 Creedmoor brass. After adjusting the salt bath level to where I wanted it, I annealed 100 cases and then weighed the amount of salts required to bring the bath level back to the starting point - it required ~100 grains (about a level cereal spoon full), 100 cases is about the maximum I do before adjusting the level due to salt loss. There is 1.5 pounds of salts in the plastic bag: http://m1.i.pbase.com/o9/72/325172/1/164507821.KSTzj1Cp.Anneal_Salts.jpg Wow, johnny on the spot! Thanks! |
|
|
PA, USA
|
[#22]
How do you determine how much salt you need if you can't see inside? Guess and check?
|
|
|
|
[Last Edit: AZ_Sky]
[#23]
Originally Posted By Domestique: How do you determine how much salt you need if you can't see inside? Guess and check? I use a long threaded screw as a dip stick to the bottom case holder plate, the molten salts 'hang' in the threads. The molten salts cool and solidify quickly to allow me to see the salt bath depth level. In the following picture, I would now add a small spoon full of salts to bring the level half way up the shoulder.  |
|
|
|
|
[#24]
Is the top disc made to cover the pot for aesthetics, or to keep heat in?
|
|
|
|
|
[#25]
Originally Posted By MisterPX: Is the top disc made to cover the pot for aesthetics, or to keep heat in? Actually, nothing about the case holder is critical - it can be made anyway anyone likes. The case holder isn't resting on the bottom of the pot, it is actually hanging in the pot from the top disc. So the top disc diameter is made to rest on the top lip of the pot (it probably does help with heat retention, but that wasn't the purpose). |
|
|
|
|
[#26]
Okay....one dumb question....
Is the salt reusable after each session? |
|
|
|
|
[Last Edit: AZ_Sky]
[#27]
Originally Posted By WeimaranerDad: Okay....one dumb question.... Is the salt reusable after each session? Yes, it is just a eutectic mixture of nitrate/nitrite salts. They melt at the eutectic point and stay molten through their usable range (in this case from ~300F to ~1000F). When the salts cool down they harden again (freeze) into their solid salt form. They are reusable over and over again with no degradation (like melting and refreezing ice/water). |
|
|
|
|
[#28]
Got my salt today, built my contraption (looks like a drunk monkey bolted it together compared to AZ's) earlier, so friday, I will be ready to go.
|
|
|
|
|
[#29]
Originally Posted By AZ_Sky:
Yes, it is just a eutectic mixture of nitrate/nitrite salts. They melt at the eutectic point and stay molten through their usable range (in this case from ~300F to ~1000F). When the salts cool down they harden again (freeze) into their solid salt form. They are reusable over and over again with no degradation (like melting and refreezing ice/water). Originally Posted By AZ_Sky:
Originally Posted By WeimaranerDad:
Okay....one dumb question.... Is the salt reusable after each session? Yes, it is just a eutectic mixture of nitrate/nitrite salts. They melt at the eutectic point and stay molten through their usable range (in this case from ~300F to ~1000F). When the salts cool down they harden again (freeze) into their solid salt form. They are reusable over and over again with no degradation (like melting and refreezing ice/water). Thank you sir! My interested has been piqued by annealers ever since I saw jmorris's version posted on the Brian Enos forums. His was a "circular saw blade" style fed by a Dillon 650 case feeder. That is the part that I thought was pretty neat. |
|
|
|
|
[#30]
Originally Posted By MisterPX: Got my salt today, built my contraption (looks like a drunk monkey bolted it together compared to AZ's) earlier, so friday, I will be ready to go. There is nothing special about the case holder, as long as yours holds the cases in the salt at repeatable levels then you win! |
|
|
|
|
[#31]
Hmm, I've had great success with spinning the case neck in a propane touch flame for ~8 seconds.
|
|
|
|
VA, USA
|
[#32]
Az-sky
I just finished assembling my salt bath per your design and it seems to work on my 5.56 cases. I have some cases that I shot 7 times for service rifle and relegated to blasting ammo. These cases are 5.56 that were run for the 5 secs at 500C - may be too long. I will try 3 secs. To show any improvement from annealing I will reload 10 each of these annealed and unannealed control , and then shoot for accuracy and check for cracks until I see a difference. As a retired ChemE, what would be great (almost scientific ! ) would be a lab that could do photomicrographs of the etched grain structure and a hardness profile along the length of the case. Unfortunately I do not now have access to a Materials Lab 
If anyone has any contacts, I can make samples available! |
|
|
|
[#33]
Originally Posted By Tomva:
Az-sky I just finished assembling my salt bath per your design and it seems to work on my 5.56 cases. I have some cases that I shot 7 times for service rifle and relegated to blasting ammo. These cases are 5.56 that were run for the 5 secs at 500C - may be too long. I will try 3 secs. To show any improvement from annealing I will reload 10 each of these annealed and unannealed control , and then shoot for accuracy and check for cracks until I see a difference. As a retired ChemE, what would be great (almost scientific ! ) would be a lab that could do photomicrographs of the etched grain structure and a hardness profile along the length of the case. Unfortunately I do not now have access to a Materials Lab
If anyone has any contacts, I can make samples available! Great news! Yeah, on the less massive 5.56 cases you might need to drop the temperature a bit or shorten the annealing time - I needed to do that even when changing from 6.5CM brass to 22-250 brass. Did that inexpensive Type K thermocouple readout from Amazon work out - I might pick one up to free up the thermocouple for my multimeter. I don't necessarily anneal to extend my case life, I do it to get a more consistent neck tension for extreme long range shooting. Love to see a pic of your setup... |
|
|
|
VA, USA
|
[Last Edit: Tomva]
[#34]
Salt Bath Setup
The temperature meter with TC I used is https://www.amazon.com/gp/product/B01IGUGO1E/ref=oh_aui_detailpage_o07_s00?ie=UTF8&psc=1&tag=vglnk-c102-20 for $11. It works well (so Far) - I hooked it up an old 12V laptop power supply and mounted it in an electrical box that I had. I am concerned that the thermocouple head insulation (glass fiber?) is in the salt and I may have to replace it. The first case fixture is 26 gauge aluminum sheet from Lowes made using with sheet metal shears. 500C is very close to zero tensile strength for aluminum and based on your experience I will redo in Stainless steel. I bought two orders of 4x4 inches SS 26 gauge on Ebay for $8 each Lowes also has 10-24 x 2" SS screws and nuts that work OK - no SS spacers which looks nicer on your rig. Bath and meter meter Case Holder holder Annealed Cases cases Me flying a Ukrainian Mig23 just for Az-sky mig23 |
|
|
|
[#35]
Testing potato direct pic.
|
|
|
|
|
[#36]
K, got all of my stuff in.
I started with 50 BMG, and went 7.5 seconds. I am going to do 220 Swift now, with 260 and 308 soon. This definitely isn't a high volume outfit, but it works, and that's what winters are for. BTW, I recommend Nome or leather gloves, and to take your holder out while the salt is hot. |
|
|
|
|
[#37]
Cool stuff guys
|
|
|
|
|
[#38]
I just built the work circuit for my annealer yesterday. I'm doing a full induction heating coil. I can manually anneal brass with it as it sits but I need an enclosure next. Also, I'll be adding in a control circuit based off an arduino and an IR laser thermometer. That way you can set the temp you want your case neck to hit, the arduino turns on the induction heating, it raises the temp of the brass to the target temp, then will kick the brass out of the heating coil.
|
|
|
|
VA, USA
|
[Last Edit: Happy2shoot]
[#39]
Originally Posted By dyezak:
Also, I'll be adding in a control circuit based off an arduino and an IR laser thermometer. Bad idea. You will never get an accurate temp reading. What is the absorptivity of your brass at the temp you want? What about when it's dirty or tarnished? Can you adjust for that with your IR probe? Your target area will be around .75 cm^2, if you miss you'll hit the coil and get a false hot reading. |
|
|
|
[Last Edit: dyezak]
[#40]
Originally Posted By Happy2shoot:
Bad idea. You will never get an accurate temp reading. What is the absorptivity of your brass at the temp you want? What about when it's dirty or tarnished? Can you adjust for that with your IR probe? Your target area will be around .75 cm^2, if you miss you'll hit the coil and get a false hot reading. Maybe not accurate, but I can count on precision. There will have to be a calibration with corroborating instruments (probably a contact pyrometer). My first step is always to clean it first. Anyhow, an IR laser accurately measures the temp of my tires across the tread pattern and I none of my brass will ever EVER be that dirty (corroborated between my non-contact IR laser and my K-probe stuck into my tires during autox). Impossible to miss at the distances we are talking about. The laser will shoot between the coils in between the bottom and the next to bottom coil. The entirety of the space inside the loop is brass, and the divergence of the laser beam at the 2cm distance can only be measured in nanometers. If a miss was to occur you would get a 0 reading because the beam would go straight through the opposing coil gap. Easy to account for that in the arduino logic. No reading, don't turn the coil on. |
|
|
|
VA, USA
|
[#41]
Use this chart to adjust the emissivity of your IR thermometer if you can:
http://www.infrared-thermography.com/material.htm Notice the change from "highly polished brass" to "oxidized brass" is 0.03 to 0.61! Example: Actual temperature (unknown to you) 750 F "highly polished brass" would display 22.5 F "oxidized brass" would display 457.5 F This is the reason why tempilaq and thermocouples still exist. |
|
|
|
[Last Edit: dyezak]
[#42]
Originally Posted By Happy2shoot:
Use this chart to adjust the emissivity of your IR thermometer if you can: http://www.infrared-thermography.com/material.htm Notice the change from "highly polished brass" to "oxidized brass" is 0.03 to 0.61! Example: Actual temperature (unknown to you) 750 F "highly polished brass" would display 22.5 F "oxidized brass" would display 457.5 F This is the reason why tempilaq and thermocouples still exist. Originally Posted By Happy2shoot:
Use this chart to adjust the emissivity of your IR thermometer if you can: http://www.infrared-thermography.com/material.htm Notice the change from "highly polished brass" to "oxidized brass" is 0.03 to 0.61! Example: Actual temperature (unknown to you) 750 F "highly polished brass" would display 22.5 F "oxidized brass" would display 457.5 F This is the reason why tempilaq and thermocouples still exist. I know you don't apply the emissivity value like that...if you did my $20 handheld laser thermometer would measure my room temp (68F) brass sitting here next to me somewhere between 2F and 41F. Funny thing...this $20 laser is telling me my 68F brass is 68F (the brass has been sitting in my 68F house for weeks). Even if there were significant deviation at elevated temperature, you just need calibration. For instance if my laser reads 400F when the brass is 750F that's fine, as long as it does it every single time in a repeatable way. You lose some resolution capability, but really, you don't need incredible levels of detail anyway. I know that emissivity certainly affects IR laser temperature readings...but I also know as a fact the impact isn't anywhere near what you describe. ETA - I just came across an engineering study where they explain how emissivity impacts ir temp measurement equipment. There's tons of formulas in there, but the one on application of emissivity states: Q = esT(4) where: Q = radiation intensity e = emissivity of material s = Stefan-Boltzmann constant T = absolute temperature The Stefan–Boltzmann constant (also Stefan's constant), a physical constant denoted by the Greek letter s (sigma), is the constant of proportionality in the Stefan–Boltzmann law: "the total intensity radiated over all wavelengths increases as the temperature increases", of a black body which is proportional to the fourth power of the thermodynamic temperature.[1] In their test example they were using a piece of stainless steel, emissivity of 0.12, baked at 175F and their standard meter measured it at 84F. That same meter measured the sample as 1600F when it was really 2000F. There's a catch to emissivity however, it depends on the specific wavelength of light naturally emitted/reflected by the subject material itself. And as you see the example above as the material starts to turn/radiate red itself from heat this color shift also impacts the light reflectivity. The closer to the IR spectrum the material's color is (i.e. the redder the material is naturally) the less emissivity impacts the reading. And if you match the IR Laser's wavelength to that of the material being measured, emissivity is effectively a non-factor. That formula looks like: lmax = b / T where: lmax = peak wavelength of radiant energy b = 2897 micron / °K T = temperature (Kelvin) When they matched the wavelength of the material itself in the 2000F test case (0.12 emissivity), they got a reading of 1950F. 97.5% accurate. That's with no calibration for emissivity. Once calibrated for a 0.12 they got 1998F. Now, I have no way of measuring the reflected wavelength of light off of brass casings without starting a whole new project...BUT, with my $20 chinese laser and a piece of brass sitting right here I can infer the gold color of the brass shifts the reflected light closer to the red/IR spectrum and gives me pretty freaking good readings at room temp. BUTx2 - the deviation factor is (in the simplest terms) a sine wave, which means it may be imperceptible at room temp, but at 750F it might be pretty evident. BUTx3 - that can be easily tested by using a second temp measuring device and calibrating my reading (which won't be off by 728F like stated previously...). Conclusion - It's something for me to take into account with calibration but won't prevent the implementation of the idea. Thank you for pointing out why my readings *will* be off when I build my control circuit. |
|
|
|
VA, USA
|
[#43]
A lot of copy and paste...
The above example is just an example. It shows that irrespective of your measuring technique the emissivity will change as you heat brass in air. Do I think it you will apply so much heat as to soften the base of the cartridge? No. IMO you should use Tempilaq, measure the time, and use that time as your cut off point. And yes that is how you use emissivity. |
|
|
|
[Last Edit: dyezak]
[#44]
Originally Posted By Happy2shoot:
A lot of copy and paste... The above example is just an example. It shows that irrespective of your measuring technique the emissivity will change as you heat brass in air. Do I think it you will apply so much heat as to soften the base of the cartridge? No. IMO you should use Tempilaq, measure the time, and use that time as your cut off point. And yes that is how you use emissivity. No, the only copy/paste was the formulas and the definition of the constant. Let me give an example as to what I mean by misapplying emissivity: Your example, brass is 750F, emissivity variation of .03 to .61: 750*.03=22 750*.61=457 That's not correct. The correct formula to apply emissivity is: Q = esT(4) and s (sigma) is approximately 5.67 x 10 -8 watt per meter squared per kelvin to the fourth (W · m -2 · K -4 ). First off, Fahrenheit is the incorrect unit of measurement. You have to convert to Kelvin. So we should be using 672K not 750F. Second the absolute temp is to the fourth power, which is actually 203,928,109,056. Now we apply the Stefan-Boltzmann constant to that 203bil number. Then you apply emissivity to the product of that, then you convert back to F. It has been 20y since I took any physics, and I honestly don't know how to propertly apply the Stefan-Bolzmann constant in this equation propertly. But I know you do not multiply emissivity times temp farenheit to get your product. ETA - all this means is there WILL be a deviation in actual temp vs measured temp as you stated; but not nearly as large as you stated. Which is probably why all the existing methods of induction annealing use time based calculations as u suggested. |
|
|
|
|
[#45]
Originally Posted By Tomva:
Az-sky I just finished assembling my salt bath per your design and it seems to work on my 5.56 cases. I have some cases that I shot 7 times for service rifle and relegated to blasting ammo. These cases are 5.56 that were run for the 5 secs at 500C - may be too long. I will try 3 secs. To show any improvement from annealing I will reload 10 each of these annealed and unannealed control , and then shoot for accuracy and check for cracks until I see a difference. As a retired ChemE, what would be great (almost scientific ! ) would be a lab that could do photomicrographs of the etched grain structure and a hardness profile along the length of the case. Unfortunately I do not now have access to a Materials Lab
If anyone has any contacts, I can make samples available! It's my area of research. I haven't yet found a good recipe for etching cartridge brass, but I've done a bit with our microhardness tester on some 223. Example: 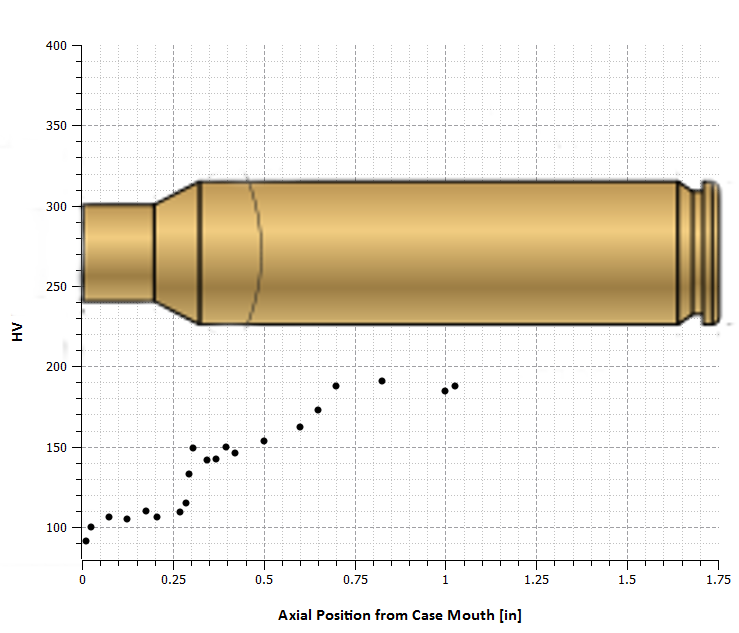
An aside, I'd want to know an awful lot more detail about the chemistry of any salts before I started soaking my brass in them at elevated temperature, even if only for a number of seconds. |
|
|
|
|
[Last Edit: AZ_Sky]
[#46]
Originally Posted By RocketmanOU:
It's my area of research. I haven't yet found a good recipe for etching cartridge brass, but I've done a bit with our microhardness tester on some 223. Example: http://i927.photobucket.com/albums/ad111/RocketmanOU/223HardnesswCase_zps75247b35.png An aside, I'd want to know an awful lot more detail about the chemistry of any salts before I started soaking my brass in them at elevated temperature, even if only for a number of seconds. I (along with others) have been annealing brass cartridge cases with salt baths successfully for quite a while now. Here's a clip from Hubbard-Hall (a company that provides chemicals for quenching/tempering/annealing in the industry). http://www.hubbardhall.com/assets/2281007.pdf |
|
|
|
|
[#47]
Continued from my post of 12/1 My first attempt at salt bath annealing did not yield a significant improvement in case life,
but I have formed a hypothesis on the failure mechanism. I annealed the ten test cases in LC 5.56 and reloaded them with ten control , all carefully inspected. These had previously been reloaded 7 times where I get almost no crack rejects. Load is the LC05 and LC07 cases, Fed 7 1/2, 23.0 g H335 and S69. (This is a light/medium load for 100 yards that gives me 0.75 MOA.) Anneal was the salt bath at 500C for 5 sec. The annealed cases were treated before the 8 th and 10 th shot. Two control and one anneal cases were found cracked after 9 th shot and another anneal failed after 10th shot. Salt Annealing did NOT restore the brass properties to original unfired quality. Examination of the case mouths show what looks like microcracks (these look like tiny scratches on the mouth where the cracks showed up. ) I did a lot of work on reinforced plastic fatigue failure where cracks start, then slowly grow under repeated impact stress until they fail. Visualize bending aluminum sheet back and forth until it separates. IF this is true annealing cannot "repair" partially cracked damaged cases- the microcrack will continue to grow under repeated stress. (Scorpius found a increase in life by annealing every reload right from the start - that might have given better results??) If annealing does not give me a major increase in life, I need to allocate my time on my problematic off-hand shooting !!! |
|
|
|
|
[Last Edit: dyezak]
[#48]
Originally Posted By Tomva:
Continued from my post of 12/1 My first attempt at salt bath annealing did not yield a significant improvement in case life, but I have formed a hypothesis on the failure mechanism. I annealed the ten test cases in LC 5.56 and reloaded them with ten control , all carefully inspected. These had previously been reloaded 7 times where I get almost no crack rejects. Load is the LC05 and LC07 cases, Fed 7 1/2, 23.0 g H335 and S69. (This is a light/medium load for 100 yards that gives me 0.75 MOA.) Anneal was the salt bath at 500C for 5 sec. The annealed cases were treated before the 8 th and 10 th shot. Two control and one anneal cases were found cracked after 9 th shot and another anneal failed after 10th shot. Salt Annealing did NOT restore the brass properties to original unfired quality. Examination of the case mouths show what looks like microcracks (these look like tiny scratches on the mouth where the cracks showed up. ) I did a lot of work on reinforced plastic fatigue failure where cracks start, then slowly grow under repeated impact stress until they fail. Visualize bending aluminum sheet back and forth until it separates. IF this is true annealing cannot "repair" partially cracked damaged cases- the microcrack will continue to grow under repeated stress. (Scorpius found a increase in life by annealing every reload right from the start - that might have given better results??) If annealing does not give me a major increase in life, I need to allocate my time on my problematic off-hand shooting !!! Originally Posted By Tomva:
Continued from my post of 12/1 My first attempt at salt bath annealing did not yield a significant improvement in case life, but I have formed a hypothesis on the failure mechanism. I annealed the ten test cases in LC 5.56 and reloaded them with ten control , all carefully inspected. These had previously been reloaded 7 times where I get almost no crack rejects. Load is the LC05 and LC07 cases, Fed 7 1/2, 23.0 g H335 and S69. (This is a light/medium load for 100 yards that gives me 0.75 MOA.) Anneal was the salt bath at 500C for 5 sec. The annealed cases were treated before the 8 th and 10 th shot. Two control and one anneal cases were found cracked after 9 th shot and another anneal failed after 10th shot. Salt Annealing did NOT restore the brass properties to original unfired quality. Examination of the case mouths show what looks like microcracks (these look like tiny scratches on the mouth where the cracks showed up. ) I did a lot of work on reinforced plastic fatigue failure where cracks start, then slowly grow under repeated impact stress until they fail. Visualize bending aluminum sheet back and forth until it separates. IF this is true annealing cannot "repair" partially cracked damaged cases- the microcrack will continue to grow under repeated stress. (Scorpius found a increase in life by annealing every reload right from the start - that might have given better results??) If annealing does not give me a major increase in life, I need to allocate my time on my problematic off-hand shooting !!! Based on the highlighted section, you did not anneal the brass. You just warmed it up good. There are tons of articles out there on the subject, even full on research done by DuPont. But this site boils it down with a fairly good rule of thumb: http://massreloading.com/annealing.html Brass is annealed by heating it to a certain temperature for a certain amount of time. The higher the annealing temperature, the shorter the time required to anneal. The grain structure of the brass begins to change - indicating the start of annealing - at just under 500 degrees Fahrenheit. At 600 degrees F, brass will anneal in one hour. At 800 degrees F, brass will take only a few seconds to anneal. Seems like most commercial machines and people in the know shoot for 700-750F for a few seconds to ensure they aren't softening the brass too much, but ensuring they are getting *real* annealing benefits without heating the body and web of the case too much. Another good resource is: http://www.annealingmachines.com/how-to-anneal.html Changes start to occur in brass grain structure at 480 degrees fahrenheit. To properly anneal brass, the temperature needs to be at 650 degrees F. for several minutes--BUT this will transfer too-much heat to the lower case in that time. So we need more heat for a shorter time. We need to raise the neck temp to about 750 degrees F. only for a few seconds to anneal. And one place who actually published their research on testing the metal's strength with force guages and pull tests: http://bisonballistics.com/articles/the-science-of-cartridge-brass-annealing For cartridge brass, the transformation is rapid, robust, and occurs at approximately 650-700 degrees Fahrenheit. If you apply a higher temperature, the brass will get even softer, but not dramatically so. 

|
|
|
|
|
[#49]
The article from Bisonballistics looks like an excellent survey.
(I used to work for Dupont but don't have access to their files. I worked on Kevlar(TM) before I switched to shooting it! If you have any more reference articles I would love to see them.) Note that my test was done 500 C (932 F) which should be hot enough to get to the flat part of the curve cited even at 5 sec. Heat transfer from liquid (salt bath) to solid is generally much better than gas flame to solid (conduction vs convection) so 5 sec is probably enough time. The key conclusion I reached is that the brass annealing process is more complicated than the bulk property change model that everything I have found uses. The bulk property model assumes that the crystal structure is fully reversible (soft to hard to soft etc). Under repeated stress fatigue, my hypothesis is that microcrack growth becomes the controlling factor in brass failure. An excellent introduction to stress fatigue is infogalactic.com/info/Fatigue_(material). Short version: ONE heavy impact or MANY small impacts will both cause failure. Heat treating brass did not restore (for my test) the original stress strain curve - brass history is also important. |
|
|
|
|
[#50]
Originally Posted By Tomva:
The article from Bisonballistics looks like an excellent survey. (I used to work for Dupont but don't have access to their files. I worked on Kevlar(TM) before I switched to shooting it! If you have any more reference articles I would love to see them.) Note that my test was done 500 C (932 F) which should be hot enough to get to the flat part of the curve cited even at 5 sec. Heat transfer from liquid (salt bath) to solid is generally much better than gas flame to solid (conduction vs convection) so 5 sec is probably enough time. The key conclusion I reached is that the brass annealing process is more complicated than the bulk property change model that everything I have found uses. The bulk property model assumes that the crystal structure is fully reversible (soft to hard to soft etc). Under repeated stress fatigue, my hypothesis is that microcrack growth becomes the controlling factor in brass failure. An excellent introduction to stress fatigue is infogalactic.com/info/Fatigue_(material). Short version: ONE heavy impact or MANY small impacts will both cause failure. Heat treating brass did not restore (for my test) the original stress strain curve - brass history is also important. I can't attest to whether or not annealing will extend the life of my cases because I don't anneal to extend the life of my cases, I use the annealing process as an attempt to reduce the neck tension variances after resizing. |
|
|
|
 Win a FREE Membership!
Sign up for the ARFCOM weekly newsletter and be entered to win a free ARFCOM membership. One new winner* is announced every week!
You will receive an email every Friday morning featuring the latest chatter from the hottest topics, breaking news surrounding legislation, as well as exclusive deals only available to ARFCOM email subscribers.

AR15.COM is the world's largest firearm community and is a gathering place for firearm enthusiasts of all types.
From hunters and military members, to competition shooters and general firearm enthusiasts, we welcome anyone who values and respects the way of the firearm.

Subscribe to our monthly Newsletter to receive firearm news, product discounts from your favorite Industry Partners, and more.
Copyright © 1996-2024 AR15.COM LLC. All Rights Reserved.
Any use of this content without express written consent is prohibited.
AR15.Com reserves the right to overwrite or replace any affiliate, commercial, or monetizable links, posted by users, with our own.


