|
[#1]
Originally Posted By SWIRE:
Previously I would just see one large groundhog in the yard. I would occasionally lose a couple of plants and just shrugged it off. Other than the hole and pile of gravel that I found by the neighbors garage there wasn't too much damage being done. There are now at least 6 different holes, one inside my shed and one close to well platform. The final straw was the destruction of the 30 plants that I spent months growing from seed. In addition to the time I had invested, I was able to get my wife's daughters, age 10 and 13, to get outside and help me plant that section of garden. They spent 4 hours out there with me building the new garden bed, digging in the dirt to get everything planted and evening running the backhoe. They were tired, dirty, and chewed up by mosquitoes but seemed to enjoy it and it was a way for me to spend time with them. So the meaning of the garden goes well beyond just growing some vegetables. If so, leave them. They are very resilient and I suspect they will grow more leaves and you may not get much in the way of tomatoes, but they may survive. The stem can photosynthesize, though not nearly as effectively as the leaves. |
|
|
|
|
[#2]
Originally Posted By Kitties-with-Sigs: How big are your clumps right now? |
|
|
|
|
[Last Edit: SWIRE]
[#3]
Originally Posted By Kitties-with-Sigs:
Are those tomatoes still there? If so, leave them. They are very resilient and I suspect they will grow more leaves and you may not get much in the way of tomatoes, but they may survive. The stem can photosynthesize, though not nearly as effectively as the leaves. Originally Posted By Kitties-with-Sigs:
Originally Posted By SWIRE:
Previously I would just see one large groundhog in the yard. I would occasionally lose a couple of plants and just shrugged it off. Other than the hole and pile of gravel that I found by the neighbors garage there wasn't too much damage being done. There are now at least 6 different holes, one inside my shed and one close to well platform. The final straw was the destruction of the 30 plants that I spent months growing from seed. In addition to the time I had invested, I was able to get my wife's daughters, age 10 and 13, to get outside and help me plant that section of garden. They spent 4 hours out there with me building the new garden bed, digging in the dirt to get everything planted and evening running the backhoe. They were tired, dirty, and chewed up by mosquitoes but seemed to enjoy it and it was a way for me to spend time with them. So the meaning of the garden goes well beyond just growing some vegetables. If so, leave them. They are very resilient and I suspect they will grow more leaves and you may not get much in the way of tomatoes, but they may survive. The stem can photosynthesize, though not nearly as effectively as the leaves. Not the prettiest garden but it was quickly thrown together this year. |
|
|
|
|
[#4]
I've been cleaning up sticks and branches in the yard and was finally making some progress and feeling good about how clean areas were getting. Then on Sunday I find this.
|
|
|
|
|
[#5]
Originally Posted By SWIRE:
I've been cleaning up sticks and branches in the yard and was finally making some progress and feeling good about how clean areas were getting. Then on Sunday I find this. https://www.AR15.Com/media/mediaFiles/680/tree1_jpg-984548.JPG https://www.AR15.Com/media/mediaFiles/680/tree2_jpg-984549.JPG https://www.AR15.Com/media/mediaFiles/680/tree3_jpg-984550.JPG |
|
|
|
|
[Last Edit: Kitties-with-Sigs]
[#6]
Originally Posted By SWIRE:
The flowers petals have fallen off now. The clumps are maybe 1 1/2 feet across. I wouldn't be able to split them much but if I could spread them out a bit that would be helpful. My experience with Tradescantia virginiana is that it takes a couple of seasons to establish, then it goes freaking nutso. Thus, my digging out a four-foot wide clump of it that was planted only three years ago (I think.) So I'm betting that if you leave it alone, by next spring you will see a huge expansion, and you can dig half of a clump or two, and divide and replant. You will get several really good starts out of each clump, and the main clumps will still be strong and viable. ETA: You CAN split them now, but you will do more damage to the main clump if you don't wait for it to get bigger. It will recover, but it won't be the monster it can become. Am I making any sense? |
|
|
|
|
[#7]
Originally Posted By Kitties-with-Sigs:
Storm? Originally Posted By Kitties-with-Sigs:
Originally Posted By SWIRE:
I've been cleaning up sticks and branches in the yard and was finally making some progress and feeling good about how clean areas were getting. Then on Sunday I find this. https://www.AR15.Com/media/mediaFiles/680/tree1_jpg-984548.JPG https://www.AR15.Com/media/mediaFiles/680/tree2_jpg-984549.JPG https://www.AR15.Com/media/mediaFiles/680/tree3_jpg-984550.JPG |
|
|
|
|
[#8]
Originally Posted By Kitties-with-Sigs:
I would wait one more season to split. My experience with Tradescantia virginiana is that it takes a couple of seasons to establish, then it goes freaking nutso. Thus, my digging out a four-foot wide clump of it that was planted only three years ago (I think.) So I'm betting that if you leave it alone, by next spring you will see a huge expansion, and you can dig half of a clump or two, and divide and replant. You will get several really good starts out of each clump, and the main clumps will still be strong and viable. ETA: You CAN split them now, but you will do more damage to the main clump if you don't wait for it to get bigger. It will recover, but it won't be the monster it can become. Am I making any sense? Originally Posted By Kitties-with-Sigs:
Originally Posted By SWIRE:
The flowers petals have fallen off now. The clumps are maybe 1 1/2 feet across. I wouldn't be able to split them much but if I could spread them out a bit that would be helpful. My experience with Tradescantia virginiana is that it takes a couple of seasons to establish, then it goes freaking nutso. Thus, my digging out a four-foot wide clump of it that was planted only three years ago (I think.) So I'm betting that if you leave it alone, by next spring you will see a huge expansion, and you can dig half of a clump or two, and divide and replant. You will get several really good starts out of each clump, and the main clumps will still be strong and viable. ETA: You CAN split them now, but you will do more damage to the main clump if you don't wait for it to get bigger. It will recover, but it won't be the monster it can become. Am I making any sense? |
|
|
|
|
[#9]
Originally Posted By SWIRE:
Makes sense. I will need to move one of the clumps, it is close to trees that I will be cutting down and removing the stumps will most likely disturb them anyway. I will leave the other clump alone for now. If you don't end up with dirt on the roots because it falls off during the split, just plant the bare-roots like you would anything else, deep enough to cover them good (the stems will flop over no matter what. Don't worry. ) and water them in well, even if it's going to rain. Compost seems to make mine take off quicker, so if you've got some, dump it in there. I've never fertilized mine. |
|
|
|
|
[#10]
Update on the groundhogs. I've removed 5 so far, 3 juvenile and 2 adults. I then filled in the 5 different tunnel entrances that I know about. So far 2 of those have opened back up. The battle continues.
I stumbled upon a way to catch them by sheer luck. Apparently the new garden that I built was across a run they had. That was why they hit that garden so much harder than they hit the other garden. I put a chicken wire fence up around it and set the trap near the fence. After the first 2 juveniles were caught I set the trap but didn't have any bait with me. The next day I had an adult ground hog in it. I reset the trap and the next day caught the other adult. Reset the trap again and the last juvenile. Apparently they hit the chicken wire fence and just follow it right into the trap. The two holes that opened up are in a different part of the yard and in some brush, so the fence trick isn't really feasible. |
|
|
|
|
[Last Edit: SWIRE]
[#11]
Some pictures.
It never seems to stop raining. The creek is up and has been like this or higher most of the year. I was picking up some branches and stacked it in the fire pit. I was not planning to light a fire the other night since it has been so wet but then found some dry brush and decided to light a small fire in the corner of the pit. That fire took off enough to make the smoke go away so I proceeded to continue cleaning up branches and adding them to the fire. The small fire turned into this...yet even with that much wood as fuel you can barely tell that I've cleaned up the branches. Last night I had a more restrained fire. |
|
|
|
USA
|
[#12]
Love this thread!
|
|
|
|
[#13]
Originally Posted By SWIRE:
Some pictures. It never seems to stop raining. The creek is up and has been like this or higher most of the year. https://www.AR15.Com/media/mediaFiles/680/creek_jpg-990000.JPG I was picking up some branches and stacked it in the fire pit. https://www.AR15.Com/media/mediaFiles/680/firepit_jpg-990004.JPG I was not planning to light a fire the other night since it has been so wet but then found some dry brush and decided to light a small fire in the corner of the pit. That fire took off enough to make the smoke go away so I proceeded to continue cleaning up branches and adding them to the fire. The small fire turned into this...yet even with that much wood as fuel you can barely tell that I've cleaned up the branches. https://www.AR15.Com/media/mediaFiles/680/firepit2_jpg-990007.JPG Last night I had a more restrained fire. https://www.AR15.Com/media/mediaFiles/680/firepit3_jpg-990010.JPG Your wild daylilies are pretty. |
|
|
|
|
[#14]
Originally Posted By SWIRE:
More berries today. I had helpers today, they were instructed to pick only the black berries and as you can see they picked red berries as well. Still happy to have the help though. https://www.AR15.Com/media/mediaFiles/680/more_berries_jpg-976981.JPG What I'm not happy about is in this picture. We dug out a new garden patch with the backhoe, added compost and other items to the soil to enrich it, and then planted about 30 tomato plants. I came back from a 4 day trip and found every single plant chewed down. I'm pretty sure it is the ground hog that I've seen. I put a trail camera up on the garden to find out for sure. Every single plant in the new garden looks like this. https://www.AR15.Com/media/mediaFiles/680/tomatoes_eaten_jpg-976989.JPG |
|
|
|
|
[#15]
Ive read through the whole thread and really enjoyed it.
We just bought an old farm house built in 1873 and may have to start my own thread to share some of the progress. |
|
|
|
|
[#16]
Love this thread.
|
|
|
|
|
[#17]
Originally Posted By Cytic:
Ive read through the whole thread and really enjoyed it. We just bought an old farm house built in 1873 and may have to start my own thread to share some of the progress. |
|
|
|
|
[#18]
Originally Posted By Cytic:
Ive read through the whole thread and really enjoyed it. We just bought an old farm house built in 1873 and may have to start my own thread to share some of the progress. |
|
|
|
|
[#19]
I've previously mentioned that I have a cistern at the house. It is 15 feet deep about 6 feet wide towards the bottom, and as was hand dug into the bedrock. It is hard to get pictures of it because it is dark and there is glare on the water but I finally got a couple pictures. We had a dry spell and I was curious if I could water the gardens from the cistern. Sure enough it worked. I dropped pump in that connects to a garden hose and ran the hose to the gardens. From my best guess the water level was about 6 feet deep and over the course of 2 days I drained it down to about a foot and a half. That should be somewhere over 1,000 gallons of water that I put on the gardens. I have not added water to the cistern, what is in it must leach into it through the bedrock.
Cistern at its typical level. Cistern after I watered the gardens. Watering the new garden from the cistern. |
|
|
|
|
[#20]
This update covers a project going on for almost a year now. It is related to the first garden I put in and how juglone from the Walnut trees really messes up tomato plants. Last fall I collected the few small tomatoes that were produced. I let them rot and then collected the seeds. This spring I started the seeds indoors and then moved the plants out to the garden. The goal is to find a variety that is more tolerant of juglone and then continue to replant it by collecting seeds. Some of the plants that I had put in last year were hybrids. So the varieties of plants that I got from the seeds are completely unknown.
So far the plants have been doing great and better than any year prior. However, we just had our first hot and dry spell which is when the juglone really hurts them. I appear to have one casualty so far. I saw it wilting the other day, which is what prompted the above water the garden from the cistern idea. After I watered it the first day the plant recovered. It was wilting the second day so I watered it heavily. The third day, yesterday, the plant looked like this. |
|
|
|
|
[Last Edit: Kitties-with-Sigs]
[#21]
Originally Posted By SWIRE:
This update covers a project going on for almost a year now. It is related to the first garden I put in and how juglone from the Walnut trees really messes up tomato plants. Last fall I collected the few small tomatoes that were produced. I let them rot and then collected the seeds. This spring I started the seeds indoors and then moved the plants out to the garden. The goal is to find a variety that is more tolerant of juglone and then continue to replant it by collecting seeds. Some of the plants that I had put in last year were hybrids. So the varieties of plants that I got from the seeds are completely unknown. So far the plants have been doing great and better than any year prior. However, we just had our first hot and dry spell which is when the juglone really hurts them. I appear to have one casualty so far. I saw it wilting the other day, which is what prompted the above water the garden from the cistern idea. After I watered it the first day the plant recovered. It was wilting the second day so I watered it heavily. The third day, yesterday, the plant looked like this. https://www.AR15.Com/media/mediaFiles/680/wilting_plant_jpg-1001271.JPG I think you should remove that plant immediately. That kind of wilting situation looks to me more like some kind of virus--maybe a virus from nematode vectors-than it does from juglone toxicity. Since you don't know what you HAVE (cuz you planted seeds from hybrids) you don't have any sense of what the resistance is, or any way to find out. I'd be more scared of viruses or other kinds of scorch-the-earth diseases than I would be of anything else, with what you've got going in that garden. I know it's hard, but getting rid of one tomato might save them all. Study the roots if you pull it up. Take pics. then put it in a garbage bag and get it off your property. |
|
|
|
|
[#22]
@SWIRE
You okay? You don't usually take breaks this long. Just checking. |
|
|
|
|
[#23]
Originally Posted By Kitties-with-Sigs:
@SWIRE You okay? You don't usually take breaks this long. Just checking. |
|
|
|
|
[#24]
If you need a hand one day I’m just down the road. I’ve enjoyed this thread immensely.
|
|
|
|
|
[#25]
Originally Posted By SWIRE:
Thank you for the concern. I'm doing ok and have several updates. The reason I've been absent is due to one of the flat roofs on the house. It was not installed correctly, especially around the chimney. I knew it would be a 3 day minimum project at best and would need some attention soon. That time came a week ago when I noticed a catastrophic failure of the roof which dumped a huge amount of water into the ceiling and wall. I was going to patch it to stop any major water inflow but my 80 year old father was visiting from out of town and got on to me about getting it fixed. He extended his trip by a day to help me on Monday. I've been working on it about 5 hours a night after work every night this week and finally tonight have roof sealed up which means the great room in the house won't flood if it rains. The rubber roof is no installed correctly around the chimney, along with tapered foam that will keep water from pooling up around chimney. I still need to add a piece of flashing on the chimney to top it off and then clean up all the construction debris. The project isn't over though, while we were pulling the roof decking up we found a major design flaw with chimney. The short version, the chimney needs to be taken down below the roof line, house modifications done, and then the chimney rebuilt. For that to happen I have to rip up most of what I spent 20 hours on this past week. I will post more details later. Typical work flow pattern for an old house, in my observation, unless you can afford to hire crews to just come in and do everything, which means stuff gets done in order. I hate that for you though. Still, learning experience. Hope you have some pics of the chimney flashing/surround. I've never seen that done on a flat roof and am interested. Understand if you don't, though. Working like crazy, you don't always have time to stop for pics. |
|
|
|
|
[#26]
Originally Posted By Kitties-with-Sigs:
Hope you have some pics of the chimney flashing/surround. I've never seen that done on a flat roof and am interested. Understand if you don't, though. Working like crazy, you don't always have time to stop for pics. |
|
|
|
|
[#27]
Originally Posted By Kitties-with-Sigs:
Hope you have some pics of the chimney flashing/surround. I've never seen that done on a flat roof and am interested.  How to Install a Rubber Flat Roof - Part 5 - Internal and External Corner Details |
|
|
|
|
[Last Edit: SWIRE]
[#28]
Here is the project that occupied all of my time last week. The roof over the great room is built with slightly sloped trusses. It has a 1/4 bubble slope on the level which is 1" for every 4 feet. It slopes down to the edge of the house and chimney. Previously I noticed they had used an asphalt based flashing product, which is a no-go for EPDM roofs as the solvent in the asphalt eats the rubber. I knew at some point I would have the project of fixing it. In addition to the wrong flashing the slope of roof went to the chimney and all the water just collected and sat there. Sitting water is fine on an EPDM but when it develops a leak all that sitting water will find its way to the hole. That is why leaks on a flat roof are so bad, all the water on the roof will move to the lowest spot which is the hole in the membrane.
It started with this surprise in the great room. The fix took me 5 days of working 4-6 hours after work, about 20 hours of my time and 5 hours of my dad's time. It took so long partially because it was my first major EPDM repair and I had no idea what I was doing, partially because of unexpected surprises that left us scratching our head on what to do next, and about 50% because I've been a desk jockey in air conditioned buildings for 20 years and roofing in 90 degree heat is not something that I am physically fit for. Half the time was spent just catching my breath and the pointless effort of trying to wipe off sweat as I was drenched from head to toe. I got the repair done though and that effort as miserable as it was actually motivated me to keep pushing harder on other projects. That took me to the roof where I found the asphalt flashing had pulled away from the chimney, pulled away from the rubber, and the rubber membrane had a big cut in it. That caused this mess and revealed multiple other bad surprises. There is so much wrong in this picture that it will a bit to explain. First and most obvious is all the wetness on the roof. It hasn't rained in 10 days. The moisture collected there due to the slope of the roof and another around the chimney to redirect the water away from it. Next look to the right of the picture, follow the piece of aluminum that runs into the chimney. That is one problem but if you look a little bit to the left you will see that soffit cavity continues through the chimney. WTF! Apparently the chimney was built after the walls and roof were in place. Instead of notching out the soffit and building the chimney right, they notched out the chimney to accommodate the soffit! That is some crack head Craigslist contractor work right there. That aluminum termination bar, I can't remove it because it is screwed in inside the chimney! At this point I should have stopped, sealed back up my cuts and then found a chimney company to build the chimney properly. But my father was pushing me to fix the bad area so it didn't get any worse. Had I known what we were going to find next I would have stopped. We pulled the decking off, thinking it would be quick fix to put new decking down. Nope. This is what we found, rotten trusses and exposed chimney flues with wood just a couple inches away. WTF!!! Also notice the chewed up electrical wires running across the soffit area and next to the flue. I added sister joists to the rotting trusses which should be good enough as it is holding up very little weight. It would be foolish to try to use the fireplace until the chimney is fixed. My phone died so I missed some pictures. We patched all the bad decking and then I went to work building out the roof around the chimney the proper way. The original installers used 1/2" fiber board as padding under the EPDM membrane. It is considered an acceptable product to use but I don't no know why. When fiber board gets wet it soaks up the water and deteriorates. When it deteriorates it creates a depression in the roof, which all the water runs to. Using fiber board under EPDM is just stupid. For padding I used polyiso foam, which is a closed cell foam that won't absorb any water. The foam I purchased was tapered from 2.5" down to .5 inches. That way the water would be redirected away from the chimney. Test fitting the foam. Notice the new decking and how much of the membrane needed to be pulled up. All the decking under the foam is new. Securing the foam. |
|
|
|
|
[#29]
Test fitting the rubber patch. It is 8' x 14', so not really a patch but a whole new section.
At this stage the rubber has been cut to fit around the chimney and the bonding adhesive applied. I was waiting for the solvent the adhesive to flash off. Once it does the rubber is simply pushed back into place and a push broom is used to remove any wrinkles and ensure the whole surface bonds. Almost done. This was 11:30pm on Wednesday night. I broke out a 10,000 lumen LED tripod work light which worked great. At this point the front seam has been made and the cuts in the original membrane have been patched. The 45 degree cuts around the chimney corners are visible. The remaining work is the two side seams, the chimney corner flashing, and T joint patches. Final product. Water should not sit right next to the chimney due to the tapered foam. If it does there is a rubber membrane that goes up the chimney to keep the water outside. The corners have two layers of flashing applied. The front edge of the patch has t-joint patches over the corners where the new seams meet. I still need to cut into the chimney about 1/4" and put some aluminum chimney flashing in over the top of the EPDM membrane. Close up of the chimney corner. Not the pretties work but it was my first time doing it. Considering that I am going to have to tear all of this back out to fix the chimney correct it is good enough. |
|
|
|
|
[#30]
Before the roof project I was actually working on planting some perennials. The gardens really need to be recreated, they have flowers but tons of weeds and there is no longer any order to it. The gardens should be moved about 10 feet to the East as well to provide more space between them and the fire pit. Lowe's had perennials on sale 3 for $12 and it seemed like an easy to get some more perennials and see what can actually grow in the soil. At first I tried to use a shovel and dig the holes. It has been very dry here making the ground very hard. Plus the location that I was planting them is a new garden that has always been grass. The shovel would have taken hours and the dirt has a lot of clay, so I decided to pull out the big tools and improve the soil while planting.
Adding woodchips to help keep the soil loose and provide organic matter when they finally break down. Adding compost and mixing everything together. Laying out the plants and then adding more compost around them. Final product. A lot of effort for just 6 plants but hopefully it pays off down the road by having better soil conditions. |
|
|
|
|
[#31]
Originally Posted By SWIRE:
I always take pictures, unless my phone dies, which it did Monday night. But I still have some pictures. I need to get a shot of the completed project and will show how the rubber goes around the chimney. I thought I had pictures of my 80 year old father, who is missing 3 fingers, straddling the trusses that are 24" on center above the 14 foot drop into the great room but my phone must have died before it was saved. You can't tell the man not to do anything because he is going to do it anyway. If so, your trusses are babysh*t. The real tragedy here is that you don't have the pics. Those are gold. Get him to your house, even just talking about it, and take some pics of him in there.. In the attic, helping paint...anything. |
|
|
|
|
[Last Edit: Kitties-with-Sigs]
[#32]
Originally Posted By SWIRE:
Test fitting the rubber patch. It is 8' x 14', so not really a patch but a whole new section. https://www.AR15.Com/media/mediaFiles/680/test_fitting_jpg-1015198.JPG At this stage the rubber has been cut to fit around the chimney and the bonding adhesive applied. I was waiting for the solvent the adhesive to flash off. Once it does the rubber is simply pushed back into place and a push broom is used to remove any wrinkles and ensure the whole surface bonds. https://www.AR15.Com/media/mediaFiles/680/glue_jpg-1015201.JPG Almost done. This was 11:30pm on Wednesday night. I broke out a 10,000 lumen LED tripod work light which worked great. At this point the front seam has been made and the cuts in the original membrane have been patched. The 45 degree cuts around the chimney corners are visible. The remaining work is the two side seams, the chimney corner flashing, and T joint patches. https://www.AR15.Com/media/mediaFiles/680/almost_done_jpg-1015202.JPG Final product. Water should not sit right next to the chimney due to the tapered foam. If it does there is a rubber membrane that goes up the chimney to keep the water outside. The corners have two layers of flashing applied. The front edge of the patch has t-joint patches over the corners where the new seams meet. I still need to cut into the chimney about 1/4" and put some aluminum chimney flashing in over the top of the EPDM membrane. https://www.AR15.Com/media/mediaFiles/680/final_jpg-1015205.JPG Close up of the chimney corner. Not the pretties work but it was my first time doing it. Considering that I am going to have to tear all of this back out to fix the chimney correct it is good enough. https://www.AR15.Com/media/mediaFiles/680/flashing_jpg-1015212.JPG Impressive for your first time and having to figure stuff out. Questions: 1-How did you bond the membrane to the chimney? 2-Did you do anything about the chewed wiring? Or can you get to it from inside the house? ETA: I have said for years that if an old house is still standing, it's because God means it to be standing. Never seen one without serious electrical problems. Not one. Ever. The Reverend Elijah Craig must have been doing some very good work for the Lord, and that work keeps the house standing after all these years, in spite of chewed Romex! Just sayin. |
|
|
|
|
[#33]
We had a heavy rain over the weekend. The roof repair is working pretty much as expected. The pictures aren't the best but in the first picture you can see the water pooling at the end of the tapered foam and there is no water pushing up against the chimney. The second picture is a closer view, once the rain let up a bit, showing where the water pools. The pictures show the design working well but it highlights the problem with any flat roof. If there is a pencil lead size hole in the rubber where the water pools, all that water will drain into the house. At some point in time there will be a pencil lead size hole there. The flat roof over this room needs to go.
|
|
|
|
|
[#34]
Originally Posted By Kitties-with-Sigs: That's AMAZING work! Impressive for your first time and having to figure stuff out. Questions: 1-How did you bond the membrane to the chimney? 2-Did you do anything about the chewed wiring? Or can you get to it from inside the house? ETA: I have said for years that if an old house is still standing, it's because God means it to be standing. Never seen one without serious electrical problems. Not one. Ever. The Reverend Elijah Craig must have been doing some very good work for the Lord, and that work keeps the house standing after all these years, in spite of chewed Romex! Just sayin. Half the house has chewed wiring and I've turned off 80% of the circuits. I believe the chewed wire I found inside the chimney is actually live though and powering outlets in the great room. The animals won't touch the wires that were upgraded 30 years ago, they only go after the new yellow coated wires. The house has certainly been through a lot and is still standing. |
|
|
|
|
[Last Edit: Kitties-with-Sigs]
[#35]
Originally Posted By SWIRE:
The same bonding adhesive is used on the chimney that is used on the flat part of the roof. I took an angle grinder to the chimney to give it a smooth surface to connect to. If the chimney wasn't covered in rough stucco I could then use an aluminum termination bar at the top of the rubber to compress it into the chimney and form a water tight seal. Since the stucco won't let me do that I need to cut a line into the chimney above the rubber and put a piece of flashing into it and down over the edge of the rubber. Half the house has chewed wiring and I've turned off 80% of the circuits. I believe the chewed wire I found inside the chimney is actually live though and powering outlets in the great room. The animals won't touch the wires that were upgraded 30 years ago, they only go after the new yellow coated wires. The house has certainly been through a lot and is still standing. 
Our house was a stop on the Underground Railroad, and we figure that Kharma is why it didn't burn down in the 170 years since it was built. (You can see through the chimneys...I mean from the attic, you can see sunlight through both sides of the chimneys on either end. yeah. Anyway.. Amazing work you did on the flat roof, but yes, I have trouble with flat roofs in general, and glad I've never had to deal with one. Glad to learn from you, though. I have that same beef to pick with Romex, btw. Mice and rats seem to like the plastic coating. That's bad. |
|
|
|
|
[#36]
Originally Posted By Kitties-with-Sigs: I have that same beef to pick with Romex, btw. Mice and rats seem to like the plastic coating. |
|
|
|
|
[#37]
I've been working on multiple projects but not really completed anything yet. I'm working on redeveloping the well that is on the property. Previously I used the water in the cistern to water the garden but ran the cistern dry and I have no gutters running into it. The bedrock in the cistern does allow some water to seep in. My goal for this year is to get a pump in the well and use that to fill the cistern and then run the other pump from the cistern to water the gardens. I did some generalized calculations on using city water vs well water for the garden. The pump in the cistern was using about 400 watts when running. I estimated 1 hour of run time was about 1,000 gallons. Using the water company you have to pay for both the supply and sewer side which costs around $1 per 100 gallons. So water from 1 hour of the cistern pump costs 4 cents compared to $10 from the water company.
|
|
|
|
|
[#38]
As previously mentioned the property is surrounded in Walnut trees which will kill off most vegetable plants. It does a number on tomato plants causing the plant to grow in odd shapes and then either dies off or will not produce fruit. Last year a couple plants produced small tomatoes and I collected those seeds which I then planted this year. The goal is to try to find a variety that tolerates my soil and juglone from the walnut trees. This year I did not do anything special with the soil, I just made a hole and threw the plant in. To my surprise some of the plants are thriving, growing well, and producing fruit. Some of the plants clearly struggle with the soil and die.
So far I have pulled up 5 plants that have wilted and were dying. The hot dry days are what really puts the strain on the plants. The juglone will cause the plants to abruptly wilt and die. Plants further away from the source of juglone will become flaccid and stunted. In my case only certain varieties are being affected by the juglone and they are intermixed with varieties that are doing well. A plant that recently wilted and died but the plants next to it are fine. Here is a picture of the garden. The plants previously removed came from the left side, front and center you can see they are wilting and dying, but everything else is growing well. I left the two wilting plants for awhile to see if they would get worse or recover. They produce fruit but the symptoms got worse and the point where I needed to remove the plants. The battle against juglone continues.... |
|
|
|
|
[#39]
As part of my battle against juglone I am collecting tomato seeds from the plants that are doing well. From what I can tell there are at least 2 different varieties, possibly three. One variety is growing tall and producing fruit. The other two are shorter and barely producing. Two thirds of the shorter plants have wilted and died. I either have a third variety or found some of the second variety that can tolerate the soil better.
Here is my seed collection process. Cut a tomato into slices and scoop out all the seed material Collect that into a cup Add an inch or two of water, cover and label Let that sit for 5 days |
|
|
|
|
[Last Edit: SWIRE]
[#40]
After 5 days the cup will look like this
Dump the seed mixture into a fine strainer Rinse well under water to remove any extra material and the gel coating around the seeds. The 5 day period is what helps that material become soft and easy to seperate. Layout and allow to dry Right now I just pulled the best looking tomatoes ever from the juglone garden. They aren't prize winners but they do have decent size to them. I will cut them up and go through seed saving process I outlined above. |
|
|
|
|
[#41]
A follow up on that unknown plant I had earlier this year. I was told it was Carolina Horse Nettle. I destroyed all but 2 of the plants. The insects took out one of the remaining plants and only this one remains. It has blooms on it so I'm curious what the fruit will look like. Apparently I picked up one of the fruits last year and put it through the process to extract the seeds. That mistake won't happen this year.
|
|
|
|
|
[#42]
This is an amazing thread and I should have been working but instead sat here all afternoon reading and looking at the pictures.
I envy you...I don't have the ability to cut a 2x4 in half without screwing it up! My uncles have both built/restored their homes and I've always been amazed at how they figure that stuff out while I struggle to hang curtain rods for the wife. I can restore old motorcycles but when it comes to homes I'm clueless! |
|
|
|
|
[#43]
Originally Posted By M4arc:
This is an amazing thread and I should have been working but instead sat here all afternoon reading and looking at the pictures. |
|
|
|
|
[#44]
I'm sure it may have been covered, but if it hasn't.. lima and snap beans, beets, corn, onions, garlic, leeks, parsnip, carrots, cauliflower, soybeans, parsley, Jerusalem artichoke, melons and squash are all relatively juglone tolerant crops.
Love your thread, swire. Great reading |
|
|
|
|
[Last Edit: FN64GR]
[#45]
A question about your cistern..
Is the bottom of the cistern below the level of your stream?? Could you set up a siphon to bring it up to the stream level? Another thought would be a hydraulic ram pump.. All you need is some vertical drop in the stream for it to function. Easy to build, parts are mostly cheap and you gots free cistern full. Tons of instructions online.. Good lick with the gardens. 
|
|
|
|
|
[#46]
Originally Posted By FN64GR:
A question about your cistern.. Is the bottom of the cistern below the level of your stream?? Could you set up a siphon to bring it up to the stream level? Another thought would be a hydraulic ram pump.. All you need is some vertical drop in the stream for it to function. Easy to build, parts are mostly cheap and you gots free cistern full. Tons of instructions online.. Good lick with the gardens. https://cdn.instructables.com/FZ8/0RJE/I9RLCX2D/FZ80RJEI9RLCX2D.RECT2100.jpg I plan to play around with a ram pump in the stream. I will only have about 2 feet of head but that should be enough to pump water up over the bank and into the pond. Not that the pond is going to hold water or be functional at this point but if I can find a reliable way to keep it filled for free that would be a start. I believe I read a ram pump can reliable pump 6 to 1. With 2 feet of head that would only get me up to 12 feet. Another water related project I want to try is creating a Persian wheel. With the high flow of the creek and a small dam already in place, I could modify the dam to direct the water through an opening where the Persion water wheel would be placed. Here is a video of one in action. The amount of water it lifts is impressive. 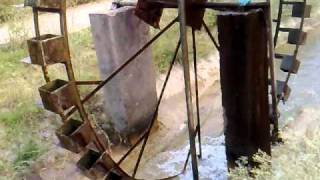 Persian Wheel - Near UET Taxila |
|
|
|
|
[#47]
Originally Posted By SWIRE:
The back of the property is on a decent slope down to the stream. The cistern is dug into the bedrock and about 15 feet deep but it sits at the top of the hill. According to a topographical map the ground behind the house is about 30 feet higher than the stream level. That would put the bottom of the cistern 15 feet above the stream level. I plan to play around with a ram pump in the stream. I will only have about 2 feet of head but that should be enough to pump water up over the bank and into the pond. Not that the pond is going to hold water or be functional at this point but if I can find a reliable way to keep it filled for free that would be a start. I believe I read a ram pump can reliable pump 6 to 1. With 2 feet of head that would only get me up to 12 feet. Another water related project I want to try is creating a Persian wheel. With the high flow of the creek and a small dam already in place, I could modify the dam to direct the water through an opening where the Persion water wheel would be placed. Here is a video of one in action. The amount of water it lifts is impressive. Very interested. |
|
|
|
|
[#48]
Bump. Don't want to see this drop off.
Swire, you doin' okay? |
|
|
|
|
[#49]
I'm doing ok. I've been getting pulled in many different directions lately and haven't had much time to work on the house or post updates.
I do have plenty of tomato seeds from the one variety of tomato that did well in the walnut soil. There were at least 2 other varieties in the same garden, I posted about the first one dying off early in the summer. I thought the other variety was going to make it and produce some tomatoes but those plants really didn't. I might get a couple ping-pong ball sized tomatoes from it but those plants are dying off now too. If anyone has walnut soil and wants to try growing tomatoes in it let me know and I will send you seeds for the plants that did well. I have no idea what variety they are. I'm curious if they will do well in other areas with walnuts. |
|
|
|
|
[#50]
Originally Posted By SWIRE:
I'm doing ok. I've been getting pulled in many different directions lately and haven't had much time to work on the house or post updates. I do have plenty of tomato seeds from the one variety of tomato that did well in the walnut soil. There were at least 2 other varieties in the same garden, I posted about the first one dying off early in the summer. I thought the other variety was going to make it and produce some tomatoes but those plants really didn't. I might get a couple ping-pong ball sized tomatoes from it but those plants are dying off now too. If anyone has walnut soil and wants to try growing tomatoes in it let me know and I will send you seeds for the plants that did well. I have no idea what variety they are. I'm curious if they will do well in other areas with walnuts. I have some Columbine seeds for you, btw, and some lily seeds. These are actual seeds from actual tiger lilies. They will take a few years to do anything. But they do just fine under walnuts. |
|
|
|
 Win a FREE Membership!
Sign up for the ARFCOM weekly newsletter and be entered to win a free ARFCOM membership. One new winner* is announced every week!
You will receive an email every Friday morning featuring the latest chatter from the hottest topics, breaking news surrounding legislation, as well as exclusive deals only available to ARFCOM email subscribers.

AR15.COM is the world's largest firearm community and is a gathering place for firearm enthusiasts of all types.
From hunters and military members, to competition shooters and general firearm enthusiasts, we welcome anyone who values and respects the way of the firearm.

Subscribe to our monthly Newsletter to receive firearm news, product discounts from your favorite Industry Partners, and more.
Copyright © 1996-2024 AR15.COM LLC. All Rights Reserved.
Any use of this content without express written consent is prohibited.
AR15.Com reserves the right to overwrite or replace any affiliate, commercial, or monetizable links, posted by users, with our own.


