|
Posted: 4/9/2020 5:14:19 AM EDT
tools
Garden rake and pitchfork other stuff white ag canvas, wire stakes, sticks to segment the bed, miracle grow, garden sprayer, and a note book. Seasoned 4"x4" to 6"x6" wood blocks or poles of similar thickness, saw mill slabs or saplings, brush. First step is to work the ground until it Is loose and measure off your bed, then rake it to remove any dirt clods. second step is to lay wood for a fire, The bed I made is about 8 by 16 feet. Do not step inside the bed, or pile the wood directly on the ground. Loose soil and air flow under the wood are keys to success. to lay a proper fire, first put blocks or dry wooden poles around the ends of perimeter of the bed, then lay thick boards or poles crosswise every 8 feet or so. I used 6"x6" blocks for my perimeter, and thick slabs and more blocks for cross pieces. The block ends you see sticking out are connected by the thick slabs. I got the blocks and slabs for the price of hauling them from a local saw mill. Be sure to use seasoned dry wood. hard woods ( poplar, oak, maple etc) are preferable to pine or cedar. Do not use pressure treated wood for bed burning. Avoid painted wood too. I used about half a standard truck bed load of slabs to cover the block frame Laying the wood lengthwise bark up. on top of that I piled dry brush from a couple trees I had cut for fire wood 2 years back. I plan for two burn beds per year. one for summer crops, one for fall. I neatly pile brush and keep a supply of wood just for beds. If you can only get green wood, stack it and in 6 month it should be good. The wood I use is generally seasoned 1 year, but it would be fine to get the wood in the fall before. As in if you want a bed in April 2021, Get the wood in November of this year. here are some pictures 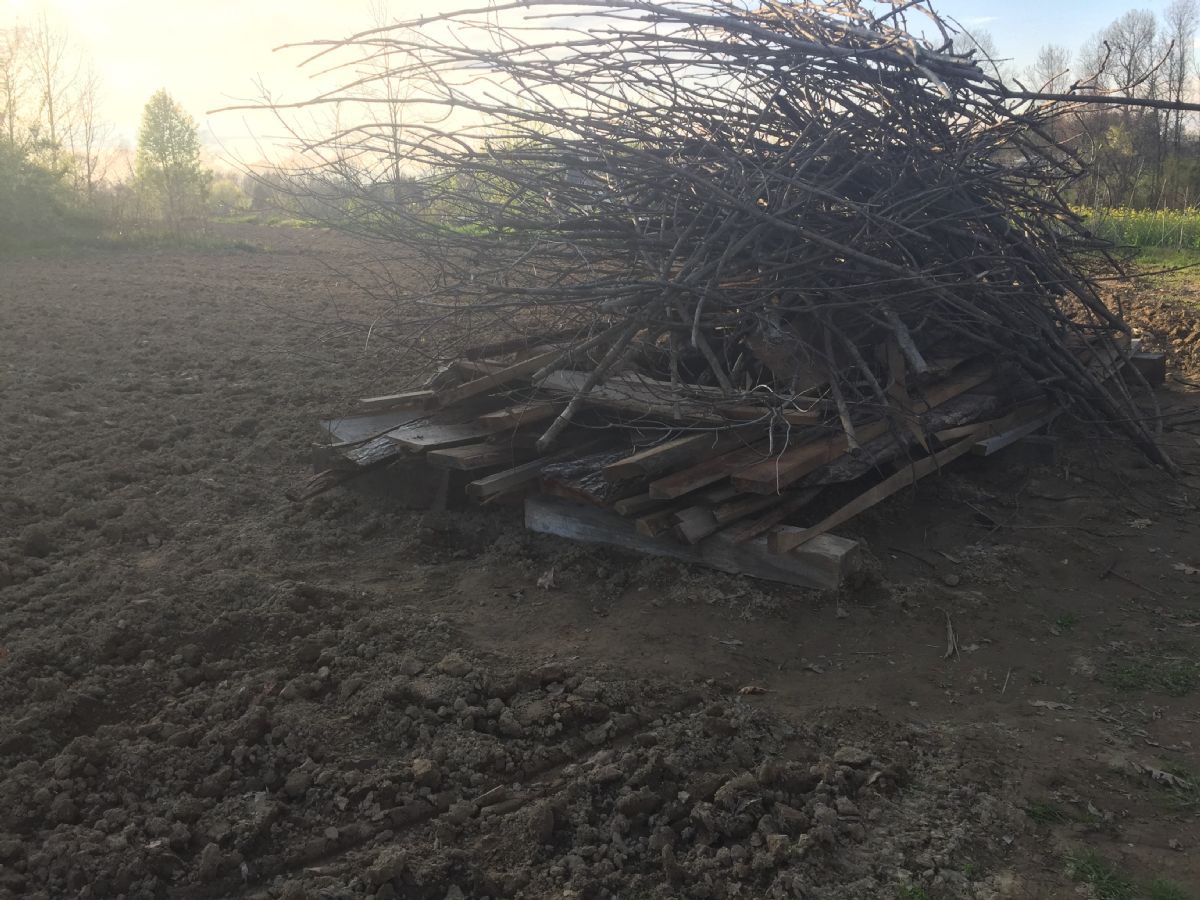 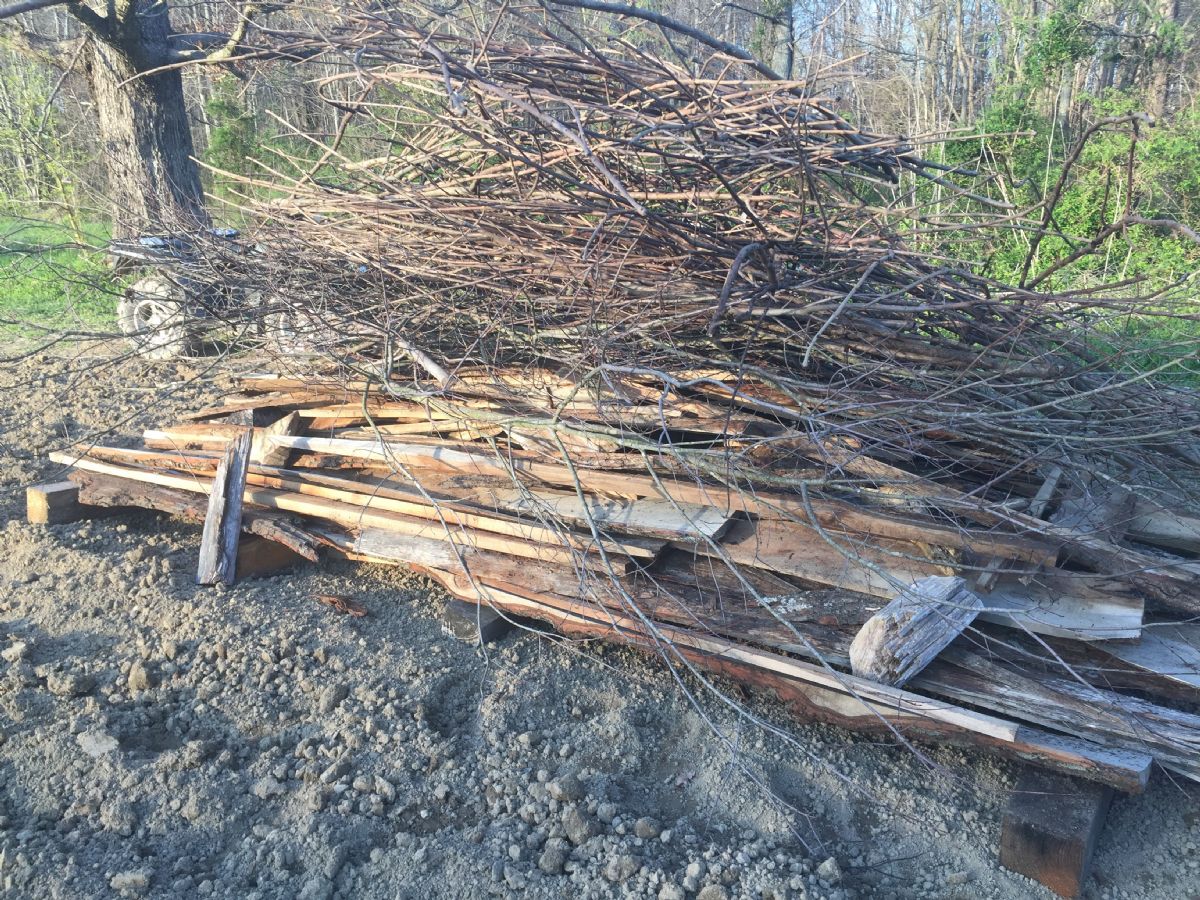
|
|
|
|
[#1]
Next comes the burning. This will take six hours and requires the rake and pitchfork. It is best to light the bed a few hours before dark. The Brush acts as an accelerant. It burns quickly producing a lot of heat and promotes a quick and consistent reduction of the bigger wood to coals. the blanket of coals created by the bigger wood is what kills the weed seed and sterilizes the top few inches of dirt.
Picture of the lit pile with a vexxed General Sterling Price wondering why I am burning down his newly claimed summer cottage.  The pile should be burned down to mostly coals by dark if you use my schedule. It I easier to see the coals, and rake them where you want them in the dark. You want to make sure the entire bed has had a blanket of coals covering it for at least two hours. Every half an hour or so rake the coals so the ash over them settles, and the coals are aerated. keep the coals inside the bed. Use the fork to pile any bigger pieces together so that they burn to coals. If the pile is properly breathing as it burns, and the wood is seasoned there won't be much left by bed time. Once all the wood Is coals go to bed, by noon the following day it should ready for final prep before planting. It should look like this. 
|
|
|
|
[#2]
Next gently rake the ashes pulling any charred wood to the edges. do not dig into or upset the soil beneath the ashes. Place some sticks down the middle lengthwise. Draw the bed onto a note book, with a legend of the directions. this bed is north south.
 space the rows about two inches apart, and as deep as the ashes. there is no need to disturb he soil. Sow the seed, gently cover them, and walk over them to pack the planted spaces.. Mark off the boundries of each variety with a stick, and record them in the notebook. Then spray the bed with miracle grow using a fine mist. here is the planted sprayed bed. 
|
|
|
|
[#3]
Now comes the canvas. You will need wire stakes like these to secure it.
 roll the excess canvas to the edge of the bed. Push the stakes into the dirt, use the crook in the wire to capture the rolled canvas. like this.  if you have problems with things getting into your bed you can stake it off, and even place snares to catch the varmint. I have no issue but my own dogs, so I just run some strands of wire around the bottom. I can still easily get in to spray the cabbage to keep the flea beatles at bay. I am going to plant peas on the side with branches.  The morels of this thread is you can grow thousands of plants in a small space with a small effort. More morels just because   in a month the canvas comes off and I will show how It turns out. this bed has tomatoes, peppers, onions and cabbage. I plant egg plant and brussel sprouts as well as tomatoes cabbage and peppers in my fall bed. I burn it last of May, or early June. |
|
|
|
[#4]
Morel gardens are the best gardens!
|
|
|
|
[#5]
Quoted: Morel gardens are the best gardens! I picked them in my yard right after I planted the bed. My Morel garden is in the apple orchard. When I find morels, I put them in a big bowl and wash and then soak them in distilled water and kosher salt for 4-5 hours then change water. Then I pour the water into a gallon jar with a half cup maple sugar, and a couple cups of corn starch and let it set over night. You can do this two or three times per batch you find. I pour the slurry onto the compost under my older apple trees. works fairly well. The North facing side of Cedar trees is also a good place. Put down a 4-5 inch deep layer of compost, pour on the slurry in a 5x5' to the gallon area, add another couple inches of untreated hardwood woodchips on top. Ashes from hard woods seems to be like morel fertilizer. I always add some to my fruit tree compost. Ashes are good for fruit trees too. A family friend of mine does the same thing, soak in distilled water, but then pours the water into a mix of 3 parts coffee grounds, 1 part equal mix of saw dust, and wood ash. Then they spread that in likely looking spots under elm and ash in the woods behind his house. either method works. It takes 3 or 4 years to get good results, but you can have one hell of a patch, with all the different morel varieties in one place. Once you have all the varieties started you can have morels from the middle of March to the end of April. Different types fruit at different times you know. I like to leave half and let rest I am going to eat just start to dry out before picking them so they drop as much of their spore as possible. In a couple decades I should have a nice patch of more than I can use and a decent fresh supply from beginning to end of the season. Growing up there were huge patches of them under the apple and pear trees my great grand parents planted. The trees either died of old age or were bulldozed, and the morels there went away. As a kid there were still several old house hold orchards around and they produced the biggest morels I have ever found. The old timers knew how to cultivate them. I have read that you can pour the slurry into compost used to grow apple or pear root stock and inoculate the trees so that morels will grow under them. |
|
|
|
[#6]
Now it is time to show the results. I took the canvas off yesterday.
 I've used this same bit of canvas for 5-6 years. Between uses I roll it up and store in a burlap sack that hangs from a rafter in a shed. anywho here are some close ups of the different vegies. Tomatoes to the left peppers to the right in front. Peppers left tomatoes right In the back. Peppers sprout slower than most other plants. They will be ready in a week or two. 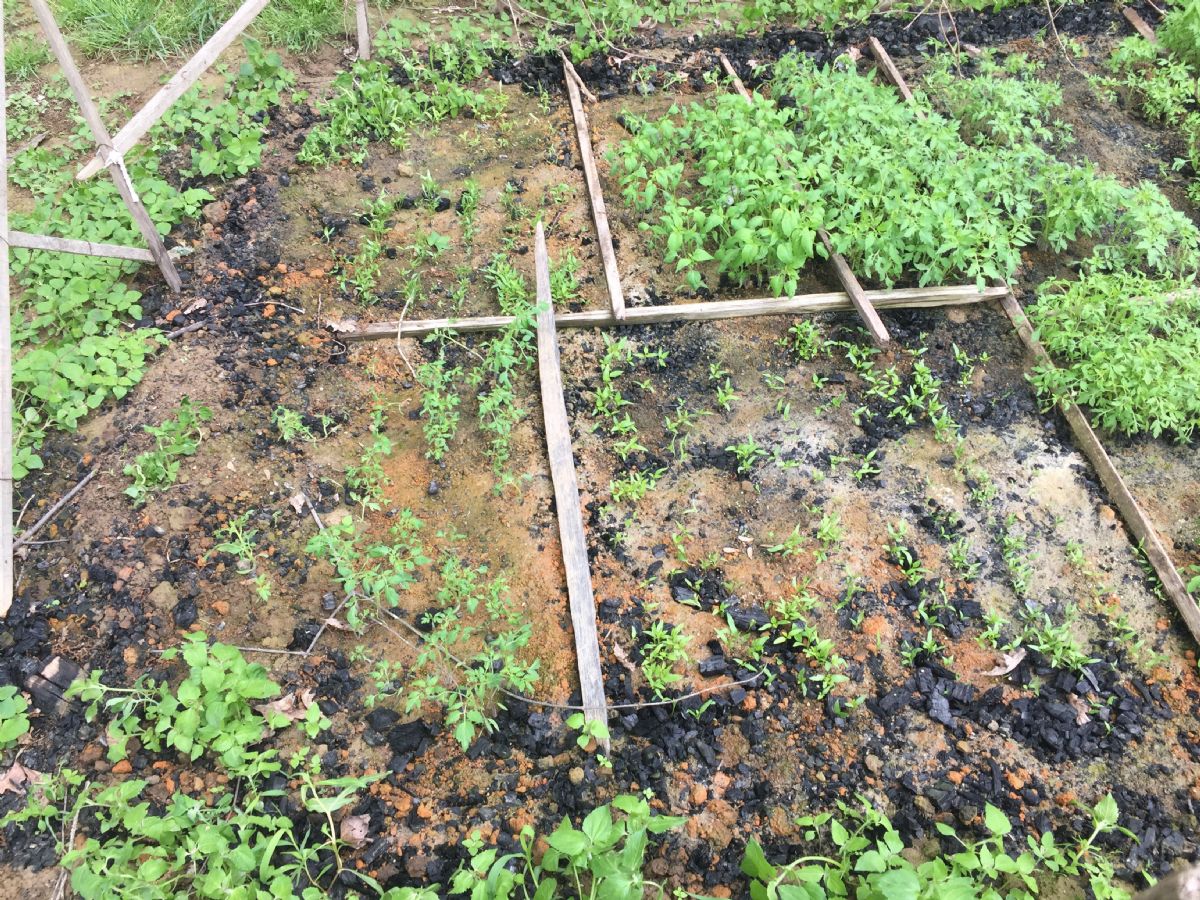 From left to right Cabbage, onions, peppers in the front. Maters in the back. The onions need to be trimmed a few times over the next week and a half before transplant. Tops are nice used as chives. The Cabbage will be ready in a few days.  The Tomatoes are ready. I use an iron bar to make a deep hole. I plant them so that leafy tops are a few inches above the soil. I pull the bigger plants and the smaller plants will be ready in a week. I supply my neighbors with plants too.  This is a new garden plot I have been trying to get into shape. I made the raised rows with a hilling disc. I left a road up the middle to haul in yard clippings to mulch the rows. I have a dump truck load of cow manure coming too.  We had an unusually cool and wet spring. We had several hard frosts in the second week of May. the plants were slow to grow as a result. Generally 35 days and the plants are ready. This year it was closer to 45 due to the weather. |
|
|
|
[#7]
Here is a small sweet potato bed. Basically what it looks like. Sweet potatoes buried under compost in a wooden frame. The sweet potato slips grow off the burried tubers, you simply pull the slips up and they break off the tuber. Plant and water them generously in a hilled row, as shown above in my garden picture.
 Now here is the most important thing you will need next to your garden. An old oak tree so that you have a place to set in the shade. My best thinking occurs under this old fellow.  I plan to burn the summer/fall crop bed around the end of the first week of June. It will have egg plant, cabbage, brussels sprouts, drying peppers and winter storage tomatoes. |
|
|
|
[#8]
I have used burn pies for seeding spots for native grasses and forbs.
Burn brush pile, rake approx 3 ft out all around burn pile, use leaf blower to blow ash from ground, toss seed onto soil. The resulting growth is very thick and vigorous in the first year. I have left burn piles without doing anything and I find that nothing seems to grow in the spot for a couple of years. As far as the Morels, we have approx 20 acres of woods. We find Morels occasionally. But it one here and one there. Never any amount to talk about. And they never seem to be in the same area. I have thought on using the one or two we find and make the slurry. Where to toss the slurry tho? Any advice in where to ss slurry as it relates to woods? Around fallen logs? Around dead ash trees? |
|
|
|
[#9]
Quoted: I have used burn pies for seeding spots for native grasses and forbs. Burn brush pile, rake approx 3 ft out all around burn pile, use leaf blower to blow ash from ground, toss seed onto soil. The resulting growth is very thick and vigorous in the first year. I have left burn piles without doing anything and I find that nothing seems to grow in the spot for a couple of years. As far as the Morels, we have approx 20 acres of woods. We find Morels occasionally. But it one here and one there. Never any amount to talk about. , And they never seem to be in the same area. I have thought on using the one or two we find and make the slurry. Where to toss the slurry tho? Any advice in where to ss slurry as it relates to woods? Around fallen logs? Around dead ash trees? If you have a saw mill close by that you can buy bulk untreated bark mulch from, make a layer of bark a few inches deep, then pour a gallon of slurry to the five foot square area. Then add a few more inches depth of the bark mulch on top, and hard wood ashes too if you have some. Use hardwood bark, leafy trees not evergreen. If you can put the bark down now so it has time to rot some by next spring go ahead and make your moral patch and pile another bunch of bark near by to cover the spot. The best place to do it is under well established old fruit trees on the north east side directly under them. In the woods any big poplar, Ash, Elm, Sycamore or Cedar would work too. You want soil that is well drained. The bigger the tree the better, the more protected the spot is the better, the less the ground has been disturbed the better. Avoid places were recent excavations have been done. (Basically to make 1 gallonish of slurry you need a food processor, 6 mushrooms, 3/4 gallon of distilled water, 1 cup of unprocessed sugar, 1-2 table spoons of kosher salt, and 2 cups of corn starch. If you want to make a 5 gallon bucket full just multiply everything by 5. 1 gallon will inoculate a 5'x5' area) This is the easiest and best way to do it in my opinion. You can skip the jugs and do the same thing in a bucket, then pour it into jugs. This way you know that each gallon of slurry gets the right amount of stuff when you broadcast it. Considering it is a 4 year investment of time, a little extra effort at the front end to get it right makes sense to me. 1)Soak a half dozen of morals in 3/4 gallon of distilled water in 1 gallon water jugs with the tops cut off for 6 or 8 hours, a half dozen morals to each gallon jug is plenty. As in if you find 30, make five batches in 5 jugs. Once soaked pour the water in jugs into one container, like a 5 gallon bucket. then add the stuff below to the individual jugs. Again, remember half dozen morels to each container in plenty for soaking them. 2) Add a cup of minimally processed sugar like Maple sugar, Maple syrup, dark molasses, unpasteurized honey, etc and a table spoon of kosher salt without iodine to each container. I add 2 cups of corn starch too. It is easier to put the sugar, salt and corn starch in first and then add the water the mushrooms soaking water and stir it up. 3)Put them in a food processor half a dozen at a time with half cup of distilled water. once processed Put each batch back into the gallon jugs you soaked them in. Wash out the processor cut and blades and cup with more distilled water and add that to the jugs too. 4)let them set for 12 hours, stir them often, then pour them on the wood chips and cover them with more wood chips. If they take you could start seeing mushrooms in 2 to 4 years. Don't let it set for more than a day. you don't want it to start to ferment in the container. Another method is to do all the steps above, but then use it to inoculate compost in an inoculation bin for growing fruit trees. make a bin 4 feet wide on a side and 3 feet tall. That would be enough to plant all the trees you could want and then enough left over to mulch the trees with the rest. Add well aged compost made with yard clippings, tree leaves, wood ashes, dirt and small wood chips or coarse saw dust. As you shovel the aged compost into the bin, add the morel slurry. Put wood chips on top a few inches deep. keep it moist. 5 gallons of slurry could treat a bin. Let the inoculated compost age in the bin over winter then use it to inoculate apple or pear rootstock seed in 2.5 gallon pots. My advice is semi dwarf and standard. Graft whatever type of apple or pear variety you want onto the rootstock, and plant the tree and compost together and mulch them with more compost and then woodchips on top of the compost to keep it moist and protected from the sun. A place shaded from the evening sun would be a good place for inoculated an orchard. A good 10 hours of light is all they need. For an idea of what well aged compost looks like. It is what is in this sweet potato bed. It is 22 months old. This compost was made for growing garden stuff. If I was making it to inoculate fruit trees I would have added wood chips to it as I turned it the first time the fall before last. You could make an inoculation bin the same way I made the sweet potato bin. just stack untreated 6x6 up to about 3 feet and then scab on some trash wood to hold it together. You can usually get this type of wood for the price of hauling it from saw mills. I might knock together a tidy compost bin and show that next. Compost is important if you want to maintain ground. I use chemical fertilize, but the plants take it better, and the ground hold moisture better if there is regular additions of compost. I have a new garden plot. might as well show how to get her done. |
|
|
|
[#10]
Great thread @waterglass !

|
|
|
|
[#11]
Quoted: Great thread @waterglass ! Thanks! I believe I told you once, years ago, I would do a how-to thread on burn beds. I even took pictures probably 5 years back, just never posted them because I forgot to take pictures of the first half of the process. then I forgot the whole thing until I found the BozemanMt pickle thread last fall. Eating good pickles all winter kept the idea for this thread fresh on my mind. Thought this spring I would stop being lazy, so I snapped some pictures while doing the deed. |
|
|
|
[#12]
Quoted: Thanks! I believe I told you once, years ago, I would do a how-to thread on burn beds. I even took pictures probably 5 years back, just never posted them because I forgot to take pictures of the first half of the process. then I forgot the whole thing until I found the BozemanMt pickle thread last fall. Eating good pickles all winter kept the idea for this thread fresh on my mind. Thought this spring I would stop being lazy, so I snapped some pictures while doing the deed. Good job. I have so many threads I want to do, but the time.... |
|
|
 Win a FREE Membership!
Sign up for the ARFCOM weekly newsletter and be entered to win a free ARFCOM membership. One new winner* is announced every week!
You will receive an email every Friday morning featuring the latest chatter from the hottest topics, breaking news surrounding legislation, as well as exclusive deals only available to ARFCOM email subscribers.

AR15.COM is the world's largest firearm community and is a gathering place for firearm enthusiasts of all types.
From hunters and military members, to competition shooters and general firearm enthusiasts, we welcome anyone who values and respects the way of the firearm.

Subscribe to our monthly Newsletter to receive firearm news, product discounts from your favorite Industry Partners, and more.
Copyright © 1996-2024 AR15.COM LLC. All Rights Reserved.
Any use of this content without express written consent is prohibited.
AR15.Com reserves the right to overwrite or replace any affiliate, commercial, or monetizable links, posted by users, with our own.


