|
Posted: 11/8/2020 1:03:31 PM EDT
TLDR: When using gaskets or O-rings to help keep the weather out of a coax entry panel or an enclosure that uses bulkhead or barrel connectors to pass rf from the outside to the inside, do the gaskets go on the outside or on the inside of the panel?
Am I over-thinking this? Yes, absolutely! That doesn't mean that I can't have some fun with it, though. My initial thought was that it was a 'no-brainer' to put the gaskets on the outside, but I've seen instructions for "cable glands" that state that the gaskets for those are supposed to go on the inside. I'm making a coax entry panel out of 1/4"-thick aluminum plate that I will set into the bottom side of a double-hung window opening. For passing my coax feedlines through the plate I will be using several N-female to N-female bulkhead connectors, along with several female-to-female UHF 'barrel' connectors. The type-N bulkhead connectors look like this:   You can see that there's a bulkhead 'shelf' or 'flange' into which an orange silicone gasket is inset, which should help keep the rain from passing through. There is also an inner-toothed lockwasher and a nut for securing the connector to the panel. The UHF barrel connectors look like this: 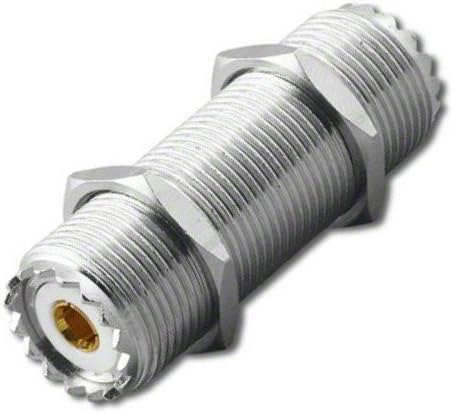 Unlike the N bulkhead connectors, the UHF barrels do not have a built-in flange, rather there are 5/8-inch nuts (and I also have some stainless outer-toothed lockwashers) to hold them in place. I have some approx. 15mm ID O-rings that I can use with the UHF barrels, but those will likely not actually prevent ingress of water via the threads, so I may also add a bead of silicone sealant when I install them. In my application I really don't need or expect to have IP-67 or IP-68 level waterproofing, in fact I will just be using typical weatherstripping foam between the edges of the aluminum panel and the window sill and/or the bottom of the window sash, along with stuffing some thick foam into the gap between the top and bottom sashes that will be left as a result of having the bottom sash rest on the top of the aluminum panel, mostly to keep out insects, and only secondarily to keep out the weather. But I'm also interested in the more general question as it applies to keeping the rain out of enclosures for outdoor matching networks and the like (although no doubt for some applications it may be preferable to supply 'weep holes' to allow possible condensation to drip out rather than attempting to hermetically seal the enclosure - I don't have a method for pumping dry nitrogen inside, after all). But I was wondering which side the gasket or O-ring should go on - the outside or the inside - or whether it even makes a difference. I haven't found any explicit instructions for the N-bulkheads - at least not in the Amphenol catalog pages or diagrams that I've seen (for example, https://www.amphenolrf.com/172124.html and https://www.amphenolrf.com/library/download/link/link_id/587568/parent/172124/. But maybe there is an industry standard practice or a mil-spec or whatever. I will also be using several #PG-7 and #PG-9 cable glands (for passing relay and rotor control cables through the plate), and I discovered that in the description for one vendor's parts it says the following (from https://www.amazon.com/Lokman-Plastic-Waterproof-Adjustable-Glands/dp/B06Y5HGYK2): "WATERPROOF- IP68 Cable glands come with gaskets for the bulkhead mounting. It makes the seal against the inside of the surface you're installing them on. thus are waterproof." The cable gland specs don't seem to say anything about it, though: 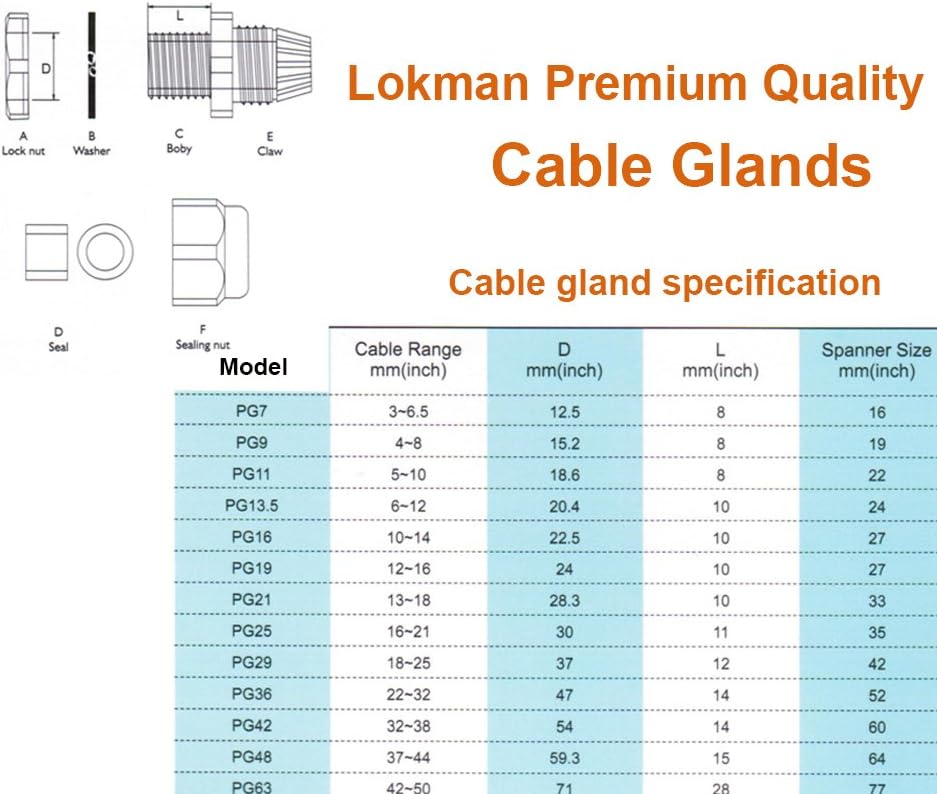 Do I trust amazon vendors to know what they're talking about? Absolutely not... Interestingly, Adafruit sells a "flanged weatherproof enclosure with PG-7 cable glands" (https://www.adafruit.com/product/3931), where it's obvious from the photo that they have put the gaskets on the outside of the box rather than on the inside:   So, is there any consensus? Or just be adventurous and flip a coin? Yes, I am definitely overthinking this. (Maybe I should have added a poll!) FWIW I'm going to go with my initial thoughts and put the gaskets on the outside. (BTW, I will also be adding several vintage E. F. Johnson model 135-51 and 135-52 ceramic feed-through "lead-in bushings" to accommodate ladder line and end-fed wires - to see what those look like check out page 9 of this 1948 catalog: http://bh.hallikainen.org/wiki/uploads/EFJohnson.pdf or page 30 of the pdf (which is actually marked as page 31) of this illustrated history of Johnson insulators: https://www.nia.org/publications/old_familiar_strains/OFS%202000_10%20vol%207%20no%204-5.pdf - they come with fiber gaskets to prevent the ceramic from touching the panel material, if not for weatherproofing duty.) |
|
|
|
[#1]
Put it in a weatherproof box:

|
|
|
|
[#2]
Weather proof box is best suggestion, connector o-rings always on outside of any box facing the elements, really only used as a water barrier. Used inside a box it wouldn't matter, can even leave it off if the other side has enough threads for the nut to lock it down tight. Depends on the connector.
|
|
|
|
[#3]
As someone who has used those exact connectors on many systems that have passed MIL-STD-810 environmental qualification testing, the answer is: it doesn't matter.
HOWEVER... (note it is a "big" however If these connectors will be repeatedly subjected to cable installation and removal cycles, then it is in the nature of these connectors to come loose if you do not put them in a "D' hole. Such a loose connector will then allow the weather in. However... (small however this time Since this will be used in a relatively non-critical application, and since you can probably access either side of the patch panel easily, and since the cables will probably rarely be reconnected, I'd put the washer/nut end on the inside of the patch panel. That way you don't have to go outside if you need to re-torque it since you probably aren't using D-holes. |
|
|
|
[#4]
Quoted: As someone who has used those exact connectors on many systems that have passed MIL-STD-810 environmental qualification testing, the answer is: it doesn't matter. HOWEVER... (note it is a "big" however If these connectors will be repeatedly subjected to cable installation and removal cycles, then it is in the nature of these connectors to come loose if you do not put them in a "D' hole. Such a loose connector will then allow the weather in. However... (small however this time Since this will be used in a relatively non-critical application, and since you can probably access either side of the patch panel easily, and since the cables will probably rarely be reconnected, I'd put the washer/nut end on the inside of the patch panel. That way you don't have to go outside if you need to re-torque it since you probably aren't using D-holes. Yes - I noticed that the N connectors can take advantage of a D-hole to prevent rotation - but as you say, this is a non-critical application, and I'm expecting that there will be few connector tighten and untighten cycles. While I do enjoy 'some' types of antenna work, I do have my limits. This is the extremely non-precise 'layout' that I'm working with. Yes, it's ugly - I changed my mind a few times when positioning the cable glands - but it's good enough for my purposes. Even though I did work through a series of "Intro to Machine Tool Technology" courses at a local community college ten years ago, and even though I could slap on some blue layout fluid (actually, I use a hefty blue magic marker instead) and scribe some layout lines on to the panel and take some care in locating and actually putting the holes in the intended locations, I'm not using my 'good' equipment ('good' at a hobbyist level, that is), rather I'm using a work table that I picked up for free from the dump, and some hand tools and scotch tape and graph paper and a fine-point sharpie and some blue painter's tape, because that's just fine for this project (plus it was over 70 degrees F today and I it gave me a chance to be outside). I'll update this thread with some other photos as it takes shape...  |
|
|
|
[#5]
I'd put the gasket on the outside if only to protect the threads from any corrosion that would make it difficult to remove the jam nut later.
|
|
|
|
[#6]
Outside. Think of it like caulking a window, outside for weather, inside for draft.
|
|
|
|
[#7]
I was going to post a couple of photos with an update, but it seems that the image host that I used for my most recent upload, postimg.cc, has been down for a couple of days (and that image is now showing up as an empty white box).
So I'll hold off until either they come back online or else until I find a different free image upload/hosting site. (I have most of the holes drilled into the coax entry panel, but next I will need to mill out a shallow pocket behind the cable glands, because those have a thread depth of only about 8mm, and that just does not leave enough room for the gasket and nut when using a 6.35mm thick aluminum plate.) |
|
|
|
[#8]
postimage is back online
Here are some work-in-progress images as I work on drilling holes for the bulkhead connectors, the cable glands, and the feedline standoff/feed-throughs... Enlarging pilot holes (5/8" silver & deming drill bit):  Most of the holes are done, time to move to the milling machine:  |
|
|
|
[#9]
To mill the pocket behind the cable glands, instead of using my own equipment, I brought the panel to my local makerspace (CT Hackerspace, http://www.cthackerspace.com/about-us/) along with some other aluminum milling projects that I wanted to work on that were too large to handle on my own machines.
Here I'm setting up the pocketing operation on the Bridgeport - using a 2-flute HSS endmill, with some WD-40 nearby for an occasional spritz of coolant/lube:  Getting ready to mill out the pocket behind the cable gland holes - using a broad-felt-tip blue magic marker to help make my scribed pocket outline more visible instead of brushing on the more traditional Dykem blue layout fluid (I use a Pilot marker https://www.amazon.com/gp/product/B00079YOQK/ but you can get large Sharpies or other markers that should do the trick just as well) - it's simpler and much less messy - (I used a utility knife to mark the outline because I forgot to bring my carbide-tipped scribing tool). It's hard to see in the photo but I have actually outlined the pocket on top of the blue marker ink but my eyesight could be better, so I place strips of blue painter's tape outside of those lines as a "note-to-self" warning that I'm approaching the edges (I don't really need the precision here, but it's good practice for times when I will need it):  The job is complete:  A few more holes to drill (for ground wire lugs), a bit of deburring work, some surface cleanup, and then I will be ready to install the connectors and mount the panel in my window. |
|
|
|
[#10]
Damn. All that and you couldn't mill D-holes?
|
|
|
|
[#11]
Quoted: Damn. All that and you couldn't mill D-holes? My home CNC router is currently out of order - I'll consider it for 'next time'... |
|
|
|
[#12]
Just a quick follow-up - my coax entry panel has been completed and installed in my window.
Currently only attached to a random-wire antenna (fed via an Icom AH-4 matching unit), working on other antennas as my next order of business. Some additional photos: Test fitting the cable glands: Test fit in window before connectors installed: Inside view of panel with connectors installed (the metal brackets are to screw it down to the window sill): Outside view of panel with connectors installed: |
|
|
 Win a FREE Membership!
Sign up for the ARFCOM weekly newsletter and be entered to win a free ARFCOM membership. One new winner* is announced every week!
You will receive an email every Friday morning featuring the latest chatter from the hottest topics, breaking news surrounding legislation, as well as exclusive deals only available to ARFCOM email subscribers.

AR15.COM is the world's largest firearm community and is a gathering place for firearm enthusiasts of all types.
From hunters and military members, to competition shooters and general firearm enthusiasts, we welcome anyone who values and respects the way of the firearm.

Subscribe to our monthly Newsletter to receive firearm news, product discounts from your favorite Industry Partners, and more.
Copyright © 1996-2024 AR15.COM LLC. All Rights Reserved.
Any use of this content without express written consent is prohibited.
AR15.Com reserves the right to overwrite or replace any affiliate, commercial, or monetizable links, posted by users, with our own.


