|
[#1]
Who's PLA?
I don't usually get that hot, with pla (stay near 185's) How do you store your filament? |
|
|
|
[#2]
Quoted:
Who's PLA? I don't usually get that hot, with pla (stay near 185's) How do you store your filament? So I should lower the nozzle temp to 185? 15 degrees makes the difference between perfection and shit? Thanks |
|
|
|
[#3]
If it's too hot, it will look melty.
Sounds like too cold. Could be the filament, could be your thermister isn't overly accurate. I'd up the heat. But pics always help. |
|
|
|
[#4]
It's odd that your calibration prints were gtg.
Other than temp, id say your nozzle distance was incorrect. A kitchen counter is a horrible place for filament. Way too much moisture. Might not be the issue, now, but it's a problem you don't want. |
|
|
|
[#5]
Quoted:
It's odd that your calibration prints were gtg. Other than temp, id say your nozzle distance was incorrect. A kitchen counter is a horrible place for filament. Way too much moisture. Might not be the issue, now, but it's a problem you don't want. |
|
|
|
[#6]
Quoted:
Who's PLA? I don't usually get that hot, with pla (stay near 185's) How do you store your filament? |
|
|
|
[#7]
I've been printing the pre-loaded cat for 2 hours. Looks perfect so far. I'm convinced I screwed up the downloaded files somehow. Maybe spacing, infill, etc. But something in that process definitely was fucked up.
Thoughts? Thanks |
|
|
|
[#8]
Cat turned out perfect. Can someone please explain what settings things need to be at when working in the slicer (Cura) to make them as good as the preloaded cat and dog? Thanks!
|
|
|
|
[#9]
Anyone?
Thanks |
|
|
|
[#10]
You should be able to start out with the preloaded configurations for quality, once you set the slicer to your machine.
|
|
|
|
[#11]
Quoted:
You should be able to start out with the preloaded configurations for quality, once you set the slicer to your machine. Like tell Cura I'm printing on an ender 3 pro somehow? Thanks! |
|
|
|
[#12]
Quoted: Wait...I'm confused. What do you mean "set the slicer to your machine"? Like tell Cura I'm printing on an ender 3 pro somehow? Thanks! The presets for any of the popular printers on any popular slicer should print pretty dang well. If they dont, you have a prob elsewhere. You see tons of people chase their tails with slicer settings, firmware, fancy upgrades, etc, when they refuse to accept that the real prob is they just didnt assemble the printer well. |
|
|
|
[#13]
Quoted: Correct. The presets for any of the popular printers on any popular slicer should print pretty dang well. If they dont, you have a prob elsewhere. You see tons of people chase their tails with slicer settings, firmware, fancy upgrades, etc, when they refuse to accept that the real prob is they just didnt assemble the printer well. Thanks for clarifying! |
|
|
|
[#14]
I looked this morning and my Cura is ALREADY set to Ender 3 Pro.....any other ideas?
Maybe it has to do with layer height? Infill, gradual infill, support, adhesion.....customize? Again, the cat and dog are near flawless. Yet the Nerf sight and a few other trinkets all had separating layers and were a total mess. So it's definitely not the machine and it's something in the files. Just not sure what everything needs to be set at. Thanks! |
|
|
|
[#15]
Could be hotend temp too low.
I had a print fail just last night because my office got down to 50 degrees, cooled the print too much. I had to turn the cooling fan down to 30 percent. I was printing petg. |
|
|
|
[#16]
Quoted:
Could be hotend temp too low. I had a print fail just last night because my office got down to 50 degrees, cooled the print too much. I had to turn the cooling fan down to 30 percent. I was printing petg. |
|
|
|
[#17]
Maybe a picture would help ... couldn't hurt.
|
|
|
|
[#18]
Quoted:
Maybe a picture would help ... couldn't hurt. Thanks |
|
|
|
[#19]
OK, within Cura you indicated the printer profile in use is the one for Ender 3 Pro.
What version of Cura is installed? What material did you select from the materials pulldown within Cura? What profile are you using for that material? What, if any, settings did you change from that profile's default settings? BTW, my ender only came with enough filament to print 1/2 a dog. Yours came with a whole spool. Is there any documentation that came with the spool, labels, etc.? It might help knowing the source & product description, don't know without asking. |
|
|
|
[#20]
Quoted:
OK, within Cura you indicated the printer profile in use is the one for Ender 3 Pro. What version of Cura is installed? 4.3.0 What material did you select from the materials pulldown within Cura? I didn't select any, but it looks like it's set on PLA. However there are at least 3 dozen different settings within the PLA screen and I'm not sure what any of them should be set at. What profile are you using for that material? What do you mean by... profile? What, if any, settings did you change from that profile's default settings? None, because I didn't know these settings existed. All I did was select different infill levels depending on how strong I needed the print to be. Thanks! |
|
|
|
[#21]
OK, assuming your cura window looks like this when first opened.
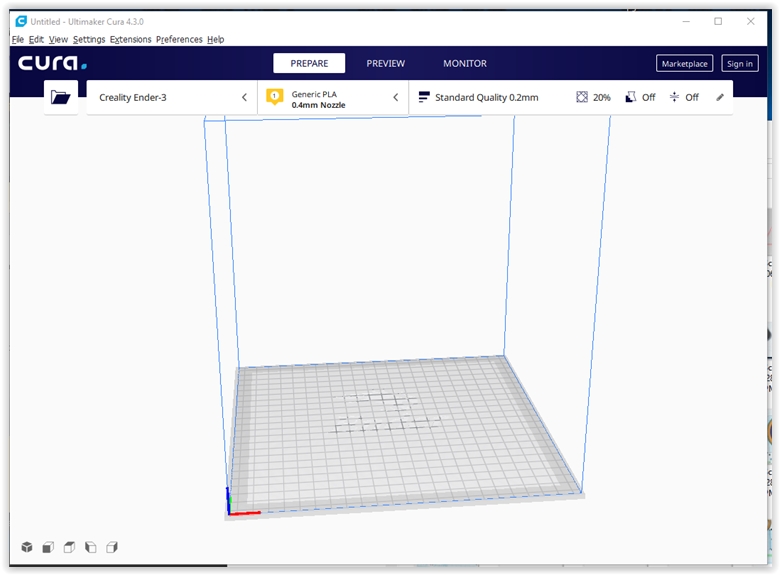
This is the materials pulldown (note cursor) 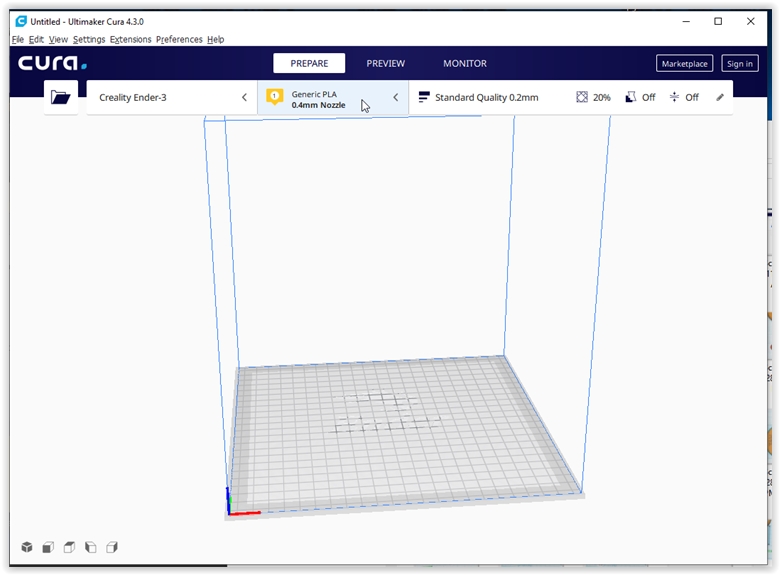
When clicked you get choices like this, in addition to the current selection you get an indicator that other choices exist. 
Use "generic" unless you know to use otherwise. Within "generic" you have the various filament types. 
Here we choose PLA 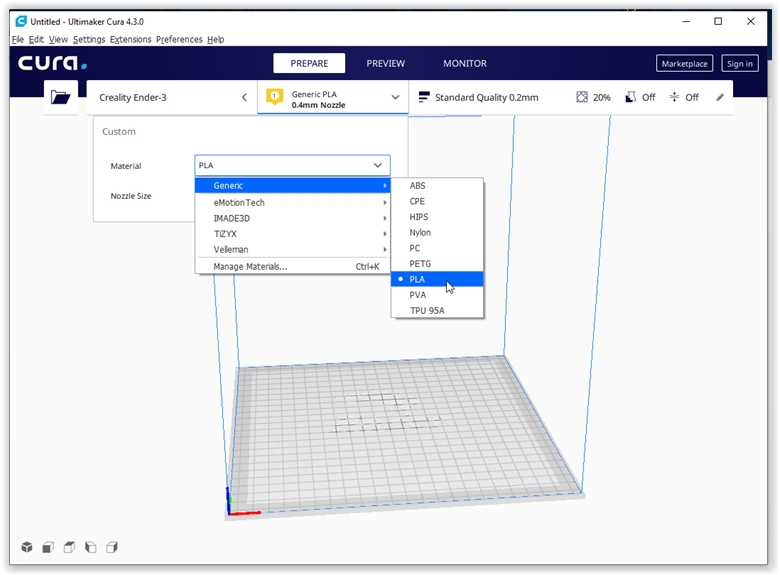
Once you have selected a material, you can choose a "profile" to control how the material is printed. This is the "profile" area. Each material has various profiles to accommodate things like layer thickness, temperature, speed, etc. 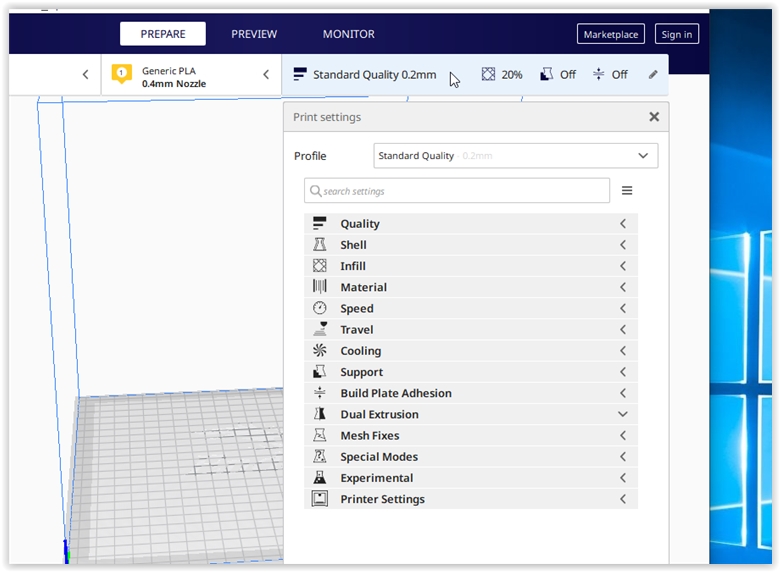
You choose the profile that matches how you want the material printed. 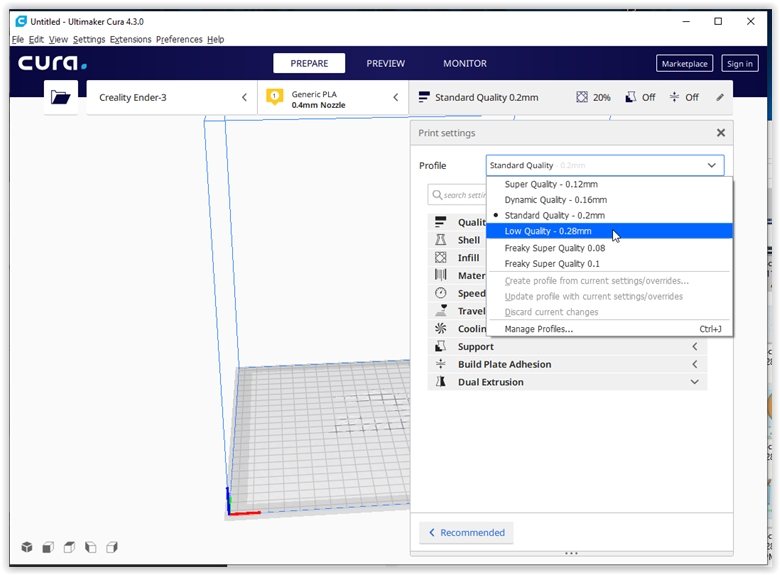
You can make changes to existing profiles & either just use the changes for that one slice, or save those changes into a new profile. You make your selections & changes before doing the slicing. |
|
|
|
[#22]
Quoted: It's at 200. |
|
|
|
[#23]
Quoted:
OK, assuming your cura window looks like this when first opened. http://www.skhowell.com/images/Screen Shot 11-11-19 at 11.21 AM.JPG This is the materials pulldown (note cursor) http://www.skhowell.com/images/Screen Shot 11-11-19 at 11.22 AM.JPG When clicked you get choices like this, in addition to the current selection you get an indicator that other choices exist. http://www.skhowell.com/images/Screen Shot 11-11-19 at 11.22 AM 001.JPG Use "generic" unless you know to use otherwise. Within "generic" you have the various filament types. http://www.skhowell.com/images/Screen Shot 11-11-19 at 11.22 AM 002.JPG Here we choose PLA http://www.skhowell.com/images/Screen Shot 11-11-19 at 11.22 AM 003.JPG Once you have selected a material, you can choose a "profile" to control how the material is printed. This is the "profile" area. Each material has various profiles to accommodate things like layer thickness, temperature, speed, etc. http://www.skhowell.com/images/Screen Shot 11-11-19 at 11.17 AM.JPG You choose the profile that matches how you want the material printed. http://www.skhowell.com/images/Screen Shot 11-11-19 at 11.21 AM 001.JPG You can make changes to existing profiles & either just use the changes for that one slice, or save those changes into a new profile. You make your selections & changes before doing the slicing. If I can compare the cat/dog to the nerf sight and other do-dads....I bet I can see where the problem/difference is. Because to be honest, none of these settings means much to me because I'm so new to it. Thanks! |
|
|
|
[#24]
Unfortunately .gcode files contain the results of applying a profile to a slice & not really much of the profile itself. You could find things like hotend and bed temperature which are specific gcode commands and inferr layer heights the magnitude of Z coordinate changes, but all those things can just as easily be found on the printer info screen while the print is running.
Try starting with something dead simple. Get a 20mm calibration cube off thingiverse. Start a fresh session in Cura. Select generic pla. Select the profile for a 0.2mm layer height. Don't change anything. Bring in the cube .STL file. Slice it & take the "save to removable drive .." option to save it to your SD or Micro SD card (a fresh blank card would be good). Don't make any changes to the file name or do any manipulation of the file. Use that same card for your print. See what happens. That would insure that the number of variables is kept to a minimum & give us a starting point. Also do look for any documentation on the filament you received, that could be helpful. |
|
|
|
[#25]
I would honestly say ditch the cheap mystery filament it came with.
Why spend half the spool trying to dial it in to never run that filament again? |
|
|
|
[#26]
Quoted:
I would honestly say ditch the cheap mystery filament it came with. Why spend half the spool trying to dial it in to never run that filament again? Thanks |
|
|
|
[#27]
Quoted:
Unfortunately .gcode files contain the results of applying a profile to a slice & not really much of the profile itself. You could find things like hotend and bed temperature which are specific gcode commands and inferr layer heights the magnitude of Z coordinate changes, but all those things can just as easily be found on the printer info screen while the print is running. Try starting with something dead simple. Get a 20mm calibration cube off thingiverse. Start a fresh session in Cura. Select generic pla. Select the profile for a 0.2mm layer height. Don't change anything. Bring in the cube .STL file. Slice it & take the "save to removable drive .." option to save it to your SD or Micro SD card (a fresh blank card would be good). Don't make any changes to the file name or do any manipulation of the file. Use that same card for your print. See what happens. That would insure that the number of variables is kept to a minimum & give us a starting point. Also do look for any documentation on the filament you received, that could be helpful. Then I can take a pic, if still having problems, and maybe it'd be easier to guide me through what to adjust. EDIT: I saved it to the SD card but it wanted to do the .ufp initially so I did another file "exported" instead of "save to SD" as ".gcode"....we'll see how it works in a couple hours! Thanks! |
|
|
|
[#28]
Quoted:
So you're saying the perfect could be stemming from the fact that Creality optimized the print to utilize that specific filament? I'm waiting on my Esun PLA+ to get here...hopefully sometime this week. We'll see how that stuff works. Thanks Quoted:
Quoted:
I would honestly say ditch the cheap mystery filament it came with. Why spend half the spool trying to dial it in to never run that filament again? Thanks At least when you get your eSun filament, there will be known specs on how to print with it. |
|
|
|
[#29]
That .ufp extension default may be a clue to what is going on (unless the ender 3 pro machine def. calls for it) Not something I have seen in several cura versions set up for a regular Ender 3.
|
|
|
|
[#30]
Quoted:
That .ufp extension default may be a clue to what is going on (unless the ender 3 pro machine def. calls for it) Not something I have seen in several cura versions set up for a regular Ender 3. |
|
|
|
[#31]
Quoted: My cura save the files to the SD card with the .gcode extension from the get to. I never had to export anything. I don't think it's a direct reason for separation as the design is clearly visible and pretty well articulated. Just that the layers aren't sticking. Thanks |
|
|
|
[#32]
I agree about .UFP being weird. Maybe OP should consider going into preferences, select "printers", select "Add", select "non-networked printers", then select "Creality3D", then choose "Ender 3". Modify the name (like add "-test" at the end) and then click the "Add" button. That will create a new selectable printer. With that new printer, do the calibration cube slice process described earlier & see if it doesn't write a .G-code file automatically with no export required.
BTW - .UFP is an Ultimaker file package , basically a zipped file of the gcode + model image. |
|
|
|
[#33]
Quoted: I'm curious how to re-configure Cura so it does the same...? I don't think it's a direct reason for separation as the design is clearly visible and pretty well articulated. Just that the layers aren't sticking. Thanks Maybe this will help? https://community.ultimaker.com/topic/25017-cura-351-saves-files-as-ufp/ |
|
|
|
[#34]
Quoted: I'm curious how to re-configure Cura so it does the same...? I don't think it's a direct reason for separation as the design is clearly visible and pretty well articulated. Just that the layers aren't sticking. Thanks |
|
|
|
[#35]
Update.... cube is about 3/4 done printing and looks flawless. Now I'm really confused.
Progress!...since it printed and it's the first thing from thingiverse to do so. But all that was different is changing the spacing to .2 instead of .06 or whatever it was at by default. Thoughts? Thanks! |
|
|
|
[#36]
0.06
waaaaaaaaay too small a layer. unless you changed it, you have a 0.4mm nozzle, trying to do a 0.06mm layer would be very very low flow rate. 0.1 is about as low as you want to go with a 0.4mm nozzle (OK, maybe could try 0.08 ... but no promises). That is not one of the common Ender 3 layers. Makes you wonder what the wall thickness was set to. |
|
|
|
[#37]
Quoted:
0.06 waaaaaaaaay too small a layer. unless you changed it, you have a 0.4mm nozzle, trying to do a 0.06mm layer would be very very low flow rate. 0.1 is about as low as you want to go with a 0.4mm nozzle (OK, maybe could try 0.08 ... but no promises). Thanks! |
|
|
|
[#38]
Actually, it can be bad going too big. If your layers were 0.6mm, for example, that would also cause problems with a 0.4mm nozzle. You don't want to do layers more that 3/4 the nozzle dimension at most. With a 0.4mm nozzle you should probably stay with layers between 0.1mm and 0.28mm in thickness. Outside that region will be headaches!
|
|
|
|
[#39]
Quoted:
So is this the answer as to why I was getting separation? Thanks! Quoted:
Quoted:
0.06 waaaaaaaaay too small a layer. unless you changed it, you have a 0.4mm nozzle, trying to do a 0.06mm layer would be very very low flow rate. 0.1 is about as low as you want to go with a 0.4mm nozzle (OK, maybe could try 0.08 ... but no promises). Thanks! You need *perfect* calibration on EVERYTHING to print at those layer heights. Ultimaker has that, your Ender doesn't |
|
|
|
[#40]
Quoted:
Actually, it can be bad going too big. If your layers were 0.6mm, for example, that would also cause problems with a 0.4mm nozzle. You don't want to do layers more that 3/4 the nozzle dimension at most. With a 0.4mm nozzle you should probably stay with layers between 0.1mm and 0.28mm in thickness. Outside that region will be headaches! Thanks! |
|
|
|
[#41]
Ok, cube finished and I think would have been flawless.....but I ripped it off the magnet and the bottom side stayed attached....so that's my fault.
The dog and cat printed on a little waste/platform...how do I have all prints do that? Also, how do I clean this magnet? There's a bunch of scrap that won't scrape off. Thanks! |
|
|
|
[#42]
If you wait til things cool, they typically pop right off with no effort. That little platform is probably a "raft" (if it extends underneath). If it is just around the bottom edge it is a "brim".
Those are both options in the "bed adhesion" section. You can choose none, skirt, raft or brim. skirt doesn't touch the model, it goes around the outside & is just there to prime the nozzle and let you evaluate the quality of the first layer before starting the actual model. There are additional settings in that section for fine tuning. |
|
|
|
[#43]
Quoted:
If you wait til things cool, they typically pop right off with no effort. That little platform is probably a "raft" (if it extends underneath). If it is just around the bottom edge it is a "brim". Those are both options in the "bed adhesion" section. You can choose none, skirt, raft or brim. skirt doesn't touch the model, it goes around the outside & is just there to prime the nozzle and let you evaluate the quality of the first layer before starting the actual model. There are additional settings in that section for fine tuning. The plan tomorrow will be to re-do all the files for .2 instead of .06 and then come home tomorrow night and see if I can get better results. I feel like we're coming down the home stretch here with resolving issues!! Thanks again! |
|
|
|
[#44]
if i leave pla out for more than a day or 2 it begins to get water logged and becomes brittle. that can affect it as well as the water vapor cools the filament as it flows.
|
|
|
|
[#45]
Quoted:
if i leave pla out for more than a day or 2 it begins to get water logged and becomes brittle. that can affect it as well as the water vapor cools the filament as it flows. |
|
|
|
[#46]
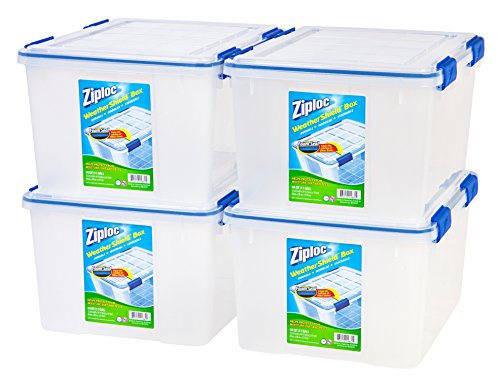
Dry box.
Gasketed storage tote at Menards works well. You can even print directly from your dry box. |
|
|
|
[#47]
Quoted:
Dry box. Gasketed storage tote at Menards works well. You can even print directly from your dry box. I printed some cubes last night and I'm not sure if it's the files or something wrong but the top layer didn't adhere and peeled off. It's almost like the printer didn't know to finish it nicely and thought it was an interior layer or something. |
|
|
|
[#48]
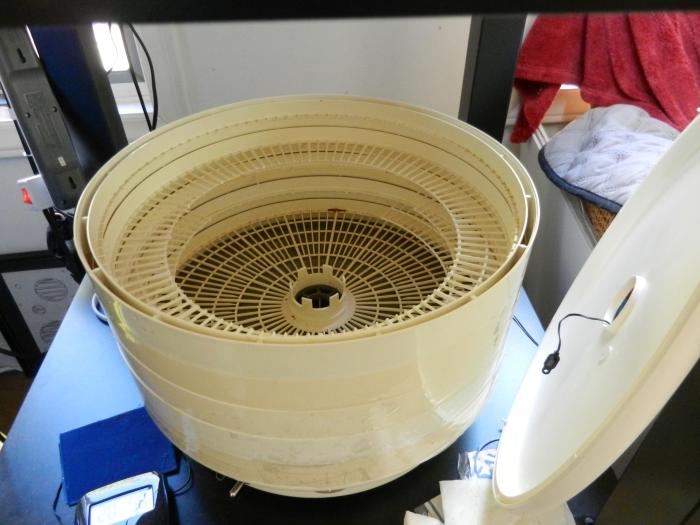
A cheap fix is a 5 gallon bucket with a gamma seal lid, throw in a bunch of silica gel, AKA dessicant, in packs or a container. I picked up a bunch of gamma seals for this when the local TSC had them on sale for $5 w/in store pickup. Pick up one of the cheap dehydrators (maybe find a used one at a thrift store), cut out the tray centers & you have a way to dry out your filament & recharge silica gel. You can use a thermometer that displays celcius with remote probe to get the right temps for what you are drying
If you want to get fancy, you can inset a hygrometer in the lid (I sealed around the edges with hot glue on mine) to know when you need to dry out the silica gel. 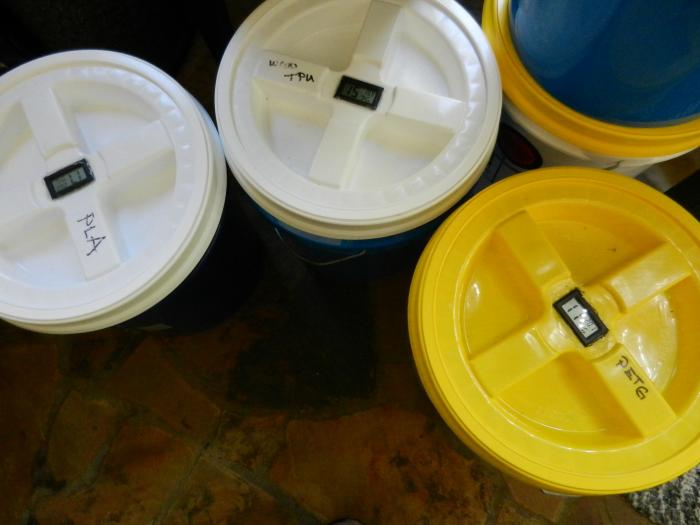
Some filaments are touchier than others, for example PLA & PETG are more sensitive than TPU. The temperature should be appropriate for the material so it dries as quick as possible but doesn't distort from getting too hot. sample time & temperature guide from PrintDry.com: Recommended Drying Time No. / Materials / Dryer Temp / Drying Time 1 PLA 50°C (122°F) > 3h 2 ABS 65°C (149°F) > 3h 3 PETG/CPE 65°C (149°F) > 3h 4 Nylon 70°C (158°F) > 12h 5 Dessicant 65°C (149°F) > 3h 6 PVA 45°C (113°F) > 10h 7 TPU/TPE 55°C (131°F) > 4h 8 ASA 60°C (140°F) > 4h 9 PP 55°C (131°F) > 6h 10 HIPS 60°C (140°F) > 4h 11 PC 70°C (158°F) > 6h 12 PEEK 70°C (158°F) > 6h |
|
|
|
[#49]
i use these with a rechageable dessicant pack for storage

if it gets brittle i use a cheap food dehydrator with a cake pan covering it to dry. |
|
|
|
[#50]
I usually run 205/60 on my Ender3 with PLA, sometimes a little less. If you have a cold print room, drafts, etc, you can have poor inter-layer adhesion.
Depends on the filament. |
|
|
 Win a FREE Membership!
Sign up for the ARFCOM weekly newsletter and be entered to win a free ARFCOM membership. One new winner* is announced every week!
You will receive an email every Friday morning featuring the latest chatter from the hottest topics, breaking news surrounding legislation, as well as exclusive deals only available to ARFCOM email subscribers.

AR15.COM is the world's largest firearm community and is a gathering place for firearm enthusiasts of all types.
From hunters and military members, to competition shooters and general firearm enthusiasts, we welcome anyone who values and respects the way of the firearm.

Subscribe to our monthly Newsletter to receive firearm news, product discounts from your favorite Industry Partners, and more.
Copyright © 1996-2024 AR15.COM LLC. All Rights Reserved.
Any use of this content without express written consent is prohibited.
AR15.Com reserves the right to overwrite or replace any affiliate, commercial, or monetizable links, posted by users, with our own.


.jpg)
