|
Posted: 4/24/2022 4:18:44 PM EDT
[Last Edit: ColinDoyle]
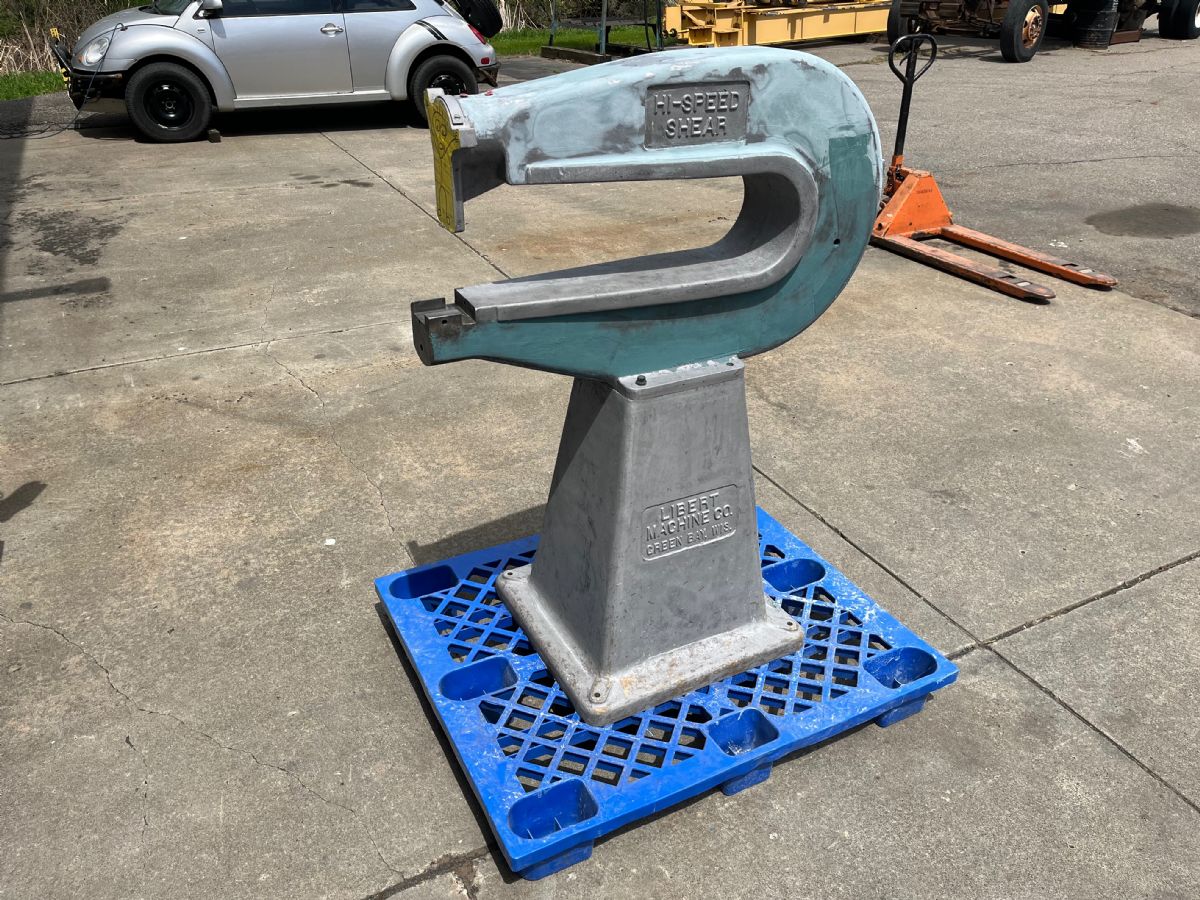
Instagram has cost me a lot of money over the years. A while back, I used the platform to befriend some coach builders and ended up attending a 3-day metal shaping workshop. I decided I'd like to add some shaping equipment to my shop, and the Libert seemed like a good place to start. With the right tooling, these machines are capable of a lot of the same functions as a Pullmax or Trumpf 'vibro shear' type machine (shrinking, stretching, planishing, beading,) but they're less powerful and generally won't move material as quickly. Libert (and similar machines) were originally equipped with shearing blades - the bottom was fixed and the top moved up and down on an adjustable-stroke eccentric cam. Usually, they have an arm protruding from the front with an adjustable center pivot point, and they're used to shear circles in sheet metal. CNC plasma and laser cutting have largely made these machines obsolete in a manufacturing context, but their rigid cast body and the eccentric cam make them good candidates for conversion into metal shaping machines.
I found this one on eBay near Indianapolis, and it was cheap enough that I found an excuse (some uShip freight) to drive down there and pick it up. I've been picking away at it as time allows, but it still needs a little work before it's finished. So far, I've converted the nose to accept 3/4-inch square shank tooling, fitted it with steel and plastic thumbnail shrinking dies, mounted an adjustable-speed motor in a custom cradle, and built a rolling dolly to fit the machine. I still need to create a means by which to adjust the motor speed (either a throttle lever or a pedal or both,) and I need to tear it all down, paint it, and reassemble it with flashy pimp hardware. Here are some photos of the work I've done so far. It's a little sparse - I was taking video of a lot of this, but forgot to photograph some details. (There's a story highlight on Instagram @colinrdoyle if any of you are apparently also teenage girls like me.) 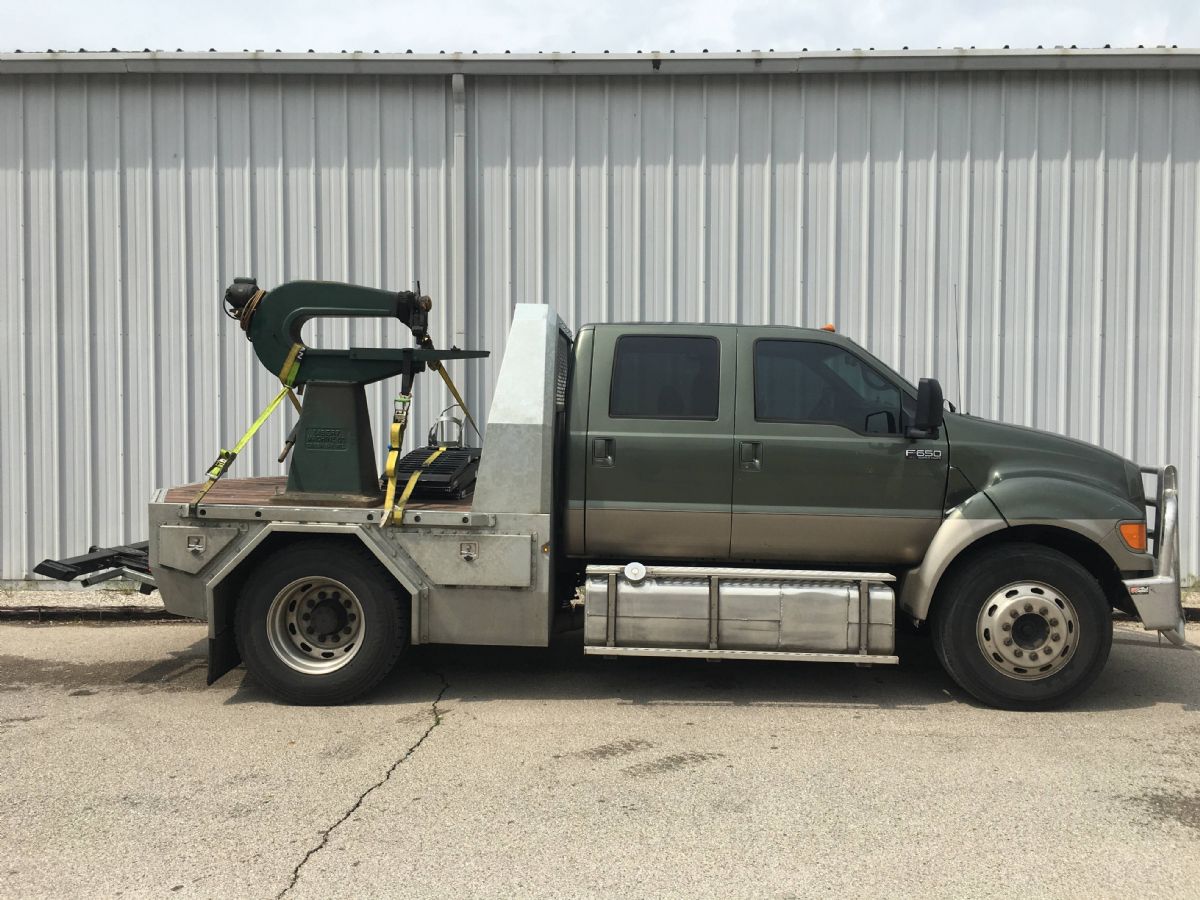 Auction pickup day in Indy. 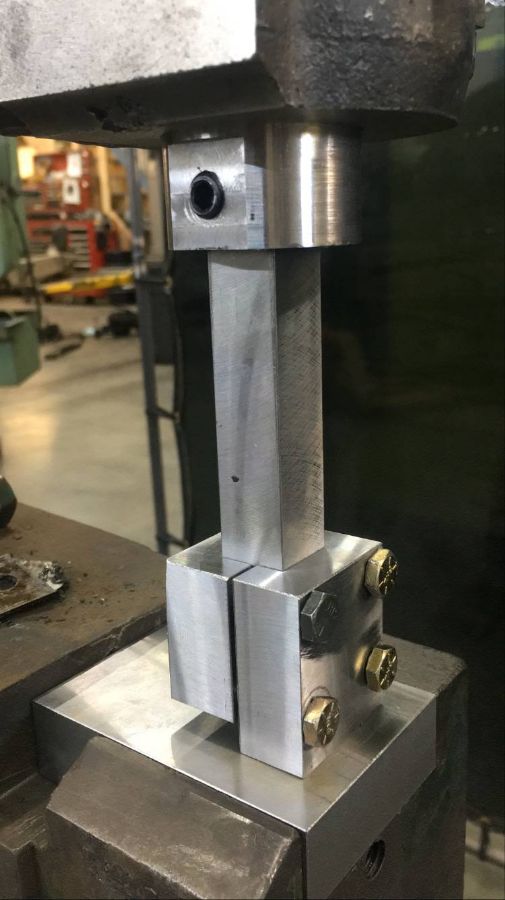 Here's something I forgot to photograph: converting the machine's top 'piston' to accept 3/4 square shank tooling. Essentially, I milled a 3/4 wide slot into the piston and silver soldered a slug of material into the top of the slot and turned it in the lathe. I couldn't really think of a better way to put a blind square hole in the part with my equipment (which does not include EDM capabilities.) Here, I'm using a piece of 3/4 square stock to align the bottom tool holder jaw with the piston, before welding the bottom part in place.   Should've chamfered those holes, right? I milled a block that fit into the recess in the lower jaw of the machine, and threaded it to accept a bolt that draws it down into the frame. I may revisit the lower tool holder and add a threaded perch with a hand wheel to adjust height. There's some height adjustment available on the top eccentric, but I won't be sure until I begin using the machine whether I'll want more adjustability. 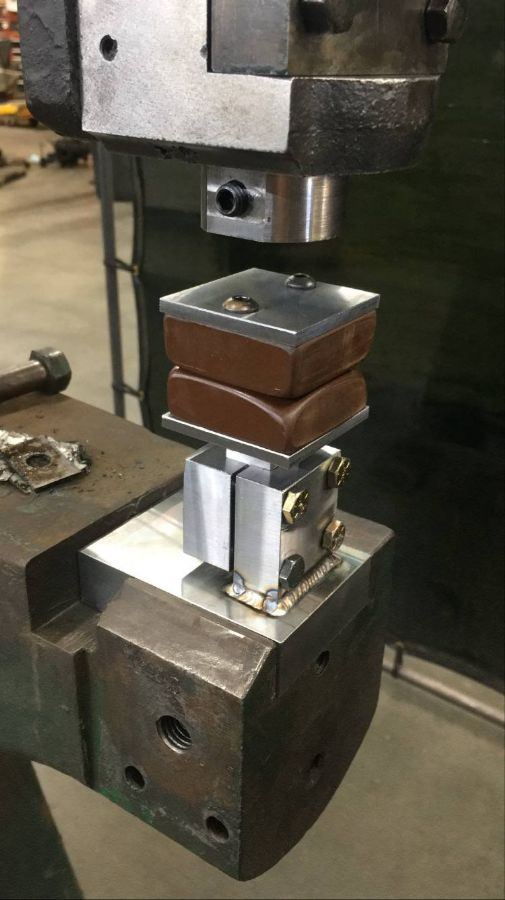 Plastic thumbnail shrinking dies partially mounted. I think I was determining where to weld the shank on the top die's backing plate. 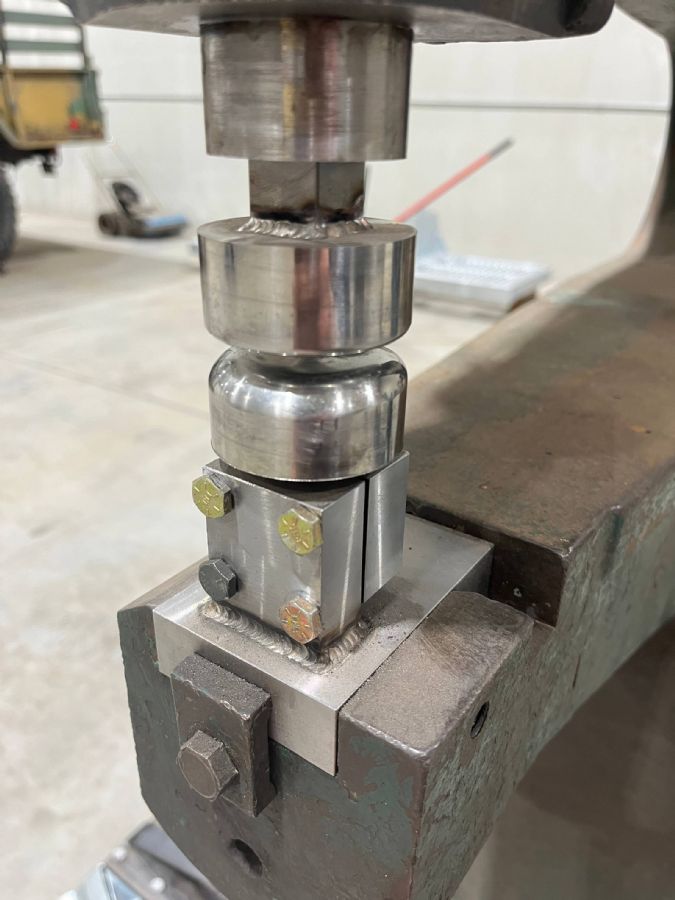 Steel thumbnail shrinking dies (look how filthy everything is - it's been sitting in the shop for ~10 months.) Lemme break off the next section into a separate reply... at the risk of someday pushing my post count into quadruple-digits. 
|
|
|
|
|
[Last Edit: ColinDoyle]
[#1]
The motor that came on the machine was all messed up - its mounting foot was broken off the can, and I think it was overheating and tripping the overload breaker after a little runtime. I tossed it and decided to use an industrial sewing machine motor with infinitely variable speed via mechanical linkage. As mentioned in the original post, I haven't made the linkage yet but I have a bunch of ideas bouncing around in my head.
I also replaced the wobbly, rusty driveshaft that ran from the original motor up to the eccentric on the nose of the machine. It has to have a little flexibility to allow the height of the eccentric cam to be adjusted by the user, so the original shaft had some oily rubber things clamped around it to act as flex couplers. I replaced everything with a new piece of cold-roll round stock and a couple Lovejoy connectors. I built an adjustable motor mount out of 3/8" plate and mounted a rear wheel bearing carrier from a Merkur XR4Ti to it, then made a pulley-to-Lovejoy shaft out of a chunk of unknown round stock from my scrap bin. The bearing carrier uses two opposing tapered bearings like a trailer hub, so I cut threads on the shaft which allows me to preload the bearings with a big nut. I milled wrench flats on the outboard end to hold the shaft while torquing the nut. I made a matching companion ring to engage the grease seal on the inboard side, as well. I used my lathe to make a screw that pushes the sewing machine motor side to side and allows me to tension the V-belt. There's a little bolt-down tab thing that clamps against the rail above the motor to lock it into position once the belt is tensioned. Astute viewers will notice my shiny gray pulley was replaced by a crappy aluminum one. That's because I'm a ham-fisted idiot who cracked the cast iron pulley in his shop press. 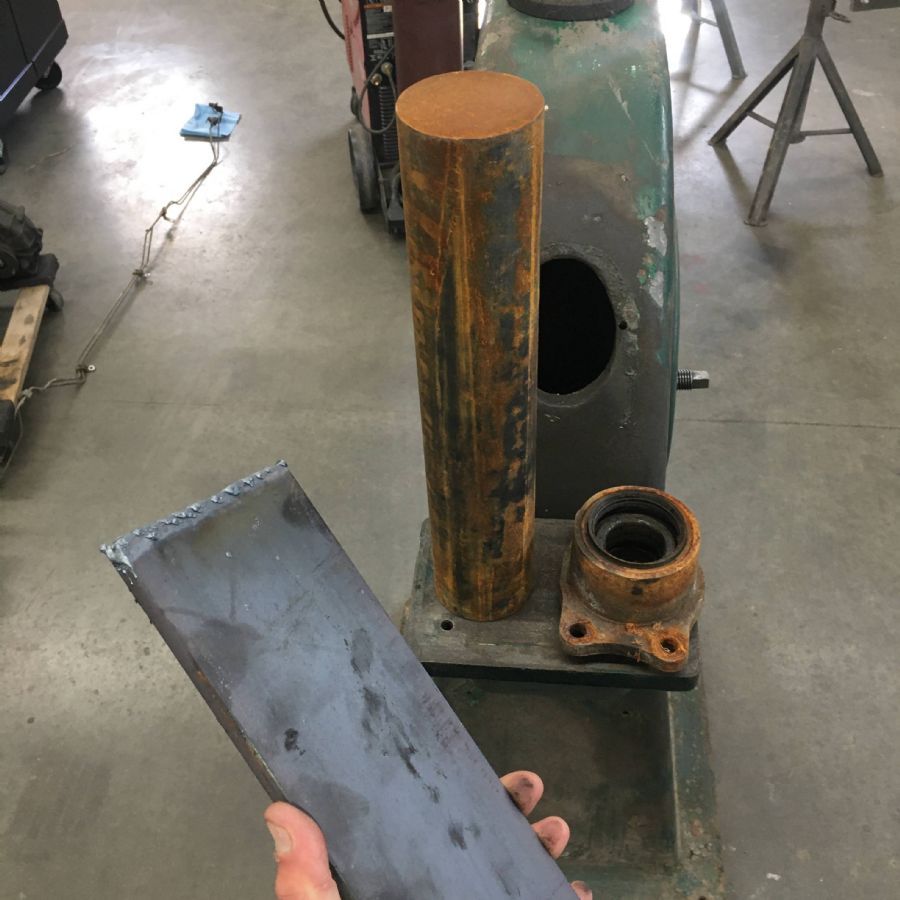     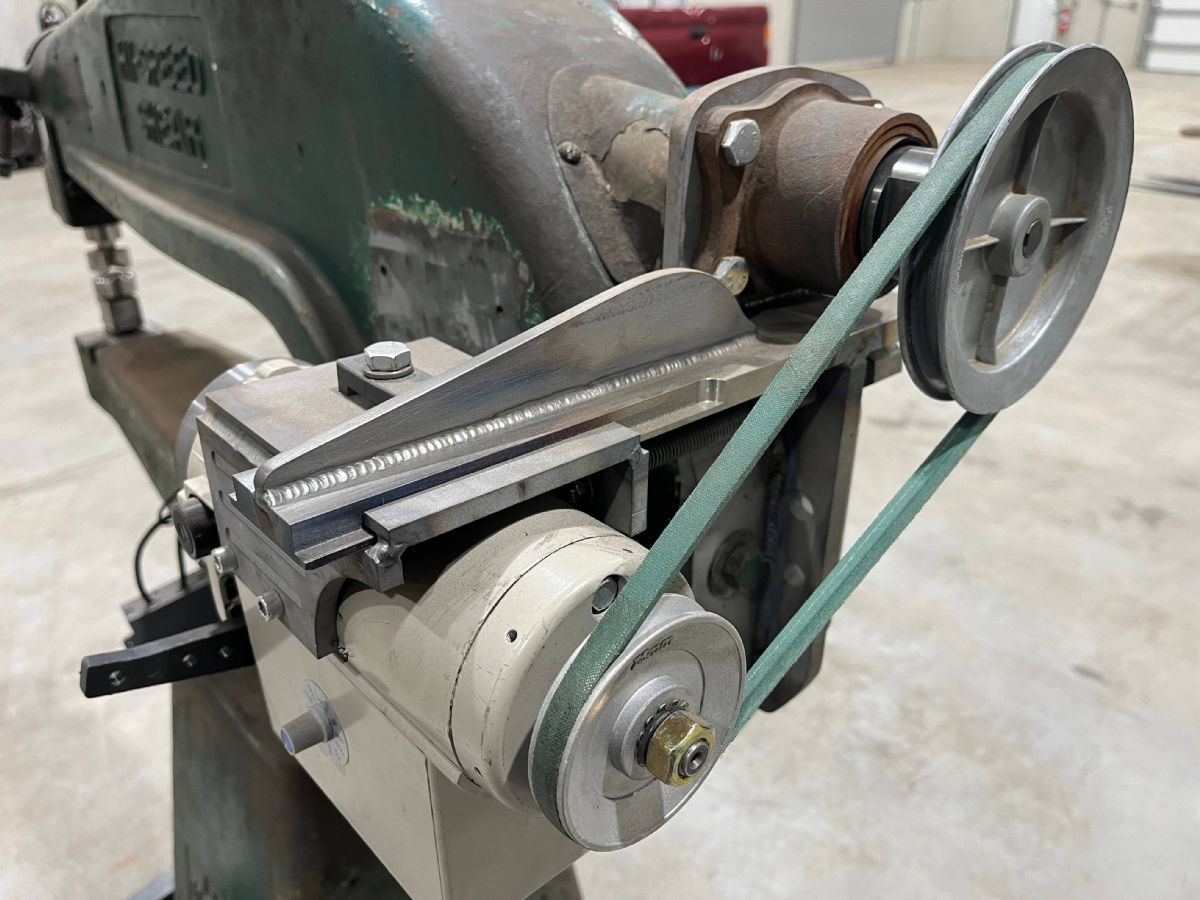
|
|
|
|
|
[Last Edit: ColinDoyle]
[#2]
The final chapter, for now... I wanted to put this machine on a rolling dolly so I could shove it into a corner when it's not being used. I found these urethane casters on eBay - nice and large so they can roll over debris, and the locking mechanism on the swivel casters locks out the swivel itself as well as the wheel's rotation. That's a nice feature that prevents a machine or a workbench from squirming around when you're putting force into it.
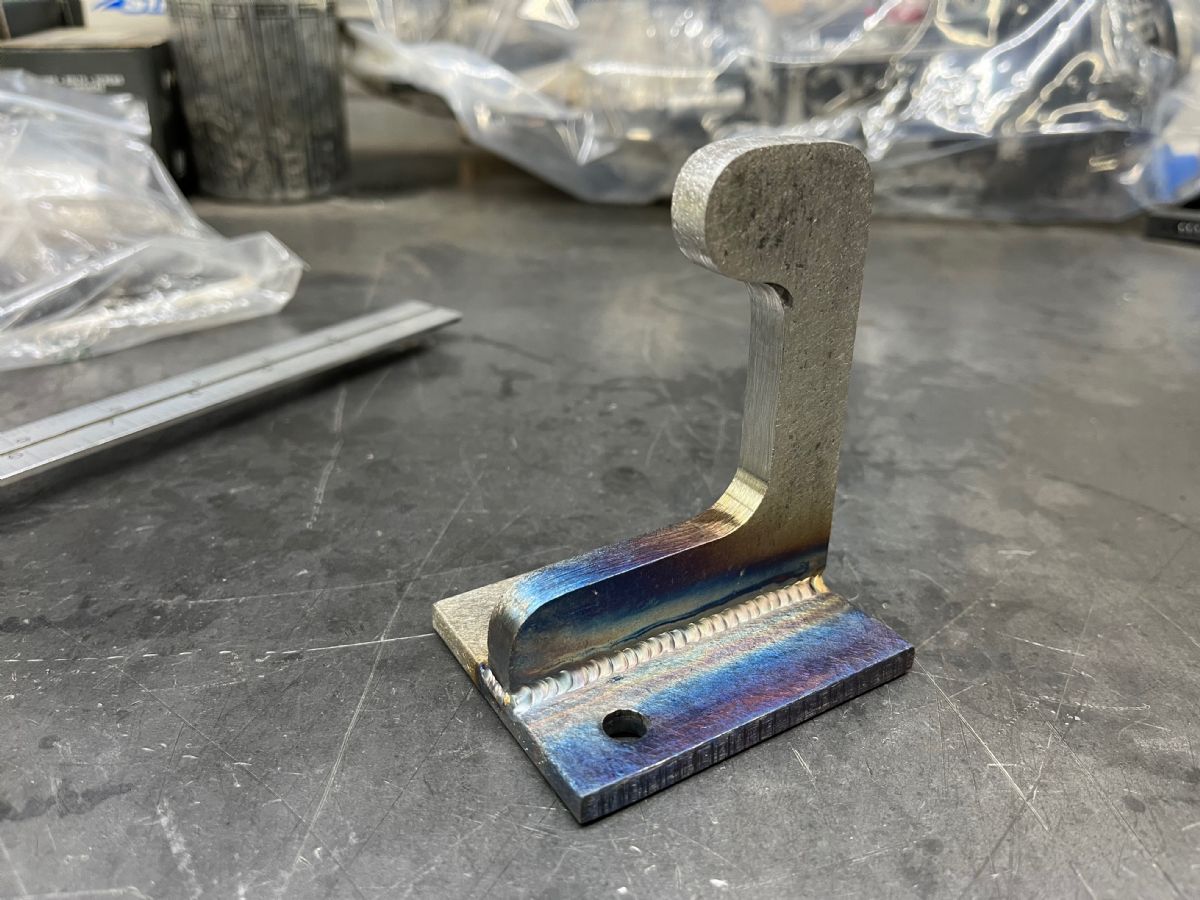
I wanted to keep the machine as low as possible, so it was a bit tricky to brace the caster mounts. The straight ones in the rear were easy, simple gusseting job. The front swivel casters couldn't have any obstructions beneath the mounting plates, so I made that arched brace across the front of the dolly, inspired by an old camelback straight edge. I had picked up a slip roll at auction a few months ago and hadn't yet rewired it from 480V to 240V 3ph, so making this part was the impetus I needed to quit procrastinating. To tie the machine and dolly together, I welded some 3/8 plate under each corner (pictured below) and drilled/tapped them for machine hold-down bolts (not pictured.) I TIG welded everything because Malcolm Gladwell told me I need to log 10,000 hours if I ever want to become proficient. 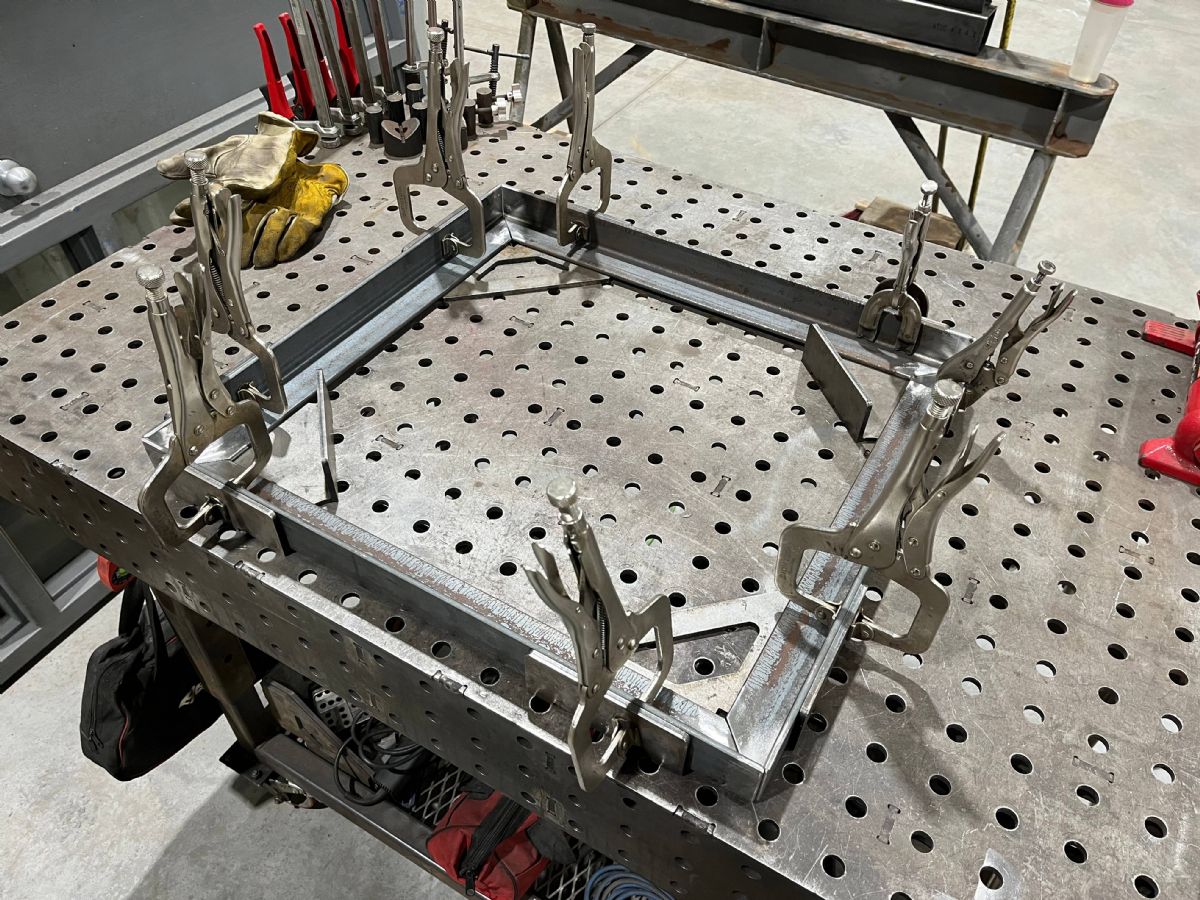     First time welding with a 1/16" tungsten electrode. Shaky!  The 3/8" tie-down plates on the bottom of the dolly. Edges are chamfered in case they snag anything while rolling across the floor, although they should still have 5/8" of ground clearance. 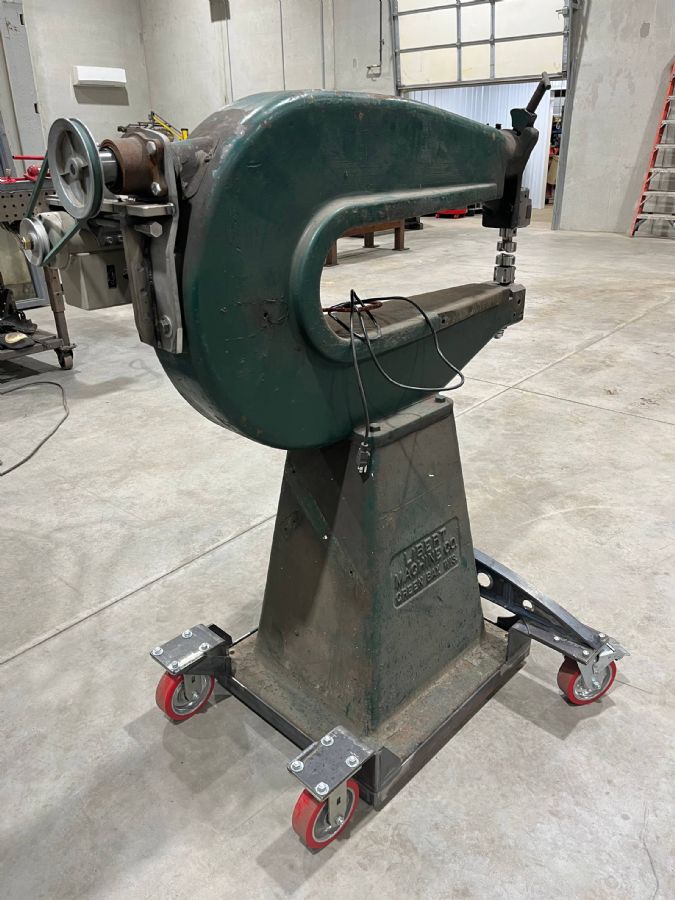 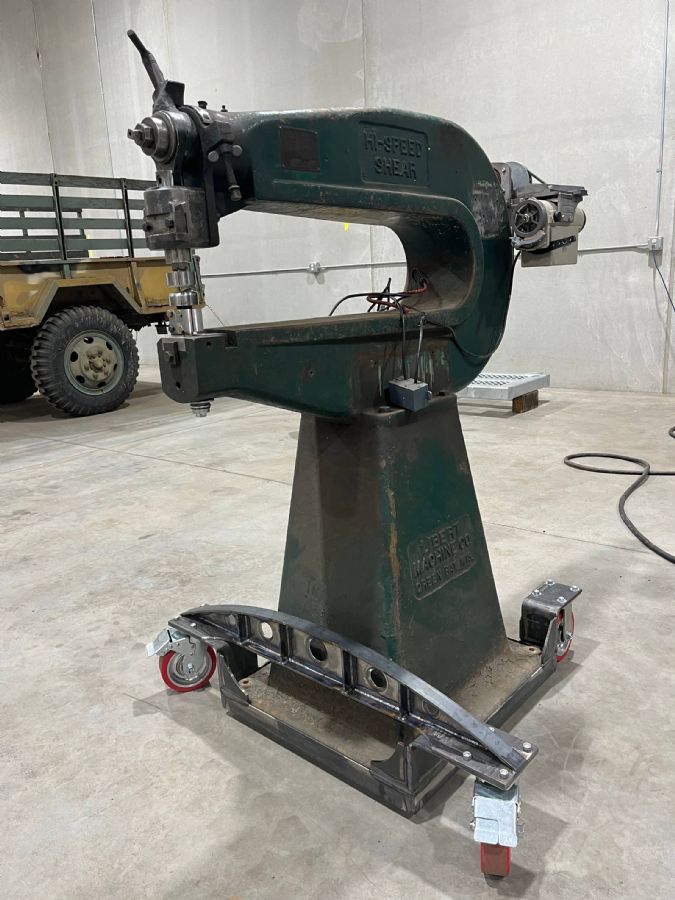 If I can defeat the ADHD demon, I might have more updates to share before this thread gets archived. |
|
|
|
|
[#3]
I love that cart, the fabricated truss/girder kicks ass.
|
|
|
|
|
[#4]
Looks great man, the welds all look clean and while I have absolutely no idea what that thing does, its got a solid foundation
|
|
|
|
|
[Last Edit: wildearp]
[#5]
Originally Posted By Seatbelts:
Looks great man, the welds all look clean and while I have absolutely no idea what that thing does, its got a solid foundation Nice welds and machining, OP! I know a retired Edelbrock machinist that has a similar throated casting that has a pretty ornate shrinker and stretcher head. OP's shop has similarities to his. |
|
|
|
|
[#6]
Thanks! I've been starting to dip my toes in the hobbyist machining world, just got my mill and lathe within the last year or so and I've been teaching myself to use them by building stuff that's intentionally overcomplicated. Definitely could've just driven the machine with a keyed shaft and a pillow block bearing from McMaster Carr, but without challenge there is no growth.
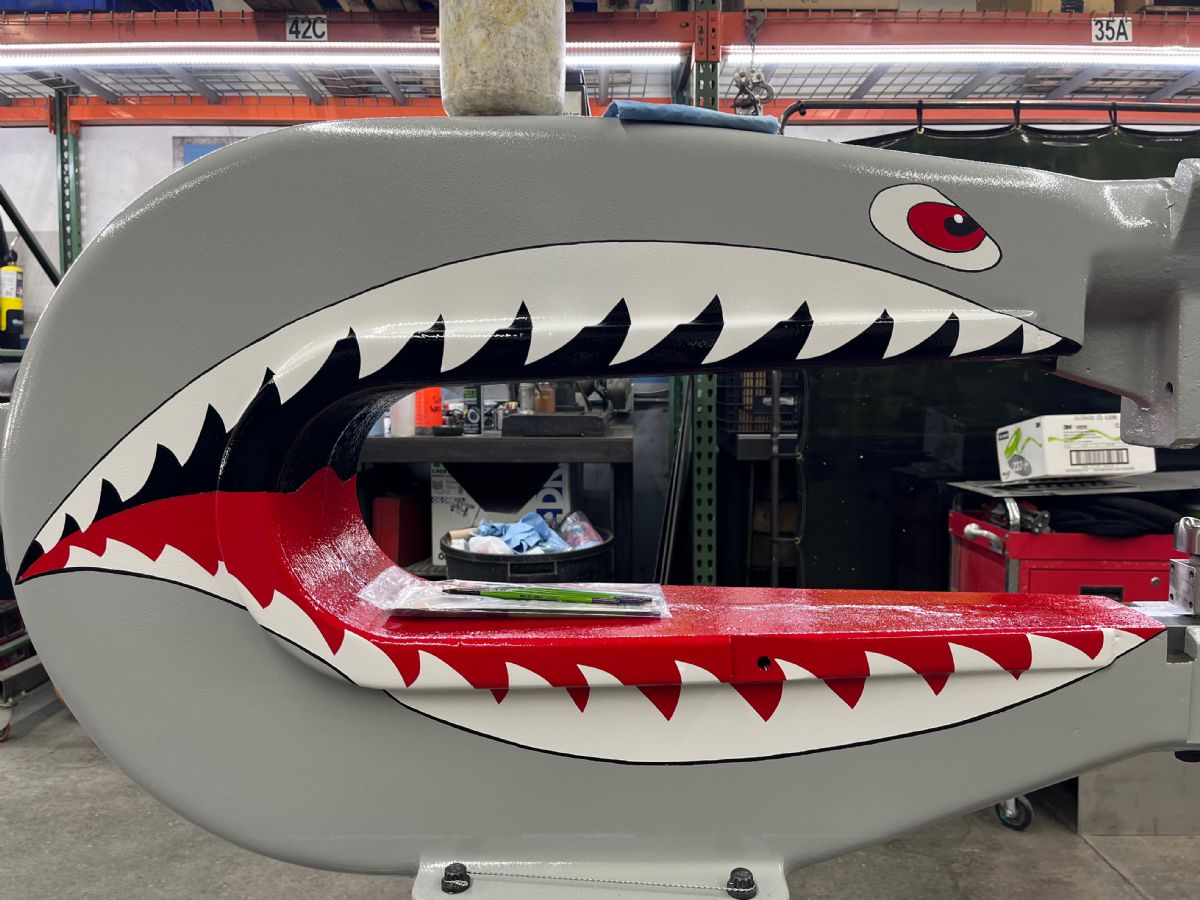
You're right about the machine's throat size - it would be pretty limiting for planishing anything but the smallest of parts, or maybe planishing welds on a relatively flat panel. I plan to use the machine primarily for shrinking. Here's a video from my friend Chris. At the 20:15 mark, he describes the function of the shrinking dies and shows the machine in action.  Metalshaping Fender Compound Curves Originally Posted By Cole2534: I love that cart, the fabricated truss/girder kicks ass. Thanks! The shape was inspired by a cast iron camelback straight edge, with maybe a little aviation influence in the flared holes. I'm planning on carrying an aviation motif into the paintjob, maybe include some gratuitous safety wired fasteners and drilled aluminum control handles, etc. A friend of mine restored this machine, and I told him I intend on stealing his paint scheme. 
|
|
|
|
|
[#7]
Just trying to keep the thread from being archived long enough that I can paint this thing and give it a final assembly.
I got rid of the plastic box on the side of the motor, turned the end cap in my lathe to remove all the ugly mounting tabs, then started building a new housing for the circuit board that controls the DC motor's speed. I eliminated the hall effect sensor that allowed variable speed via a mechanical linkage acting on a lever arm (embedded with a magnet.) The new aluminum housing will have a potentiometer to control fixed RPM, and a pair of switches: one to energize the motor circuit and another to switch from constant RPM to variable RPM via pedal control. I got a pedal for a Lincoln TIG and swapped its original potentiometer for one of the appropriate resistance to input the motor's controller. Waiting on an amphenol bulkhead connector to arrive so I can wire the TIG pedal to the controller. Another amphenol connector will be installed under the motor, allowing the machine's electrical system to be almost completely hidden from view within the casting. More to come, or not. Who cares?   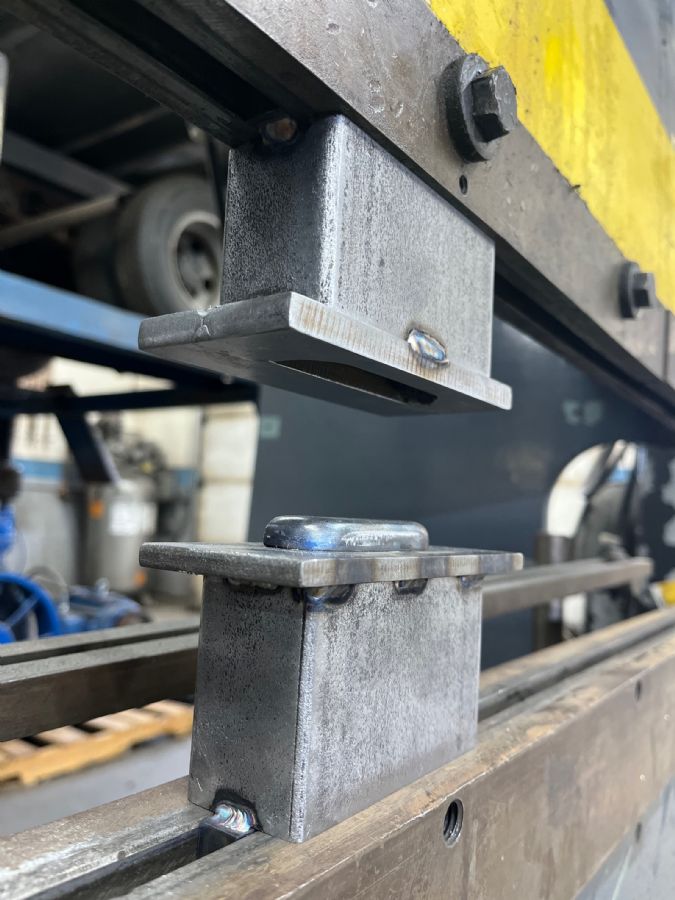 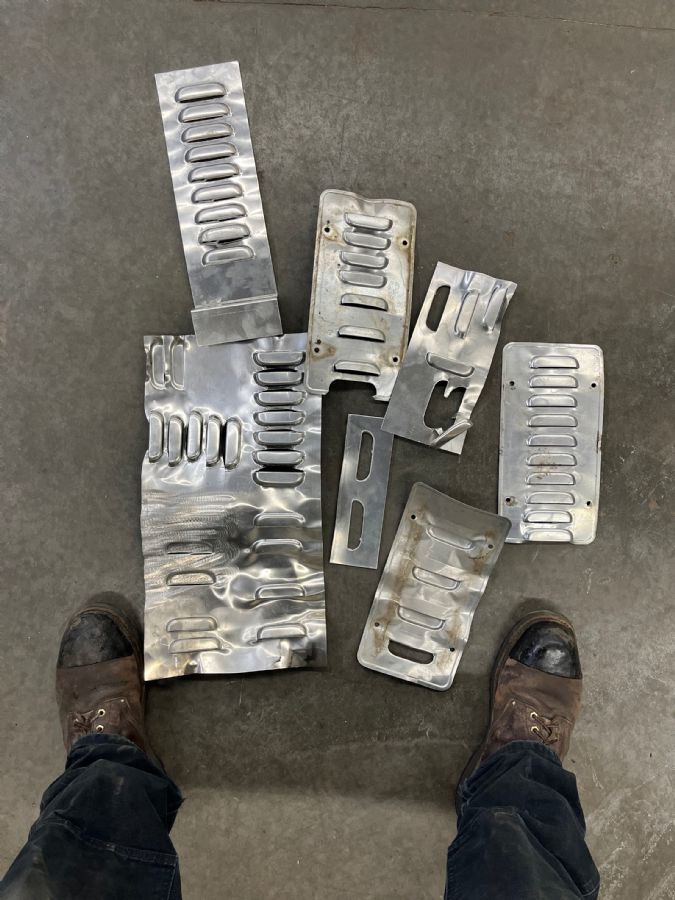  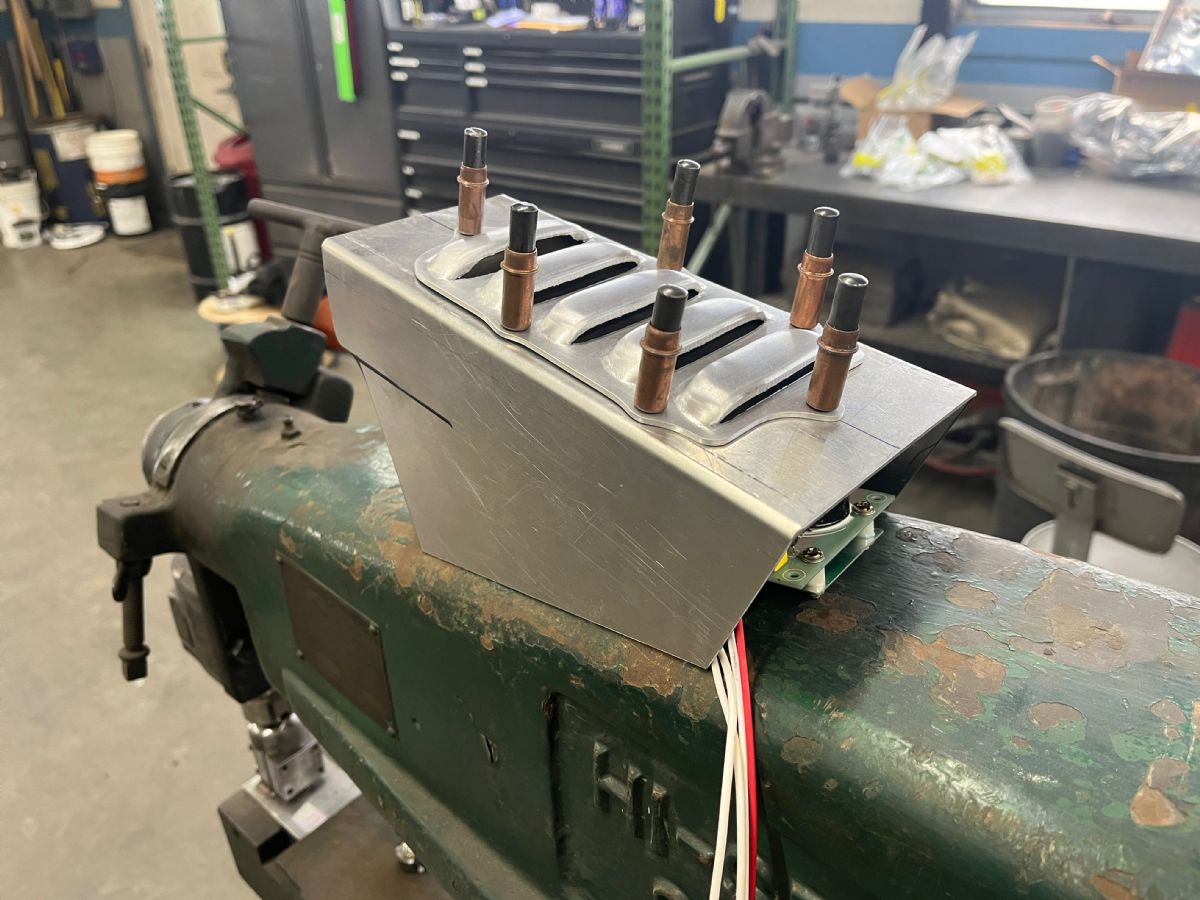  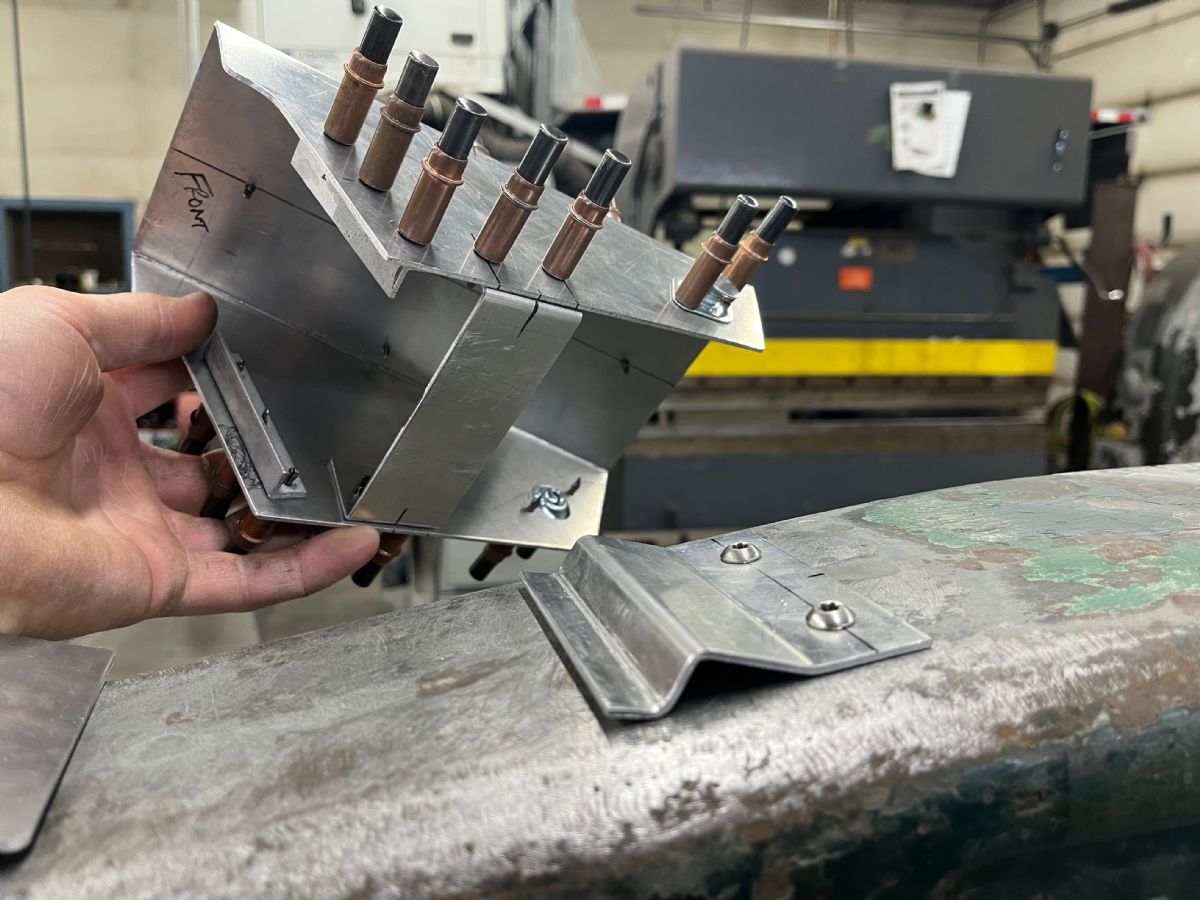   (The two wires that control motor speed via potentiometer.) |
|
|
|
UT, USA
|
[#8]
That's really cool 😎
|
|
|
|
[Last Edit: ColinDoyle]
[#9]
 I love mag drills.   It's got vertical stabilizers on the casters now. Foot pedal's 6-pin Amphenol jack is going to get mounted in that hole. 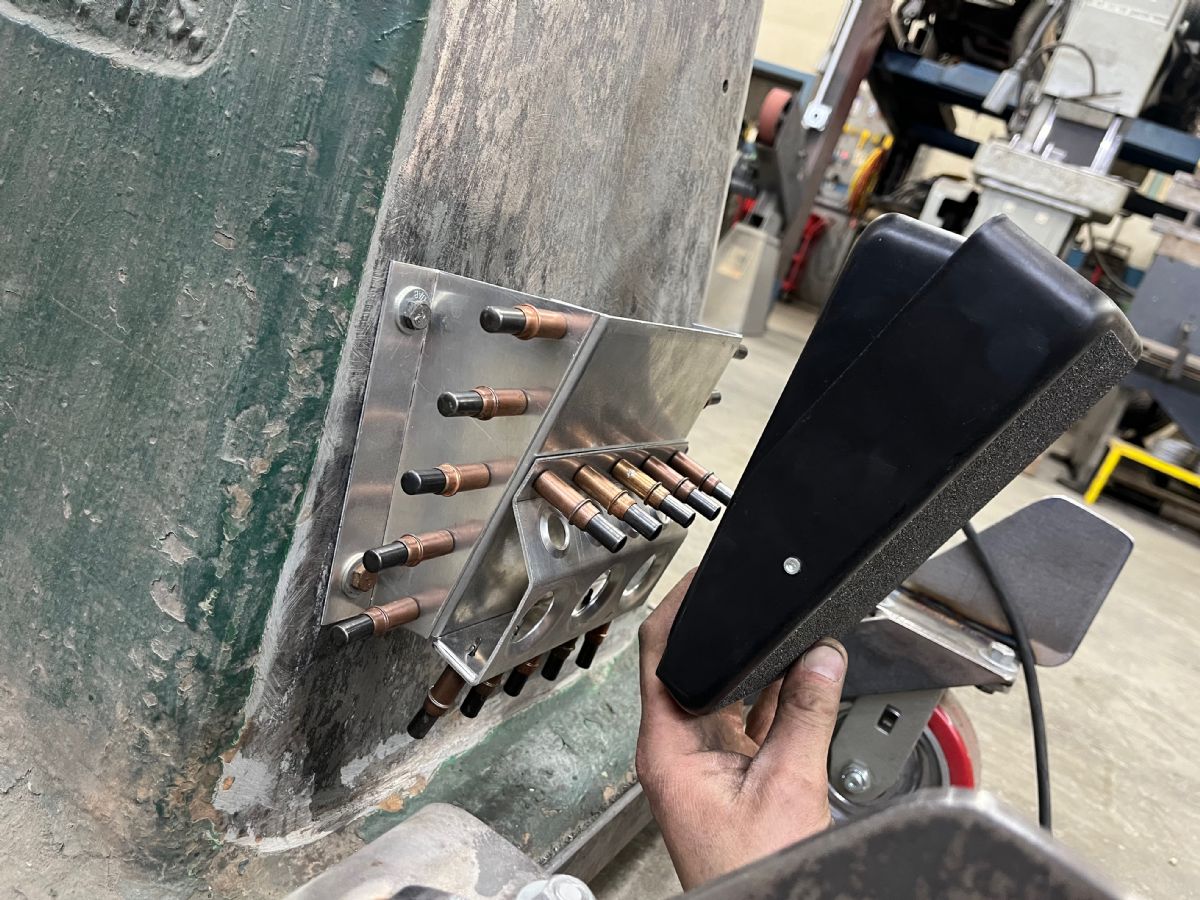 Pedal storage. Can't put it in there yet due to the Clecos. Still need to build a little cord hanger to mount above it. Hope I can fit a bucking bar in there. 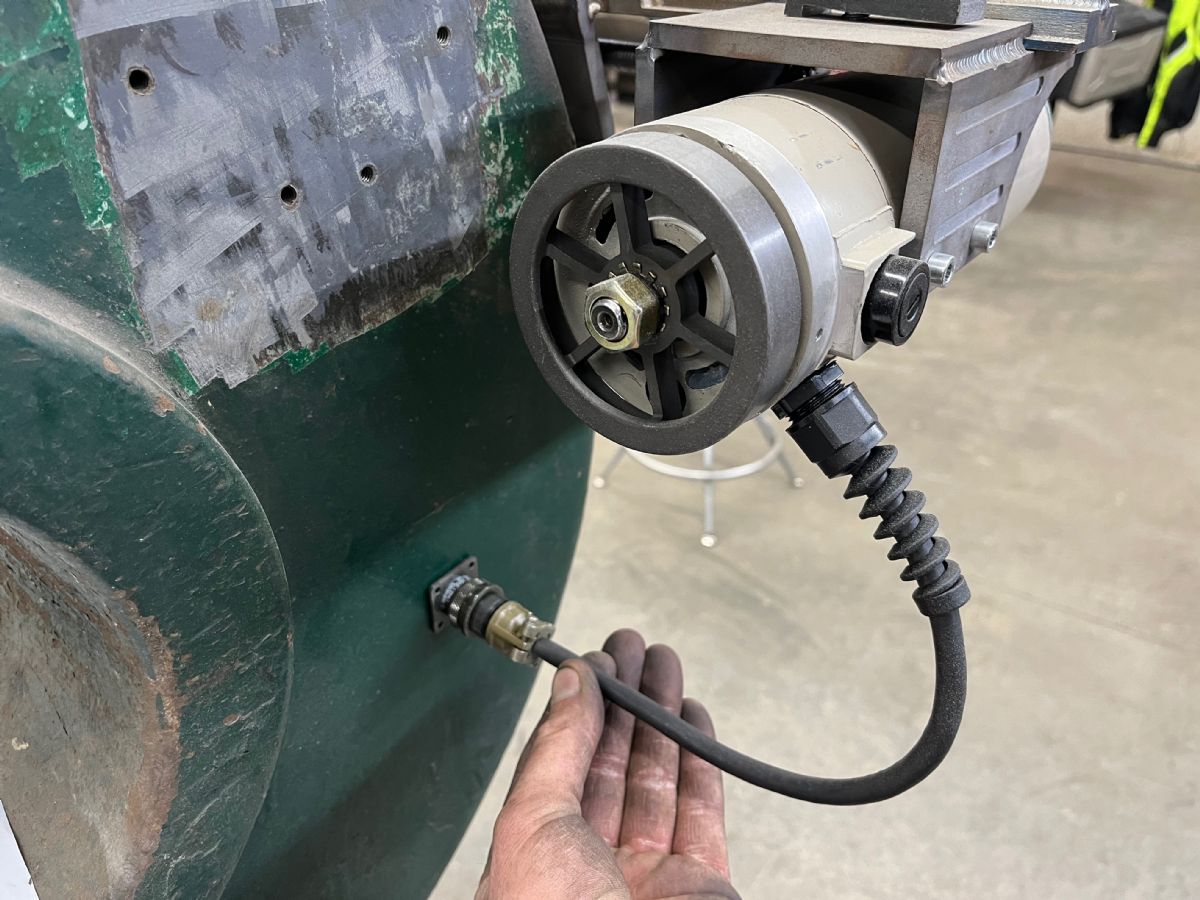 Motor with strain relief and 2-pin Amphenol plug. Trying to conceal as much wiring as possible within the machine's casting. 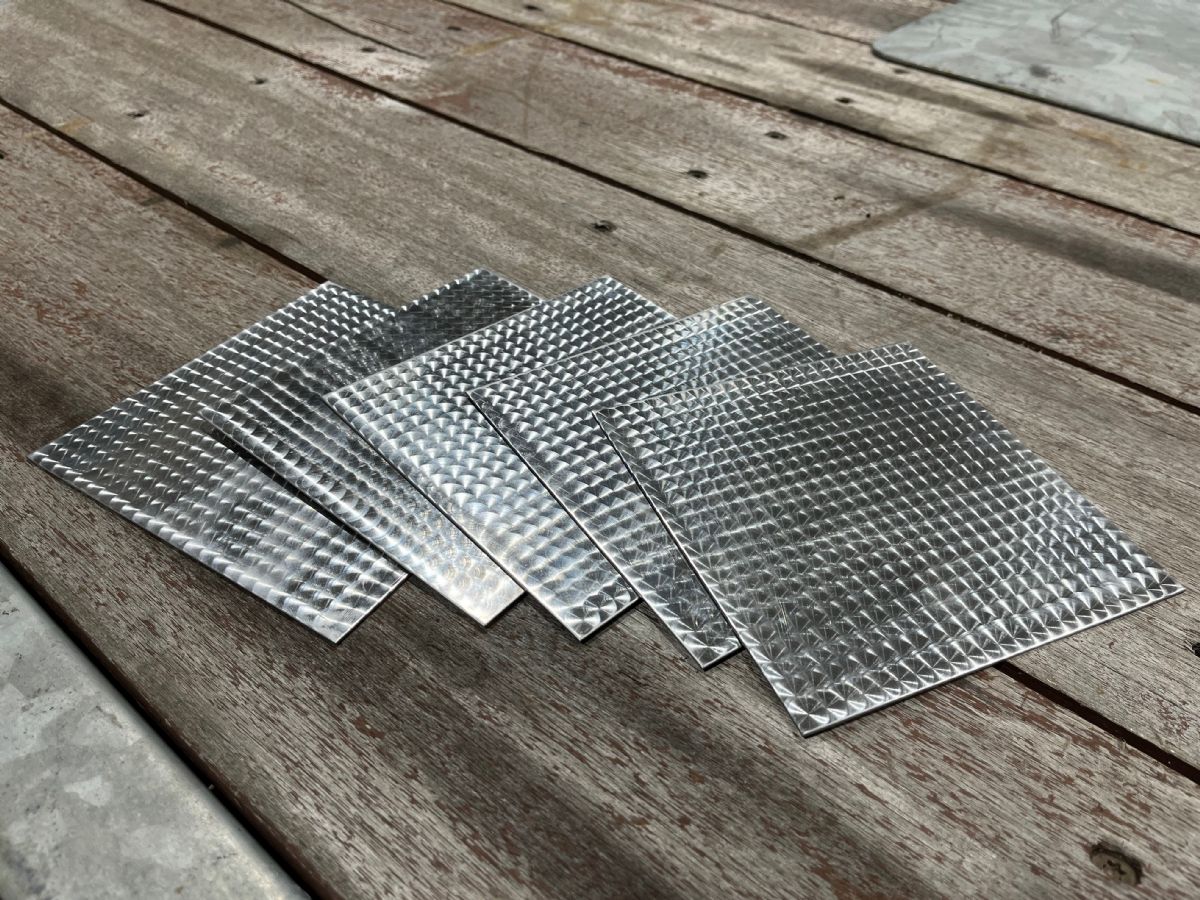 Got a 1/2-inch Cratex abrasive stick and jeweled five of these 6x6 stainless sheets. I'm planning to spray one of them with molybdenum spray and laser etch it with the graphics pictured below, and then trim it and use it for the faceplate of the motor controller housing. Hopefully I don't screw up more than once or twice, but I've given myself five chances. 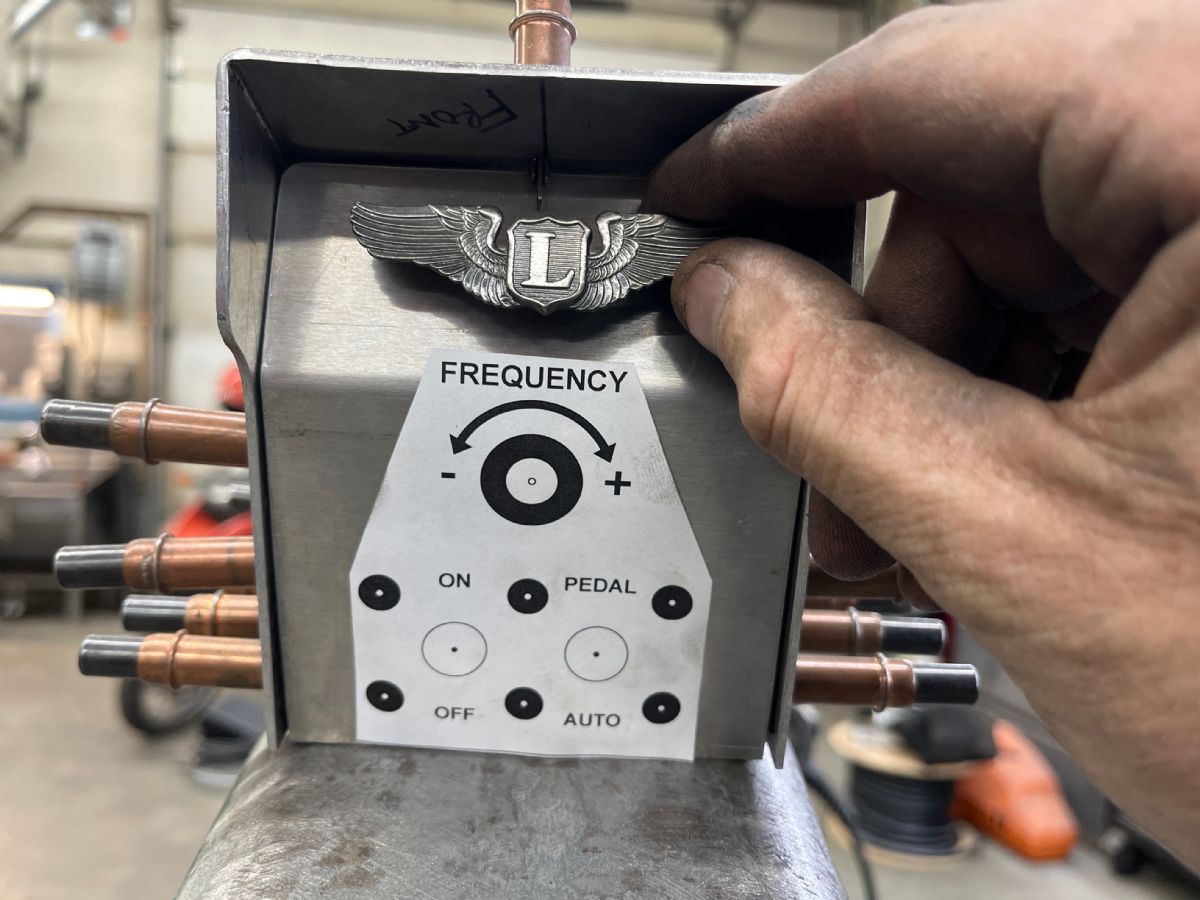 Almost ready to tear it down, strip it, and begin the paintjob. Lots of bondo on the casting... looks like some barbarian took a big grinding stone to it before it received its signature 1970s pea green paintjob. More later? |
|
|
|
|
[#10]
Oh what the hell, I'll do it tonight.
    Batteries died in my earbuds, didn't have that grimy 4/4 boom bap beat to sync my dabs, weld consistency suffered a bit as a consequence. Making progress; at least I'm not dipping my tungsten as much anymore! |
|
|
|
|
[#11]
Great stuff.
|
|
|
|
|
[#12]
Everything in this thread makes me smile.
|
|
|
|
|
[#13]
Thanks, that's the idea! A friend of mine says, "Put soul into your tools and they'll put soul back into your work."
Yesterday, I visited my friend with the laser engraver and we etched a few of the stainless sheets. Today, I bucked a bunch of rivets, re-contoured the tip of my cord hook, and trimmed the control box's engine-turned faceplate to size: 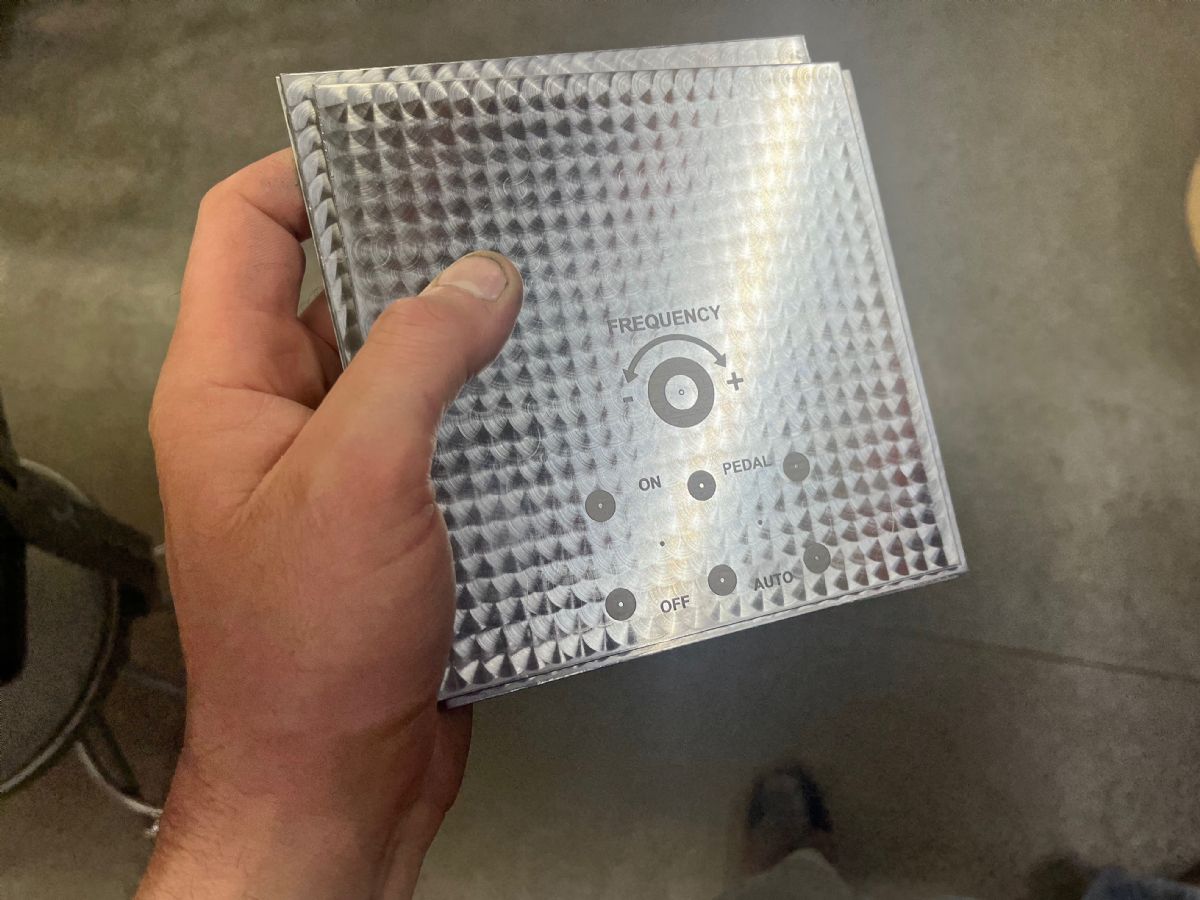 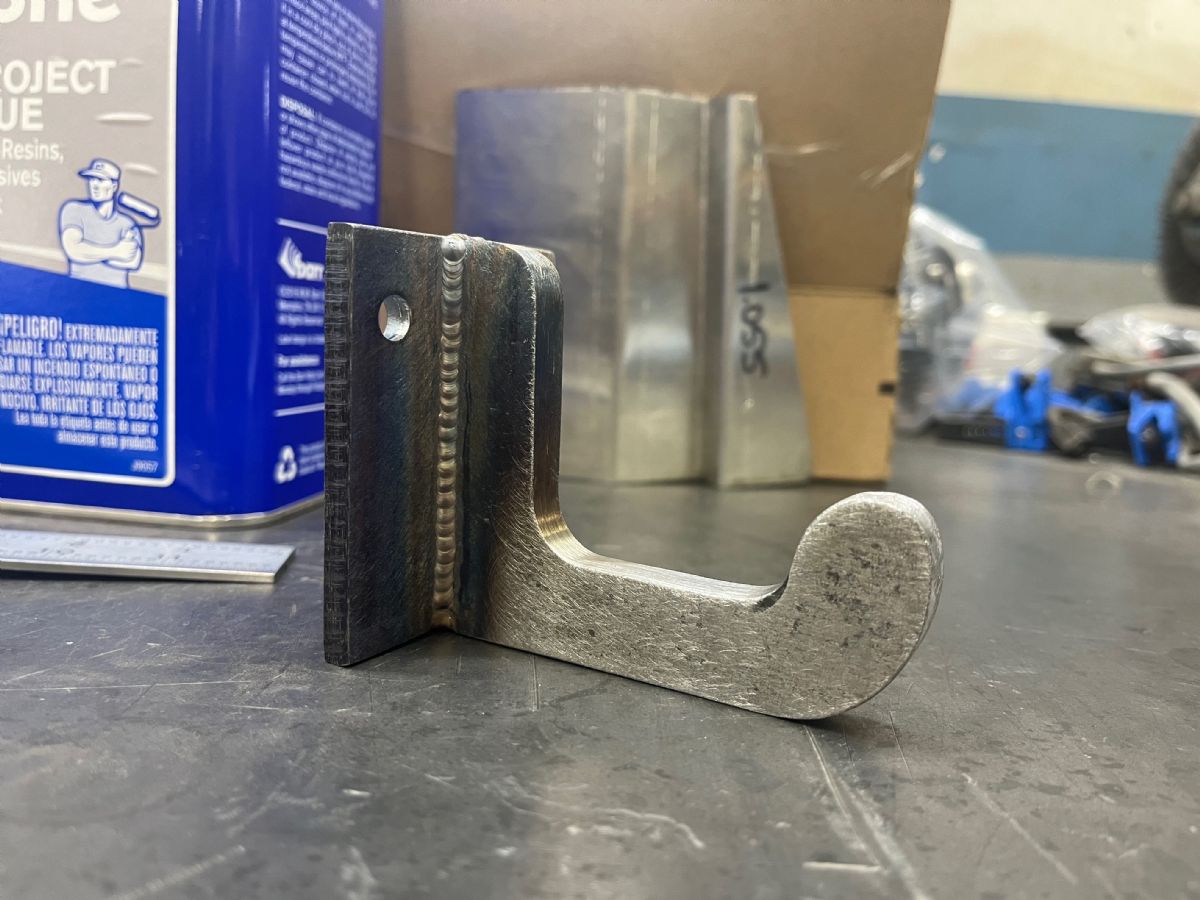 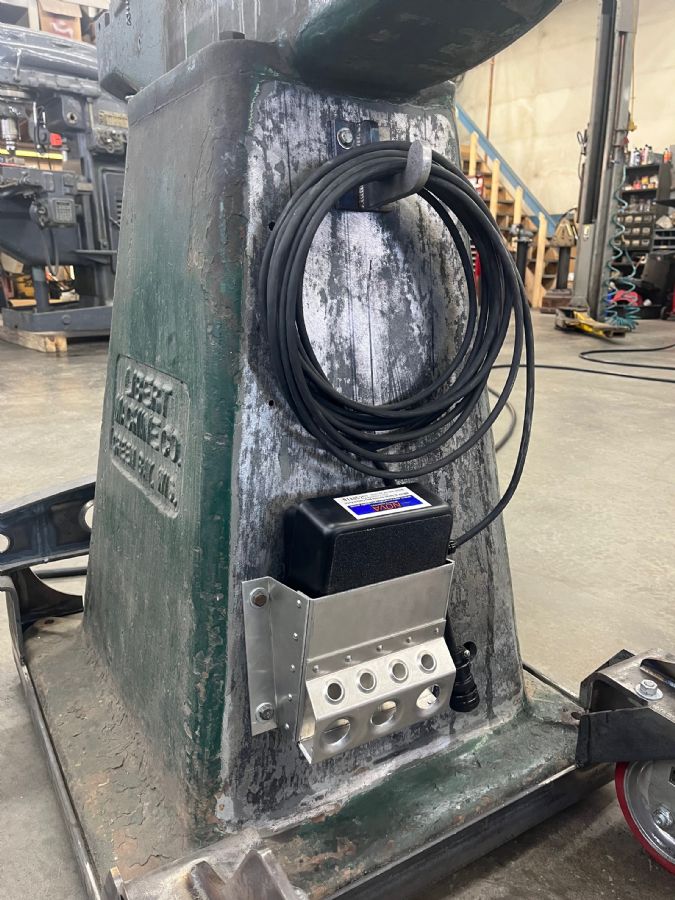 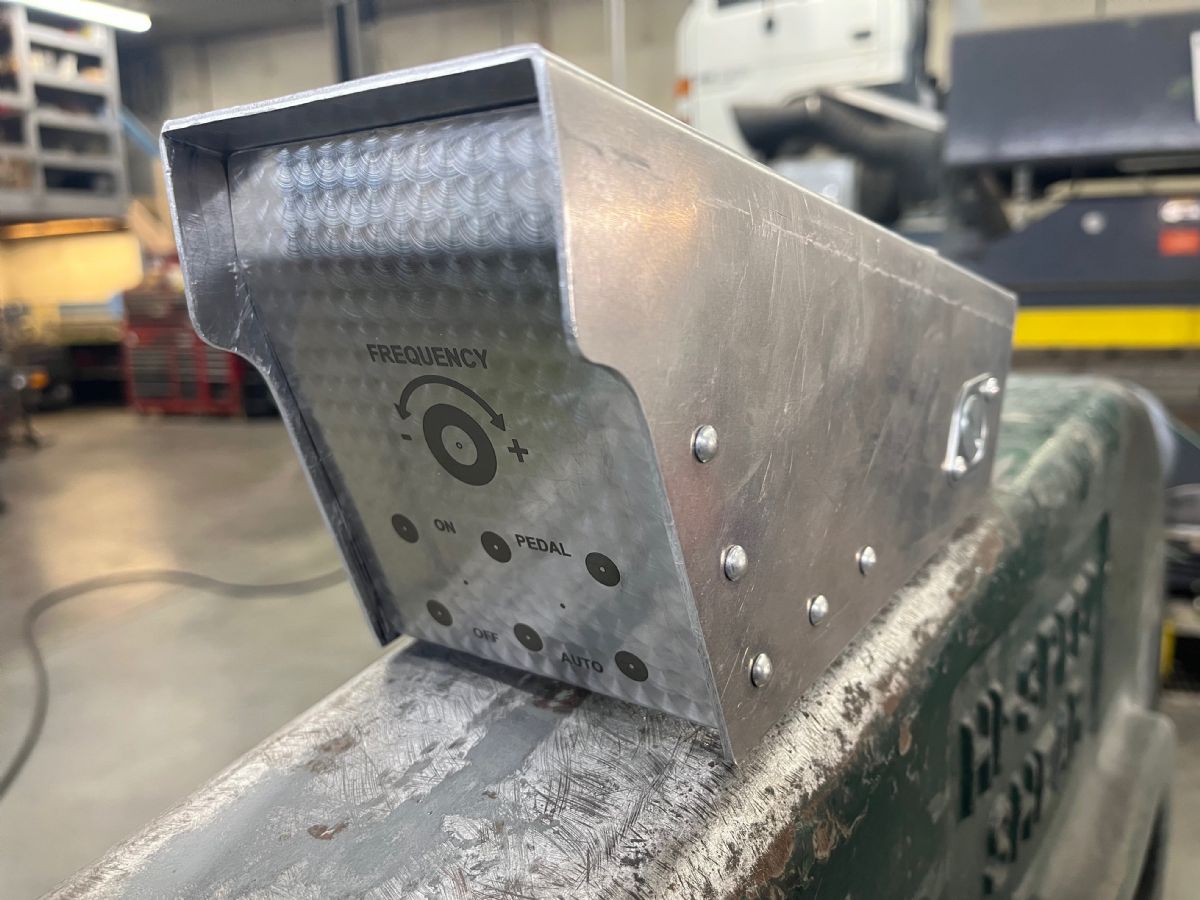 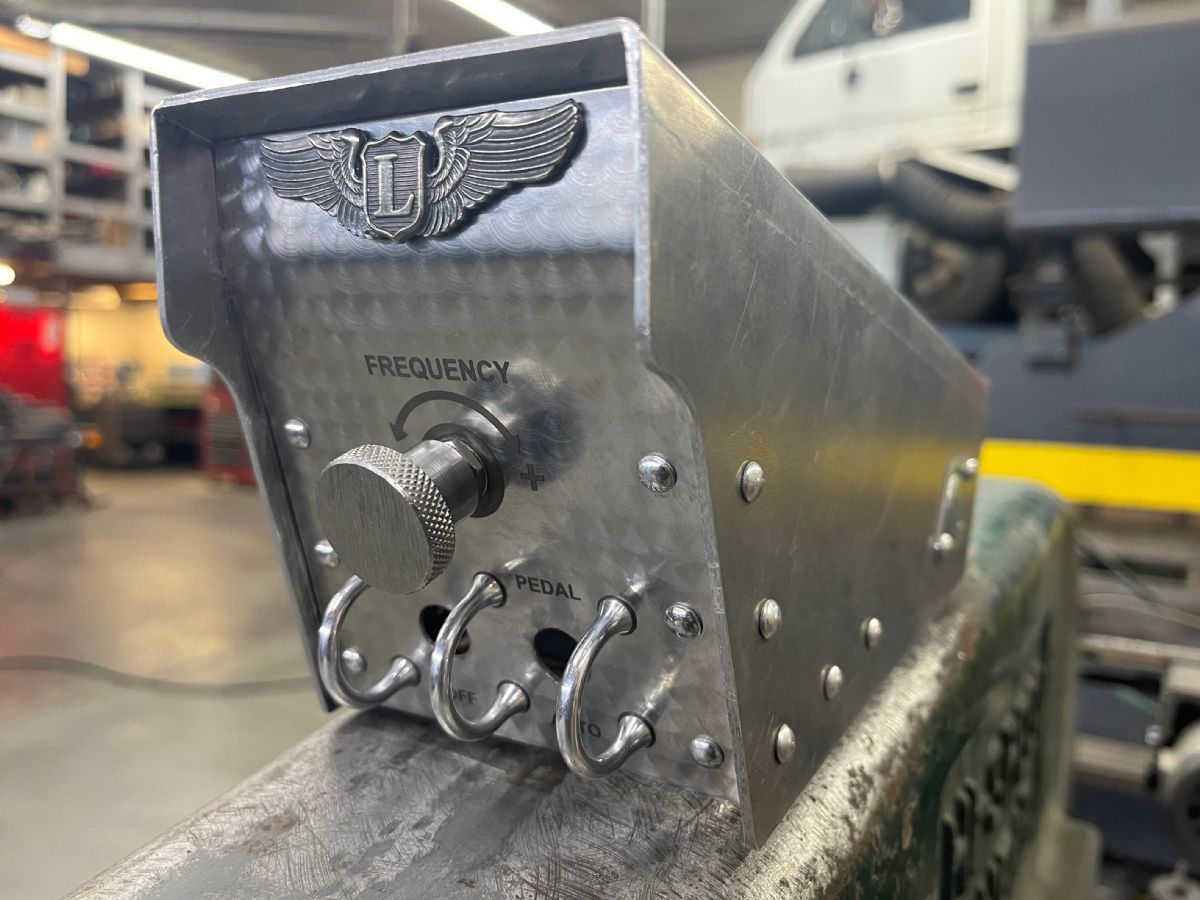  
|
|
|
|
|
[Last Edit: ColinDoyle]
[#14]
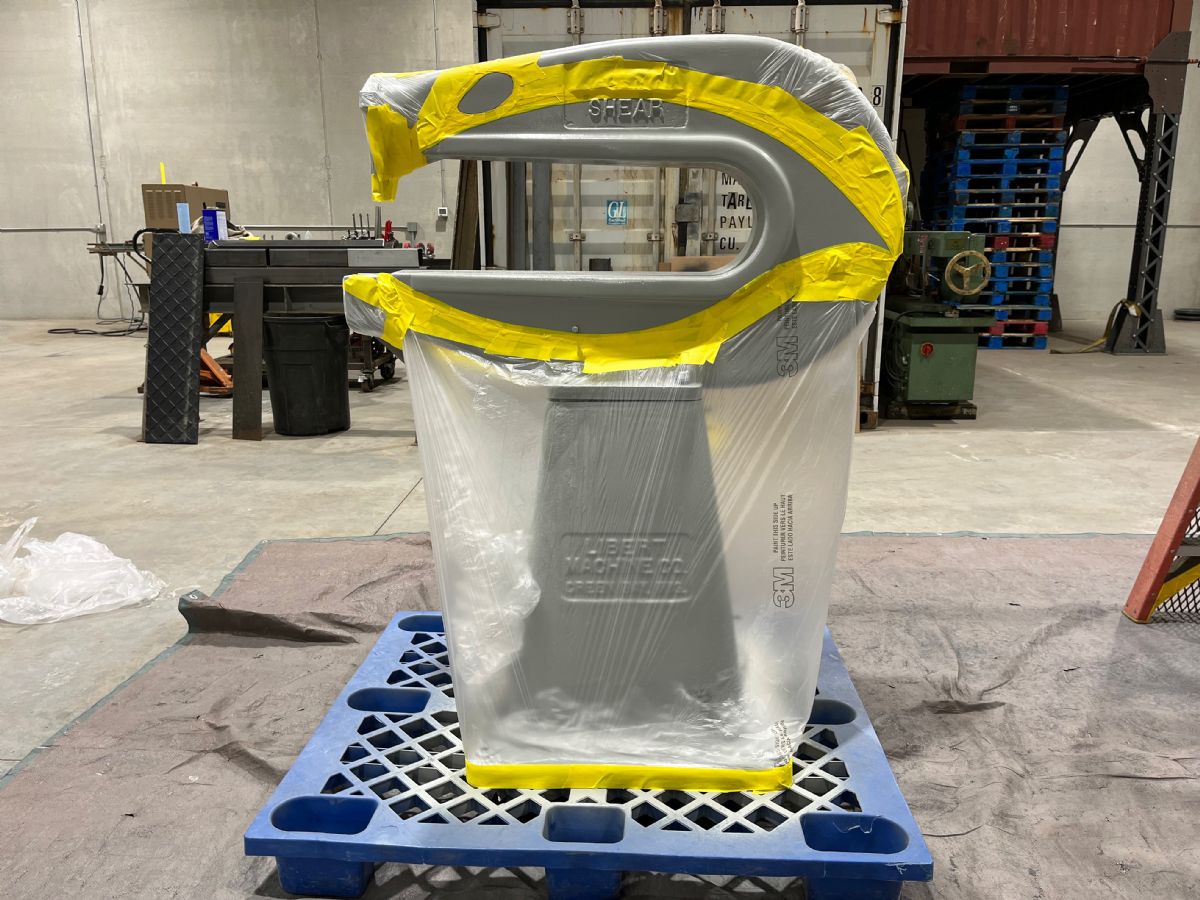
 I'm clearly not an electrical engineer.  Decapitated  Gave her a little what-for with the pressure pot blaster. Lots of body filler. 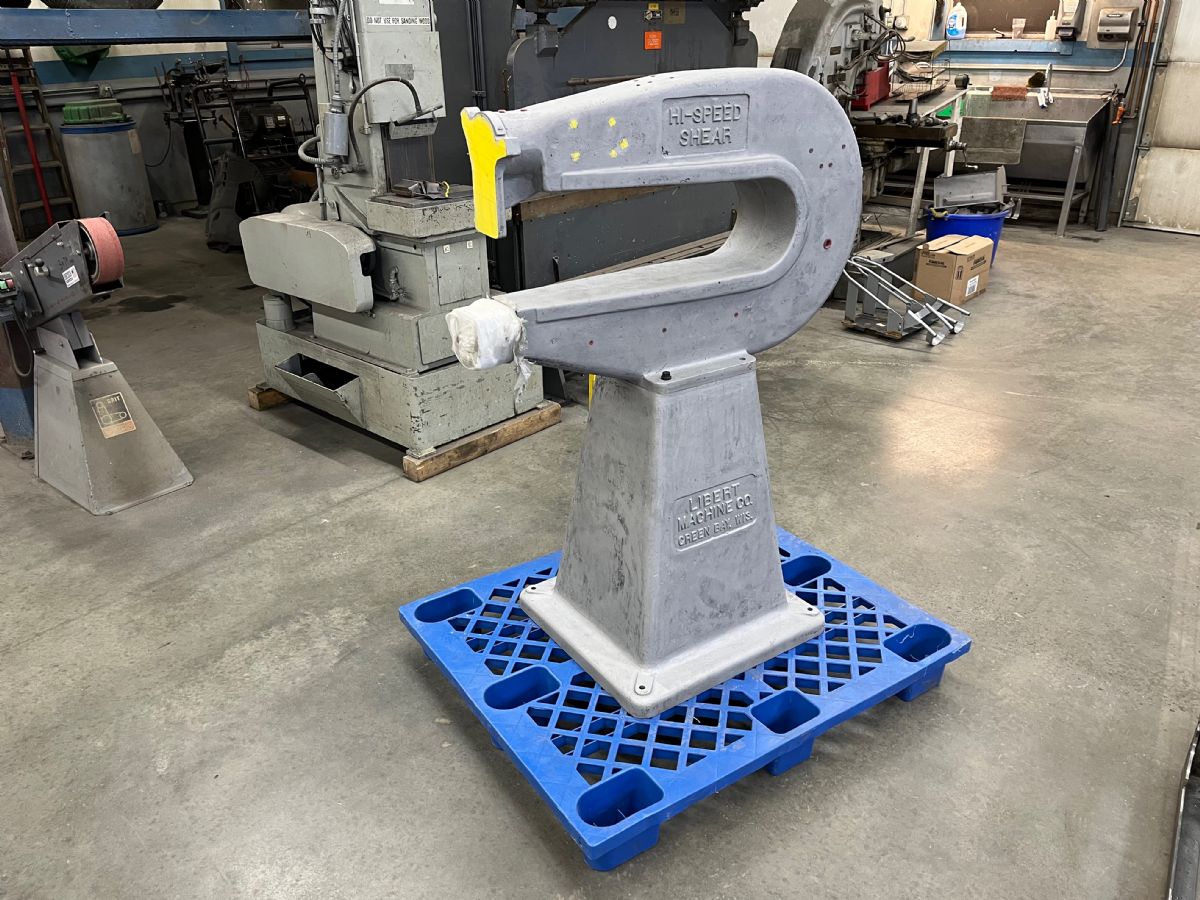 The pea green has been vanquished.  Next: skim coats of filler, lots of buzzing with the DA sander, probably some Slick Sand polyester primer, then a coat of battleship gray single-stage industrial urethane. Then graphics. Working a bunch in the coming days, progress will be slow. |
|
|
|
|
[#15]
Free time has been extremely scarce.
 Evercoat  Slick Sand  Nason Ful-Thane (applied over some texturizing spray)  Doodles 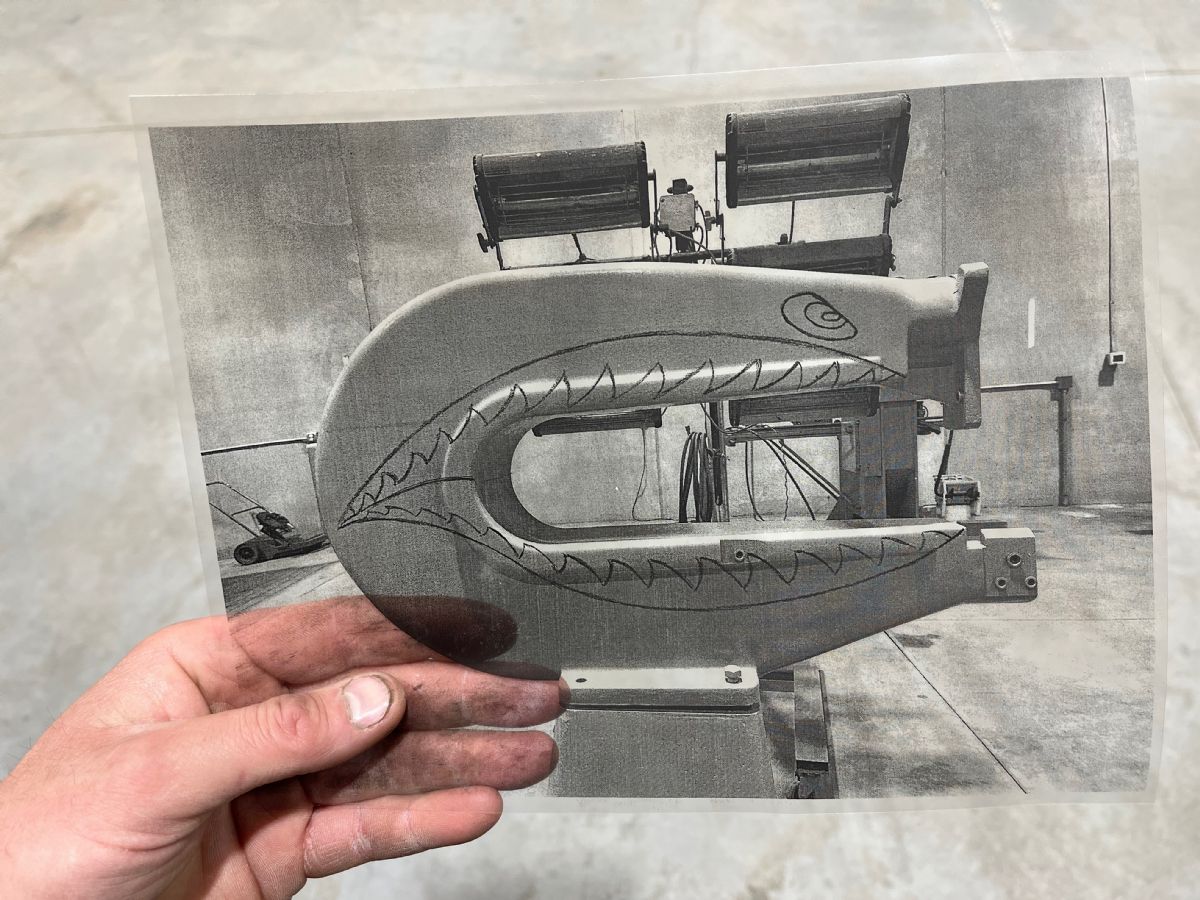 Doodles copied onto overhead transparency film.  The $5.00 overhead projector I picked up at an equipment auction, prompting all my friends to tease me.  Kinda lined up. I've got a lot of fine line tape and Mack pinstriping brushes to drag. Hopefully I'll make some more headway this week. |
|
|
|
|
[#16]

|
|
|
|
|
[Last Edit: ColinDoyle]
[#17]
    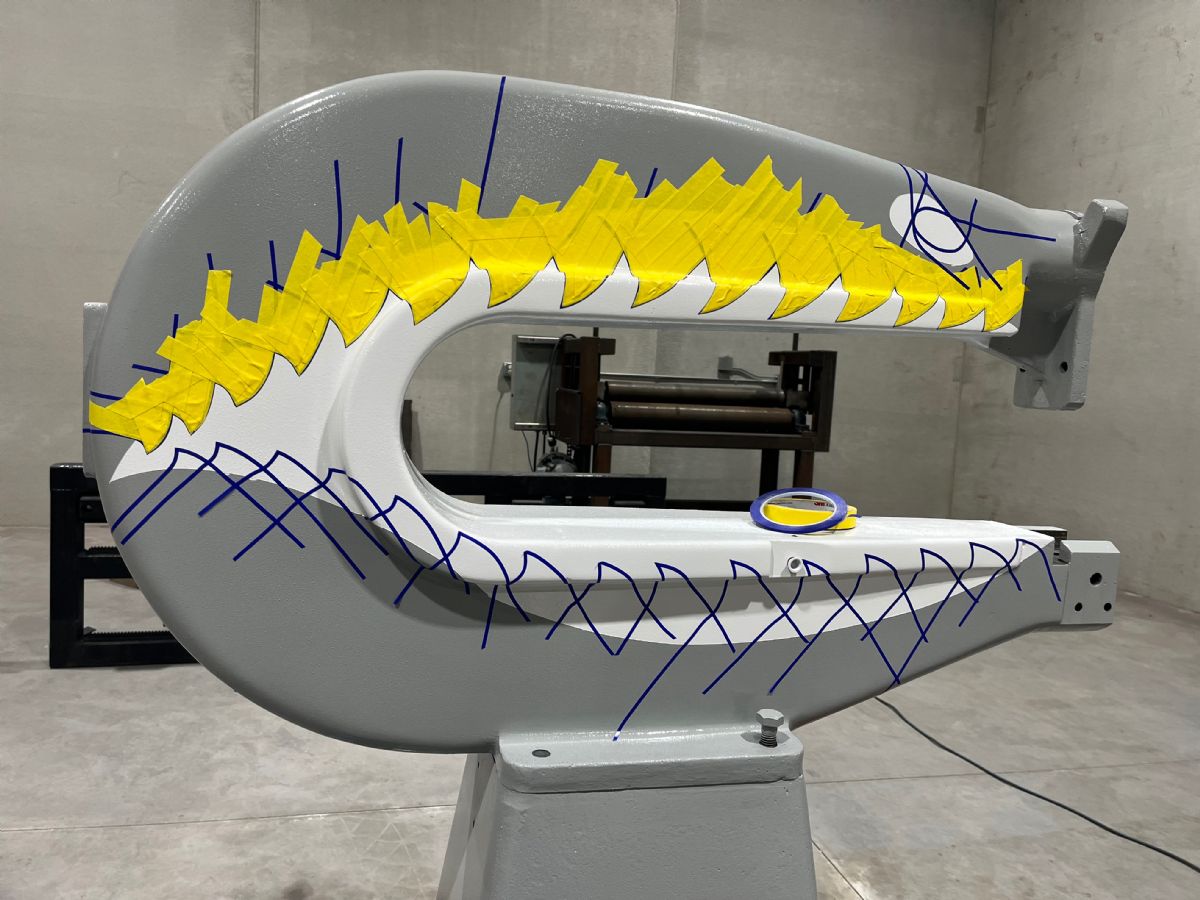  Working on tracing the projection with fine line tape on the second side right now. Goal is to spray red by the end of the day. This has deviated quite a bit from "Personal Interests > Metal Working." Edit: goal achieved 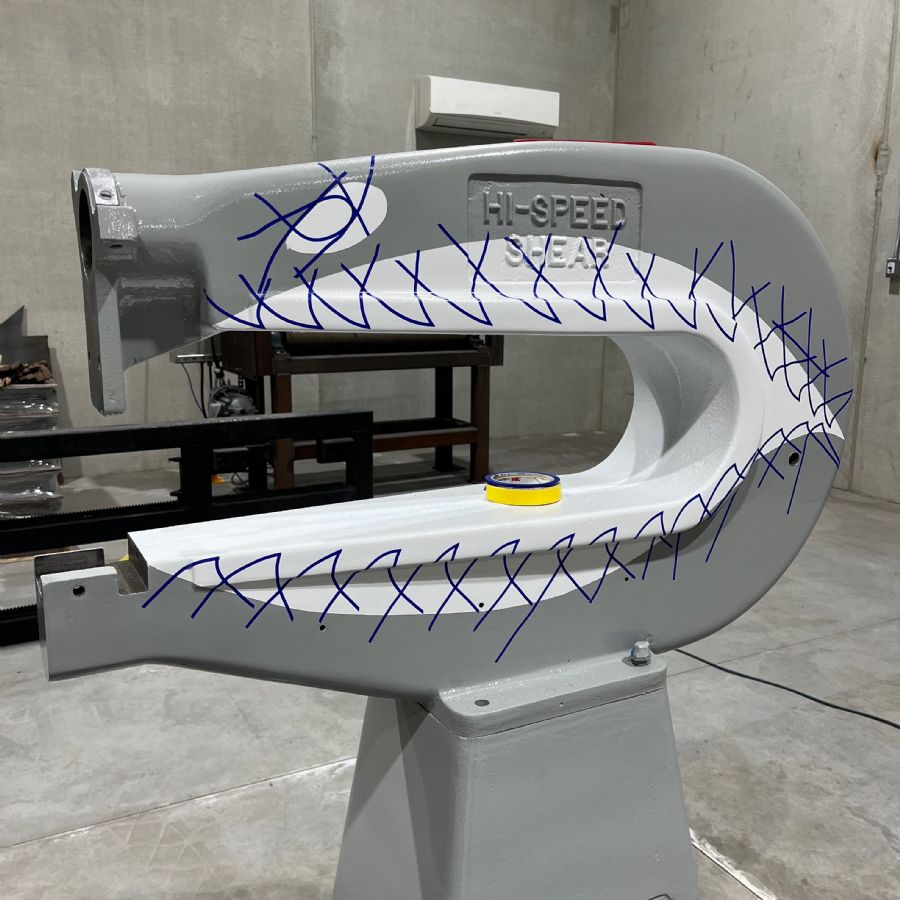  
|
|
|
|
|
[Last Edit: ColinDoyle]
[#18]
  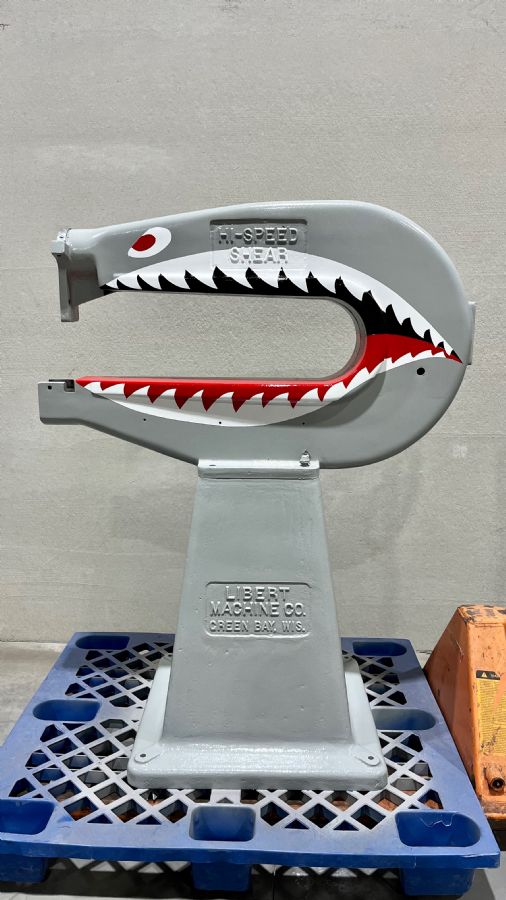 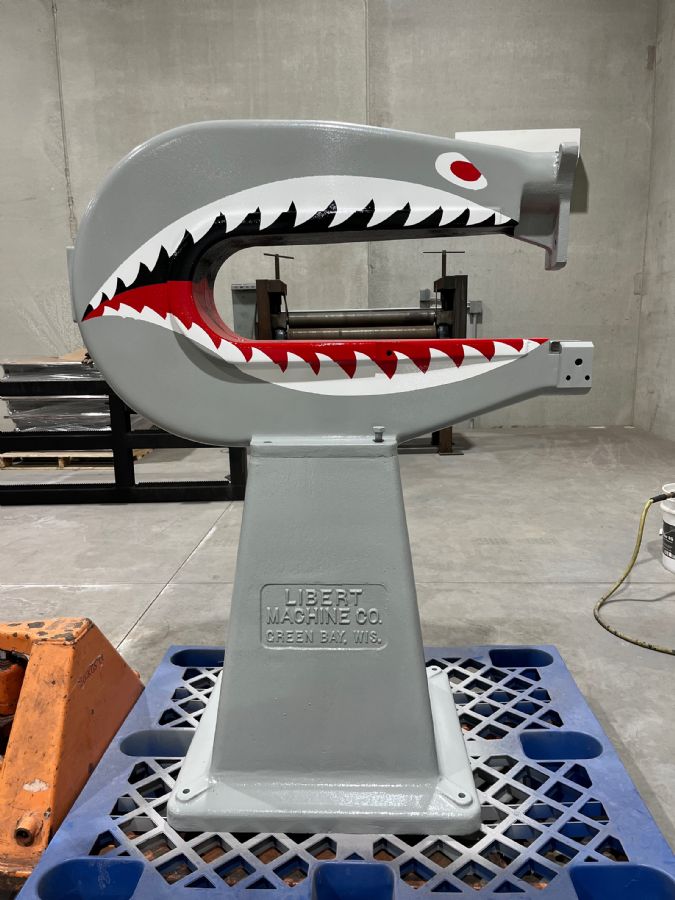 Need to wet a pinstriping brush and add pupils, then trace the graphics to sharpen up some fuzzy outlines. 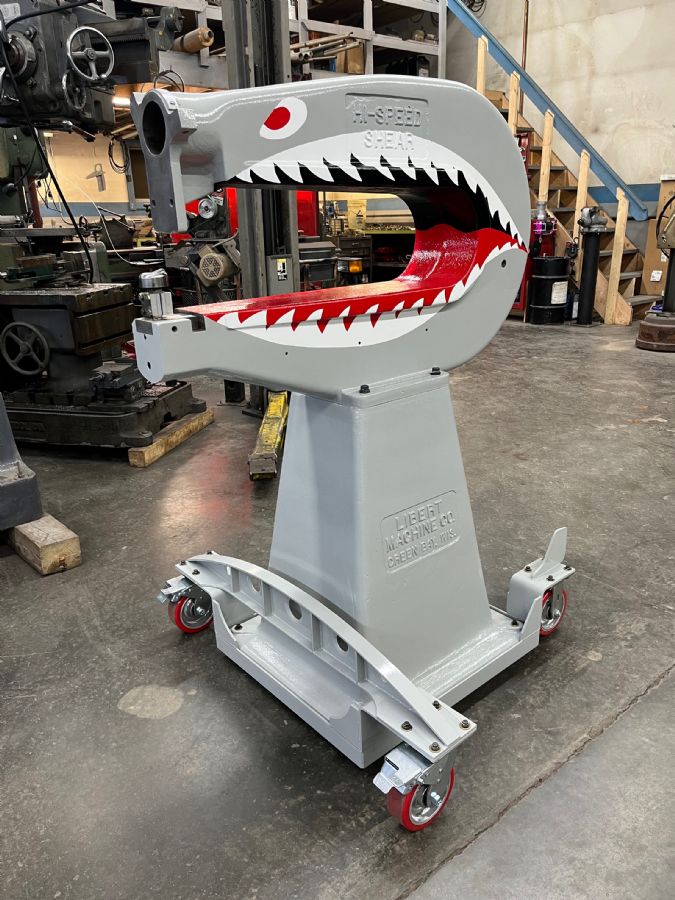 Pedestal looks a little plain. Might airbrush some riveted panels and paint a pinup girl on the front.  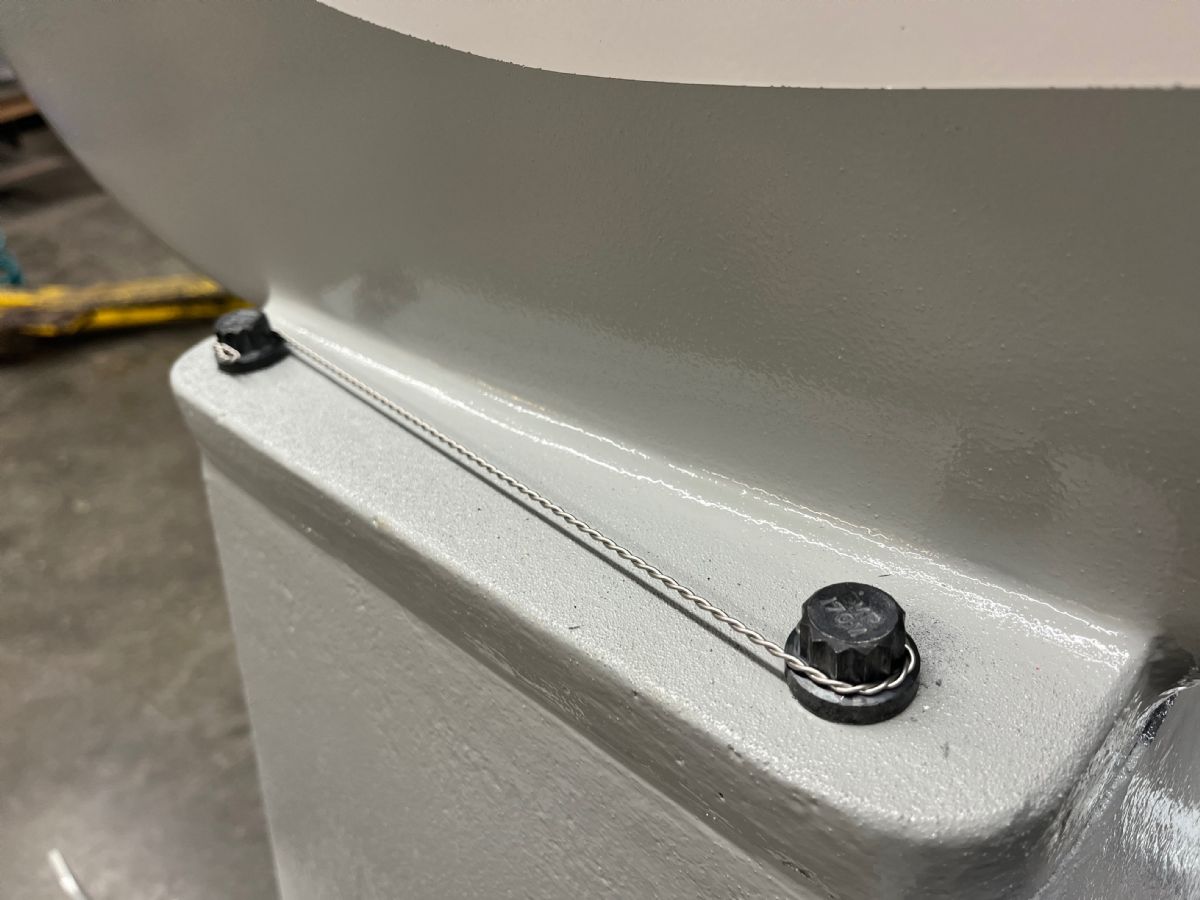  Is it even aviation-inspired if you don't use a bunch of 12-point bolts and safety wire? The caster bolts have individual nuts on the back, so the wire is completely pointless but I like the appearance.
|
|
|
|
|
[#19]
  Utmost respect for pinstripers, dragging a brush is maddening. Reminds me of my first time TIG welding, just auguring the tungsten into the puddle time after time. |
|
|
|
|
[#20]
     Turns out shading is difficult. I made that hottie look like Leslie Mann with a bad case of rosacea. 
|
|
|
|
CO, USA
|
[#21]
That's looking good! Are you left handed by chance?
|
|
|
|
[#22]
Thanks!
I'm right handed, but I've been kneeling, standing, and everything in between to access the pinup girl from various angles. |
|
|
|
CO, USA
|
[#23]
I hear you there. I noticed you take pictures with both hands (I usually take everything right handed). So I was wondering if you were left handed or ambidextrous. But after your response I looked and your tig puddles are all right handed (torch in right hand).
You have a heck of a shop to work in. |
|
|
|
[#24]
I'd like to get better at TIG welding left-handed, but haven't devoted much practice to it.
I documented the shop build in this archived thread: https://www.ar15.com/forums/General/-97-Tacoma-plow-truck-on-a-galvanized-frame-and-now-a-big-shop-build-thread-/134-2504116/ |
|
|
|
|
[#25]
OP, I guess I missed this thread until now. Cool project. Your metal work always looks badass.
|
|
|
|
|
[#26]
Thanks!
|
|
|
|
|
[#27]
  First time painting with a brush since elementary school art class. Learned a lot! |
|
|
|
|
[#28]
For not being an Artist you did Damn good. You could have painted nose art on military aircraft.
Hmmmmmm a second vocation perhaps? EBR |
|
|
|
|
[#29]
Best thread on the internet.
Outstanding! |
|
|
|
|
[#30]
Hah, thanks!
Glad I'm done with the pinup girl; I was getting tired of staring at her stupid face. |
|
|
|
|
[Last Edit: ColinDoyle]
[#31]
(Bump to avoid the thread auto-archiving.)
I'm not quite done painting yet. I cut out some vinyl masks on my plotter and I was planning on decorating the pedestal with faux riveted panels like an aircraft skin. I dug out the Vega 2000 airbrush I purchased in college and found that the air needle was hopelessly sticky and leaky, even after a good long soak in lacquer thinner in the ultrasonic cleaner. I probably used the airbrush once when it was new circa 2005, then cleaned it poorly and stuffed it in the toolbox until this week. New air needle is en route. In the meantime, I finally took some time to paint the engine guards I built for my R1200GS last August. Both the paint and the tubing was left over from other jobs. Nice mixture of stainless and mild steel, so please forgive the birdshit MIG welds and spatter pebbles. I had to fill a couple gaps caused by some pretty ugly fit-ups, tried to use those Irwin Quick-Grip clamps and Gear Tie things to balance all this shit in 3D space long enough to confirm fitment and tack it. I was pulling my hair out trying to make the cage symmetrical left to right and then I finally realized -no shit- that the right and left cylinders are staggered by an inch or so to allow the connecting rods to attach to a common crankshaft. Couldn't see the forest for the trees, staring at 1/16-inch graduations on a tape measure while the discrepancy is plain as day if you take a step back.       Riding over to the regional airport this afternoon to take an exploration flight in a Cessna 172 and talk to a CFI about starting to train for a private pilot license. This ADHD shit is no joke.
|
|
|
|
|
[#32]
Gotta bump this mofo... I promise I'll get back to the Libert after these distractions.
Working toward my private pilot license now, and building a counterfeit rimfire CMMG Banshee on an 80% lower:     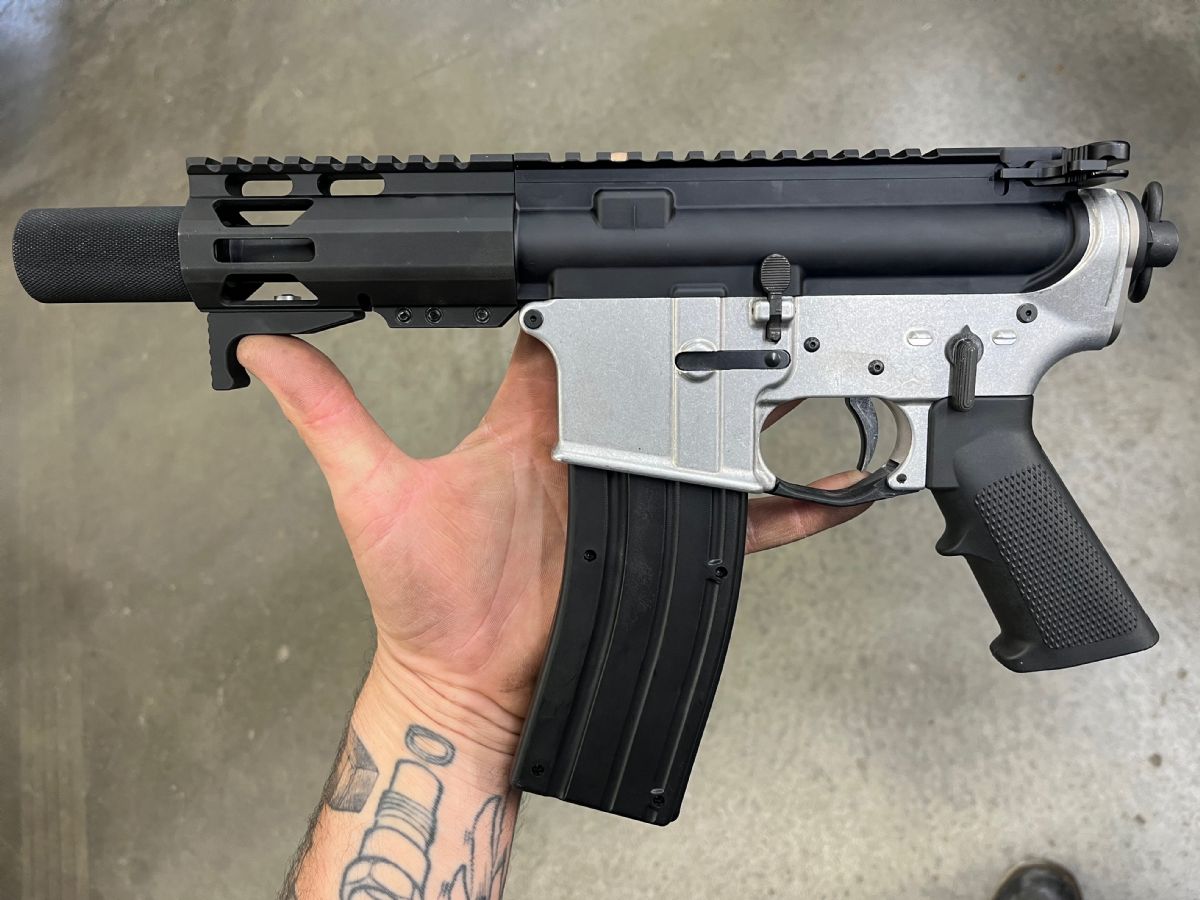 @schornstinefager It's been a while since we spoke, but I'm still hoping to send it your way for engraving and plating... start brainstorming some scrollwork |
|
|
|
|
[#33]
Big billboard 👍🏻
|
|
|
|
|
[#34]
Yessir! I found the slickside 22 upper and blocky handguard exactly for that reason.
|
|
|
|
|
[Last Edit: schornstinefager]
[#35]
Bomber pinup girli on Rivit panels peeking thru scroll cloud background ? Might be cool 😎. Or maybe something based off of Bender the robot ?
|
|
|
|
|
[#36]
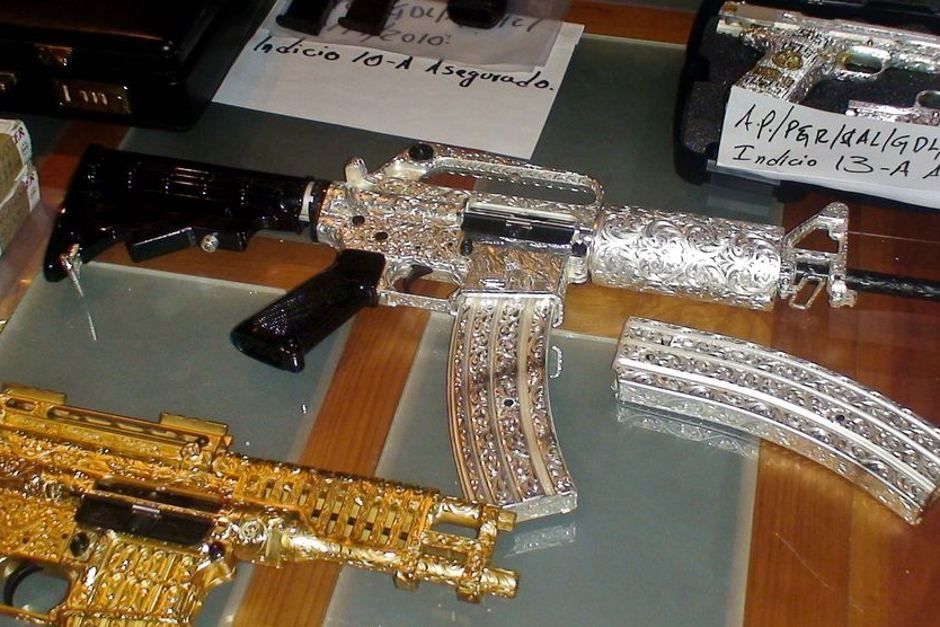
Maybe just an assload of deep filigree like these seized cartel pieces.
|
|
|
|
MN, USA
|
[#37]
I don't know where you're at, but that looks like a shop I wouldn't mind hanging out in. What's with all the containers and precast ceiling?
|
|
|
|
[#38]
I'm a little west of St. Cloud.
Here's an archived thread where I posted some info about the shop build: https://www.ar15.com/forums/General/-97-Tacoma-plow-truck-on-a-galvanized-frame-and-now-a-big-shop-build-thread-/134-2504116/ The containers are going to be my office. I haven't made much progress on finishing the shop interior lately - we've been short-staffed at the family business for the last couple years and I've been working a ton of hours driving delivery routes and stuff. Plus I have a bad habit of getting distracted by side projects. Nice to have a climate controlled workspace out of the weather for now, finishing the buildout is my ~10 year goal. |
|
|
|
|
[Last Edit: schornstinefager]
[#39]
Fillagre it is then….keep in mind gold plating is expensive i was qouted 9-1300 on a smith revolver a few weeks ago maybe nickel or hard chrome ?
|
|
|
|
|
[#40]
Yeah, I'm leaning toward nickel on the upper, lower, and handguard. The rest will be left black.
|
|
|
|
|
[#41]
You need to send me a older metal mag as well
|
|
|
|
|
[#42]
For display purposes only, unless I can find an aluminum .22LR magazine.
|
|
|
|
|
[Last Edit: schornstinefager]
[#43]
Originally Posted By ColinDoyle: For display purposes only, unless I can find an aluminum .22LR magazine. Geez from the shop I would’ve thought you could’ve modified one |
|
|
|
MN, USA
|
[#44]
Only a 3 hr drive.
|
|
|
|
[Last Edit: ColinDoyle]
[#45]
 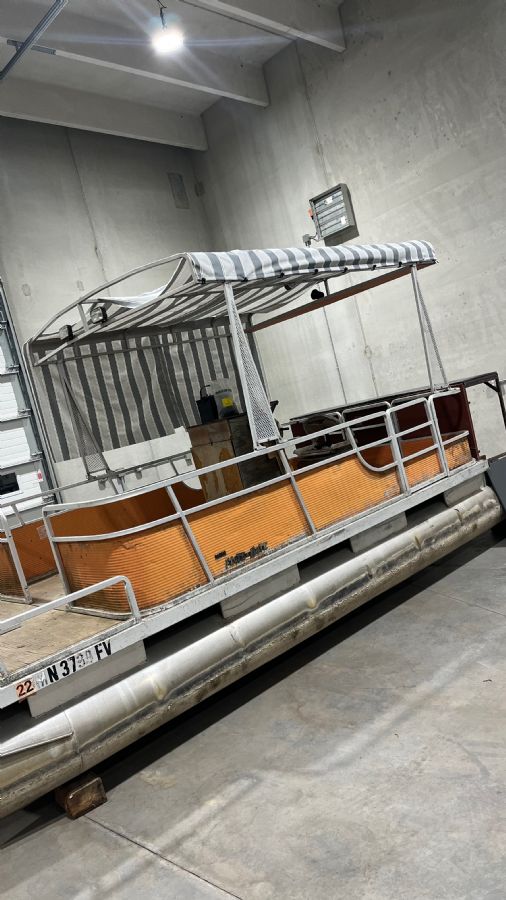 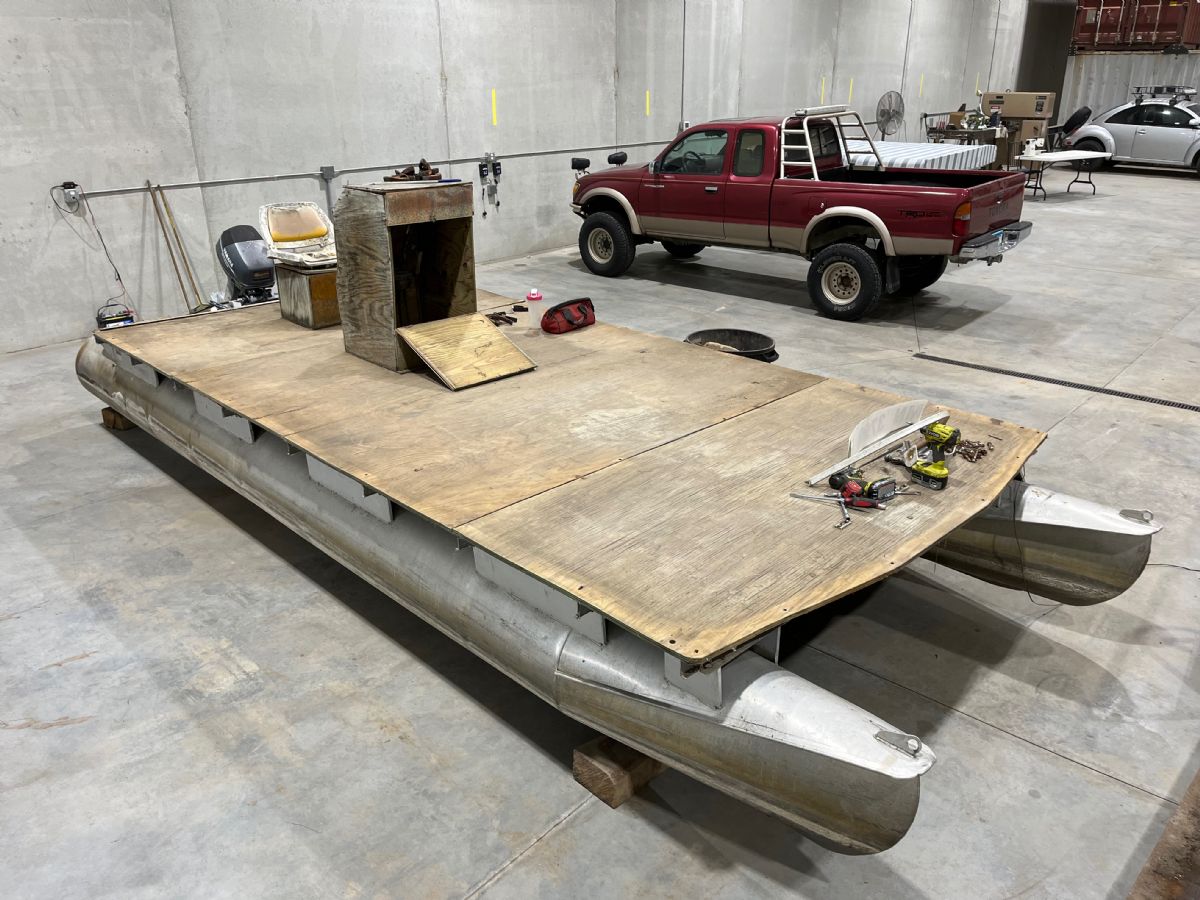 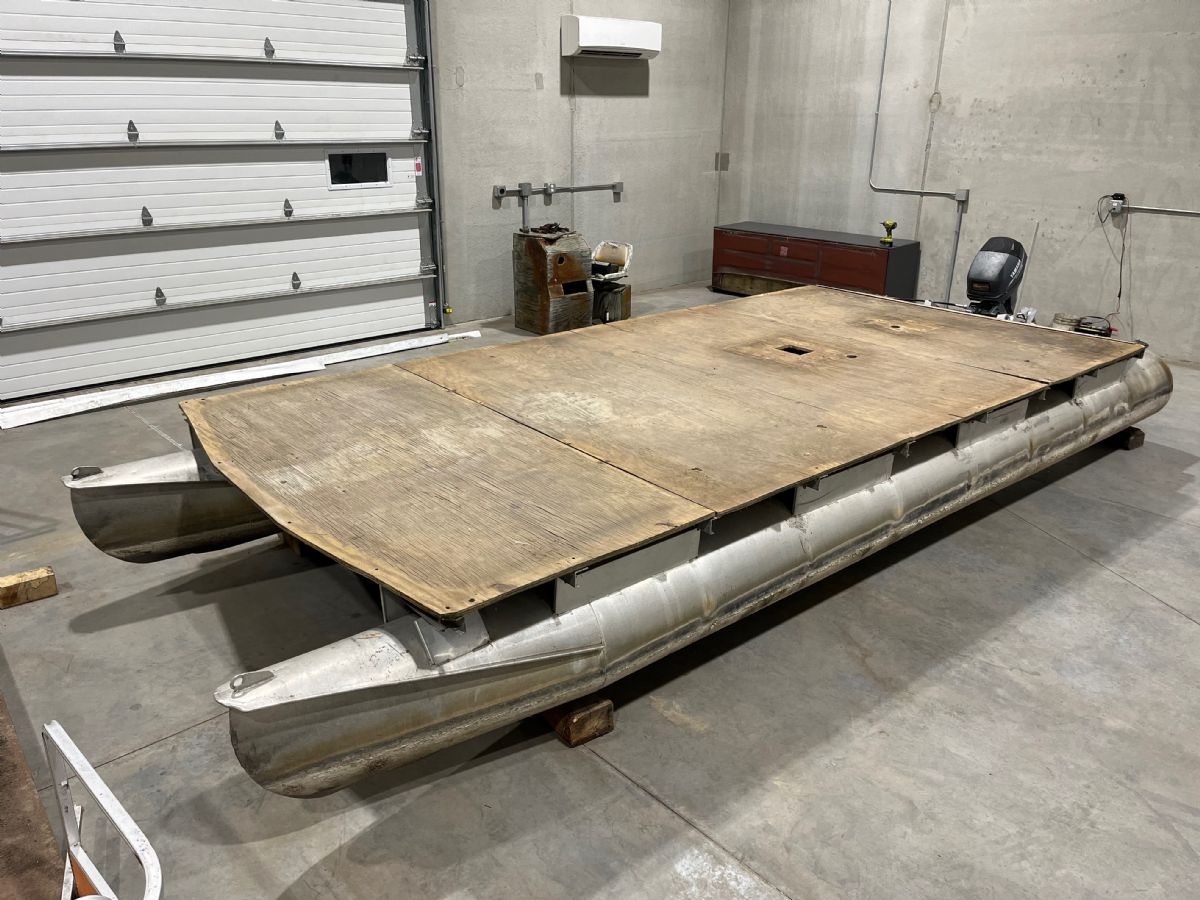 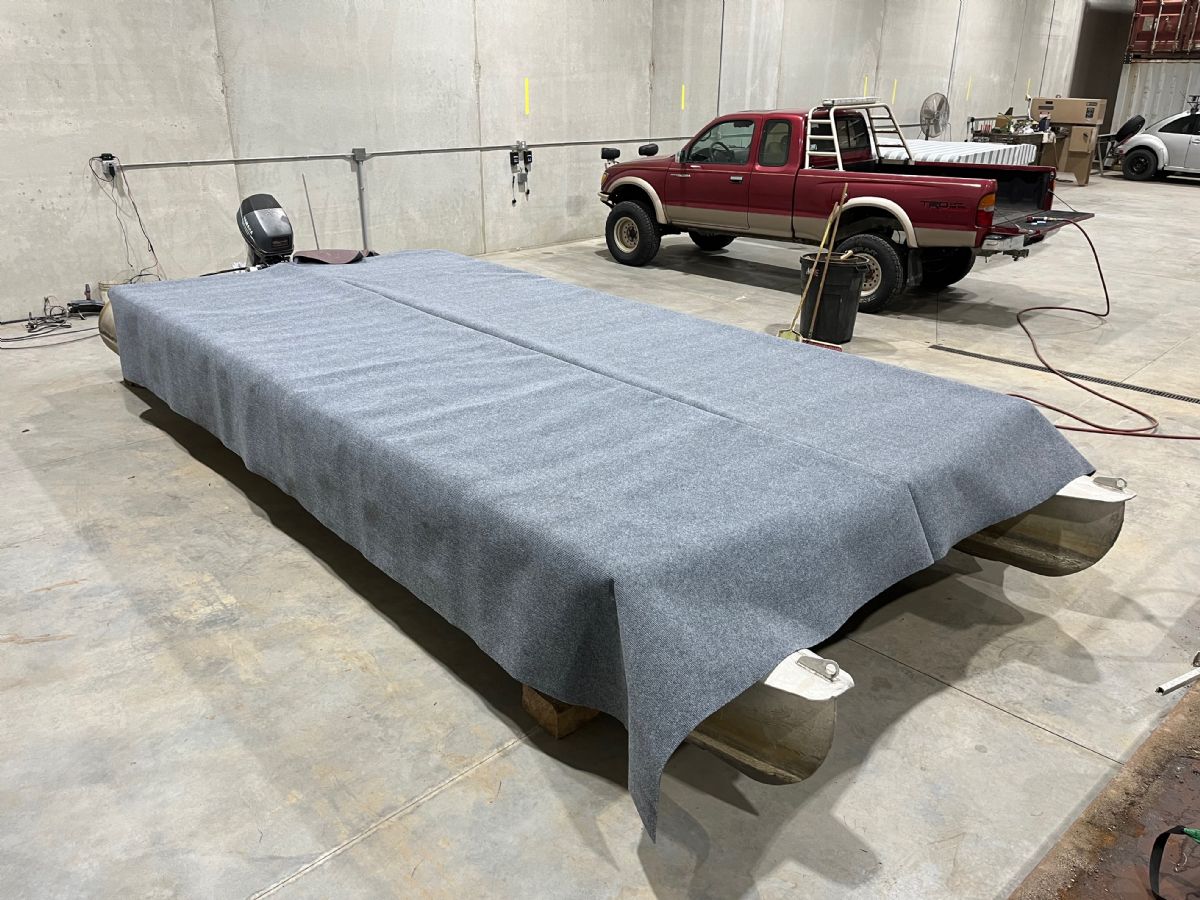   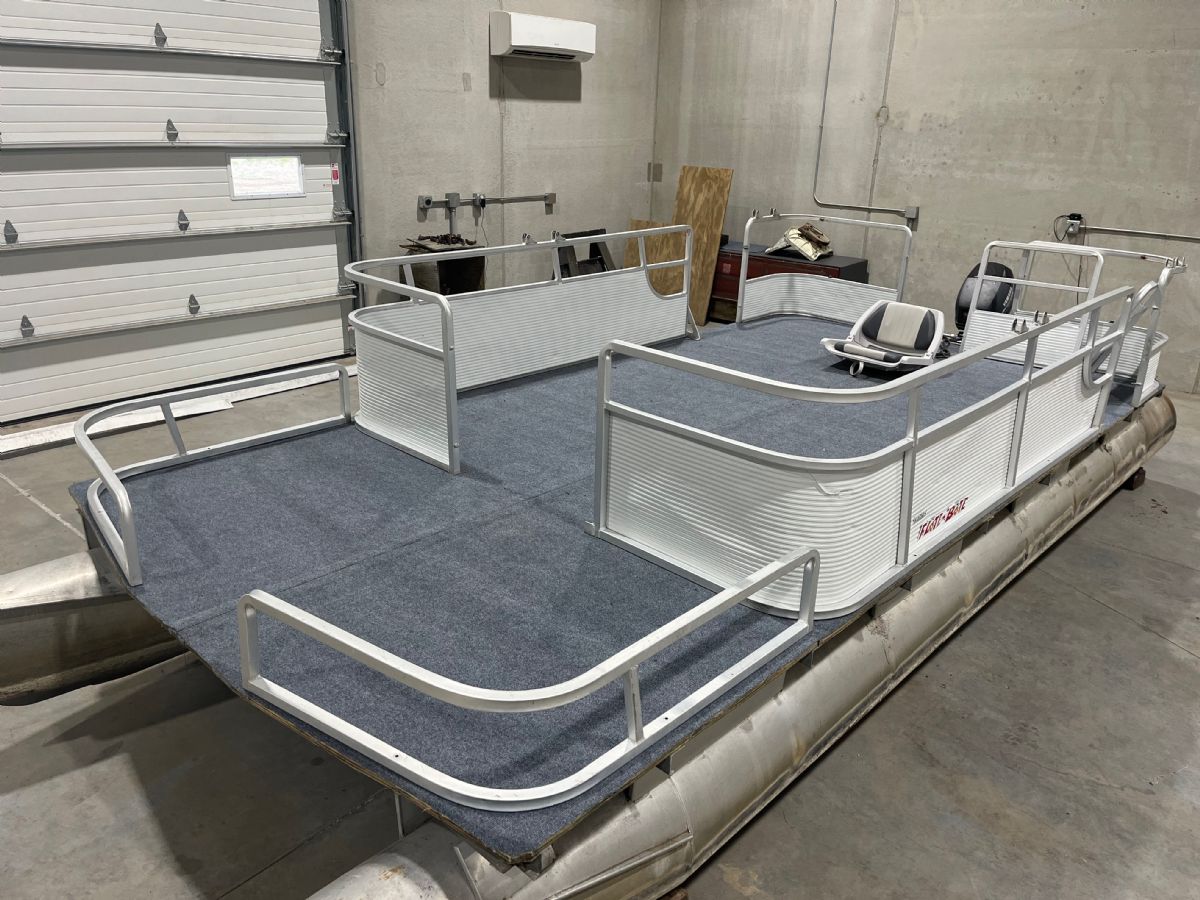  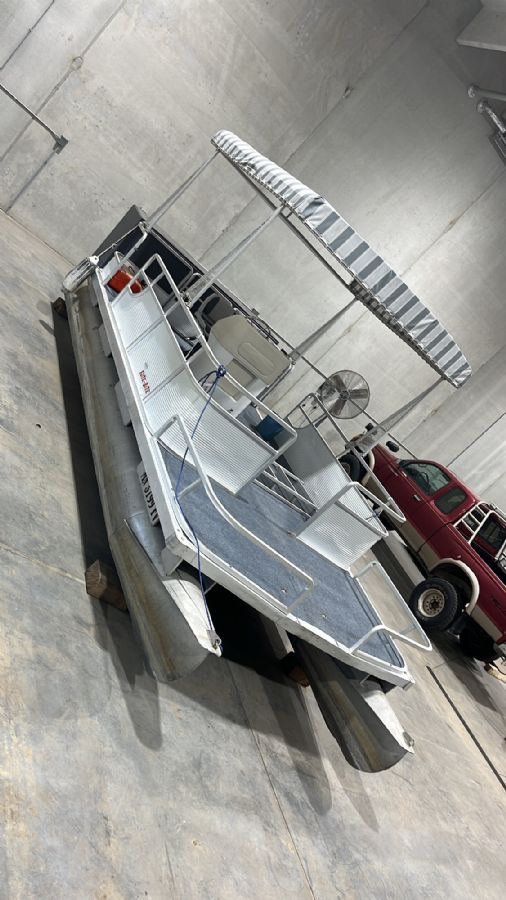  This is now a thread where I post all the stuff I did when I should have instead been finishing the Libert rebuild. Here's an early 70s Harris pontoon boat I just refurbished. It belongs to a family friend who owns a small weedy lot on a nearby lake and visits it occasionally during the summer months. We use this thing as a self-propelled raft, just to putt out to the middle and swim. It's a nice area with high property values, so it didn't seem very neighborly to leave this eyesore tied to her dock behind the homes of all the lake's full-time residents. Her husband died last year, so I told her I'd help with some of the 'man stuff' in his absence, including rebuilding this old pile of junk. New carpet, repainted the panels, new helm, new seat and pedestal, new steering wheel, new transom board, bunch of new stainless hardware, reinforced the swim ladder mounting cleats, stretched new marine vinyl over the sound-arresting plywood box at the stern and bedlinered the inside of it, sewed up a new awning, cut and applied new registration decals, etc. Here's my selfish long game: properly ingratiate myself with our family friend so that she gives me first stab at buying the lake lot if/when she sells, and then use it as a personal seaplane base. It's a hell of a lot closer to home than the regional airport - I could drive my EZGO to the lake in less than 10 minutes. Jet skis and ugly pontoons are going to be the least of the neighbors' worries once they hear a Continental IO-520 at wide open throttle. Now... if anyone knows where I can pick up a C185 on amphibious floats for like ten dollars, let me know.
|
|
|
|
|
[#46]
Originally Posted By ColinDoyle: This is now a thread where I post all the stuff I did when I should have instead been finishing the Libert rebuild. I opened this thread back up, saw the boat pics and thought "uh-oh, looks like he got distracted with a different project again!" |
|
|
|
|
[Last Edit: ColinDoyle]
[#47]
Yeah.
 I've always had a hard time ordering my work by priority, especially with a dozen employees on the farm creating more work for me, and nobody else even qualified to solder, MIG weld, or operate a drill press. Lots of menial stuff jumps to the front of the line and pushes the more complex, time-consuming work to the back. I pounded out that boat because summer is so short up here and I can work inside the shop all winter (when I'm not spending all my time starting cold delivery trucks and plowing snow, anyway.) I did find some time earlier this week to start airbrushing on the Libert pedestal. Got a long ways to go yet, I'm shooting for a riveted aircraft skin appearance. Working out my technique for shading the rivets as I go, so their appearance is changing a little as I proceed.  You can see where my masking tape tore off the pinup girl's calves. I'm going to hit all of this with Imron Elite clear to protect and 'hold down' the acrylic graphics. The painted and clearcoated emblems on that 'Flote Bote' pontoon were actually a compatibility test between the paint products I'll be combining on the Libert. |
|
|
|
|
[#48]
The pressure is off, this thread will not fall into the archive.
|
|
|
|
|
[#49]
Thank you!

|
|
|
|
|
[Last Edit: ColinDoyle]
[#50]
We managed to hire a route driver now, so I am no longer working 7 days/week on farm operations, as I have been since January 2021. Trying to get this project wrapped up before I'm plunged back into that schedule with the next manpower shortage. Feels inevitable in a small family business, but I hope it doesn't happen for a while... I'd sure like to finish earning my private pilot certificate and wrap up some other skilled labor around here before I'm reassigned to hold a steering wheel again.
Here's how I'm airbrushing the pedestal - I used a basic 2D CAD app (QCAD) to draw various curves, shapes, and straight strips containing 3/8-inch circles spaced at even intervals, and then used my vinyl plotter to cut them on masking vinyl. I'm using dark gray paint to shade the bottom of the rivet head, then highlighting the top with white. When it has dried, I peel off the strip of vinyl and back-mask each rivet head, then add a dark gray shadow above the white to give the impression that the force of the rivet head is distorting the sheet metal. I think it looks halfway convincing. My technique has changed a bit as I proceed, so the early rivet shading is not consistent with the later shading. I was pretty heavy-handed with some of the early drop shadows, too... I think I hadn't thinned the paint sufficiently, or was spraying with too large a tip. Live and learn! There's quite a bit more detail to paint. I plan on sealing all of this under some Imron Elite clearcoat, possibly with a flattening agent. 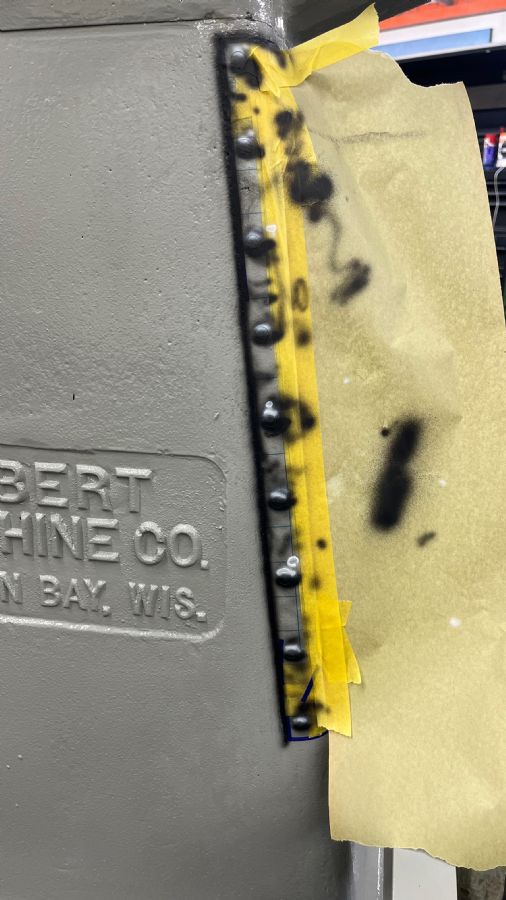         Starting to stencil some fun stuff onto the caster base. I'm going to put a checkerboard pattern on the vertical stabilizers and motor case, a la P51 Mustang. More to come.  
|
|
|
|
 Win a FREE Membership!
Sign up for the ARFCOM weekly newsletter and be entered to win a free ARFCOM membership. One new winner* is announced every week!
You will receive an email every Friday morning featuring the latest chatter from the hottest topics, breaking news surrounding legislation, as well as exclusive deals only available to ARFCOM email subscribers.

AR15.COM is the world's largest firearm community and is a gathering place for firearm enthusiasts of all types.
From hunters and military members, to competition shooters and general firearm enthusiasts, we welcome anyone who values and respects the way of the firearm.

Subscribe to our monthly Newsletter to receive firearm news, product discounts from your favorite Industry Partners, and more.
Copyright © 1996-2024 AR15.COM LLC. All Rights Reserved.
Any use of this content without express written consent is prohibited.
AR15.Com reserves the right to overwrite or replace any affiliate, commercial, or monetizable links, posted by users, with our own.


