|
[#1]
Two
|
|
|
|
[#2]
Definitely make sure that you make it twice as big as you think that it needs to be. You run out of room FAST.
|
|
|
|
[#3]
|
|
|
|
[#4]
Quoted:
Quoted:
Quoted:
I know you're kidding, but the top needs to be at least three times thicker. Seriously? I got 3/4" birch plywood. It seemed beefy. I am gonna brace the sides of the legs with 1x4's around the perimeters and maybe a diagonal brace under the top. Should I double up the plywood on top? Or triple it? Posted Via AR15.Com Mobile The minimum is 1 1/2" for a reloading bench top. Many guys use two-by lumber for it, as it's stronger than plywood. If by chance you are using a Dillon Strong Mount you can get by with less. A friend of mine made a workbench out of 2x4s set on their edges, glued and screwed. Once the glue was dry he sanded and shellacked the top. The legs were 4 * 4x4s at each corner. I have no doubt that if you could find a way to lift a car up there, it would support it. |
|
|
|
[#5]
Quoted: Quoted: I have a Honda ATV thingie that allows for trips back and forth. It's only 80 acres. http://i20.photobucket.com/albums/b201/krpind/hogstand.jpg One of my bow blinds. That is during a flood and the bottom of that is 8 feet off the ground and the water got about 6 inches inside it. That is a lot of back and forth putting that thing on those stilts.  Of course I used a generator and circular saw Dont you wish you put it up 9 feet? |
|
|
|
[#6]

|
|
|
|
[#7]
Quoted:
Bow fishing blind? 
Could have been that day. |
|
|
|
[#8]
With no woodworking skills or solid ideas of what you wanted you should have either brought in someone with skills who'd done it before, or bought some good plans with material sizes, cut lengths and fastening points all clearly marked.
My first reloading bench wound up being too small and no where near large enough. Fortunately for me I did over build it, so I wound up selling it to a buddy with less space for the cost of materials and started over and built the perfect bench. Then when I left the house I sold it to the new owner. Then I wound up getting the first one back. And I still haven't build another for the house I'm in now. I'm looking forward to seeing yours when it's done.
|
|
|
|
[#9]
|
|
|
|
[#10]
Which one?
 Posted Via AR15.Com Mobile |
|
|
|
[#11]
totally agree you gotta make it two times stronger than it needs to be. it's a fairly simple build. only get's complicated once you build your own drawers or make complicated joints. this bench is made outta 4X4, 2X4 and 2X10. took me about one uninterupted day... maby a little longer sorry for the mess -rb |
|
|
|
[#12]
A reloading bench needs to be stiff, not strong, although strength generally accompanies sfiffness with this type of construction. Weight, too. The idea is to provide a solid platform for the press and powder measure to improve uniformity and precision.
|
|
|
|
[#13]
The queef is strong with this bench.
|
|
|
|
[#14]
Quoted:
Quoted:
The minimum is 1 1/2" for a reloading bench top. Many guys use two-by lumber for it, as it's stronger than plywood. If by chance you are using a Dillon Strong Mount you can get by with less. A friend of mine made a workbench out of 2x4s set on their edges, glued and screwed. Once the glue was dry he sanded and shellacked the top. The legs were 4 * 4x4s at each corner. I have no doubt that if you could find a way to lift a car up there, it would support it. I took 1/2" MBT board and screwed it onto 2x4's sandwiched together as noted above, and of course boxed it in with 2x4 lumber at the top and at the feet of the table, using scrap 4x4 posts I had laying around. I did not make a SOLID core due to weight (I had to move it down a flight of stairs), but instead double-braced the edges and put the sandwiched 2x4's in the middle where my press was going to be. The table is very rigid, my press mount is VERY sturdy, the table still ties together and I have two of these in a row. they also remain light enough to be movable with a handcart. So it was something like this: –––––––––––––––––––––––––––––––––––––– [[....................... [[[[[[[[[[.....................................]] [[....................... [[[[[[[[[[.....................................]] [[....................... [[[[[[[[[[.....................................]] [[....................... [[[[[[[[[[.....................................]] [[....................... [[[[[[[[[[.....................................]] –––––––––––––––––––––––––––––––––––––– With the press mounted to the center "core" if you will. Excuse the periods - that's just for spacing. 
|
|
|
|
[#15]
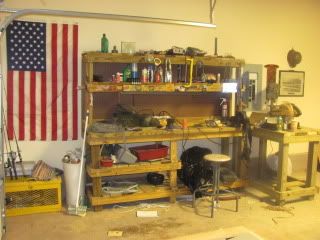
check this out, i just finished it a week or two ago
they have this excellent plywood on sale at home depot for $25 a sheet so i bought two and a big bottle of carpenter glue and a box of 1.25" drywall screws the skirts are 2x6 held to the 4x4 legs with 3/8 bolts the front lower skirt is recessed because I have legs and feet. the green floor is courtesy of the prior owners you see that wire wheel in the foreground? I made that fricking thing for "temporary use" like 25 years ago out of a ancient 1950's or 1940's motor i dumpster dived. it has a ton of torque. 
|
|
|
|
[#16]
Quoted:
check this out, i just finished it a week or two ago they have this excellent plywood on sale at home depot for $25 a sheet so i bought two and a big bottle of carpenter glue and a box of 1.25" drywall screws the skirts are 2x6 held to the 4x4 legs with 3/8 bolts the front lower skirt is recessed because I have legs and feet. http://img59.imageshack.us/img59/1328/img4247k.jpg That's a beautiful job! It's even purty. |
|
|
|
[#17]
Quoted:
check this out, i just finished it a week or two ago they have this excellent plywood on sale at home depot for $25 a sheet so i bought two and a big bottle of carpenter glue and a box of 1.25" drywall screws the skirts are 2x6 held to the 4x4 legs with 3/8 bolts the front lower skirt is recessed because I have legs and feet. the green floor is courtesy of the prior owners you see that wire wheel in the foreground? I made that fricking thing for "temporary use" like 25 years ago out of a ancient 1950's or 1940's motor i dumpster dived. it has a ton of torque. http://img59.imageshack.us/img59/1328/img4247k.jpg That's pretty much what I have in mind. With some minor differences. Posted Via AR15.Com Mobile |
|
|
|
[#18]
Here's mine before I moved it inside and filled her up. Horizontals are 2x6's and the top is from a restaurant, nice solid maple running around the edges and routed out in the front for my Dillon, formica top, $15 on Craigslist. I used some 3" square drive screws and it made everything really solid. Everything is countersunk below flush then I hit it with the belt sander. Leftover wood from my patio cover build. The finished version has a shelf where the one lower 2x4 is, added 3 more in the same plane, etc.
|
|
|
|
[#19]
Quoted:
Quoted:
check this out, i just finished it a week or two ago they have this excellent plywood on sale at home depot for $25 a sheet so i bought two and a big bottle of carpenter glue and a box of 1.25" drywall screws the skirts are 2x6 held to the 4x4 legs with 3/8 bolts the front lower skirt is recessed because I have legs and feet. http://img59.imageshack.us/img59/1328/img4247k.jpg That's a beautiful job! It's even purty. thanks i put poly on it to seal the wood, unvarnished wood gets really grimy and it is kind of unsanitary also, i already reversed the bolts sticking into the foot area to avoid snags and shortened the bolts the top is just lag bolted into the legs, i did not get all fancy pants with it, it's just a workbench I really really dont think a 3/4 sheet of plywood will cut the mustard for reloading, you should add a sheet of particle board or cheapo plywood, glue and screw. mine's actually 3 layers of 3/4" a top that's twice as thick is eight times as rigid and has 1/4 the stress |
|
|
|
[#20]
My former bench.. Currently everything is boxed up because I am taking over a larger room and consolidating it with my work shop.

The new one will probably just be a piece of counter top built on top of a heavy frame. |
|
|
|
[#21]
I'm not ever going to show photos of my benches next to this cabinet work.
|
|
|
|
[#22]
The one I built:
(it's a bit messy right now) 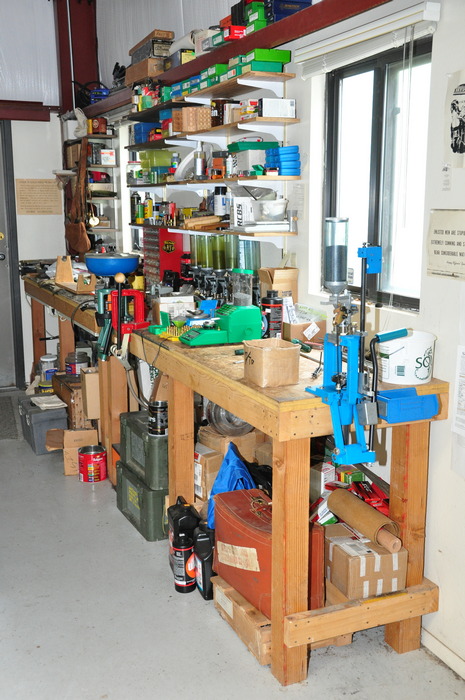
|
|
|
|
[#23]
Quoted: My former bench.. Currently everything is boxed up because I am taking over a larger room and consolidating it with my work shop. http://i392.photobucket.com/albums/pp2/angrytek/100_0572.jpg The new one will probably just be a piece of counter top built on top of a heavy frame. Well look at who just put everyone else to shame. |
|
|
|
[#24]

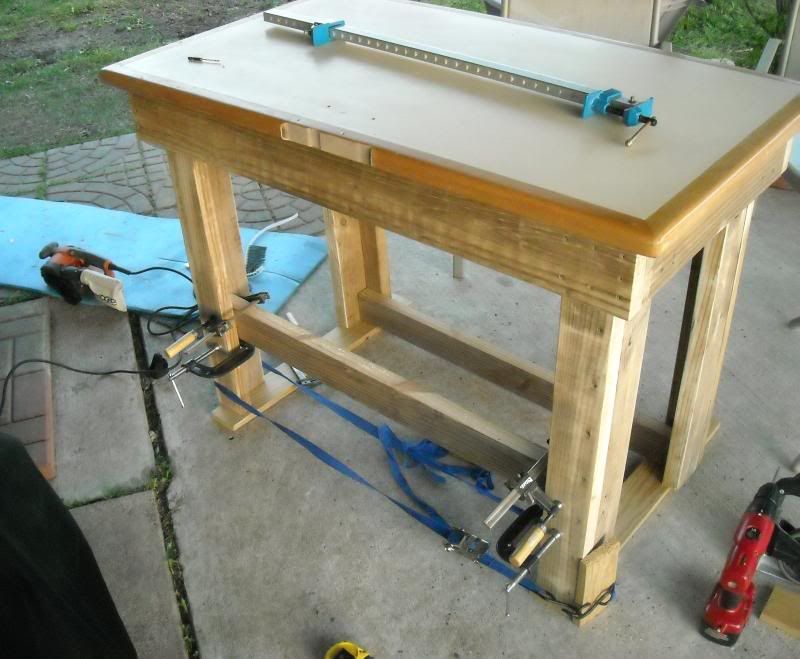
Coming along. Got some measurements wrong. (In that, now the top will be a 1x4 too small_. But I think I have a work around for that involving splitting the top in two and inlaying a darker divider in between. I don't know yet. Also, I am going to put some sort of diagonal brace on back of the "press" side. Posted Via AR15.Com Mobile |
|
|
|
[#25]
Quoted:
Quoted:
My former bench.. Currently everything is boxed up because I am taking over a larger room and consolidating it with my work shop. http://i392.photobucket.com/albums/pp2/angrytek/100_0572.jpg The new one will probably just be a piece of counter top built on top of a heavy frame. Well look at who just put everyone else to shame. Would have been more useful if the room were another 4' longer and 2' wider  Also I outgrew my safe, and am very reluctant about putting 1200lbs on the second floor. ( I would have to tear out walls to get it into that room to start) So I am taking a 13.5x18' room on the first floor, and moving the reloading room and my shop (currently 10x10 and very cramped ) that I use for building longrifles and going to make it into something neat Also I outgrew my safe, and am very reluctant about putting 1200lbs on the second floor. ( I would have to tear out walls to get it into that room to start) So I am taking a 13.5x18' room on the first floor, and moving the reloading room and my shop (currently 10x10 and very cramped ) that I use for building longrifles and going to make it into something neat |
|
|
|
[#26]
Bonus points for cutting wood in you living room. Nice.
|
|
|
|
[#27]
another apartment dweller here.

|
|
|
|
[#28]
It's the basement, not the living room!
Posted Via AR15.Com Mobile |
|
|
|
[#29]
I'm gonna need more reloading gear. All I ever had was a small apartment setup with my lee single stage press.
Posted Via AR15.Com Mobile |
|
|
|
[#30]
Quoted:
My former bench.. Currently everything is boxed up because I am taking over a larger room and consolidating it with my work shop. http://i392.photobucket.com/albums/pp2/angrytek/100_0572.jpg The new one will probably just be a piece of counter top built on top of a heavy frame. Very clean and organized.......something I (still) dont have enough room for . Quoted:
check this out, i just finished it a week or two ago http://img59.imageshack.us/img59/1328/img4247k.jpg What I have for now is a combination work,cleaning,reloading area . 

I need to build a 20 x 40 shop next year . . . . there's just no way around it , especially if I start buying machinery .
|
|
|
|
[#31]
Quoted:
I'm gonna need more reloading gear. All I ever had was a small apartment setup with my lee single stage press. Posted Via AR15.Com Mobile That's where I was three years ago .

|
|
|
|
[#32]
I am hereby naming this bench "The Hurricane Katrina Memorial Bench."
It is so friggin solid. I can't imagine any bench being stronger. I ain't done yet though.  Posted Via AR15.Com Mobile |
|
|
|
[#33]
i hope your not married. your cutting wood inside the house
 Quoted: http://i53.tinypic.com/21b90co.jpg Action shot. The dag doesn't see to mind. Fuck Norm Abram and his lasers and shop vacs and experience! Posted Via AR15.Com Mobile |
|
|
|
[#34]
 Posted Via AR15.Com Mobile |
|
|
|
[#35]
I am attempting to glue the pieces of plywood together for the top.
I don't feel great about it. I used a whole tube of loctite power grab adhesive and then stuck two pieces together with a bunch of heavy shit on top. I don't feel like there was a good enough coating of glue. Tomorrow, I will pull up the heavy stuff and see how well it grabbed. I still have one more piece to glue, then it will be 2" thick (.75¤.50¤.75). I may sink some 1 5/8 wood screws into the bottom at the same time I glue the last section. Not sure though. What do ya'll think I should do?  Posted Via AR15.Com Mobile |
|
|
|
[#36]
Quoted:
I am hereby naming this bench "The Hurricane Katrina Memorial Bench." It is so friggin solid. I can't imagine any bench being stronger. I ain't done yet though. 
Posted Via AR15.Com Mobile those center pieces should be placed vertically (not "flat") for more strength and sag-resistance. Not that it will fall apart, but... it would be more useful if they were orientated vertically. As far as your plywood - just sink some screws in there to compliment the glue and you'll be fine. If it flexes, or is not as rigid as you'd like... then add another layer! Easy! |
|
|
|
[#37]
Yeah I am not sure why I put those "flat."
I think I was thinking tthey were not really necessary, so I threw them in as "extra" surface area support. But it would have been better the way you suggested, or even running across the short spans. Like rungs in a ladder. Edit: Now I remember why I turned those flat. I wasn't sure what position or location I'd be bolting things to the top. I thought if they were flat it wouldn't matter as much if I wanted to drill through them versus in the upright position where they might split. Does that make sense? Posted Via AR15.Com Mobile |
|
|
|
[#38]
Hoping for a man cave of my own some day. Nice benches guys!
|
|
|
|
[#39]
Quoted:
Yeah I am not sure why I put those "flat." I think I was thinking tthey were not really necessary, so I threw them in as "extra" surface area support. But it would have been better the way you suggested, or even running across the short spans. Like rungs in a ladder. Edit: Now I remember why I turned those flat. I wasn't sure what position or location I'd be bolting things to the top. I thought if they were flat it wouldn't matter as much if I wanted to drill through them versus in the upright position where they might split. Does that make sense? Posted Via AR15.Com Mobile Yeah, in a way. But there's virtually no structural benefit the way you currently have them and it's more or less a waste of lumber. If you're interested in reinforcing mounting points, then you can glue/screw scrap lumber to the underside of your bench surface where ever necessary.
As you currently have it, either of the other two options (vertical longitudinally or vertical horizontally in a "ladder" formation) would be superior to your current design. Obviously, the "ladder" version is superior and structurally more effective, but more complicated than simply re-orientating the existing spans vertically. adding an additional layer of plywood (or even a small piece in between the framing) for mounting purposes would be great- but probably not necessary if you fixed the framing as noted. Just depends on if you're using lag screws or bolts for your mounts. Lag screws: use a scrap piece of 2x4 underneath as needed to screw into and "clamp" against the underside of your bench surface. Bolts: 2 layers of plywood with a properly framed substructure is more than strong enough. |
|
|
|
[#40]

Here's a mockup. The top will be thicker (that piece plus two others glue and screwed together). Not sure what kind of surface finish I want yet. Paint or stain or varnish. Posted Via AR15.Com Mobile |
|
|
|
[#41]
Quoted:
<snip> Just depends on if you're using lag screws or bolts for your mounts. Lag screws: use a scrap piece of 2x4 underneath as needed to screw into and "clamp" against the underside of your bench surface. Bolts: 2 layers of plywood with a properly framed substructure is more than strong enough. It is vitally important to NOT use lag screws to secure a press! They will "hog out" with time, coming loose in the back, and then breaking the non-flexible press flange. Bolts/washers/nuts ONLY.
|
|
|
|
[#42]
Quoted:
Quoted:
<snip> Just depends on if you're using lag screws or bolts for your mounts. Lag screws: use a scrap piece of 2x4 underneath as needed to screw into and "clamp" against the underside of your bench surface. Bolts: 2 layers of plywood with a properly framed substructure is more than strong enough. It is vitally important to NOT use lag screws to secure a press! They will "hog out" with time, coming loose in the back, and then breaking the non-flexible press flange. Bolts/washers/nuts ONLY. Fair enough. Mine have lasted through 10,000 rounds or so on a pistol press - so when they hog out I will post back with the failure. Granted, I have a very thick backing (2x4 vertical beams) that secures them... but as a general rule I don't disagree. the only failure I've ever had was a chinese bolt shearing off at the head on removal (because it was still clamping down so damn well that I had to lean on it when I was breaking the press down for moving). |
|
|
|
[#43]
My humble contribution

|
|
|
|
[#44]
So...
In a couple days, the plywood top (3 pieces glued and screwed together) will be ready. What is the best way to secure the top to the frame without screws showing from the top of the bench? Posted Via AR15.Com Mobile |
|
|
|
[#45]
Quoted:
So... In a couple days, the plywood top (3 pieces glued and screwed together) will be ready. What is the best way to secure the top to the frame without screws showing from the top of the bench? Posted Via AR15.Com Mobile I used bolts and large washers, countersunk, which show from the top of the bench. YMMV, as there are no rules. Most things that prevent them being visible (L-brackets and such) are weak. |
|
|
|
[#46]
What do the bolts attach to, for instance, on my frame?
You shouldn't drill through the thin portion of the wood should you? Posted Via AR15.Com Mobile |
|
|
|
[#47]
Quoted:
What do the bolts attach to, for instance, on my frame? You shouldn't drill through the thin portion of the wood should you? Posted Via AR15.Com Mobile Again, there are no rules, but on yours I would use generous amounts of white glue, then lag screws with washers around the perimeter and on the cross braces, countersunk with a Forstner bit. You can even sink them a little extra deep and then glue in a piece of 1 1/2" oak dowel for a plug. Use a belt sander to make it perfect afterward. I like everything glued as it contributes to rigidity. |
|
|
|
[#48]
Buy a solid core door attach legs and be done with it.
|
|
|
|
[#49]
Admiring my handiwork, I noticed at least one problem.
 Posted Via AR15.Com Mobile |
|
|
|
[#50]
Yeah, that'll make things interesting.
|
|
|
 Win a FREE Membership!
Sign up for the ARFCOM weekly newsletter and be entered to win a free ARFCOM membership. One new winner* is announced every week!
You will receive an email every Friday morning featuring the latest chatter from the hottest topics, breaking news surrounding legislation, as well as exclusive deals only available to ARFCOM email subscribers.

AR15.COM is the world's largest firearm community and is a gathering place for firearm enthusiasts of all types.
From hunters and military members, to competition shooters and general firearm enthusiasts, we welcome anyone who values and respects the way of the firearm.

Subscribe to our monthly Newsletter to receive firearm news, product discounts from your favorite Industry Partners, and more.
Copyright © 1996-2024 AR15.COM LLC. All Rights Reserved.
Any use of this content without express written consent is prohibited.
AR15.Com reserves the right to overwrite or replace any affiliate, commercial, or monetizable links, posted by users, with our own.


