|
Posted: 1/21/2019 2:11:23 AM EDT
Im brand new to reloading. I know there have been a lot of reloading bench threads and I have searched a lot of them but Im sure I missed a lot. The bench will be an L shape. 7' wide, 2' deep. The L shape will be on the left side and extend out 18" from the main bench. Im looking for help on where to mount the press how tall to make it and what materials for the top.
It seems like there are hundreds of ideas on what to use for a top and I saw many good ideas but it never hurts to get fresh ideas. I have an idea how I want to build the frame and legs but I won't turn down any advice on that part of it either. My thoughts on building the top was two yellow pine 2 x 12s side by side and then topped with 1/2" plywood to get rid of the seam and then topped with laminate counter top sheet for easy cleanup. My thoughts were the ply wood probably isnt needed for strength but it will help and the laminate would be better over plywood than being directly over the 2 x 12s, especially on the seam. Laminate is cheap, a 30" x 120" will cover everything i need and is only $31. Is there any down side to the laminate for a bench top? For the height, I plan on sitting while reloading. I have an office chair that I plan on using. I'm 6'5", while sitting in the chair my shoulder is approximately 45" off the ground, my elbow bent at a 90 is 28" off the ground. Sitting in that chair, I clamped the press to a 33" tall bench and operated it and it felt comfortable. Of course this was just the bare press, not doing any functions but the motion seemed natural and I plan on making the bench pretty close to that same height unless someone tells me its a bad idea. For the press mounting question, I'm right handed so I plan on putting it on the right side. How much room do I need to leave between the press and the wall on the right? Am I right in my thinking that the press will be best off to one side rather than the middle? Is 12" between the press and the wall enough room? The press is a Rock chucker. The way the room is setup is kind of odd. The bench is surrounded by walls but the end of the L shape and the right end are both stub walls. In the drawing the heavy black lines are the actual bench and the light black lines are showing where the walls are. Obviously I didn't take the time to draw it to scale, its just to help make sense of what I'm doing. Thanks for any advice. |
|
|
|
[#1]
There are a ton of ways to build a bench and most of them will get you to the same place.
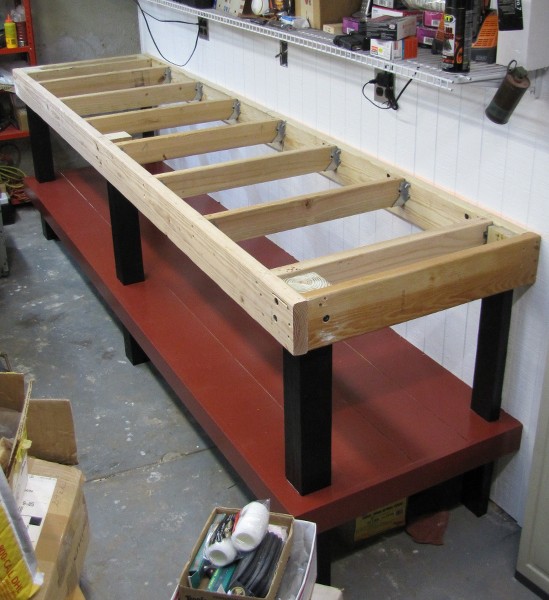
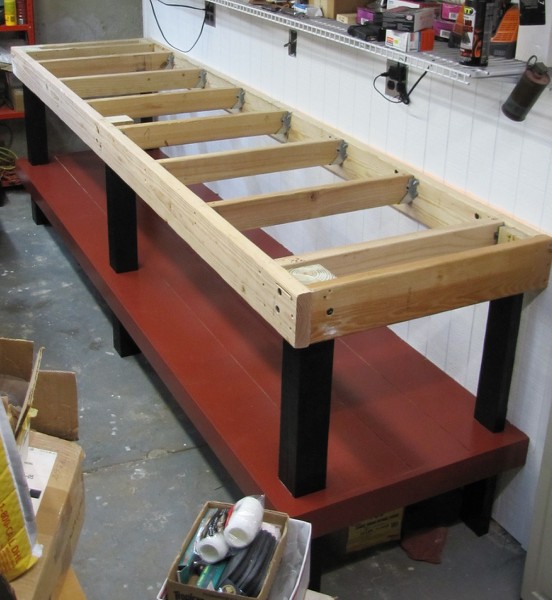
I would avoid laminate counter tops unless you do plan on having a support under it such as plywood. Laminate counters are basically fiberboard with laminate over it and the force from a press during sizing could rip through the fiberboard bottom. As long as you have support underneath you would be fine. For my bench I built the frame out of 2x4s and then put a layer of osb plywood for strength, screwed down into the 2x4s, then a layer of oak plywood on top. The top layer is connected to the osb by screwing up from the osb into the plywood. I then faced the bench with oak plywood strips I ripped from plywood. This will give you an idea of the finished product. I haven't taken many pictures of the actual bench since I've gotten everything setup. I think it turned out great though. For height I went with 41" to the top of the bench. The general rule for bench height is to stand with your arms bent parallel with the floor. Relax your hands a few inches and that's how high to make your bench. You want it to be tall enough that you can work on it while standing. You can always raise your chair to reach a higher bench, but you can never raise a bench to make it easier on your back. Always make it comfortable for standing height and then adjust your seat for sitting. This also makes it so the rounds are closer to your field of vision when you're loading rather than being covered by the top of the press (see pic below). I also strongly suggest learning Google sketchup. It's really easy to learn with a few hours on YouTube and you can completely design and build your bench in the software. I built mine to scale, the used all the measurements to build it. Worked perfectly and then I had a plan to follow and knew exactly what it would look like when finished. Good luck! |
|
|
|
[#2]
Quoted:
There are a ton of ways to build a bench and most of them will get you to the same place. I would avoid laminate counter tops unless you do plan on having a support under it such as plywood. Laminate counters are basically fiberboard with laminate over it and the force from a press during sizing could rip through the fiberboard bottom. As long as you have support underneath you would be fine. For my bench I built the frame out of 2x4s and then put a layer of osb plywood for strength, screwed down into the 2x4s, then a layer of oak plywood on top. The top layer is connected to the osb by screwing up from the osb into the plywood. I then faced the bench with oak plywood strips I ripped from plywood. This will give you an idea of the finished product. I haven't taken many pictures of the actual bench since I've gotten everything setup. I think it turned out great though. https://www.AR15.Com/media/mediaFiles/322543/20180818_225549_jpg-815695.JPG For height I went with 41" to the top of the bench. The general rule for bench height is to stand with your arms bent parallel with the floor. Relax your hands a few inches and that's how high to make your bench. You want it to be tall enough that you can work on it while standing. You can always raise your chair to reach a higher bench, but you can never raise a bench to make it easier on your back. Always make it comfortable for standing height and then adjust your seat for sitting. This also makes it so the rounds are closer to your field of vision when you're loading rather than being covered by the top of the press (see pic below). I also strongly suggest learning Google sketchup. It's really easy to learn with a few hours on YouTube and you can completely design and build your bench in the software. I built mine to scale, the used all the measurements to build it. Worked perfectly and then I had a plan to follow and knew exactly what it would look like when finished. Good luck! https://www.AR15.Com/media/mediaFiles/322543/20180928_222541_jpg-815700.JPG https://www.AR15.Com/media/mediaFiles/322543/20181007_004008_jpg-815702.JPG |
|
|
|
[#3]
OP, as far as tops go... I cut a masonite top to fit on top of a offset plywood base. I did this so that if I had a spill or stain I could easily replace it.
|
|
|
|
[#4]
There's nothing wrong with your plans that I see. Just make sure the laminate sticks to the plywood.
I really like the bench drfroglegs posted above as well as his good advice. My suggestions: 1. Make the height as high as you can be comfortable standing (can always be cut shorter). 2. Wait till you get the bench built before deciding where to put the press. It's OK to have a general idea of where while you're building but don't lock yourself in to an exact spot. 1' from the wall may not be enough. 3. Make a shelf underneath with a cut out like in drfroglegs bench where the press goes or you'll be banging knees and shins against it. 4. Make the area directly under the press as strong as you can, don't want any flex there. Hope that helps a bit. |
|
|
|
[#5]
I concur with the guy above who recommended you set the height up for standing, and then adjust your seating.
My bench is 36" tall, which is the standard for kitchen counter tops. I have bar stools for sitting. Works perfect for me. It also allowed me to use kitchen cabinets for storage under the bench. |
|
|
|
[#6]
I had to build a wall next to the steel I Beam in the center of my house to divide my reloading area from the rest of the basement.. The wall was built with 2 x 4s, double plated top and bottom with 3/8" T1-11 paneling on the studs. Here are a few pictures of the build and hardware that I used. It is Rock Solid.
One suggestion is plan to add LED lighting under the top so you can easily find items. I am adding LED lighting.My bench is 10' x 30". I also put dry wall above my reloading area to stop dust and dirt from dropping onto the bench. I am also adding LED bucket lighting into the ceiling above the bench. I wish I had done that before I built the bench. 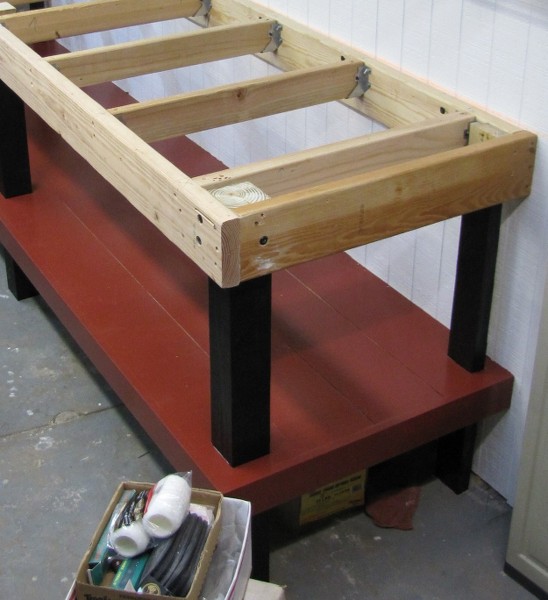
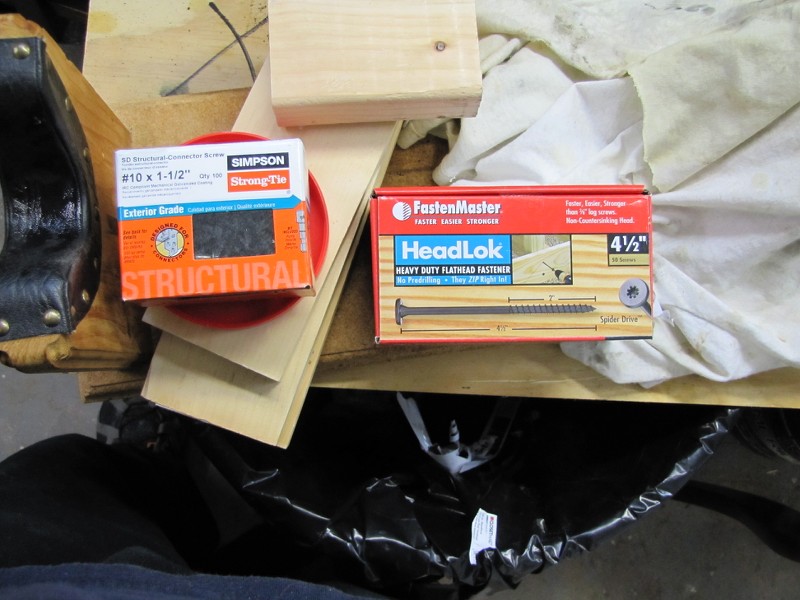
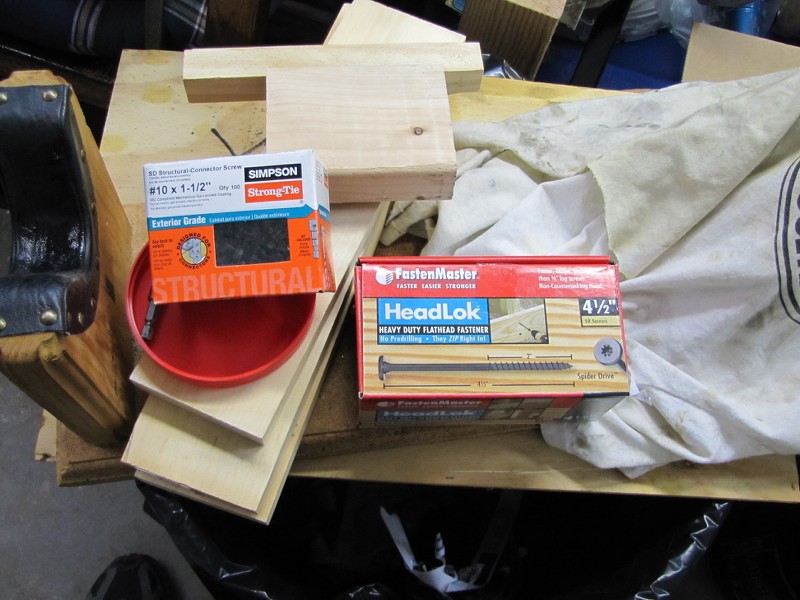
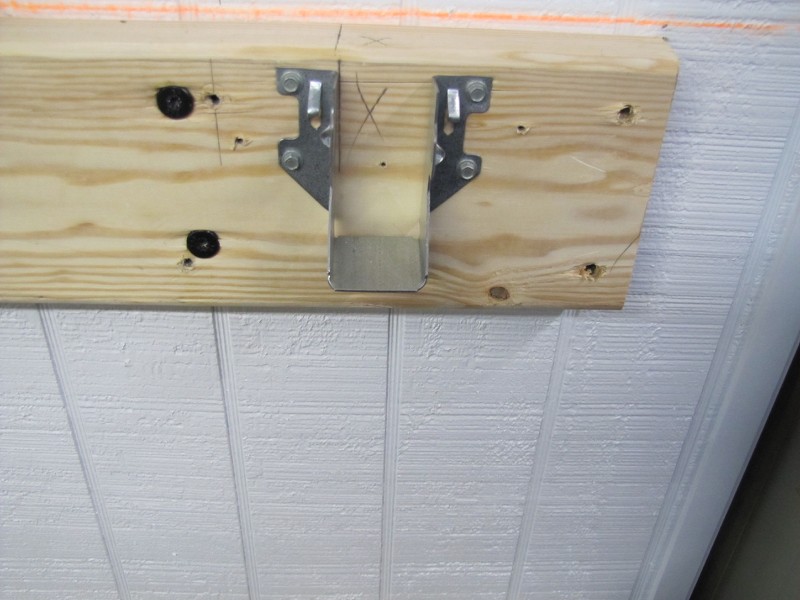
Top is 3/4 Plywood and I wrapped the top and bottom shelf of the bench with 1 by material. All paint on my bench is out door Deck Paint. The wall is painted with out door High Gloss White paint. I also ran two 20 amp circuits and a coax cable for my TV. 
|
|
|
|
[#7]
Here's a couple of pictures of the bones. I framed the entire thing in with free wood my brother gave me from an inside playhouse/bunkbed he tore down. My only costs were the $200 for the plywood, stain and polyurethane.
|
|
|
|
[#8]
Mine is L shaped. Top is 2" thick and laminated with thin oak veneer plywood. I shaped the oak edge with a router. All counters bases are anchored to the wall.

Lazy susan: 
|
|
|
|
[#9]
You can go with a thinner ply top as long as you brace underneath the press where necessary, provided the main structure is stout. I used 1/4" ply on my surface to save money and reduce weight In case I ever wanted to move it. I used a scrap piece of pressure treated 2x8 laid flat underneath the ply running front to back, screwd to the front and rear main frame 2x6s. The press was then bolted through the ply and 2x12.
In this photo you can see where the trim is relief cut, press holes are drilled, and screws for the 2x8 in the front 2x6. |
|
|
|
[#10]
Laminate top = static electricity build up = not so good.
What flooring is in the room, wood, carpet,...? |
|
|
|
[#11]
Quoted:
2. Wait till you get the bench built before deciding where to put the press. It's OK to have a general idea of where while you're building but don't lock yourself in to an exact spot. 1' from the wall may not be enough. 3. Make a shelf underneath with a cut out like in drfroglegs bench where the press goes or you'll be banging knees and shins against it. 4. Make the area directly under the press as strong as you can, don't want any flex there. Hope that helps a bit. |
|
|
|
[#12]
Quoted:
Laminate top = static electricity build up = not so good. What flooring is in the room, wood, carpet,...? |
|
|
|
[#13]
Laminate doesn't cause the static but it allows it to exist.
Wood is very good at dissipating static, preventing a build up and not supporting large discharges. The flooring is decent. At least it won't hide things you drop. Carpeting is about the worst for that and generates a lot of static, too. Concrete is best. |
|
|
|
[#14]
I just built one over the past couple of weekends using some scrap counter tops I found in storage at work. It's 7' from the corner in one direction, and 8' in the other
I have a 2 X 6's laying horizontally, supported by a 2 x 4 running vertically, under the front edge. Rest of it is 2 x 4 frame anchored to the walls The presses all are lag bolted into the 2 x 6, and the 2 x 4. It's rock solid. I don't have all of my presses mounted yet, but it's getting there 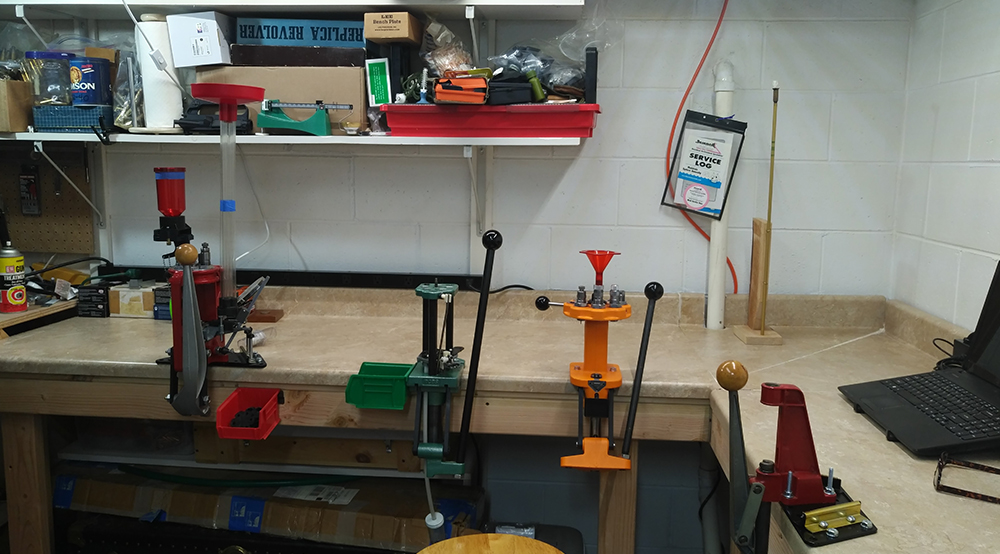
|
|
|
|
[#15]

Built in 1997. I sit to reload also. Top is 32.5 off the floor, I'm 5'10 inches. Bench is 57 x 21 inches. I used melamine to cover my bench top. Never any static. It comes in 3/4 thick sheets , and other sizes. Find it at any box store. I glued the top on and secured it from the bottom with screws. |
|
|
|
[#16]
Quoted:
Im not planning on mounting the press until it’s done, I was mainly asking about the press to decide where to put a leg at. With that said, If I had a leg directly under the press, would the leg get in my way? I’ve never operated a press so I don’t know how much force we are talking to run it? I’m thinking I would sit/stand right beside the press to operate it and the leg wouldn’t be in my way. I’m thinking maybe I will put a leg 18” away from the end and either mount the press directly above it or 6” inward to have it 24” away from the wall to make sure I have plenty of clearance. Quoted:
Quoted:
2. Wait till you get the bench built before deciding where to put the press. It's OK to have a general idea of where while you're building but don't lock yourself in to an exact spot. 1' from the wall may not be enough. 3. Make a shelf underneath with a cut out like in drfroglegs bench where the press goes or you'll be banging knees and shins against it. 4. Make the area directly under the press as strong as you can, don't want any flex there. Hope that helps a bit. Since you said you'll be sitting to load you need to get your knees under the bench, refer to #3 in my post. A cut out in the lower shelf will accomplish that. You'll also likely be sitting to the left of the press so the handle doesn't come down into your lap. This is why I prefer to load standing up. Sitting off-set to the press feels awkward. |
|
|
|
[#17]
Sitting to reload may feel awkard to the young.
I used to stand to reload, then time caught up with me. Sitting works well for me and the press is to my right side. |
|
|
|
[#18]
Quoted: A leg directly under the press may not get in your way but it might interfere with the operation of the lower part of the press. Most need about 3/4'' clearance. Set it on the edge of any box/crate or square piece of furniture, pull handle and observe. Since you said you'll be sitting to load you need to get your knees under the bench, refer to #3 in my post. A cut out in the lower shelf will accomplish that. You'll also likely be sitting to the left of the press so the handle doesn't come down into your lap. This is why I prefer to load standing up. Sitting off-set to the press feels awkward. Notice in my pictures above I have 3 reloading stations with three corresponding cutouts (the bench spans 3 walls with a station on each wall). I sometimes load sitting down so I planned those cutouts specifically for when I'm sitting. You also need to consider the press mounting. If there is a leg directly under the press you would not he able to removably mount it (you wouldn't be able to use a bolt/nut to mount it. I wanted extra stability in my press so I mounted some angle iron underneath that is permanently mounted. The holes all line up so I can drop a bolt through and thread a nut on the bolt. That way I can remove the entire press and mount if I want to. |
|
|
|
[#19]
I had an L shape for years when I lived in NY.. I went with a 30" depth instead of 24" since i keep dies etc on the top of it.. I found the 24" to be not enough room..
Now living in a rented house in NC I still use a 30" deep by 48" wide instead of 6' wide by 4' wide L shape.. I don't have the room as I did in my house in NY. My RCBS RC and Dillon 550b fit in the 48" wide space with no problem. both tops were 2x4's on edge.. |
|
|
|
[#20]
Quoted:
Sitting to reload may feel awkard to the young. I used to stand to reload, then time caught up with me. Sitting works well for me and the press is to my right side. You can accomplish this by having a work surface at a level that allows you to stand comfortably to perform certain tasks, or just when you want a change, but you have a strong, comfortable, elevated, swivel chair with a back to sit and perform your reloading process at other times. I think a lot of us perform some gunsmithing tasks at our reloading bench, and a lot of those require some standing to work over the gun. Standing and working over a rifle at normal table/chair height kinda sucks sometime, for example when doing scope installs and such. Anyway, for me having that option of standing or sitting has been more comfortable....YMMV. |
|
|
|
[#21]
Quoted: This. Notice in my pictures above I have 3 reloading stations with three corresponding cutouts (the bench spans 3 walls with a station on each wall). I sometimes load sitting down so I planned those cutouts specifically for when I'm sitting. You also need to consider the press mounting. If there is a leg directly under the press you would not he able to removably mount it (you wouldn't be able to use a bolt/nut to mount it. I wanted extra stability in my press so I mounted some angle iron underneath that is permanently mounted. The holes all line up so I can drop a bolt through and thread a nut on the bolt. That way I can remove the entire press and mount if I want to. https://www.AR15.Com/media/mediaFiles/322543/20180902_152708_jpg-817455.JPG I built a support bracket for my Inlinefabrications Mount using 2 x 4s. I laid two 2 x 4s on their side and screwed them into the support studs for the bench top and to each other. Then I screwed another 2 x 4 perpendicular to the two 2 x 4s and screwed it to the 2 x 4 to the support studs for the bench top. I lagged the front of the Inlifabrications mount into the center of the 2 x 6 in the front of my bench top. Pre-drilling all of the holes and installing screws into those holes made installation much easier. My Press is Rock Solid and does not move at all. 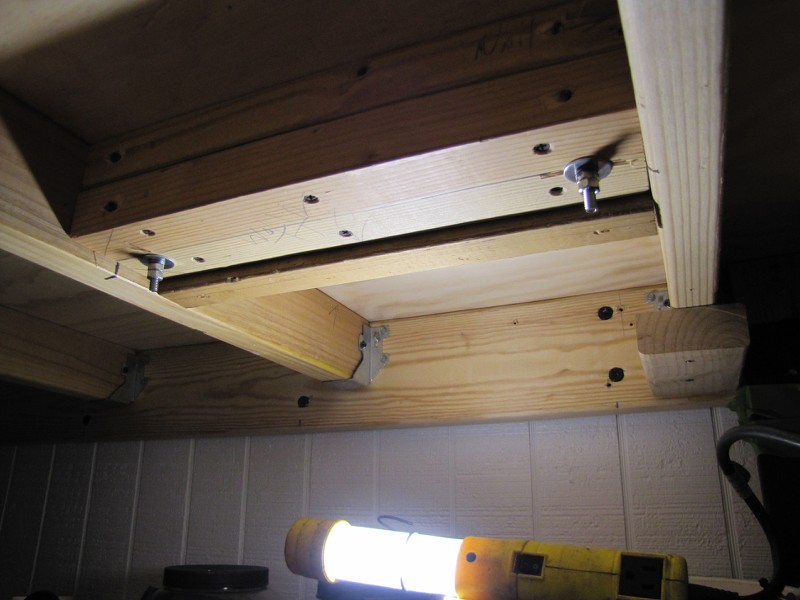

|
|
|
|
[#22]
Lags will eventually work loose. Not ideal if you can help it. Bolts w/ lock washers/nuts are best and can always be snugged up.
I used pre-made laminate counter tops. They're fantastic and my bench is a U-shape Here's my tips for you: - I used 5/8" ply underneat the laminate. I attached the two (final step) via LOTS of wood glue and 1.25" screws from underneath. Not going anywhere. - You can buy pre-mitered corners. Great for a seamless bench top. - Over build your frame. I used 12" spacing between cross-members. I also used joist hangers in applications where those members would see downward force (i.e. next to the press). - SISTER YOUR 2x4's for the legs!!!! Look it up if you need to. I see a member above didn't. Sistered 2x4's are stronger (and easier to build) than a 1/2 lap 4x4. One 2x4 goes directly under your frame, the other goes up the backside of the frame to just below your deck height. The two joined boards are incredibly strong (glue AND screw) and the 2x4 directly under the frame takes the shearing stress off of the fasteners. The one running up the back allows for better attachment to the frame AND support for your plywood directly to the base. - The more wood to wood joint action you can get the better. Screws aren't made for to resist shear, that's nail territory. Use either where appropriate. It's cheap enough. |
|
|
|
[#23]
A good table top height for me is 41". That's around bellybutton high and works great when standing.
If you're going to use mount system that raises the press above the table top you may need to build up under the base to achieve the best level. This is all personal preference, remembering you're going to spend a lot of time doing repetitive motions. A little time spent now will pay off down the road. |
|
|
|
[#24]
It’s already been said a few times, but I’ll chime in on the height thing as well- make it tall enough to stand and use a taller chair if you decide to sit.
I made mine sitting height and it was the biggest mistake I made when putting my reloading area together. I’d love to be able to stand for some things but it’s awkward as hell at the sitting height I made it. Making it sitting height permanently removes the standing option. Making it standing height keeps both options open. Bottom line is it’ll be a lot easy to buy a taller chair than rebuild the entire bench. |
|
|
|
[#25]
I made my frame to my elbow height, the counter top added 3/4" to that.
It's perfect for standing and sitting on a bar stool |
|
|
|
[#26]
@eric_cartman
I used an IKEA solid oak counter top for mine the one at this link https://www.ikea.com/us/en/catalog/products/60274964/ be careful as most of their counter tops are particle board with veneer but this one is solid oak butcher block style confirmed as I have drilled through it. Reasonably cheap for it being solid oak butcher block style. Mines different than what you want to do but the ikea countertop was the cheapest route I could find for the solid wood bench I bought a cheap Husky roll cabinet tool box on Black Friday last year for like $189 it came with a 1" thick maple top on it, I took the wheels off it and bolted some 3/4" plywood to the bottom to stabilize it, I cut the maple top of it to make up the 12" difference that the ikea countertop and doubled it up on the end and bolted it back to the tool box and mounted my vise on it. The whole back edge of the ikea counter top is mounted to the wall with aluminum L screwed to the wall (I did the back wall in 3/4" plywood when I build the garage) and the counter top bolts to the L aluminum from underneath via bolts and nutserts in the bottom of the counter top. The other end of the counter top is bolted to where the handle used to be on my Matco tool box with aluminum brackets I made. Sturdy enough my fat ass can stand on it anywhere. Said you wanted new ideas and I did mine unusually. 

|
|
|
|
[#27]
If you have a window make sure you plan for a boolit casting area!
Some 300 blackout subs and HP supers! |
|
|
|
[#28]
I've put down rubber matting in front of the bench to help relieve the stress of standing for long periods. The edges lock together and you can get it cheap at HF.
I've been using a bench that's 32" high and find its too low even sitting. Used doubled 3/4" ply and joined them together with construction adhesive to get a 1 1/2" top. Its been a very solid and durable free standing bench over the past 30 yrs. I'm now building a new bench to isolate all the reloading stuff from other projects. I'll definitely make it taller than the previous bench. Just cleared a corner in the garage for it. The concrete floor is uneven from the contractors adding more slope than necessary for water drainage. Just welded up some brackets tonight to make the legs adjustable using carriage bolts. |
|
|
|
[#29]
Quoted:
Lags will eventually work loose. Not ideal if you can help it. Bolts w/ lock washers/nuts are best and can always be snugged up. I used pre-made laminate counter tops. They're fantastic and my bench is a U-shape Here's my tips for you: - I used 5/8" ply underneat the laminate. I attached the two (final step) via LOTS of wood glue and 1.25" screws from underneath. Not going anywhere. - You can buy pre-mitered corners. Great for a seamless bench top. - Over build your frame. I used 12" spacing between cross-members. I also used joist hangers in applications where those members would see downward force (i.e. next to the press). - SISTER YOUR 2x4's for the legs!!!! Look it up if you need to. I see a member above didn't. Sistered 2x4's are stronger (and easier to build) than a 1/2 lap 4x4. One 2x4 goes directly under your frame, the other goes up the backside of the frame to just below your deck height. The two joined boards are incredibly strong (glue AND screw) and the 2x4 directly under the frame takes the shearing stress off of the fasteners. The one running up the back allows for better attachment to the frame AND support for your plywood directly to the base. - The more wood to wood joint action you can get the better. Screws aren't made for to resist shear, that's nail territory. Use either where appropriate. It's cheap enough. and a lock washer between the lag head and that washer. So far there is no loosening of my lags. |
|
|
|
[#30]
Sorry I haven't updated for a bit. Thank you everyone for the help and suggestions. I hate to be that guy that comes asking for advice and then ignore it but I couldn't bring myself to take the advice of making it tall enough to stand at. I realize most of the people on here suggested that and most of them have a ton of experience so I will probably regret it. I work on my feet most days and when I get home, I want to sit down. I figured a comfortable taller chair with a back would be over $100. If it gets to the point that I decide I want to stand, I can easily raise it up. I ended up changing my design a bit. I framed it with 2 x 4's on 12" spacing and topped it with 1/2" plywood double up. I had planned on making it much heavier but It seems rock solid the way it is. Ive got the top on but I still have to coat it with something, probably paint. There's also a lot of other finish work to do. I will post an update with pictures next week when I get it completed. Thanks again everyone.
|
|
|
|
[#31]
In for pics.
|
|
|
|
[#32]
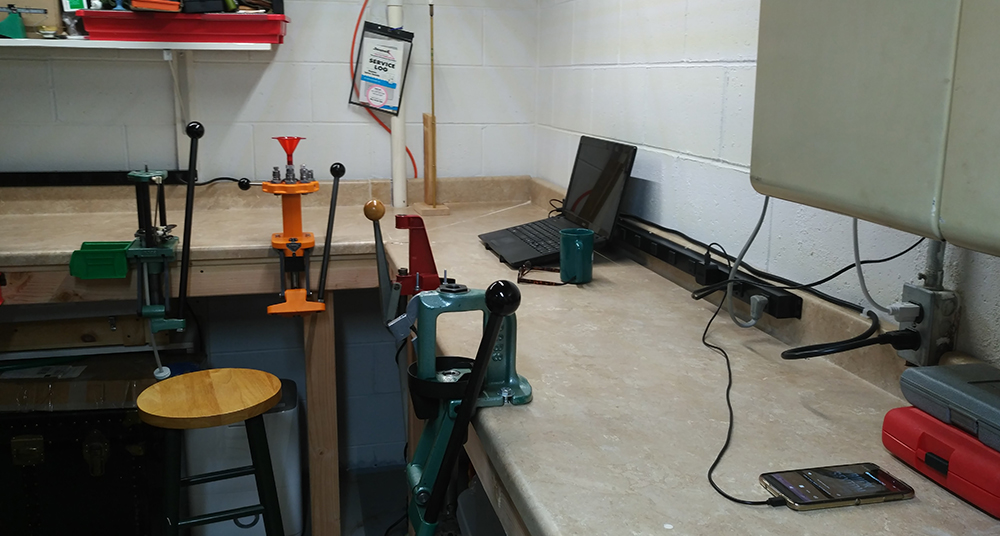
TL:DR Pics at the bottom, Thanks for all the help
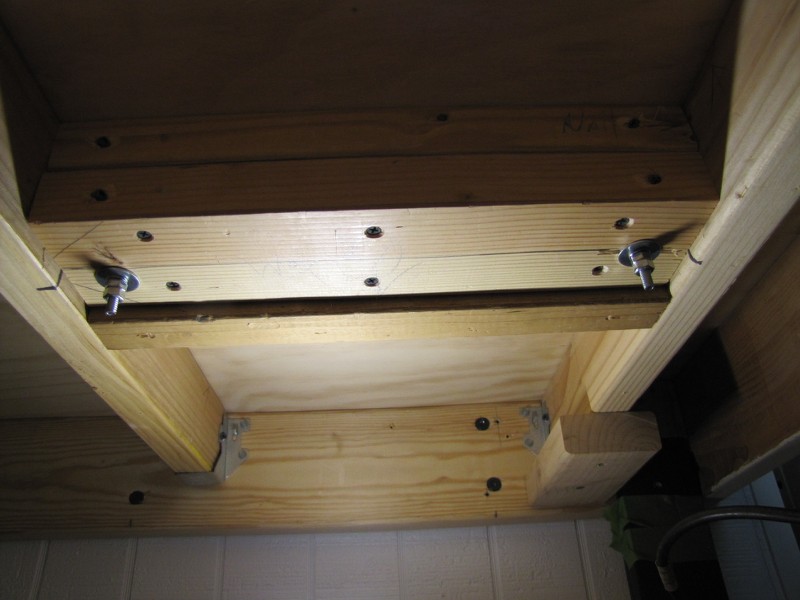
Here is the finished product. Ive still got some finish work to do in the room but it is coming along. Before the reloading bench project, this was a 7 x 10 walk in closet off of a finished room in the basement that I had converted into my gun/hunting room. The door into the room was right behind the TV on the reloading bench. I tore out the wall on the opposite side and made the room bigger by extending it out further into the unfinished part of the basement and I moved the entry door over to that side. I only added 4' x 10' to the room because one day I plan to finish the rest of the basement and I couldn't take up any more room for that. Now I have 11' x 10' total. You can see in some of the pics where the wall was before. I forgot to take more pictures as I was building but I did take one as I was working on the framing. The whole setup seems rock solid but time will tell when I actually start reloading. I have 2 receptacles at bench height and then I have four under the bench. As I get the hang of everything and figure out where and how everything works, I will drill holes in the top and run power cords under the bench to reduce clutter on top. I had always planned on putting LED strip lights above the bench but someone here recommended lighting below the bench, that was an excellent suggestion. For anyone who isnt famiiar with LED strip lights like these, they are super easy and cheap to install and put out a lot of light. Two 16' strips of light, a splitter cable, and the power supply was $35. In one of the pics of the bench, the only light on in the room is the 2 strip lights. I used 16' above the bench and then only 8' below. Strip Lights Power Supply |
|
|
|
[#33]
That turned out nice, lots of room to grow into.
|
|
|
|
[#34]
Quoted:
TL:DR Pics at the bottom, Thanks for all the help Here is the finished product. Ive still got some finish work to do in the room but it is coming along. Before the reloading bench project, this was a 7 x 10 walk in closet off of a finished room in the basement that I had converted into my gun/hunting room. The door into the room was right behind the TV on the reloading bench. I tore out the wall on the opposite side and made the room bigger by extending it out further into the unfinished part of the basement and I moved the entry door over to that side. I only added 4' x 10' to the room because one day I plan to finish the rest of the basement and I couldn't take up any more room for that. Now I have 11' x 10' total. You can see in some of the pics where the wall was before. I forgot to take more pictures as I was building but I did take one as I was working on the framing. The whole setup seems rock solid but time will tell when I actually start reloading. I have 2 receptacles at bench height and then I have four under the bench. As I get the hang of everything and figure out where and how everything works, I will drill holes in the top and run power cords under the bench to reduce clutter on top. I had always planned on putting LED strip lights above the bench but someone here recommended lighting below the bench, that was an excellent suggestion. For anyone who isnt famiiar with LED strip lights like these, they are super easy and cheap to install and put out a lot of light. Two 16' strips of light, a splitter cable, and the power supply was $35. In one of the pics of the bench, the only light on in the room is the 2 strip lights. I used 16' above the bench and then only 8' below. Strip Lights Power Supply https://www.AR15.Com/media/mediaFiles/442580/IMG_3448_jpg-832710.JPG https://www.AR15.Com/media/mediaFiles/442580/IMG_2132_JPG-832718.JPG https://www.AR15.Com/media/mediaFiles/442580/IMG_2142_JPG-832721.JPG https://www.AR15.Com/media/mediaFiles/442580/IMG_2143_JPG-832723.JPG https://www.AR15.Com/media/mediaFiles/442580/IMG_2150_JPG-832725.JPG |
|
|
|
[#35]
Most of you guys have way, way too much room. It almost seems like it is not a challenge to jam yourself in there to make some bullets.
|
|
|
|
[#36]
Quoted: I like what you did with the lighting and I will try it out on my reloading bench but the power supply is no longer available. Any suggestions on another type? Another link for same power supply |
|
|
|
[#37]
Or here’s a link for a 2 pack of 24 watt power supplies. Each one would power one 16’ strip. I’m sure you can find them as a single as well, that was just the first one that popped up. The one I linked in the post above is showing as $10.65 and in stock. Last week when I bought it, it was $12.99
2 pack |
|
|
|
[#38]
Quoted:
Or here’s a link for a 2 pack of 24 watt power supplies. Each one would power one 16’ strip. I’m sure you can find them as a single as well, that was just the first one that popped up. The one I linked in the post above is showing as $10.65 and in stock. Last week when I bought it, it was $12.99 2 pack https://www.amazon.com/dp/B00VE7HBMS |
|
|
 Win a FREE Membership!
Sign up for the ARFCOM weekly newsletter and be entered to win a free ARFCOM membership. One new winner* is announced every week!
You will receive an email every Friday morning featuring the latest chatter from the hottest topics, breaking news surrounding legislation, as well as exclusive deals only available to ARFCOM email subscribers.

AR15.COM is the world's largest firearm community and is a gathering place for firearm enthusiasts of all types.
From hunters and military members, to competition shooters and general firearm enthusiasts, we welcome anyone who values and respects the way of the firearm.

Subscribe to our monthly Newsletter to receive firearm news, product discounts from your favorite Industry Partners, and more.
Copyright © 1996-2024 AR15.COM LLC. All Rights Reserved.
Any use of this content without express written consent is prohibited.
AR15.Com reserves the right to overwrite or replace any affiliate, commercial, or monetizable links, posted by users, with our own.


