|
[Last Edit: PR361]
[#1]
Photos of finished small parts, after final boil and polishing with brush and steel wool.
|
|
|
|
|
[#2]
|
|
|
|
|
[#3]
Sometimes I do what I call “ patch” bluing, ie; i just try to repair a worn place or something that got screwed up.
I had some rusty magazines that I’ve been bluing concurrent to the rifle project, didn’t really put a lot of effort into them, just knocked off the rust and started bluing. This carbine follower was worn to bare metal where the cartridge stripped off, just steel wooled it and started rusting, turned out nice. |
|
|
|
|
[Last Edit: PR361]
[#4]
One of the magazines, somehow got contaminated by the rust solution or water and sat for a week, rusted and pitted on the bottom halfway through the bluing process, just sanded off the rust and continue bluing, it should eventually blend back in.
ETA: thought those photos were better... 
After one rust. |
|
|
|
|
[Last Edit: PR361]
[#5]
Humidity is important, getting ready to rain, parts are rusting fast.
Another rust on a .22 a friend gave me, this is a damn near perfect rust, what I strive for every time . |
|
|
|
|
[#6]
You work in the coolest firehouse ever
|
|
|
|
|
[#7]
Originally Posted By kala_azar:
You work in the coolest firehouse ever 
|
|
|
|
|
[#8]
Nice project... Just a quick question, as I rust blued an old beaten up Stevens model 15 rifle in much the same way... I had a couple of difficulties though, and I would appreciate your thoughts... there were sections of the barrel/receiver that turned out to be a copper color after rusting and carding. I figured I screwed up and nothing would change it, so I reassembled the rifle and put it on the shelf. After a year or so, those coppery colored spots had gone away and turned into the dark blue the rest of the parts had. Any explanation for that? Oh, and BTW, I just chucked the small end of the barrel into a drill, rested the other end on a piece of felt, and draw filed/sanded the pitting out, so our solutions are similar. Thanks for any insight!
|
|
|
|
|
[#9]
Originally Posted By PR361:
Sometimes I do what I call “ patch” bluing, ie; i just try to repair a worn place or something that got screwed up. I am going to be doing something similar on a Remington 700 in the next day or two. If you don't mind, I will piggyback on your thread instead of starting a new one. My process is slightly different and will give folks examples of different approaches to the same end. No worries if you want your project to stand alone. |
|
|
|
|
[#10]
Originally Posted By UtahShotgunner: OP, I am going to be doing something similar on a Remington 700 in the next day or two. If you don't mind, I will piggyback on your thread instead of starting a new one. My process is slightly different and will give folks examples of different approaches to the same end. No worries if you want your project to stand alone. |
|
|
|
|
[#11]
Originally Posted By k75zracer:
Nice project... Just a quick question, as I rust blued an old beaten up Stevens model 15 rifle in much the same way... I had a couple of difficulties though, and I would appreciate your thoughts... there were sections of the barrel/receiver that turned out to be a copper color after rusting and carding. I figured I screwed up and nothing would change it, so I reassembled the rifle and put it on the shelf. After a year or so, those coppery colored spots had gone away and turned into the dark blue the rest of the parts had. Any explanation for that? Oh, and BTW, I just chucked the small end of the barrel into a drill, rested the other end on a piece of felt, and draw filed/sanded the pitting out, so our solutions are similar. Thanks for any insight! Different steels respond differently to the rust process, harder, higher nickel content seem to be the most difficult, softer alloys being the easiest, in my view. Bottom line, IDK...
|
|
|
|
|
[#12]
Originally Posted By PR361: More education is better! We learn from each other. Will remind myself to take pictures! |
|
|
|
|
[#13]
With PR361s permission I am going to add my bit to this rust bluing/blacking thread.
Recently purchased a Remington 722. It appears to have been consigned to the auction house from the State Police or other law enforcement organization in Alaska. From the auction pics it appeared to have had a very hard life and I purchased it to pull down and sell as parts. I failed to take any "before" pics and the auction has deleted the listing so you'll have to take my word, it was rough. At least half of the stock finish was gone and the wood discolored and stained. Barrel blacking worn almost to white metal. I pulled it apart and applied stripper to the stock. Planned to spray some polyurethane on it and list it on eBay. When wiping it down with a damp rag to raise grain I found some of the nicest wood I have seen on a 722. APOLOGIES FOR PIC QUALITY. I take almost all pics with my phone, and inside w/ fluorescent lights, it doesn't do well. Stock with oil finish and evidence sticker that was on the it when I bought it. After putting the effort into making the stock pretty, the metal looked shabby. Also it had some numbers etched into it. I'd guess by law enforcement. Disassembled, these are the parts I am going touch up with the rust bluing process. The ONLY polishing I will be doing is to removed the electric penciled numbers. |
|
|
|
|
[#14]
The barrel is shown, but I didn't black it at this time.
My barrel boiling tank is outside and we have had high winds for the last 2-3 days. Can't keep my propane burners lit. Instead, I put the barrel in my Evaporust tank and will show it when it is finished. All parts were first de-greased in a very hot Simple Green solution. Will be wiped down with acetone right before we begin the rusting process. Then it was time to do the only polishing. Hard to see in the pic, but there are two bare metal "stripes" on each side of the mounting holes. Used a small Swiss file and 400gr emory cloth to remove the electic pencil numbers. Screw heads were polished exactly like PR361 showed for his rifle. I use a vegetable steamer tray to boil the small parts without losing them in the pot. Here are the two pieces of equipment that make this project go quickly. Not shown is the pot of boiling water. Propane torch: Carding wheel: When set up this way, the drill needs to be on its lowest speed. On this bench top model, that is 5-600 RPM. |
|
|
|
|
[#15]
The propane torch needs to be used VERY carefully.
We are getting the parts just warm enough to quickly evaporate the rusting solution. With larger, heavier parts the boiling water is your heat source. Let's do some blacking! All parts are first 'burnished' with a de-greased wire wheel (not pictured). This is to "open the pores" of the steel so they will more readily accept the rusting solution. I'm sure this is incorrect terminology, but it is vitally important. If not done, the results are poor. It also needs to be done right before rusting. No more than five minutes or you will have to do it again. Action goes in the boiling water to heat up. Small parts are heated with torch and rusting solution applied. For screws I hold them with needle nose pliers, heat the head for a second or two and then dunk them in the rust solution. Then back in the flame until the solution "dries out" Did the same for the recoil lug. Floor plate I just held in my hand as I was wearing Nitril gloves which was enough insulation. Pull action from water, put steamer tray with small parts in pot to boil. Not critical, but I use compressed air to blow water out of crevices in action before applying solution to the HOT action. If solution does not completely evaporate, I will wave the action in the flame just long enough to dry it out. Action immediately goes back into the boiling water after small parts are taken out. Small parts carded - then heated with torch(they cool quickly) dipped or wiped with rust solution. They then replace the action in the boiling water. Action blown dry with compressed air - carded - rust solution applied and into the boiling water. You get the idea. Once you are started, you are moving quickly but efficiently through the steps. It goes quickly enough that I don't even turn off the drill w/ the carding wheel. |
|
|
|
|
[Last Edit: UtahShotgunner]
[#16]
I usually don't keep a count on the rusting cycles.
Just go through the steps until the parts take on a deep black color. Here are the parts carded and dry after 2-3 cycles. After one or two more cycles the parts are carded, blown dry and given a heavy coat of 30wt non-detergent motor oil. This is the ONLY oil I will use. Too many products (particularly gun oils) have additives that will loosen and remove freshly done rust blacking. Ask me how I know.... The parts will sit with this heavy application of oil for at least 24 hours. This helps "fix" the blacking to the underlying metal Comments about this project. 1) The use of a heat source is VERY common. You can even find YouTube videos from inside Turnbull's shop showing his guys using this method. That said, stick to the cold rust method if you are not familiar with the process. 2) Not including the disassembly of the metal parts(removing the barrel) it took me longer to take and edit the pics and write this up than it did to do. (Metal work, not the stock work.) I have done dozens of similar rifle renovations and know the steps and movements I will be making in my tiny shop. Ex: It took me less that two minutes to polish out the electric pencil marks. I knew which file to use and when to switch to emery cloth. 3) Don't be afraid to try rust blacking. Worst case, you have to polish a part and do it over. I had some great mentors who gave me hints & tips, but my process is not exactly the same as theirs. More than one way to skin a cat. 4) This is not my not my only rust bluing process. This is for projects that need to have minimal time involved. "Good looking and functional" is the goal. Not perfection. When I am building a custom rifle or doing work for a customer, the process looks much more like what PR361 showed us. Though heat can help on some guns, like the high nickel content Winchesters. In a situation like this where I am renovating a rifle for resale, I have purposely sought out time saving methods, as I cannot have days involved in a single project. Including the stock strip and refinish the metal work described and another hour or so for the barrel and reassembly, I will have right around six hours involved in this project. ETA: I didn't show the wire wheel I use for burnishing, or the blacking solution I used. I have tried every commercial solution I can find and have made up a couple myself. Everybody needs to keep a few secrets. ETA II: When first trying rust blacking I do suggest you use distilled water. I had very poor results when I have used our tap water. Turns out we have a very high iron content and that messes up the process. To always have enough distilled water on hand, I put our basement dehumidifier on a platform and have the drain line into a 55gal barrel. In the summer it overflows. |
|
|
|
ID, USA
|
[#17]
Thanks for the write up. I may have to try this with a couple rusted AK mags I have and see how it comes out.
|
|
|
|
[Last Edit: UtahShotgunner]
[#18]
Had the time to take care of the barrel today.
It has been soaking in the Evaporust since my last post. Another reason I like the stuff. Other than removing rust, it won't attack the metal so if you can't get to it quickly it won't hurt anything. Will mention again, this rifle was getting a nice renovation, but not a restoration. Nor could I put a lot of time into this project. Even now, I would likely make more by parting this rifle out. A stock this nice would bring good money on eBay and short action 700s are in demand. But sometimes you just have to save them. Using the time stamps on the pictures, from the time I took the first picture as I filled my boiling tank to the last with oil wiped on the barrel, this project took 49 minutes. Pulling the barrel out of my Evaporust tank. Scrubbing exterior with Scotch Brite and HOT water. Polishing with 320gr. Going only lengthwise on the barrel. Barrel then burnished before rusting. Barrel placed in boiling water for a couple minutes, then rusting solution applied. After this, efficiency and speed are important. Need to card barrel quickly so next rust cycle can be started while barrel is hot. First rust. |
|
|
|
|
[#19]
After first rust, boil & card.
Sometimes when it is cold and dry as it is now, I will let the barrel "steam" for a few minutes before boiling. Not needed with this barrel, but often helpful with the Winchester Nickel Steel barrels. In hot humid weather(summer) this doesn't really help. The steam just converts the red oxide to black. On this barrel, I did three rusting cycles before applying the oil. |
|
|
|
SC, USA
|
[#20]
I recall a process to "blacken" metal using a hot ammonium nitrate solution. Boil the solution adding the nitrate till the temp is something like 350 deg.???
Solution would harden when cooled and could be stored / reused?? Metal polish clean and degrease same as the rust blue. Going on a long ago fuzzy memory of reading about this process to blacken metal. Oh well off to the internet to search. |
|
|
|
[Last Edit: PR361]
[#21]
Finally got some shop time this weekend to reassemble the Savage.
I wanted to polish and jewel the bolt before reassembly, got that done, put it all together. |
|
|
|
|
[Last Edit: PR361]
[#22]
Not perfect, I would have liked to get the bolt handle and trigger guard darker, but all in all, much nicer than it was, and it looks period correct, in my view. If I was really shooting for a perfect look, I would polish off the parts I wasn't satisfied with a nd re-rust them. But I've got other projects lined up, limited time, and this one is " Good nuff" for what I set out to do.
|
|
|
|
|
[#23]
Did a few rusty magazines as well, turned out nice, now I have to do the rest...
|
|
|
|
|
[#24]
I have set the toggle on this thread to keep it out of the archive.
|
|
|
|
|
[#25]
Thank you🙂
I would like to see a continuing discussion of bluing techniques and methods, input from various experiences.’ |
|
|
|
|
[#26]
Great work and thanks for the great information.
|
|
|
|
|
[#27]
Auction rifle came to me with an Alaska State Police sticker and case number electo-penciled on the front ring.
Clearly a working rifle. It was rough when it arrived. Wish I had a before pic, but the auction house deleted them before I thought to save them. This is the only pic they didn't delete.

While stripping the wood in preparation of breaking down the rifle and selling it for parts, I saw that it was nicely grained. So I decided to renovate the rifle instead of parting it out. Refinished the wood, polished the bolt and reblacked as described in the thread. Not perfect by any means, but it will serve someone for years. |
|
|
|
|
[#28]
Originally Posted By UtahShotgunner:
Auction rifle came to me with an Alaska State Police sticker and case number electo-penciled on the front ring. Clearly a working rifle. It was rough when it arrived. Wish I had a before pic, but the auction house deleted them before I thought to save them. This is the only pic they didn't delete.
https://images.proxibid.com/AuctionImages/1391/171757/Small/11089-1.jpg While stripping the wood in preparation of breaking down the rifle and selling it for parts, I saw that it was nicely grained. So I decided to renovate the rifle instead of parting it out. Refinished the wood, polished the bolt and reblacked as described in the thread. Not perfect by any means, but it will serve someone for years. https://www.AR15.Com/media/mediaFiles/119347/20200129_145328_jpg-1255733.JPG Good looking rifle now. 
|
|
|
|
|
[#29]
Originally Posted By PR361: Turned out nice! Good looking rifle now. It is a "Five Foot Rifle", but that is all that I intended. |
|
|
|
|
[Last Edit: Et2ss]
[#30]
Forgive my hasty post, but I'm away on a business trip and trying this from my phone.
I like using Laurel mountain forge solution. It seems the least finicky to use. I just follow their directions. I don't boil the pieces, just quench with boiled distilled water. Summer humidity is enough to obtain a good rust, in the winter, I hang the pieces on the towel rack outside my shower, plenty of humidity
First carding or two is with 0000 steel wool, then subsequent carding a are with heavy linen canvas scraps. After the final carding I quench with boiled water with washing soda in into neutralize any further rusting. For the crew heads, I heat them to a dull red and quench in motor oil until they are nice and deep blue. I can only find a few pics now A Stevens 520 barrel 
A Savage 1899 takedown receiver, I took a pic before finishing the forearm ferule to show what a grey rat it was before bluing 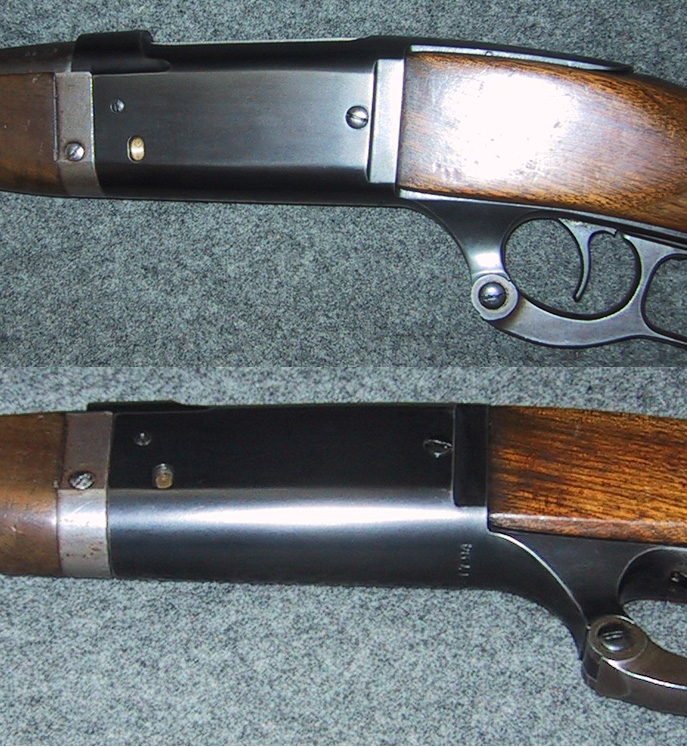
A Husqvarna 1907 slide. Before, during, and after 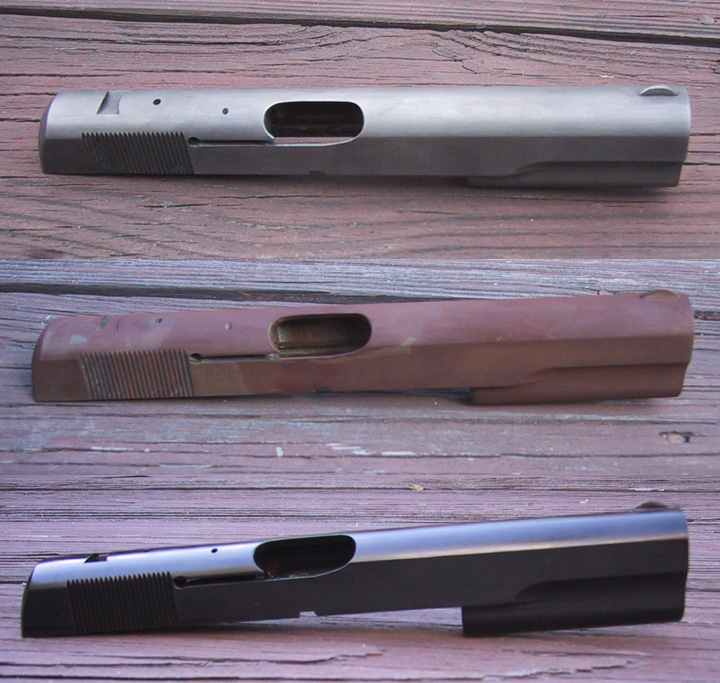
This was a poor Savage 1907 I picked up for a song. It was as grey as the 1899 pictured above, but had a lot of rust and putting. A good media blast helped smooth that out. 
EDITED: for stupid phone auto correct |
|
|
|
|
[#31]
Thanks for posting up, fellas. Very helpful.
Bought a cheap used Marlin Glenfield once - stripped the chipped brown paint off the stock and found good-lookin wood underneath. You never know. |
|
|
|
|
[#32]
Originally Posted By Et2ss:
Forgive my hasty post, but I'm away on a business trip and trying this from my phone. I like using Laurel mountain forge solution. It seems the least finicky to use. I just follow their directions. I don't boil the pieces, just quench with boiled distilled water. Summer humidity is enough to obtain a good rust, in the winter, I hang the pieces on the towel rack outside my shower, plenty of humidity
First carding or two is with 0000 steel wool, then subsequent carding a are with a heavy linen canvas scraps. After the final carding I quench with boiled water with washing soda in into neutralize any further rusting. For the crew heads, I heat them to a full red and quench in motor oil until they are nice and deep blue. I can only find a few pics now A Stevens 520 barrel https://www.newphillysports.com/Images/rustblue.jpg A Savage 1899 takedown receiver, I took a pic before finishing the firestorm ferule to show what a grey rat it was before bluing https://www.newphillysports.com/Images/rustblue2.jpg A Husqvarna 1907 slide. Before, during, and after https://www.newphillysports.com/milsurp/1907.jpg This was a poor Savage 1907 I picked up for a song. It was as grey as the 1899 pictured above, but had a lot of rust and putting. A good media blast helped smooth that out. http://newphillysports.com/milsurp/1907blue.jpg I will have to try carding with some canvas, sounds like a good way to get a final polish . |
|
|
|
|
[#33]
Originally Posted By PR361: Nice work! I will have to try carding with some canvas, sounds like a good way to get a final polish . the scrap piece |
|
|
|
|
[#34]
Bumping this so it doesn't slip into the archives
|
|
|
|
|
[#35]
I've long planned to try my hand at rust bluing. I have a couple of busted old Remington 11-48 receivers to use for a practice run (one has the end of the magazine tube broken off, the other has had the stock tube broken off and horribly bubba welded back onto the reciever), and recently picked up a Winchester 72 that was too far gone to not justify a reblue. No pitting, just no finish left to speak of.
Had this thread bookmarked, which offers similar instructions to what has been posted here. https://www.rimfirecentral.com/forums/showthread.php?t=290576 I need to order a tank, which I will do so next pay day from Brownells (had a $40 tank bookmarked from Midway but they discontinued them )Have some Pilkington's rust blue, and eezox to use after the bluing is done. My plan was to cap a bit of PVC and do a vinegar soak to remove bluing and rust. Looks like evaporust might be a better option? I know when I've used vinegar on ATV steel gas tanks to remove rust, they tended to flash rust afterwards. Polish/ sand the parts down. Apply rust blue solution and allow it to rust, then boil and card. Originally Posted By PR361: After boiling and carding, ready for the next rust. A word about carding, I use 0000 steel wool and a Brownells carding brush. When I started, I read you should “ degrease” your steel wool so you don’t contaminate the metal with oil. This leads to rapidly rusting, disintegrating, messy steel wool. And completely unnecessary. The carding brush, a very fine steel wire, is worth every penny. The one from the hardware store won’t work, it just brushes the blue back off. So are you saying here that you don't degrease your 0000 steel wool? From what I've read, even oil from fingerprints will screw with a rust blue job. I plan on using carding brushes, and was going to soak steel wool in acetone to degrease it for carding. Great thread. Subscribed. |
|
|
|
|
[#36]
Oh, the other thing I noticed was it appears you put the rifle on the bottom of the tank vs suspending it with wire. Is that correct, and if so, no ill effects from doing so?
I'm a klutz, so the simpler i can make the process, the less likely I'll screw it up. |
|
|
|
|
[#37]
Originally Posted By wm69: Oh, the other thing I noticed was it appears you put the rifle on the bottom of the tank vs suspending it with wire. Is that correct, and if so, no ill effects from doing so? I'm a klutz, so the simpler i can make the process, the less likely I'll screw it up. I suspend the barrel of the bottom of the tank. Two or three pieces of stiff wire bent to follow the contour of the tank. Hooks over the edges on each side and approx. 1/2" off the bottom. Keeps the boiling water turbulence from moving the parts around and abrading the surface. Small parts are in the vegetable steamer basket, so that keeps small parts off the bottom. |
|
|
|
|
[#38]
Originally Posted By UtahShotgunner: I suspend the barrel of the bottom of the tank. Two or three pieces of stiff wire bent to follow the contour of the tank. Hooks over the edges on each side and approx. 1/2" off the bottom. Keeps the boiling water turbulence from moving the parts around and abrading the surface. Small parts are in the vegetable steamer basket, so that keeps small parts off the bottom. Wonder how upset the wife will be if I use her steamer basket......... |
|
|
|
|
[#39]
Originally Posted By wm69: I've long planned to try my hand at rust bluing. I have a couple of busted old Remington 11-48 receivers to use for a practice run (one has the end of the magazine tube broken off, the other has had the stock tube broken off and horribly bubba welded back onto the reciever), and recently picked up a Winchester 72 that was too far gone to not justify a reblue. No pitting, just no finish left to speak of. Had this thread bookmarked, which offers similar instructions to what has been posted here. https://www.rimfirecentral.com/forums/showthread.php?t=290576 I need to order a tank, which I will do so next pay day from Brownells (had a $40 tank bookmarked from Midway but they discontinued them )Have some Pilkington's rust blue, and eezox to use after the bluing is done. My plan was to cap a bit of PVC and do a vinegar soak to remove bluing and rust. Looks like evaporust might be a better option? I know when I've used vinegar on ATV steel gas tanks to remove rust, they tended to flash rust afterwards. Polish/ sand the parts down. Apply rust blue solution and allow it to rust, then boil and card. So are you saying here that you don't degrease your 0000 steel wool? From what I've read, even oil from fingerprints will screw with a rust blue job. I plan on using carding brushes, and was going to soak steel wool in acetone to degrease it for carding. Great thread. Subscribed. I degreased when I first started, but found it unnecessary. I don’t bother now. I do wear nitrile gloves. Laurel Mountain Browning Solution is my go to, it touts itself as oil cutting. But I’ve used other solutions with good results without bothering to degrease the steel wool, or use distilled water. |
|
|
|
|
[#40]
bump
|
|
|
|
|
[#41]
Bumping to the top to keep it going.
|
|
|
|
|
[#42]
Novak's conservation method
 Conservation 101: Stop the decay! |
|
|
|
 Win a FREE Membership!
Sign up for the ARFCOM weekly newsletter and be entered to win a free ARFCOM membership. One new winner* is announced every week!
You will receive an email every Friday morning featuring the latest chatter from the hottest topics, breaking news surrounding legislation, as well as exclusive deals only available to ARFCOM email subscribers.

AR15.COM is the world's largest firearm community and is a gathering place for firearm enthusiasts of all types.
From hunters and military members, to competition shooters and general firearm enthusiasts, we welcome anyone who values and respects the way of the firearm.

Subscribe to our monthly Newsletter to receive firearm news, product discounts from your favorite Industry Partners, and more.
Copyright © 1996-2024 AR15.COM LLC. All Rights Reserved.
Any use of this content without express written consent is prohibited.
AR15.Com reserves the right to overwrite or replace any affiliate, commercial, or monetizable links, posted by users, with our own.


