|
Posted: 12/30/2013 7:48:20 PM EDT
I received a Hornady LNL AP for my birthday. I have read a great deal about the care and feeding of these machines, and the trials and tribulations that some experienced. My press ran well for me after the initial setup, but there was one issue that bothered me. At index on the downstroke of the ram(handle moving up), the shellplate would jump the last few degrees as the balls went home into the detents. No amount of tuning with the pawls would cure the abnormal movement. Closer examination showed that the shell plate was riding slightly above the sub-plate until the balls started to ramp into the detents. As the balls tried to go home the shellplate would leap forward and then sit down onto the sub-plate. This was not so bad except for the fact that I was loading .40S&W and the flake powder would occasionally hop out of the cases. I went looking for a solution. I took the shellplate off and then removed the sub-plate, exposing the drive hub and drive shaft. Seeing the relationship of the parts showed that the height of the drive hub and the height of the sub-plate set the clearance for the shellplate against the sub-plate. I called Hornady CS and described my problem. They sent a new drive hub but it was identical to the one in the press.
What follows is my solution to this problem. I started by measuring the height of the drive hub and the height of the sub-plate. I found that the drive hub was .014" taller than the sub-plate. This difference is what allowed the shellplate to float above the sub-plate during indexing. I am a machinist and I knew the issue could be solved on a milling machine, but I wanted to come up with a no-cut solution. The drive hub is 1" in diameter and the ram area that it sits in has a 1.562" bore. I began to search for a shim set that would work and found one without to much trouble or cost. Now to the good part. This is the shim assortment, with sizes from .001 to .125". 1"ID and 1.5"OD. $7.90 to my door from eBay. 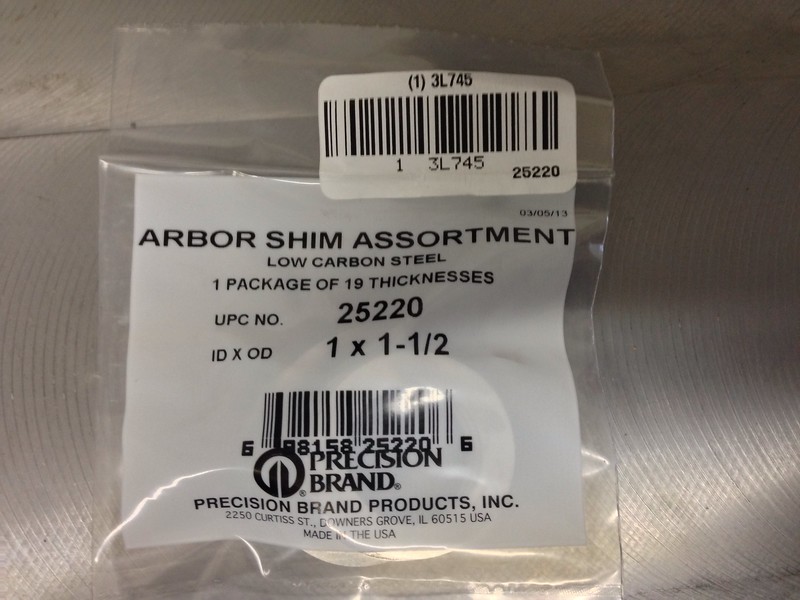
Untitled by zweitakt250, on Flickr Here you can see the drive hub sitting on the drive shaft. 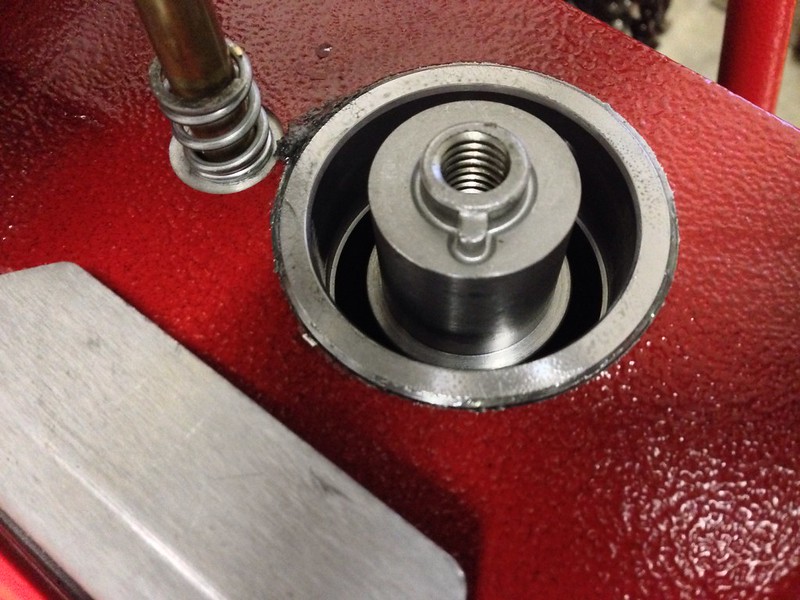
Untitled by zweitakt250, on Flickr Measuring the drive hub from shoulder to face shows that its critical dimension is .942" 
Untitled by zweitakt250, on Flickr Measuring the sub plate shows a height of .928" 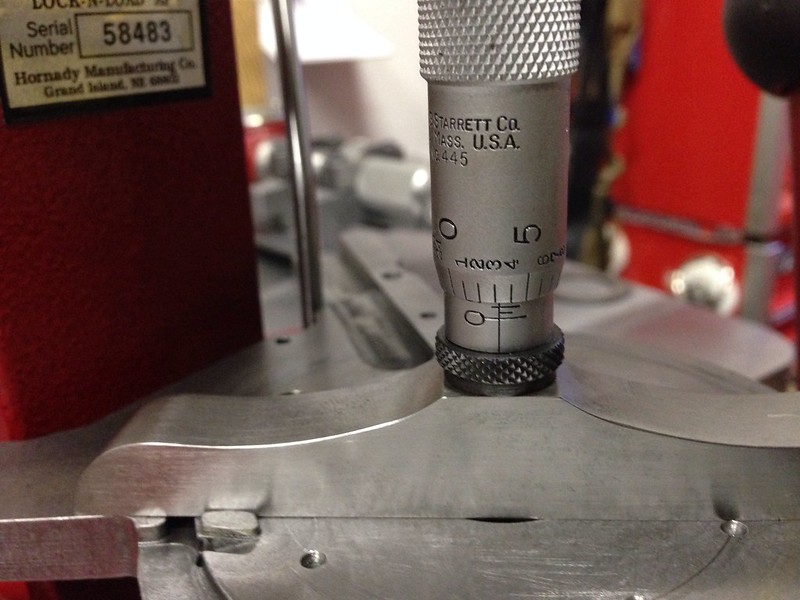
Untitled by zweitakt250, on Flickr This results in a .014" clearance. I knew it needed to be less. I decided to try a .004" clearance. Using the .01" shim showed great improvement, but I thought the clearance could go to .003". No .011" shim is provided so I made a stack out of a .005 and .006" shims. Checking the stack. 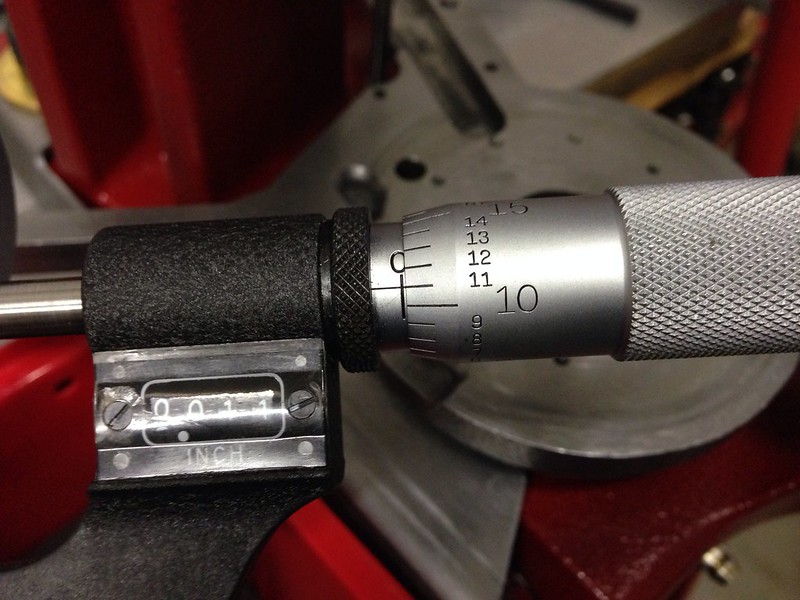
Untitled by zweitakt250, on Flickr The shims in place on the drive hub. 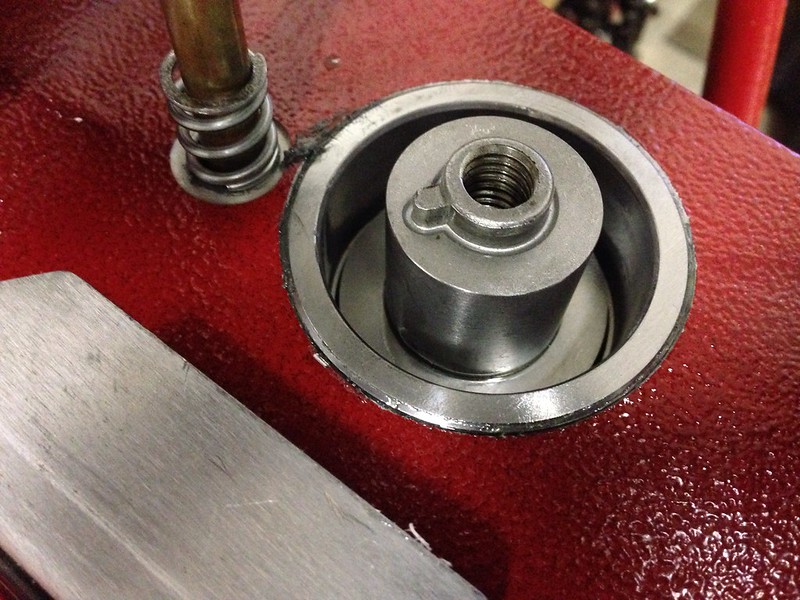
Untitled by zweitakt250, on Flickr Now when the shell plate is tightened the drive hub will be pulled barely above flush, keeping the shellplate in contact with the sub-plate and making the indexing of the press ultra smooth. 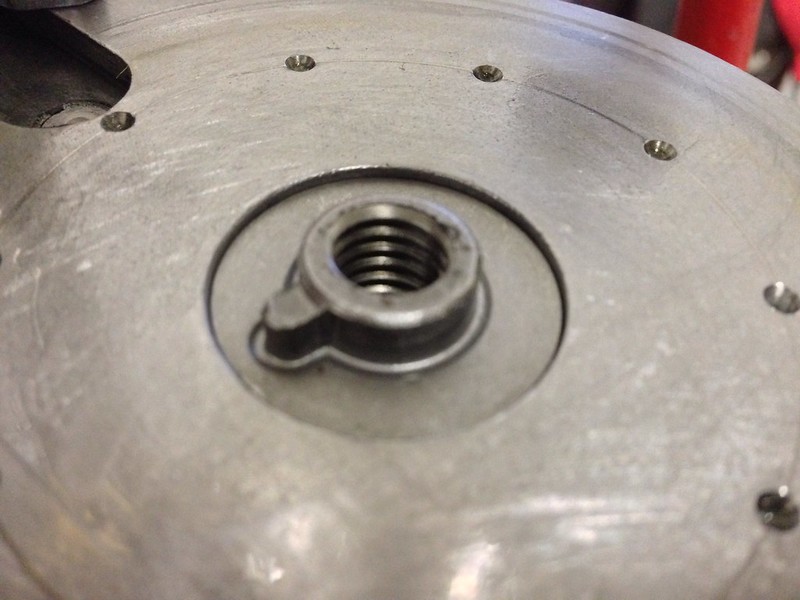
Untitled by zweitakt250, on Flickr If you read much at all about the AP you will find many that complain about the lack of ability to seat primers below flush. My first run of 100 rounds resulted in two high primers, the rest just flush. I determined that this was also a result of the shellplate rising from the sub-plate. Pushing harder on the handle only resulted in the primer punch housing bottoming against the frame. Now with the clearance set the press will seat primers below flush with ease. I hope that this thread will help those with a Hornady AP to create better ammo and be able to enjoy their press even more. Thanks for looking! |
|
|
|
|
[#1]
Excellent post and details on fixing the specific issue for your press!
|
|
|
|
|
[#2]
Nice work. I know the "jump" you are talking about but I have not had a problem with it yet... I'll file this for future repairs if needed.
|
|
|
|
KS, USA
|
[#3]
Nice my LNL likes to shake the powder out of pistol brass that in nearly full. Thanks will give it a shot. |
|
|
|
[#4]
Wow, this is great. I wonder if it would solve a different issue as well:
There are a few people (including me) who have experienced "case tilt" in station 5 with tall cartridges such as 357 Mag. I have always wondered if finding a way to pull the shell plate tighter might eliminate the case tilt. So, your shims are raising the sub-plate higher, which pulls the shell plate tighter, right? Or did I just say that backwords? |
|
|
|
|
[#5]
Absolutely just added something to my list of things to do tomorrow, thank you so much!
|
|
|
|
MA, USA
|
[#6]
Great info, Subscribed for later use as needed. I was having primer issues on LPP cartridges (mostly .45acp), but following the cleaning / polishing instructions for the primer slide seemed too cure my issues.
|
|
|
|
[#7]
Originally Posted By bluegrass_uk:
Wow, this is great. I wonder if it would solve a different issue as well: There are a few people (including me) who have experienced "case tilt" in station 5 with tall cartridges such as 357 Mag. I have always wondered if finding a way to pull the shell plate tighter might eliminate the case tilt. So, your shims are raising the sub-plate higher, which pulls the shell plate tighter, right? Or did I just say that backwords? Actually, the sub-plate is fixed in location to the ram. The shims force the drive hub down, and in turn keep the shellplate in contact with the sub-plate. This fix should also help with any case tilting issues as the case head will be held against the sub-plate better. Posted Via AR15.Com Mobile |
|
|
|
WA, USA
|
[#8]
eh, there's a MUCH easier fix for this.
use a punch and tap the ball detents until they are nearly flush with the shellplate. the shellplate will still index perfectly fine, but it will completely eliminate the shellplate snapping and spilling powder. don't worry about tapping them too far. you can always tap them back from the other side. |
|
|
|
[Last Edit: TZ250]
[#9]
Originally Posted By bani:
eh, there's a MUCH easier fix for this. use a punch and tap the ball detents until they are nearly flush with the shellplate. the shellplate will still index perfectly fine, but it will completely eliminate the shellplate snapping and spilling powder. don't worry about tapping them too far. you can always tap them back from the other side. Eh, sorry, but that is NOT correct. See the part in the first paragraph about all the reading I did? Re-setting the balls was the first thing I tried. It had a near zero effect. The only thing that will hold the shellplate next to the sub-plate is to have the drive hub/sub-plate clearance set correctly. Posted Via AR15.Com Mobile |
|
|
|
|
[#10]
Ordered. I will report back with results!
Thanks again for sharing this. I have tried a few fixes myself and lots of research with no real solutions yet. |
|
|
|
|
[#11]
I also notice a small amount of powder that will jump out of the case with 9mm, as well as the "case tilt" in station 5.
I'll be giving this a shot. |
|
|
|
|
[#12]
done and done, works great, now someone needs to change my oil.. cause its too cold to leave my reloading bench
|
|
|
|
|
[#13]
I guess I'm going to have to pull mine apart and take a look. I have trouble with the 9 mm cases being jolted on the advance and tossing powder out of the cases.
Thanks OP. |
|
|
|
|
[Last Edit: GWhis]
[#14]
In my 5 years on this forum, I've read lots of threads about case tilt with the Hornady tool, but not powder spillage on rotation. I know Dillon and RCBS progressives can be a little abrupt on the tail end of the auto-advance rotation and can throw a little powder, and fixes from lighter springs to roller bearings have been used. This appearss to be a good clean fix. Gives me an idea to try on the Pro 2000 to smooth that one out further. The one thing we can't do is smooth the action to the point of mushy detent. Or IOW's to the point it may not always stop perfectly where it's supposed to. Too light a spring can do that on the green machine.
So if this simple method indeed fixes spillage and tilt on the Hornady, IMO, we ought to keep this thread out of the archives. Great Post! |
|
|
|
|
[#15]
Toggle set to keep thread out of archives.
To OP, while in this forum if you click on My Topics, this thread will always be there. Well done.
|
|
|
|
USA
|
[Last Edit: rtpguy]
[#16]
This seems to be the identical shim pack the OP posted, on Amazon (2-4 weeks to ship) for $7
And on eBay for $8 You can try looking for "Precision 25220" elsewhere if you'd like to find the same set as the OPs. Going to go pull my shell plate off and see what there is to see. No real issues on timing, but it does jostle slightly on 9mm. |
|
|
|
[#17]
Great post! I've had a bit of a problem with powder shaking out of 9mm cases as well. Just ordered a shim assortment from McMaster and will give this a try. The McMaster part # is 3088A936.
|
|
|
|
OH, USA
|
[#18]
Originally Posted By rtpguy:
This seems to be the identical shim pack the OP posted, on Amazon (2-4 weeks to ship) for $7 And on eBay for $8 You can try looking for "Precision 25220" elsewhere if you'd like to find the same set as the OPs. Going to go pull my shell plate off and see what there is to see. No real issues on timing, but it does jostle slightly on 9mm. Yup, looks the same, I ordered one from Amazon this morning when they were in stock, it is due to be delivered Friday, |
|
|
|
[#19]
Originally Posted By Ohio_OJ:
Yup, looks the same, I ordered one from Amazon this morning when they were in stock, it is due to be delivered Friday, Originally Posted By Ohio_OJ:
Originally Posted By rtpguy:
This seems to be the identical shim pack the OP posted, on Amazon (2-4 weeks to ship) for $7 And on eBay for $8 You can try looking for "Precision 25220" elsewhere if you'd like to find the same set as the OPs. Going to go pull my shell plate off and see what there is to see. No real issues on timing, but it does jostle slightly on 9mm. Yup, looks the same, I ordered one from Amazon this morning when they were in stock, it is due to be delivered Friday, I was prepared to pay a premium at the grainger down the road, but they royally hosed up my account and got it for half price :) |
|
|
|
|
[#20]
It is slightly annoying that you need to buy a 19 piece shim kit to get what you need, 1 to 3 shims. That is industrial supply though. 1 is as much as a bunch of em'. The good thing about the kit though is it comes with a .0015" shim which will allow you to set the clearance within .0005".
I'm glad that some of you feel like this will help. I would be grateful if any that try the fix could post the clearances they find in their APs. Since I have two drive hubs and they have identical heights it would be interesting to know if the sub plates vary in height. Posted Via AR15.Com Mobile |
|
|
|
PA, USA
|
[#21]
Shims on order . . . hope to stop 9mm powder spillage . . .will report clearance . . . THANK YOU Dr. TZ250 :)
|
|
|
|
[#22]
Probably not going to help on mine. The shoulder measurement on the hub is 0.946 and the subplate is 0.942.
|
|
|
|
|
[#23]
Originally Posted By johnh57:
Probably not going to help on mine. The shoulder measurement on the hub is 0.946 and the subplate is 0.942. No, yours seems to be set up right. Interesting data though. Your hub is within .004" of mine, but your sub-plate is .014 taller than mine. Thanks for the feedback. Posted Via AR15.Com Mobile |
|
|
|
FL, USA
|
[#24]
Very useful post!
|
|
|
|
[#25]
Just as a double check I used a set of feeler gauges to check the gap between the subplate and the shell plate. 0.004 was the thickest gauge I was able work in there. You do have to lift up on the shell plate to seat the hub up to the subplate.
|
|
|
|
WA, USA
|
[#26]
Originally Posted By TZ250:
Eh, sorry, but that is NOT correct. See the part in the first paragraph about all the reading I did? Re-setting the balls was the first thing I tried. It had a near zero effect. The only thing that will hold the shellplate next to the sub-plate is to have the drive hub/sub-plate clearance set correctly. Posted Via AR15.Com Mobile Originally Posted By TZ250:
Originally Posted By bani:
eh, there's a MUCH easier fix for this. use a punch and tap the ball detents until they are nearly flush with the shellplate. the shellplate will still index perfectly fine, but it will completely eliminate the shellplate snapping and spilling powder. don't worry about tapping them too far. you can always tap them back from the other side. Eh, sorry, but that is NOT correct. See the part in the first paragraph about all the reading I did? Re-setting the balls was the first thing I tried. It had a near zero effect. The only thing that will hold the shellplate next to the sub-plate is to have the drive hub/sub-plate clearance set correctly. Posted Via AR15.Com Mobile it IS correct, because it works for me and many others. i used to have really bad snapping and lots of spilled powder with 9mm and 300blk. now i have zero. you need to tap the detents until the detent balls are nearly flush. but it fixes the snapping problem 100%. |
|
|
|
[Last Edit: TZ250]
[#27]
Originally Posted By bani:
it IS correct, because it works for me and many others. i used to have really bad snapping and lots of spilled powder with 9mm and 300blk. now i have zero. you need to tap the detents until the detent balls are nearly flush. but it fixes the snapping problem 100%. Originally Posted By bani:
Originally Posted By TZ250:
Originally Posted By bani:
eh, there's a MUCH easier fix for this. use a punch and tap the ball detents until they are nearly flush with the shellplate. the shellplate will still index perfectly fine, but it will completely eliminate the shellplate snapping and spilling powder. don't worry about tapping them too far. you can always tap them back from the other side. Eh, sorry, but that is NOT correct. See the part in the first paragraph about all the reading I did? Re-setting the balls was the first thing I tried. It had a near zero effect. The only thing that will hold the shellplate next to the sub-plate is to have the drive hub/sub-plate clearance set correctly. it IS correct, because it works for me and many others. i used to have really bad snapping and lots of spilled powder with 9mm and 300blk. now i have zero. you need to tap the detents until the detent balls are nearly flush. but it fixes the snapping problem 100%. Sorry I wasn't clear. It fixed my problem 0%. Do you see the above posts where one members press has .004" of clearance vs. mine which has .014" of clearance? Maybe you are a visual learner and need to to a before and after video to realize the difference? Of course we have to recognize that you are totally ignoring the fact about the effect the excessive clearance has on the priming operation. If the shell plate is allowed to move up from the force of the primer punch then that is wasted movement of the priming stroke. Did you see where I stated that the clearance adjustment improved the ability to seat primers correctly on my press? I'd like to know how you think tapping the balls into the shellplate would affect the primer seating operation. The fact of the matter is that it has absolutely no effect on the priming operation. I'm sorry if you feel like you need to come into another members thread and try to undermine the research and results of that member. Maybe it will help you to know that I have been reloading rifle and handgun for nearly forty years. Or that I am a Master CNC Machinist and that my work every day involves making parts that must work together, with tolerances sometimes tighter than .001". The measuring tools in the above pictures above have a value higher than that of the reloading press. They were used to provide quantitative data that can be used by others. You stated that you knew of a "MUCH"(capitalization your idea) easier fix than the one I outlined in this thread. I'm glad your method worked for you. It didn't work for me. That is why this thread exists in the first place. My only goal was to try and help members of this and other forums with an issue that they may have with their Hornady AP presses. If your press is working 100% for you then it should be easy for you to disregard any further discussion in this thread as you obviously have no need for any of the information within. Posted Via AR15.Com Mobile |
|
|
|
|
[#28]
I'm not following the ball detent punch - what exactly are you punching?
|
|
|
|
|
[#29]
Very informative write-up,TZ250.Thanks for posting (and explaining that)
Not apples to apples,I know,but I have an older Hornady Projector that has similar problems to what you describe.I'm going to take a look at it (one of these days) and see if shims might help it. |
|
|
|
|
[#30]
Do the shims just go on top of the flange at the bottom of the drive hub? I haven't taken my subplate off to look at it, and I'm trying to get a sense for how the shims impact the height of the drive hub.
|
|
|
|
|
[#31]
Does this actually fix the issue? Has anyone run the press long enough to know if its works? I keep reading "should fix" not does fix. Just curious..........
Nice job OP way to think outside the box 
|
|
|
|
|
[#32]
Originally Posted By ScottyPotty:
Does this actually fix the issue? Has anyone run the press long enough to know if its works? I keep reading "should fix" not does fix. Just curious.......... Nice job OP way to think outside the box Originally Posted By ScottyPotty:
Does this actually fix the issue? Has anyone run the press long enough to know if its works? I keep reading "should fix" not does fix. Just curious.......... Nice job OP way to think outside the box It did in fact fix the issue on my AP. The press indexes now with complete smoothness. Once the left pawl turns loose of the star wheel the shellplate is indexed exactly where it should be, never moving any faster than the operator intends. Originally Posted By GHPorter:
Do the shims just go on top of the flange at the bottom of the drive hub? I haven't taken my subplate off to look at it, and I'm trying to get a sense for how the shims impact the height of the drive hub. The shims do go on the flange on the drive hub. The shims keep the drive hub from rising up when the force of the shellplate locating balls or the priming operation pushes upward on the shellplate. The drive hub is what determines the relationship between the shellplate and the sub-plate. Here is a before and after picture:
Untitled by zweitakt250, on Flickr
Untitled by zweitakt250, on Flickr Originally Posted By johnh57:
I'm not following the ball detent punch - what exactly are you punching? The "punching" referred to is about driving the locating balls in the bottom of the shellplate back up into the bores in which they travel. This moves the backing plugs that hold the springs upward. The net effect is to reduce the spring preload on the balls which in turn gives the balls less force to apply while trying to go home into the detents. |
|
|
|
|
[#33]
Thanks, TZ. It's really hard to see exactly where the shims are in the photo, since they fit very closely to the hub. I'll have to check this out on mine. I'll start with feeler gauges, since I don't have the same kind of micrometers you used.
|
|
|
|
|
[Last Edit: dryflash3]
[#34]
Originally Posted By TZ250: edit.... It fixed my problem 0%. Do you see the above posts where one members press has .004" of clearance vs. mine which has .014" of clearance? Maybe you are a visual learner and need to to a before and after video to realize the difference? Of course we have to recognize that you are totally ignoring the fact about the effect the excessive clearance has on the priming operation. If the shell plate is allowed to move up from the force of the primer punch then that is wasted movement of the priming stroke. Did you see where I stated that the clearance adjustment improved the ability to seat primers correctly on my press? I'd like to know how you think tapping the balls into the shellplate would affect the primer seating operation. The fact of the matter is that it has absolutely no effect on the priming operation. I'm sorry if you feel like you need to come into another members thread and try to undermine the research and results of that member. Maybe it will help you to know that I have been reloading rifle and handgun for nearly forty years. Or that I am a Master CNC Machinist and that my work every day involves making parts that must work together, with tolerances sometimes tighter than .001". The measuring tools in the above pictures above have a value higher than that of the reloading press. They were used to provide quantitative data that can be used by others. You stated that you knew of a "MUCH"(capitalization your idea) easier fix than the one I outlined in this thread. I'm glad your method worked for you. It didn't work for me. That is why this thread exists in the first place. My only goal was to try and help members of this and other forums with an issue that they may have with their Hornady AP presses. If your press is working 100% for you then it should be easy for you to disregard any further discussion in this thread as you obviously have no need for any of the information within. Originally Posted By TZ250: Originally Posted By bani: Originally Posted By TZ250: Originally Posted By bani: eh, there's a MUCH easier fix for this. use a punch and tap the ball detents until they are nearly flush with the shellplate. the shellplate will still index perfectly fine, but it will completely eliminate the shellplate snapping and spilling powder. don't worry about tapping them too far. you can always tap them back from the other side. Eh, sorry, but that is NOT correct. See the part in the first paragraph about all the reading I did? Re-setting the balls was the first thing I tried. It had a near zero effect. The only thing that will hold the shellplate next to the sub-plate is to have the drive hub/sub-plate clearance set correctly. Posted Via AR15.Com Mobile it IS correct, because it works for me and many others. i used to have really bad snapping and lots of spilled powder with 9mm and 300blk. now i have zero. you need to tap the detents until the detent balls are nearly flush. but it fixes the snapping problem 100%. edit.... It fixed my problem 0%. Do you see the above posts where one members press has .004" of clearance vs. mine which has .014" of clearance? Maybe you are a visual learner and need to to a before and after video to realize the difference? Of course we have to recognize that you are totally ignoring the fact about the effect the excessive clearance has on the priming operation. If the shell plate is allowed to move up from the force of the primer punch then that is wasted movement of the priming stroke. Did you see where I stated that the clearance adjustment improved the ability to seat primers correctly on my press? I'd like to know how you think tapping the balls into the shellplate would affect the primer seating operation. The fact of the matter is that it has absolutely no effect on the priming operation. I'm sorry if you feel like you need to come into another members thread and try to undermine the research and results of that member. Maybe it will help you to know that I have been reloading rifle and handgun for nearly forty years. Or that I am a Master CNC Machinist and that my work every day involves making parts that must work together, with tolerances sometimes tighter than .001". The measuring tools in the above pictures above have a value higher than that of the reloading press. They were used to provide quantitative data that can be used by others. You stated that you knew of a "MUCH"(capitalization your idea) easier fix than the one I outlined in this thread. I'm glad your method worked for you. It didn't work for me. That is why this thread exists in the first place. My only goal was to try and help members of this and other forums with an issue that they may have with their Hornady AP presses. If your press is working 100% for you then it should be easy for you to disregard any further discussion in this thread as you obviously have no need for any of the information within. edit, problem solved. |
|
|
|
|
[#35]
Originally Posted By dryflash3:
Keep your posts polite, or the thread will be locked and untoggled. Apologies. Edited. Posted Via AR15.Com Mobile |
|
|
|
|
[#36]
Perhaps the simplest way to check if this fix is going to help is to see what feeler gauge you can get between the shell plate and the sub-plate. You'll have to lift up on the shell plate a bit to make sure it is up as far as it can go.
I have a little bit of a powder jouncing problem with the 9mm - but I only have about a 0.004 gap between the shell plate and the sub-plate. I'll look at the resetting the detent balls on the shell plate. Thanks OP - good work! |
|
|
|
|
[#37]
Originally Posted By johnh57:
Perhaps the simplest way to check if this fix is going to help is to see what feeler gauge you can get between the shell plate and the sub-plate. You'll have to lift up on the shell plate a bit to make sure it is up as far as it can go. I have a little bit of a powder jouncing problem with the 9mm - but I only have about a 0.004 gap between the shell plate and the sub-plate. I'll look at the resetting the detent balls on the shell plate. Thanks OP - good work! The ball reset may work for your press since the clearance is close. Since your clearance is .004" do you have good primer seating on your press? Posted Via AR15.Com Mobile |
|
|
|
|
[#38]
My press seats primers fine - most of the problems I have had were noob operator error. It has taken me a while to learn to push the arm back far enough to seat the primers. I reload on a progressive shot shell press and there is no push back. Muscle memory is hard to re-train!
I've had the misc odds and ends of problems with getting the primer system tuned, I had to chamfer the mouth of the SPP shuttle because it wasn't letting primers load into the shuttle - etc. Growing pains really. I have not yet chamfered the bottom lip of the shuttle itself though. That would de-sensitize it to fouling somewhat but I'd rather that there just wasn't any misc flakes of powder about to cause it to foul in the first place. I don't like that the primer shuttle is hidden from view - I would like to be able to glance at the shuttle and know there is really a primer there. (shotgun press training again - shotgun primer feeds are twitchy - it's really nice having the shuttle right in front of the press so you can see every single primer feed into the seating ram) |
|
|
|
USA
|
[#39]
Originally Posted By johnh57:
My press seats primers fine - most of the problems I have had were noob operator error. It has taken me a while to learn to push the arm back far enough to seat the primers. I reload on a progressive shot shell press and there is no push back. Muscle memory is hard to re-train! I've had the misc odds and ends of problems with getting the primer system tuned, I had to chamfer the mouth of the SPP shuttle because it wasn't letting primers load into the shuttle - etc. Growing pains really. I have not yet chamfered the bottom lip of the shuttle itself though. That would de-sensitize it to fouling somewhat but I'd rather that there just wasn't any misc flakes of powder about to cause it to foul in the first place. I don't like that the primer shuttle is hidden from view - I would like to be able to glance at the shuttle and know there is really a primer there. (shotgun press training again - shotgun primer feeds are twitchy - it's really nice having the shuttle right in front of the press so you can see every single primer feed into the seating ram) You shouldn't need to chamfer the hole in the shuttle, but it does need to be adjusted. Pull the blast tube and primer feed tube off, leaving the piece the tube threads into/slides into on the press. Loosen the allen key holding the black bracket at the top of the press. Cycle the press handle down fully, and look down into the hole for the primer, adjust the black bracket so the hole is just slightly rearwards past center. Tighten and re-assemble, should be good to go unless you've got an out of spec part or some truly odd-sized primers. Have run WSP, Remington, S&B, Fiocchi, CCI, Tula w/out issues.. |
|
|
|
[#40]
It just needed a tiny, tiny chamfer. Maybe 0.010 - couple twists by hand with a drill bit.
After thinking about it for a bit, it wasn't a problem with the primer dropping into the shuttle - it was the shuttle hanging up on the next primer. The factory supplied large primer shuttle had an ever so slight chamfer and it worked fine. The spp shuttle was square edged, it tended to hang up on the primers above it. A tiny chamfer allowed the shuttle to clear the primer column. |
|
|
|
|
[Last Edit: TZ250]
[#41]
Originally Posted By rtpguy:
You shouldn't need to chamfer the hole in the shuttle, but it does need to be adjusted. Pull the blast tube and primer feed tube off, leaving the piece the tube threads into/slides into on the press. Loosen the allen key holding the black bracket at the top of the press. Cycle the press handle down fully, and look down into the hole for the primer, adjust the black bracket so the hole is just slightly rearwards past center. Tighten and re-assemble, should be good to go unless you've got an out of spec part or some truly odd-sized primers. Have run WSP, Remington, S&B, Fiocchi, CCI, Tula w/out issues.. Originally Posted By rtpguy:
Originally Posted By johnh57:
My press seats primers fine - most of the problems I have had were noob operator error. It has taken me a while to learn to push the arm back far enough to seat the primers. I reload on a progressive shot shell press and there is no push back. Muscle memory is hard to re-train! I've had the misc odds and ends of problems with getting the primer system tuned, I had to chamfer the mouth of the SPP shuttle because it wasn't letting primers load into the shuttle - etc. Growing pains really. I have not yet chamfered the bottom lip of the shuttle itself though. That would de-sensitize it to fouling somewhat but I'd rather that there just wasn't any misc flakes of powder about to cause it to foul in the first place. I don't like that the primer shuttle is hidden from view - I would like to be able to glance at the shuttle and know there is really a primer there. (shotgun press training again - shotgun primer feeds are twitchy - it's really nice having the shuttle right in front of the press so you can see every single primer feed into the seating ram) You shouldn't need to chamfer the hole in the shuttle, but it does need to be adjusted. Pull the blast tube and primer feed tube off, leaving the piece the tube threads into/slides into on the press. Loosen the allen key holding the black bracket at the top of the press. Cycle the press handle down fully, and look down into the hole for the primer, adjust the black bracket so the hole is just slightly rearwards past center. Tighten and re-assemble, should be good to go unless you've got an out of spec part or some truly odd-sized primers. Have run WSP, Remington, S&B, Fiocchi, CCI, Tula w/out issues.. I did the sight alignment thing with mine, but I also put an ever so slight chamfer on the small primer shuttle, along with running a stone over the sliding surfaces and a liberal application of graphite. So far my priming system has been 100%, other than the seating depth issue. Posted Via AR15.Com Mobile |
|
|
|
USA
|
[Last Edit: rtpguy]
[#42]
Originally Posted By TZ250:
I did the sight alignment thing with mine, but I also put an ever so slight chamfer on the small primer shuttle, along with running a stone over the sliding surfaces and a liberal application of graphite. So far my priming system has been 100%, other than the seating depth issue. Posted Via AR15.Com Mobile Originally Posted By TZ250:
Originally Posted By rtpguy:
Originally Posted By johnh57:
My press seats primers fine - most of the problems I have had were noob operator error. It has taken me a while to learn to push the arm back far enough to seat the primers. I reload on a progressive shot shell press and there is no push back. Muscle memory is hard to re-train! I've had the misc odds and ends of problems with getting the primer system tuned, I had to chamfer the mouth of the SPP shuttle because it wasn't letting primers load into the shuttle - etc. Growing pains really. I have not yet chamfered the bottom lip of the shuttle itself though. That would de-sensitize it to fouling somewhat but I'd rather that there just wasn't any misc flakes of powder about to cause it to foul in the first place. I don't like that the primer shuttle is hidden from view - I would like to be able to glance at the shuttle and know there is really a primer there. (shotgun press training again - shotgun primer feeds are twitchy - it's really nice having the shuttle right in front of the press so you can see every single primer feed into the seating ram) You shouldn't need to chamfer the hole in the shuttle, but it does need to be adjusted. Pull the blast tube and primer feed tube off, leaving the piece the tube threads into/slides into on the press. Loosen the allen key holding the black bracket at the top of the press. Cycle the press handle down fully, and look down into the hole for the primer, adjust the black bracket so the hole is just slightly rearwards past center. Tighten and re-assemble, should be good to go unless you've got an out of spec part or some truly odd-sized primers. Have run WSP, Remington, S&B, Fiocchi, CCI, Tula w/out issues.. I did the sight alignment thing with mine, but I also put an ever so slight chamfer on the small primer shuttle, along with running a stone over the sliding surfaces and a liberal application of graphite. So far my priming system has been 100%, other than the seating depth issue. Posted Via AR15.Com Mobile Learn something every day. I did the graphite, slight 'undercut'/bevel on leading edge, and stoned them, but haven't as far as I can tell, needed the chamfer. Added to the info storehouse in case priming starts acting up. Great (shim) post/pics/explanation, BTW! |
|
|
|
[#43]
Picked up a shimming kit today from Grainger. Warehouse is down the street from my office.
Going to play around with it this weekend. What sort of tool do you need to measure the gap distance? |
|
|
|
|
[#44]
So, I got my arbor shim kit in today (free 2 day shipping from Amazon prime) and got to work right after getting home.
The shim that worked the best for my press was the 0.002 shim. Anything larger than that and shell plate couldn't really rotate after being tightened down. I will say that I think it does make the indexing smoother and will likely decrease any jerkiness of locking the in the rotation. Unfortunately, it has not yet resolved the case tilt issue that I have in station 5 with 357 mag. Dang. |
|
|
|
|
[#45]
Originally Posted By Foxtrot08:
Picked up a shimming kit today from Grainger. Warehouse is down the street from my office. Going to play around with it this weekend. What sort of tool do you need to measure the gap distance? You can measure the difference in height between the drive hub and the sub-plate with a set of calipers. A less precise method is to slip feeler gauges between the shellplate and the sub-plate. Posted Via AR15.Com Mobile |
|
|
|
OH, USA
|
[#46]
I used a .004 shim on mine and have about .0025 shell plate clearance, this seems to be the sweet spot form my press.
It did smooth out the index operation in a manual checking type of operation, I will really find out on the next production batch. Thanks |
|
|
|
[#47]
Used a 0.005" shim in mine, this leaves 0.004" clearance. Still a little bit of snap when the detents drop in, but it is smoother. Thanks to the OP for this idea.
|
|
|
|
|
[#48]
Originally Posted By presa_dad:
Used a 0.005" shim in mine, this leaves 0.004" clearance. Still a little bit of snap when the detents drop in, but it is smoother. Thanks to the OP for this idea. My press had a small amount of snap at .004" clearance. It was better at .003". You might try the .004 and .0015" shim. Posted Via AR15.Com Mobile |
|
|
|
|
[#49]
Tightened up clearance to 0.003" this morning and ran 200 rounds of .223. Indexing is very smooth, primer seating feels more solid, and case tilt in station five is gone. I couldn't be happier.
|
|
|
|
|
[#50]
Originally Posted By presa_dad:
Tightened up clearance to 0.003" this morning and ran 200 rounds of .223. Indexing is very smooth, primer seating feels more solid, and case tilt in station five is gone. I couldn't be happier. Excellent news!!! Posted Via AR15.Com Mobile |
|
|
|
 Win a FREE Membership!
Sign up for the ARFCOM weekly newsletter and be entered to win a free ARFCOM membership. One new winner* is announced every week!
You will receive an email every Friday morning featuring the latest chatter from the hottest topics, breaking news surrounding legislation, as well as exclusive deals only available to ARFCOM email subscribers.

AR15.COM is the world's largest firearm community and is a gathering place for firearm enthusiasts of all types.
From hunters and military members, to competition shooters and general firearm enthusiasts, we welcome anyone who values and respects the way of the firearm.

Subscribe to our monthly Newsletter to receive firearm news, product discounts from your favorite Industry Partners, and more.
Copyright © 1996-2024 AR15.COM LLC. All Rights Reserved.
Any use of this content without express written consent is prohibited.
AR15.Com reserves the right to overwrite or replace any affiliate, commercial, or monetizable links, posted by users, with our own.


