NV, USA
|
Posted: 12/18/2013 11:13:49 PM EDT
Back in January, I committed to purchasing a set of dies to swage .224 jacketed bullets from .22LR brass. After a long wait, I received the last dies in my set last week. I've posted a couple of references to swaging in other threads, and was asked if I'd do a write-up outlining the process.
First, though, let me be clear - I'm not an expert at this yet. I've successfully made my own bullets, but I'm a noob compared to those that I learn from over at the CB swaging forum. Some of those folks hang out here too and I'm sure they (and others) will chime in with additional info. That said, I'm sharing what I did and what's worked for me so far. So.... here goes. There will be 8 posts: Part 1: Swaging Equipment The equipment required to swage bullets can range from mild to wild. Part of my strategy for swaging bullets includes doing it in a reasonably cost effective manner. I will pay for quality when the task requires a quality tool to achieve the best outcome (i.e. my choice of dies). On the other hand, if a simple / cheap tool is effective, I’ll usually pick that as opposed to a more expensive, but only marginally more effective alternative (i.e. my choice of annealing tools). There are many choices to be made, and in some cases, ‘better’ equipment is available. As with the rest of this site, this section reflects the decisions I made (your mileage may vary). Swaging dies: This is the most obvious set of equipment, and the most expensive. It’s also the place where one has choices between (relatively) cheap and (perhaps) unjustifiably expensive. I chose BT Sniper swaging dies, and I learned about his dies through the swaging forum at Castboolits.gunloads.com. You’ll see the rationale in that decision spread through the rest of this material, but in my opinion, the BT Sniper dies represent a very good balance between the very best quality, price and use. The BT Sniper die set includes a bullet mold, a derim die, a core swage die, a core seating die, a point forming die and an ejection system (purpose built for specific reloading presses). Wet tumbler: An important part of producing quality bullets requires the raw materials to be as clean as possible. Wet tumbling, using both stainless steel pins and citric acid (‘Lemishine’) (for initial cleaning and intermediate cleaning before the final bullet is formed) and ceramic media (for the final cleaning) is the only reasonable method. Dry tumbling (using a vibratory tumbler and crushed walnut or corn cob) has its place in reloading, but wet tumbling is (IMHO) unequalled. 
Reloading press: A good, strong, single-stage reloading press is required (or, alternatively, a dedicated ‘swaging press’). In my case, although I have an RCBS RockChucker, I wanted to dedicate a press for swaging. I chose to follow Brian Thurner’s recommendation and purchased a Lee Classic Cast press. The ‘good & strong’ requirement means an “O” style press; a lot of stress is put on the press during the derimming operation. The press must be solidly mounted. 
Heat source for annealing: In their native form, .22LR brass is too hard for bullet jackets. Annealing softens the brass, and ensures that it will swage to a point without folding & creasing. The softer brass is also more suitable for engraving by the rifling of the barrel when it’s fired. There are a number of ways to anneal the brass; I chose a low-tech method which repurposes my propane burner used for bullet casting. This propane burner, combined with a toaster oven pan, aluminum foil and a thermometer, allows me to anneal effectively. A page is dedicated to annealing for more information. 
Scale: I use a balance for most reloading tasks; for swaging, I use a small electronic scale. I’ve found electronic scales somewhat finicky an (perhaps) inaccurate compared to a balance, making them questionable (IMHO) for weighting smokeless powder. However, for this task (weighing jackets and cores) a small electronic scale is ideal. 
Part of the point in bullet making / swaging is to create a projectile of a specific weight (i.e. 55 grains). To achieve this weight, the weight of jackets is combined with the weight of the cores, and specific core weights are achieved through adjustment of the core swage die. Casting Equipment: I chose to cast my bullet cores. This was a simple choice for me since I already cast my own lead bullets from wheel weights. My setup is cheap - a cast iron pot, a ladle and a propane burner. As noted above, the core mold came with the set I bought. An alternative way to make cores is to buy lead wire of a specific diameter, and cut the cores to length. If I didn't already cast my own bullets, I may well have gone that route. (continued) |
|
|
NV, USA
|
[#1]
Part 2: Cleaning Brass For Jackets
As mentioned in the prior post, it is imperative that the .22LR brass that will form jackets be immaculately clean. This goes hand-in-hand with quality control (‘QC’) to ensure the best possible, most accurate bullet. My method of cleaning .22LR brass / jackets is wet tumbling. I use a Harbor Freight dual drum tumbler, which has served me well so far. While this tumbler might be too small for most other tumbling tasks (i.e. cleaning a large enough quantity of .223/5.56 brass), the size of each drum is ideal (IMHO) for the batches of .22LR brass that I process. Wet tumbling involves using stainless steel pins, which when combined with water & citric acid, do a phenomenal job of cleaning brass, including the insides. Since my use of stainless steel pins is (so far) limited to swaging, I bought a relatively small batch of pins – 2 lbs. I use 1 pound of pins in each drum. This smaller quantity of stainless steel pins is available here, among other sources. My source of citric acid is Lemishine – the product typically used in dishwashers. There are other sources, including some where bulk quantities of citric acid can be purchased at a lower overall cost. However, the amount of Lemishine used is very small per batch; I’m perfectly fine paying retail prices for Lemishine at my local store (Target). The process of tumbling is very simple – combine one Crystal Light container full of .22LR brass (about 575 pieces) and one pound of stainless steel pins in one of the Harbor Freight drums. I add just enough hot water to cover these items, then I add a squirt of liquid dish detergent. Then, I add a 9mm case full of Lemishine, and swirl the mixture together for a few moments. You’ll notice a small amount of outgassing as the tarnished brass & citric acid react. I don’t seal the drum for a moment or two if only to ensure that pressure doesn’t build up and break the seal, causing a leak. Once sealed, I tumble this drum for approximately 2 hours (probably longer than necessary, but since this is one part of a batch process and it doesn’t take my hands-on time, its inconsequential. After two hours have passed, it’s time to separate the pins from the brass. I use three things to make this easy. First, a strainer through which the pins can pass but not the .22LR brass. My wife donated a stainless steel strainer that is well suited for this. Second, a plastic pan larger than the strainer but that will still fit into the sink. Third, a magnet (the stainless steel pins are magnetic, and some will surely resist separation). 
I run hot water through the strainer and into the pan, and begin swirling & hand-mixing the brass to encourage the pins to fall through the strainer. The pan is catching the pins & the water is helping to rinse the dirty solution away. I continue to separate the pins this way until I’m sure they’re almost all in the pan and I’ve got ‘clean’ water. Then, I’ll run the magnet through the strainer picking up any stray pins, or any brass that has been jammed full with several pins. Tip: Over-tumbling leads to the pins filling up & sticking inside the brass. I’ve found that when I tumble for 2 hours or less, this happens infrequently. If I tumble longer, the odds of getting pins stuck in the brass increases significantly (which is QUITE frustrating). Once the pins are separated from the brass, the pins go back into the drum for the next batch; I fill the pan with hot water once again and submerge the strainer & brass in the hot water. I add a pinch of Lemishine to this and ensure it dissolves. I’ve found that so long as the citric acid solution is the last thing the brass touches before it dries, the brass doesn’t tarnish or water spot. When just rinsed with water, my hard water will spot the brass. This has a side benefit of passivating the brass. The wet brass is laid out on a towel and air-dried with the help of a small fan. Because the brass isn’t derimmed yet, this may take longer than anticipated, if only because the water hides within the rim. Once dried, the clean brass is put into a plastic bag along with a sticky note indicating the current state of the brass – “Tumbled” (it’s obvious that it hasn’t been derimmed yet). I find that using sticky notes is an excellent way to stay organized without permanently marking the container. Subsequent batches of tumbled & clean brass can be added to the bag as they’re finished, building up a larger supply in one container. Always ensure they’re dry first! Be sure to stop & admire how shiny the brass is at this point… it will likely look better than new, completely clean and unrecognizable from the tarnished state when you first picked it up off the ground. 
This same method of tumbling is also used at several other stages of processing: * After derimming (to remove the swaging lube, and to better clean the inside of the brass, which has now been unfolded, revealing additional priming residue). It’s desirable to remove all of the residue from the inside of the brass; residue can cause the brass to stick on the derimming punch, causing unnecessary aggravation. * After annealing (to remove any scaling left behind, and to restore the shine to the now-tarnished brass) I will also wet tumble the brass one more time – once it’s been point formed into a swaged bullet. This isn’t a mandatory step, but the final result looks fantastic! |
|
|
NV, USA
|
[#2]
Part 3: Derimming (Making Jackets)
Derimming is the process where the rim of the .22LR case is flattened out to make a smooth bullet jacket. The derimming process is simple and straightforward – using a dedicated derimming die on a strong reloading press, the .22LR brass is pushed through the die with a punch. Clearly, the tolerances of the die and punch are critical for this process. Preparation for derimming includes sorting the cases by headstamp. There are two reasons for this. First, different headstamps can have different thicknesses of brass. Running the same headstamp through the die results in a similar amount of force and ‘feel’ for that headstamp. Consistency is important in order to produce consistent bullets. Also, different headstamps tend to weight different amounts, so sorting by headstamp early in the process, and doing them in batches, helps ensure consistency. The derimming die is a push-through die – the .22LR goes into the bottom, is pushed through the die by the punch and it leaves the top of the die as a bullet jacket. Shown below, I’ve derimmed brass with my press mounted horizontally. This provides two benefits – first, the jackets simply fall into a container as they leave the die. Second, derimming takes the most force of all of the swaging steps. Mounting the press horizontally allows me to derim the brass while standing, and it provides great leverage. 
Alternatively, derimming can also be done with the press mounted vertically (below). I’ve switched from the horizontal orientation to vertical orientation to avoid remounting the press for other operations. The challenge, then, becomes catching the jackets as they leave the die. There are several solutions for this, but I chose to design, print and use a purpose-built container that is similar in design to the Lee push through sizing die systems. 
Importantly, each time a swaging die is used, the brass must be lubricated. A lanolin-based lube is used. Like when resizing bottleneck cartridge brass for reloading, the lubrication keeps the brass from sticking to the die as it is stretched. 
Once the brass is derimmed, I wet tumble again. This serves two purposes. First, it removes all of the lube from the brass. Since the next step in jacket preparation is annealing, removing the lubrication at this stage ensures that the lube doesn’t get burned onto the jacket. Second, when the rim is unfolded, it exposes additional priming residue that may not have been cleaned out during the initial wet tumble. I understand that not all bullet swagers go through this extra step of wet tumbling, but to me it is an easy way to ensure I’m working clean, and it doesn’t take much of my time. (continued) |
|
|
NV, USA
|
[#3]
Part 4: Casting Cores for Swaging
There are two ways to make cores for swaged bullets – casting cores and cutting cores from lead wire. I chose to cast cores because I am already set up for bullet casting. Casting bullet cores is much like casting bullets, except I’m not as worried about the finish and look of the slug when it drops from the mold. The cores will go into a swaging die where they will be sized to the specific weight needed for the final bullet. For example, to create a 55 grain bullet, I subtract the weight of the jacket (i.e. approx 9.7 grains for a jacket made from Remington .22LR brass) from the desired weight to know what the weight of my cores needs to be. The lead used for cores needs to be soft – pure lead is perfect. Core swaging requires tremendous pressures, and soft lead ensures that the die isn’t damaged. Since I use wheel weights for my cores, pre-sort my wheel weights and only use stick-on weights for bullet cores. The clip-on weights can be used for swaged bullets; I ingotize (is that a word?) the stick-on weights and the clip-on weights separately so I have an ample supply of soft lead for bullet swaging. My purchase of BT Sniper’s .224 swaging system included an 11 core mold designed specifically to make cores suitable for ~55 grain bullets. Alternatively, Brian can provide molds that cast heavier cores (i.e. to create 62 grain bullets). Like bullet casting, molten lead is poured from a ladle into the mold. I won’t delve deeply into that process here, but feel free to look at my bullet casting page for more details. Suffice to say that my lead casting equipment is primitive… but it works fine and it’s cheap. The cores drop from the mold heavier than my target weight of 43.7 grains. As already noted, the raw core will be swaged to its final weight in another step. 
(continued) |
|
|
NV, USA
|
[#4]
Part 5: Swaging Cores
Starting with a large container of cast cores, these are swaged to their final weight in a core swage die. The operation of the die is simple – the raw core is pushed into the die with a punch; the pressure of the swaging operation squeezes the lead into the confined space in the die and forces the excess lead out of a bleed hole on the side of the die. The size of the confined space in the die is adjusted so that the optimal weight is obtained. 
Using my stick-on wheel weight lead, raw cores drop from the mold at about 52 grains: 
After swaging, the final core weights approximately 45.3 grains:
Again, consistency in process is required to produce consistent bullet weights. Pulling the handle of the press the same way every time, getting to know the ‘feel’ and being consistent with the amount of lubrication applied to the core produces consistent results. Like the other swaging operations, the core is lubricated using the same lanolin lube used in swaging. A benefit of the BT Sniper swaging system I purchased is the inclusion of an auto-ejection system. This system uses a press operated pushrod that protrudes into the top of the die. After the core is swaged, and as the press handle is lowered, the pushrod pushes the swaged core out of the bottom of the die. This auto-ejection system helps increase productivity since the core doesn’t have to be manually extracted from the die. Although I’ve never used them, I understand that other die systems require manual tapping on a pushrod to eject the core. As I was waiting for my swaging dies, I realized that an opportunity existed to improve the workflow and process. When the core is pushed from the die, it has nowhere to go – and it drops on the floor. Using my 3D printer, I designed a catch tray that rests on the bottom portion of the auto-ejection system. This catch tray catches the cores as they fall from the die, saving me (and my back) from having to pick up the swaged cores from the floor. Since I do much of my work indoors, the added benefit to the catch tray is working cleaner… (and less ‘feedback’ from the integrated spousal unit). 
After swaging, the cores are cleaned of lubrication in acetone, and stored in bulk in a container until they’re seated in the jackets. (continued) |
|
|
NV, USA
|
[#5]
Part 6: Annealing Jackets
Annealing brass is pretty simple. Annealing, which involves heating the brass to about 800 degrees, softens the brass which makes it suitable for point forming & softer so that it will be appropriately engraved by the rifling. Annealing for swaging is different than annealing for reloading in that for swaging, we want the entire piece of brass to get to a uniform temperature. Annealing for reloading entails heating only the case neck, while keeping the area bow the shoulder (particularly the web) unaffected. This is critical so that the part of the brass that withstands the pressure of the cartridge load stays hard & strong. Per the guidance of my die maker, annealing should be done after derimming. Presumably, annealing before derimming will cause the derimming punch to break through the brass more often. Annealing does need to be done before point forming, however. If the brass is too hard when the point is formed, it will fold over & crease, causing a defect. Some that anneal for swaging use a Lee casting pot dedicated to the task. Testing has found that these casting pots heat to the right level. In my case, I’m using a propane burner and a flat toaster oven tray for annealing. I’m covering the tray with aluminum foil and laying out one layer of brass. Then, I’m covering the brass & tray with another layer of foil with some space for air. I poke a thermometer through the top layer of the foil to monitor temperature. Alternatively, I’ve also used a clean pot on the propane burner; others anneal in a BBQ. The method of heating the brass isn’t terribly important, so long as they get hot enough, long enough. Using my method, I’m finding that it typically takes about 20 minutes to heat to 800 degrees. It is important that all of the brass be heated, and it can be difficult to make sure they’re all heated evenly. So, I leave the heat on a little longer, open the foil to move & stir and move the pan around over the heat. When I’m confident that they’ve all been annealed, I dump the brass in cold water. This isn’t necessary to assist in the annealing process; it simply makes the brass able to be handled quicker. A way to check .22LR brass for proper anneal is to pinch the mouth closed. Unannealed brass can’t be pinched closed; annealed brass can be pinched closed with relative ease. One the brass is annealed, it must be cleaned again. I wet tumble, using the stainless steel pin method outline on another page. Be sure to ensure that the brass is completely cleaned of any scale or stains that result from the annealing process. Clearly, there are many ways that brass can be annealed for swaging. So long as it gets hot enough, and all of the brass is annealed, none are ‘wrong’. But, efficiency is important – find a method that doesn’t require you to use a propane torch to heat each piece of brass individually and you’ll be happier. (continued) |
|
|
NV, USA
|
[Last Edit: ricklaut]
[#6]
Part 7: Seating Cores
Core seating actually accomplishes two things – it bonds the jacket to the core, and it expands the size of the bullet to nearly its final size. 
Again, a special die is used to seat the cores – a core seating die. The clean core is placed into the jacket, and the jacket / core are pushed into the die using a punch. The die is adjusted so that just the right amount of pressure is exerted to accomplish both the bonding and the expansion. Depending on the size of the core (remember, different final bullet weights are possible), the die is adjusted to achieve this pressure at the top of the press stroke. Again, efficiency in process is important. To get the cores in the jacket, one can either manually insert each core into each jacket just before placing them into the die – or – a ‘core shaker’ can be used to drop the cores into the jackets in batches. Others before me created ‘core shakers’ using holes in plexiglass layers to form a tray for the jackets, and through which to drop the jackets heavy end first, and then drop the cores into the jackets. Using my 3D printer (and with permission & encouragement from one of the recent builders of a ‘core shaker’ tray), I designed and printed my own device. This ‘core shaker’ saves a tremendous amount of time over manually placing each core into a jacket. I did a time study and found that I was more than twice as fast using the ‘core shaker’ than I was using the manual method. 

Here’s a video demonstrating how the core shaker works: http://www.youtube.com/watch?v=usDXJ3UMWGQ Once the cores are in the jackets, they’re simply run through the adjusted die. As with the core swaging process, the auto-ejection system and the catch tray add additional efficiency to the process. The auto-ejection system pushes the jacket/core out of the die, and they fall into the tray (rather than onto the floor). After core seating, the jacket/core combination should be .2235? in diameter. This is just under the final desired size of .224? – just right for point forming. |
|
|
NV, USA
|
[#7]
Part 8: Point Forming
The last step in swaging bullets is point forming – this is the final result: 
One more die is used to form the point on the bullet. Again, the jacket/core is pushed into the die with a punch; the pressure pushes the bullet into the cavity, which has been adjusted so the amount of force is just right to form the point, expand the bullet to its final diameter (.224) and form the base of the bullet. As BT Sniper puts it, “this is where the magic happens”. After adjusting and locking down the die, it’s a simple event… insert the lubricated jacket/core and out comes a perfectly formed bullet! Assuming, of course, that everything leading up to this point has been executed correctly. For example, if the brass wasn’t properly annealed, the point will fold over and create a blemish. If the brass is over-lubricated, pressure dents will form near the tip of the bullet. The goal, of course, is to create bullets with as few flaws as possible. Since we’re using .22LR brass as jackets, they’ll never be truly perfect. Often, the firing pin will punch a small hole in the brass which ends up near the base of the bullet. Sometimes its visible; often the hole closes up almost entirely. Again, the auto-ejection system is a tremendous aid to productivity. A pin inside the die is pushed downward to eject the bullet as the press handle is lowered. And, the catch tray is there so the bullet doesn’t fall to the floor. Before they’re declared done, the finished bullets go through one more round of wet tumbling. This isn’t absolutely necessary… but they look good! 
So, the obvious next question is how do they shoot…? That will be the subject of a more in-depth discussion, but my results indicate that at a minimum, they’re completely consistent with commercial, bulk 55gr FMJ bullets in my AR. Other swagers report that they’re able to achieve less than 1 MOA when they have tight controls on their processes and quality. 
Hope that helps those who expressed interest in knowing more about what's involved! |
|
|
|
[Last Edit: dryflash3]
[#8]
Well done. I'm going to set the toggle to keep this thread out of the archives.
ricklaut, you will always be able to find this thread under My Topics in this forum. eta, toggle set. |
|
|
|
|
[#9]
Nice job.
|
|
|
|
|
[#10]
OP,
While I have no interest or desire to make my own bullets, I found your write up well organized, interesting and extremely informative. Thanks for the great write up!!! |
|
|
|
AZ, USA
|
[#11]
Thank you for posting this write up.
|
|
|
|
[#12]
|
|
|
|
WA, USA
|
[#13]
Very cool.
Seems like Speer started that way |
|
|
|
[#14]
Originally Posted By AlphaOperator:
So when are you going to start selling boolits to us 
excellent read |
|
|
|
|
[Last Edit: InfiniteGrim]
[#15]
How much did all the equipment cost? Die look like they are $800-1600.
|
|
|
|
|
[#16]
Wow, great post.
Two questions... -How many do you do at one time? -Now that you have your process somewhat refined, how long does it take you start to finish to make x bullets? |
|
|
|
NV, USA
|
[Last Edit: ricklaut]
[#17]
Wow - thx for all the kind words
@ teeli: Not any time soon :) Two reasons - first, ATF requires licensing / ITAR (crazy, but they do). Even if I wanted to go through all of that, our county won't approve home FFLs. Second, it takes a lot of time, and it would turn from an enjoyable hobby into a job at that point! @ InfiniteGrim: Approx $1,200 + a couple of the other things I didn't already have (i.e. tumbler, picked up the extra press so I could dedicate one to this). @ AJE: I'm running batches of each step. Before I got my dies, I pre-sorted all of my brass (17k) by headstamp (THAT's fun. Not). He shipped the first half of my order (core mold, derim die and core swage die) first. I derimmed all of one headstamp worth of brass (about 2k?), poured about 1500 cores in one setting and swaged about 700 cores to size while I waited. When my final dies arrived, I had everything ready to go, but I didn't feel like I'd over committed just in case I needed to back up and re-do something (unlikely, but perhaps I didn't know what I didn't know). I've found that with core seating / point forming, it's pretty easy to knock out batches of about 300 - 500 of each. Now that I've got the dies locked down, it only takes 3 - 5 min max to change over from one task to another (swap die / punch and remove / replace the auto-eject system). Over the past week, I've already gone back and poured more cores, and am about to derim another batch of brass. On the amount of time... I actually did a time study, keeping notes of how long each step took, and comparing a couple of different ways to do several of the tasks. I'll skip to the final answer... about 85 minutes per hundred, not counting how long it took to sort the brass by headstamp. I'm still pretty new at it, but think I can get that down to about 60 min per hundred without converting to a pneumatic press. Pneumatic presses... guys have started using air to drive the ram, which is particularly useful for derimming, which takes the most force and doesn't require as much 'feel' to know what's happening. If I ever was in a position to get my FFL and try to make these for sale, that would be on the "must" list. ETA: Edited my typo - was typing before I finished my coffee. 85 min per HUNDRED (not thousand...!). |
|
|
|
[#18]
NICE WORK!
Very cool. Makes me wish I had the time to design some equipment for this. |
|
|
|
|
[Last Edit: Smokey99]
[#19]
Terrific job! What Lube is used for forming point?
|
|
|
|
|
[#20]
ricklaut,
thanks for posting this I have been thinking about this for many years and never made the jump, your write up may be the push that dose it. I've got everything I need except the swagging dies and an extra heavy duty press thanks.
|
|
|
|
NV, USA
|
[#21]
@ Smokey99: Anhydrous lanolin and castor oil is used for all of the processes.
@ Bwehn: For .224, O frame reloading presses work fine. I was going to use my Rockchucker, but its weak point is the slot where the punch slides in. I went with a Lee Classic Cast, which has a threaded ram and strong linkage. So, an extra $125ish if you don't have one already. |
|
|
GA, USA
|
[#22]
excellent post
thanks for sharimg. clown |
|
|
MI, USA
|
[#23]
1: Awesome how-to and write-up. I have heard about doing this, but haven't seen the individual steps described so completely.
2: You have awesome toys! Between this setup and your 3-d printer, I am extremely jealous. I doubt I'm going to go this route, but I do like doing neat things, even if it doesn't make the most financial sense (I reload a bunch of cal's, even ones I barely shoot because I find reloading fun). |
|
|
|
[#24]
Nice! That chicago tumbler is going to fail soon, though. Ask me how I know...
|
|
|
|
NV, USA
|
[#25]
Originally Posted By KeepShooting:
Nice! That chicago tumbler is going to fail soon, though. Ask me how I know... :) It's already surpassed it's life expectancy, so anything more is just a bonus! |
|
|
|
[#26]
Very nice! I wish I had the time for this.
|
|
|
|
|
[#27]

|
|
|
|
WA, USA
|
[#28]
any hope for making 308 caliber, say 220gr jacketed?
|
|
|
NV, USA
|
[#29]
Originally Posted By bani:
any hope for making 308 caliber, say 220gr jacketed? There is... swaging dies for .308 are on my list, but I haven't ordered them yet (for the same reason it took me so long to jump into these - cost & lead time). No plans to get the licensing required to sell, though. |
|
|
TX, USA
|
[#30]
BAM! Thanks for a great write up. I should have done the post reservation method for my lead casting one.
My wallet is not thanking you, looks like another grand will be invested in this endeavor.
|
|
|
|
[Last Edit: Flamethrower]
[#31]
Originally Posted By ricklaut:
Wow - thx for all the kind words @ teeli: Not any time soon :) Two reasons - first, ATF requires licensing / ITAR (crazy, but they do). Even if I wanted to go through all of that, our county won't approve home FFLs. Second, it takes a lot of time, and it would turn from an enjoyable hobby into a job at that point! @ InfiniteGrim: Approx $1,200 + a couple of the other things I didn't already have (i.e. tumbler, picked up the extra press so I could dedicate one to this). @ AJE: I'm running batches of each step. Before I got my dies, I pre-sorted all of my brass (17k) by headstamp (THAT's fun. Not). He shipped the first half of my order (core mold, derim die and core swage die) first. I derimmed all of one headstamp worth of brass (about 2k?), poured about 1500 cores in one setting and swaged about 700 cores to size while I waited. When my final dies arrived, I had everything ready to go, but I didn't feel like I'd over committed just in case I needed to back up and re-do something (unlikely, but perhaps I didn't know what I didn't know). I've found that with core seating / point forming, it's pretty easy to knock out batches of about 300 - 500 of each. Now that I've got the dies locked down, it only takes 3 - 5 min max to change over from one task to another (swap die / punch and remove / replace the auto-eject system). Over the past week, I've already gone back and poured more cores, and am about to derim another batch of brass. On the amount of time... I actually did a time study, keeping notes of how long each step took, and comparing a couple of different ways to do several of the tasks. I'll skip to the final answer... about 85 minutes per hundred, not counting how long it took to sort the brass by headstamp. I'm still pretty new at it, but think I can get that down to about 60 min per hundred without converting to a pneumatic press. Pneumatic presses... guys have started using air to drive the ram, which is particularly useful for derimming, which takes the most force and doesn't require as much 'feel' to know what's happening. If I ever was in a position to get my FFL and try to make these for sale, that would be on the "must" list. ETA: Edited my typo - was typing before I finished my coffee. 85 min per HUNDRED (not thousand...!). Great write up! I need to correct you on one thing though. The above statement in red is simply not true. |
|
|
|
|
[#32]
Nicely done.
|
|
|
|
NV, USA
|
[#33]
I need to correct you on one thing though. The above statement in red is simply not true. Hmm... Clark County, NV - If you're in the unincorporated parts of the county (I am) or in the City of Las Vegas, all of the research I've done says they won't approve a business license for a home FFL (city of Henderson will - but I'm not moving to do it). ATF won't bless the FFL unless you're in compliance with local laws... There are a few home-based FFLs in the area that are grandfathered from before the county changed their zoning laws - but no new ones. If you know otherwise, please let me know - I'm interested. |
|
|
WA, USA
|
[Last Edit: bani]
[#34]
Originally Posted By ricklaut:
There is... swaging dies for .308 are on my list, but I haven't ordered them yet (for the same reason it took me so long to jump into these - cost & lead time). No plans to get the licensing required to sell, though. Originally Posted By ricklaut:
Originally Posted By bani:
any hope for making 308 caliber, say 220gr jacketed? There is... swaging dies for .308 are on my list, but I haven't ordered them yet (for the same reason it took me so long to jump into these - cost & lead time). No plans to get the licensing required to sell, though. if you use 22lr brass for 224 bullet jackets, what's the host brass used for 308 bullet jackets? also, i see people using lead wire for cores instead of casting their own. any downsides other than cost? |
|
|
TX, USA
|
[#35]
Excellent thread!
Thanks for posting! |
|
|
|
[#36]
Any problems with difficult to remove fouling with the rimfire jackets?
|
|
|
|
USA
|
[#37]
Originally Posted By bani:
if you use 22lr brass for 224 bullet jackets, what's the host brass used for 308 bullet jackets? also, i see people using lead wire for cores instead of casting their own. any downsides other than cost? Originally Posted By bani:
Originally Posted By ricklaut:
Originally Posted By bani:
any hope for making 308 caliber, say 220gr jacketed? There is... swaging dies for .308 are on my list, but I haven't ordered them yet (for the same reason it took me so long to jump into these - cost & lead time). No plans to get the licensing required to sell, though. if you use 22lr brass for 224 bullet jackets, what's the host brass used for 308 bullet jackets? also, i see people using lead wire for cores instead of casting their own. any downsides other than cost? Looks like FN5.7 brass or 5/16" copper tubing jackets BT Sniper 308 Dies |
|
|
NV, USA
|
[#38]
@ bani: As Erizzo pointed out, 5.7, copper tubing and (IIRC) I saw someone using 9mm and .30 Carbine. Lead wire works fine too, but unless you extrude it yourself from soft lead, you're dependent on a supplier.
@ MonkTX: No issues with fouling that I've read of, and in my (so far) limited experience I've had no issues. I may have the opportunity to send about 500 of them (or about $54 worth (10.7 cents each - primer & powder cost) |
|
|
|
[#39]
Originally Posted By ricklaut:
Hmm... Clark County, NV - If you're in the unincorporated parts of the county (I am) or in the City of Las Vegas, all of the research I've done says they won't approve a business license for a home FFL (city of Henderson will - but I'm not moving to do it). ATF won't bless the FFL unless you're in compliance with local laws... There are a few home-based FFLs in the area that are grandfathered from before the county changed their zoning laws - but no new ones. If you know otherwise, please let me know - I'm interested. Originally Posted By ricklaut:
I need to correct you on one thing though. The above statement in red is simply not true. Hmm... Clark County, NV - If you're in the unincorporated parts of the county (I am) or in the City of Las Vegas, all of the research I've done says they won't approve a business license for a home FFL (city of Henderson will - but I'm not moving to do it). ATF won't bless the FFL unless you're in compliance with local laws... There are a few home-based FFLs in the area that are grandfathered from before the county changed their zoning laws - but no new ones. If you know otherwise, please let me know - I'm interested. Sorry man. I misread county as country. I am at fault for not reading properly. You have my apologies. |
|
|
|
NV, USA
|
[#40]
Originally Posted By Flamethrower:
Sorry man. I misread county as country. I am at fault for not reading properly. You have my apologies. No worries. I was hoping you were right and there was a way to do it! |
|
|
TX, USA
|
[#41]
Great writeup and pics. I always wondered about the process of forming jackets from 22LR brass but i did not realize the dies were that expensive.
|
|
|
|
[#42]
Very Nice to know this is possible. I read a little about it a few months ago, but this thread is very easy to understand.
|
|
|
|
TX, USA
|
[#43]
Can you do a write up on how you converted the classic cast over for bullet swaging? I have a set of Larry Blackmons dies to make 116gr 308 bullets for my benchrest rifle but I haven't touched them since I received them.
|
|
|
USA
|
[Last Edit: ERizzo]
[#44]
Originally Posted By andre3k:
Can you do a write up on how you converted the classic cast over for bullet swaging? I have a set of Larry Blackmons dies to make 116gr 308 bullets for my benchrest rifle but I haven't touched them since I received them. I wouldnt call it a conversion. You unscrew the top of the ram and bolt on BT Snipers kit. Takes 2 minutes. BT Sniper 22 KIT 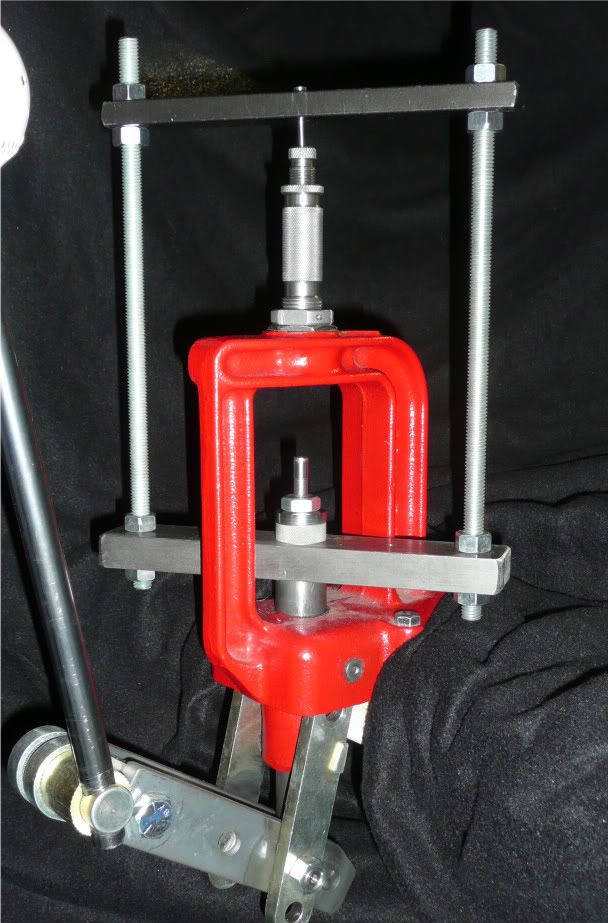
|
|
|
NV, USA
|
[#45]
Originally Posted By ERizzo:
I wouldnt call it a conversion. You unscrew the top of the ram and bolt on BT Snipers kit. Takes 2 minutes. BT Sniper 22 KIT http://i636.photobucket.com/albums/uu87/BTSniper/pressupgrade002.jpg Originally Posted By ERizzo:
Originally Posted By andre3k:
Can you do a write up on how you converted the classic cast over for bullet swaging? I have a set of Larry Blackmons dies to make 116gr 308 bullets for my benchrest rifle but I haven't touched them since I received them. I wouldnt call it a conversion. You unscrew the top of the ram and bolt on BT Snipers kit. Takes 2 minutes. BT Sniper 22 KIT http://i636.photobucket.com/albums/uu87/BTSniper/pressupgrade002.jpg Yup - that's it - very simple & effective. Another reason I like the Classic Cast is because I can change the angle of the arm... For everything but derimming, I have it up similar to how it's shown in ERizzo's pic; for derimming (which takes quite a bit more force and less 'feel'), I have the handle angled down, so that when the rim is being unfolded, I'm leaning down into it, not pulling. BT Sniper also makes an ejection kit like this for the RCBS RockChucker, and he makes punches for their slotted ram. |
|
|
|
[#46]
What do you figure your return on investment is? In number of bullets that is.
|
|
|
|
|
[#47]
Originally Posted By Flamethrower: What do you figure your return on investment is? In number of bullets that is. |
|
|
|
|
[#48]
Great write up
|
|
|
|
|
[#49]
Originally Posted By bwehn:
My guess would be about 18-21,000 Originally Posted By bwehn:
Originally Posted By Flamethrower:
What do you figure your return on investment is? In number of bullets that is. I was thinking more than that. Figuring the cost of buying bullets vs the cost of the equipment to make your own + materials. Brass is free, but lead MAY not be. Figuring $100 per K to buy bullets. Equipment being $1200. There is 12k worth of bullets just in equipment cost. Even if you could make 100 bullets per hour, that is 10 hours per 1,000 bullets. Not trying to rain on anyone's parade. The bullets look fantastic! It just seems that a guy would need to have a lot of free time to make them all and make it a worthwhile endeavor for even himself. I would like to see a side by side comparison of accuracy between these and your everyday 55gr fmj like Hornady, Sierra, Armscor, etc. |
|
|
|
USA
|
[#50]
Originally Posted By Flamethrower:
What do you figure your return on investment is? In number of bullets that is. You wont come out ahead. This is a labor of love and or just being able to make your own whatever and whenever you want. Its either stock up 18,000 bullets or custom make them at your leisure. Or, maybe its about being able to make therm when others cant even buy them. |
|
|
 Win a FREE Membership!
Sign up for the ARFCOM weekly newsletter and be entered to win a free ARFCOM membership. One new winner* is announced every week!
You will receive an email every Friday morning featuring the latest chatter from the hottest topics, breaking news surrounding legislation, as well as exclusive deals only available to ARFCOM email subscribers.

AR15.COM is the world's largest firearm community and is a gathering place for firearm enthusiasts of all types.
From hunters and military members, to competition shooters and general firearm enthusiasts, we welcome anyone who values and respects the way of the firearm.

Subscribe to our monthly Newsletter to receive firearm news, product discounts from your favorite Industry Partners, and more.
Copyright © 1996-2024 AR15.COM LLC. All Rights Reserved.
Any use of this content without express written consent is prohibited.
AR15.Com reserves the right to overwrite or replace any affiliate, commercial, or monetizable links, posted by users, with our own.


