|
Posted: 9/2/2021 8:23:07 PM EDT
I have sprayed this twice and it’s not even close to grey. I preheat the parts to 170 and layer on the coating with an airbrush. I then tried 300 and 325 for 1hr. What temperatures and time are you guys using?
 C156224B-322B-49DC-89BA-B1ED64037754 by Derek Williams, on Flickr C156224B-322B-49DC-89BA-B1ED64037754 by Derek Williams, on Flickr
|
|
|
|
[#1]
I feel that I’ve had pretty good success with Norrell’s. I followed the instructions, pre-heated, sprayed several
light coats, then baked at 300 degrees for one hour. Your lower looks gray to me. All of mine have come out About that color. |
|
|
|
[#2]
Far from an expert but that looks pretty sharp to me.
|
|
|
|
[#3]
Is this this the grayish-black Colt Flat?
I’m asking asking solely for my own benefit. I have a couple that I need to finish. |
|
|
|
[#4]
Quoted: I feel that I’ve had pretty good success with Norrell’s. I followed the instructions, pre-heated, sprayed several light coats, then baked at 300 degrees for one hour. Your lower looks gray to me. All of mine have come out About that color. I will have to take a picture in the sunlight. With no background info given, I asked my 12yr daughter what color is this? Her response - army green |
|
|
|
[#5]
I thought that remembered reading on John Norrell’s page that baking too hot or too long could give it a green tint.
Heading to his page now. |
|
|
|
[#6]
Quoted: I feel that I’ve had pretty good success with Norrell’s. I followed the instructions, pre-heated, sprayed several light coats, then baked at 300 degrees for one hour. Your lower looks gray to me. All of mine have come out About that color. I will have to take a picture in the sunlight. With. I background I asked my 12yr daughter what color is this? Her response - army green Per the instructions: 7. Can I make Moly Resin harder by curing longer or at a higher temperature? The desired compromise between hardness, flexibility and durability is achieved at 300 degrees for all colors but Glosy Black. It should be noted that curing with a longer duration or at higher temperatures other than 300 degrees with our flat or semi-gloss Grayish-Black Moly Resin produce will a green hue/tint that is desired by our military collectors. See curing instructions for Grayish-Black. Then on the website more instructions: The hardening catalyst is fully activated at 300 degrees and the minimal cure time should be 1 full hour. Curing for a longer time is fine but not required. Heating the parts to cure at lower temperatures for longer periods of time will not adequately harden the coating. Special Curing Instructions Glossy Black Moly Resin needs to be cured at 315 to 325 f. The highest gloss of the product is when coating over metal room temperature and may also be placed over pre-heated metal but may produce slightly less gloss. Practice on a small piece of scrap metal to check your technique. Color Desired Temperature Oven Time Grayish-Black 300 f. 1 Hour Green Hue Gray-Black 325 to 350 f. 1.5 hours or longer When attempting to create the green hue, it is important to keep checking the oven to catch the green at the depth of color you desire. The longer it is left at the higher temperature the greener it will become. I also emailed them and no response yet. |
|
|
|
[#7]
Quoted: I will have to take a picture in the sunlight. With no background info given, I asked my 12yr daughter what color is this? Her response - army green Pictured is 300 @ 1 hr. Digital oven temp and thermostat. This is my first attempt at Molly Resin. I have Cerakoted a lot. |
|
|
|
[#8]
I re-read the same page that you quoted. That was the page I remember reading. I would like to see it in daylight.
I guess it’s possible that he sent you the wrong color. I’m sure if that’s the case he would replace or refund. |
|
|
|
[#9]
Upper A1 as received from Nodak, 2nd A1 Molly but looks bronze green. Left lower stock Aero Pre. Right lower is Cerakote smoke. It really is a green bronze color. No where near a grey. Will try and get some sun light pics.
 130AC8AF-CF22-4533-94F0-4D38AC5DA54D by Derek Williams, on Flickr 130AC8AF-CF22-4533-94F0-4D38AC5DA54D by Derek Williams, on Flickr
|
|
|
|
[#10]
I've had that issue of it being too green. What I've found to help is to shake the bottle until the ball rattles, and then really do shake it for the full two minutes that is on the instructions. When I bake mine, now, I do it at 285 for an hour and fifteen minutes. It's as strong as it should be and I've had no more green problems.
JT |
|
|
|
[#11]
Quoted: I've had that issue of it being too green. What I've found to help is to shake the bottle until the ball rattles, and then really do shake it for the full two minutes that is on the instructions. When I bake mine, now, I do it at 285 for an hour and fifteen minutes. It's as strong as it should be and I've had no more green problems. JT  Which reminds me. I have some small parts that I need to mail you for finish work. |
|
|
|
[#12]
My first try at grayish-black also came out more green than gray. Luckily it was a test lower so I just sprayed over it with Rustoleum dark gray auto primer.
My SOCOM black ones have came out fine but have been scared off of trying grayish black again. I have a couple getting anodized now in Canadian gray and will post pics when they get back. ETA I may try again using JT's method of cooking. |
|
|
|
[#13]
Doesn't look that "off" to me.
Here's my GAU-5/A/A that's done in Norrells Colt Grey-Black and it looks pretty close to yours.  You do need to shake Norrells longer than you might think, especially if it's been sitting for a while. |
|
|
|
[#14]
I blew through half a quart of grayish black a couple weeks ago trying to get anything that looked remotely like "grayish black." This was my first experience using Molyresin, but definitely not my first using a baked finish. I also use an infrared thermometer to monitor temperature. I preheated and sprayed at about 150-175 and tried baking at, above and below the instructions....several times. Everything looks green to bronze. I don't want to say the bottle was mislabeled, but I just can't get right color from it. I did end up painting one gun dark bronze, which I do like, so it's not a total loss.
I finally tried mixing Socom black and light gray in several different ratios. I settled on 50/50 and have done four guns so far. |
|
|
|
[#15]
It looks about right to me, it’s supposed to be “greyish black”, not grey.
|
|
|
|
[#16]
Looks good to me. I had a 1980s usgi replacement a1 upper and found the grey black to be slightly warmer than that color. It also gives instructions on how to cure it to get it more or less green. But it looks fine to me.
|
|
|
|
[#17]
Sunlight pics. As far as shaking till the ball rattles, there is no ball in the bottle I have and I shaked it for 8/10 minutes, and every retime I added to the air brush.
 3F7160A9-6618-45F7-B0C2-DFE3A83BDBAA by Derek Williams, on Flickr 3F7160A9-6618-45F7-B0C2-DFE3A83BDBAA by Derek Williams, on Flickr A3032FF5-1E75-483E-8564-1F264FF2D6DD by Derek Williams, on Flickr A3032FF5-1E75-483E-8564-1F264FF2D6DD by Derek Williams, on Flickr
|
|
|
|
[#18]
And here is my set up
 335C5C9C-17DE-4C5A-B8D4-3A068C02F9F8 by Derek Williams, on Flickr 335C5C9C-17DE-4C5A-B8D4-3A068C02F9F8 by Derek Williams, on Flickr 99D95DCC-8CDA-4B5A-9B33-838BDC8D8037 by Derek Williams, on Flickr 99D95DCC-8CDA-4B5A-9B33-838BDC8D8037 by Derek Williams, on Flickr
|
|
|
|
[#19]
Quoted: As far as shaking till the ball rattles, there is no ball in the bottle I have... I thought the same thing with the last bottle I bought (the large size bottle, I don't know if the small ones have a ball or not). Either way, that's exactly why I mentioned it. The ball was stuck in the bottom off a bunch of goo. The rest of the product was thin as water. So, you may want to at least put a rod down to the bottom and check to see what's going on down there. Also, with a vertical oven like you have, it must be much hotter at the top than it is at the bottom. I'd put a thermometer at the same level your parts hang and check the temp (which you may have done, I can't tell where your temp sensor is by the photos). JT |
|
|
|
[#20]
Quoted: I thought the same thing with the last bottle I bought (the large size bottle, I don't know if the small ones have a ball or not). Either way, that's exactly why I mentioned it. The ball was stuck in the bottom off a bunch of goo. The rest of the product was thin as water. So, you may want to at least put a rod down to the bottom and check to see what's going on down there. Also, with a vertical oven like you have, it must be much hotter at the top than it is at the bottom. I'd put a thermometer at the same level your parts hang and check the temp (which you may have done, I can't tell where your temp sensor is by the photos). JT BINGO!!! I received my resin last week but it’s got to be super old. I bent a steel rod prying the gunk off the bottom and yep, their are balls in there. They should say this in the directions and should have a manufacturing date code on this stuff. I really don’t see how this will dissolve. Temp prob is located in the upper left corner 4” down from the top, 3” from the left just under the upper rack. |
|
|
|
[#21]
Quoted: I have sprayed this twice and it’s not even close to grey. I preheat the parts to 170 and layer on the coating with an airbrush. I then tried 300 and 325 for 1hr. What temperatures and time are you guys using? https://live.staticflickr.com/65535/51421405650_79659fa772_k.jpgC156224B-322B-49DC-89BA-B1ED64037754 by Derek Williams, on Flickr You didn’t shake up the moly resin good enough, buy a sawzall mixing attachment off of Amazon and shake it for 5 minutes or so and the color with be SPOT ON. (I learned this by personal experience) |
|
|
|
[#22]
Moly takes a lot of time and practice to master, for me it took a bit.
I’m sure an airbrush would work good but my best luck has been a high end automotive HVLP. The gun cerakote advertises on their site is perfect, drop the $50 on the 50 micron metal filter they sell too. I wasn’t getting the flat, smooth texture I need until bought better guns, and started filtering the larger flakes out of the Bronze for the older XM stuff. If the gun doesn’t atomize the paint to the optimum level it just doesn’t lay right. If you want me to paint, as much as I hate doing it I will spray pieces, I prefer to do the upper/lower together to reduce the back and forth. I stand behind my work but there is no way to matchy matchy a upper unless you paint it too. As long as the parts are anodized, I don’t mess with raw parts unless I owe you money. Top is original upper, dusted to match a grey lower, middle is a two part grey with gold undercoat. Bottom is same, grey/gold. Original uppers, painted lowers.   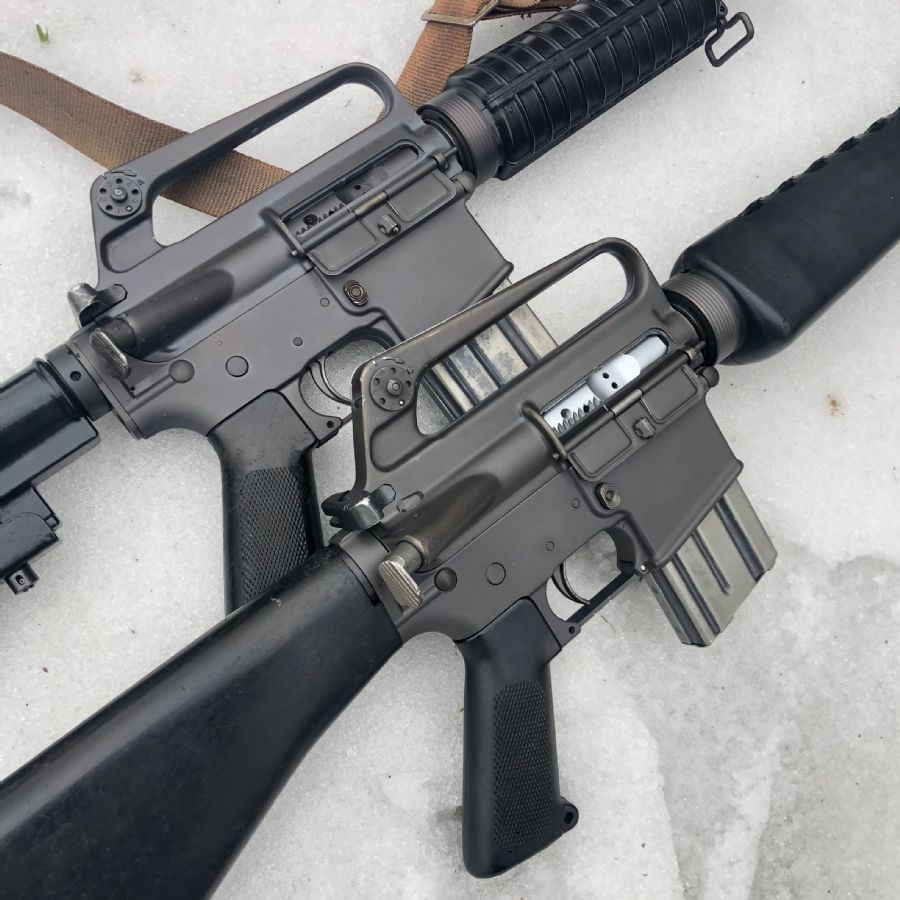
|
|
|
|
[#23]
Let me clarify the issues I had - preheat @ 175 won’t work with cheaper guns, it will end up looking semi gloss in no time; 200 works but you need a heat gun by you at all times, and you need to turn volume down as much As poss. You end up jacking around, putting 20 coats on until it’s right.
If you go 250 or so, you can apply more paint at once but you will have more dry/rough paint on surface. 15 coats When you run a gun like this: Iwata LPH80 All the issues stop. Preheat to 200, have a heat gun next to you, lay down thicker coats with it never glossing up, as it gets cool you just heat with gun until it’s too hot to touch, keep going. What took me 2-3 hrs per (plus 1hr cure) is prob 1 plus cure. I suggest laying a foundation of his flat bronze to give the grey some depth. Without it, it just looks sterile. Running bronze, you need this strainer and two paint Guns. Strainer Your wondering, “why do I want a $311 paint Gun and a $40 strainer”. Depending on how sick you are with the retro virus, it will save you a lot of time/money and headache. Trust me. For $400 you can have the gun, strainer, and paint. Then you can refinish a whole collection. If you need help message me. - use old buffer tube to hold lowers - I use a aluminum jig I cut to hold uppers, heat up and slide them on out of the oven, paint, hang back up - dust inside first, then attach upper/lower by putting a piece of wire trough front/rear pin holes. Rotate it on buffer tube as painting and it seems to work perfectly. |
|
|
|
[#24]
If you heat at too high a temperature or heat over an hour you will get a greenish tint on Norrels Colt Gray. It even mentions this in the instructions as a way to get a green tint.
Ask me how I know... BTW Norrels did send me the wrong color once labeled as Colt gray...it wasn't |
|
|
|
[#25]
It wasn’t to hot and it wasn’t to long. My oven is set up as a convection and the temperature accuracy has been checked. The issue seems to be extreme settling in the material. I painted cars for years and this is the most settled compacted material I have ever used. I bent a medal rod trying to agitate the material. Afterwords I had to use a super fine strainer to get all the undissolved material out to make it suitable for spraying. I do have a Sata mini-jet I am going to try out with some of the above suggestions.
If I were writing the tech manual for this stuff I would include much more information and some better tips. I would also include a date code on the material. The company has never responded to any of the emails I have sent them. 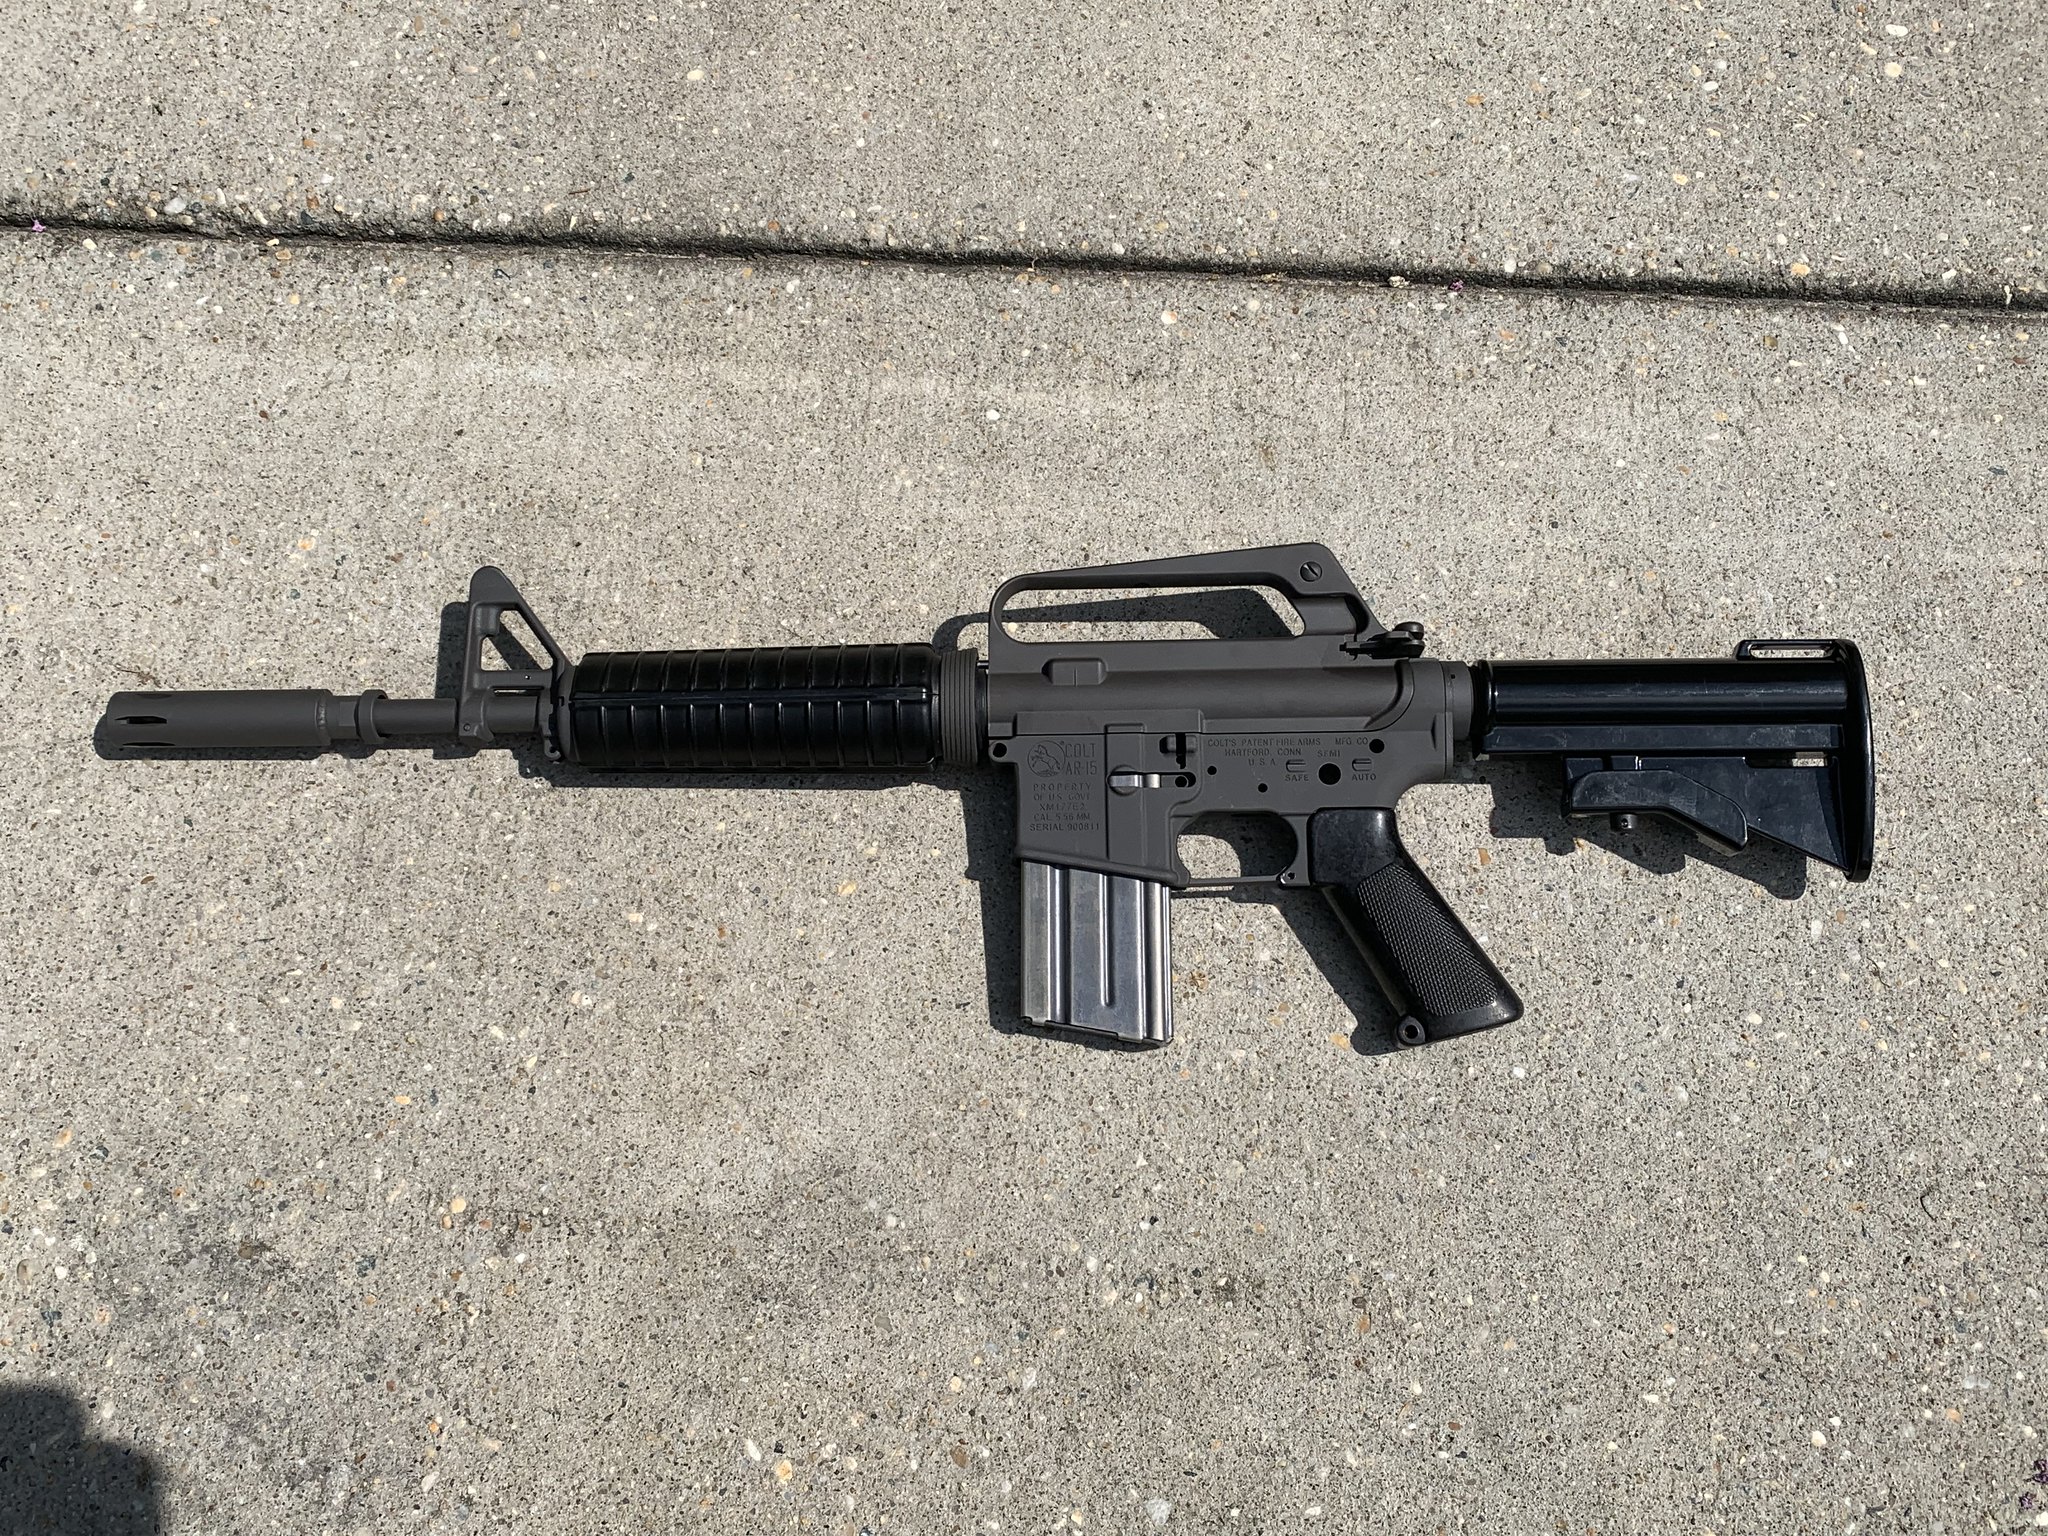 764AC6E4-FE25-41A9-9AE5-FF24950D2EAB by Derek Williams, on Flickr 764AC6E4-FE25-41A9-9AE5-FF24950D2EAB by Derek Williams, on Flickr
|
|
|
|
[#26]
Quoted: Moly takes a lot of time and practice to master, for me it took a bit. I’m sure an airbrush would work good but my best luck has been a high end automotive HVLP. The gun cerakote advertises on their site is perfect, drop the $50 on the 50 micron metal filter they sell too. I wasn’t getting the flat, smooth texture I need until bought better guns, and started filtering the larger flakes out of the Bronze for the older XM stuff. If the gun doesn’t atomize the paint to the optimum level it just doesn’t lay right. If you want me to paint, as much as I hate doing it I will spray pieces, I prefer to do the upper/lower together to reduce the back and forth. I stand behind my work but there is no way to matchy matchy a upper unless you paint it too. As long as the parts are anodized, I don’t mess with raw parts unless I owe you money. Top is original upper, dusted to match a grey lower, middle is a two part grey with gold undercoat. Bottom is same, grey/gold. Original uppers, painted lowers. https://www.ar15.com/media/mediaFiles/415053/3D0DD213-6FE7-4993-9CFF-435432D69041-2035567.jpghttps://www.ar15.com/media/mediaFiles/415053/081A633E-879D-4C30-9D21-8C35F3BF806C-1913090.jpg https://www.ar15.com/media/mediaFiles/415053/A4CBAC13-B2A3-4D06-A178-DE8078F73424-1913070.jpg Those look amazing. Absolutely beautiful work. |
|
|
|
[#27]
Quoted: It wasn’t to hot and it wasn’t to long. My oven is set up as a convection and the temperature accuracy has been checked. The issue seems to be extreme settling in the material. I painted cars for years and this is the most settled compacted material I have ever used. I bent a medal rod trying to agitate the material. Afterwords I had to use a super fine strainer to get all the undissolved material out to make it suitable for spraying. I do have a Sata mini-jet I am going to try out with some of the above suggestions. If I were writing the tech manual for this stuff I would include much more information and some better tips. I would also include a date code on the material. The company has never responded to any of the emails I have sent them. https://live.staticflickr.com/65535/51427995616_a7162dfdfc_k.jpg764AC6E4-FE25-41A9-9AE5-FF24950D2EAB by Derek Williams, on Flickr If this XM carbine is the result of your most recent efforts, I would like to congratulate you. It looks like you nailed it regarding the color, if you’re trying for mid to late 1960’s Colt gray. |
|
|
|
[#28]
I just did 5 lowers this past weekend.
One thing I can tell you is They did much better when I put them in the 300F oven for 2-3 min so that the lower only heats to 100-120F. My applications went on much smoother when the aluminum wasn’t all that hot. We used Colt gray 90% and so I’m black 10% To get the look we wanted on retro builds. We also Used bronze as the first coat then the 90%_10% Mixture for the second and third coats. That looked great and had a hint of the under color. Hope this helps. Allan |
|
|
|
[#29]
I just did 5 lowers this past weekend.
One thing I can tell you is They did much better when I put them in the 300F oven for 2-3 min so that the lower only heats to 100-120F. My applications went on much smoother when the aluminum wasn’t all that hot. We used Colt gray 90% and so I’m black 10% To get the look we wanted on retro builds. We also Used bronze as the first coat then the 90%_10% Mixture for the second and third coats. That looked great and had a hint of the under color. Hope this helps. Allan |
|
|
|
[#30]
In the case of raw aluminum lowers such as 80%'s, what are you guy doing doing to give the smooth aluminum finish some tooth? A while back I used some of the Brownell's Alumahyde with preheating and air gun drying multiple light coats and it peeled off in sheets. After that I used anodized lowers.
|
|
|
|
[#31]
I blast it with with alum oxide.
|
|
|
|
[#32]
The Norrell's green/bronze issue with grayish-black Colt can be used to advantage if you are building a worn-looking replica. Spray a coat and intentionally let it go green/bronze. Spray a second coat correctly. After it cures, use steel wool to wear through the top coat and expose the greenish-bronze in high wear areas. It ends up looking like old anodizing that has been burnished by decades of handling. If you don't go too crazy with the steel wool, you don't get the appearance of an abrupt transition, but it still looks worn. Fake aging can go really wrong if not done well, but this method tends to look like natural wear, especially if you don't go overboard and expose bare metal or keep the bare metal to a minimum.
The rounded end of this partial fence is how this ends up looking: |
|
|
|
[#33]
Got a bottle of the Norrells Moly Resin Gray-Blck Colt Flat for my Brownells 601 project and have been following this thread with interest. Like a couple of others here; my bottle was settled well enough that the balls in it were stuck to the bottom and would not rattle no matter how long I shook it by hand. So I tried something a little different- I put the unopened bottle in my vibratory brass cleaner and ran it about 15 minutes. When I took it out, the bottle seems no worse for the wear, but the balls are rolling around freely inside it now. Might be something to give a try if yours is having the same issue? I'll know more when I try to use it (and will re-shake it again just before doing so) but this might be good for getting it mixed really well.
|
|
|
 Win a FREE Membership!
Sign up for the ARFCOM weekly newsletter and be entered to win a free ARFCOM membership. One new winner* is announced every week!
You will receive an email every Friday morning featuring the latest chatter from the hottest topics, breaking news surrounding legislation, as well as exclusive deals only available to ARFCOM email subscribers.

AR15.COM is the world's largest firearm community and is a gathering place for firearm enthusiasts of all types.
From hunters and military members, to competition shooters and general firearm enthusiasts, we welcome anyone who values and respects the way of the firearm.

Subscribe to our monthly Newsletter to receive firearm news, product discounts from your favorite Industry Partners, and more.
Copyright © 1996-2024 AR15.COM LLC. All Rights Reserved.
Any use of this content without express written consent is prohibited.
AR15.Com reserves the right to overwrite or replace any affiliate, commercial, or monetizable links, posted by users, with our own.


