|
Posted: 3/3/2021 2:18:35 AM EDT
HDLS helped me finish my second AR build last month and lacked the proper tools for a FSB installation, but he was able to figure something out using what he had and I thought I'd post it up. The FSB isn't canted and is solidly in place. The taper pins ended up not quite being even in the vertical plane, but the issue is pretty much just aesthetic. Overall, I think the rifle turned out pretty well. Neither of us had any prior experience with FSB installation. He also helped to install the barrel, since I lack the tools for that as well, and have never done it before. I was definitely very appreciative, since it saved me a good chunk of cash on this build.
He ended up drilling and tapping the underside of the FSB for a set screw to help keep the FSB in place since the clamp method often suggested online does not work with a 0.625" FSB. Worked out pretty well. The hole for the front taper pin was drilled and reamed, and the taper pin installed, so that the set screw could be removed in doing the rear one.   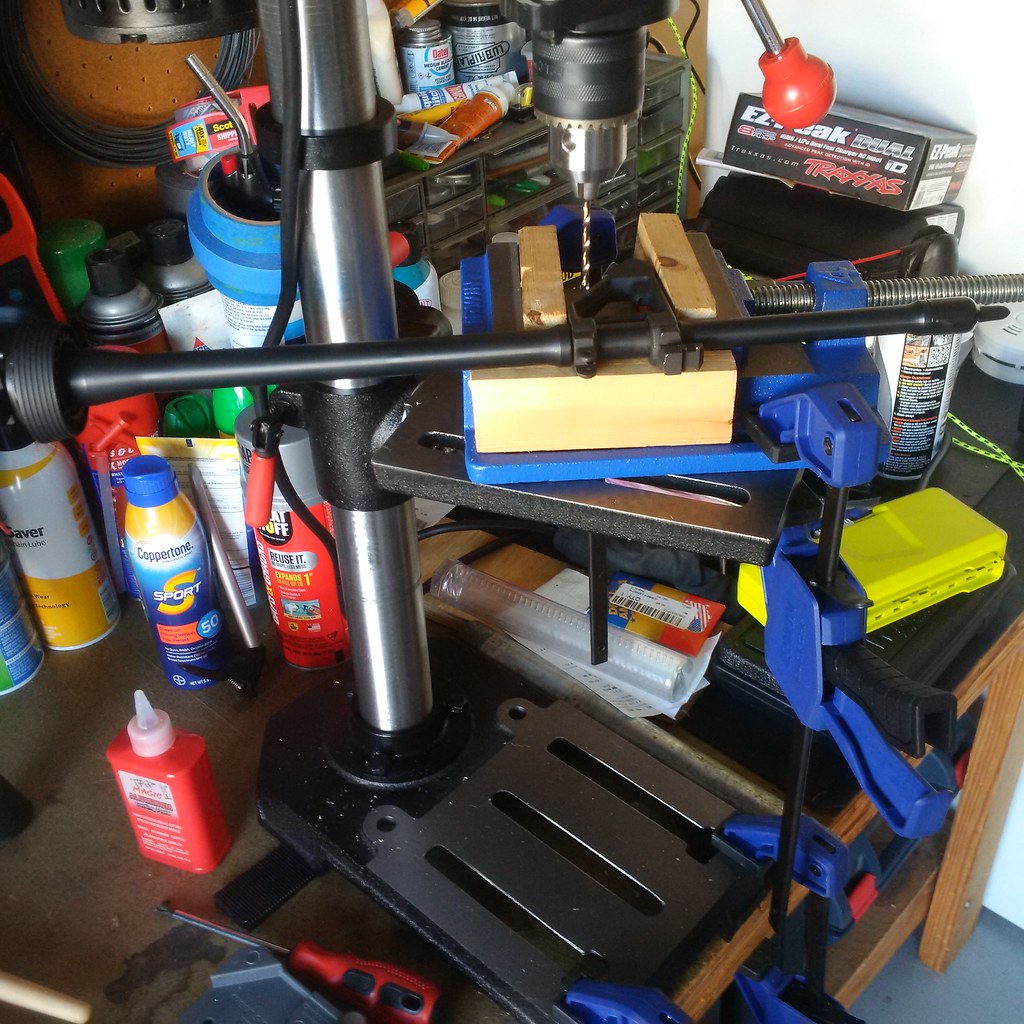      And the resulting rifle:  
|
|
|
|
[#1]
Joining the FSB hackers club feels good, doesn't it?
I'm a life member: A2 FSB Home Install Process ETA: Nice job, by the way. |
|
|
|
[#2]
If you need a visual index to help time the barrel and the front sight, the threads on a steel USGI segmented cleaning rod match the front sight threads. Join a couple cleaning rod segments together and thread them into the threaded hole for the front sight. Now your front sight post is 2 feet tall.
If you want to create a perfect vertical reference, tie some (white) kite string to a socket or wrench and hang it from the ceiling or a rafter in your shop. Aim the barreled upper at the white string. Then you can level the receiver itself horizontally with a torpedo level. By shifting slightly left and right, make sure the kite string aligns with the cleaning rod section at at both the top and bottom at the same time. Clamp the front sight in place, make an index mark with a pencil so you can see if the front sight shifts while drilling, and you are good to go. After drilling the first hole, I put a same-size drill bit (shank first) into the hole, that way nothing can shift while drilling the 2nd hole. |
|
|
|
[#3]
Kudos
|
|
|
|
[#4]
Thank you all.
|
|
|
|
[#5]
Quoted: Kudos The kudos goes to @HDLS We did brainstorm together a bit, and I provided an extra hand when needed, but the work was pretty much all his. |
|
|
|
[#6]
Quoted: If you need a visual index to help time the barrel and the front sight, the threads on a steel USGI segmented cleaning rod match the front sight threads. Join a couple cleaning rod segments together and thread them into the threaded hole for the front sight. Now your front sight post is 2 feet tall. If you want to create a perfect vertical reference, tie some (white) kite string to a socket or wrench and hang it from the ceiling or a rafter in your shop. Aim the barreled upper at the white string. Then you can level the receiver itself horizontally with a torpedo level. By shifting slightly left and right, make sure the kite string aligns with the cleaning rod section at at both the top and bottom at the same time. Clamp the front sight in place, make an index mark with a pencil so you can see if the front sight shifts while drilling, and you are good to go. After drilling the first hole, I put a same-size drill bit (shank first) into the hole, that way nothing can shift while drilling the 2nd hole. Interesting. We were eyeballing it the best we could. Good to know for next time. Pencil marks were used, partly to ensure there was sufficient gap for the handguard retainer. We didn't have a shim or anything else of the exact same size to use. It ended up perfect, though. The taper pin was put into the first hole before the drilling began on the second one. After the taper pin was installed, the set screw was removed. We had to use a set screw because clamps wouldn't secure the FSB into place. Clamping only works on the 0.75" FSB because the rings are much thinner. |
|
|
|
[#7]
Quoted: Joining the FSB hackers club feels good, doesn't it? I'm a life member: A2 FSB Home Install Process ETA: Nice job, by the way. I'm pretty sure we looked at that one and were trying to figure out why the article said to use a gunsmith for a 0.625" FSB, which we were using. We figured it was likely because the clamp method shown can't work with that type of FSB. |
|
|
|
[#8]
Quoted: I'm pretty sure we looked at that one and were trying to figure out why the article said to use a gunsmith for a 0.625" FSB, which we were using. We figured it was likely because the clamp method shown can't work with that type of FSB. It's not that it can't be done-as you have proven! I just want folks to use caution. |
|
|
|
[#9]
 I really enjoyed doing that. Quite the challenge but I think it came out really good. Let’s go shoot that thing and get it sighted in! |
|
|
|
[#10]
Quoted: I really enjoyed doing that. Quite the challenge but I think it came out really good. Let’s go shoot that thing and get it sighted in! I agree. It needs to get sighted in. Need some practice in general. Hopefully we can take it out some time this month. I'll probably bring it to the SoCal Battle Buddies hike I have planned for the 20th if I get enough people interested to do the hike. If not, we should figure out a good day to go shooting (or just use that day if it works for you). Thanks again for the help with this thing! It probably still wouldn't be done, otherwise, and ultimately helped to keep the build on-budget. |
|
|
|
[#11]
Quoted: The only reason I recommended to use a gunsmith for a .625" barrel/FSB is because there is less room for error compared to a .750" It's not that it can't be done-as you have proven! I just want folks to use caution. Quoted: Quoted: I'm pretty sure we looked at that one and were trying to figure out why the article said to use a gunsmith for a 0.625" FSB, which we were using. We figured it was likely because the clamp method shown can't work with that type of FSB. It's not that it can't be done-as you have proven! I just want folks to use caution. That was another guess when we were trying to figure it out. Unfortunately, most guides online are oriented towards 0.75" FSBs and you see a lot of the "consult a gunsmith" advice for them. First hole drilled on the FSB was perfect in terms of how much it took out of the gas block journal. Second hole was a bit shallow, but still sufficient. HDLS was very careful not to go too deep, and I also had a picture of my 0.625" bayonet lug I have taper-pinned to the barrel on my first build to help use as a visual guide as well (ADCO put that one on). |
|
|
|
[#12]
Hell yeah! Love it. Made my day.
|
|
|
|
[#13]
Quoted: The kudos goes to @HDLS We did brainstorm together a bit, and I provided an extra hand when needed, but the work was pretty much all his. I haven’t read every post since it’s a busy day but just happened to see your thread and thought I’d give a little input. I’ve been doing this exact same thing for a few years now. I told a few people about it on here but never did a write up or photos. What I do is use a dimpling jig that’s meant to put the dimple for a lo-pro directly under the gas port hole so it’s nearly perfectly aligned. I have the SLR jigs that are about $25 for each .625 and .750. And I tap the hole under the FSB 8-32 I believe it is. None have ever needed drilled out but the threads are a little loose but strong enough to hold in place for drilling the pins. It only takes a minute or two to tap since they’re already the right size. And only a couple minutes to dimple the barrel and you won’t see the dimple after the FSB is installed since it covers it. The dimple allows the FSB to hold more secure as well so it’s less likely to move around when drilling. I often found it hard to get a handguard cap behind the FSB like this so I started putting a handguard cap behind the FSB before drilling. You can also move the sight base slightly to each side for adjustment but not much. I usually throw it on a old carry handle upper with no rear sight and eyeball for straightness and it’s worked well for me. But the adjustment is so minimal that you should be able to get it sighted in even if you don’t eye ball it because the dimple makes it almost perfectly aligned. I like the idea of the cleaning rod in the front sight, I’ll have to read these posts in more detail later. |
|
|
|
[#14]
Looks like you guys did a great job!
Whose made the mid-length pencil barrel you used? |
|
|
 Win a FREE Membership!
Sign up for the ARFCOM weekly newsletter and be entered to win a free ARFCOM membership. One new winner* is announced every week!
You will receive an email every Friday morning featuring the latest chatter from the hottest topics, breaking news surrounding legislation, as well as exclusive deals only available to ARFCOM email subscribers.

AR15.COM is the world's largest firearm community and is a gathering place for firearm enthusiasts of all types.
From hunters and military members, to competition shooters and general firearm enthusiasts, we welcome anyone who values and respects the way of the firearm.

Subscribe to our monthly Newsletter to receive firearm news, product discounts from your favorite Industry Partners, and more.
Copyright © 1996-2024 AR15.COM LLC. All Rights Reserved.
Any use of this content without express written consent is prohibited.
AR15.Com reserves the right to overwrite or replace any affiliate, commercial, or monetizable links, posted by users, with our own.


