|
Posted: 1/5/2020 3:50:49 PM EDT
All right, what shenanigans happened to the Mill box thread?
https://www.ar15.com/forums/Industry/Just-for-the-fun-of-it-and-it-works-great-MILL-BOX-lots-of-pics-for-your-pleasure/724-290514/ It disappeared from my Subscribe list, and from the Build forum. Google lists its date as 12/13/2018. I can find an entry for it in Google (Google search) but when I click on the link, it flashes the thread out of the archives for a second, then I get the generic AR15.com "Community" forums list. Picking the Google "Cached" entry gets the same thing. All the individual photos from the thread are still there via Google, though. Using ARF's Archive search for "MILL BOX" (any) for 12/1/2018- 12/1/2019 doesn't find it. @BLACKLIGHT, as the OP, can you resurrect this? You posted you were working on a Gen 2 here... https://www.ar15.com/forums/AR-15/Made-a-box-to-contain-the-chips/4-746264/?page=1 |
|
|
|
[#1]
The first thread is in the archive.
Try searching directly there. |
|
|
|
[#2]
Quoted:
The first thread is in the archive. Try searching directly there. To be specific, search Archives for MILL BOX (any or exact match, doesn't matter), thread Titles, AR15 Community or All, for 12/1/2018- 12/1/2019 doesn't come up with that thread. Archive search can't be that retarded, or I'm doing something wrong- please enlighten me. |
|
|
|
[#3]
@airman100
5D tactical industry webpage was terminated I guess or they didn't want to pay the industry partners fee so my thread was up in smoke with it. Yes I made a new box and stand. I will post pics this week. There was a thread that I listed some info in that someone else started. https://www.ar15.com/forums/AR-15/Made-a-box-to-contain-the-chips/4-746264/ Yes changes have been made. Im just completing Gen 2. No pics yet. The first Gen there were a few modifications to the box and the splash guard on the router. When I made the first wood box, I made it thick and heavy because I didn't want it to move. Well when I screwed the vice through the tub into the wood box I didn't silicone the screws so over time they started to leak and it soaked the wood and made it even heaver to move and I was loosing fluid. I got a new tub the same kind and this is what I did and am doing. I built a new wood stand that is lighter and can be put up and clamped down on a fold up table/catering table. I want to stand now when I do this, not sit on a rolling stool. I screwed the vice down and this time I used flex seal all over the screws and filled gaps, basically flex seald the shit out of the vice. Im not cutting a notch out of the side of the tub like I had on the other for accessing the deck plate on the jig for changing of the depth gage on the router. Im just buying another jig and using that deck plate that will be screwed to the base of the wood stand box for changing the depth on the router. The drain hole will be in the back left going into the catch screen and into the sump return. The original sump was under the wood box and was a pain to get out and I spilled the coolube a few times so it got messy. When Im done milling I always empty the sump back into the original Coolube bottle to prevent evaporation and contamination of it. Return hoses will be on the side of the tub. Other than that all else it the same. I have 6 lowers milled on the first and original endmill. Here are my thoughts and what I can say. This thing has saved time and mess clean up PERIOD. There are no chips to vacuum up or deal with. The glass mist shields keep the mist out of your face and back into the tub. When Im done I put the lid back on the tube and put it away till next time. There was someone that said in my original post that Coolube is not intended for that purpose, I get it but the reason I went with that product is hardly any smell safe biosafe and it keeps the mill bit cool and clean and its a great cutting fluid and super easy clean up. Also will not rust parts. It keeps the deck plate of the jig smooth and new looking, and makes it easy to remove chips from the jig deck. When Im done I stick the lower in a plastic tub and hose it down with a garden hose to get the lube and chips off, super easy. Then I put it in a stainless steel container full of Acetone. The fluid shield that I put on the router was absolutely genius it made it to the point that there is very little mist or chips coming up. I only use my router to mill. So when Im done it goes back into another box and put way till next time. |
|
|
|
[#4]
Quoted:
5D tactical industry webpage was terminated I guess or they didn't want to pay the industry partners fee so my thread was up in smoke with it. Quoted:
5D tactical industry webpage was terminated I guess or they didn't want to pay the industry partners fee so my thread was up in smoke with it.  Thanks for keeping your thread going. Thanks for keeping your thread going.
Yes I made a new box and stand. I will post pics this week. I got a new tub the same kind and this is what I did and am doing. I built a new wood stand that is lighter and can be put up and clamped down on a fold up table/catering table. I want to stand now when I do this, not sit on a rolling stool. I screwed the vice down and this time I used flex seal all over the screws and filled gaps, basically flex seald the shit out of the vice. Im not cutting a notch out of the side of the tub like I had on the other for accessing the deck plate on the jig for changing of the depth gage on the router. Im just buying another jig and using that deck plate that will be screwed to the base of the wood stand box for changing the depth on the router. The drain hole will be in the back left going into the catch screen and into the sump return. The original sump was under the wood box and was a pain to get out and I spilled the coolube a few times so it got messy. When Im done milling I always empty the sump back into the original Coolube bottle to prevent evaporation and contamination of it. Return hoses will be on the side of the tub. I was following the the "Coolube isn't supposed to be used like that" comments, but there didn't seem to be any safety concerns, just that it wasn't intended to be recirculated, so I think I'll do something similar. Aquarium pumps for this pressure/throughput are pretty cheap. Looking forward to Gen 2. |
|
|
|
[#5]
@airman100
New pics   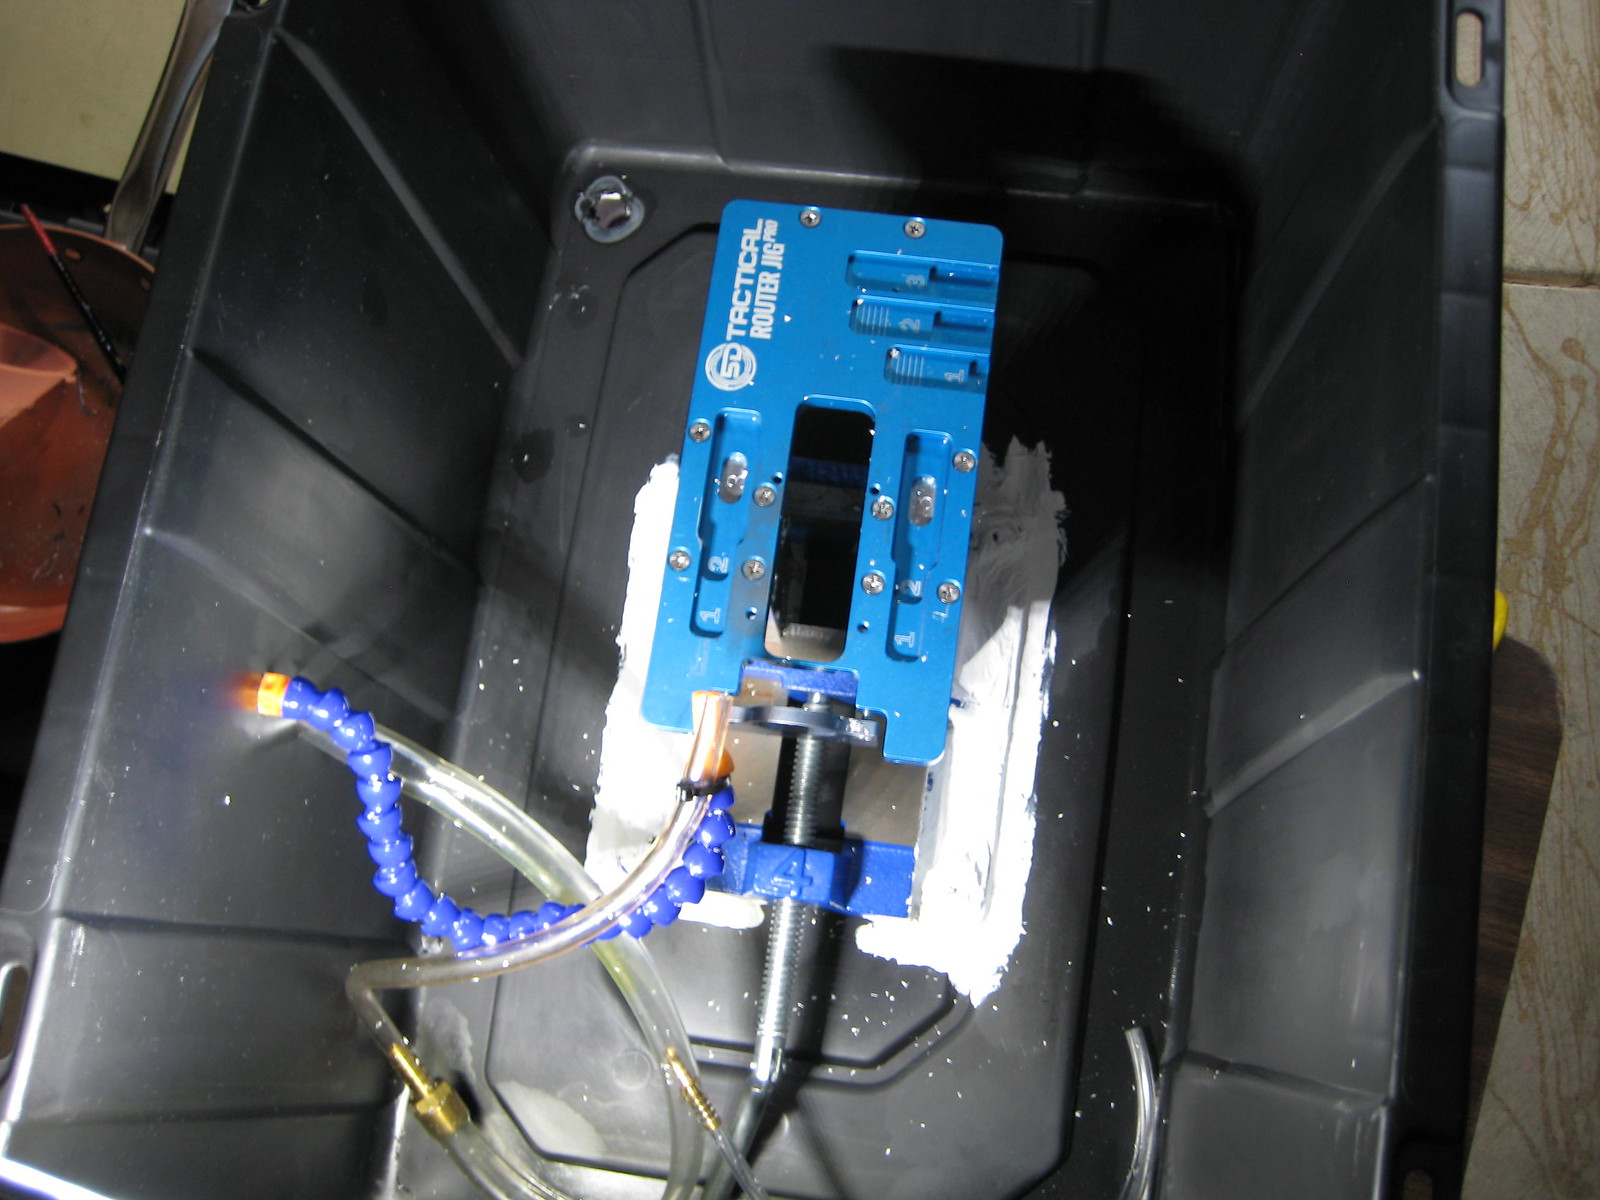  I measured the final depth cuts with a caliper on the jig deck for section 1 and 2 and just transferred that to my depth cut guide that I made. I only make half depth cuts so this is just a guide. I have done enough so I know how it works. My main concern was the stops on depth guide 1 and 2 so I was precise on that with my caliper.  

|
|
|
|
[#6]
@BLACKLIGHT
Great pics! Looks a lot cleaner and simpler. I think the new drain arrangement is better, and I've re-thought what I was going to do with nested containers. Transferring the bit depth gauges to outside the milling cavity makes a whole lot of sense. I see there are two supply lines into the tub for the coolant, one articulated positional, one raw end opening of a larger diameter (and it looks like there's a bayonet wye to a smaller diameter raw line, too) You're using the positional on the bit.. are you using the larger line to flow over the main plate/ use for cleanup? Quoted:
The fluid shield that I put on the router was absolutely genius it made it to the point that there is very little mist or chips coming up. |
|
|
|
[#7]
Holy shit. I thought you had milled a hole in the wall of the upper until I realized that was the reflection of the trigger hole in the bottom of the lower.
Well done! |
|
|
|
[#8]
Quoted:
@BLACKLIGHT Great pics! Looks a lot cleaner and simpler. I think the new drain arrangement is better, and I've re-thought what I was going to do with nested containers. Transferring the bit depth gauges to outside the milling cavity makes a whole lot of sense. I see there are two supply lines into the tub for the coolant, one articulated positional, one raw end opening of a larger diameter (and it looks like there's a bayonet wye to a smaller diameter raw line, too) You're using the positional on the bit.. are you using the larger line to flow over the main plate/ use for cleanup? This makes it sound like there's something attached to the DW router itself, and I missed any pictures of that. Or do you mean the acrylic splash shields attached to the sides of the box? Thanks. Drain arrangement is simpler and easy to get to for clean up and for storage. The supply lines that go in: The blue one is for supply and to hold the other supply line zip tied together so they both will stay in place in the back of the receiver/extension tube hole. They flood the milling pocket really good. The little on that branches off: I use that to clean the little chips from the guide pockets and to hose down the jig deck. This makes the router slide real easy and smooth and keeps the jig deck new looking. Its not getting marred up from chips. This is another great item I came up with. Splash guard on the router. When I start the first few passes of milling there is more liquid spray and mist and a few flying chips. So I came up with this. I took an orange juice bottle and cut it up and heated it with a small torch and shaped it and bingo. This is such a saver. Nothing is getting past it now and keeps the mist way down. As soon as Im deeper into the pocket the fluid is so much there is no mist or spray. 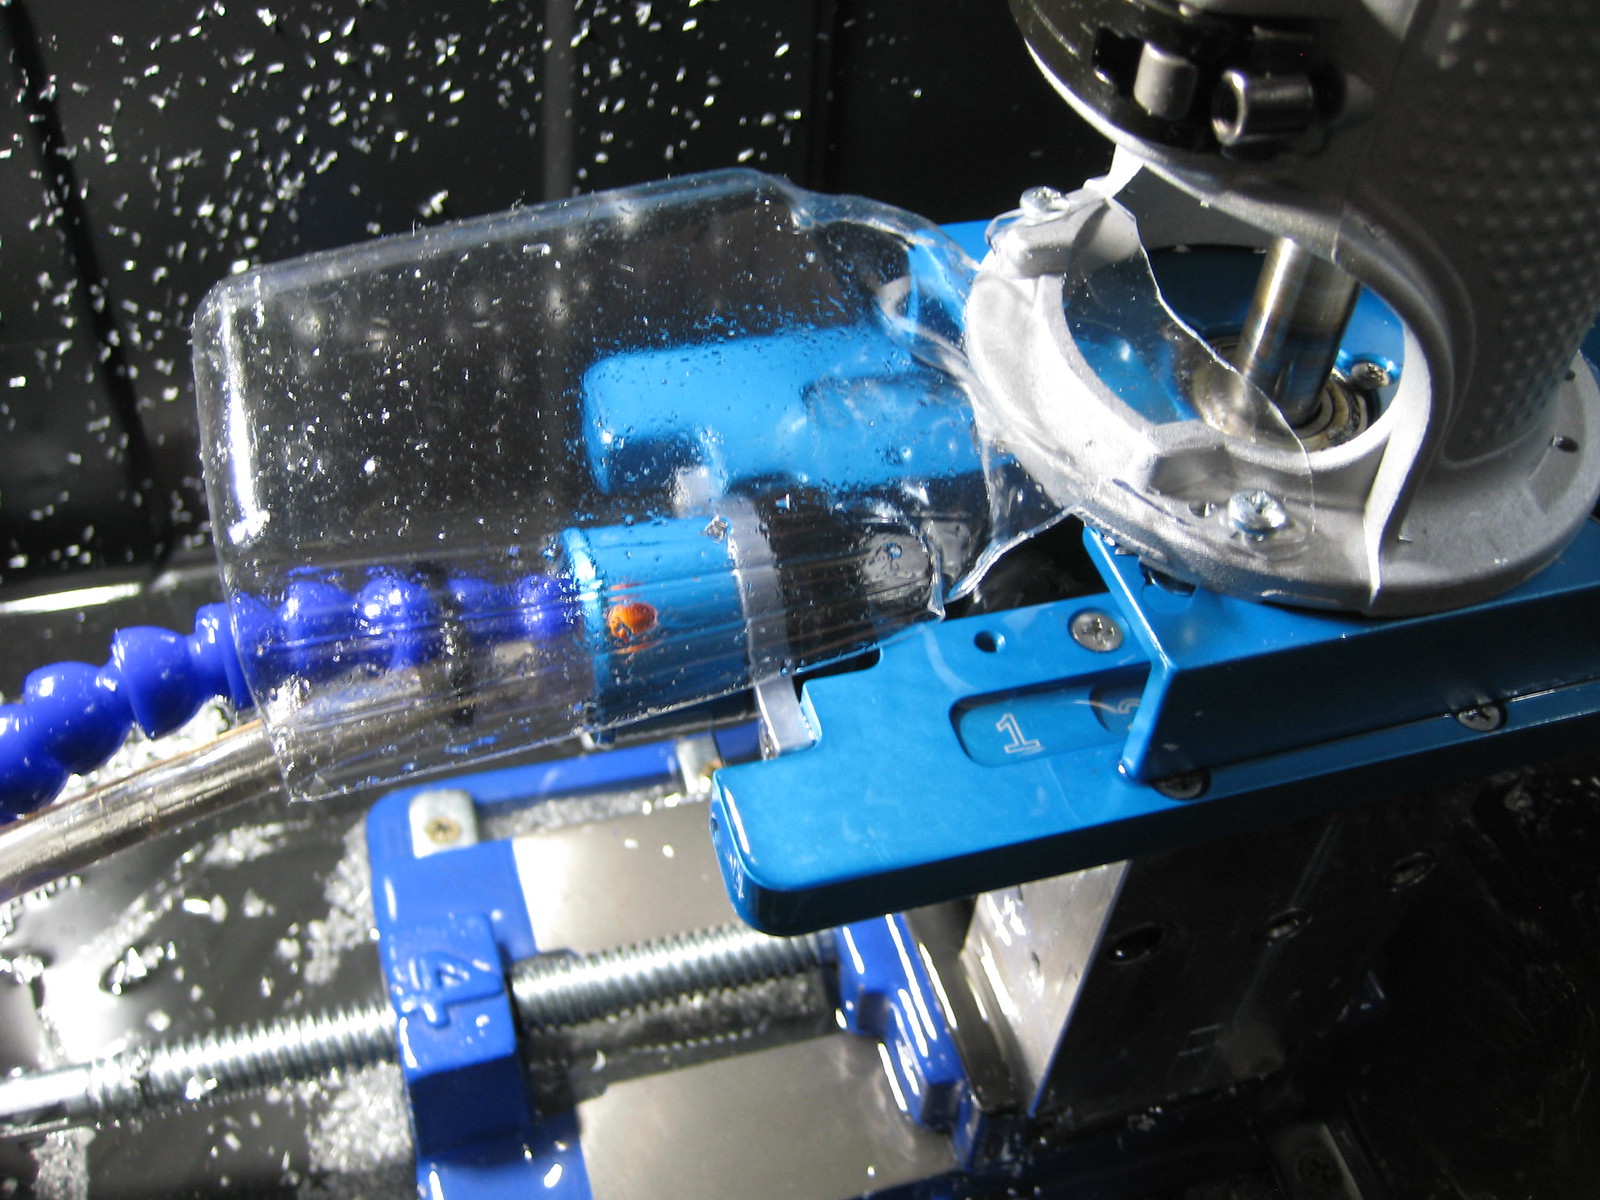
|
|
|
|
[#9]
Quoted:
The supply lines that go in: The blue one is for supply and to hold the other supply line zip tied together so they both will stay in place in the back of the receiver/extension tube hole. They flood the milling pocket really good. The little on that branches off: I use that to clean the little chips from the guide pockets and to hose down the jig deck. This makes the router slide real easy and smooth and keeps the jig deck new looking. Its not getting marred up from chips. Quoted:
The supply lines that go in: The blue one is for supply and to hold the other supply line zip tied together so they both will stay in place in the back of the receiver/extension tube hole. They flood the milling pocket really good. The little on that branches off: I use that to clean the little chips from the guide pockets and to hose down the jig deck. This makes the router slide real easy and smooth and keeps the jig deck new looking. Its not getting marred up from chips. This is another great item I came up with. Splash guard on the router. When I start the first few passes of milling there is more liquid spray and mist and a few flying chips. So I came up with this. I took an orange juice bottle and cut it up and heated it with a small torch and shaped it and bingo. This is such a saver. Nothing is getting past it now and keeps the mist way down. As soon as Im deeper into the pocket the fluid is so much there is no mist or spray. https://live.staticflickr.com/7877/32148195027_e42fb59088_h.jpg |
|
|
|
[#10]
I need to do this
|
|
|
|
[#11]
Quoted:
I need to do this I would love to see a video of how well it works |
|
|
|
[#12]
Quoted:
Agreed. I would love to see a video of how well it works Quoted:
Quoted:
I need to do this I would love to see a video of how well it works |
|
|
|
[#13]
Quoted: airman100 Thanks. Drain arrangement is simpler and easy to get to for clean up and for storage. The supply lines that go in: The blue one is for supply and to hold the other supply line zip tied together so they both will stay in place in the back of the receiver/extension tube hole. They flood the milling pocket really good. The little on that branches off: I use that to clean the little chips from the guide pockets and to hose down the jig deck. This makes the router slide real easy and smooth and keeps the jig deck new looking. Its not getting marred up from chips. This is another great item I came up with. Splash guard on the router. When I start the first few passes of milling there is more liquid spray and mist and a few flying chips. So I came up with this. I took an orange juice bottle and cut it up and heated it with a small torch and shaped it and bingo. This is such a saver. Nothing is getting past it now and keeps the mist way down. As soon as Im deeper into the pocket the fluid is so much there is no mist or spray. https://live.staticflickr.com/7877/32148195027_e42fb59088_h.jpg What pump are you using? How are you mist guards at the top of the box attached? Thanks! |
|
|
|
[#14]
@TrailerTrash556
@hrt4me I just saw this and well I don't have a youtube account to post video. I just milled one Friday night. I wont be doing another for awhile. I works just like it should. Continuous fluid just like a regular mill. The catch screen needs to be dumped every other pass as chips build up and then the fluid starts to overflow with chips back into the sump, so that does take little extra time. It took me 3-4 hours. I don't rush it because Im building a firearm and I want it to be nice plus this is my 8th lower on the end mill and I noticed on the 6th and 7th lower that the endmill was getting a little dull. Might be time to replace endmill. The tips are not sharp like they were, but its the original end mill. @SamE0717 pump is COODIA 320GPH (1200L/H) Aquarium Submersible Pump 25W 6.5ft High Lift Fountain Water Pump For Aquarium, Fish Tank, Pond, Hydroponics and Graden Sparying with 5.9ft (1.8M) Power Cord, 2 Nozzles Sold by: EKOSTORE Return window closed on Nov 30, 2017 $16.99 Mist shields I just took a torch heated up the plastic and pushed the glass shields into it to make the grooves. They stay put and are easy in and out. |
|
|
|
[#15]
thanks for the update!
|
|
|
|
[#16]
This thread is relevant to my interests.
|
|
|
 Win a FREE Membership!
Sign up for the ARFCOM weekly newsletter and be entered to win a free ARFCOM membership. One new winner* is announced every week!
You will receive an email every Friday morning featuring the latest chatter from the hottest topics, breaking news surrounding legislation, as well as exclusive deals only available to ARFCOM email subscribers.

AR15.COM is the world's largest firearm community and is a gathering place for firearm enthusiasts of all types.
From hunters and military members, to competition shooters and general firearm enthusiasts, we welcome anyone who values and respects the way of the firearm.

Subscribe to our monthly Newsletter to receive firearm news, product discounts from your favorite Industry Partners, and more.
Copyright © 1996-2024 AR15.COM LLC. All Rights Reserved.
Any use of this content without express written consent is prohibited.
AR15.Com reserves the right to overwrite or replace any affiliate, commercial, or monetizable links, posted by users, with our own.


