|
[#1]
Quoted:
Quoted:
Well I tried the Elmer's paint pen today. Sadly it didn't turn out well. It did a nice fill but left a little residue around the edges of the rollmark. After trying to scratch it away with my fingernail I moved on to some thinner. Still no luck. What would be the strongest thinner/paint remover that would take all of the paint off the lower. Brake cleaner? I just want to start over fresh. What do yall recommend? I used Elmers and used a Q-tip and nail polish remover. -First I rubbed what I could with my fingernail or buffed it with a paper tower. what wouldn't come off I used nail polish remover -Don't drench the Q-tip. -What I did was shake the bottle, remove the cap and then swipe the inside of the cap with the Q-tip so its not drenched. -you can lightly rub the Q-Tip in those places and it comes right off. it may smear a bit but it comes off -after everything is good and dry (I gave it at least a day), I took gun oil to rubbed it on the receiver to give it a nice good sheen. -When I used the Elmers Pen....I angled the lower so when I pushed the paint it would fill the letter instead of dragging the pen over the engraved letter. I let gravity work to my favor. hope this helps...good luckk I just did my DPMS lower this weekend (my camera sucks, looks better in person) 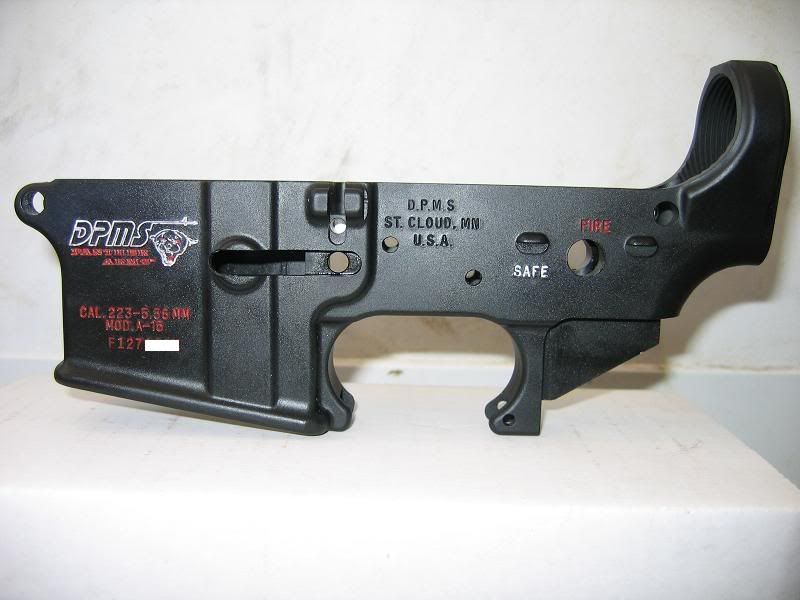
|
|
|
|
[#2]
Quoted:
Thanks, Frank. This is ALL that I ever use to fill marks. Takes 5 minutes or less per lower: http://www.imageviper.com/displayimage/99412/0/testors8.JPG Did you ever get any paint outside the roll marks and if so, did the brush cleaner take it off the receiver? |
|
|
|
[#3]
Sometimes paint gets outside of the marks. I usually wait 2 minutes for it to air-dry slightly, then I moisten a shotgun bore patch with a very light coating of CLP. I take the patch and wipe it over the rollmarks in a circular motion (wax on, wax off). The paint on the receiver surface comes off, and the paint in the marks stays there. Cake!
|
|
|
|
[#4]
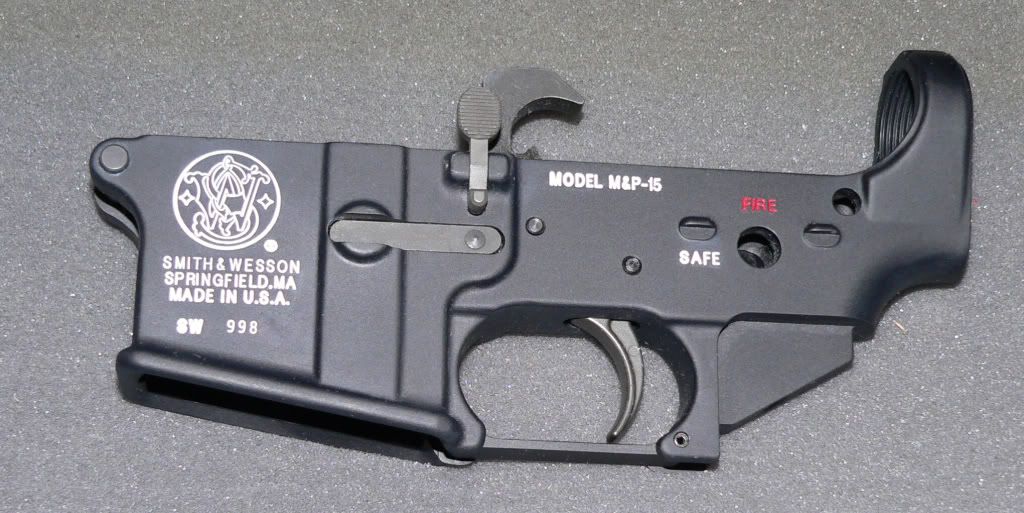
Here's my S&W. I couldn't find any testor's paint, so I ended up using auto touch up paint. The red is laquer, and was alot thicker. I couldn't find any thinner for it. I couldn't let it sit too long, or else it was really tough to get off. I used O'rielly's brake cleaner for clean up. I'm not sure about the white. But I'm assuming it's laquer also. It was a different brand, and alot thinner. I think the auto paint may have been more of a mess to deal with, but I don't have anything to compare it to. But I really like the result's.
What do you guy's think of the white tip on the safety selector in the last pic. Keep it, paint it red, or loose it all together. 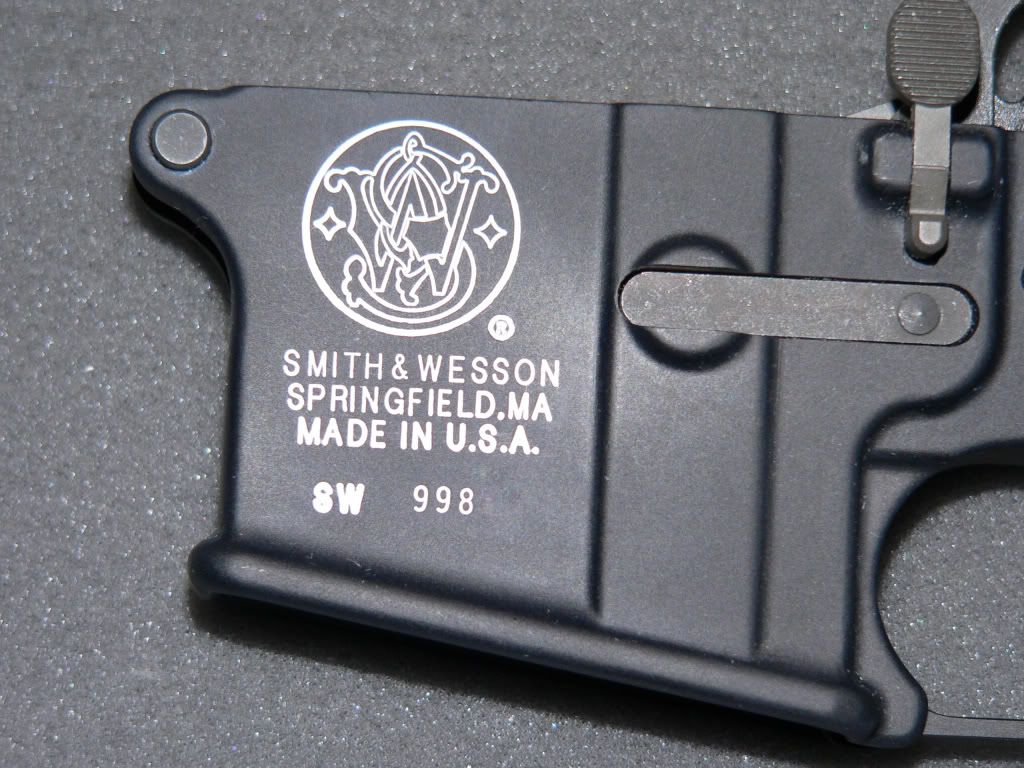
|
|
|
|
[#5]
All finished, check it out!
Before: http://img.photobucket.com/albums/v292/TexAg05/100_2311x.jpg http://img.photobucket.com/albums/v292/TexAg05/100_2319x.jpg During: http://img.photobucket.com/albums/v292/TexAg05/100_2327x.jpg After: http://img.photobucket.com/albums/v292/TexAg05/100_2336x.jpg http://img.photobucket.com/albums/v292/TexAg05/100_2338x.jpg How To: Step1: Get lower and Testors enamel. I ended up not using the paint brushes. Step2: Get messy. Cover everything in paint and immediately dab the puddle with a tissue. Let dry. (a tooth pick or q-tip are good applicators here. I used both.) Step3: Get some automotive brake cleaner and spray onto a q-tip and wipe away excess paint. Careful not to use too much as it will clean away the paint in the letters. Then spray some CLP onto a cloth and wipe away the residue left from the brake cleaner. Step4: Photograph and post pics! For those curious, the brake cleaner is the best! I tried rubbing alcohol and nail polish remover and they got rid of the excess but not all of the paint. The brake cleaner cuts through all of it. If you are wanting to do this and are wanting to know what takes off the excess paint: BRAKE CLEANER!! Works like a dream! |
|
|
|
[#6]
Quoted: All finished, check it out! Before: http://img.photobucket.com/albums/v292/TexAg05/100_2311x.jpg http://img.photobucket.com/albums/v292/TexAg05/100_2319x.jpg During: http://img.photobucket.com/albums/v292/TexAg05/100_2327x.jpg After: http://img.photobucket.com/albums/v292/TexAg05/100_2336x.jpg http://img.photobucket.com/albums/v292/TexAg05/100_2338x.jpg How To: Step1: Get lower and Testors enamel. I ended up not using the paint brushes. Step2: Get messy. Cover everything in paint and immediately dab the puddle with a tissue. Let dry. (a tooth pick or q-tip are good applicators here. I used both.) Step3: Get some automotive brake cleaner and spray onto a q-tip and wipe away excess paint. Careful not to use too much as it will clean away the paint in the letters. Then spray some CLP onto a cloth and wipe away the residue left from the brake cleaner. Step4: Photograph and post pics! For those curious, the brake cleaner is the best! I tried rubbing alcohol and nail polish remover and they got rid of the excess but not all of the paint. The brake cleaner cuts through all of it. If you are wanting to do this and are wanting to know what takes off the excess paint: BRAKE CLEANER!! Works like a dream! Nice. Very nice. I like the OD lettering in the logo |
|
|
|
[#7]
Nice job guys!
|
|
|
|
[#8]
I did the crayon but I think I will try the model paint if all I have to do is make a mess andthen wipe it clean.


|
|
|
|
[#9]
Quoted:
Nice. Very nice. I like the OD lettering in the logo Thanks coug! I had a blast painting my lower and was pleased with the results and I ended up painting one of my shotguns and my Glock. |
|
|
|
[#10]
I originally did not buy into this pimp your gun stuff and equated it
with pearl handles on a revolver but after seeing all the tasteful work done I think I'm going to try it. So I have a few questions: 1. Is there a decent website/supplier to order Testors paint and microbrushes from online? I'd rather do this than drive all over looking for the stuff. 2. Does anyone know of the names or numbers of the Testors paints that match FDE and Tan the best? 3. Doesn't the brake cleaner really dull the finish on the lower? 4. Any ideas on how I can paint my Noveske lower to match the top on my car? Thanks.... 
|
|
|
|
[#11]
This is my first attempt with my first lower! The colors are 1167 Flat Tan and 1145 White (Red is not Testors).

|
|
|
|
[#12]
308gtsi, I'm not sure about any online suppliers but any local craft/hobby store should have Testors. I used 1168 Flat White, 1150 Flat Red and 1164 Flat Green. The brake cleaner doesn't dull the finish but there will be a film from the paint being thinned and spread around. After you use the brake cleaner just get a soft rag and put some CLP on it and then lightly wipe away the residue.
|
|
|
|
[#13]
Quoted: 1. Is there a decent website/supplier to order Testors paint and microbrushes from online? I'd rather do this than drive all over looking for the stuff. http://i132.photobucket.com/albums/q23/zerferderfer/pm.jpg I bought mine from here: http://cgi.ebay.com/ws/eBayISAPI.dll?ViewItem&rd=1&item=360098894094&ssPageName=STRK:MEWN:IT&ih=023 Great price, answers questions quickly, and doesn't gouge on shipping if buying more than one bottle. Check Them Out! |
|
|
|
[#14]
Quoted:
Quoted:
1. Is there a decent website/supplier to order Testors paint and microbrushes from online? I'd rather do this than drive all over looking for the stuff. http://i132.photobucket.com/albums/q23/zerferderfer/pm.jpg I bought mine from here: http://cgi.ebay.com/ws/eBayISAPI.dll?ViewItem&rd=1&item=360098894094&ssPageName=STRK:MEWN:IT&ih=023 Great price, answers questions quickly, and doesn't gouge on shipping if buying more than one bottle. Check Them Out! Any hobby store in your area should have it. Hobby Lobby for sure does if there is one around you. Thats where I got the testors paint and brushes from. I think my total came to about $9 for testors red and white paint, testors thinner, and two microbrushes |
|
|
|
[#15]
Great answers... thanks.
BTW was just kidding about the top on that car :-) I'm not really looking to paint my lower leaopard skin but then again coloring the roll marks might lead to harder stuff |
|
|
|
[#16]
ok. I like the painted rollmarks. what do you use to clean the lower with? bought paint, thinner & brake cleaner. have q-tips & toothpicks. what is the paint to thinner ratio?having wife do the painting for me. my hand is not as steady as it use to be.
|
|
|
|
[#17]
Did you even read this thread?
 Use CLP or any other gun lube of your choice. Use CLP or any other gun lube of your choice.
And you don't need a "steady hand". If you can touch the tip of the toothpick to the rollmark, the paint will run in to the grooves like rain down a gutter. They practically fill themselves. I was looking at the pictures above that were obviously done with a brush, and that much work is NOT necessary. Just put a little thinner in your pant, get a drop on the end of a toothpick, and TOUCH the drop to the rollmark. Done. No brushing required. No steady hand required. No wife doing a man's job required. 
|
|
|
|
[#18]

|
|
|
|
[#19]
Brownells laquer sticks work awesome as well.
|
|
|
|
[#20]
With the lacquer sticks did you just rub the stick over the marks and then clean up the excess, or did you use a toothpick to be more precise? I have a couple of lacquer sticks in my possession but have been nervous that the paint would discolor or dissolve if CLP ever got to it durring cleaning. My philosophy in regards to CLP can be summed up by the old lady on the Frank's Red Hot radio commercials: "I put that s!*t on everything."
|
|
|
|
[#21]
Testors Model Paint

|
|
|
|
[#22]
So I guess that I should ask a similar question to the guys that have used the Testor's method. Does your paint fill (once properly dried of course) survive semi-regular contact with CLP? I really like the way that the fill looks on all of the above receivers but I don't want to get into a situation where I am reapplying it every second or third time that I clean the rifle.
|
|
|
|
[#23]
I'd use your toenail polish to color in the nooks and crannies, or whatever your Kindergartner teacher lets you take home after school . Or paint the whole thing pink.

|
|
|
|
[#24]
With the Laquer stick you just rub it over the area to fill.......wipe off excess (may have to use a little brake cleaner or mineral spirits)......then wipe off any remaining residue with CLP. Really easy process and it seems to last. I'm going to try the paint method on my next rifle because the OD Green color-fill is way cool.
|
|
|
|
[#25]
Quoted:
So I guess that I should ask a similar question to the guys that have used the Testor's method. Does your paint fill (once properly dried of course) survive semi-regular contact with CLP? I really like the way that the fill looks on all of the above receivers but I don't want to get into a situation where I am reapplying it every second or third time that I clean the rifle. Mine gets a light surface coat of CLP after every cleaning, and it looks perfect still. CLP doesn't remove it, make it soft, or stain it at all. |
|
|
|
[#26]
Testors white and red on my .22lr. I wuz bored, what can I say.......

Page 4 is mine! |
|
|
|
[#27]
This thread needs sticky... I went to purchase the model paint because of this.
|
|
|
|
[#28]
I gave it a shot today with Testors and a micro brush. My lower is a SunDevil –– the logo is pretty intricate. I started out trying to fill the lines and it was about the most tedious thing I've done in a long time. Felt like I was trying to defuse a bomb. It sucked and I gave up and just kind of painted over the whole logo.
I didn't have any brake cleaner, but I did have white gas (camp stove stuff). I think I started trying to clean it up a bit too soon (10 minutes? maybe less). The paint came out of most of the lower part of the rollmark and it has smeared the paint around so the entire area is discolored. So far this project has been a big "fail" for me. I'm hoping the white gas isn't too strong for the finish –– it looks like I've smeared the paint, but it could be the finish is faded. If so, I'm gonna be pissed. I'll go over it later with some more white gas and one of two things will happen –– it will either clean up the smudging, or I'm gonna need to get the lower redone. Anyone ever use white gas to clean up the excess paint? Anyone think it's a bad idea? I was initially thinking it couldn't be stronger than brake cleaner, but... Ed |
|
|
|
[#29]
Quoted:
Quoted:
So I guess that I should ask a similar question to the guys that have used the Testor's method. Does your paint fill (once properly dried of course) survive semi-regular contact with CLP? I really like the way that the fill looks on all of the above receivers but I don't want to get into a situation where I am reapplying it every second or third time that I clean the rifle. Mine gets a light surface coat of CLP after every cleaning, and it looks perfect still. CLP doesn't remove it, make it soft, or stain it at all. Thanks, that's what I was hoping to hear... |
|
|
|
[#30]
Quoted:
All finished, check it out! How To: Step1: Get lower and Testors enamel. I ended up not using the paint brushes. Step2: Get messy. Cover everything in paint and immediately dab the puddle with a tissue. Let dry. (a tooth pick or q-tip are good applicators here. I used both.) Step3: Get some automotive brake cleaner and spray onto a q-tip and wipe away excess paint. Careful not to use too much as it will clean away the paint in the letters. Then spray some CLP onto a cloth and wipe away the residue left from the brake cleaner. Step4: Photograph and post pics! For those curious, the brake cleaner is the best! I tried rubbing alcohol and nail polish remover and they got rid of the excess but not all of the paint. The brake cleaner cuts through all of it. If you are wanting to do this and are wanting to know what takes off the excess paint: BRAKE CLEANER!! Works like a dream! How long did you let it dry? Ed |
|
|
|
[#31]
Quoted:
Quoted:
All finished, check it out! How To: Step1: Get lower and Testors enamel. I ended up not using the paint brushes. Step2: Get messy. Cover everything in paint and immediately dab the puddle with a tissue. Let dry. (a tooth pick or q-tip are good applicators here. I used both.) Step3: Get some automotive brake cleaner and spray onto a q-tip and wipe away excess paint. Careful not to use too much as it will clean away the paint in the letters. Then spray some CLP onto a cloth and wipe away the residue left from the brake cleaner. Step4: Photograph and post pics! For those curious, the brake cleaner is the best! I tried rubbing alcohol and nail polish remover and they got rid of the excess but not all of the paint. The brake cleaner cuts through all of it. If you are wanting to do this and are wanting to know what takes off the excess paint: BRAKE CLEANER!! Works like a dream! How long did you let it dry? Ed If I remember correctly, I let it dry for 5 or 6 hours. |
|
|
|
[#32]
you might try "goof off"
They sell it at the depot. I bet it will take the paint out of the cracks. Test it on a hidden location so you are sure it doesn't remove any finish. I think the paint thinner will be necessary for the more fine detailed rollmarks. I started mine and realized the micro brush was still too big. Looks like a needle is the only way I am going to paint mine. |
|
|
|
[#33]
tag
|
|
|
|
[#34]
I am so freaking anxious to get my order from Del-Ton so I can put together the lower I painted in this thread and see what it looks like with its OD furniture on.
|
|
|
|
[#35]
I am right in the middle of doing this to my Tactical Innovations lower on my first build. Used a tiny bit too much laquer thinner on cleaning, so the touch up paint is drying right now.....
Found that the q-tips got down in the lettering a bit too easy. Some blue shop towel with some laquer thinner worked much better. |
|
|
|
[#36]
http://images46.fotki.com/v1433/photos/0/453080/7226762/DSC01942-vi.jpg
Start http://images29.fotki.com/v320/photos/0/453080/7226762/DSC01944-vi.jpg other side http://images22.fotki.com/v811/photos/0/453080/7226762/DSC01951-vi.jpg paint on left side http://images29.fotki.com/v1008/photos/0/453080/7226762/DSC01952-vi.jpg material used - can't believe how hard it was to find a model shop that was still in business and actually had paint! http://images45.fotki.com/v1360/photos/0/453080/7226762/DSC01954-vi.jpg right side http://images42.fotki.com/v1447/photos/0/453080/7226762/DSC01957-vi.jpg Some touch up after the laquer thinner removed a little bit too much paint http://images29.fotki.com/v1007/photos/0/453080/7226762/DSC01964-vi.jpg All done! FYI - some good tunes and a couple of beers didn't hurt things out! LOL |
|
|
|
[#37]
Well, here's my first attempt. I went with some non-standard colors. Rollmark got "flat tan"; "safe" indicator got yellow; and the "fire" indicator got a dark red. I like the yellow, but the red is a bit too dark, and the tan is just kind of...blah. I may do it over.
As you can see, the lines in the Sundevil logo are thin and shallow. Keeping the paint from bleeding over the channels was absolutely impossible, so I said F it and painted the area in as small of a foot print as I could manage. Initially, I tried to clean up the over run way too soon and drew a lot of paint out of the channels. I only waited about 10 minutes. A second application got a dry time of about 12 hours. The pain stayed in the rollmarks better, but was harder to get the smudging cleaned up. I had been using white gas as my cleaning fluid, but it wasn't cutting it and I went out and bought some non-chlorinated brake cleaner as recommended. That did the trick for the most part. I could probably go over it again to clear it up a bit more. 

Ed |
|
|
|
[#38]
Awesome writeups and pix...........Im trying this!
|
|
|
|
[#39]
Figured I would gussy up my Stag.
I had a ball doing this! It kept me busy for about 2 hours. Grey, Red, White Testors, and a ton of patients. http://i631.photobucket.com/albums/uu32/Swampdog02/Painted.jpg |
|
|
|
[#40]
Has anyone tried applying the paint with a small syringe to prevent making a mess?
|
|
|
|
[#41]
Quoted:
Has anyone tried applying the paint with a small syringe to prevent making a mess? Actually, at least in theory, that sounds like a great idea. Quoted:
Figured I would gussy up my Stag. I had a ball doing this! It kept me busy for about 2 hours. Grey, Red, White Testors, and a ton of patients. http://i631.photobucket.com/albums/uu32/Swampdog02/Painted.jpg Nicely done. The gray is an interesting touch. Welcome to the forums; a fellow stripped Stag owner I see! I'm jealous of the nice black Stag receivers I am seeing cuz mine is this weird blue-ish black. 
|
|
|
|
[#42]
BTT
|
|
|
|
[#43]
I do like the grey. Suttle, yet you can still read it easily. Nice job.
|
|
|
|
[#44]
Quoted: i wouldnt recomend the crayons or grease because they look horrible after a little use. The proven best way to do it is to use testors model car paint. mix it up with some thinner and then use a tiny micro brush or something simular to put it into the rollmark and let the paint flow throw the roll mark itself. next mix put 1 drop of thinner and 1 drop of clp on a shotgun pad and lightly buff over the roll marks to remove any excess paint. looks professin when your all done... http://i136.photobucket.com/albums/q198/RallySoob/20rndPmagpimped.jpg That looks good.. I think I am going to have to do that now.. Not sure whether I want to try the testors paint or the paint pens mentioned down further.. hmmmm If I go with the testors.. do you have to mix it with the thinner, or can you use it straight outta the jar? |
|
|
|
[#45]
I used my Testors straight out of the jar, no thinner.
|
|
|
|
[#46]
OK, Ive seen enough! I HAVE got try this on my new lower......
|
|
|
|
[#47]
Quoted:
I used my Testors straight out of the jar, no thinner. Ditto, I've tried using it thinned down but always found that it wiped out too easily. I never could hit the sweet spot that got to the point where it set up and didn't want to come out. When painting straight from the bottle I let it sit about 3 minutes and it tacks to the point that it won't wipe out using blue towels dampened with chlorinated brake cleaner (CRC). The de-chlorinated stuff might be better for the users health but not the job at hand. Buy the good stuff and make sure your area is well ventilated. I've also found that the brighter red the paint the better. Testors makes several different shades of read. Your initial reaction might be that this is too bright or scarlet but it sure shows up better than more traditional reds. Bright Red Enamel is the shade I would suggest. |
|
|
|
[#48]
Just did this myself with the Testors...after 3 tries, I got it down to a science.
http://www.vaofftopic.com/Mike/ar15lower.jpg |
|
|
|
[#49]
Quoted:
Just did this myself with the Testors...after 3 tries, I got it down to a science. http://www.vaofftopic.com/Mike/ar15lower.jpg Nice job, that red is sharp! You going to do the rest of the lettering? |
|
|
|
[#50]
Quoted:
Quoted:
Just did this myself with the Testors...after 3 tries, I got it down to a science. http://www.vaofftopic.com/Mike/ar15lower.jpg Nice job, that red is sharp! You going to do the rest of the lettering? Yeah, I used gloss instead of flat. I also filled the wells generously due to the new found trick I stumbled upon to make cleanup cake. Instead of wiping away the excess with a q-tip, cloth, or cleaning pad when its dry...I took a cleaning pad coated LIGHTLY with the thinner and folded it tightly over a fresh toothpick and lightly rubbed that over the painted area. The toothpick does not let the cloth dip into the well and only removes the excess. There will still be smudges left, but if you take another clean pad (again LIGHTLY coated with thinner) it will remove the rest. The faint residue was removed by some gun oil and pressure. I dont plan on painting the rest of the engravings yet...Im going to wait till I get the rest of my parts to complete the build and then decide. |
|
|
 Win a FREE Membership!
Sign up for the ARFCOM weekly newsletter and be entered to win a free ARFCOM membership. One new winner* is announced every week!
You will receive an email every Friday morning featuring the latest chatter from the hottest topics, breaking news surrounding legislation, as well as exclusive deals only available to ARFCOM email subscribers.

AR15.COM is the world's largest firearm community and is a gathering place for firearm enthusiasts of all types.
From hunters and military members, to competition shooters and general firearm enthusiasts, we welcome anyone who values and respects the way of the firearm.

Subscribe to our monthly Newsletter to receive firearm news, product discounts from your favorite Industry Partners, and more.
Copyright © 1996-2024 AR15.COM LLC. All Rights Reserved.
Any use of this content without express written consent is prohibited.
AR15.Com reserves the right to overwrite or replace any affiliate, commercial, or monetizable links, posted by users, with our own.


