|
[#1]
I'm a Rit Dye noob, but I'll tell you what I know. I've done it once and got the results I had hoped for. I used a stainless steel pot on the stovetop. I added dye to the water until it was just barely darker than my desired color. It made it easier to see what color the dye mixture was. I got it hot, but not boiling. Threw the stuff in that I wanted to change colors and kept checking it until the desired color was reached.
I did some white index clips, which made it easy to use a tiny amount of water, and gave me a blank canvas, so I didn't have to try to guess the end color. Hopefully some more experienced people will be a long since I am just learning myself.
|
|
|
|
[#2]
I have been able to get good results by doing the following.
1. Pre-heat oven to 170 (lowest the oven will go) 2. Heat a pan of water to 170-185 3. Measure liquid dye by the 1/4 teaspoon ( use a ratio of 1/4 teaspoon dye to each 6 cups of water) 4. Pre-heat the parts in the oven 5. place parts in the water suspended off of the bottom of the pan (depending on the size of the pan I either use string hung from the stove hood, a wire platform for canning, or a small wire mesh basket) 6. The time I use is dependent of the shade I am looking for. If I am doing a color match I have that item available to compare 7. Cold water rinse the parts and pat dry with paper towels to check the color. 8. If the part is getting another color or there is any metal in the part I put it back in the oven to dry. If you are putting patterns on a part with tape the oven preheat will make your tape stick better an prevent bleeding. Practice and enjoy. 


|
|
|
|
[#3]

|
|
|
|
[#4]
DAMN MTguns, that is impressive. What tape do you use to do the patterns? blue painters tape or something else? that is impressive work for sure. Does it ever fade or have issues?
|
|
|
|
[#5]
I use electrical tape. Specifically scotch 35 professional grade. It comes in several colors. O use red, blue, orange, green, and yellow. When I do a pattern I use a different color for each layer.
Electrical tape is good because; It is waterproof It is rated for use up to 175 degrees It does not leave a residue It cuts well With E tape be sure to let it fully relax before it goes on the part, or you will suffer shrinkage and bleeding. HTH. |
|
|
|
[#6]
Quoted:
be sure to let it fully relax before it goes on the part, or you will suffer shrinkage and bleeding. HTH. I think my DR. told me the same thing...... 
|
|
|
|
[#7]
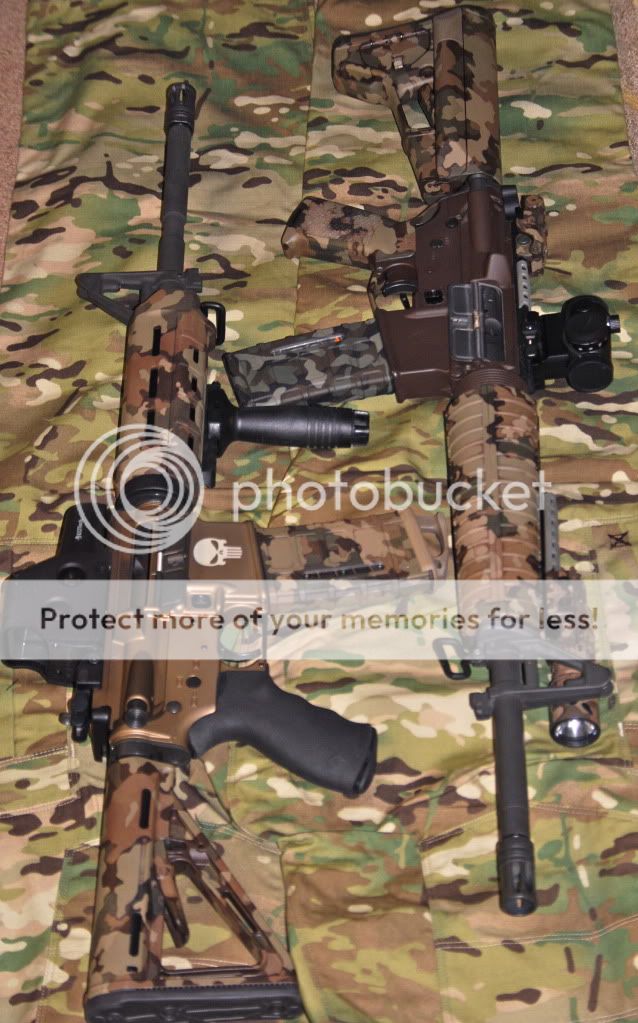
Those Pmags with the pseudo blood spatter are Rit dyed?
|
|
|
|
[#8]
Quoted:
Those Pmags with the pseudo blood spatter are Rit dyed? yes |
|
|
|
[#9]
Impressive!
|
|
|
|
[#10]
MTguns, that is some nice work!
|
|
|
|
[#11]
I would love to see a detailed tutorial on this procedure! This is sick!
 Awesome work BTW. Awesome work BTW.
|
|
|
|
[#12]
I take it that the parts originally are tan or another light color and then you work your way to darker colors? I would like to see something detailed as well. Does this bleed out with use? Once dyed does it permeate deep enough to resist scratching? Thanks for the information.
|
|
|
|
[#13]
MT GUNS, you seriously have some artistic talent... and at a level money could be made if used. WOW - IMPRESSIVE!
|
|
|
|
[#14]
Quoted:
I take it that the parts originally are tan or another light color and then you work your way to darker colors? I would like to see something detailed as well. Does this bleed out with use? Once dyed does it permeate deep enough to resist scratching? Thanks for the information. This? |
|
|
|
[#15]
I tried to rit dye this pistol grip black and it would not take it. Let it sit in the hot dye for 1 hour and still nothing. Don't know what it's made of.
I ended up spraying it with Krylon Fusion Ultra Flat black but it was too flat. Next I sprayed it with SEM black self etching primer. It really brought it to life but it was a little too glossy so I top coated with Krylon clear matte. I think it matches the forearm pretty good. The mag seems a little blacker than anything else. 
|
|
|
|
[#16]
Quoted:
Quoted:
I take it that the parts originally are tan or another light color and then you work your way to darker colors? I would like to see something detailed as well. Does this bleed out with use? Once dyed does it permeate deep enough to resist scratching? Thanks for the information. This? Bump for more info? |
|
|
|
[#17]
FDE, Foliage green, or LaRue UDE are the colors to use. You really have to go from light to dark.
Another thing to consider is what colors you are dyeing and what color your base piece is. When I went from foliage green to gray I used a small amount of pink dye along with the gray. green and pink are opposite on the color wheel, thus canceling out each other. In my first tests the foliage green always came out gray-green without a bit of pink dye. |
|
|
|
[#18]
Quoted:
I would love to see a detailed tutorial on this procedure! This is sick! Awesome work BTW.I can do a detailed how too. But it will have to wait a bit. I am living in a hotel while my entire household is being shipped from Alaska. I won't have my computer with all my pictures on it until early July. Anyone with patients and attention to detail can do this. 
|
|
|
|
[#19]
Quoted:
Quoted:
I would love to see a detailed tutorial on this procedure! This is sick! Awesome work BTW.I can do a detailed how too. But it will have to wait a bit. I am living in a hotel while my entire household is being shipped from Alaska. I won't have my computer with all my pictures on it until early July. Anyone with patients and attention to detail can do this. http://emob920.photobucket.com/albums/ad50/AKsnowHare/DSCN1336-1.jpg I am patiently awaiting your tutorial sir. |
|
|
|
[#20]
MTguns, that Multicam set on the FDE Punisher M4 is awesome. Please provide notes on that specifically or at least sell me a set. You the man.
|
|
|
|
[#21]
MTguns, that is amazing. I was a fan of Duracoat but it is essentially paint and rubs/scuffs off under use. Dye wont as it penetrates the plastic. I have a black speedfeed stock set I want to be OD Green and have read everywhere that you have to go light to dark. Is it a lost cause to try to turn black into green? Would the dye have to be super concintrated, longer time, or both?
|
|
|
|
[#22]
AWESOME job.
|
|
|
|
[#23]
What makes dye better is that you are actually changing the color of the material itself, not adding anything. I dyed a handgurd on my MP5 and it looked factory original. It can also be used to stain wood stocks.
|
|
|
|
[#24]
Certainly not as impressive as others...
Before 
After... 
The mag I ordered in multicam to bust a buddy's balls. |
|
|
|
[#25]
Quoted:
MTguns, that is amazing. I was a fan of Duracoat but it is essentially paint and rubs/scuffs off under use. Dye wont as it penetrates the plastic. I have a black speedfeed stock set I want to be OD Green and have read everywhere that you have to go light to dark. Is it a lost cause to try to turn black into green? Would the dye have to be super concintrated, longer time, or both? ?? ETA: just re-read...MT is not expected back till early July-like today...
hope the move goes/went well! |
|
|
|
[#26]
Some types of hot glue can also be used in place of electrical tape to create designs on the items you want to dye.
|
|
|
|
[#27]
Quoted:
Some types of hot glue can also be used in place of electrical tape to create designs on the items you want to dye. A tip, if you use hot glue. You can get hot glue off of nearly any (minus fabrics and things of this nature) surface with over the country rubbing alcohol. http://www.youtube.com/watch?v=tPw38johd_8&feature=channel_video_title |
|
|
|
[#28]
I am posting a reply to this post because I followed MTguns recipe and came out with great results on my Magpul equipped AR. After seeing the results first hand I think this method deserves a lot of credit and I don't want to see this thread vanish. It is super cheap, and since my furniture is dyed I don't have to worry about the great results wearing off like a normal painted process. Thank you so much for this thread, I for one, am glad I found it. All of my friends are amazed and think my forearm and other accessories are special "factory graphic package". LOL, but I'll never tell.
|
|
|
|
[#29]
About how long do you preheat the parts in the oven for?
|
|
|
|
[#30]
i've done my whole set of magpul furniture (miad, moe handguard, moe stock, pmags, rear mbus, afg), dying them from FDE to a dark red, crimson-ish color. no need to preheat the parts, just mix up the dye, get it hot (just barely steaming, not bubbling), drop the parts in, stir them around, checking the color every few minutes until you get about what you're looking for, then rinse them off, dry and reinstall.
|
|
|
|
[#31]
Quoted:
i've done my whole set of magpul furniture (miad, moe handguard, moe stock, pmags, rear mbus, afg), dying them from FDE to a dark red, crimson-ish color. no need to preheat the parts, just mix up the dye, get it hot (just barely steaming, not bubbling), drop the parts in, stir them around, checking the color every few minutes until you get about what you're looking for, then rinse them off, dry and reinstall. change few minutes to few seconds and the last post is fine |
|
|
|
[#32]
Quoted:
i've done my whole set of magpul furniture (miad, moe handguard, moe stock, pmags, rear mbus, afg), dying them from FDE to a dark red, crimson-ish color. no need to preheat the parts, just mix up the dye, get it hot (just barely steaming, not bubbling), drop the parts in, stir them around, checking the color every few minutes until you get about what you're looking for, then rinse them off, dry and reinstall. Post pics!!!!!!!!!!!!!!!!! |
|
|
|
[#33]
on the black stock with blood pattern, how did you get the white on there?
|
|
|
|
[#34]
It could just be me but I don't see white in there.
|
|
|
|
[#35]
Quoted:
It could just be me but I don't see white in there. its like an off white, but it might be a very light colored tan. |
|
|
|
[#36]
Been trying to get my wife more interested in shooting the AR. She doesn't like it in basic black and isn't too fond of the off the shelf colors either. I asked her how she would feel if the plactic parts were purple. Her eyes lit up and I had her. I was originally thinking some sort of paint, but I stumble on this thread (and then Googled for more info). Okay, a few before and after pics. MOE LGS was outhandguard and grip with a basic Pmag. My LGS, NFA (in North Las Vegas), was out of dark earth stocks (it was too late to try Lock n' Load in Henderson, probably do that tomorrow), but I decided to go with what I had.
Group shot before. 
Close up of the handguards before, a better representation of the color. 
Group shot after. The actual color isn't that dark. 
A close up, better color representation. 
Close up of the grip and the magazine cover. The black part was in the dye solution for the same amount of time as the grip. No change in color. Didn't figure it would, but it was worth a shot. 
As an aside, the magazine follower and floor plate retainer would not take color. Setup was a stainless stock pot on the stove. Water to two inches below the top, a splash of purple Rit (liquid). The water was brought up to 170º and the parts were dipped for a little over a minute each, suspended with mason's line (it was handy). I'll take better pics once the whole thing is together in better light. Robert |
|
|
|
[#37]
I just turned a black Pmag blue. Am I a wizard?
|
|
|
|
[#38]
Yes, please tell us how and post pics. I have a bunch of black stuff I'd love to turn a different color. I was actually thinking of trying a light color, yellow or something, to try on black and then go other colors.
Robert |
|
|
|
[#39]

Black, Navy?, OD Green, modified FDE, FDE. The navy one was made from a black pmag. |
|
|
|
[#40]
Any special tricks to dye black parts lighter? Say OD green?
|
|
|
|
[#41]
Finally got around to (somewhat) better pics after getting a stock and trigger guard dyed. The color is close, and I can see where some of the tan shows through in spots where I have to assume the polymer is more dense. My wife is happy, and that's all that matters right now...
A closeup of the MOE stock. 
The full view. 

My Spikes, with awful camo dye job (the green isn't right) and mismatched furnature (waiting on the correct handguards to come in). 
Overall I am happy with the results. The purple is a concession to my wife, who likes to shoot but hates the "black rifle" look (and wasn't moved by the tan/green look either). She got excited about the idea of a purple handled pistol too... Robert |
|
|
 Win a FREE Membership!
Sign up for the ARFCOM weekly newsletter and be entered to win a free ARFCOM membership. One new winner* is announced every week!
You will receive an email every Friday morning featuring the latest chatter from the hottest topics, breaking news surrounding legislation, as well as exclusive deals only available to ARFCOM email subscribers.

AR15.COM is the world's largest firearm community and is a gathering place for firearm enthusiasts of all types.
From hunters and military members, to competition shooters and general firearm enthusiasts, we welcome anyone who values and respects the way of the firearm.

Subscribe to our monthly Newsletter to receive firearm news, product discounts from your favorite Industry Partners, and more.
Copyright © 1996-2024 AR15.COM LLC. All Rights Reserved.
Any use of this content without express written consent is prohibited.
AR15.Com reserves the right to overwrite or replace any affiliate, commercial, or monetizable links, posted by users, with our own.


