|
Posted: 8/22/2009 5:53:43 PM EDT
Well, I found a listing on Craigslist for a Generator shed. It was described as being all steel and heavy for $50. I called and from the measurements I knew my Generator as well as a generator a good amount bigger then mine would work with the shed so I bought it. Here are the pics (I got it Thursday this week)


The unit was actually built for some PA Department grant experiment on alternative fuels and my impression they were running generators off of biogas at a landfill. The state required them to build the shelter to ensure that no pollution could occur from fuel or oil spills and that is why it had the completely enclosed bottom. The shed with the roof weighs about 100 to 150 pounds and the steel was rather significant. I thought about using the unit as it is and adding a way to lock the generator but I decided that I don't really want to store my generator outside exposed like this and I first thought about adding sides that could be removed. That would have worked but the more I thought about it I decided to simply use the steel in this structure to help build a very robust generator shed that could not be cut open easily with saws. I have a lot to do still but we had a rainy day so I only got part way done but I think I have bought everything I need to finish the project except for the wood and materials for the roof. I will post more about the roof issue after the photos. Smallest Attic Fan I could get at Lowes (about $70 item) 
Fan activated vents for the exaust (about $30) 


Gable Vent - plastic with screen (about $30) 


Fist job was cut open the bottom to get me more space. Used two saws all blades as the steel and welds were pretty tough. 

I didn't get pics of the process but the base is made out of pressure treated 2x4s in 12-inch centers. Way overkill for the use but I did this as it allows me plenty of places to lag bolt the metal to the joists. Above the 2x4 frame I used a piece of 3/4 inch pressure treated plywood and that was nailed down with 3-inch nails using my Dewalt framing nail gun. I really over built this but I wanted to make sure that nobody would be able to disassemble the shed to get the generator out. 

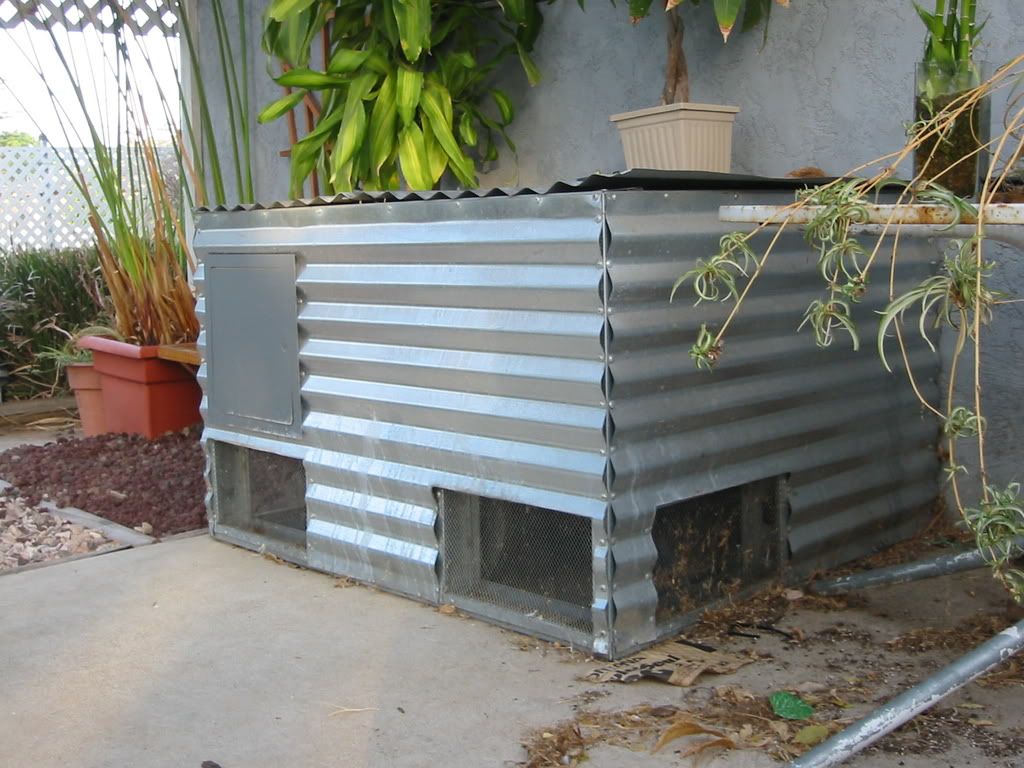
This photo shows as far as I got before it started raining. The metal box is bolted down with three lag screws as of this pic and I have two large eye screws that are attached at the rear of the box. The eye screws are so that I can lock the generator to these and because they will be all the way to the back of the shed it will be very difficult for anyone to try to pick the locks and hopefully to get in with bolt cutters to try to cut the chain or lock. 
To each side of the unit I have 4-inches. I will be building walls out of 2x4s on each end and these fraimed walls will contain the vents as well as the fan. The metal roof that I got with the generator shed will not be used as I think it will rattle like crazy and there is just no good way for me to secure it. So, I will be using carriage bolts to bolt the walls of the shed to the metal uprights of my purchased Gen Shed to make it harder for anyone to break in and frankly the more I look at this project I really wasted $50 buying this little generator shed that I have already set to reworking but by god I think I am building one of the strongest 30 x 55-inch storage sheds out there. Oh yea, I also purchased 4x6 pressure treated lumber that this shed will sit on. I originally planned to directly build these into the design but as I started building I decided that I will simply cut these to work where I want the shed to sit and then I will chain these to the shed to make it more difficult for someone to try to load the entire shed and generator onto a truck. I will post a list of my final costs too and FWIW I am pretty sure I will have more into the shed then I have into the generator. I have to decide when I get done with this if I will store the generator outside in this shed or if I will use the shed to store gas and propane as the gas cans in the garage stink the place up. With the vents, this might be better to have outside as the shed will sit on the north side of our home so it will be shaded from the summer sun and it would be cooler then our garage. Anyways, darned weather kept me from getting as much done as I hopped and I hope to finish tomorrow if my wife and kids will allow it. |
|
|
|
[#1]
pics no worky.
|
|
|
|
[#2]
Quoted:
pics no worky. they do for me and thanks for posting, this is interesting, but seems like the project got a little out of hand? |
|
|
|
[#3]
Well, I wanted to build a shed for running the generator. When I saw the listing for $50 I thought I found an easy way out of a lot of work but the more I looked at it the more I decided I really wanted something that would better secure the generator . The original box was really just to help keep some of the rain off the generator. I think this shed will give me a ton of other options for storage beyond just being a shed to hold the generator while it is running.
As for the images, I did have an error in my path and I fixed them. |
|
|
|
[#4]
For 50 bucks you got way more worth than you spent.
|
|
|
|
[#5]
I like overbuilt things, OST
|
|
|
|
[#6]
Outstanding! That's a great buy.
|
|
|
|
[#7]
Awesome! I need to build something like this for my genny.
|
|
|
|
[#8]
Tag.
I need a shed for my genset |
|
|
|
[#9]
I made my own from steel studs and metal siding, been holding up for years now. Put a car muffler on it tooo and its alot quieter, its a old model probably from the 80's so it had tiny screw on mufflers, like on mowers, not the nice ones that come on them today. It is electric start which is nice, and I have a float charger on it so it always charged.
|
|
|
|
[#10]
Quoted:
I love the no refilling the tank setup. Just swap the whole jerry can. |
|
|
|
[#11]
Quoted:
I love the no refilling the tank setup. Just swap the whole jerry can. Yeah to bad its my only one, the original was filled with rust, still have it but its unusable. Havent checked this one to see if its rusted out, but I can just connect the fuel line to any external can if needed. |
|
|
|
[#12]
Nice shed, looks like a fun project.
|
|
|
|
[#13]
Well, I had better weather yesterday and I dot a lot more done but not quite done yet...
Here is the pic of the floor. Note my photographer helper checking out the photos she took of Minie mouse 
This is one of the pins that held the original roof on. I decided to cut these off, later I realized I could have left them on as they would not impact the way I ended up building this, but you can see how these would have rattled like crazy with the metal roof. Note that the steel angle iron is bolted to the back wall of the shed using a carage bolt. I will be adding at least 2 more carage bolts but I am honding off putting too many bolts in case I need to unbolt things for any reason. 
Exterior framing, this will get added to from inside once I get the holes cut for the vents. Note I removed the front two angle irons that stuck up to give me more room to move things around inside the shed. Because the front now is inside the outer shed by 6+ -inches these were not adding any value. I do have the steel I cut off and I may find another use for it on this project (have to see). 
Exterior is all attached This is 5/8-inch board and I have as many nails into this as I could have used to build a full sized 8x10 shed  . Darned Dewalt fraiming nail gun makes it too much fun not to just nail the living stuffings out of a project like this! . Darned Dewalt fraiming nail gun makes it too much fun not to just nail the living stuffings out of a project like this!


Here is the shed with the door added but I learned I screwed up and I purchased a fence gate thinking it would be stronger to hold the weight. The only issue is the hinge has a pin that pops right out so it is worthless for security. Frustrating as they hinges are nice and rugged but very easy to pop the pin and gain access. The two fixes I see is to weld up a steel pin that could not be removed or I may put a couple eye bolts on the inside of the door and use heavy chain and locks on the inside to make it impossible to take the door off. Another option I thought of is to use this side as the latch and pit paddle locks through where the hinge pins would go and add non-pinned hinges to the other side. 
Before I add the roof I need to get the vents and fan installed plus I want to add a pass through for the power cables to allow the generator to get hooked up to our future sub-panel. |
|
|
|
[#14]
are you going to connect to a transfer switch on the panel or bootloeg it in.
are you planning on running it inside the wood box, I would be concerned with a fire hazzard. |
|
|
|
[#15]
Quoted:
are you going to connect to a transfer switch on the panel or bootloeg it in. are you planning on running it inside the wood box, I would be concerned with a fire hazzard. I am planning to add a subpannel and I have a thread on that here: http://www.ar15.com/forums/topic.html?b=10&f=18&t=626636 When I get that wired, I will run the wire to the wall next to wher ethis generator shed will be sitting. Then I will use a short cord to connect the generator to the plug in the wall. the generator shed will be about 20-feet from my service panel when it is in place. As for the fire hazard, they make these generator sheds out of plastic so this will certainly be less subject to problems then the plastic boxes. The extra depth I added was to ensure that I have at least 8-inches between the exaust and the door and I have thought about adding metal to the inside of the door to act as a heat shield as well. The fan will provide plenty of ventilation for this little shed so the inside of the shed shoul dnot get hot but I will need to do some testing once it is all done. Still, I have never tried this before so I will have to see what happens after it is built and running. |
|
|
|
[#16]
Nice job. Seems like a lot of trouble just to build a box around the metal shed you bought. You could have just built the wood box and not even used the shed thing. To each his own.
|
|
|
|
[#17]
Quoted:
Nice job. Seems like a lot of trouble just to build a box around the metal shed you bought. You could have just built the wood box and not even used the shed thing. To each his own. Absolutely! I had planned to build the shed before I found the metal box. Once I found the metal box I couldn't seem to not buy it and after stairing at it for a couple days I decided to build what I had planned anyways. My "mistake" was not leaving the metal shed alone and selling it and getting my money back out of it as frankly that metal box inside the shed does not do a whole lot to add strength to the box. Just with this in there someone could not cut this generator out with a chainsaw now
The steel that this metal shed was made out of is really significant and once I had it I felt obligated to include it (perhaps foolishly). I would certainly not suggest anybody add the steel if you build your own! |
|
|
|
[#18]
GOOD work!
|
|
|
|
[#19]
You guys do pretty good work. I suck at carpentry.
|
|
|
|
[#20]
I would like to make one with cinder blocks and a type of steel roof, and hide it in the the back yard and possibly half buried. that would help with the noise if your trying to run it without anyone knowing. mine sounds like a lawn mover from the street, if all power is out someone will hear some type of noise.
|
|
|
|
[#21]
Maybe I missed something but why do you need the metal housing if you are going to bolt it inside a bigger shed? Might as well not even use it, or did I miss something?
Sorry missed your previous post |
|
|
|
[#22]
Quoted:
You guys do pretty good work. I suck at carpentry. I must second that... my carpentry all looks like the stuff "Little Bill" built in "Unforgiven." |
|
|
|
[#23]
Sorry, I have not managed to get oics of the final project. Kids are back to school and time has been short but perhaps tonight I can get the electric hooked up for the fan and take final pics...
I have a question however if anyone has any advise... The fan uses flexable metal conduit and I purchased a metal box that I will be mounting inside the shed. The conduit serves as a ground for the fan so the metal box will get grounded to the metal box inside my shed. I am considering adding a second ground wire that would connect the generator to the metal box as well and then adding a copper clad grounding rod outside of the shed that would then be connected to the metal box inside the shed. I do not know if this is a bit overkill, everything else about this shed is already overkill, but my theory is that 95%+ of the time this shed is going to be used to store my gassoline and propane. I figure a ground might help prevent any static build-up when the generator is not in use and it would also ground the generator and fan when the gas cans and propane cylinders are removed and the generator is run in there. I am not planning to buy a huge grounding rod, just a 3-ft or so copper clad one for what should really only be for static. Also note, the metal floor and edges of the metal shed were painted with rubberized truck bed liner. This was done to prevent metal-to-metal contact of the shed to Jerry Cans plus it should help prevent some of the vibration. It also makes it look a lot better too, not that I tried to make this shed look pretty. I already have grounding wire and clamps so the only thing I would need to buy is a grounding rod and as long as I don't buy a solid coper unit they are not that expensive compared to the money I have already invested. Any Oppinions? |
|
|
|
[#24]
I install grounding rods all the time at work, but the ones ive ever seen were around 8 feet long, and they arent solid copper. We use a electric jackhammer to pound them in. If your near your house cold water copper pipe you can buy a clamp for that. On mine since its so far away, and its on concrete I never used a ground rod. I know at the gas stations they want you to fill the tanks on the ground, so maybe the ground rod, or ground wire into the earth is a good idea. Is yours on a concrete pad, that may be good enough. When we do concrete pads for transformers we will install stripped copper wire on top of the rebar, I think in a circle pattern. Been years since we did it but we used a certain length of bare wire, and the end of it stuck out of the concrete to tie into the transformer. I think it was called a ufer ground. That may be the easiest way if your not on a concrete pad.
|
|
|
|
[#25]
Personally I would have either not used the metal frame or fletched it so you could add wood or just used more metal for the sides.
|
|
|
|
[#26]
Quoted:
I install grounding rods all the time at work, but the ones ive ever seen were around 8 feet long, and they arent solid copper. We use a electric jackhammer to pound them in. If your near your house cold water copper pipe you can buy a clamp for that. On mine since its so far away, and its on concrete I never used a ground rod. I know at the gas stations they want you to fill the tanks on the ground, so maybe the ground rod, or ground wire into the earth is a good idea. Is yours on a concrete pad, that may be good enough. When we do concrete pads for transformers we will install stripped copper wire on top of the rebar, I think in a circle pattern. Been years since we did it but we used a certain length of bare wire, and the end of it stuck out of the concrete to tie into the transformer. I think it was called a ufer ground. That may be the easiest way if your not on a concrete pad. It is not on a concrete pad. The shed was built on 4x6 pressure treated to act as skids. The internal metal box is lag bolted to the skids but the lags to not penetrate to the ground. As for 8-ft grounds, I really hope that is not necessary or I will run a wire to the house ground and tie into that. Quoted:
Personally I would have either not used the metal frame or fletched it so you could add wood or just used more metal for the sides. Well, the original box was smaller then what I would want to enclose so my original plan was to just extend it but I just couldn't stop myself and before long the project took a left turn and I ended up with this metal box inside there that really was not needed. Still, it is all steel and welded so it would make a good grounding surface if there is any value to doing it. |
|
|
|
[#27]
OK, I am sorry I get delayed in posting the rst of the pics. My wife was loosing patience with my project and taking pics so I didn't take pics of every step along the way....
Here is the Shed with holes cut for the vents: 
Air Intake vent from outside 
Air Intake vent on inside with screen: 
Power vent outside: 
Power Vent on inside - Note I had to notch the board above vent for lever to work: 
This is the thermostat control for the fan, it was removed 
Note the cover of the thermostat popped off and I saved it for some future project 
Fan screwed to inside of Generator Shed 
I didn't get pics of adding the roof or doing the roofing. Also note that the shed now has three hinges. I discovered, must to my frustration, that the hinges I had chosen for this project had pins that could be popped out to allow access to the shed from the hinge side. So, I bought another pair of hinges that could not be disassembled and as long as I already had the other hinge I elected to use three hinges on that side of the door. Also note I painted the power vent black. 
The air intake vent says it is not paint able so I left it white. 
This is the largest locking latch I could get and it is bolted fast with lots of carriage bolts. 
Note the black coating is rubberized truck bed lining. I bought a gallon of it and applied numerous coats. The dribbles down the front were because I didn't expect the liquid to flow. I decided it gives the shed a well used look so I decided not to try to scrape it off. 
Fan on inside 
Vent on inside 
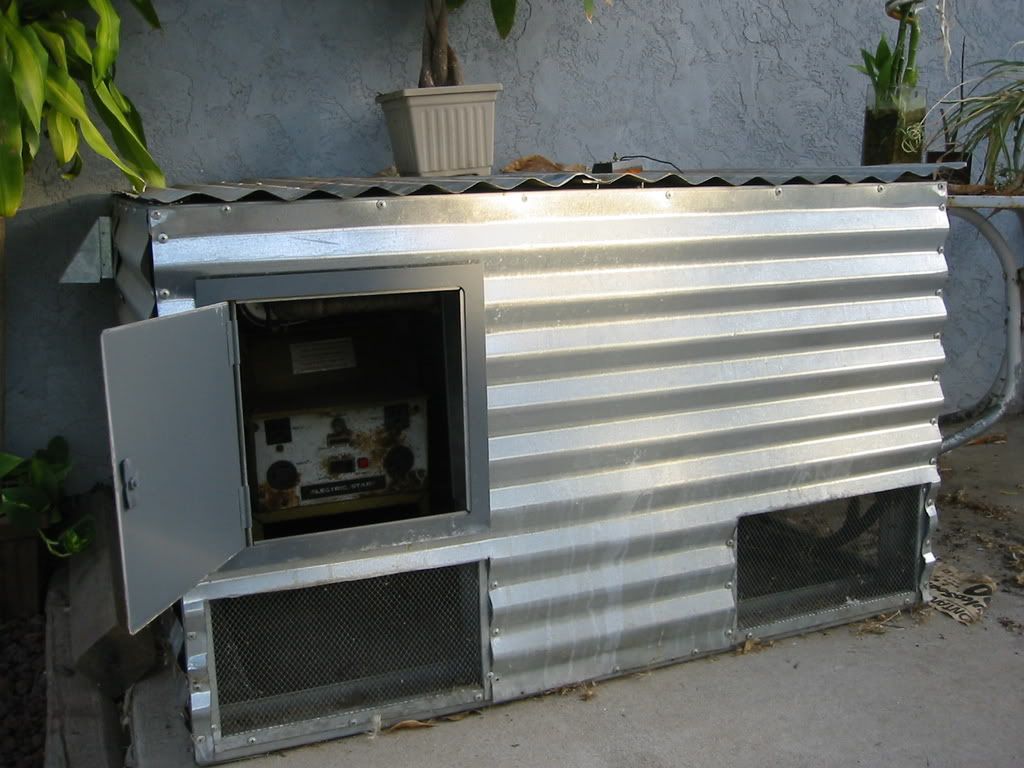
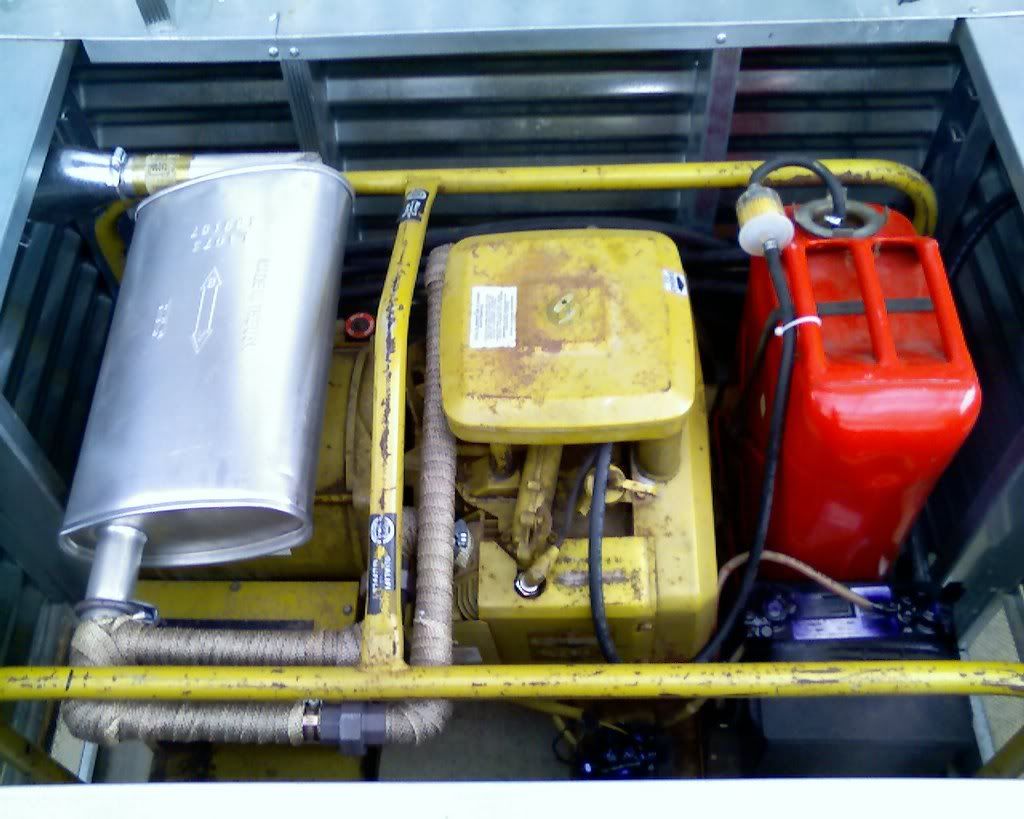
Finished electrical hookup: 
Height demonstration: 
Some of the cans in the shed: 
Note that I can fit at least 23 20l Jerry cans in the shed (note I would never have that many in there that are full!), Right now I have three full Scepters and my 5-gal Safety can. The two 20-gal propane cylinders are visiting while I work to redo another smaller shed as I am pretty sure the fire code around hear says I am not supposed to store propane in the same shed as gasoline but it is better then it sitting in the garage or out unlocked so it is in there for now. Here is a pic that shows a row of 4-Jerry cans wide: 
Now, if I needed to use the generator, all I need to do is pull out my gas containers and park the generator in there. I then would plug the fan into one of the outlets on the generator and use extension cords to power my critical equipment. My next major project is to add an electric sub panel that will allow me to run the power from the generator to the critical circuits and when that is done the fan will get plugged into an outlet powered by the subpanel to allow for better load management. That is why I used a 10-ft extension cord. Here is the tread on the Transfer Panels I am looking at: http://www.ar15.com/forums/topic.html?b=10&f=18&t=626636 I also said I was keeping track of my expenses but I have to be honest, I spent a small fortune that really was not needed. I have more carriage bolts, lag bolts, screws, nails, and extra pressure treated lumber on this shed to the point I could have likely built three of these and they would have been strong enough. My goal was to make this strong enough that nobody would be able to break their way in and this shed is way stronger then the pictures make it look. It is also a very heavy critter between the steel box on the inside and all the extra stuff I added around it. The last item I need to do is to ground the metal box on the inside to the house. I have heavy ground wire for the job and it will simply get run into the garage where the natural gas line comes in and I will attach the ground wire directly to that. The fan in the shed is already grounded to the metal box via self taping metal screws and a second wire is in place to allow me to ground the generator to the metal box as well. Anyways, this project is done and it gives us a lot of storage for fuel as well as a place to run the generator if we ever loose power long enough that we need the generator. |
|
|
|
[#28]
attach the ground to a cold water pipe, not the gas line
|
|
|
|
[#29]
Quoted:
attach the ground to a cold water pipe, not the gas line I need to look again but I am pretty sure that the electrician has the house ground connected to the gas line. The water line is on the opposite side of the house and there is no grounding rod. |
|
|
 Win a FREE Membership!
Sign up for the ARFCOM weekly newsletter and be entered to win a free ARFCOM membership. One new winner* is announced every week!
You will receive an email every Friday morning featuring the latest chatter from the hottest topics, breaking news surrounding legislation, as well as exclusive deals only available to ARFCOM email subscribers.

AR15.COM is the world's largest firearm community and is a gathering place for firearm enthusiasts of all types.
From hunters and military members, to competition shooters and general firearm enthusiasts, we welcome anyone who values and respects the way of the firearm.

Subscribe to our monthly Newsletter to receive firearm news, product discounts from your favorite Industry Partners, and more.
Copyright © 1996-2024 AR15.COM LLC. All Rights Reserved.
Any use of this content without express written consent is prohibited.
AR15.Com reserves the right to overwrite or replace any affiliate, commercial, or monetizable links, posted by users, with our own.


