|
[#1]
FA pins can suck. It's honestly my least favorite part of the rifle to get pinned. Some are easy, but that's the only pin on the entire thing that I feel like I want a roll pin punch for. FWIW, even the best punches can bend with time or a good pounding. Roll punches, while different than roll pin punches, can work, but can be a PITA.
Lowers, in my opinion, are pretty simple and easy once you figure out how to get the hammer spring oriented for install. Pins are much easier - just be sure to support the wing on the trigger guard with a block or a bit of wood when installing the pin, lube that sucker up with grease, and take your time lining it up. Barring breaking that, you'll probably enjoy the lower assembly. For pics, setup a free Photobucket account, upload your photos to it, and copy the image code next to the picture. Paste that here and you're set. Post pics after you complete the build! |
|
|
|
[#2]
Quoted:
Well got it done but the forward assist was not easy. It was the devil just getting the pin started and after I got it started it still took a bit of wacking to finish the job. Believe it or not I did use tape in the beginning. But a few minor knicks as some tape tore with repeated whacks. Very minor and I drove from below. I would post a photo but don't know how. Dust cover was a snap. So I oiled it up for now but what do you guys use to touch up those knicks? Oh also found out that punch set from Home Depot is garbage. Finishing the FA pin off the punch kept bending. Looking ahead I am almost finished building my workbench and will complete my first lower. I hope those pins go in easier on the lower parts kit. I'll build the PSA lower first and save the Aero's for later. Lol If you will invest in a set of quality ROLL PIN STARTER punches, and a good set of ROLL PIN PUNCHES, the job will take about 20 seconds. Go to plastixrevolution and look for their vice block made of polymer. Drill a couple of holes through it and screw it onto your bench or use it in the vise. The vise block in question is rectangular, has a hole at each end. You put the stripped upper in it, push in the pins and it will hold it upright while you start the FA pin, then insert FA and push in making sure the tooth on the FA is oriented towards the bolt channel. Drive pin further in with the Starter punch and finish it off with the Roll Pin Punch till flush. I guess when you have done a thousand of them or so it does get easier |
|
|
|
[#3]
Last lower I assembled was a San Tan Tactical. All the spots where roll pins went, was replaced with Allen head screw pins. It was the most drama-less lower I've done. Just a dab of Loc-tite and all done.
|
|
|
|
[#4]
 This is what I use to touch up nicks. |
|
|
|
[#5]
To start roll pins, I used a set of nail sets for putting in finish nails so you can putty over the nail. They have a indent on the end that fits all of the roll pins used on guns. I have glued a small rectangular cobalt magnet to the shaft that holds the pin to the punch, then I start the roll pin, once started, I finish up with a pin punch, works like a charm, they come in three punch sets for less than $10 for good quality ones and they won't bend.
|
|
|
|
[#6]
Press pins in, punch pins out.
I know they're called "starter punches" but for an ar build, they're not needed. Tell all your friends |
|
|
|
[#7]
Quoted:
Press pins in, punch pins out. I know they're called "starter punches" but for an ar build, they're not needed. Tell all your friends I did my first build without a starter and when I tried my nail sets it was much easier on subsequent builds, we all develop methods for building these guns. |
|
|
|
[#8]
I had a hell of a time with my first FA Pin as well. I agree that a press is the way to go. I got a cheap 1/2 ton arbor press from harbor freight for like $12 or $15 on sale. I use it all the time for all kinds of stuff, so money well spent, and will save me headache and fits of rage on subsequent builds.
|
|
|
|
[#9]
I always pinch one end of any roll pin with a pair of pliers making it just slightly smaller than the diameter of the full body of the pin then add a small amount of whatever type of lube I have handy. It make starting and driving the pin with any punch MUCH easier and doesn't cost a thing.
|
|
|
|
[#10]
Quoted: If you will invest in a set of quality ROLL PIN STARTER punches, and a good set of ROLL PIN PUNCHES, the job will take about 20 seconds. Go to plastixrevolution and look for their vice block made of polymer. Drill a couple of holes through it and screw it onto your bench or use it in the vise. The vise block in question is rectangular, has a hole at each end. You put the stripped upper in it, push in the pins and it will hold it upright while you start the FA pin, then insert FA and push in making sure the tooth on the FA is oriented towards the bolt channel. Drive pin further in with the Starter punch and finish it off with the Roll Pin Punch till flush. I guess when you have done a thousand of them or so it does get easier Quoted: Quoted: Well got it done but the forward assist was not easy. It was the devil just getting the pin started and after I got it started it still took a bit of wacking to finish the job. Believe it or not I did use tape in the beginning. But a few minor knicks as some tape tore with repeated whacks. Very minor and I drove from below. I would post a photo but don't know how. Dust cover was a snap. So I oiled it up for now but what do you guys use to touch up those knicks? Oh also found out that punch set from Home Depot is garbage. Finishing the FA pin off the punch kept bending. Looking ahead I am almost finished building my workbench and will complete my first lower. I hope those pins go in easier on the lower parts kit. I'll build the PSA lower first and save the Aero's for later. Lol If you will invest in a set of quality ROLL PIN STARTER punches, and a good set of ROLL PIN PUNCHES, the job will take about 20 seconds. Go to plastixrevolution and look for their vice block made of polymer. Drill a couple of holes through it and screw it onto your bench or use it in the vise. The vise block in question is rectangular, has a hole at each end. You put the stripped upper in it, push in the pins and it will hold it upright while you start the FA pin, then insert FA and push in making sure the tooth on the FA is oriented towards the bolt channel. Drive pin further in with the Starter punch and finish it off with the Roll Pin Punch till flush. I guess when you have done a thousand of them or so it does get easier https://www.plastixrevolution.net/collections/ar15-upper-vise-blocks/products/ar-15-upper-receiver-vise-block-pin |
|
|
|
[#11]
Why not just use adjustable pliers and press the pin in place. Then whack it with the punches.
Obviously, tape up the teeth of your pliers. |
|
|
|
[#12]
Thanks for all the advise and support. I ordered the starter punches and also the roll pin punches from Midway. This vise block looks very reasonable and I have to get one for the lower too. Considering the comments I think I did pretty good. I am going to setup photo shop and post a few pics. And I guess I will try Walmart on the Birchwood Aluminum black. Academy and Gander only had the blue and natural wood paint. And I was cleaning out a small box I keep a few recently ordered things in and found a 50 dollar Gander gift card that was actually the rebate on a safe I purchased. Lol. Prob use it for fishing as I don't really like their gun dept, a little expensive and they never seem to have what I want. Anyway back to the topic will work on photos.
|
|
|
|
[#13]
For the pics, go to www.photobucket.com (not the Photoshop software package). Setting up an account will only take a minute or so and is free. Good luck!
|
|
|
|
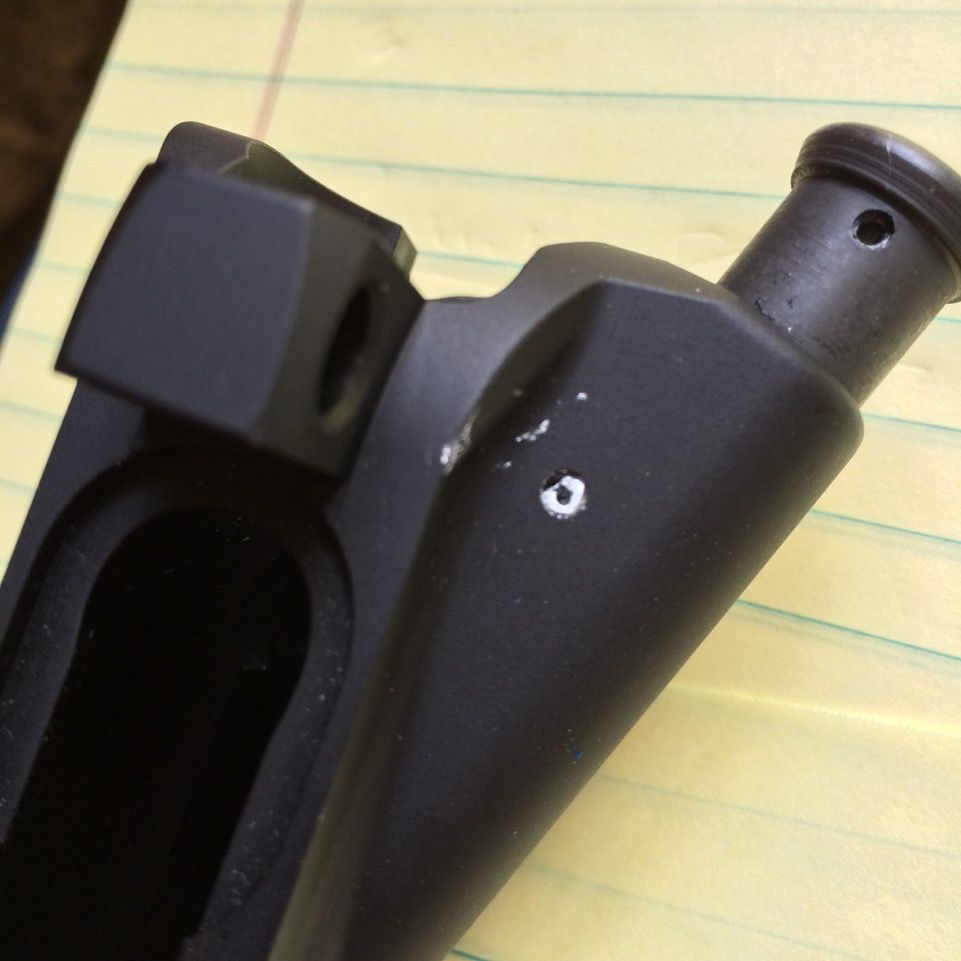
[#14]
Ok here it is. Hope it worked.
http://i1070.photobucket.com/albums/u499/silvers559/Mobile%20Uploads/image_zps5rmxnjv4.jpeg |
|
|
|
[#16]
There is nothing I do on my guns that involves a metal hammer, I use a plastic hammer for all things guns, that way I am not knocking off the finish, get yourself a reloading hammer and you will be much happier with the outcome.
|
|
|
|
[#17]
Quoted:
There is nothing I do on my guns that involves a metal hammer, I use a plastic hammer for all things guns, that way I am not knocking off the finish, get yourself a reloading hammer and you will be much happier with the outcome. Lol. Will do Dave. Yeah knew that was crazy and I did initially tape it. But honestly the picture makes it look worse. Anyway never a steel hammer, taped or not. |
|
|
|
[#18]
I learned my lesson a long time ago.
First, sand one end of the roll pin to create a bevel, touch it up with a Cold Blue Second, have the PROPER TOOLS, I purchased a set of roll pin holding punches. Before having them I launched God knows how many gas tube roll pins. Third, lightly oil the pin and the hole. Fourth, use coil pins preferably over roll pins. Fifth, and probably the most important is to trust your supplier. MANY pins are out of spec and too large of diameter. |
|
|
|
[#19]
Update:
What am I missing? I purchased the Al Black Birchwood Casey. Cleaned area with Isophryll then applied with rag. I thought this was black paint? Lol Does it take several applications or is this just a protectant? Idk help me here please. I have used the car paint touch ups and this is what I was expecting. I'm clueless. Thanks for any help. |
|
|
|
[#20]
Yes it may take a few times to get the color your want try putting on with a qtip let set for a minute if you look closely you will see it bubbling that is the alum black doing its thing when bubbling has stopped usually only a minute or so wipe off with qtip and done
|
|
|
|
[#21]
Quoted:
Yes it may take a few times to get the color your want try putting on with a qtip let set for a minute if you look closely you will see it bubbling that is the alum black doing its thing when bubbling has stopped usually only a minute or so wipe off with qtip and done Ok that makes sense. Will try again. I do see now it has darkened a bit. I was reluctant to use the Qtip because of possible strands getting on the work, thus the rag. But will use Qtip now. I was expecting a small brush attached to the top. |
|
|
|
[#22]
I used DeWalt channel locking pliers (covered with tape) to press in all my roll pins. Worked like a charm. No marks or scuffs whatsoever.
That said, I will be getting some of that aluminum black because I plan to break mine back down to do some coating (cerra or dura, not sure yet). So, I'll be getting some good punches for that project. And a brass/plastic hammer too. |
|
|
|
[#23]
Quoted:
I used DeWalt channel locking pliers (covered with tape) to press in all my roll pins. Worked like a charm. No marks or scuffs whatsoever. That said, I will be getting some of that aluminum black because I plan to break mine back down to do some coating (cerra or dura, not sure yet). So, I'll be getting some good punches for that project. And a brass/plastic hammer too. Check out Midway for all those supplies. I got mine delivered last week. Very quick service. Was going to go with Brownells until I got to the shipping. Lol they wanted double what Midway charged. It would have been almost 16 dollars shipping, and that was the lowest offer. I am 40 miles north of Hou in a small town but hardly the sticks. But another issue. |
|
|
|
[#24]
Quoted:
Pretty close - one more step. When you're in your photobucket library, click on the image, don't copy the address bar. Instead, look to the right of the image - it should say 'Share This Image' just above a box with an address starting with [URL... Click that box, it will automatically copy it for you, and then you can paste that into your post. You'll be set. <a href="http://s1070.photobucket.com/user/silvers559/media/Mobile%20Uploads/image_zps5rmxnjv4.jpeg.html" target="_blank">http://i1070.photobucket.com/albums/u499/silvers559/Mobile%20Uploads/image_zps5rmxnjv4.jpeg</a> Wow you really buggered that up. Use channel locks or vise grips and press the pin in. Tape up the jaw that will be contacting the finish. I start the roll with a punch and hammer. Just enough so it will "stand" on its own. Then I use vise grips and press the pin with one hand while holding the part with the other. The pliers will get it all but the last tiny bit. I tap it home with a punch and call it done. I just installed 3LPKs yesterday and had no issues. I used Anderson LPKs this time. If you want really easy pins spring for the Spike's kit. The coil pins go in like butter with a punch. I am too cheap to pay for those when I can buy Anderson's for 1/2 the price. |
|
|
 Win a FREE Membership!
Sign up for the ARFCOM weekly newsletter and be entered to win a free ARFCOM membership. One new winner* is announced every week!
You will receive an email every Friday morning featuring the latest chatter from the hottest topics, breaking news surrounding legislation, as well as exclusive deals only available to ARFCOM email subscribers.

AR15.COM is the world's largest firearm community and is a gathering place for firearm enthusiasts of all types.
From hunters and military members, to competition shooters and general firearm enthusiasts, we welcome anyone who values and respects the way of the firearm.

Subscribe to our monthly Newsletter to receive firearm news, product discounts from your favorite Industry Partners, and more.
Copyright © 1996-2024 AR15.COM LLC. All Rights Reserved.
Any use of this content without express written consent is prohibited.
AR15.Com reserves the right to overwrite or replace any affiliate, commercial, or monetizable links, posted by users, with our own.