|
Posted: 9/27/2014 2:34:44 PM EDT
Hello everyone, I have been slowly building my first AR over the year until recently I just ordered the remaining parts to finish it. I have a few questions for everyone after I list my parts:
Lower receiver: Mag Tactical MG-G4 Lower parts kit: Rock River Arms Butt stock, grip, buffer tube and spring: Strikeforce Stock Package with Scorpion Recoil System and Aluminum Civilian (Commercial) Buffer Tube Assembly Upper receiver: Aero Precision Assembled Cerakote Upper Receiver w/Port Door & Fwd Assist BCG: Aero Precision, 5.56 Bolt Carrier Group, Complete (Phosphate coated) Charging handle: Raptor Ambidextrous Charging Handle by AXTS (.223/5.56) Barrel: Aero Precision, 16" M4 5.56 barrel Gas block: Aero Precision .750 Low Profile Gas Block Gas tube: Seekins Precision Melonited Carbine Length Gas Tube Hand guard: Aero Precision EQ-15 (Enhanced Quad Rail, 15") Handguard Barrel nut: Seekins Precision Bar/MCSR Mounting Nut & Bar/MCSR Shim and Screw Kit Muzzle device: YHM 5.56MM SLANT MUZZLE BRAKE/COMP Sights: Yankee Hill Machine Q.D.S. Flip-Up Sight Set Hooded Version, Front and Rear 


|
|
|
|
[#1]
I am currently waiting for the barrel, bcg, gas block and hand guard to arrive in the mail to finish. I am trying to plan ahead and prepare for the hand guard and barrel nut install as I believe its going to present me with some problems. I just realized today that the barrel nut wrench my friend loaned me will not fit the Seekins barrel nut I purchased. I have also read on these forums that the type of barrel nut I am using can easily be over tightened causing the nut to deform and not allow the hand guard to go over it. I did purchase the shim and screw kit with it but want to know if I use all 3 shims or just 1 or 2 or none at all? Will an armorers wrench with just the 3 pins work for tightening this nut down?
On the subject of oil, grease and loc-tite I have a few questions regarding them. When I assembled my lower I did not use any oil or grease on anything, should I have and what type? When it comes to my upper what do I need to oil, grease and loc-tite? I am sorry for all the questions everyone, I did search for some of these answers on the forums but I wanted to start my own thread with everything in it and hopefully get all the answers right here. |
|
|
|
[#2]
Quoted:
I am currently waiting for the barrel, bcg, gas block and hand guard to arrive in the mail to finish. I am trying to plan ahead and prepare for the hand guard and barrel nut install as I believe its going to present me with some problems. I just realized today that the barrel nut wrench my friend loaned me will not fit the Seekins barrel nut I purchased. I have also read on these forums that the type of barrel nut I am using can easily be over tightened causing the nut to deform and not allow the hand guard to go over it. I did purchase the shim and screw kit with it but want to know if I use all 3 shims or just 1 or 2 or none at all? Will an armorers wrench with just the 3 pins work for tightening this nut down? On the subject of oil, grease and loc-tite I have a few questions regarding them. When I assembled my lower I did not use any oil or grease on anything, should I have and what type? When it comes to my upper what do I need to oil, grease and loc-tite? I am sorry for all the questions everyone, I did search for some of these answers on the forums but I wanted to start my own thread with everything in it and hopefully get all the answers right here. The instructions for the handguard will explain how the shims work. Basically you install the barrel nut without the shims then based on where you're indexed at you use the shims to get the nut right when torqued on. My wrench would not work with the nut either so I used a strap wrench to tighten the barrel nut. The lower does not need grease or loc-tite. Some people will loc-tite the castle nut for the buffer tube but the correct procedure is to stake the castle nut. Just the barrel nut needs grease. Grease to use is Permatex anti-seize, or Mobil 1 Synthetic Wheel Bearing Grease. Other wheel bearing grease with moly and no graphite will work too. Some guys believe loc-tite on the barrel extension aides accuracy. I don't think the loc-tite there does anything, too much heat. One area to "loc-tite" would be the gas block if yours takes set screws. Use Rockset instead of loc-tite though, even the high temp loc-tite can't withstand the temperature the gas block sees. I'd recommend you shoot the gun a few times before applying rockset though. Rockset is a bitch to crack so make the gun runs right. If it doesn't run right you'll be glad disassembly has one less hassle. Just bring an allen wrench to the range and check the gas block set screws occasionally. Clean the barrel chamber with a chamber brush. Oil the bolt carrier group before shooting. |
|
|
|
[#3]
Thank you Gixxersixxer for the info, I'm sure I will be posting more questions as the parts arrive this week. I do have another question, what would cause a pivot pin to be really hard to push out? When I received my Aero Precision stripped upper all it had installed was the forward assist and ejector door installed. I mated it to the assembled lower and had a really rough time trying to remove it back off because the pivot pin and takedown pin were so tight. A co-worker who builds weapons told me to take a drill bit the same size as the holes and run it through by hand to remove excess cerakote or anodize. I did as he said and the takedown pin works great, however the pivot pin is still really tight, I have to use the tip of a pen to push it out.
|
|
|
|
[#4]
Since the takedown pin was freed up with a drill bit the pivot pin tightness is probably due to tolerance stacking.
No dimensions are exact, there can be a couple thousandths of variation plus or minus in a measurement and still be within spec. If the lower has a measurement on the minus side while the upper has a measurement on the plus side the two tolerances add to make the alignment of the two holes off more. If it really bothers you the pivot pin can be removed and hit with some fine grit sandpaper. It's best to determine where the pivot pin is excessively rubbing so you know where best to work. |
|
|
|
[#5]
So all my goodies arrived today:

First question I have is: Is it normal for the gas block to be tight when trying to position it up to the gas hole? When trying to slide it up to the gas hole it starts to get tight about 1" inch before its even in place. Second question: The BCG has a coating of oil on it, is this sufficient enough for lubrication? Third question: Do I need to use loctite on the screws that secure the free float Aero quad rail to the Seekins barrel nut ? There were no instructions provided with the handguard, barrel, gasblock and BCG, I'm a little disappointed as I was thinking Aero Precision was a great company with solid product that supply everything needed. |
|
|
|
[#6]
Quoted:
First question I have is: Is it normal for the gas block to be tight when trying to position it up to the gas hole? When trying to slide it up to the gas hole it starts to get tight about 1" inch before its even in place. Second question: The BCG has a coating of oil on it, is this sufficient enough for lubrication? Third question: Do I need to use loctite on the screws that secure the free float Aero quad rail to the Seekins barrel nut ? There were no instructions provided with the handguard, barrel, gasblock and BCG, I'm a little disappointed as I was thinking Aero Precision was a great company with solid product that supply everything needed. 1. It's normal for the GB to be tight at the gas block. It's not normal to have to beat it on with a hammer. Light taps, or putting the barrel in the freezer to contract the metal, would be all that's needed. Make sure the set screws are loose and not inhibiting further movement. In addition make sure you don't put the GB all the way back to the shoulder on the barrel. You're running a free float rail so you don't have an handguard cap but you still need to provide the 1/32" of spacing as if there were a handguard cap. If the barrel is properly dimpled it should ensure the GB is lined up right when you tighten the set screw. 2. No that packaging oil is not sufficient. Use some 5w-20, or 5w-30, motor oil and coat the BCG, you shouldn't need more than a teaspoon. 3. You should, but not right now. Make sure the rifle runs properly before you makes things harder to come apart. Here is an overview of the HG install process, just showing a different outer barrel nut. For your barrel nut the index cuts face toward the muzzle. The shims come into play if the the outer barrel nut gas tube hole won't line up with the receiver after tightening the inner nut. There should be one thin shim and two thick shims. I can't exactly recall from memory how much each shim moves the barrel nut. I want to say the thin shim will move the barrel nut from being mis-aligned at the outside edge to being aligned. I think one thick shim will move you from the outside edge of the hole to the inside edge. You also have to take into account the tightening process. IIRC the tightening process is intended to take one hole/index mark. So, if your hand tight and barrel nut lines up at the outside edge of the middle hole you will need the thin shim to get you perfectly aligned before tightening. When you finish tightening you'll be aligned at the left hole of the three. If you're hand tight and line up perfectly with either of the two leading holes, or the leading index mark, you won't need any shims. Kind of shitty explanation but it's the best I've got. Play around with putting the barrel nut on hand tight while you pay attention to the index marks and holes. Then try applying different shims to understand how much they move the alignment. From there figure the tightening process requires you to go to the next point over from where you're at when hand tight. The barrel doesn't need instructions, the barrel extension pin faces up and mates into the cut out in the upper receiver. Some barrels fit into the receiver with some slop others take some light taps while taking care not to damage the crown on the barrel. You can search youtube for BCG dis-assembly . |
|
|
|
[#7]
Alright, so I finished the build on Friday 10-3 and have a few issues. First thing I want to say is a huge thank you to Gixxersixxer for all your advice and expertise, between what you have told me in this thread and youtube videos I did well. So let me start by saying that my biggest fear of installing the Seekins barrel nut and timing it right for the hand guard was ridiculous...that was the easiest part. Installing the roll pin in the gas block and tube was by far the most frustrating of anything. I do have a big problem well big to me, the hand guard where it meets the ears of the pivot pin mounts is rubbing and or touching. Once the whole upper was assembled I began to attach it to the lower and started with pushing in the take down pin which went in easily, then the pivot pin which would not budge in the slightest. I started to think this was the same problem I described earlier about the pivot pin being tight but now it was more accentuated. I began to really back track and determine why it would not go in, looking through the hole you could see it was not completely lined up just off a little. It was then I noticed that the lower part of the hand guard where it meets the ears of the pivot pin mounts was touching. I realized that I could pull it away some by tearing it back apart and putting the barrel shims in as I did not use them the first time around. So I put the 3 shims supplied with the kit on and it still touches, in a moment of stupidity and 6 Saint Pauli Girls in I decided to sand that area on the hand guard with some sand paper. The sanding did help some as it allowed me to insert the pivot pin with no problems now but.... now I cannot get the upper to pivot on just the pin it only goes up a little until the hand guard touches the ears again.
|
|
|
|
[#8]
Being limited to 2,000 characters per post because of being a new member kind of sucks. So my question now is: Do I have the hand guard trimmed down some so I can pivot the upper like normal? Can I also have this area touched up and cerakoted again, currently I took a black sharpie over it so the bare metal is not exposed.


|
|
|
|
[#9]
Wow three firsts for you. Welcome to the Machine

|
|
|
|
[#10]
Welcome to the site, and nice build.
|
|
|
|
[#11]
Quoted:
Being limited to 2,000 characters per post because of being a new member kind of sucks. So my question now is: Do I have the hand guard trimmed down some so I can pivot the upper like normal? Can I also have this area touched up and cerakoted again, currently I took a black sharpie over it so the bare metal is not exposed.  If this image is showing the maximum amount of pivot it looks like there's enough movement to remove the BCG without removing the pivot pin which is all you really need. However, the full range of movement should allow the upper to pivot over to the point where your hand gets pinched by the handguard if you're holding the magwell when you remove the takedown pin. It looks like the handguard possibly missed a machining step unless you removed that much material. Notice how yours doesn't have a 45 degree cut near the pivot pin ears. I'd email AP and get a replacement. 
Brownells sells a product called Aluma-Hyde that can be used to touch up the areas you removed material. |
|
|
|
[#12]
I'm going to agree with you Gixxersixxer on that 45 degree by the pivot pin ears, mine does not even have it. I did not remove very much material, only enough to get the pivot pin in, it still needs to be pushed out with a pen tip or pencil with some force. Good eye on noticing that.
Question is does Aero Precision have someone on their team that frequents these forums? If the answer is yes how do I get them to notice this thread? I'm still going to email them and try to get a replacement or have them correct this one. |
|
|
|
[#13]
Aero's industry forum is here: http://www.ar15.com/forums/f_2/592_Aero_Precision.html
Just start a new post. Explain what you've encountered and give them the chance to make it right. All your posts so far have been pretty even tempered so I don't think you'll have a problem. You could also send them a private message since chances are it will end up going that way to exchange identifying information anyway. |
|
|
|
[#14]
The pivot pin area on your lower isn't mil-spec, a standard A2 lower is what that rail is made for.
|
|
|
|
[#15]
Someone at work here just mentioned to me that my pivot pin might not be the correct size. Is there actually a difference in size compared to a mil-spec pivot pin and a civilian spec pivot pin?
|
|
|
|
[#16]
Doubtful.
Colt owners often refer to having a small or large hole upper receiver (and corresponding lower receiver). Small hole receivers of .250" are the "milspec", but during early production by Colt for the civilian market, they produced rifles utilizing a .315" spec, so as to preclude use of military uppers on civilian lowers. This production lasted until roughly 1993-1994. As a general rule of thumb all Colt "unblocked" lower receivers, are large hole, while pre-ban "blocked" lower receivers represent transition years where occasional variations popped up.

(Above left) Armalite large hole upper receiver... This was produced in limited numbers, and is no longer in production. (Above right ) New Colt small hole upper as shipped with a HBAR upper assembly. (Below) Colt SP1 and A2 upper receivers. 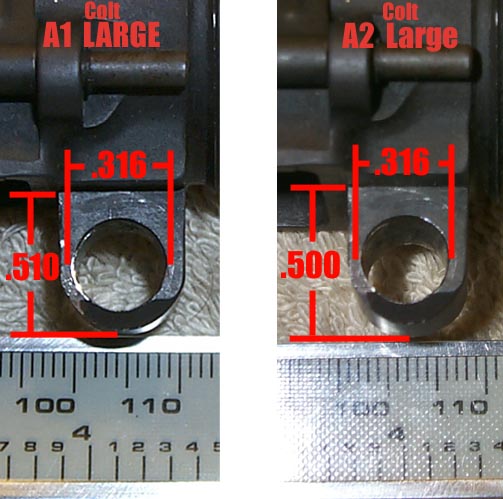
From: http://biggerhammer.net/ar15/uppers/ |
|
|
|
[#17]
Well I took your advice Gixxersixxer and sent Aero Precision a PM about my issue and basically I have to deal with it. They said that since my lower is not a standard lower it won't work, their hand guard is meant to work with standard lowers. So the only thing I can think of is to remove only enough material where the lower portion of the hand guard meets the barrel nut then spray some of that alumi stuff you mentioned to match the color. I will keep everyone posted as to the outcome.
|
|
|
|
[#18]
So I filed some more down and still have some more to go, the results are great. I can almost fully pivot the upper now, just need to get the area touched up now.
|
|
|
 Win a FREE Membership!
Sign up for the ARFCOM weekly newsletter and be entered to win a free ARFCOM membership. One new winner* is announced every week!
You will receive an email every Friday morning featuring the latest chatter from the hottest topics, breaking news surrounding legislation, as well as exclusive deals only available to ARFCOM email subscribers.

AR15.COM is the world's largest firearm community and is a gathering place for firearm enthusiasts of all types.
From hunters and military members, to competition shooters and general firearm enthusiasts, we welcome anyone who values and respects the way of the firearm.

Subscribe to our monthly Newsletter to receive firearm news, product discounts from your favorite Industry Partners, and more.
Copyright © 1996-2024 AR15.COM LLC. All Rights Reserved.
Any use of this content without express written consent is prohibited.
AR15.Com reserves the right to overwrite or replace any affiliate, commercial, or monetizable links, posted by users, with our own.


