|
Posted: 8/30/2014 7:42:19 PM EDT
This has come up a couple of times, and it's always been explained, and usually very well. But pictures help a lot, and I had the opportunity to take pictures with my latest upper build, so here goes!
This description will assume that the reader: a) knows how to disassemble a bolt, b) has access to a readily available, "standard" headspace gauge as opposed to the expensive and increasingly rare GI gauges that don't require disassembling the bolt, and c) wants to verify that their new barrel will be safe with the bolt they plan to use with it. I'm demonstrating with a 300 Blackout GO gauge from PTG, so there is no version that's made to use an assembled bolt with. The process isn't really any different from using a headspace gauge with an assembled upper, but it looks different because you're doing it without the upper. First, here's my gauge, and my bolt: 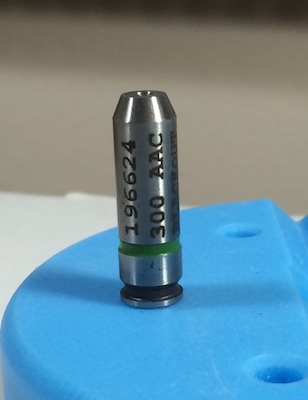 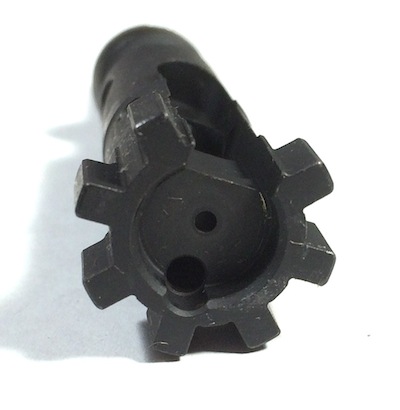
Note that it has a distinct "rim" that's similar to a cartridge case rim. That's why the extractor has to come off of the bolt. The ejector needs to come out because it will oppose any attempt you make to push in on the bolt and can confuse you about whether or not you're "forcing" the bolt. The green ring on the gauge identifies it as a GO gauge (not all gauges are marked with a color, but PTG uses green for GO and red for NO GO). Now simply put the gauge into the chamber (make sure the chamber is free of debris, gunk, excessive oil/grease, etc. first). This is what it'll look like from the breech end: 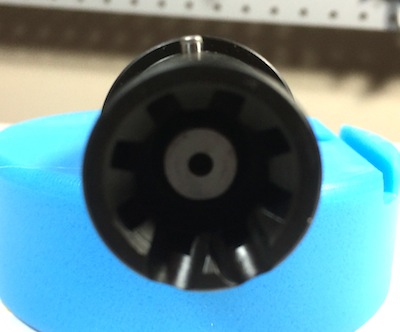
Next, simply insert your stripped bolt into the barrel extension... 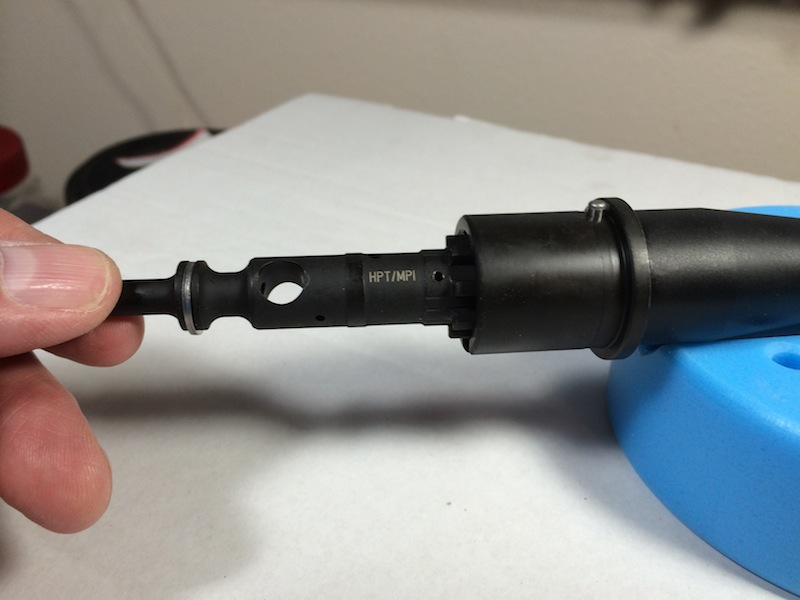
...and try to turn it (either direction - it doesn't matter) to lock the lugs within the barrel extension: 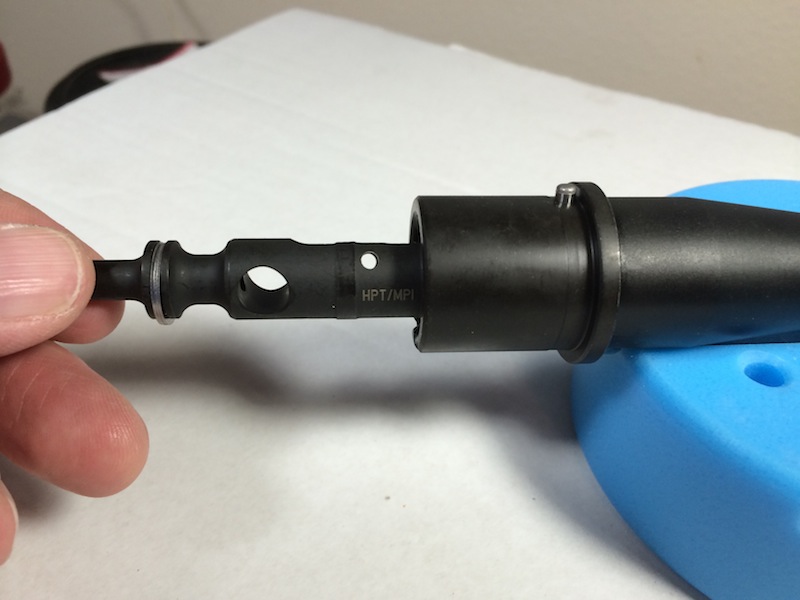
If the GO gauge allows the bolt to turn, the barrel is chambered AT LEAST deeply enough. The process with a NO GO or FIELD gauge is the same, but you DO NOT want the bolt to rotate with either of those gauges, as they indicatea "worn" chamber or excessive chamber depth; not necessarily "unsafe!!!!!" but definitely too deep a chamber for a NEW barrel. |
|
|
|
[#1]
Two questions for you. I hope they aren't to far on the stupid scale.
1: Can you use a piece of brass instead of a go gauge? 2: If that is all that head spacing requires, what extra step is done when you get a matched bolt/barrel? |
|
|
|
[#2]
Quoted:
Two questions for you. I hope they aren't to far on the stupid scale. 1: Can you use a piece of brass instead of a go gauge? 2: If that is all that head spacing requires, what extra step is done when you get a matched bolt/barrel? 1. No. The point of the gauge is to have a specified dimension for the chamber. Brass (spent or otherwise) won't be machined to the appropriate specs or tolerances. 2. That's for CHECKING headspace. Headspace is SET when the barrel is mated to the extension, and for all practical purposes (particularly in chrome-line barrels) can't be changed. |
|
|
|
[#3]
When you check the headspace, you're testing to see if your bolt and your barrel are a safe combination. With bolt guns there are other steps that can be taken to change the headspace, but not with an AR. Since the headspace for a given barrel is set when the manufacturer assembles the barrel extension onto the barrel, you can't change it, but it is also very possible to have a combination of barrel and bolt have the chamber too long, or too short for that combination. That's what you're checking with what I presented.
|
|
|
|
[#4]
The way a military armorer, or factory does this is to selectively fit a bolt to the barrel. Most barrel/bolt (new) sets are GTG. For the ones that don't pass, they swap bolts around until they get one that does pass.
The pic of your 300 Blackout gage looks like a "belted" case, rather than a "rimmed" case. Nice clear write up, by the way. |
|
|
|
[#5]
Im going to ask a stupid question, Im in the process of building a SPR and using a Wylde chambered barrel. I have yet to check head space on any of my other two builds, but will the 556 guage work on the wylde chamber or is there a specific one.
|
|
|
|
[#6]
I believe it will.
.223, 5.56, and .223 Wylde are all damn near identical. The major difference is the throat length. .223 is the shortest, and 5.56 is the longest. |
|
|
|
[#7]
The primary difference between SAAMI .223 Remington, 5.56 NATO, and Wylde chambers is in the leade and freebore - that part of the chamber between the cartridge case and the rifled part of the barrel. Essentially (and I'm over simplifying it here) the .223 chamber has a very steep angle where the rifling begins, the 5.56 chamber has a much more gradual angle, and Wylde is supposedly somewhere in between. The cartridge section of all three chambers is essentially identical so all you need to be concerned about is the actual headspace dimension a particular gauge measures. I use Forster's GO and NO GO gauges for my 5.56mm rifles.
The headspace gauge does look a little "belted," but most gauges do - the body is ground down in the middle to minimize contact between that part of the gauge and the chamber. The important parts of the gauge are the angled, "shoulder" part and the base. Everything else is pretty much just there... |
|
|
|
[#8]
Quoted:
The primary difference between SAAMI .223 Remington, 5.56 NATO, and Wylde chambers is in the leade and freebore - that part of the chamber between the cartridge case and the rifled part of the barrel. Essentially (and I'm over simplifying it here) the .223 chamber has a very steep angle where the rifling begins, the 5.56 chamber has a much more gradual angle, and Wylde is supposedly somewhere in between. The cartridge section of all three chambers is essentially identical so all you need to be concerned about is the actual headspace dimension a particular gauge measures. I use Forster's GO and NO GO gauges for my 5.56mm rifles. The headspace gauge does look a little "belted," but most gauges do - the body is ground down in the middle to minimize contact between that part of the gauge and the chamber. The important parts of the gauge are the angled, "shoulder" part and the base. Everything else is pretty much just there... Thanks, GH, good someone has the ability to type, lol. I use the H&P method still, after 15+ years using a keyboard. I usually make it short and sweet |
|
|
|
[#9]


If your barrel measures 1.6206" from inside the barrel extension's lugs to the 0.330" datum line, and the bolt measures 0.156" from the bolt-face to the edge of the lug's side that is one the same side as the gas rings; your AR15's headspace will measure 1.4646". Which is the minimum headspace for a new barrel that has been high pressure tested (HPT). |
|
|
 Win a FREE Membership!
Sign up for the ARFCOM weekly newsletter and be entered to win a free ARFCOM membership. One new winner* is announced every week!
You will receive an email every Friday morning featuring the latest chatter from the hottest topics, breaking news surrounding legislation, as well as exclusive deals only available to ARFCOM email subscribers.

AR15.COM is the world's largest firearm community and is a gathering place for firearm enthusiasts of all types.
From hunters and military members, to competition shooters and general firearm enthusiasts, we welcome anyone who values and respects the way of the firearm.

Subscribe to our monthly Newsletter to receive firearm news, product discounts from your favorite Industry Partners, and more.
Copyright © 1996-2024 AR15.COM LLC. All Rights Reserved.
Any use of this content without express written consent is prohibited.
AR15.Com reserves the right to overwrite or replace any affiliate, commercial, or monetizable links, posted by users, with our own.


