CA, USA
|
Posted: 2/20/2010 10:01:59 PM EDT
[Last Edit: VaderSpade]
With a Tactical Machining Jig. Customer support at Tactical Machining is second to none, they are great to work with, and have always gone above and beyond.
http://vadertactical.com/ First I want to thank everyone for all the help I’ve received on these boards. I’ve done a few of these now, and I just about have the kinks worked out, so I thought I would pay it forward, and help others with their builds. Now let me say if your trying to save money this is not the place to do it. It cost a lot more to make your own than it does to buy a lower ready to go. Unless of course you already have ALL the tools, cutters, anodizing equipment, etc. The Tactical Machining jig is by far the easiest way to complete an 80% receiver that I’ve tried. I was lucky enough to find a killer deal on a nearly new mill for $850.00 on Craigslist. If your going to try milling with a drill press I would recommend getting (at the least) an X, Y table, and a vise. A small mill would be better. With a drill press you will need to go much slower. Although most jigs are designed to work with a drill press, there are a few problems; the most dangerous of these is your drill chuck coming lose at high speeds. I don’t recommend using a drill press, but I did with my first build, and sure enough the drill chuck came loose and buggered up my FCG pocket. I locked it back into place with RED loctite gave a day to set up, and had no further problems. If you do this you do so at your own risk. I won’t be covering all the measurements and dimensions just yet they are easily available elsewhere. I’ll post a link at some point. 

The Tactical Machining jig is very straightforward, use this plate with this end mill, and go slow. |
|
|
CA, USA
|
[Last Edit: VaderSpade]
[#1]

I try to get as close as possible to the edge of the plate, for the outline, but I like to leave a few thousandths for the cleanup stage. 
Make sure your cutting edges are below the plate, or you will be ordering a new one. 
Watch your clearance. I can’t reach the back with this setup, but we’ll clean that up later. 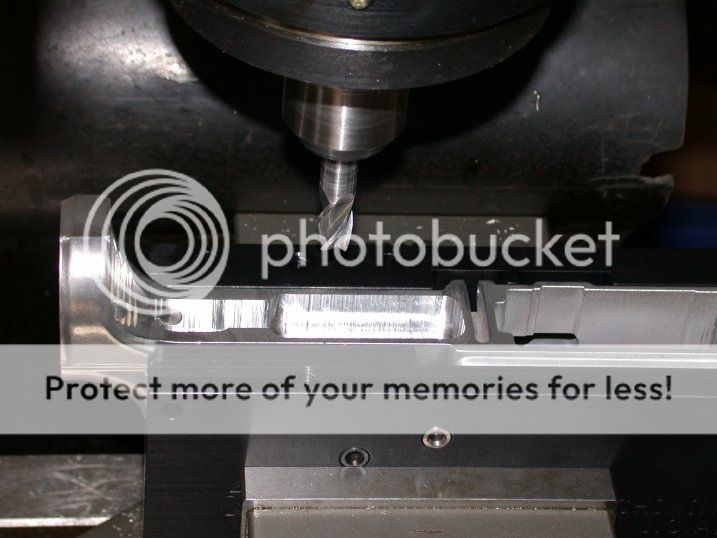
After you have a good outline remove the top plate, measure twice, and cut carefully. |
|
|
CA, USA
|
[Last Edit: VaderSpade]
[#2]

Just short of the .690 spec. We’ll get that with a full-length end mill, for a cleaner cut. 
It always spooks me when I break through the selector hole. What’s that! Oh ya it’s O.K. 

As I mover deeper I leave just a little more, kind of a step cut. This keeps shaving from being crushed against the side, and cleans up easily when we move to a full length end mill. |
|
|
CA, USA
|
[Last Edit: VaderSpade]
[#3]

Note the depth mark on my end mill, this is my warning mark. Don’t go too deep. 
My sophisticated measuring tool. 
First stage done. 
Switching to the full-length end mill. |
|
|
CA, USA
|
[Last Edit: VaderSpade]
[#4]

Taking those last thousandths off the sides and bottom. 
Finishing the end I couldn’t reach with the short end mill. Measure carefully. 
Make sure the trigger slides in before you change setups. 
Now put the top of the jig back on with the trigger slot plate. You may have noticed I skipped the second plate. That plate is for the full depth part of the pocket. If you’re going to use the edge of the plate as a guide it’s a good idea to use it. For me it’s just as easy to measure it in as I clean up with the long end mill. |
|
|
CA, USA
|
[Last Edit: VaderSpade]
[#5]

I can’t express how easy this plate makes cutting the trigger hole. Before it was “Change tools from milling to drilling, take three measurements, drill three holes, change back to milling and hope you’re not too far off. Then file the little bit you WILL be off.” With this Tactical Machining jig it take just a few moments. 
Flip the jig and drill two 5/32nds holes. 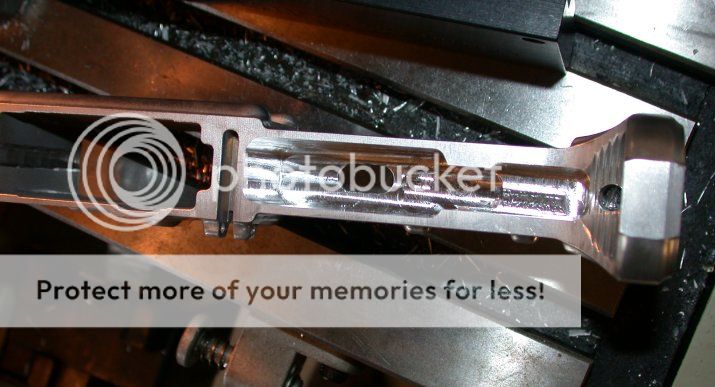
Looking good. 
|
|
|
CA, USA
|
[Last Edit: VaderSpade]
[#6]


Check the trigger, and upper fit. You don’t want to be filing after anodizing. |
|
|
CA, USA
|
[Last Edit: VaderSpade]
[#7]
Etching
Half the fun of building a gun is putting your own mark on it. I have been experimenting with different methods, and short of buying a CNC rig electro etching is the best method I have found. I am etching with a jewelry plating power source but a battery charger will work (not an automatic one). First we make a stencil, by hand or with a vinyl cutter. I use one from U.S. Cutter; 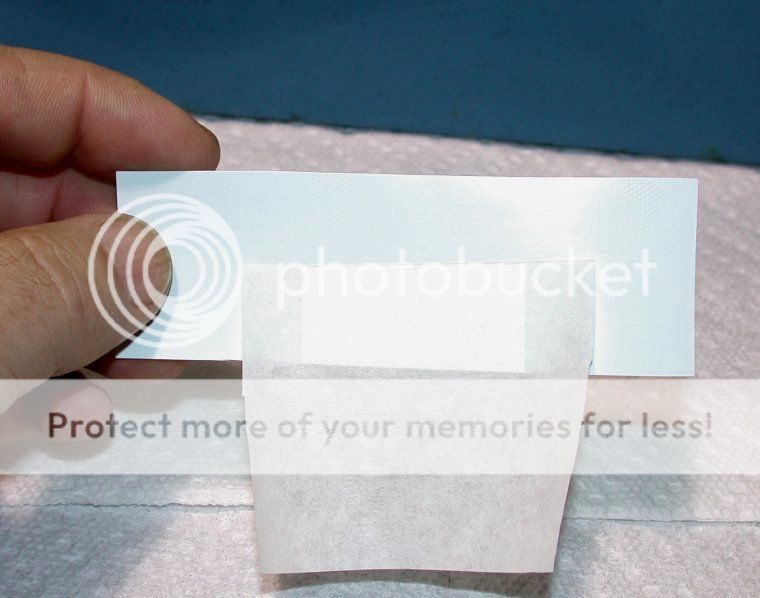
Tape is used to pull the stencil from it’s backing in one piece. 
The stencil is placed on the receiver with the letters in place. This makes the stencil easier to place, and gives a solid surface to work against. 
The letters or graphics are then “weeded out”. You will need a magnifying glass (I double up reading glasses) a long needle, and tweezers to pull the bits you want removed. Carefully remove (weed) the parts you want etched. 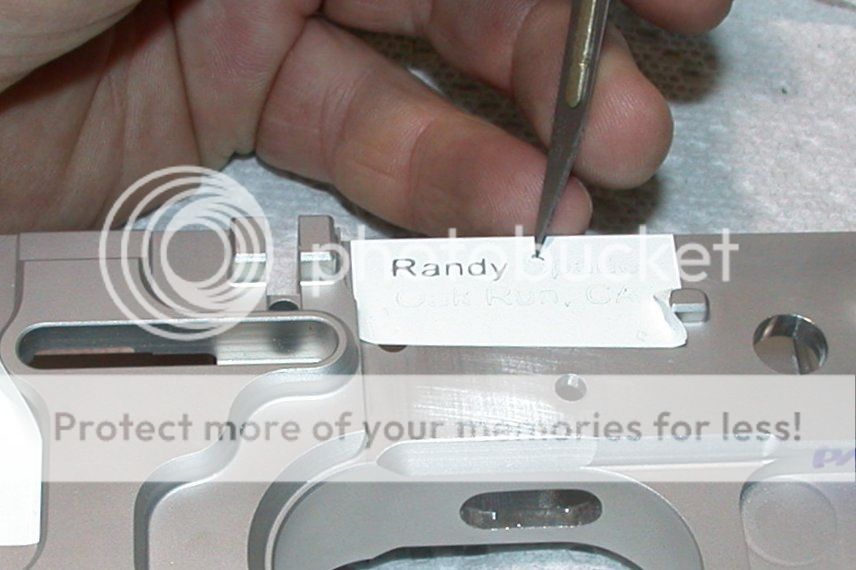
Carefully lift the edge of the bit you want to remove. 
Pull the bits away with tweezers. 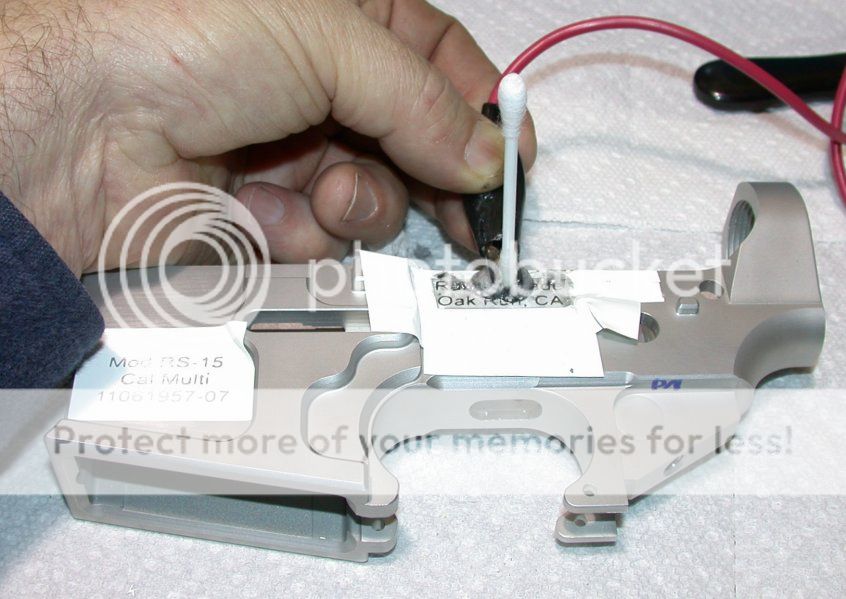
My charger is set to the full 12 volts @ 10 amps. The amps that trickle through are determined by how much surface area is contacted by the Q-tip. Place the clip about halfway up on the swab. I place a little solution in a shallow container and dip the Q-Tip, make sure it gets wet up to the clip. There will be bubbling, when this slows and the Q-Tip turns black repeat the process. It can be hard to see how deep your going, when the little islands within the a’s & e’s won’t stay in place you’ve gone about as deep as possible. I should say large open areas do not work as well as smaller outlines. I use about ½ cup of vinegar and a teaspoon of salt. 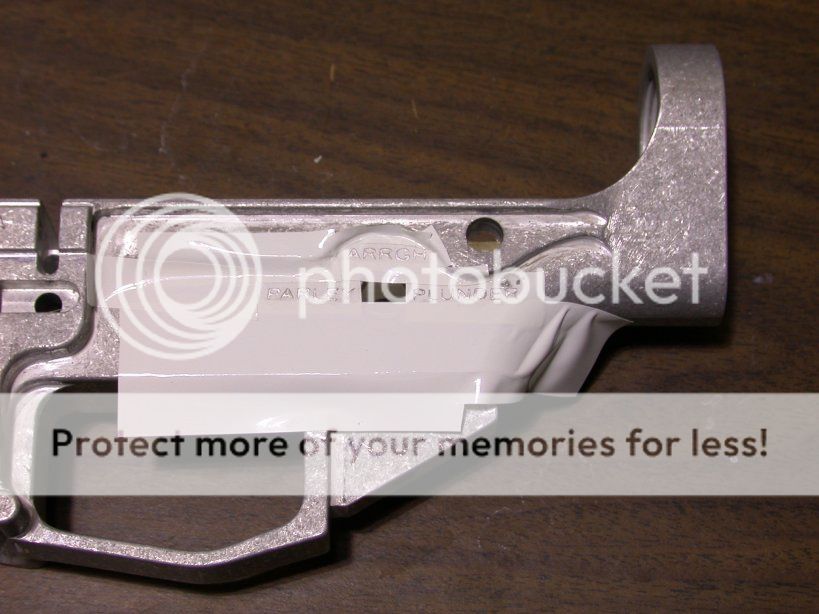
Tape the surrounding area to avoid sparks and etching areas you don’t want etched. 
I mixed white vinegar with a little salt, dipped a Q-tip into this solution and attached it to the negative side of the charger, then clamped the positive side to the lower. It takes awhile, and starts slowly, but after you break through the surface the pace picks up. 

|
|
|
CA, USA
|
[Last Edit: VaderSpade]
[#8]


A few tips in response to some questions I've received. A cheap NON-automatic automobile battery charger 12 volt, 10 amps should work fine. An automatic automobile battery charger would read a dead short and turn itself off. One thing I learned the hard way is that the positive side needs to be connected to the lower and the negative side to the Q-Tip. I got it backward once and it ate away the clip holding the Q-Tip, and barely marked the work piece (in this case just a piece of scrap). If the bare clip touches bare metal there will be sparks, tape off the surrounding area. I recommend testing any setup on a piece of scrap before trying it on a lower. Example of text; Manufacture City State Model Caliber serial # Max is 10 maybe 12 letters/numbers per line. If you want room for artwork the Manufacture and city should be moved to above the hammer pin/selector area. |
|
|
CA, USA
|
[Last Edit: VaderSpade]
[#9]
Anodizing
I’m using the Moonlite Anodizing kit, and although I have nothing to compare it with I think it works just great. They have a great how to, so I won’t try to explain everything. I’ll just post pictures with some captions, showing the lowers being anodized. http://www.focuser.com/anodize.html 
The lineup. 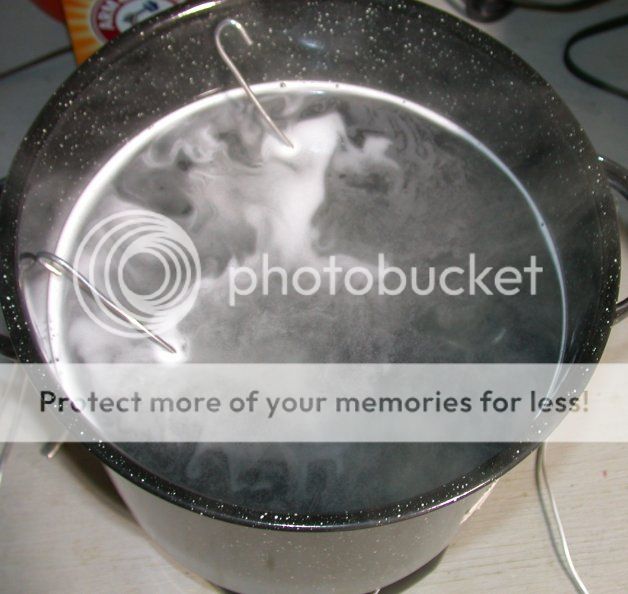
Prep the surface, and clean. Submerse in 140 degree cleaner for 5 minutes, then rinse well. |
|
|
CA, USA
|
[Last Edit: VaderSpade]
[#10]

Etch at room temperature for a few minutes. 
Your part will turn black. Rinse. 
Deoxidize/Desmut the part at room temperature about 3 minutes, and rinse well. 
It should be shiny again. |
|
|
CA, USA
|
[Last Edit: VaderSpade]
[#11]
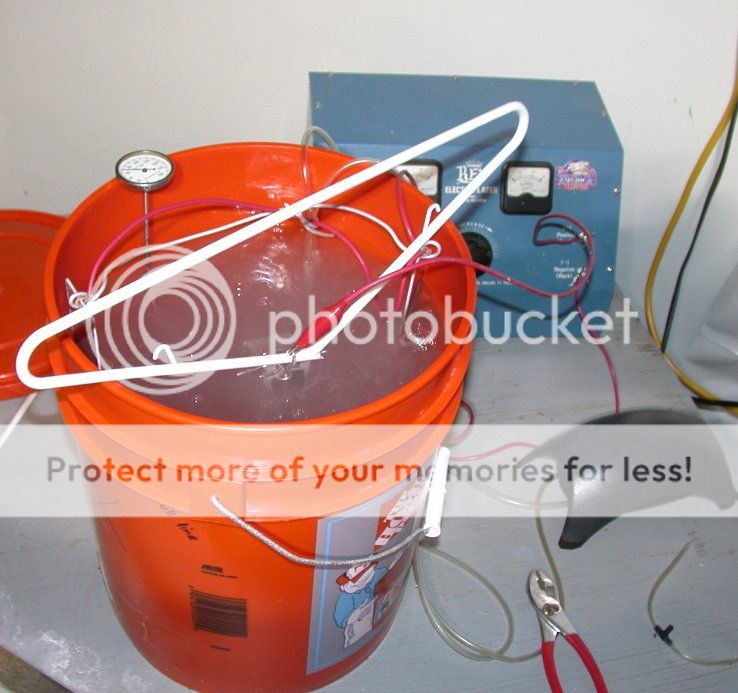
Now we’re anodizing! 68-72 degrees for 75 minutes. Read the instructions as to how to figure voltage and time with your power supply. 
It should have a nice golden tone when it’s done. Rinse twice. 
Before and After. 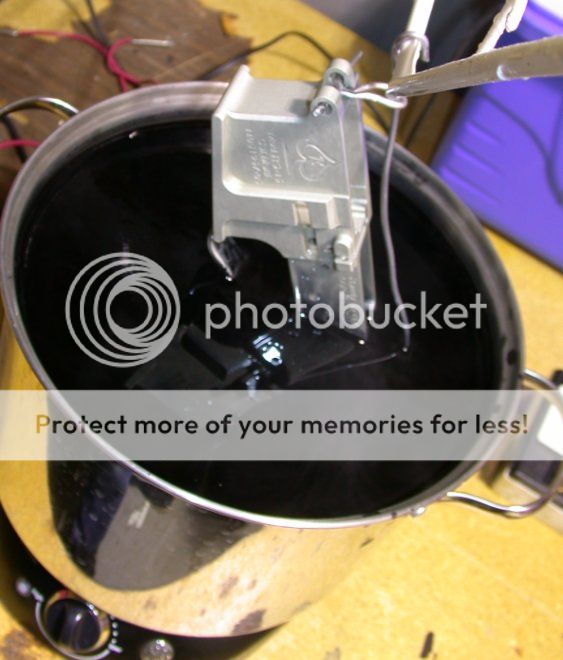
Into the dye. 120-140 degrees for 5-20 minutes depending on how dark you want it. |
|
|
CA, USA
|
[Last Edit: VaderSpade]
[#12]

Looking good. Rinse it. 
Finely seal it at 180 degrees for 20 minutes. And rinse for the last time. After that final rinse I like to dry it with a hair dryer, and oil it up. 
Finished. Never let the part dry between steps, and because of the heat used in some steps that can be tough. |
|
|
CA, USA
|
[Last Edit: VaderSpade]
[#13]
Why build your own???
For me I’m building family heirlooms, these guns will be here long after I’m gone. I hope they will say something about what I stood for. That’s the second amendment etched into the upper receiver. 
As to reliability, mine are as good as the best out there. Being perfectionist drives a lot of us that build our own. I have collected arrowheads forever. Most were just chipped to be shot once and never seen again. The builders didn’t put much time of effort into them, and why would they. But others are works of art. Why? Why would someone put so much time and effort into an arrowhead? If you can find the answer to this question you will have your answer. And yes I have built my own Bows and Arrows; I still chip arrowheads now and then. |
|
|
AZ, USA
|
[#14]
amazing! Looks really great
|
|
|
|
[Last Edit: Serenity7]
[#15]
Very nice! I may be doing one or two with a drill press soon. I hope they turn out as nice.
|
|
|
|
|
[#16]
I'm So telling on you!!!!!!!!!!!
|
|
|
|
|
[#17]
Fantastic job - thanks for detailing each of these steps in the same thread.
What causes the surface finish variations on the raw aluminum (i.e. your shiny 5.56 receiver vs. the splotchy .308)? Does this cause any impact to the outcome of the final anodized finish? I've seen 80% TM-15's with both types of finish presentations - just curious. Killer deal on the mill. I need to scour CL more often. |
|
|
|
|
[#18]
Great reference! Thank you. I've been kicking the idea around for a bit and this helps a lot.
|
|
|
|
|
[#19]
Wow what a thread! This is so tagged. You do nice work. I can see that a mill does a lot cleaner work than a drill press. Thanks for sharing with us.
|
|
|
|
CA, USA
|
[#20]
Originally Posted By ARfanatic:
Fantastic job - thanks for detailing each of these steps in the same thread. What causes the surface finish variations on the raw aluminum (i.e. your shiny 5.56 receiver vs. the splotchy .308)? Does this cause any impact to the outcome of the final anodized finish? I've seen 80% TM-15's with both types of finish presentations - just curious. Killer deal on the mill. I need to scour CL more often. The splotchy appearance is mostly lighting, and the shiny look of the 5.56 lower is because it was wet. When holding these in your hand they look as good as any (better than some) store bought lower. There is a difference between 6061, & 7075 aluminum but it’s slight. |
|
|
USA
|
[#21]
Wow. Looks fantastic. Good job!
|
|
|
|
[#22]
Great thread. This one deserves a Thumb tack.
Can you tell me where you got this 80% lower?: 
It looks a lot like the SMOS lowers but I don't see them on their website. Thanks! Wes |
|
|
|
CA, USA
|
[Last Edit: VaderSpade]
[#23]
Originally Posted By Wangstang:
Great thread. This one deserves a Thumb tack. Can you tell me where you got this 80% lower?: http://www.randysrockshop.com/calguns/Dscn7126.jpg It looks a lot like the SMOS lowers but I don't see them on their website. Thanks! Wes http://www.tacticalmachining.com/products.php?pid=34 80% http://www.tacticalmachining.com/products.php?pid=41 finished |
|
|
AZ, USA
|
[#24]
VaderSpade-
Wow...that's really awesome! I have a couple questions about the etching process. You mention 'weeding' the stencil. What does that mean? What kind of tape are you using for adhering the stencil and masking off areas? Do you set the charger to the full 12 V when you do this? And finally, do you have a rough measurement ratio on salt to vinegar? Again...cool stuff. Thanks! |
|
|
AL, USA
|
[#25]
I'm new to this part of the forums, and This is the information I was looking for, I vote this should be Tacked?
|
|
|
|
[#26]
wow. very cool.
|
|
|
|
CA, USA
|
[#27]
Originally Posted By 2t0ner:
VaderSpade- Wow...that's really awesome! I have a couple questions about the etching process. You mention 'weeding' the stencil. What does that mean? What kind of tape are you using for adhering the stencil and masking off areas? Do you set the charger to the full 12 V when you do this? And finally, do you have a rough measurement ratio on salt to vinegar? Again...cool stuff. Thanks! The stencil is placed on the receiver with the letters in place. The letters or graphics are then “weeded out”, this makes the stencil easier to place, and gives a solid surface to work against. You will need a magnifying glass (I double up reading glasses) and a long needle to carefully remove (weed) the parts you want etched. The stencils are cut from vinyl designed for sign making; http://www.uscutter.com/GreenStar-Intermediate-Calendered-Vinyl-24quot-x-10-Yard-Roll_p_1020.html My charger is set to the full 12 volts @ 10 amps. The amps that trickle through are determined by how much surface area is contacted by the Q-tip. I should say large open areas do not work as well as smaller outlines. I use about ½ cup of vinegar and a teaspoon of salt. |
|
|
|
[#28]
Wow, this is really an amazing project! Thanks so much for the photos and information!!!
|
|
|
|
|
[#29]
That is really, really cool. Thanks for sharing.
|
|
|
|
|
[#30]
So other than the complete badass factor of doing your own are there any other advantages
|
|
|
|
CA, USA
|
[#31]
Originally Posted By wheelchairman:
So other than the complete badass factor of doing your own are there any other advantages Some people like the idea of no paperwork (but I wouldn't be posting here if that were my goal), and here in California it's one of the very few ways to get an AR pistol. Knowing your rifle inside out, and having your name on it is the best advantage. I was changing a buffer tube with one of my grandfathers (gone 30 years now) wrenches today. One he had put his name on, and I felt he was with me. I hope my grandchildren will feel the same thing when I'm gone and they are shooting one of my old guns. |
|
|
|
[#32]
Slasher, thanks for the tack!
 And OP great info. |
|
|
|
WA, USA
|
[#33]
Good job brah! This is too awesome and unique!
|
|
|
HI, USA
|
[#34]
Excellent DIY, these are hard to find
Sticky Status!! |
|
|
|
[#35]
VaderSpade
Any chance you could get pretty detailed with the how to on the etching either by making a video and hosting it on Youtube or slightly more detailed step by step photos or both? Thanks Wes |
|
|
|
CA, USA
|
[#36]
Originally Posted By Wangstang:
VaderSpade Any chance you could get pretty detailed with the how to on the etching either by making a video and hosting it on Youtube or slightly more detailed step by step photos or both? Thanks Wes I do plan on refining, editing, and adding to this thread as I find the time. With the questions I’ve received I can tell showing the weeding of the stencils and other steps are in order. I will have my camera nearby the next time I do some etching. |
|
|
NM, USA
|
[#37]
Does the etching work through a hard anodized lower?
|
|
|
CA, USA
|
[#38]
Originally Posted By clayvt:
Does the etching work through a hard anodized lower? No, |
|
|
AZ, USA
|
[#39]
Very cool! How did you cut the letters and graphics? a vinal cutter?
|
|
|
CA, USA
|
[#40]
Originally Posted By Silverado2500HD:
Very cool! How did you cut the letters and graphics? a vinyl cutter? Yes, with a vinyl cutter. |
|
|
CA, USA
|
[#41]
I have been getting a lot of questions on etching, so I just revised, and added more photos to the etching part of this thread.
|
|
|
AL, USA
|
[#42]
I have been looking for different sources for the 80% lowers, and I am surpised no one has come up with a list of links to vendors that sell them and some of perks with each one. For example, where can you find a 80% lower that has no engravings on them especially around the selector?
Also where can you find unfinished/unanodized upper receivers? |
|
|
CA, USA
|
[Last Edit: VaderSpade]
[#43]
Originally Posted By Shermantor-AR15:
I have been looking for different sources for the 80% lowers, and I am surpised no one has come up with a list of links to vendors that sell them and some of perks with each one. For example, where can you find a 80% lower that has no engravings on them especially around the selector? Also where can you find unfinished/unanodized upper receivers? CNCGUNS.com is a good resource. Tactical Machining has made un-marked lowers for others, they may make more when they get caught up, and you ask for them. Yellow Logic uppers and lowers are a little more money, but for that one of a kind build I think they are worth it. The Blue gun in last picture ia a Yellow Logic. http://www.yellowlogic.net/marine-electronics/BILLET/15ALT080.html Different sources for the 80% lowers; http://www.cncguns.com/forum/index.php?topic=608.0 http://www.cncguns.com/forum/index.php?topic=1548.0 |
|
|
TX, USA
|
[#44]
Alright, I think what you've got on the etching section is adequate for getting the gist of things, but what is the solution you're using? Just salt and vinegar?
It seems like you just mix salt/vinegar, dip q-tip, attach negative end of charger to wet side of q tip you're using, attach positive side to wet q tip you're not using, go over what needs etching until q tip is black, etc... can you go too deep with the etching? thanks |
|
|
CA, USA
|
[#45]
Originally Posted By reddeth:
Alright, I think what you've got on the etching section is adequate for getting the gist of things, but what is the solution you're using? Just salt and vinegar? It seems like you just mix salt/vinegar, dip q-tip, attach negative end of charger to wet side of q tip you're using, attach positive side to wet q tip you're not using, go over what needs etching until q tip is black, etc... can you go too deep with the etching? thanks 1/2 cup vinegar, and a teaspoon of salt that's it. Positive side needs to be connected to the Lower and the negative side to the Q-Tip You can go too deep but it's hard, you lose detail if you go too deep. I suggest practicing on some scrap. |
|
|
TX, USA
|
[#46]
Cool, this may be easier than I thought! Well this thread has saved me from a trip to the engraver's for a few things
|
|
|
GA, USA
|
[#47]
Vaderspade,
How well does the yellow logic lower fit in the Tactical Machining jig? I like the Tactical Maching jig, but already have an AR10 and AR15 lower from a different place. When I called them, they said they could only guarantee that their lowers would fit and align properly. I would still consider the TM jigs if I can gather enough info to support them fitting other lowers. My AR10 lower is a cnc armalite style. The AR15 lower is an Utratech (very nice by the way) Thanks in advance, Maddawg |
|
|
CA, USA
|
[Last Edit: VaderSpade]
[#48]
Unfortunately neither Yellow Logic nor Quentin Defense billet lowers will fit into the Tactical Machining jig.
The magazine flare is just too wide, I don’t know about the one’s you have. I would love to see and know where you got the AR15 lower by Utratech. I believe any lower from a mil spec forging will work in the Tactical Machining jig, but some need more work than the jig is made for. |
|
|
GA, USA
|
[#49]
I got the Utratech lower on gunbroker.com. You can also buy direct at www.ultratech.com. They sell complete lowers and 80% lowers as well.
They are very complete and very well machined. Highly recommended. Thanks for the info. Maddawg |
|
|
GA, USA
|
[#50]
Correction. www.utarms.com
Maddawg |
|
|
 Win a FREE Membership!
Sign up for the ARFCOM weekly newsletter and be entered to win a free ARFCOM membership. One new winner* is announced every week!
You will receive an email every Friday morning featuring the latest chatter from the hottest topics, breaking news surrounding legislation, as well as exclusive deals only available to ARFCOM email subscribers.

AR15.COM is the world's largest firearm community and is a gathering place for firearm enthusiasts of all types.
From hunters and military members, to competition shooters and general firearm enthusiasts, we welcome anyone who values and respects the way of the firearm.

Subscribe to our monthly Newsletter to receive firearm news, product discounts from your favorite Industry Partners, and more.
Copyright © 1996-2024 AR15.COM LLC. All Rights Reserved.
Any use of this content without express written consent is prohibited.
AR15.Com reserves the right to overwrite or replace any affiliate, commercial, or monetizable links, posted by users, with our own.


