|
[#1]
Could you be referring to the roller bearing and 2 washer set up that the group over at the Brian Enos forums have been using for a few years? It has been referenced here before. It works great on the 650. Unique Tek has a set up very similar for the 550 b units.
It works and does the job just like they say it will. Have fun. Alan A posted and shared this fix/mod in June of 2009 at the Brian Enos Forums - 650 shell plate fix for snapping The fix
Go to www.mcmaster.com and get these parts. 5909K31 1 Each Steel Needle-roller Thrust Bearing Cage Assembly For 1/2" Shaft Diameter, 15/16" Od 5909K44 2 Each .032" Thick Washer For 1/2" Shaft Diameter Steel Needle-roller Thrust Bearing That's PARTNUMBER, QTY, DESC FYI 650 owners - the website address to the Brian Enos forum where they have photos and thread discussing how to do this mod. The thread is quite long and it is referenced in several different topics there. It eliminates all of the unnecessary movement with the 650 shell plate which ends up giving the operator more control, precision and speed with the manufactured cartridges coming out of this well made press. It is a simple, easy and inexpensive mod. IF YOU OWN A DILLON 650 Give this a try! You WILL like it. http://www.brianenos.com/forums/index.php?showtopic=86570&st=125&p=1420964&hl=shell%20plate%20mod&fromsearch=1&#entry1420964 |
|
|
|
[#2]
This is a variation of that mod using one brass thrust bearing, one chrome washer and copper based anti-seize..... But there's more.
What ? You wanna hear all about it..... naaa, not yet. |
|
|
|
[#3]
Quoted:
This is a variation of that mod using one brass thrust bearing, one chrome washer and copper based anti-seize..... But there's more. What ? You wanna hear all about it..... naaa, not yet. Perfecting the design? Posted Via AR15.Com Mobile |
|
|
|
[#4]
You can keep it to yourself i really dont want to hear about it anyway.
 Spill it Spill it
|
|
|
|
[#5]
Hold on to your underwear. I'm not quite done perfecting it yet. Hopefully tomorrow.
I've not loaded anything with change done yet, Have sized and trimmed .223/556 brass. Shellplate feels solid, index smooth and have .003 variance in trim height. That pretty much translates to .003 seating variance which is pretty damn good, but.... (there it is) haven't supported underside of shellplate yet. I need to find a really thin hard plastic washer for this so shellplate isn't elevated. There's a good explanation for not going the Enos modification. Doesn't leave much threaded on shellplate bolt and bolts like to be threaded deep as possible. Here's what it looks like so far. 
Really, I'm just waitin around for Dillon to tell me my warranty is voided. 
|
|
|
|
[#6]
[ skeptical ] Yawn
Like "NippsDXer" said, this is old news on the IPSC forums. 
|
|
|
|
[#7]
Skepticism from Derek ?? No way.
The Enos mod doesn't leave enough threads sunk. I realize I'm treading on hallowed Kool-Aid grinds here but I got news for ya. This isn't the machine everyone said it was. It has it's share of problems. Caterpillar rep told me one time you can't do this and you can't do that. Won't work. We'll void your warranty. After he was shown the door and 1.3 miilion miles later he was proven wrong. Just like all the times someone in 1911 forum has said you can't do this or that...... still goin strong and done almost everything I've set out to do. This blue machine is just one more thing. |
|
|
|
[#8]
All kidding aside,.....your pic looks odd.
How do you have the ejector wire set up ? I looks like you've got it UNDER the shellplate bolt. Maybe it's the angle of your photo ???? this pic (stolen from the Benos forum thread) is what mine looks like..... 
|
|
|
|
[#9]
Yes its under the bolt, it's where it has to be. Sized some 700 plus .223\556 cases today at a pretty fast clip. I had one piece try and hang. With ejector wire elevated it seems to me to loose some of the integrity that base gives it. Wire needs to be sunk down pretty good. My mod keeps wire and shell plate where both belong while supporting both.
Once again, I'm not done and still experimenting. Finished product could look totally different. When curing my Hornady oal issue. Press was standing in machine shop just minutes away from switching on both mill and lathe. Everything is still on the table at this point and I'm very open to suggestions. |
|
|
|
[#10]
The ejector wire goes OVER the bolt.
Maybe this is were you're having some trouble? Look at page 30 in the ( paper) manual, FIG 130 |
|
|
|
[#11]
Nannana, no. I had ejector wire where it should have been.
What will happen when Westlakes Hardware opens in the morning. I will get another thrust bearing that fits inside the loop on ejector wire. That way it fits over thrust bearing like it would the bolt. Shell plate has to "float". I'm accepting that, otherwise index has no room to operate and it has to maintain proper height to accept case rim from case feeder arm. I'm attempting to support shell plate with a .002 "weeble, wobble." |
|
|
|
[#12]
My XL650 is consistent and trouble free.
I cut a turn off the spring under the ball bearing, and did the bearing mod, posted above. my trimmed 5.56 brass is very consistent, . . . . .enough for dime sized groups at 100yrds. If you set the shellplate up so it's almost tight, but doesn't drag, all is good. the trimming of the spring and ball bearing mods, are only to keep powder from sloshing out of the case when it snaps into the next position. properly adjusted, you should have little to no "weebles and wobbles" |
|
|
|
[#13]
I'm with Dereck on this. On my older 650 I have the bearing mod. On my newer one that I load small primer cartridges - primarily 223, I've had no problems with consistent trimming or OAL of loaded cartridges. OP are you sure you aren't reinventing the wheel?
|
|
|
|
[#14]
Removed, stay on topic. Topic is Dillon 650. dryflash3
|
|
|
|
[#15]
I just remembered a good practice that a Dillon representative told me regarding COAL problems. Always adjust the seating die with a cartridge in station #1. That way you are ensured that the tool head has full upward tension when adjusting the die.
I appreciate the desire to figure out and fix things yourself. I'm guilty of that myself! However, when it comes to the 650, there's some guys in Arizona that know more about the small nuances of the 650 than probably anyone on this board. The nice thing is, they are only a phone call away!
|
|
|
|
[#16]
Quoted:
OP are you sure you aren't reinventing the wheel? Come on, it's 1911smith. His entire life revolves around reinventing the wheel, hopefully in new, better ways. |
|
|
|
[#17]
Quoted:
I'm with Dereck on this. On my older 650 I have the bearing mod. On my newer one that I load small primer cartridges - primarily 223, I've had no problems with consistent trimming or OAL of loaded cartridges. OP are you sure you aren't reinventing the wheel? That's exactly what I'm avoiding here. If all I get done in the end is that, then all is not good. I was seeing swings upwards of .010. At present I'm down to .003. Still working with it. I've been on the phone with Arizona.... one good call with a not so great answer and one not so great call with a less than stellar display of intellect. Don't ask specifics because my intent here is not to do anyone harm. Just want my problem fixed is all. Of the three, Dillon, Hornady and Lee. Lee having placed a distant third to the others product. I can say this. Both Hornady and Dillon can take some phone lessons from Lee. Also Henny, when you say consistant... consistant without a set of numbers covers a lot of ground. |
|
|
|
[#18]
Quoted:
Nannana, no. I had ejector wire where it should have been. ...." stare and compare.... 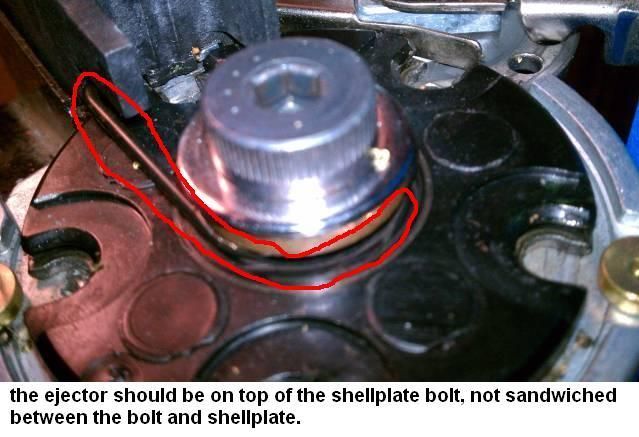
vs. 

the ejector should just snap over the top of the shellplate bolt. |
|
|
|
[#19]
Derek, I see this and new thrust bearing takes care of that problem. Ejection isn't my issue, oal inconsitancy is and I have cut it in half over having wire as shown in your picture. Again this has nothing to do with issue. Anyway, here at hardware store now.
Thanks for your interest and if you see something of concern, please continue to speak up. |
|
|
|
[#20]
I understand OAL is your trouble....and what you're trying to get resolved.
";;;weebles and wobbles ..." as you stated. I can imagine having the ejector sandwiched between the bolt and shellplate could cause OAL issues. I'm trying to help by explaining that it looks like you've assembled it incorrectly. |
|
|
|
[#21]
Keep up the work, let us know if it works.
|
|
|
|
[#22]
Ok, Time to put up my toys and go to work. Get them all back out next weekend.
This is as far as I got today and believe it to be the final fix. No time to try out, except I did feed a few pieces of .223 to check case feeder arm alignment to shell plate.... Perfect fit, Pictured is what I brought home to try. 
Installed. 

I could have sworn plastic washers were 1/2 id. Took half inch drill bit to fit. Pictured is two thin plastic washers on bottom. On top shell plate. 1 chrome washer and 1 brass thrust bearing. Chrome has a polished surface that keeps thrust bearing operating smoothly without lubricant. 
Ejector wire installed correctly and notice it's not bent down to anchor in base like with "Enos" modification. Have lots of thread sunk deep with shell plate center bolt. This is the cure, Plastic washers under shell plate give stability needed. Will give a run of 9mm a go next weekend, expecting variance to be less than .005 and closer to .003. All parts as shown can be purchased at most hardware stores. My local is an ACE hardware dealer.* almost forgot. Modification allows shell plate to tightened to within my required thousandths. Advisable to use Tetragrease or comparable smeared over plastic washers. |
|
|
|
[#23]
any update on how it worked out also what size washers are you using thinking of giving it a try thanks.
|
|
|
|
[#24]
Changing calibers from .223 to 9mm in a few minutes. Takes me 3 times longer than it would any one else doing a caliber conversion, dial in powder load, set oal, case mouth od and go.
My go to for 9mm has been Hornady AP. Breakin out a new tool head and dies for first time tonight. So ima breakin out the Diet Mountain Dew and havin a party. 
* Will update after running the first hundred. *
(That's top secret code for, look for update when you wake up in the morning.) Now, where did I put that bottle of Adderall.
 |
|
|
|
[#25]
So if the ENOS mod or the UniqueTek roller bearing mod in your opinion doesn't leave enough thread engagement with the bolt, why not get a longer bolt?
I don't have a XL650, just looking at the pictures. Brett |
|
|
|
[#26]
Quoted:
So if the ENOS mod or the UniqueTek roller bearing mod in your opinion doesn't leave enough thread engagement with the bolt, why not get a longer bolt? I don't have a XL650, just looking at the pictures. Brett Enos mod not only takes up too much thread but does nothing to support underside of shell plate... Where the real issue is. What the Enos mod does do is places a bearing under bolt. Without bearing, shell plate will grab bolt. Threading it deeper and locking index. The whole purpose of the bearing modification is to push shell plate down just enough that indexing is possible and still smooth. While minimizing oal variance it still doesn't take all of what could be taken. Plastic washers or shims support underside of shell plate while washer and thrust bearing allow bolt to be run down where shell plate has a couple of thousandths clearance in the weeble-wobble play. Eliminating a washer also gives shell plate bolt more thread to work with. This combination cuts variance in half. Multifaceted issue that requires attack from both top and bottom of shell plate while threading bolt as deeply as possible to preserve thread integrity. To your bolt question, It resembles an axle bolt and you can replace it with a hex headed bolt which leaves another issue. What to do with ejector wire. Yea, this is pretty well thought through. It's not much to do with reinventing the wheel. It's more like giving the wheel an under carriage with stop block and shock absorber. |
|
|
|
[#27]
1.135
1.135 1.131 1.131 1.136 1.133 1.131 1.133 1.136 1.135 1.134 1.133 1.135 1.135 1.134 1.133 1.134 1.134 1.135 1.132 1.134 1.131 1.132 1.133 1.136 1.135 1.131 1.134 1.137 1.132 1.134 1.132 1.133 1.131 1.132 1.133 1.134 1.134 1.136 1.131 low oal - 1.137 high oal .006 variance with an average below .005..... I'll call it good. Try with one plastic washer below shell plate before going to two. Press is currently set at two. |
|
|
|
[#28]
Have you tried removing all the extra ACE hardware parts, and reassembling everything per the manual, with the ejector spring correctly installed ABOVE the shell-plate bolt ? The Benos mod is to smooth out the rotation/indexing of the shell plate to keep powder from sloshing out of the top of the case. Seems like the best way to get consistent over-all-length, would be to remove all excess parts. |
|
|
|
[#29]
Quoted:
1.135 1.135 1.131 1.131 1.136 1.133 1.131 1.133 1.136 1.135 1.134 1.133 1.135 1.135 1.134 1.133 1.134 1.134 1.135 1.132 1.134 1.131 1.132 1.133 1.136 1.135 1.131 1.134 1.137 1.132 1.134 1.132 1.133 1.131 1.132 1.133 1.134 1.134 1.136 1.131 low oal - 1.137 high oal .006 variance with an average below .005..... I'll call it good. Try with one plastic washer below shell plate before going to two. Press is currently set at two. How are you measuring your oal? Are you measuring from the case head to the bullet tip with calipers? If not...then i would like to see what kind of consistancy you get if you would measure off the bullet ogive which is where most seater dies seat. I have found with many bullet manufacturers,that the tip is inconsistant with the ogive unless you are using match grade bullets
|
|
|
|
[#30]
Quoted:
Have you tried removing all the extra ACE hardware parts, and reassembling everything per the manual, with the ejector spring correctly installed ABOVE the shell-plate bolt ? The Benos mod is to smooth out the rotation/indexing of the shell plate to keep powder from sloshing out of the top of the case. Seems like the best way to get consistent over-all-length, would be to remove all excess parts.
Previously posted picture. I wished I hadn't posted the first picture because that's diverted your attention from where things are now. It was a part of the process to get to where I'm at now. I'm confused about Enos modification. Is it to cure oal deviation or powder spill ? Doesn't matter much to me one way or the other. It was suggested at first as cure to oal. I could remove all parts and check difference. My red neck, quasi German approach was the finger tip method. Before any parts were added one push of finger tip could visibly tilt shell plate. Now with Ace parts I know play is there. I just can't feel it's there. Press isn't designed to remove all variance. Just the way it was built and something I'll have to live with. Anyway. there it is. As close to perfect as I can make it. Sorry to have stepped in hallowed blue kool-aid grinds. It's just a tool to me. |
|
|
|
[#31]
Quoted:
I have found with many bullet manufacturers,that the tip is inconsistant with the ogive unless you are using match grade bullets
Measured results are loaded 9mm cartridges. |
|
|
|
[#32]
Quoted:
Quoted:
I have found with many bullet manufacturers,that the tip is inconsistant with the ogive unless you are using match grade bullets
Measured results are loaded 9mm cartridges. Explained then....I assumed you were loading 223
|
|
|
|
[#33]
Well just for kicks and grins I took everything off and put press back together exactly as should been.
Wow is all I can say. .020 variance. Bullets used have only .006 variance but that really doesn't mean anything because it's .014 above what I was getting before with Ace* modification. Think I'll reinstall my Ace Hardware * parts. |
|
|
|
[#34]
What kind of bullet are you using?
I've found that the shape of the seater has quite the affect on OAL variances for my pistol loads. Flat noses with a flat seating plug seat very consistently. Round noses aren't as consistent. One variation is a certain plated hollowpoint that is wide enough to engage the radiused edge of the seater. |
|
|
|
[#35]
Could you post a list of what type and size washers/thrust bearings you used and maybe a how-to for us not quite so technically inclined
|
|
|
|
[#36]
Quoted:
What kind of bullet are you using? I've found that the shape of the seater has quite the affect on OAL variances for my pistol loads. Flat noses with a flat seating plug seat very consistently. Round noses aren't as consistent. One variation is a certain plated hollowpoint that is wide enough to engage the radiused edge of the seater. I did this same thing with Hornady AP press, remember ?? I'm with your point, hear your point and have factored that point. |
|
|
|
[#37]
Quoted:
Could you post a list of what type and size washers/thrust bearings you used and maybe a how-to for us not quite so technically inclined Plastic washer used underside measures .013 thickness. Suggest using one to start, then maybe to two. One should work fine. At present am running just the one plastic washer. Chrome washer seen on top of shell plate measured thickness is .079 and 1/2" ID. Brass thrust bearing measured thickness is .125 and 1/2" ID. Here's the logic in a nutshell. Plastic washer at bottom absorbs side to side motion by giving shell plate something to land against while preserving the necessary space needed to index. Chrome washer gives a slick surface for thrust bearing to slide on while in rotation. Without these two pieces of hardware it's impossible to snug shell plate down enough to remove oal variance. Center bolt will other wise grab shell plate and spin it's self down while indexing and lock index. |
|
|
|
[#38]
Quoted:
Chrome washer gives a slick surface for thrust bearing to slide on while in rotation. Without these two pieces of hardware it's impossible to snug shell plate down enough to remove oal variance. Center bolt will other wise grab shell plate and spin it's self down while indexing and lock index. The brass tipped set screw (part number 21 on page 48 of the owners manual) is suppose to prevent the shell plate bolt from tightening up correct? I've reloaded a lot of rounds with my 2 650s and never had a problem with the shell plate bolt tightening up. EDITED: Forgot my punctuation! |
|
|
|
[#39]
When shell plate catches center bolt no amount of torgue I've applied to part 21 has been able to stop center bolt from threading down and locking index. If I apply any more torgue something is gonna give.
The fact you've had zero issue Henny is, I suspect more forgiveness of oal variance on your part. |
|
|
|
[#40]
Quoted:
Quoted:
What kind of bullet are you using? I've found that the shape of the seater has quite the affect on OAL variances for my pistol loads. Flat noses with a flat seating plug seat very consistently. Round noses aren't as consistent. One variation is a certain plated hollowpoint that is wide enough to engage the radiused edge of the seater. I did this same thing with Hornady AP press, remember ?? I'm with your point, hear your point and have factored that point. 10-4 Posted Via AR15.Com Mobile |
|
|
|
[#41]
Just for fun. Took press completely apart, cleaned and put back together. Ran one plastic washer under shell plate and one brass thrust bearing on top of chrome washer.
.005 variance. I can't speak to your press but mine is fixed. Feed is flawless, perfectly aligned and timed. |
|
|
|
[#42]
Quoted:
When shell plate catches center bolt no amount of torgue I've applied to part 21 has been able to stop center bolt from threading down and locking index. If I apply any more torgue something is gonna give. The fact you've had zero issue Henny is, I suspect more forgiveness of oal variance on your part. How much should we be forgiving? Remember that the majority of owners do not perform this type of fix on either the 650 or LnL.......... |
|
|
|
[#43]
According to Hornady variations up to .010 are acceptable to commercial ammunition manufacturing.
A lot of variation will occur from bullet ogive to tip that we have zero control over. Unless meplating rifle bullets we're not going to control and need to measure variance with comparator. With regard to some makes of bullets have seen distinct variance in shape of ogive. This definitely affects measurement when using a floating sizing sleeve. ie, Hornady and Dillon seater dies. In some of the runs I used Ranier bullets. The same two numbers in oal would caliper in my runs. Every now and then there would be a "flyer" which threw a number outside what I was reporting with Ranier. This can only be manufacturing. Cheap bullets, who cares. Changing to quality jacketed would cut variance down to under .003. That's something to be very happy with. Keeping a loaded shell plate is imperative to consistent oal. I would load shell plate full and have dropped one finished cartridge before taking final oal measurement. To get measurement in ball park I would dial oal in within 0.010, load up shell plate and then fine tune seating die. Placing a rubber o-ring under clip of Dillon seating die will help out too. Variance in both Hornady AP and XL650 have been measured using 9mm pistol bullets. Have taken the variance I could control and cut it as much as possible. On both presses before adjusting I would measure up to .025 variance. That's some pretty wild swings. Summing up this ties into another project. Liken to killing alligators to drain swamp. While I don't think or have ever thought variance we normally see affects accuracy. Variance certainly plays a role in feed ability. Something as any one knows is big in most of my posts. There is a bullet, (I love suspense) I've been working with on a project where COAL rides the outer edge of feed ability. Removing variance from both XL650 and AP presses was important. Plus the fact it was just plain driving me nuts. |
|
|
|
[#44]
Quoted:
When shell plate catches center bolt no amount of torgue I've applied to part 21 has been able to stop center bolt from threading down and locking index. If I apply any more torgue something is gonna give. The fact you've had zero issue Henny is, I suspect more forgiveness of oal variance on your part. I tighten the shell-plate bolt until the shell-plate no longer rotates, then slowly back it off until it indexes freely without looseness. then Immediately tighten the brass tipped screw, this should lock the shell-plate bolt into position. If your brass tipped screw is unable to lock the shell-plate bolt, I'd suggested Calling DILLON right away. Seems you like may have had two problems working against you. 1. improper ejector spring placement 2. brass tipped screw check out page 36, fig. 172, 173. here: http://www.dillonprecision.com/manuals.html |
|
|
|
[#45]
i too tried the enos fix solely because the 650 was "sloshing" out powder when the shell plate snapped into place. using the thrust washers and bearings etc etc solved that problem pretty well but i can't get the ejector wire bent correctly. got 3 in and no matter what i do the loaded rds jam up at the out chute. wire keeps popping out of the hole the end goes into. finally said to hell with it and went back to stock and live w/an occassional flake of powder on the shell plate. the precision rifle rds i load on a forester co-ax anyways. even w/this minor annoyance the 650, in my opinion, is light years ahead of the LNL i got rid of. like 1911 pistolsmith, i don't care what color the machine is, i just want it to work. the 650 does. BTW, if any of you guys have a correctly < removed > getting the wire in the right shape is due to my clumsiness, not a fault of the machine.
No buying, offers to buy, or selling in threads. Must be done in IM's dryflash3 |
|
|
|
[#46]
Quoted:
Quoted:
When shell plate catches center bolt no amount of torgue I've applied to part 21 has been able to stop center bolt from threading down and locking index. If I apply any more torgue something is gonna give. The fact you've had zero issue Henny is, I suspect more forgiveness of oal variance on your part. I tighten the shell-plate bolt until the shell-plate no longer rotates, then slowly back it off until it indexes freely without looseness. then Immediately tighten the brass tipped screw, this should lock the shell-plate bolt into position. If your brass tipped screw is unable to lock the shell-plate bolt, I'd suggested Calling DILLON right away. Seems you like may have had two problems working against you. 1. improper ejector spring placement 2. brass tipped screw check out page 36, fig. 172, 173. here: http://www.dillonprecision.com/manuals.html *sigh* Press now operates to my standards. I'm happy, very happy. Press produced inconsitancies that I won't tolerate from any press. I can go on, shoot multiple holes in enclosed post, debate and win my points. All while making an ass of myself. For what ? To prove what ? There was a problem. Problem worked. Problem solved. Dillon was called multiple times. Their answers didn't work and there's nothing wrong with set screw. I do appreciate your input Derek. Loaded enough rounds this morning to hear primer alarm sound three times in about thirty minutes. OALs were within .006 loading 124 grain Ranier. I was so happy with results. To celebrate I bought a new Bushnell Elite 6500, 4.5-30x50 mil dot rifle scope. So see, already moved to next project. This one one is successfully done. Next.............. Questions ? Ejecter wire can be an issue from this modification. Have dealt with issue but don't dare post. Not worth the hastle until bullet proofed. Posted Via AR15.Com Mobile |
|
|
|
[#47]
What does the shell plate have to do with OAL issues anyway, doesn't the case head sit on the sub plate therefore making OAL the distance between the die and the sub plate. All the shell plate does is make the case index when it rotates correct?
I don't have a Dillon so maybe I'm missing something but when you were working on your Hornady LnL you had to adjust the sub plate so it wouldn't flex, the shell plate on the LnL has nothing to do with OAL and I'm pretty sure it doesn't on the Dillon either. . |
|
|
|
[#48]
Dillon is completely different animal than Hornady. From an engineering perspective the presses aren't the same. Both index very differently.
On a Hornady press case head rests on sub plate while guided by shell plate. On Dillon case head rides inside shell plate.

Shell plate doesn't rest on ram like Hornady. It's suspended above base.. Whole different animal indeed, built for speed. |
|
|
|
[#49]
Quoted:
Dillon is completely different animal than Hornady. From an engineering perspective the presses aren't the same. Both index very differently. On a Hornady press case head rests on sub plate while guided by shell plate. On Dillon case head rides inside shell plate. http://s660.photobucket.com/albums/uu324/daclark1911/SU1BRzAyMjguanBn.jpg http://s660.photobucket.com/albums/uu324/daclark1911/DSC03000.jpg Shell plate doesn't rest on ram like Hornady. It's suspended above base.. Whole different animal indeed, built for speed. OK I see now, carry on. I don't see how that's is any better for speed vs the Hornady setup but I do see how it could cause much more variation in sizing and seating OAL if the shell plate has any flex to it at all. |
|
|
|
[#50]
Quoted: Thanks for those pics. I now understand what you're talking about (I'd been trying to figure out what needed fixing). I figured that the 650 had the same shellplate design as the 550, just with an extra station. I was wrong and now understand what you're trying to accomplish. Carry on!
Dillon is completely different animal than Hornady. From an engineering perspective the presses aren't the same. Both index very differently. On a Hornady press case head rests on sub plate while guided by shell plate. On Dillon case head rides inside shell plate. http://s660.photobucket.com/albums/uu324/daclark1911/SU1BRzAyMjguanBn.jpg http://s660.photobucket.com/albums/uu324/daclark1911/DSC03000.jpg Shell plate doesn't rest on ram like Hornady. It's suspended above base.. |
|
|
 Win a FREE Membership!
Sign up for the ARFCOM weekly newsletter and be entered to win a free ARFCOM membership. One new winner* is announced every week!
You will receive an email every Friday morning featuring the latest chatter from the hottest topics, breaking news surrounding legislation, as well as exclusive deals only available to ARFCOM email subscribers.

AR15.COM is the world's largest firearm community and is a gathering place for firearm enthusiasts of all types.
From hunters and military members, to competition shooters and general firearm enthusiasts, we welcome anyone who values and respects the way of the firearm.

Subscribe to our monthly Newsletter to receive firearm news, product discounts from your favorite Industry Partners, and more.
Copyright © 1996-2024 AR15.COM LLC. All Rights Reserved.
Any use of this content without express written consent is prohibited.
AR15.Com reserves the right to overwrite or replace any affiliate, commercial, or monetizable links, posted by users, with our own.


