|
Posted: 6/17/2010 2:20:08 PM EDT
Finally getting around to starting/finishing my communications box. This isn't a traditional go-kit or emergency box in the form that some may need. I will be using this box frequently, will be taking it with me when I go out-of-town, weekends at the lake, etc. So, while it needs to have the function and emergency features of a go-kit, I would also like to add a little more flexibility.
Given that it will also be my emergency communications box, I also want those back up power features and am planning on a few. Power Planning: On board 12V power. This will be a light weight sealed lead acid battery. I am not anticipating it being able to provide more than limited service because I don't want that kind of weight built into the box. When I need full service, I'll get that external. Off board 12V power. This will be accomplished a number of ways. First, a simple Anderson powerpole attachment to a 12V power source. Second, there will be an on-board DC-DC converter to handle higher voltages from external power sources, such as the 18 to 24 volt lithium batteries. On board Power Supply. I have attached images of the proposed wiring diagram and the proposed face plate. 
I have the box.. the picture below isn't the exact box.... I couldn't find the picture of the right one, but it is very similar. I'll take a picture and update. 
Basically, a clamshell hard plastic container that is substantially waterproof.. no wheels on mine... it measures around 18 inches wide 12 inches deep and 10 inches high... everything does fit... but it has taken some planning to get everything in... yes, it is all vented....ample air movement has been thought through. This case, however, will not pass the Jedi bathtub submersion test... but, it is sufficiently waterproof for my purposes.... 
The plan is to make the framework and face plate by cutting the parts out on a laser cutter engraver, which I do have.... All of the frame parts are drawn out on autocad and cut in the laser. The face plate will be cut from white acrylic and then painted. Once painted, it will be put back into the laser and the paint will be burned off revealing the white acrylic below exposing the lettering. Some of the frame diagrams look like this... 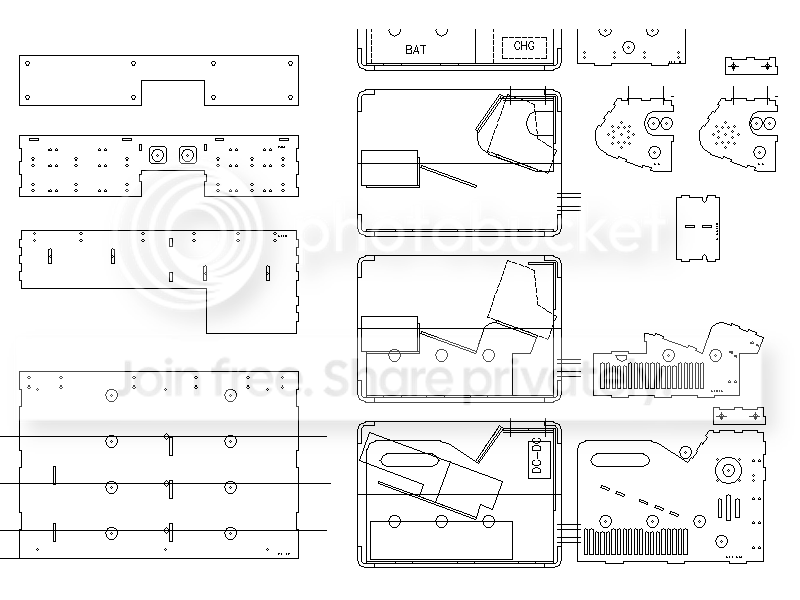
Not sure how well this screen shot image will show up, but once I post so actual picures it will be more clear. On the face plate, the center box is a small SWR meter... I was going to have a switch to turn the on board battery charger on and off, but I ran out or room when I added the SWR meter. 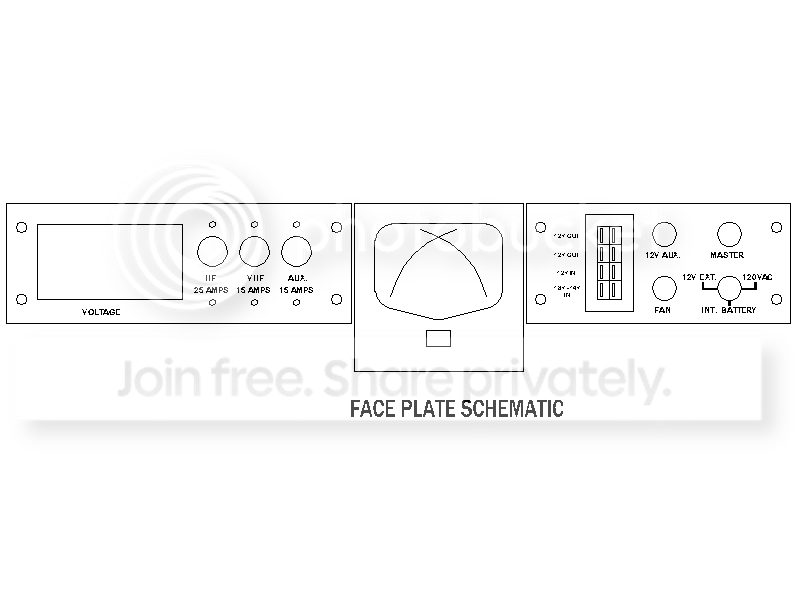
Anyway... before I start burning parts, I would appreciate you guys helping me think through this one more time to make sure I haven't forgotten anything important.... I am sure I will forget something... but hopefully nothing too critical... The second phase of the project will be a small portable antenna bag... but, we aren't there yet.... Thanks in advance for the input... |
|
|
|
[#1]
Holy crap!

You've put so much thought into this I can't even follow it completely! You really do seem to have a very well thought out, solid plan. Like all plans, lets see how far this one gets. One other note, thought, opinion, the people who have "ecomm boxes" need to have them out to use like you're planning. What looks pretty and works great in your basement doesn't always pan out in the field. What you're planning is what all "ecomm boxes" should be. Functional. Nice work and you haven't even started. |
|
|
|
[#2]
I'm not sure that I fully understand all of your diagrams, but here are a few thoughts:
Accessible fuses or circuit breakers? Convenience 110 VAC outlet(s)? Bring all rear-panel radio connectors to front panel? Mic brackets? Separate broadcast/EAS/WX receiver? ETA: Also storage for radio manuals? I'm not a Yaesu user, but my experience with Icom rigs is that they have so many features that I use only rarely that I often forget how to do certain procedures, and so it helps to have a manual on hand at all times... |
|
|
|
[#3]
ANOTHER Go Kit???
One thing cool about this... all of them are unique, and reflect the builder's goals and needs. OK, this guy's kit, like my Pelican case kit (see http://www.ar15.com/forums/topic.html?b=10&f=22&t=634319) are pretty well sealed, even if not perfectly watertight. When our kits are sitting around not doing anything useful, should Mndless and I put some silica gel packs or anything in them to keep them in top notch condition? |
|
|
|
[#4]
K... going to do a test/fit run this weekend... cut all the parts out and see where I have screwed things up in the layout...
Hopefully won't be too far off... 
|
|
|
|
[#5]
WAY to complicated for me. why 2 radios when the 857 will do it all? also, if its open while in use the fan isnt needed. so its something you could skip. of course, im a firm believer in K.I.S.S.
|
|
|
|
[#6]
I'd keep the 2 rigs, ability to use local vhf, uhf well using HF can't be a bad thing. think getting field reports on vhf and passing them on HF. or getting spots for dx from vhf, uhf.
|
|
|
|
[#7]
Quoted:
WAY to complicated for me. why 2 radios when the 857 will do it all? also, if its open while in use the fan isnt needed. so its something you could skip. of course, im a firm believer in K.I.S.S. Because VHF/UHF and HF are two different animals. At best, VHF/UHF is regional, that is, IF the repeaters work after an emergency. Maybe they won't. And even if they do, you may or may not be able to link them to other repeaters if the phone system is down. That happened across the south after Katrina. Towers damaged, the phones and internet didn't work. Many people's phones were local only... as the servers in New Orleans were underwater and it took weeks to get everything rerouted to other areas. It was several years getting antennas repaired. Hams are way down the list for tower maint crews. Often I monitor 2m while working HF. Sunday nights I work a local 2 meter net while doing the "early bird check in" on my favorite HF net. I literally have a mic in each hand. When I had a FT-897 it just didn't work for that purpose. |
|
|
|
[#8]
Very nice.
... Im jealous. |
|
|
|
[#9]
Nice project. I will be looking forward to see how it comes out.
|
|
|
|
[#10]
Mnd, very nice.
"Not sure how well this screen shot image will show up, but once I post so actual picures it will be more clear. On the face plate, the center box is a small SWR meter... I was going to have a switch to turn the on board battery charger on and off, but I ran out or room when I added the SWR meter." Why not consider using 3 position center off toggle switches for more functions in less room? [Also, are laser cutters of 1/8" aluminum capacity, used, available at reasonable $ in the present economy?] |
|
|
|
[#11]
Quoted:
Why not consider using 3 position center off toggle switches for more functions in less room? Did not think of that... thanks... I could probably join up the charger and the fan on the same switch... just could not run them both at the same time... don't think that should be an issue... Quoted:
[Also, are laser cutters of 1/8" aluminum capacity, used, available at reasonable $ in the present economy?] I am sure there must be... have been thinking of selling mine :) Mine is only a 40W laser, not sure it would cut 1/8" aluminum... probably need something approaching 100W for that. Waterjet cutter might be a better option for cutting metal.... Thanks again for the switch comment... That might just solve the issue |
|
|
|
[#12]
Where da pix at, yo? I demand updates!
 |
|
|
|
[#13]
Quoted: ANOTHER Go Kit??? One thing cool about this... all of them are unique, and reflect the builder's goals and needs. OK, this guy's kit, like my Pelican case kit (see http://www.ar15.com/forums/topic.html?b=10&f=22&t=634319) are pretty well sealed, even if not perfectly watertight. When our kits are sitting around not doing anything useful, should Mndless and I put some silica gel packs or anything in them to keep them in top notch condition? I can't think of anything that it would hurt, as long as you don't have a lead-acid wet cell inside. |
|
|
|
[#14]
Quoted:
Where da pix at, yo? I demand updates! laser issues.... going to have to call the service tech.... I bet his freek'n name is Murphy!! It has been sitting idle for 6 months or so.... guess it didn't like that.... But... ready to cut when Murphy extracts his pound of flesh... |
|
|
|
[#15]
Got the laser working and have started cutting some test pcs.... the test parts are out of cheap masonite... once I am sure everything fits ok, we'll cut the acrylic sheets
in the laser 
finished cutting 
parts 
Hope to have the test parts glued together tonight... once I get this glued together and post a picture, what I am putting together will make more sence... I know these pcs, as shown, don't provide much of a picture yet... |
|
|
|
[#16]
Those woods is purdy!!!!
|
|
|
|
[#17]
I am definitely watching this build. Looking good so far!
|
|
|
|
[#18]
Unless there's some danger of backfeed into the power supply devices, could you reduce the 3 and 2 position switches to a single 2 position "Power Supply" and "Battery" switch?
Power selector switches can fail. Jumpers might be an interesting/cheaper way to go. Or at least as a backup, inside the unit. |
|
|
|
[#19]
OP's cutting up some masonite first... but when he cuts acrylic (Plexiglass, etc) it will cut cleanly like this:
http://www.youtube.com/watch?v=nuiGDBD1-XM |
|
|
|
[#20]
Nice , Are you sure your not kin to this guy

He has alot of trouble with his "laser" too. |
|
|
|
[#21]
Got some test panels cut out tonight... several issues that need to be corrected... Not sure how large these pictures will be... but I'll downsize them tomorrow if they are too large...
The preliminary glue up of the frame... the idea is that this frame work holds the components. It is lowered down into and bolted to the plastic carry box. If anything needs to be worked on, the entire frame can be lifted out of the box... well... that is the idea...  

The drop'd space to the right side of this picture is where the SWR meter will sit... 
I did a ruf sample on the face plates... painted the white acyrilc black... not sure yet what color I want the face plates to be... suggestions? The carry case/box is black... I was thinking red or dark blue.... 

Want to let the glue dry and try to mount some radios and stuff to this sample before I cut the real parts... but... making progress. yes.. yes... the text will line up correctly on the final version....
|
|
|
|
[#22]
Man that is cool as all get out ..... Im very jealous and am wondering are you for hire..
|
|
|
|
[#23]
Quoted:
Man that is cool as all get out ..... Im very jealous and am wondering are you for hire.. +1 and WOW!!! 
|
|
|
|
[#24]
Quoted:
Man that is cool as all get out ..... Im very jealous and am wondering are you for hire.. But of course... payment must be cold and come in a container that has a twist off cap... |
|
|
|
[#25]
Makes me wish I had a laser
I wonder, if I am really careful, can I use one of these? http://www.wickedlasers.com/lasers/Spyder_III_Pro_Arctic_Series-96-37.html |
|
|
|
[#26]
And here I thought lasers were only good for making your dog run into cyclone fences at night.
|
|
|
|
[#27]
Quoted: Got some test panels cut out tonight... several issues that need to be corrected... Not sure how large these pictures will be... but I'll downsize them tomorrow if they are too large... The preliminary glue up of the frame... the idea is that this frame work holds the components. It is lowered down into and bolted to the plastic carry box. If anything needs to be worked on, the entire frame can be lifted out of the box... well... that is the idea... http://i585.photobucket.com/albums/ss300/mndless/box1.jpg http://i585.photobucket.com/albums/ss300/mndless/box2.jpg The drop'd space to the right side of this picture is where the SWR meter will sit... http://i585.photobucket.com/albums/ss300/mndless/box3.jpg I did a ruf sample on the face plates... painted the white acyrilc black... not sure yet what color I want the face plates to be... suggestions? The carry case/box is black... I was thinking red or dark blue.... http://i585.photobucket.com/albums/ss300/mndless/plate1-1.jpg http://i585.photobucket.com/albums/ss300/mndless/plate1.jpg Want to let the glue dry and try to mount some radios and stuff to this sample before I cut the real parts... but... making progress. yes.. yes... the text will line up correctly on the final version.... Sir....that is just BADASS!! Commercial quality work. Very nice. One suggestion....instead of bolting the frame into the case, investigate using some 3 inch velcro strips. All of my gear is velcroed onto my go kit shelves....they take quite a bit of effort to get them loose. |
|
|
|
[#28]
Test fit has a good many issues... sequence of attachment issues, not enough room issues and some simply got it wrong issues...


|
|
|
|
[#29]
Still looks very good , and makes what I did look like a chimp with a sledge hammer built mine.
|
|
|
|
[#30]
That just keeps getting better...... I'm thinking you might need to sell the cut boards.
|
|
|
|
[#31]
I like it! Can't wait to see the finished product. Seeing that ATU in there makes me glad that I invested in a nice and compact LDG tuner ;-)
|
|
|
|
[#32]
What voltgauge is that? or is it home brew?
|
|
|
|
[#33]
Quoted:
What voltgauge is that? or is it home brew? Oh man... I have bought 3 different meters looking for the right one.... ar-jedi kept shooting down my meters.... :) Suprisingly, the box doesn't say who made it... and I don't have any instructions.. I'll post a picture of the box and the meter... but, I dont' know. The first meter I purchased required a 9v power source.... I tried to cut the supply voltage to power the meter and jedi shot me down.... Finally came up with this meter which is supposed to function from the 12v supply voltage... but... there is no model number or manufacturer on the packaging I have... I'll see if I can find a receipt in my stuff.... I don't through anything away :) |
|
|
|
[#34]
Quoted:
That just keeps getting better...... I'm thinking you might need to sell the cut boards. Thanks for all the kind remarks... As far as making parts availiable... not really my thing... however, if someone has the exact same HF radio, the exact same tunner, buys the exact same ciruit breakers, the exact same volt meter... so that I don't have to make any changes.... happy to cut out these again and send them to you with no instructions and no phone support....
Lot of time putting this together just for my setup... any changes and a lot of stuff has to be modified.... not really a kit type project.... IMO... If someone wants to help me put together a generic version of this concept... I am happy to help, and happy to make that available for the cost of the material... but... so many variables, not sure a one size fits all frame can be made... |
|
|
|
[#35]
All I can say is...
|
|
|
|
[#36]
Wow, that looks great, I can't wait to see the finished product!
|
|
|
|
[#37]
Quoted:
One suggestion....instead of bolting the frame into the case, investigate using some 3 inch velcro strips. All of my gear is velcroed onto my go kit shelves....they take quite a bit of effort to get them loose. Haven't thought of that, how would you attach the velcro to the plastic box? |
|
|
|
[#38]
Really, really nice. That is turning out great!
|
|
|
|
[#39]
Wow I am amazed and I use to repair lasers all the time mostly 50 watt diode and 100 watt YAG lasers for marking parts.
Would love to know more about the laser system you are using. |
|
|
|
[#40]
Quoted:
Wow I am amazed and I use to repair lasers all the time mostly 50 watt diode and 100 watt YAG lasers for marking parts. Would love to know more about the laser system you are using. Sandhills must be central SC?? Nothing real fancy... mine is 4 years old or so, doesn't look exactly like th new ones, but is very similar to this.. Universal Laser I purchased this thing when I was working on a home built flight deck... you cut each component out of acrylic and similar to what I am doing here Flight deck sample What you are looking at in the above picture is fully functional acrylic panels with switches, etc, placed in front of computer monitors running software written by Project Magenta. Fun stuff.... However, it turned into too much work, I got tired of the project and quit with it.... now I have a laser with nothing to do with it... other than fun little projects like this one..
|
|
|
|
[#41]
Power and antenna attachments

|
|
|
|
[#42]
Quoted: Quoted: One suggestion....instead of bolting the frame into the case, investigate using some 3 inch velcro strips. All of my gear is velcroed onto my go kit shelves....they take quite a bit of effort to get them loose. Haven't thought of that, how would you attach the velcro to the plastic box? It has glue on it. Peel and stick. I have my go box in a plastic rack mount box. It sticks to whatever type of plasctic that's made of. I did wipe it down with alcohol first just to get off any mold release spray that may have been on it. ETA: Where did you get those metal bulkhead caps? All I found was rubber ones. Gotta get me some of those!! |
|
|
|
[#43]
Quoted:
Quoted:
Why not consider using 3 position center off toggle switches for more functions in less room? Did not think of that... thanks... I could probably join up the charger and the fan on the same switch... just could not run them both at the same time... don't think that should be an issue... Quoted:
[Also, are laser cutters of 1/8" aluminum capacity, used, available at reasonable $ in the present economy?] I am sure there must be... have been thinking of selling mine :) Mine is only a 40W laser, not sure it would cut 1/8" aluminum... probably need something approaching 100W for that. Waterjet cutter might be a better option for cutting metal.... Thanks again for the switch comment... That might just solve the issue Or use a rotary switch. 1, 2, 1+2, etc. |
|
|
|
[#44]
Updates... have made progress on the radio support frame... I am on test cut #3 and I finally have it fitting properly within the plastic box. There are still a few issues I have noticed, so we will at lease have test cut #4 before the final.
When I got everything fitting in the plastic box I noticed a couple of things... first, the back of the radios is not readily accessible. So I opted to install some remote jacks on the right front... this includes the external speaker/headphone jack, the CW/Key jack and the data jack. I also noticed a space between the two radios where stuff might fall down into the box. Installing a blocking plate took care of that and also gave me a place for 2 more switches. So, I am placing an on/off for both the power supply and the battery charger there. I want to be able to leave the box plugged in and run either of those two without the other... which requires a switch. Anyway, paited up a test sample... I like the orange, but it lacks contrast on the lettering of the white acrylic... so... will keep testing some options... Sorry for the picture sizes... 


Going to start working out the routing of wires next.... |
|
|
|
[#45]
HOLY CRAP!!!

You got mad skills dude!!! That is awesome!!! |
|
|
|
[#46]
Daaannngggg!!!! That keeps looking better with every revision. Helluva job!
|
|
|
|
[#47]
That's just awesome...I am supremely jealous
|
|
|
|
[#48]
Showoff!!!
|
|
|
|
[#49]
that is some of the coolest fab work I've seen on this site......no shit.....truely badass!!!!
Do Want... |
|
|
|
[#50]
Seeing that, and that he is going to use a plastic to make it, it brought to mind the Plastix Plus Outfit that makes the AR15 work stands and racks, as well as fire/emergency equipment racks, police car consoles, etc, from a tough black wrinkle plastic that is WELDED together.
Cut it up and fit it like the OP is doing, plastic weld that sucker and it would be indestructable! |
|
|
 Win a FREE Membership!
Sign up for the ARFCOM weekly newsletter and be entered to win a free ARFCOM membership. One new winner* is announced every week!
You will receive an email every Friday morning featuring the latest chatter from the hottest topics, breaking news surrounding legislation, as well as exclusive deals only available to ARFCOM email subscribers.

AR15.COM is the world's largest firearm community and is a gathering place for firearm enthusiasts of all types.
From hunters and military members, to competition shooters and general firearm enthusiasts, we welcome anyone who values and respects the way of the firearm.

Subscribe to our monthly Newsletter to receive firearm news, product discounts from your favorite Industry Partners, and more.
Copyright © 1996-2024 AR15.COM LLC. All Rights Reserved.
Any use of this content without express written consent is prohibited.
AR15.Com reserves the right to overwrite or replace any affiliate, commercial, or monetizable links, posted by users, with our own.


