|
[#1]
This somewhat depends on what all you might need access to quickly.
If you plan to load everything using a ramp and a 2 wheel dolley then high sides are no biggy. If you are going to load everything by hand then it is nice to have low sides. If you might want to get to something up front without unloading the back of the trailer the low sides make more sense. If you have some other people who might be helping you then the height of the sides that work for you may not work for them. Part of why I got the trailer I did is it has a ramp built in as a rear gate and there are no real sides to the trailer. I can load it with a dolley easily but if carrying things by hand I can easily pack the trailer up without lots of extra steps from high sides on the trailer. Overall I think it comes down to just what you are loading, how well protected it is, and if the sides really add something of a benefit at different heights. |
|
|
|
[#2]
Thanks for the input.
Dolly loading would be nice, but with the deck as high as it is I think I'm going to have to hand load it unless I build some kind of ramp. The kitchen box is big and heavy so that would be my primary concern: Pic of box:  Plus figuire on somw MFCs and MWCs, the rest of the items will be easier to handle. |
|
|
|
[#3]
I guess it depends on what you are hauling.
If it is just gear, I would go with the lower sides. If I was hauling an unsecured load, like dirt or gravel, then I would want to go a little higher to help keep crap from falling out and breaking windshields behind you. Just becareful with the taller sides so you don't over load the tires with sand or something as it is easy to do with taller sides. If this were mine, I would really look at is solid tie downs, and not wall height. Most trailers don't have enough, and, or are always in the wrong place. By that I mean you have a hard time centering a heavy load, and keeping the chains or straps pulling against each other. I am pretty sure this won't be the case with a smaller jeep trailer, but it is still nice to tie things down. |
|
|
|
[#4]
Great points BB. Yes this trailer (besides hauling my camping gear) is also used to haul stuff to the dump, and stuff from the Hardware store home.
With the taller sides I'll be able to get the dirt cheap mulch from the dump (instead of the overpriced bagged stuff from HD). Tie does will be included as they are sorely lacking right now. I plan on having a tarp that can cover the trailer, so plenty of tie downs will be needed to handle that. |
|
|
|
[#5]
PICS!!!!!!!!!!!!!!!!!!!!!!
|
|
|
|
[#6]
LOL, here is one from the guy that I bought the trailer from (prior to him delivering it to me) Since this image was taken, I've removed all the wood higher than the deck (including the fenders). Also the trailer was lowered. My BIL in a mechanic and he put the axel back where it belonged (lowering the trailer some 4") and put the hitch in the proper hole for a Jeep (it was set up for a truck). So now the trailer will travel level behind my XJ. I'll see about taking a couple of up-to date pics tonight (not that there is much to see). When I'm finished rest assured I WILL be posting pics. |
|
|
|
|
[#7]
RED X on those pics, but I do remember when you first got it. Anxious to see the final results. Ive been itching to build/buy a BOT, Ive got some specific ideas I want to incorporate, but nothing has panned out yet. |
||
|
|
|
[#8]
Sorry about that - when MSN get's bogged down the pics don't come through. Check in later. |
|
|
|
|
[#9]
My $0.02 (and no, you can't get a refund) is to make it with a lower side then build a modular type side extension that you can install/remove for the top so you get both short and tall sides in true ARFcom fashion.
|
|
|
|
[#10]
Forest, before you spend money on a trailer, you need to repair/upgrade the suspension on your Cherokee. You are gonna be wearing it one of these days if you don't fix it...
Ops |
|
|
|
[#11]
The more I look at it Forst, the more I like the idea of inserts for a frame and then OD green canvas the frame. You could make the frame modular so it pops in and toether so you could use it with or without. That would be very cool looking as well as very practical.
Tj |
|
|
|
[#12]
Trailer and wood I have now. Suspension work is going to happen this summer, I need upgraded springs if I want to pull the trailer fully loaded. |
|
|
|
|
[#13]
Ok I see what your saying. Go with the low sides, but have drop in sides with a kind of canvas 'insert'? I was going to go with a canvas top (kind of like the military trailer we used in flight ops). But by using a canvas insert I could get similar benefits to 'high sides' with lower weight. I like it. |
|
|
|
|
[#14]
personally I would go with the deeper sides.
The higher sides will help keep unsecured items from bouncing out. |
|
|
|
[#15]
That's the idea. Now you've got me out looking at mine to see if I can do it. 
|
||
|
|
|
[#16]
Ok so I took the morning off today to do some staining. I'm using a Cabot's stain normally meant for houses. The thickest they have (on the second coat you can't see the wood grain). Normally this stuff retails for $25/gallon
 I got this one for $5 because it was a 'mistake'. I had wanted black - but it wasn't an option, so the guy said he could add black tint to darken it. It came out a slate grey. Not bad IMHO. I got this one for $5 because it was a 'mistake'. I had wanted black - but it wasn't an option, so the guy said he could add black tint to darken it. It came out a slate grey. Not bad IMHO.Here is the trailer w/o the sides on. The outer sides are in the bed drying.  I think I mentioned the sides are going to be two pieces of 3/8" exterior grade plywood I had left over from another project. I wanted to stain them (at least the touching sides) prior to putting them together and cutting to the final height. Here is a shot of the front corner. You can note the 'side rails' I added last week the lower part of both sheets will screw into here. Also note I added the top 2x8 PT to the front last week as well.  This is a shot from the front with one of the outer sides put into place to show height. The front (2x8s) show what the final height of the sides WILL be. The side board shows the height that I was considering (18" or so). (yes I know I have to trim those carriage bolts).  Eventually all the wood will be the grey - metal will stay black. The black you see on the inner fender well is aluminum flashing (it will be covered with the inner wall). I am now looking for a 2' + tall scissors jack. I want to mount it to the rear - so when I stop with the trailer I can lower the jack and support the back. Right now if you sit on the back edge (with no gear in the trailer) the front WILL tip up. With the jack in place I'll have 4 contact points the trailer could be used as a shelter. Oh one I idea I had considered was to hinge the inner plywood wall with the outer one at the top. That way I could unlatch the inner wall and rotate it perpendicular to the outer wall (making a nice flat area that I could transport sheetrock or plywood on - while having 24 cubic feet of storage space below. Likewise they could be rotated fully up so the side walls would be about 2' high should I want to haul a bunch of mulch or yard waste. In the end I discounted the idea because I didn't think my the 3/8" plywood would be strong enough to handle the stresses. However, should I ever redo the bed in metal it's an idea I'll consider again. I'll keep updating this as my progress continues. |
|
|
|
[#17]
Right now the sides only have 1 coat (you can see the wood grain in the last shot). When I'm done they will have several more like the fenders (which currently have 4 coats).
Also I need to make a new license plate hanger. Normally the plate is under one of the tail lights - but the original hanger shattered in the cold last winter. So for now it's temporarly screwed into the back (where the tailgate will eventually go.). I'll cut a new hanger out of an old top from a 5 gallon bucket. |
|
|
|
[#18]
Looks pretty good. Nice work.
|
|
|
|
[#19]
Thanks. I gotta order a couple of jerry can holders so I can mount some MWCs to the sides - that when things will get *interesting*
|
|
|
|
[#20]
Look hear for inspiration. Pic#4 in particular. cgi.govliquidation.com/auction/view?id=1311180&convertTo=USD |
|
|
|
|
[#21]
I see how they stabilize that trailer. Nice idea, unfortunetly that solution won't work as well with my trailer due to the location of the tail lights.
I have thought about using a 'drop leg' hinged to the bottom. But after seenig some scisors jacks used as 'stabilizers' on a campling trailer I thought that would be the ticket. They stow completely out of the way - and can be adjusted to different height requirements. |
|
|
|
[#22]
Well it looks like JC Whitney has what I am looking for:
www.jcwhitney.com/webapp/wcs/stores/servlet/Product?storeId=10101&Pr=p_Product.CATENTRY_ID%3A2008313&TID=231000000&TID=231000000&productId=2008313&catalogId=10107 |
|
|
|
[#23]
looks great........taggin for more pics and progress.........
|
|
|
|
[#24]
One trick I leaned might help some of you.
I secured the side rails using large Lag Screws. But before I could drill the holes for them I wanted to tack the side rails in place (so they wouldn't move while drilling). I found these neat self drilling hex head lag screws at the family run hardware store. The first 1/4" or so is like drill bit so they drill their own hole while you screw them in. Using a battery poweder drill (with a socket head attachment) I was able to drill a couple of these screws in really quickly. They did an excellent job of tacking the rail in place while drilling for the much large lag screws. IIRC the ones I used were 1/4"x3" (they come in much smaller sizes as well). In the middle pick above you can see them near the ends of the rail (one is over the left end of the orange side lamp). |
|
|
|
[#25]
My son and I had a couple of hours Sunday to work on the trailer. We cut the sides to the right height and attached the outer walls. To make sure the walls were all the same height we stacked them on top of each other (making sure the bottoms were square/alighned) then clamped all 4 together before cutting them with a circular saw. We also cut down the bolts that mount the upper front wall.
Here is how it looked when we were finished:  The battery is sitting on the 2 inner walls which we'll install another day (after I get more hardware). ETA: This is turning out to be a good father/son project. Besides being my helper and 'go-fer', my son learned to run a socket wrench and a grinder during yesterday's work. |
|
|
|
[#26]
What is the weight capacity on it?? Best guess???
Is this to carry all your preps or just water/fuel?? |
|
|
|
[#27]
It's listed at 500lbs offroad (that was the limit of the original trailer and still be able to float). On road it's rated near 4500 lbs.
This trailer can carry: Water, fuel, my large tent (16'), camping kitchen, food, sleeping bags, and more. I've already used it once on a camp out (w/o the sides) and it did well, but as I'm building this I'm adding some things to make it better/ help it carry more. |
||
|
|
|
[#28]
defintely a cool idea.........something I might think about since i can't find a rack i'm excited about for my truck (excursion)....... I might go enclosed though to allow more security and less attention......
|
|
|
|
[#29]
Not many enclosed military trailers that my Jeep can pull. I wanted the military trailer as they were built for off-roading so it could take some punishment. I had a thread a couple years back when I started on the path to getting a trailer. And one thing I was warned about were the commercial trailers and their light construction and small wheels. |
|
|
|
|
[#30]
I need one that I can pull behind a 1/2 ton 4wheel drive pickup. My truck is built like a short bed CUCV. What did trailers did the military use with those? Anyone know? Jason |
||
|
|
|
[#31]
My platton (Flight Ops) had a 1 1/2 ton trailer our CUCV used to pull. Very Similar to this one: M-105. We had canvas on ours and set it up with an L shaped table, filing cabinet, radio racks, and a couple of boards for use with china markers. I think ours was a M1100 rather than the 105, but it's been a while. I will also warn you that when you get into military trailers of that size the trailer weight is up there. I looked at some surplus M1100 series trailers and IIRC their weight was in the 1500lbs range before you added a pound of cargo. Thanks to NSW for the heads-up on this, I almost bought a M1101 till I found out how heavy they were. |
|
|
|
|
[#32]
great job, nice trailer.
|
|
|
|
[#33]
Here is the one I built to tow behind my Jeep. The frame is angle iron, the box is heavy sheet metal pop rivited to the frame, the deck is plywood, the axle is a 1/4 ton from Trailer Wheel and Frame, the hubs accept a Jeep wheel pattern, the wheels are Jeep wheels as are the lights.
The tailgate is an after thought to haul a motorcycle. The original design was too short to carry a motorcycle and there was no way to load it. The original concept was to be able to take a fanily of four on camping trips in the Jeep and be able to carry all the camping gear, personal gear, and spares for the Jeep. It worked fine for that until the kids grew up. We don't take family camping trips now. The trailer gets used mostly to haul stuff to the deer camp. 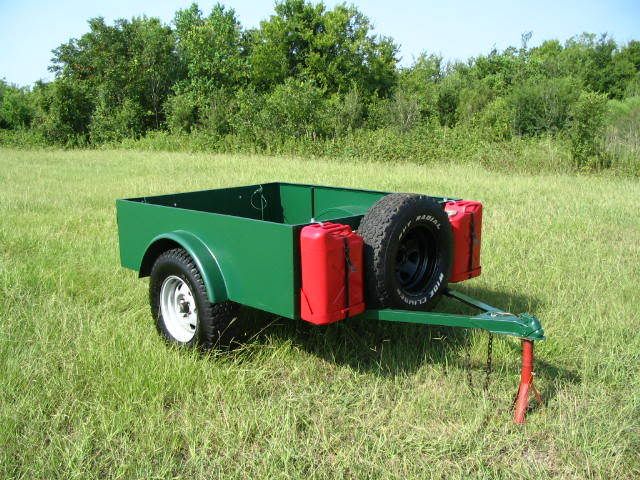  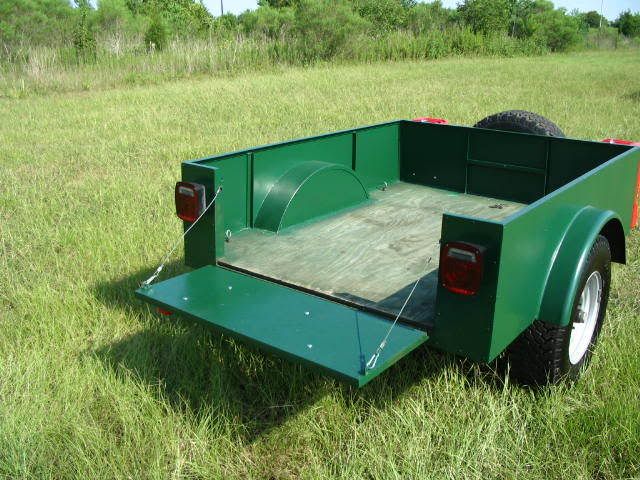 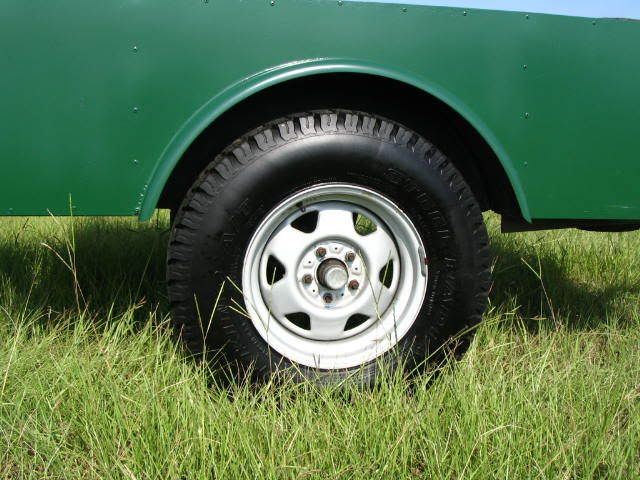
|
|
|
|
[#34]
Nice Job! The Axe & Shovel were a nice touch.
|
|
|
|
[#35]
Today I started adding the inner walls to the trailer. The curvature of the wood made it a challenge. To keep the inside relatively smooth I am using T-Nuts, which sit pretty much flush with the walls. Once the hole is drilled the T-nuts are hammered into place and you can attach a bolt (or screw eye) from the other side.
 Right now I have 2 screw eyes per side (more are comming) and 2 in the front. I also have a few 3/8 bolts holding the sides together. I also cut some angle steel for the end, to be bolted to the frame, and to the sides at the end of the trailer. One thing that concerns me is the location of the screw eyes - I'm thinking they may interfer with my plans to attach jerry cans to the front sides. We'll have to wait and see. What's left: 1) Make a new license plate bracket (I'll be doing that later tonight) 2) Stain the inside walls and another coat on the floor. 3) Attach the angle steel on the ends 4) Maybe make some 'L' brackets with the leftover steel to help ties the sides to the floor. 5) Build a tailgate. 6) Attach a scisors jack under the back of the trailer. 7) Attachments for Jerry cans and a full-size D handle shovel. 8) Build the 'add on' higher sides. |
|
|
|
[#36]
I'm watching this thread with great interest!
I've got a line on an M416- if I can make a deal on it, I'll be using it exactly as you guys are, for camping and occasional chores. Very cool trailers, guys! |
|
|
|
[#37]
Ok got more work done today...
 My son helped me and stained the inner walls, while I put a second coat on the exterior walls (and a 6th coat on the fenders...) I also drilled, primed and painted the angle steel for the rear (I'll be installing it later this week). Also if you look carefully in the photo just to the right of the tire is my new license plate bracket. I made it using the lid from a 5 gallon bucket. The original bracket broke last winter (got so cold the plastic was brittle). This new bracket is a softer plastic that will flex more. Best of all it was free, I primed the plastic with the Krylon Fusion primer, then painted it with Krylon ultra flat black (and I painted the back of the plate ultra flat black). Also note the screw eyes on the front (they were added yesterday but the photo didn't show them). I don't like the side screw eys sticking out so far. I'm thinking of screwing them in all the way, then cutting them off and grinding down what's left (to keep the inside fairly smooth). Tonight's the first night I'm leaving her out w/o the tarp over it since the walls were installed. |
|
|
|
[#38]
Lookin good. All the eyes are a great idea.
jim |
|
|
|
[#39]
Nice!
Forest, were you ever in GLCM? I knew a guy that was AD, and converted a mil trailer for...well, nevermind. But your idea, and speech (written) pattern, remind me of him. |
|
|
|
[#40]
ttt
|
|
|
|
[#41]
GLCM? This is my first trailer though. |
|
|
|
|
[#42]
Ground Launch Cruise Missile.
Not sure how much info is out there, and I never worked them, so I'll just leave it at that. EDIT: Shoot, just Google "GLCM" there's a ton of pics, etc out there. |
|
|
|
[#43]
Backstop,
Ok that I understand. Nope not me. |
|
|
|
[#44]
Ok so last night I get home from work and start to install the corner brackets which are supposed to secure the back end of the sides, and provide an anchor point for the tail-gates straps.
 Installation want well enough on the upper portions (side to the bracket). I wish I had more distance from the center of the holes to the edge - but I didn't find any 2"x1" angle at Home Depot or the local hardware store I frequent. Anyway things went well enough till I went to secure the bottom then I realized I reallye F-ed up. My orginal intention was to have 2 bolts go through the bumper into the steel frame of the trailer - then secure them with washers and lock nuts. However I found the 'bumper' extended about 3/4" from the frame which threw off my entire plan  . Right now I have a few 1/4"x 1.5" lag screws holding the frames in place. They feel 'solid' for a litle shake - but if I put any real foces on it they won't hold. . Right now I have a few 1/4"x 1.5" lag screws holding the frames in place. They feel 'solid' for a litle shake - but if I put any real foces on it they won't hold.Now I'm thinking I should have just ripped off the entire bed and rebuilt it from scratch - oh well when this bed needs a rebuild I'll do it right. Till then I'm thinking I'm going to drill a hole in from the corner of the bracket - through the bumper and into the frame on an angle. Then use something like a 1/2" x4" bolt to anchor it tight at an angle. I'll probably need to cut an angled spacer for inside the frame - but tha'ts pretty easy to do. ETA oh and my son and I added another set of screw eye anchor ponits half way between the fender anchor point and the tailgate anchor point. The front point I've decided to move up to the same level as the fender and the new point - and I'll replace that screw eye with a bolt. I also added a screw eye on the front dead center - but at the same height as the other 2 eye's on the front. I've also decided I'm going to run some 1"x1" angle aluminum along the top edge /inside edge of the sides. Similar to how I attached the rear angle steel - only the aluminum won't have any anchor points - just bolts & T-nuts to hold it in place.. |
|
|
|
[#45]
Looks like I'll be using it this weekend as a 'cargo hauler' and I've got 2 camping events (one this month one next month) as well.
I'm hoping the Jerry Can brackets get here before then. |
|
|
|
[#46]
good job brother
|
|
|
|
[#47]
One note on the trailer.
I took it with me on a trip this past weekend. We were supposed to get a cabinet for the dining room.. Anyway I was tracking the milage as we drove out west. The trip was 150 miles (one way) and we had to go over several mountains (ranging fro 1800' ASL to 2900' ASL). My Cherokee normally gives me 18-20 MPG on the Highway, this trip with the trailer was 15.1 gal (pretty much all highway - I refilled when we got to our first night's stay). So it looks like the trailer drops milage 3-5 miles per gallon. |
|
|
|
[#48]
Forest, man, that is NICE.
|
|
|
|
[#49]
Whoo Hoo! My two Jerry can holders came in today. Even better if I move the front eyebolt to the new location I was considering it looks like the holders will fit perfectly on the sides!
Now I got to get some black engine paint to repaint the holders (I don't like the red). I figure engine paint can withstand gasoline ? ETA: Given the jerry can holders will be on the sides, I've got a 20mm ammo can to bolt on the the drivers side front. I'll use this to hold cargo net, straps, and the chain/lock I use to lock up the trailer. Any suggestions on weather proof spacers I can use as I need hold the can about half an inch off the wood to allow for room to remove the lid? I'll probably use four 1/2"x2" lag screws to hold the can in place. |
|
|
|
[#50]
 Today's updates: 1) Replaced the forward eyebolt with a standard bolt. 2) Added 2 eye bolts forward of the fender at the same height as the rear eyebolts. Spacing (17") was altered a bit to allow fitting of 2 gas cans. (you can see them to either side of the MFC. 3) Screwed in the eyebolts all the way and started trimming the excess on the iniside. 4) Measured, drilled and test fit (see photo) of jerry can holders. Originally I was going with Brass bolts, but when I tried to fit them I found the brass bolts had a different thread pitch than the steel t-nuts. So back to steel. I'll have to paint the steel bolts with the same black engine block paint that I'm going to paint the Jerry Can holders with (black of course). I need to use engine block paint as Krylon won't stand up to Gasoline. The MFC and MWC's fit a bit snug in the Steel Jerry can holders - but they will fit. Next step after these are painted and installed will be the installation of an ammo can on the right front for some water tight storeage. |
|
|
 Win a FREE Membership!
Sign up for the ARFCOM weekly newsletter and be entered to win a free ARFCOM membership. One new winner* is announced every week!
You will receive an email every Friday morning featuring the latest chatter from the hottest topics, breaking news surrounding legislation, as well as exclusive deals only available to ARFCOM email subscribers.

AR15.COM is the world's largest firearm community and is a gathering place for firearm enthusiasts of all types.
From hunters and military members, to competition shooters and general firearm enthusiasts, we welcome anyone who values and respects the way of the firearm.

Subscribe to our monthly Newsletter to receive firearm news, product discounts from your favorite Industry Partners, and more.
Copyright © 1996-2024 AR15.COM LLC. All Rights Reserved.
Any use of this content without express written consent is prohibited.
AR15.Com reserves the right to overwrite or replace any affiliate, commercial, or monetizable links, posted by users, with our own.


