FL, USA
|
[Last Edit: Opey]
[#1]
Federal Air Marshal Tactical Pistol Course (TPC)
This course is shot cold (no warmup) on the FBI QIT target All strings are shot from a distance of seven yards. Drill Starting Position Seconds Allowed Total Rounds One Round (twice). Concealed Holster 1.65 (3.30 total) 2 Double Tap (twice) Low Ready 1.35 (2.70 total) 4 Rhythm; fire 6 rounds at one target; no more than 0.6 between each shot. Low Ready 3.00 6 One Shot, speed reload, one shot (twice). Low Ready 3.25 (6.50 total) 4 One Round each at two targets 3 yards apart Low Ready 1.65 (3.30 total) 4 180 degree pivot. One round each at 3 targets (twice). Turn left, then right. Concealed Holster 3.50 (7.00 total) 6 One Round, slide locks back; drop to one knee; reload; fire one round. Low Ready 4.00 (8.00 total) 4 QUALIFICATION: TIME: Cannot exceed total time for each drill. Example: Drill #1 - 1st time 1.70 seconds, 2nd time 1.55 seconds; Total = 3.25 seconds = Go. Must achieve a "GO" on each drill. ACCURACY: Target is FBI "QIT" (bottle). Total rounds fired is 30. Point value inside bottle = 5. Point value touching line or outside bottle = 2. Maximum possible score = 150. Mininum qualifying score = 135. All stages must equal "GO" to qualify. Courtesy of Dean Speir. borrowed from Handgun Drills, Standards, and Training Page |
|
|
AZ, USA
|
[Last Edit: MarkP]
[#2]
Todd L. Green has a site that is dedicated to training with the handgun , including a Drills page HERE.
you can modify them to suit whatever carbine you are running. until that day M |
|
|
|
[#3]
Just bump the ranges back a bit for carbine.
|
|
|
|
|
[#4]
|
|
|
|
USA
|
[Last Edit: fargo007]
[#5]
^^^^^^
This document is now available on my website complete with a printable score sheet that walks you through the entire CoF. http://BHTCorps.com Look on the "Links" page. 
––Fargo007 |
|
|
|
[#6]
PM Sent
|
|
|
|
OR, USA
|
[Last Edit: SMPrider112]
[#7]
Heres my agencies qual:
Daylight Handgun Qualification Course: Safety: Eye and hearing protection required Muzzle control while firing, reloading, and during any malfunction clearance Students to remain on the line until ALL have re-holstered and checked by instructors prior to moving forward. Number of rounds: 50 Scoring method: 80% minimum qualification standard, scored long form numerical. Head shots do not count. Course of fire: Stage 1- maximum time allowed: 50 seconds From 25 Yard Line: 1. Fire 2 rounds with strong hand, kneeling around the strong side of the barricade. 2. Fire 2 rounds over the top of the barricade while kneeling. 3. Fire 2 rounds around the support side of the barricade while kneeling. 4. Reload, then fire 2 rounds from any of above positions. 5. All rounds may be fired strong hand. Stage 2- Maximum time allowed: 5 seconds per 2 round string From 15 yard line 1. Draw and fire 2 rounds, two-hand sighted fire. Re-holster. Repeat 3 times for a total of 6 rounds. Stage 3- Maximum time allowed: 25 seconds From 10 Yard Line: 1. Draw and fire 12 rounds, two-hand sighted fire in 25 seconds. Perform a mandatory reload between 1st and last round (12th) Stage 4- Maximum time allowed: 5 seconds per 3 round string From 5 yard Line: 1. Draw and fire 3 rounds, two-hand Sighted fire in 5 seconds. Re-holster. 2. Repeat for a total of 12 rounds. Stage 5- Maximum time allowed: 10 seconds From 3 Yard line: 1. Draw and fire 3 rounds, strong hand, single hand sighted fire. 2. Transfer the handgun to support hand and fire 3 rounds, single hand sighted fire. Stage 6- Maximum Time Allowed: 3 seconds per 3 round string From 2 yard line: 1. Draw and fire 3 rounds, close quarters, unsighted fire. Stand with hands uncumbered simulated notebook and pen. 2. Repeat for a total of 6 rounds Edited to add the targets we use are DPSST targets with a 3/5 scoring grid...very similar to IPSC targets with half of the C-section integrated with the A section in the chest for a 5 zone and the remaining C section and part of the D section making up the 3 zone. Scored long 250 points is a possible. |
|
|
|
[#8]
Tag since I've decied to do some kind of drill every trip to the range.
I was shooting a USPSA pistol match almost every month until about a year ago but due to my work schedule I can't make it to our local club match very often. I still shoot once or twice a month but can't make the matches and I miss the challenge. The drills will help make up for that to some extent... |
|
|
|
GA, USA
|
[#9]
Mag Pul Dynamics BSA course of fire.
5yrd line Dynamic Stance Time: 2 sec par on shot clock total rds: 20 -4rds -4rds -4rds -4rds -4rds 10yrd line Dynamic Stance Time: 2 sec par on shot clock total rds: 20 -4rds -4rds -4rds -4rds -4rds 15yrd line Dynamic Stance Time: 2 sec par on shot clock total rds: 20 -4rds -4rds -4rds -4rds -4rds 25yrd line Dynamic Stance Time: 2 sec par on shot clock total rds: 10 -2rds -2rds -2rds -2rds -2rds 50yrd line Dynamic Stance Time: 2 sec par on shot clock total rds: 10 -2rds -2rds -2rds -2rds -2rds 75yrd line on Beep go from standing to Dynamic Kneeling fire 2 shots Time: 4 sec par on shot clock total rds: 10 -2rds -2rds -2rds -2rds -2rds 100yrd line On Beep go from standing to Dynamic Prone then fire 2 shots. Time: 4 sec par on shot clock total rds: 10 -2rds -2rds -2rds -2rds -2rds |
|
|
GA, USA
|
[#10]
Hackathorne standards.
Handgun Standard Exercise: Hackathorn Standards Course Designer: Ken Hackathorn Source: Larry Vickers (former CAG Lead Firearms Instructor) 300 Points 60 Rounds No Make Up Shots IPSC Target: A = 5 C = 3 D = 2 Entire Head = 5 All stages start holstered unless otherwise noted. 250+ Expert 200-249 Acceptable Below 200 Needs Improvement Notes: Originally designed for IPSC targets; IDPA target are slightly more difficult (smaller 5 zone). Highest Score Ever: Larry Vickers 298 Highest First Time Score: Rob Leatham 290 Jerry Barnhart's First Time Score: 277 Targets: 3 IPSC, 1m spacing, staggered medium-high-low height #1––5 yards––1 rd on each head from draw freestyle––3 sec #2––5 yards––1 rd on each head strong hand––4 sec #3––5 yards––1 rd on each body strong hand––3 sec #4––5 yards––1 rd on each body strong hand––3 sec #5––8 yards––2 rds on left target freestyle––2 sec #6––8 yards––2 rds on center target freestyle––2 sec #7––8 yards––2 rds on right target freestyle––2 sec #8––10 yards––El Presidente; start facing uprange w/6 rds in gun, turn and draw, 2 rds each target, slide lock reload, 2 rds on each target––10 seconds #9––10 yards––weak hand pickup; gun on ground, butt to strong side, start standing, strong hand in small of back, retrieve handgun, 1 rd on each target––5 sec #10––12 to 8 yards––2 rds each target while moving forward from 12 yds––5 sec #11––15 yards––transition drill; start with hands at shoulder level as if holding rifle, 1 rd on each target––4 sec #12––20 yards––start standing; drop to prone, 2 rds on each target––10 sec #13––25 yards––start behind barricade; 2 rds on each target standing, perform tactical reload under cover(retain/stow partial mag), 2 rds on each target kneeling––24 sec |
|
|
GA, USA
|
[#11]
1/2 and 1/2 drill (vtac)
All from standing, start at the low ready. you will need 1 target ipcs, idpa etc. 30rds (ar) shot timmer. obviosusly the goal is to get A zone hits. 1) 20yds, fire 10rds in 10 sec. 2) 10yds fire 10rds in 5 sec. 3) 5yds fire 10rds in 2.5 sec. |
|
|
GA, USA
|
[#12]
1-5 drill(vtac)
all from standing, start at the low ready. you will need. 3 x targets, 5yds away 1 yd approx appart. again Ipsc, idpa etc ( i do this at 5,7,10,15,and 25yds.) going for the A zone. shot timmer if you so choose. 15rds (ar) per run. on the beep, 1) fire 1 rd on the left target 2) fire 2 rds on the center target 3) fire 3 rds on the right target 4) fire 4 rds on the center target 5) fire 5 rds on the left target. |
|
|
GA, USA
|
[#13]
Push your limits drill (I.C.E)
3-4" circles work good for this one cadence fire. (this is a handgun drill). you will be suprised how fast you can get the hist that you need, and how quick you get them. you will need 15rds per rep. you will fire on the number(1,2,3,4, or 5 only) A) 1 one thousand, 2 one thousand, 3 one thousand, 4 one thousand, 5 one thousand. B) 1 and 2 and 3 and 4 and 5 C) 1,2,3,4,5 |
|
|
GA, USA
|
[#14]
Fight to your feet.
handgun or rifle drill, heck or both is fine too. you will need 1 tgt any kind. get down supine( on your back feet towards the target) in front of your target, with gun holsters(handgun) 1) fire 2-3rds into target form supine 2) move to sitting and fire 2-3 rds 3) move to kneeling and fire 2-3 rds 4) get to your feet engage and back away as you engage. reload when you need too. once you get the hang of this you will be able to shoot through all the transitions, and you will be back on your feet and away form the target quickly./ |
|
|
GA, USA
|
[#15]
Originally Posted By FMD:
[div style='text-align: center;']MidSouth Meltdown</center id=center> Equipment: 1 Rifle (with sling) and one magazine. 1 Pistol (with holster) and enough magazines to feed the gun for 30 rounds. 30 rounds of rifle ammo. 30 rounds of pistol ammo. Distance: Anything shorter than 25 yards (5-15 Feet is typical). Target: 2 Targets required; They may be as small as target pasters, or you can use two "zones" in a silhouette. Goal: Rifle to pistol transition muscle memory/reinforcement. The Drill: Begin by facing the target in "Sul". 1) Bring your rifle up, acquire a sight picture (remember your sights are ~2" higher than your bore), disengage your safety and fire ONE round. 2) Reengage your safety and let your rifle hang on its sling. 3) Draw your pistol, acquire a sight picture, disengage your safety (if applicable) and fire ONE round. Note: For DA/SA pistols, this shot is DA. 4) Reengage your safety (decocking if that's how your gun came out) and reholster. Re secure any holster retention device(s) disengaged on the drawstroke. Continue these four steps (changing pistol magazines when appropriate) until your rifle is empty. Performance Evaluation: If you performed the drill perfectly, you will have one rifle-caliber hole in one target, and one pistol-caliber hole in the other. If this is the case, call Ripley's, buy a lotto ticket, and await the lightning strike. Variations & Additions: Add an additional magazine of rifle ammo and magazines of pistol ammo for a total of 120 rounds, 60 revolutions. Add a sidestep to the drawstroke. Add rotation (begin at 90/180/270 from the target) to each revolution. Add an "asses, scan, tacload" to each revolution. Fire the revolution reaction-side. Fire the revolution one handed. Fie the revolution one handed with the reaction-side. "Contractor Pushups" (Tactical Response); Begin from the prone position for the rifle, stand to fire your pistol, and return to prone for the rifle. Combine any or all variations above for a truly hellish experience. i agree 100% that transitions should be trained, and as a matter of fact they can be a life saver, however i disagree with the way this drill is done. i am not trying to belittle anyone or be an ass, just want to give folks something to think about. why train yourself to fire 1 rd and transtion, this has the ability to be a training scar. instead of firing 1rd from the rife. i start with the gun empty but it charged much like you would do with the MEU SOC handgun qual. pull the rifle up get a sight picture, pull the trigger you will hear and feel the "click" and that is what you want to train, not just going through the motions of droping the rifle and drawing the handgun, it is much like training for tyoe one malfunctions, if you pull the trigger and then do a tap rack that makes little to no sense. instead use a snap cap, action trainers, dummy reloads etc. much like there is no reason to perform a speed reload when you fired the gun and there are rds in the mag still, and the slide isn't locked to the rear. all of the abpove i believe to be bad training habbits, and have the possibility of causing bad training scars. |
|
|
|
[#16]
Not to waste bandwidth, but guys...thank you for this kind of info....very much worth the price of membership. I am a team leader on a tactical unit in the Midwest, (per policy can't say which) and am always on the hunt for new skills and drills for my guys.
Please keep it coming. Romper |
|
|
|
|
[Last Edit: Opey]
[#17]
Just came across this CBP Course of Fire. Not sure if this is valid, but I like that it lists different distances, different positions and lists time alotments for each drill
|
|
|
|
GA, USA
|
[#18]
Originally Posted By topgunpilot20:
Originally Posted By Opey:
US Army Rifle Marksmanship www.globalsecurity.org/military/library/policy/army/fm/3-22-9/index.html US Army Combat Pistol Qualification Course www.globalsecurity.org/military/library/policy/army/fm/3-23-35/appa.htm US Army Alternate Pistol Qualification Course www.globalsecurity.org/military/library/policy/army/fm/3-23-35/appb.htm What the heck is up with all the blankety-blank pop-ups at global security !!!!!!!!!!!! Info not worth fighting the wal-mart ads !!!!!!!!!!!!!!! |
|
|
PA, USA
|
[Last Edit: YWHIC]
[#19]
Heres the one I came up with for my shooting range (opening soon) in West Texas..
Total DEPTH/distance needed is 145 yards Need 70 rounds of rifle ammo and 30 rounds of pistol ammo Using 8 Fed QIT Targets... need 4 'plywood' barricades with cutout for kneeling and prone cut in them.. Starting at cone A (and 20 yards from firing line) using rifle shoot 10 rounds at target (which is 25 yards out from firing line) while advancing to cone B at Cone B (which is 10 yards from firing line) transition to pistol and shoot just 5 rounds Pistol Mag Change while advancing at Cone C (which is 5 yards from firing line) shoot 5 more rounds from the pistol while advancing to firing line. sprint to the right >>>> to next station target is 50 yards out.. using rifle shoot 10 rounds into target while MOVING to the right >>>> just before getting to the next station to the right, Rifle Mag Change (take a knee to do it).. >>>>> next target is also 50 yards out there is a RIGHT barrier and a LEFT barrier.. with kneeling cut outs to use.. on Left barrier (facing target) shoot over the RIGHT cutout while kneeling 10 shots with rifle move to Right barrier and use Left side of barrier while standing with Left shoulder (aka normally week side) and 10 shots or drop to prone.. **(you can mix this up for opposite stong side shooters).. sprint to the Right>>>> to the next station.. conduct Rifle mag change (take a Knee to do it)... and transition to the Pistol.. Target is 35 yards out.. Shoot 10 rounds from the pistol.. conduct Pistol mag change.. sprint to the next target station >>>>> next target(s) are 100 yards out there is a RIGHT barrier and a LEFT barrier.. with kneeling cut outs to use.. on Left barrier (facing target) shoot over the RIGHT cutout while kneeling 10 shots with rifle move to right>>>> transition to Pistol in the middle of the 100 yard distance is a target at 35 yards.. shoot 10 shots from your pistol move to right>>>> (back on the 2nd 100 yard target) move to Right barrier and use Left side of barrier while standing with Left shoulder (aka normally week side) and 10 shots you can also just drop to prone.. **(you can mix this up for opposite stong side shooters).. >>>> move to right.. Rifle Mag Change... last target is 35 yards out and you will advance toward while firing rifle.. 10 rounds.. crappy 1st drawing draft.. 
Al Zeller OffGridTraining.Com |
|
|
|
[#20]
All on the 6" plate at 7yds. Increase distance at your proficiency, then work in transitions from TGT to TGT.
|
|
|
|
|
[Last Edit: asicsaug]
[#21]
A drill I came up with to help me with pistol shooting but any firearm, or multiple firearms, could be used. Emphasis is on moving and shooting, shooting from cover, and shooting both primary side and reaction side. I tried omitting Target B and just running between positions of cover. Next time I think I'll try doing stationary exercises (push-ups, sit-ups, jumping jacks, squats, etc) behind the positions of cover, before moving to the opposite cover. Distances could be varied but I found that about 25 yards between positions of cover seemed about right. Perhaps someone can come up with a good name for it.

|
|
|
|
TN, USA
|
[#22]
NIce drills - good stuff. Anyone got pics of some of your rifle barricades?
|
|
|
|
[#23]
Originally Posted By Opey: USMC Marine Expeditionary Unit, Special Operations Command Qualification Course What sighting system is used for this? Gotta try this. Seems like it would be good to try with my RCO as it'll be at the optics weakest range and force me to improvise. |
|
|
|
CA, USA
|
[#24]
I was unable to view the MEUSOC qual course above. Can someone copy and paste it here?
This is the link from above: http://docs.google.com/Doc?id=d4kj7c8_8fncwvrgq Thank you- |
|
|
PRI
|
[#25]
|
|
|
|
[Last Edit: tweeter]
[#26]
Originally Posted By asicsaug:
A drill I came up with to help me with pistol shooting but any firearm, or multiple firearms, could be used. Emphasis is on moving and shooting, shooting from cover, and shooting both primary side and reaction side. I tried omitting Target B and just running between positions of cover. Next time I think I'll try doing stationary exercises (push-ups, sit-ups, jumping jacks, squats, etc) behind the positions of cover, before moving to the opposite cover. Distances could be varied but I found that about 25 yards between positions of cover seemed about right. Perhaps someone can come up with a good name for it. http://i859.photobucket.com/albums/ab158/asicsig/asicsaugdrill.jpg That's a modified Highsmith. I use something very close to your version (three targets). My version: 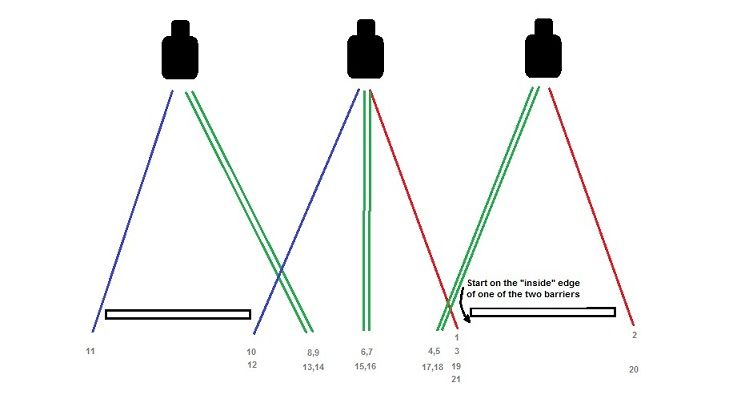
It's a good drill for shaking out non-dominant/support-side weaknesses. |
|
|
|
PRI
|
[#27]
|
|
|
PRI
|
[#28]
|
|
|
WI, USA
|
[Last Edit: chwi548]
[#29]
10-32 Solutions Standards
3 Phases of Accuracy, Pressure, and Skills that can be worked on individually or together for a aggregate qualification score. Accuracy Phase- 50 yards using a NRA MR-31C target, can be downloaded off net. 5 rds Standing 20 Seconds 5 rds Kneeling 30 Seconds 5 rds Prone 60 Seconds 150 Pts Possible, 105/70% to Qualify (5.75” 7-ring) Pressure Phase- Modified Navy Qual-MNQ--50 Yards, Par 25 sec 8-inch Circle Target, 15 Rounds, 3 magazines w/5rd ea Standing 5 Rds <RELOAD> Kneeling 5 Rds <RELOAD> Prone 5 Rds Variations: Trident Concepts rules; A) Safety must be activated prior to movements and reloads. Failure=DQ. B) Weapon charged after reload via Charging Handle. Failure =DQ. C) Kneeling-Forward leg @ 90° angle, rear foot flat, extended leg. Failure=DQ. Scoring: Misses=5 Pts Every Second Over/Under Par= 2Pts/1Pt 40 Pts or Less to Qual Expert 0-9 Sharpshooter 10-25 Marksman 26-40 Aggregate 0=40, 40=.5. Multiply X2, 80 Points possible. Skills Phase- Two targets-can be silhouettes with appropriate sized scoring zones; Target zones are 8-inch diameter COM, 4-inch diameter square, circle, or inverted triangle, 2-in column connecting the two. 50Y Pair COM Stand T1, Pair COM Kneel T1&T2, Pair COM Prone T2 1x 8 rds 8rds 25Y Run 50-25 Pair COM Stand T1 Pair COM Kneel T2 1x 4 rds 12 rds 25Y Single Brain Shot T1&T2 1x 2 rds 14 rds 25Y-15 Moving Pair COM T1&T2 1x 4 rds 18 rds 15Y Pair COM T1&T2 1x 4 rds 22 rds 15Y-10 Moving Failure Drill on T1 1x 3 rds 25 rds 10Y Pair COM T1&T2 1x 4 rds 29 rds 10Y-5 Moving Failure Drill on T2 1x 3 rds 32 rds 10Y-3 Moving Box Drill; Hammer each body, single shot each brain. 1x 6 rds 38 rds 5Y Single brain shot, T1&T2 1x 2 rds 40 rds Total Scoring: 16 COM, 4 Brain (32/8 Total). Hit Desired Area = 2pts Hit Outside Area = 1pt Miss Off Target = 0pt Maximum Possible 80 Points. 64 (80%) to qualify. Aggregate Scoring: 150+80+80=310 Points, 70 rounds Class A/Expert 310-278=90% Class B/Sharpshooter 277-248=80% Minimum Qual Class C/Marksman 247-216=70% 215-186=60% Link to PDF download of COF and MR31 |
|
|
PRI
|
[#30]
|
|
|
|
[#31]
For my first official contribution here as an instructor....
I have a compilation of pistol and carbine drills in PDF format. There's also some stuff on the fundamentals of marksmanship, targets, etc. I have attempted to give credit to the instructors who I learned the drills from. It should print nicely onto 1/2 sized sheets of paper that you can put in a little binder and take to the range. http://progunfighter.com/drills/ |
|
|
|
|
[#32]
Some excellent analysis and approach to shooting in close quarters with this one. Meat and potatoes starts at 3:20
NOIR Episode 20 with Tarvis Haley |
|
|
|
|
[Last Edit: PTD175]
[#33]
Here are a few Qual Courses from my area. Bare minimum Scores to pass are 70, 85 for Firearms instructors or our SWAT equivalent. (Almost all of our officers shoot at least an 80, with a majority shooting well above 90)
The target used can be purchased at letargets.com SKU: B-21PCT-BG. TARGET All course will use the above target. Daytime Patrol Rifle Qualification Course 50 total rounds (46 rifle, 4 pistol) Basic Scoring: All rounds in the "Coke Bottle" worth 2 points, on the silhouette outside the bottle is 1 point, off the silhouette or below the sleeves on the arms 0points. Advanced Scoring for Firearms Instructors/SWAT All rounds in the "Coke Bottle" worth 2 points, outside the bottle but in the silhouette is 0 points, off the silhouette automatic failure. ***Cruiser Ready Configuration is as follows: Bolt closed on empty chamber, loaded mag inserted, close dust cover, safety on, large aperture on rear sight*** Stage 1: 50 Yard Line, 10 Rounds, Prone position in 60 seconds Start standing, weapon in the cruiser ready configuration with a 5 round magazine and an additional magazine loaded with 5 rounds. When the target turns (or at the command of fire, beep, whatever device you use) assume a prone position and fire 10 rounds in 60 seconds, reloading as necessary. Stage 2: 50 Yard Line, 10 Rounds, Kneeling or sitting in 60 seconds Start standing, weapon in the cruiser ready configuration with a 5 round magazine and an additional magazine loaded with 5 rounds. When the target turns (or at the command of fire, beep, whatever device you use) assume a kneeling or sitting position and fire 10 rounds in 60 seconds, reloading as necessary. Stage 3: 25 Yard Line, 10 Rounds, Standing to kneeling in 45 seconds Start standing in the low ready position, loaded with a 5 round magazine, and have one additional 5 round magazine. On the signal to fire, fire 5 rounds standing and 5 rounds kneeling in 45 seconds, reloading as necessary. Stage 4: 15 Yard Line, 8 Rounds, Standing in 15 seconds Start standing in the low ready position, loaded with a 4 round magazine, and have one additional 4 round magazine. On the signal to fire, fire 8 rounds standing in 15 seconds. ***At this point load one rifle magazine with 1 round and stow it in a pouch, pocket, and load the other magazine with 7 rounds and load your rifle. Additionally, if it has not been done, go ahead and load and charge your pistol with a 4 round magazine.*** Stage 5: 7 Yard Line, 6 rounds, standing 3 rounds in 3 seconds (Repeat once) Start standing in the low ready position, loaded with the 7 round magazine. On the command to fire, fire 2 rounds center mass and 1 round to the head in 3 seconds. Repeat for a total of 6 rounds. Stage 6: 7 Yard Line, 6 Rounds (2 rifle, 4 pistol), standing 3 rounds in 10 seconds (Repeat once) Start Standing in the low ready position, with 1 round in the rifle. On the command of fire, fire 1 rifle round center mass, then transition to pistol with movement and fire 2 pistol rounds center mass in 10 seconds. Repeat for a total of 6 rounds. More courses to follow. |
|
|
|
CO, USA
|
[Last Edit: TonyF]
[#34]
Edit: TonyF
|
|
|
PRI
|
[#35]
The FBI Qualification Test
The current FBI qualification test is a timed 60-round test typically shot on a FBI-Modified QIT target. All strings are fired from the holster, as you aren’t walking around in public with a gun in your hands only count those scores within the upper chest and head; low hits within the dotted gray line are considered misses. The strings of fire are as follows. You start when you hear the shot timer. •At 3 yards, 3 rounds, strong hand only in 3 seconds. (fired twice) •At 3 yards, 3 rounds strong hand only, switch hands, 3 rounds weak hand in 8 seconds. (fired once) •At 5 yards, 3 rounds in 3 seconds. (fired 4 times) •At 7 yards, 4 rounds in four seconds (fired twice) •At 7 yards, fire 4 rounds, reload, then fire for more rounds in eight seconds (fired once) •At 15 yards, fire 3 rounds in 6 seconds (fired twice) •At 15 yards, fire four rounds in eight seconds (fired once) •At 25 yards, move one step to “cover,” (a real or imagined barricade), fire two rounds standing, kneel, and fire 3 rounds kneeling in 15 seconds. (fired twice) From 5 yards and out, you shoot with both hands on the handgun. 48 hits out of 60 (80%) are required as to obtain a passing score, and shots fired after the shot timer stops are considered misses. FBI instructors are required to make at least 54 of 60, or 90% of hits. |
|
|
|
[#36]
New Mexico Regulation and Licensing Department Qual for Private Investigators and Level 3 Armed Security
50 Round Day Qualification Stage I: 6 Rounds. 7 Yard Line. 1. Draw, shoot a failure drill in 10 seconds, 2. Draw, shoot a failure drill in 10 seconds MAKE SAFE, Mark (2) head shots on target. Stage II: 6 Rounds. 25 Yard Line. 1. Draw, go to a roll over prone position and shoot two rounds in 10 seconds 2. Draw, go to a kneeling position (CHOICE), shoot two rounds in 10 seconds. 3. Draw, go to a kneeling position (CHOICE), shoot two rounds in 10 seconds. Stage III: 6 Rounds. 15 Yard Line. 1. Draw, shoot two rounds in 10 seconds 2. Draw, go to a kneeling position (CHOICE), shoot two rounds in 10 seconds. 3. Draw, go to a kneeling position (CHOICE), shoot two rounds in 10 seconds. Stage IV: 18 Rounds. 7 Yard Line. 1. Draw to the low ready and transition to the support hand low ready, shoot two rounds in 10 seconds. Break to the support hand low ready. 2. Support hand low ready, shoot two rounds in 10 seconds. Transition, holster. 3. Draw, shoot two rounds, speed or tac load, and shoot two more rounds in 10 seconds. 4. Draw, shoot two rounds, speed or tac load, and shoot two more rounds in 10 seconds. 5. Draw, shoot two rounds in 10 seconds. 6. Draw, shoot two rounds in 10 seconds. 7. Draw, shoot two rounds in 10 seconds. Stage V: 10 Rounds. 5 Yard Line. 1. Draw, shoot two rounds in 10 seconds. 2. Draw, shoot two rounds in 10 seconds. 3. Draw, shoot two rounds in 10 seconds. Draw, shoot two rounds, speed or tac load, and shoot two more rounds in 10 seconds Stage VI: 4 Rounds. 1 Yard Line. 1. Draw to a weapon retention position, support hand on head or behind back, and shoot two rounds in 10 seconds. 2. Draw to a weapon retention position, support hand on head or behind back, and shoot two rounds in 10 seconds. |
|
|
|
|
[#37]
Originally Posted By DakotaLawDog:
For my first official contribution here as an instructor....I have a compilation of pistol and carbine drills in PDF format. There's also some stuff on the fundamentals of marksmanship, targets, etc. I have attempted to give credit to the instructors who I learned the drills from. It should print nicely onto 1/2 sized sheets of paper that you can put in a little binder and take to the range.http://progunfighter.com/drills/ Great stuff in the drill book. Thanks |
|
|
|
PRI
|
[#38]
This was posted quite a few years back.
DHS Course of fire with M4: 50 rounds total - start with a 30 round mag and have 20 rounds ready for reload course of fire: 100 yards: 5 rounds kneeling, 5 rounds prone (semi-auto on both) 50 yards: 5 rounds standing, 5 rounds kneeling, 5 rounds prone (semi-auto on all) 25 yards: 5 rounds standing : emergency reload and 5 more standing (semi-auto on both) 7 yards: three commands of fire, two shots each (still in semi auto only) next at the 7 yard line is: three commands of fire, in three shot burst mode DHS - USBP 100 yd line: 15 rounds Shooter’s choice of standing, sitting, kneeling or prone. Shooter must fire five shots from any three of the four different positions. 2 minutes for each position. 25 yd line: 10 rounds, (6 standing; 4 kneeling). Standing – starting in high search, fire 2 shots each target facing for a total of 6 shots. 4 seconds each facing. Kneeling – starting from standing in high search, drop to kneeling and firing 2 shots each target facing for a total of 4 shots. 5 seconds each facing. 15 yd line: 10 rounds (Full Auto) Shooter loads first magazine with 6 rounds and a second with 4. At the facing, shooter fires the first 6 rounds in two shot bursts until empty, reloads the 2nd magazine and fires the remaining 4 rounds in two shot bursts. One facing for all 10 rds, 15 seconds 7 yd line: 15 rounds (Full Auto) Three shot burst each target facing, 2 seconds. Repeat for a total of 15 rounds. Total rounds fired is 50 for a possible score of 250. Minimum is 175. Target is a TQ 15. Body hits are 2 pts, outer ring hits are 4 pts. Inner ring hits are 5 pts. |
|
|
|
[#39]
Canadian Armed Forces Personal Weapons Test 1:
 Canadian Armed Forces Personal Weapons Test 1 |
|
|
|
 Win a FREE Membership!
Sign up for the ARFCOM weekly newsletter and be entered to win a free ARFCOM membership. One new winner* is announced every week!
You will receive an email every Friday morning featuring the latest chatter from the hottest topics, breaking news surrounding legislation, as well as exclusive deals only available to ARFCOM email subscribers.

AR15.COM is the world's largest firearm community and is a gathering place for firearm enthusiasts of all types.
From hunters and military members, to competition shooters and general firearm enthusiasts, we welcome anyone who values and respects the way of the firearm.

Subscribe to our monthly Newsletter to receive firearm news, product discounts from your favorite Industry Partners, and more.
Copyright © 1996-2024 AR15.COM LLC. All Rights Reserved.
Any use of this content without express written consent is prohibited.
AR15.Com reserves the right to overwrite or replace any affiliate, commercial, or monetizable links, posted by users, with our own.


