IN, USA
|
Posted: 5/20/2010 5:00:53 PM EDT
I am buying this steel target from Wideners tomorrow.
http://www.wideners.com/itemdetail.cfm?item_id=8807&dir=16|49|890 Trying to do the steel target thing on the cheap. Need some help on some stand ideas. Pics would be helpful. Thanks! |
|
|
AL, USA
|
[#1]
Bumped to follow
Inquiring minds want to know. |
|
|
CA, USA
|
[#2]
|
|
|
|
[#3]
find you a nice real estate sign in the next neighbor hood down the street

|
|
|
|
GA, USA
|
[#4]
Permanent install or something you can transport easily?
Rebar bent into a squared off "C" can be pushed into the ground, unless its really hard or rocky. Hardware store shackels to hang the plate. |
|
|
USA
|
[#5]
Unless you are looking to create a mount that will be permanent and last for years (or a dozen direct hits) you should build it out of 2x4 lumber and hang the steel on rope. Hang it off the front of the stand so that splash coming off the plane of the target (at rest) won't hit the wood or rope. I have run many classes/events shooting thousands of rounds at steel, and wood + rope is the way to go: cheap, strong, light-weight, soaks as many hits as anything, doesn't get sharp edges when damaged... Sounds too simple but it just works well. If this is for permanent installation then you might want to use chain, but the only advantage I've ever found for steel is that it isn't weakened by sunlight the way rope will be over time. Keep some extra carriage bolts, nuts, and washers around ~it's not that uncommon for someone to hit a bolt straight-on and ruin it. Best of luck. . |
|
|
IL, USA
|
[#6]
DIY...

A little angle iron, some piping, and some know how... |
|
|
KY, USA
|
[#7]
Ill have to post pictures of mine I built sometime for ya, but here are the materials
(1) 14''Wx30''L AR500 3/8'' steel sheet (2) Climbing Carabiner latches with small chains hooked on them (1) 3' 2x4 peice of wood with screw in hooks to attach the metal and target to let hang and swing (4) 5' rebar sticks for legs Thats pretty much it. I drilled 2 holes in the top corners of the steel, hooked in the carabiners and hung the chains to the hooks on the wood. I drilled 4 angeled holes in the 2x4 so I could space out the legs and make them look like /\/\ or something along that design. Close to 500+ rounds of .223, and 100 rounds of 7.62x54r and you can barely tell its been hit. When the bullet hits the steel and it swings back, it throws the casing down in to the ground eliminating a chance of richochet. |
|
|
|
[#8]
Awesome info
|
|
|
|
|
[#9]
Out of archives
|
|
|
|
|
[#10]
no love for this info?
|
|
|
|
KS, USA
|
[#11]
Originally Posted By luv_the_huskers:
no love for this info? It is good info but for the cost of THESE I would rather buy it all together and not have to worry about having to use chains and rig my own stand. |
|
|
|
[#12]
I love this thread
|
|
|
|
OK, USA
|
[#13]
Originally Posted By ander254:
find you a nice real estate sign in the next neighbor hood down the street That is what I use. Just hang the target from the top with chain. Works great, well until I shot the chain. |
|
|
TX, USA
|
[#14]
We welded a rebar stand together and weld a piece of pipe to a steel plate. The top piece of rebar is slid into the pipe and the legs are welded on. This let's the steel plate hand and it a really tough stand. I will try and post so pictures soon. They are at my ranch
|
|
|
PA, USA
|
[#15]
I made 4 target stands using old fence posts and lots of nails. then I hung the targets up with twine in such a way that they were angled.
When I needed the targets to be higher (so I could see them over a fence) I knocked over a bail of hay and put the target stand on top of that. It worked well I could move the bail anywhere I needed it with a tractor and just put the target stand on top of it. |
|
|
|
[#16]
from my post in hometown.
Thought I would posts some pictures of my new targets and give some info in case anyone is looking to make their own. My goal was to make a target that could be set up by one person, with cheap, easily replaceable mounts protected by the target, for both pistol and rifle practice. I had some IDPA size targets made up by a local metal supply shop. They are made out of 3/8" thick Hardox 500 which from what I have read, is equal to AR500. Targets also have laser etched IDPA score zones which does not come through in the pictures very well or in person. Next run will have to try a deeper cut or multiple side by side passes to increase the width. Chain is 5/16" and the bolts are 7/16". They fit through the links pretty well. I had square holes cut in the targets so I could use carriage bolts but I made them to small. Should be .450" instead of .4375". Chain is wrapped around the post with a 7/16" bolt which rests on the notches in the t-post. Might cut the chain and go with a u-bolt style mount to alleviate the binding of the chain as it wraps around the t-post which can cause the target to hang crooked although the single chain makes for a nice carry handle. Base is 2"x2" 1/8" wall tubing. Jamed some 3/4" conduit in there to take up the slop. Might also try multiple pieces of 1/2" conduit. Updated version of the base has the angle iron running at 45 degrees and the tubing about 5" off the ground to limit contact points on the ground. Angle iron also has hole drilled in it to allow for rebar stake to keep from tipping forward or moving. Will use base for pistol work and pound t-posts into the ground on the rifle range. Angle of the target is about 8 degrees forward when post is vertical. Helps for some deflection and absorption. I played with the mounting points to see what angles I would get. The lower the mounts on the target the greater the angle. Thinking I will move them bolts out as far as I can on the next run but keep the height the same. Base 
Angle 
Chain Mount 
Full View (sorry for the crick in your neck) 
Option Mount 
|
|
|
|
|
[#17]
Appreciate the original post is over a year old, but the topic is obviously still relevant!
In terms of Steel Targets, some things to consider, Bullet Splatter - when the bullet hits the steel it turns into a fan of fine metal particles that will shred anything other than very hard steel. If you use wood or plastic to make any part of your stand that runs inline with the steel target it can get cut into shreds in very little time! I have seen a 2"x4" cut to the point of failure with less than 50 rounds of impact on the target from the splatter. Chain / Shackles for Hanging - this is a very common practice, but unless you are using very large hardened hardware, which are way too expensive, then a single round impact on the chain can take it out of action. The chain can handle the bullet splatter, but it can't take many direct hits, so it can be a factor if missing the target is going to be common practice. I have tried about everything, the best that I have found so far, Old Fire Hose, Heavy Straps, or Old Conveyor Belt - assuming they are of adequate strength and thickness, these materials can take hundreds if not thousands of bullet impacts without failure. We have multiple first hand examples where a 1 3/4" Fire Hose has had hundreds of hits and is still holding the target in place. Key to making it last is protecting it from the bullet splatter by slightly canting the steel plate at an angle. This way the bullet splatter does not come off the top of the plate and into the straps holding it. We accomplish this by placing a small piece of wood or steel between the plate and hose when we mount them, this kicks the top of the plate out and angles the bottom of the target in. Rebar & Bracket - we have been using rebar for legs and cross braces in conjunction with a metal pipe bracket to hold them together. The rebar can easily handle the bullet splatter, and can in some cases take a bullet impact without failure. If a leg or cross brace does get cut, it is very easy, quick, and cheap to replace. There are a number of people selling these brackets, and they are pretty easy to make on your own if you any fabrication skills. Some examples of what I am talking about: 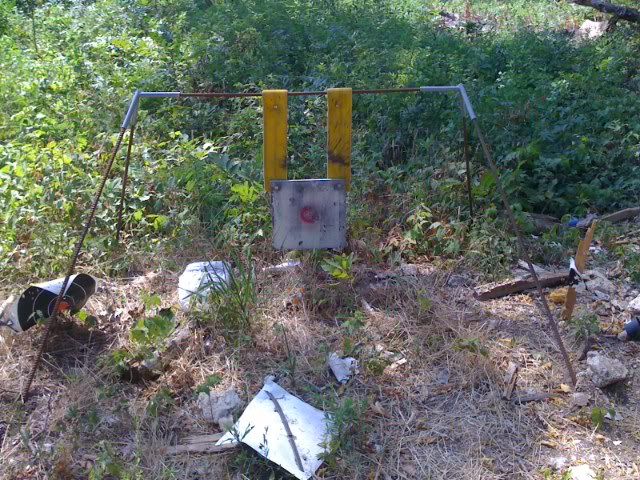
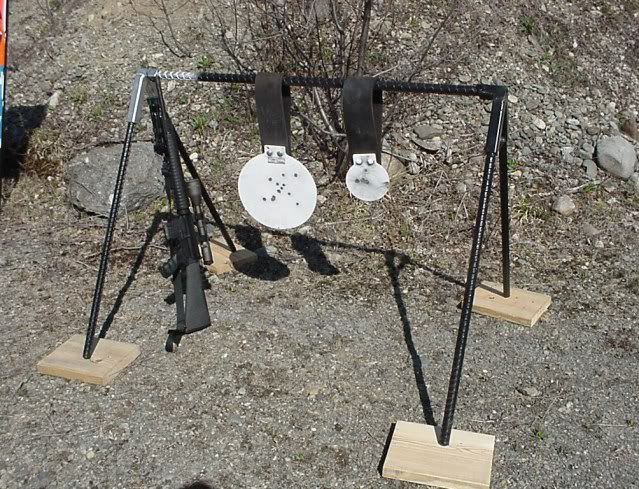
A long range shooter who makes & sells brackets http://www.acetargets.com/ Best of Luck, M Richardson |
|
|
|
 Win a FREE Membership!
Sign up for the ARFCOM weekly newsletter and be entered to win a free ARFCOM membership. One new winner* is announced every week!
You will receive an email every Friday morning featuring the latest chatter from the hottest topics, breaking news surrounding legislation, as well as exclusive deals only available to ARFCOM email subscribers.

AR15.COM is the world's largest firearm community and is a gathering place for firearm enthusiasts of all types.
From hunters and military members, to competition shooters and general firearm enthusiasts, we welcome anyone who values and respects the way of the firearm.

Subscribe to our monthly Newsletter to receive firearm news, product discounts from your favorite Industry Partners, and more.
Copyright © 1996-2024 AR15.COM LLC. All Rights Reserved.
Any use of this content without express written consent is prohibited.
AR15.Com reserves the right to overwrite or replace any affiliate, commercial, or monetizable links, posted by users, with our own.


