|
[#1]
you could just touch it with an endmill and hit the bare area with alumihyde or sharpie.
I'm sure any machine shop could do it trivially - you're not taking much metal off, and you have a huge hole for the center finder to work with. I hate to even suggest this, but you could probably even do it with a drill press and an end mill, since you're just plunging in. |
|
|
|
[#2]
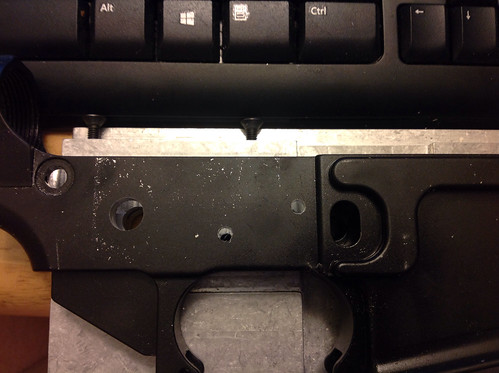
Do have a pic of the hole? I had the same problem with a DD lower. Turned out the take down pin head was too big. I found one with a slightly smaller dia head and it worked out.
|
|
|
|
[#3]
I thought about that but wasn't sure if that was viable so thanks for the confirmation. I will need to check into Alumahyde as I have never used it before or possibly Aluminum Black if I just want it to be black. My wife works at a small machine shop that has a CNC mill, Bridgeport, lathe, etc. so I bet the guy that runs it can help me out if the below option doesn't work.
I did talk to the machinist and he mentioned just making a new takedown pin as well that would have the hole moved inward slightly. Does anyone know if the pin is case hardened or through hardened? |
|
|
|
[#4]
Quoted:
Do have a pic of the hole? I had the same problem with a DD lower. Turned out the take down pin head was too big. I found one with a slightly smaller dia head and it worked out. I don't think it is the pin as you can see there is no recess(maybe .001" deep) milled into the lower. 

|
|
|
|
[#5]
Slight update....
I was looking at the takedown pins last night and found that the thickness of the head varied greatly (.020"+) between 3 pins I have. Talking with a machinist that works with my wife he said to bring stuff in today so I just dropped it off. My solution is to chuck the pin in a lathe and take some of the thickness down on the inside of the head closest to the closed position detent hole. He thought that would work great and be easy so he said to drop by after lunch and check it out after he got it done. I figure I'd rather ruin a couple dollar pin than mill the lower immediately. |
|
|
|
[#6]
It has been resolved.
I called Essential Arms and was told that I could send it in but that he hadn't ever heard of or seen that problem before. In the meantime the machinist that my wife works with took 3 pins, the lathe, and a cutter and shaved off enough material from the underside of the pin head to make them all engage the detent perfectly!! I am VERY happy with the results and will be sure to reward him as he is a gun guy and has saved me a bunch of work and worry over this problem. 
|
|
|
|
[#7]
|
|
|
|
[#8]
Quoted:
Glad it worked out for you. For the record, here's what the two lowers I completed recently look like: <a href="http://www.flickr.com/photos/ryjones/9704723261/" target="_blank">http://farm3.staticflickr.com/2854/9704723261_a1c3a73297.jpg</a> Parts by Ry Jones, on Flickr You can see where EA started to cut, and stopped right away. The ones on these lowers are much deeper (and more like my Bushmaster lowers) I am happy with this solution. Sending it in would have required time, $$, and the possibility of it getting lost/damaged which I didn't like. The one you posted is what it should look like and is what the other 8 or so lowers I have assembled looked like but I missed that on this one sadly or I wouldn't have used it. I was told they would make the cut and re-coat it with Tuff Coat so they did say they would fix it but it just wasn't worth it when I can have a $3 part modified and it will work just fine without any risk. |
|
|
|
[#9]
oh yeah, I'm not arguing with your solution, I just thought it was weird that they clearly started the cut then stopped.
|
|
|
|
[#10]
Quoted:
oh yeah, I'm not arguing with your solution, I just thought it was weird that they clearly started the cut then stopped. I didn't think you were arguing and appreciate the pictures. I find it odd that they stopped too but they did on 2 of the 4 EA lowers I have seen now. My brother has one with the same problem that I just assumed was a bad detent or something until I saw my problem. We confirmed his is the same way. We have 3 lowers that have consecutively serial #'s and 2 of them are this way. A friend has another one purchased at the same time and it has the recess machined full depth so who knows what happened. They were all purchased late 2008 to early 2009 so it may have been a "panic" oops. |
|
|
|
[#11]
Interesting. I had to get up to check it buy my EA lower is the exact same way but functions fine.
|
|
|
|
[#12]
Quoted:
Interesting. I had to get up to check it buy my EA lower is the exact same way but functions fine. This one (and I assume the other problem lower) both worked fine when you dropped the detent in the first time along with the spring. When the end plate was put on it would engage, however, every time after that it would fail. I always thought it was a spring or detent issue with the other lower but didn't worry much about it figuring I would fix it later but the second lower doing it made me curious. I learned that from now on I will buy test lowers thoroughly before proceeding with any kind of permanent paperwork submission |
|
|
 Win a FREE Membership!
Sign up for the ARFCOM weekly newsletter and be entered to win a free ARFCOM membership. One new winner* is announced every week!
You will receive an email every Friday morning featuring the latest chatter from the hottest topics, breaking news surrounding legislation, as well as exclusive deals only available to ARFCOM email subscribers.

AR15.COM is the world's largest firearm community and is a gathering place for firearm enthusiasts of all types.
From hunters and military members, to competition shooters and general firearm enthusiasts, we welcome anyone who values and respects the way of the firearm.

Subscribe to our monthly Newsletter to receive firearm news, product discounts from your favorite Industry Partners, and more.
Copyright © 1996-2024 AR15.COM LLC. All Rights Reserved.
Any use of this content without express written consent is prohibited.
AR15.Com reserves the right to overwrite or replace any affiliate, commercial, or monetizable links, posted by users, with our own.