|
[#1]
Yep, you need to set the boring bar cutting edge so the bar cutting edge is in line with the postive movement of the head adjustment that is going to be advanced out wards, and with a slight positive rake to the line.
The lines top to bottom line is the line movement of the boring head movement to it spindle shaft, the cross line is the line of the spindle of the boring head that you can see the head has been advanced past this spindle center line, the V arrow is the direction that the head will be advanced outward to cut a larger radius bore each step, with the boring bar cutting insert set with a slight positive rake to the heads center line advance of the boring head movement each step outwards( the leading edge of the insert is always the leading edge on the heads cutting radius circle movement). 
With the major negative rake you have the boring bar inset set up now to the movement line of the head leading edge, the boring bar tip cutting edges has not support, and your going to just crack the cutting leading edge off the carbide tip instead. Note, think cutting edge of the insert and direction of cut pressure, and the amount of material the insert edge has behind in when it touches the stock and starts to cut it. 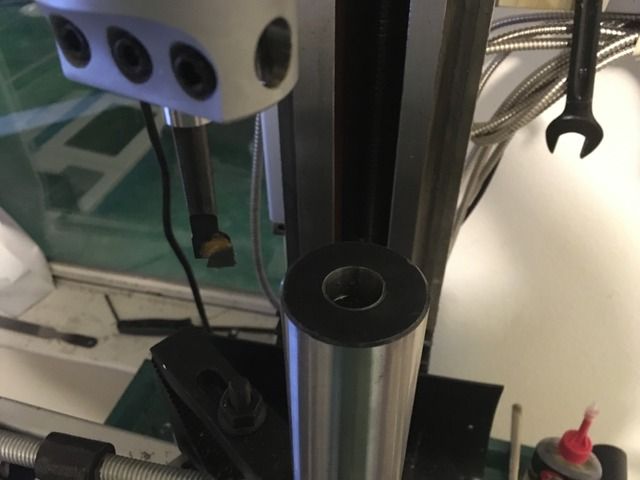
To add, the way you have the bar stock set so high above the vise, you going to make a mess of it, Even if you can get the bolt channels EDM cut afterwards, The through bore in the receiver is best done in a lathe, even if you are trying to save edm wire from not having to cut the center bore channel as well. Hence true the round stock up in a spider, drill the through channel a few thousands smaller than needed, the run a finish reamer for a perfect through channel instead. Simply with the reach of the boring bar, and the smaller deep channel it would need to bore, even with a bunch of final passes to bring the channel up to spec with a single point cutter, the boring bar is going to have too much flex with it trying to reach that far out from it support. Now you can either broach or EDM cut the bolt lug channels. From there, go to town on boring and threading the barrel channel/setting the initial locking lug face surfaces in the lathe, then you can finish the rest of the receiver on the mill. |
|
|
|
[#2]
I recommend not using "PH" in conjunction with 4140 or other carbon steels as it has a specific meaning in metallurgy.
PH means precipitation hardening. Not "pre hardened". |
|
|
|
[#3]
Quoted:
I recommend not using "PH" in conjunction with 4140 or other carbon steels as it has a specific meaning in metallurgy. PH means precipitation hardening. Not "pre hardened". Yeah, yeah. And I suppose you think this --> .1 is a tenth, too.  We all know it's "HT". But everyone calls it pre heat treated. |
|
|
|
[#4]
Quoted:
Yeah, yeah. And I suppose you think this --> .1 is a tenth, too. We all know it's "HT". But everyone calls it pre heat treated. Quoted:
Quoted:
I recommend not using "PH" in conjunction with 4140 or other carbon steels as it has a specific meaning in metallurgy. PH means precipitation hardening. Not "pre hardened". Yeah, yeah. And I suppose you think this --> .1 is a tenth, too. We all know it's "HT". But everyone calls it pre heat treated. That's a thousand tenths, and even the machinists I've been around don't talk that way! What I really like are advertisements for "1000 millionths accuracy", or some such nonsense. On the heat treating, I'm referring to writing the condition as 4140 PH, instead of 4140 HT (HT to what?!). PH13-8M0 is a proper use of "PH", and it's even part of the alloys name in this case. Something interesting I ran across this spring was whining about heat treat of carbon steel splines and gears with the usual process, and a guarantee of mechanical properties over a 20 ksi span. I don't know if the guy ever got it, maybe they plan to reject every part that didn't harden to the upper end of the range for the heat treat condition specified. |
|
|
|
[#5]

I finished boring the barrel shank. I bored it to exactly 1.002" or so. I'm waiting for the tap to arrive. Will worry about what's behind that later on. I will need to find some way to lap or level the shoulder in the receiver, any suggestions? I will post a pic of the EDM blank as soon as it arrives. I can do the same to the EDM blank as well. |
|
|
|
[#6]
I think I would wait until the inner bore was all there and make something that rides in there. Then you would be fairly sure everything lines up.
|
|
|
|
[#7]
Quoted:
<a href="http://s107.photobucket.com/user/rahimiiii/media/002_zpsaz0rw5av.jpg.html" target="_blank">http://i107.photobucket.com/albums/m320/rahimiiii/002_zpsaz0rw5av.jpg</a> I finished boring the barrel shank. I bored it to exactly 1.002" or so. I'm waiting for the tap to arrive. Will worry about what's behind that later on. I will need to find some way to lap or level the shoulder in the receiver, any suggestions? I will post a pic of the EDM blank as soon as it arrives. I can do the same to the EDM blank as well. Your working it backwards. Start with the barrel in a lathe since IIRQ, your going to be using one already threaded, and see what needs to be cleaned up on the barrels threads and shoulder to get them concentric to the bore/chamber line on the barrel. Once you have that cleaned up, then you know what to threaded the receiver and set the threaded depth to get you close for the barrel isntall . Also, until you get the bolt channel completed, you have nothing to square the receiver to, to start truing the barrel channel and receiver lugs to center line of the bolt channel. As for running a threading tap on anything, short of say the scope mount threaded channel, the barrel channel needs to single point lathe cut to keep the threaded channel square with the bolt channel. Hence on a production action to clean it up, you are first squaring the receiver up against the bolt channel on the lathe, then you are squaring the threads (ending up with them over sized), facing the end of the receiver to the center line of the bolt channel, and them squaring the face of the receiver locking lugs up to the bolt channel. This now sets what the new barrel will need to be threaded (to match the new threads on the receiver), and even if the bolt handle will need to be removed and re-brazed back on (if the receiver bolt lugs had to be faced way back to get them squared to the bolt channel center line, and now the handle no longer fits correctly to the bolt handle slot in the receiver). As for a receiver from scratch, you really never want to start with your round stock at final OD. Hence when the bolt channel is created, it not always going to be concentric to the OD of the stock piece, and with it being over sized in OD, this allow you to center the piece on the bolt channel in the lathe, then turn the OD down to the final dimensions so the OD of the receiver is square to the bolt channel. Again, on a production 700 receiver, 99.9% the bolt channel is not square to the OD of the receiver, so that is why you never, never trying center the piece in a lathe off the OD of the receiver (center line of bolt channel always driving the bus). |
|
|
|
[#8]
Quoted:
That's a thousand tenths, and even the machinists I've been around don't talk that way! What I really like are advertisements for "1000 millionths accuracy", or some such nonsense. On the heat treating, I'm referring to writing the condition as 4140 PH, instead of 4140 HT (HT to what?!). PH13-8M0 is a proper use of "PH", and it's even part of the alloys name in this case. Something interesting I ran across this spring was whining about heat treat of carbon steel splines and gears with the usual process, and a guarantee of mechanical properties over a 20 ksi span. I don't know if the guy ever got it, maybe they plan to reject every part that didn't harden to the upper end of the range for the heat treat condition specified. Every toolmaker in every shop I've ever been in, when they said a "tenth" they meant a "tenth of a thousandth" aka one ten thousandth of an inch. The old joke is "Have you ever worked in tenths?" but the "tenths" is slurred in to "tents". The pat answer is "Well, I've worked in a couple alley shops before but never in a tent". 
It's funny, when I first started the trade, my aunt worked at Fischer Body as a die grinder. I mentioned that I was holding tenths on the grinder that day. She said she holds tenths every day and it's no big deal. Measures with a scale. I said, "No, tenths of a thousandth. .0001".
"Oh". I've worked with 17 and 15- 4- PH quite a bit in the aerospace field. Spec on 4140 HT is 28-32 Rc C scale. There are other pre hardened steels. NAK 50 is about 40 Rc and is an extremely good (Japanese iirc) steel. Very stress free and great for emergency jobs where there's no time for HT. |
|
|
|
[#9]
I think my point about "tenths" blew right past; I know how it's used in the shop.
My point about "HT" is that there are many choices, I can specify heat treats of 4140 from annealed and normalized to 220 ksi condition. (Last winter I was hunting for a piece of pre heat treated plate to use on my blacksmith anvil and I was surprised by the prices, plus I would like to use a harder heat treat.) We are illustrating the different ways we think about these materials. You have a notion about what 4140HT means for your uses and needs, and I have another one. I think in terms of the strength of the material in ksi, and have to use a hardness table for translation if I'm faced with a material that is presented as having some Rockwell hardness without the rest of the story. Each heat treat specification produces material heat treated over a 20 ksi range. In other words, if I specify heat treat to 140 ksi per process spec "1", the resulting material will exhibit 120 to 140 ksi ultimate strength, or hardnesses of Rc 26 to 31. If I chose spec "2", the next one in the list without any other control, the result would be 125 ksi to 145 ksi (Rc 27 to 32.5). What I would do in real life for a part that let's say I required to be 140 ksi, is specify, "Heat treat to 140 ksi minimum (Rc 31.5) per process spec 4." , knowing that I might have to live with parts that came out of tempering at 160 ksi. As part of the analysis, I would take a look at other properties than the ultimate strength, mostly the ductility and yield strengths. I probably would not specify mid range properties without a remarkable reason that justified the scrap rate, and an expensive materials testing project to develop the allowables for that essentially unique material would be necessary to justify choosing a particular strength. That ain't gonna happen. A nice feature of working 4140 is that heat treat processes are available that produce overlapping ranges in the strength. 4340 and 6150 are two others. The rest process in steps such as 120 to 140 ksi, then 140 to 160 ksi, then 160 to 180 ksi, and so on. It's too bad carbon steels love to rust, they can be used to produce really great parts with smart choices. |
|
|
|
[#10]
I think we may be talking past one another.
Yes, you can take 4140 ann and heat treat it to any Rc you wish up to about 55. If you want harder, you can nitride it in one of several different ways or carburize and harden (which I've never heard of being done with that material). But, there's a specific material called 4140 pre-heat treat. Designated 4140 HT and industry standard Rc is 28-32. OP said he had a bar of 4140HT and then said it checked 40 Rc. That is out of spec for that material designation. I don't know where he got the material. It's possible someone mistakenly sold him some NAK50 or similar. |
|
|
|
[#11]
I don't know if it is truly 4140 pre hard but the eBay description says it was turned and ground to 1.5 inch, it has been hardness tested to 40rc, and he said it was used as some kind of a pin or something. Whatever it was it is heavy, strong, and hard to machine enough that I believe what it says. Standard pre hard is probably around 28-32 rc but it is clear whatever this is has been heat treated further. It could very well be stainless given how it would not rust much at all
|
|
|
|
[#12]

I just got the blank from Gary. I can fit a small ring mauser bolt inside the raceway (I won't be using that of course). On request I also asked for the "reaction rod" that the EDM inevitably leaves as it does the work... he said it makes a good action wrench. |
|
|
|
[#13]

To address the problem with indexing, but also to give me a good way to clamp this thing while I'm working on it, I milled a flat on all 4 sides. It's a very small flat and I can remove them if I want to (the bar stock is much bigger than the receiver). |
|
|
|
[#14]

Now I mill the back of the receiver to create the tang (the object here is to reduce the amount of metal that I have to bore and "broach") One thing I have discovered: for operation like this a 1 inch HSS end mill I got for free at my university's machine shop worked great. The large HSS end mill has better ventilation so it won't heat up the metal as much, and the few time I dulled the cutter (work hardening or whatever) I just took the end mill to a bench grinder and sharpened it and kept cutting. End mill this big is easy to sharpen with a bench grinder, and the fact that I got it for free is even better. The reason they threw this end mill in a scrap bin is because it basically broke... but there was enough shank that I can still grip it with an ER collet. This 4140 is very hard to cut and I basically chipped my carbide end mill trying (I do not know if it's due to thermal shock or whatever) Simple HSS tools such as boring bar and large end mill is actually better because the worst I can do is dull them, at which time I can just go and sharpen it with a grinder and keep on cutting. |
|
|
|
[#15]

Moving on... I just got the tap from China... it was really cheap for what it is (a giant stinkin tap). I was able to start it, using the mill for alignment and once it got a couple of turn in, it basically aligns itself. I have test fitted a barrel onto it and it is spot on, however the problem is I need a much longer wrench to turn this giant stinkin tap against hardened steel. I will need to go to Walmart and buy a big wrench to finish this operation. By the way as for the guy who earlier talked about having a friend EDM the raceway: Gary essentially told me that the blank he sold me used about 3000 meters of wire, so that's at least 30 dollars in wires alone. Then he said it took about 8 hours to actually cut the blank, so factoring in the cost of electricity, the wire, the guy's labor (watching the machine for 8+ hours to cut that thing) really does put into perspective how expensive it gets. Perhaps if steps were taken to reduce the amount of EDM time, such as bore a .700" hole down the middle, machine the 1" hole in the front, and then machine out the tang area, this could cut down the amount of time and wire used for the EDM process but I suspect it will still be expensive. I'm just wondering if anyone could actually make a 80% (you know machine out the rails, etc. and send it to the ATF for a determination letter). The only problem I see is it will most likely not be something that a person can complete with only a drill press. At minimum I think the front portion and the threads inside the receiver ring can't be done, and holes would have to be drilled... If someone could figure out how to make a 80% that requires some milling, precision drilling, etc. then he could make a lot of money... |
|
|
|
[#16]
You have your mill in a carpeted bedroom?
|
|
|
|
[#17]
It's the only room I have at the moment, so I have little choice.
|
|
|
|
[#18]
Quoted:
It's the only room I have at the moment, so I have little choice. I welded a glider fuselage in the living room of an apartment. I put particle board with a plastic sheet on the floor to protect the carpet. That mostly works, except when a hot part bounces off the particle board onto the plastic on the carpet. I fixed it with a pocket knife and comb when I moved out. |
|
|
|
[#19]
Besides, it's actually the one activity I can do. I was mostly interested in guitar building and woodworking in general but metalworking is much more easily done in the apartment, because metal doesn't create fine dusts that stay in the air for days, coating everything in the room, and in several adjacent rooms with a fine coating of dust, nor does it clog ventilation ducts with dust. Milling is also a lot quieter than cutting wood with a router, if done correctly. The metal shaving mostly stays in my room and they are easily vacuumed up or brushed off. Wood particle gets on everything, including inside your lungs and coats the entire room in dust.
Even milling wood with a mill is not all that good because the wood dust gets everywhere, and I can't use coolants to stop the dust from going everywhere (whereas on metal this is easily done). |
|
|
|
[#20]


I finally got the "receiver" threaded. A barrel is fitted to make sure it fits. I did not thread all the way because there's a recoil lug that goes between the receiver and the barrel. It's crude but it works so far. |
|
|
|
[#21]

More progress. The bar stock is trimmed to length and the tang almost cut. After the tang is cut I also cut the rail in that part of the receiver, This will serve as a guide as I bore the hole, and mill the rail from the back in. Hole for the stock mount is also drilled. |
|
|
|
[#22]

DAYLIGHT!! It was not easy boring holes through a round bar like this, but I realized the reason HSS drill bit had so much trouble drilling this is because this metal dulls drill bits or cutting tools very easily, even carbide tools were getting dulled. So as a brand new drill bit drills a bit, it dulls the bit and as it does that, it stops cutting leading to difficulty. I just used plenty of cooling fluids and sharpening the drill bit regularly and I was able to drill through the entire thing without much effort. I drilled it in from either end and while there are some misalignment, it will be corrected later on. |
|
|
|
[#23]

More update: Receiver bored to size. It's not pretty since I don't have a .702" chucking reamer (nobody makes that it seems) but I finished with a 11/16" drill bit left over from my 80% 10/22 project. Exact same size and it would at least give me a bolt riding surface. Next step will be to cut out the ejection port and the inside portion of the bolt rail. With that guide I can then take a series of plunge cut with an end mill to form the raceway and make a useable receiver. |
|
|
|
[#24]
An 11/16ths' drill is more than 10 thousandths of an inch smaller in diameter than .702.
But the wobble in your set up will probably take care of that. |
|
|
|
[#25]
You're doing a great service to folks showing them this can be done in an apartment. Thank you.
|
|
|
|
[#26]
If it won't fit, I can enlarge it very slightly with a boring head.
|
|
|
|
[#27]
A couple of articles about a rail gun built by an Australian -
http://bulletin.accurateshooter.com/tag/rail-gun/ Scroll down the page. http://www.benchrestbulletin.net/drupal/sites/bulletin/personalprojects/action%20details.htm A little light on the bloody details, but still interesting. |
|
|
|
[#28]
When you said rail gun I thought you meant that thing that uses electricity to shoot projectiles at hypersonic velocities
|
|
|
|
[#29]


More progress, I started machining the ejection port and the bolt raceway. I will use a ball end mill to round the bottom. |
|
|
|
[#30]


I roughed out the ejection port. Rather than turn a huge chunk of steel into shavings I drilled a bunch of holes, and then whacked it with a hammer and the piece fell right off. I will then go back and clean it up with an end mill... saves a lot of wear and tear on end mills. |
|
|
|
[#31]

Ejection port machining finished. Next operation will be to stand the receiver up to broach both ends. This is probably going to be the hardest part for me and will require some patience. |
|
|
|
[#32]

I cut the bolt raceway. I have ordered a 3/8" broach and will use it to try to square up the corner. |
|
|
|
[#33]
Quoted:
<a href="http://s107.photobucket.com/user/rahimiiii/media/001_zpsppfyiu5q.jpg.html" target="_blank">http://i107.photobucket.com/albums/m320/rahimiiii/001_zpsppfyiu5q.jpg</a> I cut the bolt raceway. I have ordered a 3/8" broach and will use it to try to square up the corner. A large clearance and force press and a lot of shimming. |
|
|
|
[#34]
I'm likely to use the broach as some kind of a saw to just shave off a tiny amount of metal around the corners... not a lot of metal will be removed so the amount of force needed is minimal. It's just a step above using a file that's all.
|
|
|
|
[#35]

I used a combination of smaller end mills, a file, and a LOT of elbow grease to get to this point. I need to file it some more to get it through the receiver bridge. turns out the broach is way too big to fit in the tiny receiver. It consists of a broach about 3/8" wide attached to a block of steel at least 5/8" thick and about 1" deep. I'm going to set it aside for now because that broach may come in handy later... but I will need to grind it down before I can use it as it is. |
|
|
|
[#36]
Quoted:
I'm likely to use the broach as some kind of a saw to just shave off a tiny amount of metal around the corners... not a lot of metal will be removed so the amount of force needed is minimal. It's just a step above using a file that's all. Good luck not having a lot of taper. I did find an old broach from work in my shop. It was designed to make a channel about 1/2 inch wide and 3/8 deep. We used them to allow length adjustment on some equipment at a very high altitude for antanna pointing. It is abut 48 inches long. A couple passes with different collars to control it in the bore. They lasted about four sharpenings so this one is a little worn. The press was all of two stories high. |
|
|
|
[#37]
This is the result of a LOT of elbow grease:

I don't have a two story tall press, 6 foot long broach, etc. but I have a lot of patience. It's not benchrest fit, and there are looseness in there but I will refine the head end because that's where it matters the most anyways. If Khyber Pass could make firearms from scratch with just files... I need to enlarge the bore a little bit because it's a really tight fit and will not go all the way. The fit at the head end is the most critical. |
|
|
 Win a FREE Membership!
Sign up for the ARFCOM weekly newsletter and be entered to win a free ARFCOM membership. One new winner* is announced every week!
You will receive an email every Friday morning featuring the latest chatter from the hottest topics, breaking news surrounding legislation, as well as exclusive deals only available to ARFCOM email subscribers.

AR15.COM is the world's largest firearm community and is a gathering place for firearm enthusiasts of all types.
From hunters and military members, to competition shooters and general firearm enthusiasts, we welcome anyone who values and respects the way of the firearm.

Subscribe to our monthly Newsletter to receive firearm news, product discounts from your favorite Industry Partners, and more.
Copyright © 1996-2024 AR15.COM LLC. All Rights Reserved.
Any use of this content without express written consent is prohibited.
AR15.Com reserves the right to overwrite or replace any affiliate, commercial, or monetizable links, posted by users, with our own.


