|
[#1]
I bought a safe a couple of weeks ago and started looking at light kits, LED strips and other solutions and became overwhelmed. Thanks to this thread, I decided to go with the daylight white LED strip from Amazon that several others used and grabbed a 12V adapter from my stash of assorted electronics and hooked them up. I didn't bother with a switch at this point since they don't draw that much power and should continue working for ages, although that may change. I also realized the the Browning ProSteel prystop bolts/screw combination will short out the strip if you run it over top of the screw in the frame.
Anyway, I'm extremely pleased with the results, especially considering it cost me $8.47 (including tax) to get the project done and it's about the perfect level of lighting! |
|
|
|
[#2]
Got my uncle to do his safe because of this thread. Here is what he posted on another forum.
Safe before:  Safe after:  Still not 100% done since I am still trying out variations on it. Here is what I ordered. SINOLLC DC12 5A 60Watt LED Power Supply Driver Transformer AC 120V-130V to DC 12V 5A Output Voltage Convertor LED Strip Low Voltage Powered LED Light Regulator - - Amazon.com Amazon.com: SINOLLC DC12V 3528 SMD 60leds/m Daylight White Pure White Flexible LED Strip Light Un-waterproof Indoor LED Strip Light: Home Improvement Amazon.com: SINOLLC DC12V 5050 SMD 60leds/m Daylight White Pure White Flexible LED Strip Light Waterproof Outdoor Indoor LED Strip Light: Home Improvement 2 of these: SINOLLC DC12V 8A Aluminium Case Single Color LED Strip Light Dimmer Controller Single Channel Knob Dimmer Controller For LED strip Light single color Flexible LED Ribbon - - Amazon.com Amazon.com: Monoprice 50ft 18AWG CL2 Rated 2-Conductor Loud Speaker Cable (For In-Wall Installation): Electronics Vktech 150pcs 2:1 Heat Shrink Tubing Tube Sleeving Wire Cable 8 Sizes 2-13mm Black - Halogen Bulbs - Amazon.com Amazon.com: 2.5m 20mm Black Sticky Self Adhesive Velcro Hook & Loop Tape Strip 2 Rolls New: Electronics Amtonseeshop(TM) Best Price Newly Fashion Dc 12v-24v 8a Automatic Infrared PIR Motion Sensor Switch for Lighting - - Amazon.com http://www.staples.com/3M-1-2-inch-x-36-yds-Double-Coated-Foam-Tape-4466/product_191050 http://www.staples.com/STARTECHCOM-Self-Adhesive-Rubber-Feet/product_IM1CH4517 Based on the info for the LED light strings, if I used all of them it would be a 60watt load @ 5amps. Hence the transformer I selected. My safe is not drilled except for the top hole used for the lifting lug and since it is a 2,500lb safe I did not feel like moving it away from the wall to drill a new hole in it. The rubber feet I ordered and stuck to the bottom of the transformer so it would sit on top of the safe with out sliding off. I used the 5050 LEDs around the inside of the door jam and the 3528 LEDs across the bottom of each shelf at the back and across the top back. Since I was unsure of how bright the LEDs were going to be I bought the 2 variable resistors (only $5 total) in case I need to adjust them. The motion sensor is rigged to trigger the lights when the door is opened. I did not trust the double sided tape on the back of the LEDs to stick to the door jam metal so I used the roll of double sided foam tape on the entire back of the LEDs. It also gives it some electrical insulation between the LEDs and the steel wall of the safe. I cut the Velcro in half and stuck it to the back of the LEDS used on the shelf lighting. Its perfect for holding the lights there. All connections are soldered and protected with heat shrink tubing. Right now I have the variable resistors stuck to the safe wall with Velcro and the motion sensor stuck to the door with Velcro as well. I left some extra length in the wires in case I wanted to shift the shelving around. If I were starting this from scratch again I would not bother with the variable resistors and I need to buy a different motion sensor since this one does not have a time delay after motion stops. It is very annoying when it shuts off on you. There is another one that has an adjustable time delay on when it shuts off after last detected motion but is rated for only 5amps. It should work fine since I did not use all the LEDs. |
|
|
|
[#3]
More pictures of BAR please
|
|
|
|
[#4]
  |
|
|
|
[#5]
Something tells me that's the last known picture of Barney
|
|
|
|
[#6]
Quoted: Something tells me that's the last known picture of Barney Well there is one last video of him...... |
|
|
|
[#7]
Just installed this set and it's great.
Replaced a couple of motion activated pucks, which sucked. Best part of this, is it's cheap. Thanks OP. |
|
|
|
[#8]
Mods - please move this to the safe section of Arfcom.
|
|
|
|
[#9]
Bump for more pics of DIY safe lighting projects.
|
|
|
|
[#10]
Quoted:
Bump for more pics of DIY safe lighting projects. Hoping to finish mine this week. It got put on hold for a bit due to other things. Then, when I tried to wire it all up, the magnetic switch I got didn't work out (no two spots on the safe door and jam were level enough to use it on) so I had to order a motion switch. Started to work on it last night and ran out of the right size of heat shrink tubing. Hoping to get some time tonight or tomorrow to finish it up. I'll be back with pics when I do. |
|
|
|
[#11]
Quoted:
Quoted:
Bump for more pics of DIY safe lighting projects. Hoping to finish mine this week. It got put on hold for a bit due to other things. Then, when I tried to wire it all up, the magnetic switch I got didn't work out (no two spots on the safe door and jam were level enough to use it on) so I had to order a motion switch. Started to work on it last night and ran out of the right size of heat shrink tubing. Hoping to get some time tonight or tomorrow to finish it up. I'll be back with pics when I do. Bummer. Looking forward to the pics. |
|
|
|
[#12]
Quoted:
Quoted:
Quoted:
Bump for more pics of DIY safe lighting projects. Hoping to finish mine this week. It got put on hold for a bit due to other things. Then, when I tried to wire it all up, the magnetic switch I got didn't work out (no two spots on the safe door and jam were level enough to use it on) so I had to order a motion switch. Started to work on it last night and ran out of the right size of heat shrink tubing. Hoping to get some time tonight or tomorrow to finish it up. I'll be back with pics when I do. Bummer. Looking forward to the pics. It's going about on par with most of my projects. Somehow every DIY job I undertake takes me three times as long and costs twice as much as most people. It's like I have a super power of making everything more complicated than it needs to be. |
|
|
|
[#13]
Install a second row of red leds so your night vision won't be affected.
|
|
|
|
[#14]
Quoted:
Quoted:
Quoted:
Quoted:
Bump for more pics of DIY safe lighting projects. Hoping to finish mine this week. It got put on hold for a bit due to other things. Then, when I tried to wire it all up, the magnetic switch I got didn't work out (no two spots on the safe door and jam were level enough to use it on) so I had to order a motion switch. Started to work on it last night and ran out of the right size of heat shrink tubing. Hoping to get some time tonight or tomorrow to finish it up. I'll be back with pics when I do. Bummer. Looking forward to the pics. It's going about on par with most of my projects. Somehow every DIY job I undertake takes me three times as long and costs twice as much as most people. It's like I have a super power of making everything more complicated than it needs to be. This I understand and that's why I ordered the large kit from LiteTechAuto along with the motion sensor. An idiot can have this set up going in five minutes. I also ran 14/3 romex to my safe and made a male plug for the wall receptacle and ran the romex to a gang box and mounted a receptacle to it. Now when I open the Amsecs door on comes good lighting. |
|
|
|
[#15]
Nice setup. I bought some battery-powered LED motion lights as I don't have AC access near my safe. Works great...technology really helps!
|
|
|
|
[#16]
Well, here it is! I finally finished this little side project and I have to say I'm really happy with how it turned out.
First, the materials: LE Lampux 12V Flexible LED Strip Lights, LED Tape, Daylight White, 300 Units 3528 LEDs, Non-waterproof, Light Strips, Length 5M LE Power Adaptor, Transformers, Power Supply For LED Strip, 12V, 3A Max, 36 Watt Max Estone 10pcs Connector Adapter Cable LED PCB Strip 3528 to 3528 Single Color 8mm Free Welding Magnetic Switch (fail--see below) LEDENET® 12V 24V PIR Sensor LED Dimmer Switch Motion Timer Function Sign Control PIR8 Cotroller LED Strips Lighting So, I first attempted to use the cheap magnetic switch. Unfortunately, the way my safe door is constructed, there were no two level surfaces where I could get them to match up to shut the lights off. I even took video from inside with my iPhone while closing the door to try and find a flat spot, but no dice. So, I picked up the PIR sensor instead. It says it's a dimmer, but it's not. It does have a variable timer, but it doesn't seem to go any lower than 2 minutes. Oh well--fine by me. So, I wired it up with some solid copper, 4-conductor thermostat wire I had laying around (needs +/- input and output to the motion sensor). This worked even better than I expected and I tacked it into the corner where you can't see it with some insulated wire staples. Tucked the AC adapter and cords all bundled up into the back of the safe. My safe has power to it and a nice finished outlet inside otherwise I probably wouldn't have even bothered with the project. Here is all the wiring I did. One pair for input from the power adapter, another pair for output to the light strip. Soldered neatly and heat shrink wrapped. 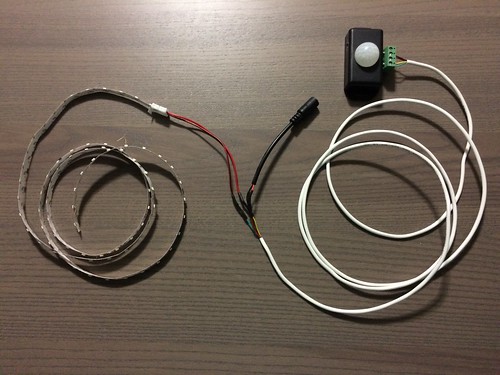
Tucked it all in the back neatly and wire stapled it where necessary. This pic is pre-lighting. 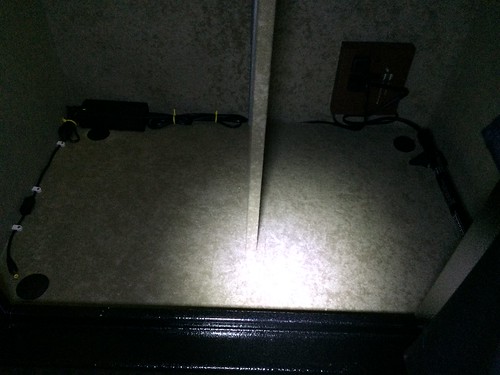
A quick shot of running the lights and wiring to the motion sensor up the inside of the door frame. 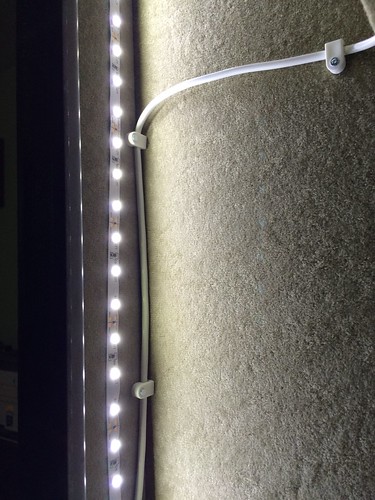
Let there be light! 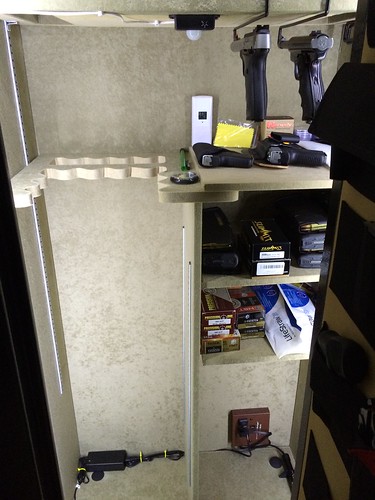
MOAR GUNS! One last picture after I put everything away. 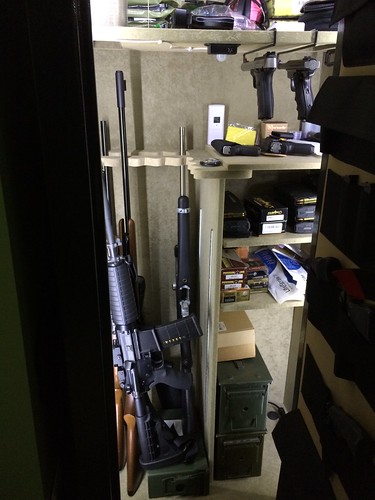
I'm really pleased with how it turned out. I was using some battery-powered little stand-alone LED lights, but it was dim and hard to see (especially since this is in a corner of my basement where there's not great lighting in the room to begin with). Now, you open the door and BAM--you get full lighting on everything in the safe. Then, the light turns out after two minutes (tested it several times). I ended up spending about $45 and $7 of that was wasted on the mag switch that didn't work out. It did take me quite a bit of time since I'm so picky about how I do things. I'd say I probably spent about 6 hours on it, but a lot of that was just thinking things through and trying stuff so I was sure it would work. Sadly, it was pretty much a waste since all the guns were lost in a tragic boating accident shortly after this. But, at least I have a nicely lit safe now. |
|
|
|
[#17]
Quoted:
Well, here it is! I finally finished this little side project and I have to say I'm really happy with how it turned out. First, the materials: LE Lampux 12V Flexible LED Strip Lights, LED Tape, Daylight White, 300 Units 3528 LEDs, Non-waterproof, Light Strips, Length 5M LE Power Adaptor, Transformers, Power Supply For LED Strip, 12V, 3A Max, 36 Watt Max Estone 10pcs Connector Adapter Cable LED PCB Strip 3528 to 3528 Single Color 8mm Free Welding Magnetic Switch (fail--see below) LEDENET® 12V 24V PIR Sensor LED Dimmer Switch Motion Timer Function Sign Control PIR8 Cotroller LED Strips Lighting So, I first attempted to use the cheap magnetic switch. Unfortunately, the way my safe door is constructed, there were no two level surfaces where I could get them to match up to shut the lights off. I even took video from inside with my iPhone while closing the door to try and find a flat spot, but no dice. So, I picked up the PIR sensor instead. It says it's a dimmer, but it's not. It does have a variable timer, but it doesn't seem to go any lower than 2 minutes. Oh well--fine by me. So, I wired it up with some solid copper, 4-conductor thermostat wire I had laying around (needs +/- input and output to the motion sensor). This worked even better than I expected and I tacked it into the corner where you can't see it with some insulated wire staples. Tucked the AC adapter and cords all bundled up into the back of the safe. My safe has power to it and a nice finished outlet inside otherwise I probably wouldn't have even bothered with the project. Here is all the wiring I did. One pair for input from the power adapter, another pair for output to the light strip. Soldered neatly and heat shrink wrapped. https://farm3.staticflickr.com/2944/15337280542_50a2477d5a.jpg Tucked it all in the back neatly and wire stapled it where necessary. This pic is pre-lighting. https://farm3.staticflickr.com/2942/15337281262_a6cb23322e.jpg A quick shot of running the lights and wiring to the motion sensor up the inside of the door frame. https://farm3.staticflickr.com/2942/15151063117_ef233649c0.jpg Let there be light! https://farm3.staticflickr.com/2943/15150826459_56cd1edf4a.jpg MOAR GUNS! One last picture after I put everything away. https://farm4.staticflickr.com/3858/15334419951_24fdb8a745.jpg I'm really pleased with how it turned out. I was using some battery-powered little stand-alone LED lights, but it was dim and hard to see (especially since this is in a corner of my basement where there's not great lighting in the room to begin with). Now, you open the door and BAM--you get full lighting on everything in the safe. Then, the light turns out after two minutes (tested it several times). I ended up spending about $45 and $7 of that was wasted on the mag switch that didn't work out. It did take me quite a bit of time since I'm so picky about how I do things. I'd say I probably spent about 6 hours on it, but a lot of that was just thinking things through and trying stuff so I was sure it would work. Sadly, it was pretty much a waste since all the guns were lost in a tragic boating accident shortly after this. But, at least I have a nicely lit safe now. Good work friend. Now when you swing that Cannon safes door open you get good lighting. No way in hell I will ever do without a lit up gun safe. I'm getting to old besides. |
|
|
|
[#18]
Quoted:
Quoted:
<snip> Good work friend. Now when you swing that Cannon safes door open you get good lighting. No way in hell I will ever do without a lit up gun safe. I'm getting to old besides. Thanks! Really, it's absolutely beautiful. The picture doesn't do it justice. Every square inch is clearly lit with a pleasant white light. I'm really glad I persevered and finished the job. |
|
|
|
[#19]
My wife and I picked up an old china cabinet of craigslist. She completely refinished it, and I used the LED strips to light it.
I also did under cabinet lighting in the kitchen with them, and have plans for a few closets. 
|
|
|
|
[#20]
Nerf guns and Beenie babies? I bet that's Monopoly money too.
Posted Via AR15.Com Mobile |
|
|
|
[#21]
Did mine too. I was happy with the results. Thanks for all the great ideas guys.
 |
|
|
|
[#22]
http://www.ebay.com/itm/371139048824?_trksid=p2060778.m2749.l2649&ssPageName=STRK%3AMEBIDX%3AIT
There's the set I ordered works great the tape didn't stick well to the fabric on the interior I just grabbed the ol staple gun and went to town. I need a hole for the power cord but I will be doing that soon. This is completely dark room and set on white color. Uses red, green, and blue at same time. The controller will change colors and make it change patterns etc. 


|
|
|
|
[#23]
Very cool!
|
|
|
|
[#24]
I'm glad this thread was moved to this forum and out of GD.
With this thread available here no one should be without a lighted gun safe anymore. |
|
|
|
[#25]
Bump to give all the Black Friday gun safe buyers something else to spend money on.
|
|
|
 Win a FREE Membership!
Sign up for the ARFCOM weekly newsletter and be entered to win a free ARFCOM membership. One new winner* is announced every week!
You will receive an email every Friday morning featuring the latest chatter from the hottest topics, breaking news surrounding legislation, as well as exclusive deals only available to ARFCOM email subscribers.

AR15.COM is the world's largest firearm community and is a gathering place for firearm enthusiasts of all types.
From hunters and military members, to competition shooters and general firearm enthusiasts, we welcome anyone who values and respects the way of the firearm.

Subscribe to our monthly Newsletter to receive firearm news, product discounts from your favorite Industry Partners, and more.
Copyright © 1996-2024 AR15.COM LLC. All Rights Reserved.
Any use of this content without express written consent is prohibited.
AR15.Com reserves the right to overwrite or replace any affiliate, commercial, or monetizable links, posted by users, with our own.


