|
[#1]
You can use Hornady Lock and Load collets in a lee classic cast single stage press.

|
|
|
|
[#2]
I was reaming and uniforming the primer pockets on a batch of LC brass and noticed that my drill was varying speed significantly. I had been using a Dewalt cordless but this batch is over 1000 pieces so I decided to ditch changing batteries and use my corded drill.
I have been using a corded right angle close quarters drill on a dimmer switch for my lathe trimmer for years and never had a speed issue. With the bigger drill I found that if I use a splitter and tie a incandescent light in parallel with the drill to add a more consistent load to the dimmer switch the voltage remains constant which keeps the drill running smoothly. The drill setup for uniforming. The dimmer switch setup with a receptacle for constant 120 and one fed from the dimmer switch. (This is on my soldering bench but I use it like a router control for reloading.) The splitter with the lamp and drill plugged in. The overhead lamp. It looks bright in the picture but it is really dim with the dimmer set about half way. |
|
|
|
[#3]
Cigar punch from old brass:
Disclaimer: Please do not smoke and reload! I know a lot of us who reload, occasionally smoke a cigar. Well, if you prefer punching over clipping, then you can choose a caliber that will suite your preference in air flow and proceed to cleaning and sizing your case. Once you size you case, you will proceed to the reloaders best friend: the chamfer tool, and begin your bevel. The VLD tools give the best results but any chamfer tool will work. Once you get a bevel that is close to sharp, then you'll need a cone with peg attached to the base and a fine (or ultra fine) grit sand paper and further improve the edge of the case mouth. I found I rarely had to mess with the exterior of the case but to get a better edge to punch through the tobacco, a light bevel did help out and the sand paper I was already using did accomplish that. Once you feel your case mouth is sharp enough, then polish your new punch with Nu Finish until glossy and then clear coat the body of your punch only. Tape the mouth and neck to avoid contamination each time you punch a cigar. I found one of the rubber inserts that came with my ear buds fit perfectly over the case mouth and protected the edge, as I use mine as a key chain. Definitely a fun project to do to kill some time while waiting on a drum of brass to clean. |
|
|
|
[#4]
Simple marking tool out of 1/2" copper tubing pipe and Allen screws.
Mark one or two stripes with Sharpie markers on the case sides so it's easier to identify your cases on the floor rather than marking the heads. Put in drill, drill press or in my case a lathe. 


|
|
|
|
[#5]
It's a royal PITA trying to shag JUST those .380 cases on a cluttered and un-policed range, because they hide among the 9mm cases. And picking up JUST the 9mm cases, avoiding those .380s is equally as difficult. I generally don't bother worrying about it at the range - I load both. But then I get them home and clean them, and...
Even with great lighting, it's never easy sorting these similar cases, especially when all of the cases you're sorting are just as shiny and clean as all the other cases. But there's a trick to visually identifying .380s among 9mm cases: look at the extractor groove. Notice how the .380's extractor groove is wider and more pronounced than the 9mm's in these SAAMI drawings. In person, it's MUCH more obvious. I think it's more obvious than the 2mm case length difference, and it's way more obvious than the dead-straight .380 case versus the (mildly) tapered 9mm. 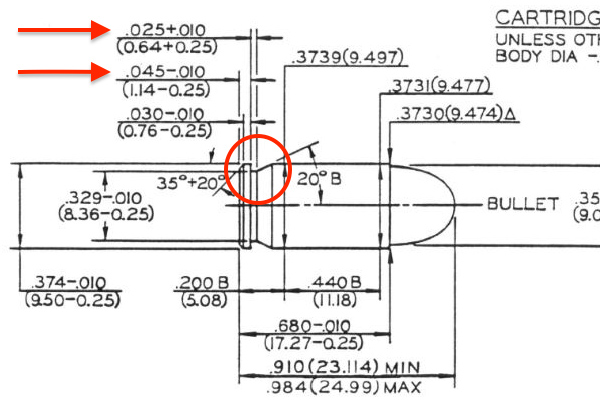
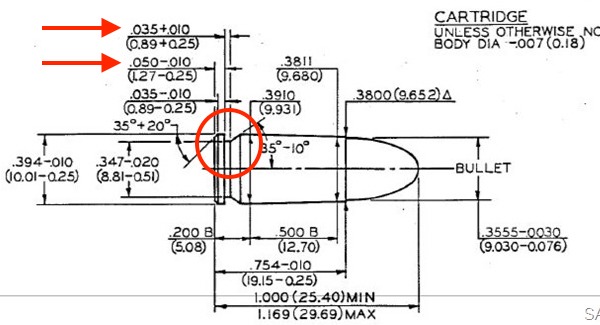
And here's a picture to show the "in real life" difference. Notice how much like a .45 case the extractor groove in the .380 case (on the left) is, while the 9mm's groove is shorter and at less of an angle. 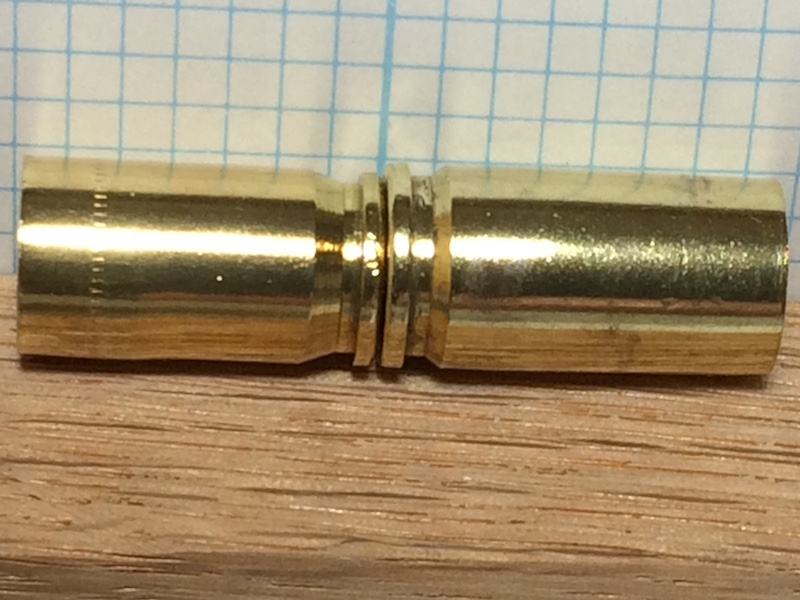
Edited to add photo. |
|
|
|
[#6]
Another point that just came to me: when tumbling mixed brass (whatever tumbling method you use), it's important to keep in mind that some cases can "swallow up" smaller cases. For example, .45 ACP cases can swallow .40 S&W cases, which in turn can swallow 9mm cases. I have in the past gotten multiple "trifectas" when dry tumbling these cases together.
Here's a "worst case of cases": a .45 with a .40 with a 9mm with a .32 case... 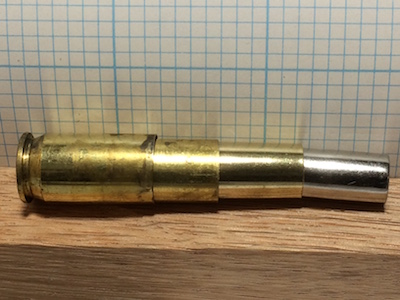
So when you tumble more than one caliber at a time, pay attention to compatibility. 9mm, .380, .38 Special, .357 Magnum, and even 9mm Makarov can all tumble together. All variations of .45s (including .45 LC, etc.) can tumble together. I tumble .32 ACP cases with .30 Carbine, along with 300 Blackout, 7.62x39, .308 Win, and .30-'06, all without any issues (and I could probably toss in Tokarev cases as well, but I haven't tried it yet). Sadly, .40 S&W is really only compatible with 10mm Auto, so tumbling the 40s has been pretty much only 40s. But wait! I said I can tumble .32 cases with .30 caliber rifle cases, right? How does that work? Basically, we don't want to mix cases that have substantially different mouth diameters which would allow them to catch (and "swallow") each other. The case length isn't at all a problem, only mouth diameter. Yes, it looks kind of goofy pouring out a mixture of .30-'06 and .32 Auto cases, but they all stay separate and work fine. I'm planning to do an experiment soon with .40 S&W cases mixed with some .30 rifle cases (a mix of .308, Blackout and a couple of .30-'06) to see if they coexist in the tumbler without problems, and I'll report back. Edited to add the picture. |
|
|
|
[#7]
After wet tumbling I put my brass upside down in a test tube drying rack (can stack between pins or put pin inside case neck).
Allows water to drain out, also makes it easy to look at head stamps. Similar to this: 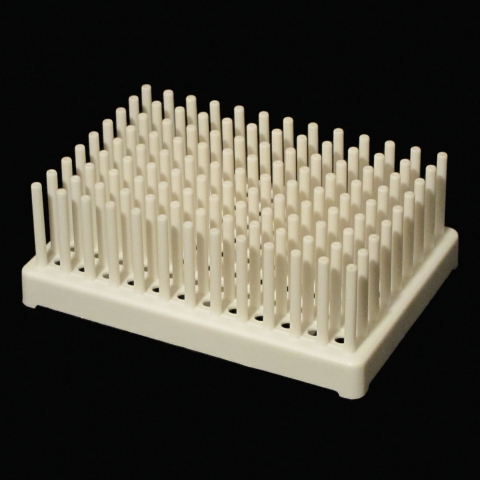
|
|
|
|
[#8]
Here's a cool trick on using the Dillon Super Swager. Use a spring (from an old style dillon powder measure or whatever) and wrap it around the cam.
This will sling the case once the swaging head is released, throwing the brass forward. I use a medium flat rate box with a shop rag hung off it to slow the case so it doesn't bounce back off the box. This let's you process cases FAST. Also, if the case binds up due to spring tension, roll the case with two fingers and it will release. |
|
|
|
[#9]
If you haven't used it, the app called Evernote will help you out with all things.
It can do a lot of things, but I mainly use it for logs or notes, in particular, my reloading logs. Instead of having everything written down in a notebook somewhere, it's all neatly organized in Evernote. My Evernote files are instantly synced between my phone, laptop and iPad, no matter what device I'm using, all my logs are there, always up to date. Can't lose them, can't spill coffee on them, always have them with me no matter where I am (iPhone). I can even imbed photos of things in the notes as well (awesome 5 shot group of that unicorn load I found).... This also comes in handy for other "note lists".... great place to write down that list of "random things to get at Home Depot".... you know, the things you can never remember when standing in Home Depot swearing you are forgetting something. I also write down all the house air filter sizes and qtys needed. How about all those pesky frequent flyer account numbers/logins that no normal human can remember (one for ever stupid airline), or how about gift ideas for yourself, your wife... etc. It's a crazy awesome tool.... ZA |
|
|
|
[#10]
Quoted:
Kinetic bullet puller: I'll have to try the shell holder trick. I've had good results from turning the collet upside down, using the lip at the "outside" of the collet to hold the case by the rim. I also put a "patch" of paper towel over the back of the puller - it keeps powder from spraying out when/if the case pops through the collet, and sometimes even if it stays in place. I've shared this before, as have others: use commercial pistol trays - the plastic or styrofoam trays commercial pistol rounds are sold in - as loading blocks. I use 'me for orienting cases for lubing the case mouth, as well as holding cases for loading stages. And employing a trick I saw in a video linked here some time ago, I count cases by just pouring them over pistol trays. I go a step further and double check case length here; those .380 cases can't masquerade as 9mm cases if you use this technique. Regarding kinetic pullers Stuff about 1/2" worth of paper tower in the puller and jam it all the way to the head. This has two benefits, 1. Prevents damage to bullets and 2. Prevents damage to the puller itself RE: #2 - the tip of the kinetic pullers are designed to be very strong in the direction that you hit against solid surfaces (outside to inside) but weak from the inside out. I've had a heavy bullet come right through the end of the puller. |
|
|
|
[#11]
Quoted:
You can use a Walmart Grey tote to cover the Frankford Arsenal Wet Tumbler to knock down the decibels a few... https://www.AR15.Com/media/mediaFiles/310106/20161230-163716-116980.JPG https://www.AR15.Com/media/mediaFiles/310106/20161230-163725-116982.JPG You can cover a vibratory tumbler with a plastic garbage can to kill noise too |
|
|
|
[#12]
We sometimes see folks that have stuck a case and are well- stuck- on how to get it out and what to use to do it.
So here's how: What you’re gonna need: # 28 drill bit 1/4-20 tap 1/4-20 bolt with at least 1.5" of thread 1/4" fender washer socket or 6- 5/8" washers or a ½” pipe “close nipple” to fit over the case head What you’re gonna do: Unscrew the decapping stem and lift it as high as you can in the die; tighten it down Screw the sizer die into the press upside down so that the die mouth is flush with the press top Drill out the primer pocket with the #28 bit Tap the hole Place the socket (or washers) with the 1/4" fender washer over the protruding case Begin turning the bolt into the hole and continue turning until the case pops out Squirting some oil or liquid case lube helps the process The case should pull off the decapping stem; if not, put it back in the press the ‘right way’ and pull it out. Costs about $12 at most hardware stores for the materials if you don't have a tap set. |
|
|
|
[#13]
Quoted:
Regarding kinetic pullers Stuff about 1/2" worth of paper tower in the puller and jam it all the way to the head. This has two benefits, 1. Prevents damage to bullets and 2. Prevents damage to the puller itself RE: #2 - the tip of the kinetic pullers are designed to be very strong in the direction that you hit against solid surfaces (outside to inside) but weak from the inside out. I've had a heavy bullet come right through the end of the puller. I stick a foam ear plug in the bottom of mine. |
|
|
|
[#14]
Apply some Meanstreak Paint Marker, wipe with a mineral spirts soaked paper towel and the eyes win!
Click this Video 


Pre-apply some cold blue on shell holders helps contrast. 
|
|
|
|
[#15]
I you are a 357 Sig reloader but are having a hard time finding brass, 40 caliber brass can do just fine. First, size and decap the brass using a 40 caliber die, then size the brass using the 357 Sig die. Now you have 357 Sig Brass. One thing to remember is creating brass this way will make the necks a shorter length than stock 357 brass. So use 124 grain or heavier bullets since they are longer and have more 'bearing neck'. Finally, avoid super hot 1600 FPS loads even with stock 357 Sig brass. I have found these hot loads, over time, will split the necks like rifle cases.
|
|
|
|
[#16]
On a 1050, the Powder Reservoir and Primer tube are very close, if you use a RF-100 Primer Filler the tubes are much thicker than pickup tubes, so it can be a bit tricky to drop primers - so load primers with the handle down which drops the reservoir out of the way.
On a 550, fill the primer tube with the handle down as well, which retracts the slide back under the tube which supports the primers when dropping - otherwise they can drop a bit too far from the weight/force from falling and the slide won't be able to retract all the way and pick one up without having to fiddling around with the bottom primer. |
|
|
|
[#17]
Quoted:
You can use Hornady Lock and Load collets in a lee classic cast single stage press. https://www.AR15.Com/media/mediaFiles/242214/IMG-20170106-161611787-120712.jpg They will also work in an RCBS Rockchucker Supreme |
|
|
|
[#18]
When trickling powder into a scale pan to up the charge weight it is easy to go overboard. Removing a tenth or two of powder is a pain, especially by trying to dump a little out. I use a pair of surgical clamps. They are like big tweezers that can reach into the pan and grab a few grains.
|
|
|
|
[#19]
Quoted:
No, brother, you are not the only one! I didn't have any of that kind of tubing handy, so I went to Lowes and got these: http://www.widgetco.com/1-4-Black-Screw-Protectors.jpg (The picture is from Widgetco, but the protector caps are by Hillman and found in the "specialty hardware" section at Lowes and probably Home Depot too.) They came in 4-packs for not much money. I may find some of that tubing for future uses, though. Quoted:
Quoted:
Has anyone besides me scraped their arm or hand from the adjusting threaded screw that comes out the top of RCBS dies? I cut a piece of 1/4" id clear vinyl tubing about an inch long, about a 1/2 inch longer than the screw. When you want to change a setting, you can either pull the tubing off or insert a screwdriver into the tubing. Now if I brush the top of the die, no more bleeding all over the bench. No, brother, you are not the only one! I didn't have any of that kind of tubing handy, so I went to Lowes and got these: http://www.widgetco.com/1-4-Black-Screw-Protectors.jpg (The picture is from Widgetco, but the protector caps are by Hillman and found in the "specialty hardware" section at Lowes and probably Home Depot too.) They came in 4-packs for not much money. I may find some of that tubing for future uses, though. I have always placed an empty case of the caliber that I am loading on the spindle. I always can tell what the press is set up for real easy. I thought of vacuum tubing from the auto parts store but could not find any before finding my bandaids... |
|
|
|
[#20]
I'm surprised this has not been mentioned and maybe I just overlooked it or no one else does it
I reload on a 550, 3 tool heads and a powder measure on each. I place a tab of blue painters tape on the reservoir cap and label it with a black marker for the cartridge and powder brand plus type. I use an ink pen to mark what weight I am throwing. If I'm working up loads I mark out the old weight and make the new entry. I leave the label on after I empty the reservoir for a reference to powder type and weight when last used. Remove and add new label as needed cheaply. |
|
|
|
[#21]
On a progressive, when setting initial powder charge weight, I collect 10 throws, weigh them, then divide by 10 to get the actual per cartridge charge. Once I get on target using this method, I load up the shell plate (cases in each position) and check 2-5 cartridges. This method usually gets me to my target charge in the 1st or 2nd try.
|
|
|
|
[#22]
I set my powder measure a little differently. I set it to what I want first- say 4.3g on a digital scale. Then I throw two charges and dump in in the pan- should be 8.6. If so, I throw two more and add them and should now be 9.2 +/- .1
Then two more for 18.4 +/- .1. If four charges is off .2 or more, I adjust and start over. Ultimate goal is 10 throws yielding 43g +/- .2g. Once I have that, I'm off to the races. With an electronic scale this goes really fast. With a beam scale it is also not bad. |
|
|
|
[#23]
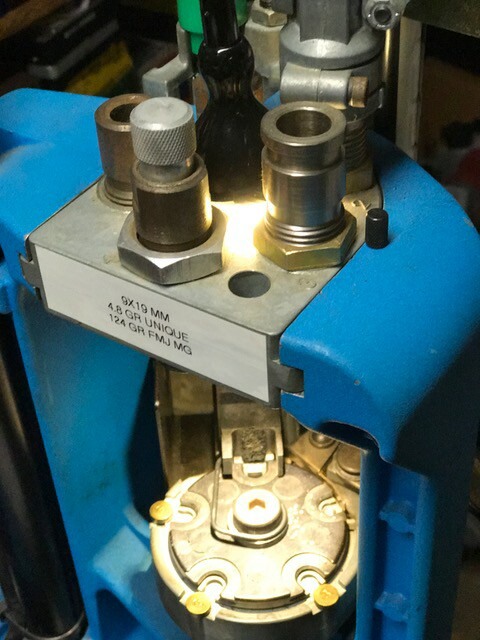
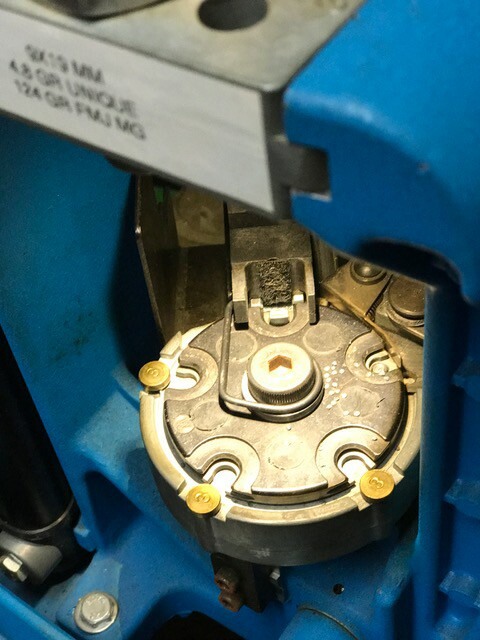
The Hornady Lock N Load powder measure, when installed on their Lock N Load AP progressive press, is actuated by a case being under the measure - the powder drop tube stops on the case as the ram goes up, which operates a linkage to rotate the measure's metering drum.
This can make it challenging when setting up the measure. Trying to get powder drops that are consistent with the way the measure will operate during progressive operation has usually meant (for me) trying to hold the linkage and simulate the speed the linkage would move. In particular, just holding the scale's pan under that drop tube while manually operating the linkage was messy...I'd get powder grains all over because the drop tube (and even the powder drop die) doesn't extend through the top of the press frame. Based in part on advice from dryflash3, I start with a regular case, prime it, then run it up under the powder measure. I can then take the case out, dump it in the scale's pan, and see how I'm doing. Once I get the measure itself set correctly, I then adjust the linkage setup to get the powder-through expander doing the amount of bell I want. One extra benefit from this method is that you can feel exactly how much effort goes into JUST the powder measure operation. With all the stations in use, it's impossible to feel how much work each station takes. It's important to know that the powder measure isn't dragging or the drop tube isn't galling as it goes up and down, because that not only makes it harder to work, but it can change the amount of powder dropped. |
|
|
|
[#24]
Here are some tips for new guys from when I started.
When you upgrade weighing equipment don't get rid of your non-electronic balance and or trickler. Keeping them gives you more flexibility when weighing powder. I also use my balance as a final verification that my electronic scale works. Well I have a hybrid electo-mechanical balance but the same applies. I went to a high speed trimming setup from the get go. I did not want to deal with a lathe style trimmer setup (which I had from the start) and went to a World's Finest Trimmer right off the bat for 6.5 Grendel, .223 Rem and now my 6.5 Creedmoor. I traded some beer for my reloading setup so it came with a lot of stuff I didn't/don't use. I got a Hornady primer reamer as a cheap and quick way to remove primer crimps. $9 beats $90 when you're starting out. I have no plans of switching to something like a super swage. I use the cheap thin load stickers that come in boxes of bullets and other things to label my powder measure when I don't empty it between loading sessions. That way I know that I left 8208XBR or H4350 in the hopper rather than HS6 or something else. If you use the sticker over top a piece of clear scotch tape it will not leave the papery adhesive behind. |
|
|
|
[#25]
If you have a RCBS Chargemaster, paint the rim of the bottom of the powder drain spout bright red. That way it kinda slaps you in the face before you pour in powder and the spout is open.
|
|
|
|
[#26]
Go to your local hardware or Amazon and get some small Neodymium Rare Earth magnets.
They're great for hanging a tool on your strong mount. 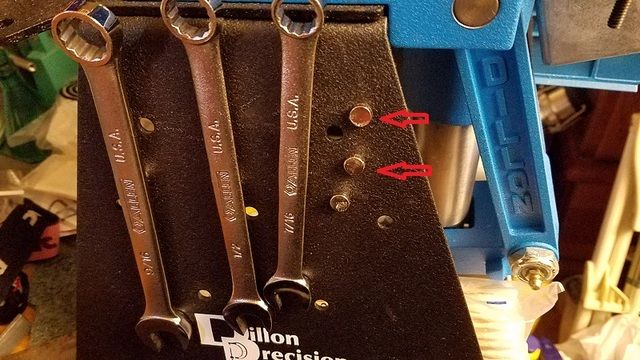
|
|
|
|
[#27]
Quoted:
It's a royal PITA trying to shag JUST those .380 cases on a cluttered and un-policed range, because they hide among the 9mm cases. And picking up JUST the 9mm cases, avoiding those .380s is equally as difficult. I generally don't bother worrying about it at the range - I load both. But then I get them home and clean them, and... Even with great lighting, it's never easy sorting these similar cases, especially when all of the cases you're sorting are just as shiny and clean as all the other cases. But there's a trick to visually identifying .380s among 9mm cases: look at the extractor groove. Notice how the .380's extractor groove is wider and more pronounced than the 9mm's in these SAAMI drawings. In person, it's MUCH more obvious. I think it's more obvious than the 2mm case length difference, and it's way more obvious than the dead-straight .380 case versus the (mildly) tapered 9mm. http://www.ghporter.com/PubPics/Arfcom/380CtgDetail.jpg http://www.ghporter.com/PubPics/Arfcom/9mmCtgDetail.jpg And here's a picture to show the "in real life" difference. Notice how much like a .45 case the extractor groove in the .380 case (on the left) is, while the 9mm's groove is shorter and at less of an angle. http://www.ghporter.com/PubPics/Arfcom/380_9mmCompare.jpg Edited to add photo. 
Get one of these, worth the money |
|
|
|
[#28]
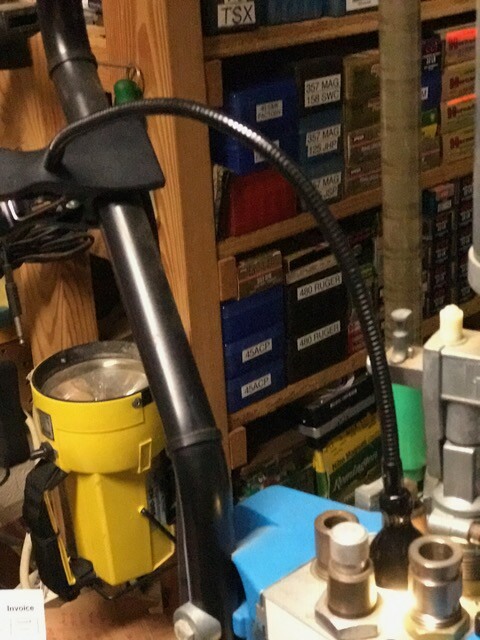
As I've aged I've tried putting more light around the 650 to see better. I've really not found anything that did what I wanted.
I was at IKEA a couple of weeks ago and saw this LED light on a goose neck. The clamp is heavy and it has rubber in the clamp that holds on tight. I mounted it to the case feeder post, bent the light at the angle I needed and let is shine down the hole in the middle of the 650 tool head. Works great and puts bright light exactly where I need it. I loaded 500 rounds of 9mm and the clamp never moved. Operates off AC. Cost was 9.99 + tax. 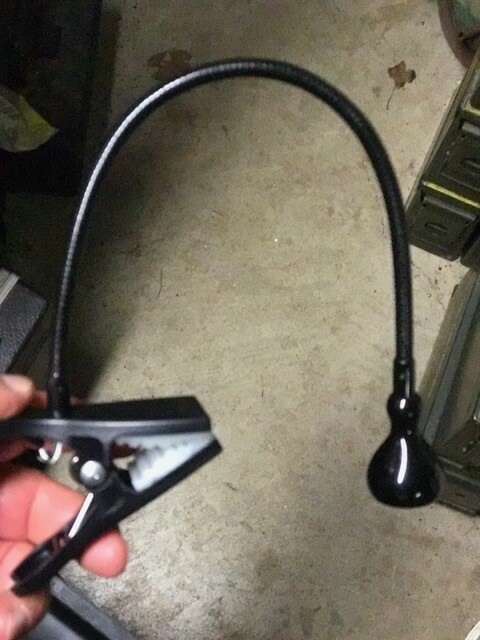
|
|
|
|
[#29]
Quoted:
We sometimes see folks that have stuck a case and are well- stuck- on how to get it out and what to use to do it. So here's how: What you’re gonna need: # 28 drill bit 1/4-20 tap 1/4-20 bolt with at least 1.5" of thread 1/4" fender washer socket or 6- 5/8" washers or a ½” pipe “close nipple” to fit over the case head What you’re gonna do: Unscrew the decapping stem and lift it as high as you can in the die; tighten it down Screw the sizer die into the press upside down so that the die mouth is flush with the press top Drill out the primer pocket with the #28 bit Tap the hole Place the socket (or washers) with the 1/4" fender washer over the protruding case Begin turning the bolt into the hole and continue turning until the case pops out Squirting some oil or liquid case lube helps the process The case should pull off the decapping stem; if not, put it back in the press the ‘right way’ and pull it out. Costs about $12 at most hardware stores for the materials if you don't have a tap set. What I discovered was that if you have 12 point sockets, the following sizes should work: 18mm 19mm 11/16ths 3/4ths In a pinch, you can just screw the die just half way into the press....or in my case, my 650 toolhead....with the die upside down. The other thing I discovered is that with a handheld drill, once the drill bit gets through the web of the case, the drill bit grabs and pulls itself down hard into the decapping pin assembly, wrecking it. If you have a drill press and a vise handy, that would be the way to go. The other thing I do is use a hex nut above the fender washer once the bolt is threaded into the case's web. Then thread the nut down on top of the fender washer, which pulls the case out of the die. And yes, I tried the freezer trick. It didn't work. |
|
|
|
[#30]
When seating a bullet on Hornady LnL AP, raise the ram about half way up before placing the bullet in the case.
This will help keep the bullet aligned as it goes into the seating die. If you place the bullet in the case while the ram is down, it may topple as you cycle the handle. |
|
|
|
[#31]
I had a tub full of randomly pulled projectiles from screw ups or range pick ups, whatever. Since I was doing .223 anyway I culled those out and sorted by weight. Found that an empty large primer tray works great to organize the projectiles
|
|
|
 Win a FREE Membership!
Sign up for the ARFCOM weekly newsletter and be entered to win a free ARFCOM membership. One new winner* is announced every week!
You will receive an email every Friday morning featuring the latest chatter from the hottest topics, breaking news surrounding legislation, as well as exclusive deals only available to ARFCOM email subscribers.

AR15.COM is the world's largest firearm community and is a gathering place for firearm enthusiasts of all types.
From hunters and military members, to competition shooters and general firearm enthusiasts, we welcome anyone who values and respects the way of the firearm.

Subscribe to our monthly Newsletter to receive firearm news, product discounts from your favorite Industry Partners, and more.
Copyright © 1996-2024 AR15.COM LLC. All Rights Reserved.
Any use of this content without express written consent is prohibited.
AR15.Com reserves the right to overwrite or replace any affiliate, commercial, or monetizable links, posted by users, with our own.


