|
Posted: 9/29/2013 4:45:17 PM EDT
[Last Edit: Taipan01]
I wrote this one a bit over a year ago:
http://www.ar15.com/forums/t_6_42/377402_I_said_I_would_write_up_my_style_so_I_did__enjoy__I_hope____.html You may want to peruse it as it will show/explain some of the odd items that I used then and still do today but I didn’t want to duplicate what I have already written. It was geared for small time and new reloaders along with ways to reduce space concerns. I based it on straight wall pistol rounds as I find it the easiest type to learn with. At the end, I said I may perhaps do a write up on wax bullets which I did with this one: http://www.ar15.com/forums/t_6_42/386806_Wax_Bullets__a_continuation_from_one_of_my_posts_.html Both threads contained only straight walled pistol cartridges so I thought I’d switch up a bit and do one on bottle necks again, trying to nip some issues early and toss out a few tips along the way without veering to far off course. The same old prelude: No, I’m not a professional writer and my grammar bites, it goes hand in hand with my spelling which, coincidently also bites so it’s a matched set. Or in firearm speak a brace (meaning a pair). I don’t know what rhetoric is so I can’t go for a trifector or perhaps I can, as I’m poor at all three, something to dwell on later. This is a writeup about my style and to open up with a few things that may help the newer reloaders with some of the little things you bump into along the way as you stumble and bumble on the dark walkways of bottle neck reloading. The key to good reloading is consistency of materials and the steps you take from start to finish. This again is my style and it works for me. Costs are also a concern for many, as like myself, so I try and use products that are reasonable but produce a good end result. In this case, I’m not looking for 1,000 yard performance. I want to build a better then good cartridge for hunting/target from everyday components. This will be a full on resizing and I won’t be covering fire-formed cartridges though I am using a specific rifle to fit it to simply to extend some points. Some other time maybe. I’ve had these bouncing around from corner to corner for a decade or so: 
They are 180 grain Core-Lokt PSPs (looks like the gun shop owner can’t spell either) bullets and a rag tag collection of 308 Winchester shells. Some were Winchester Silvertip 180’s and some Remington Core-Lokt 180’s (at least the 180 part is a constant). I don’t intend to load them together but to prep them for later use as the Core-Lokts I want to put into 30-06’s but I’m out of shells for now and I’ve loaded up all my bullets (I prefer 165’s) for the 308 shells I have on hand but these should suffice for what I’m writing as both utilize the .308 diameter bullet. All of them were fired out of an older (meaning before Cerberus) Bushmaster BAR-10 308. 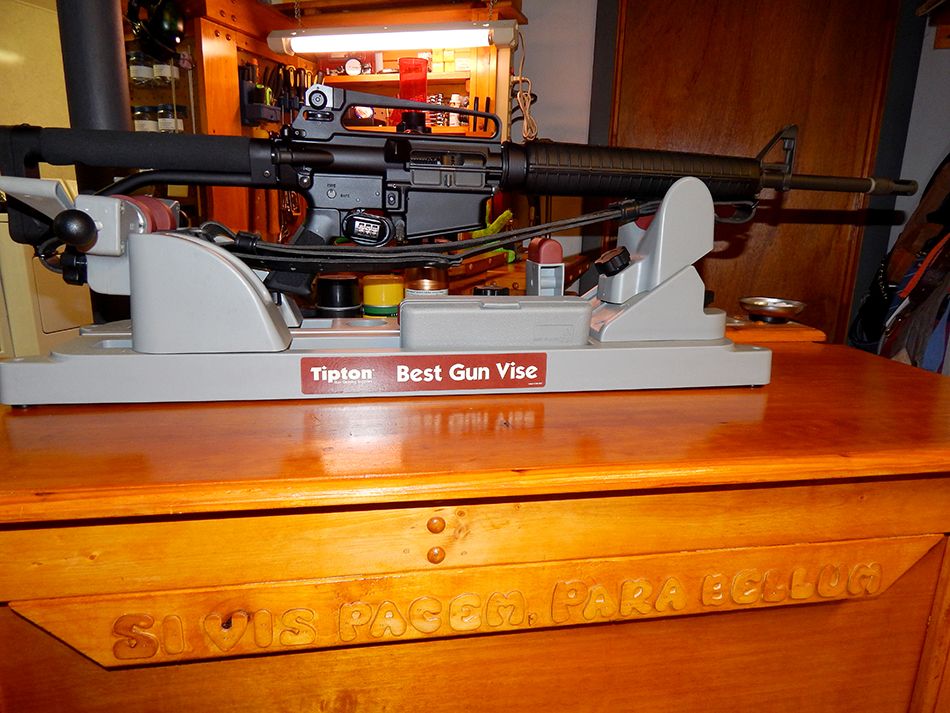
It’s chambered in 7.62/308 (which is a bit confusing in and of itself). Simply put, though many think they are designations of military vs commercial naming conventions, they have different chamberings. And NATO is anything but a standard considering the vast numbers and locations of manufactures and variations in quality control but I digress. Here’s a stolen image (and they’ll be more swipes to come) to show the different chambers and the potential for growth of the shell when its fired. 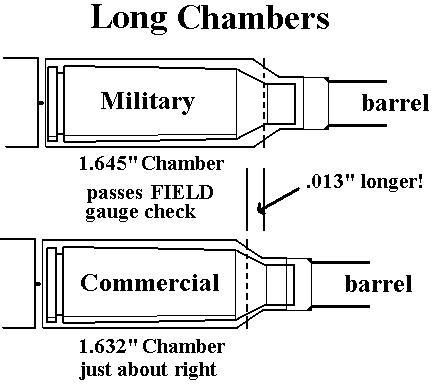
Some go, no go and field gauge specs on both (inch measures): 308 go: 1.6300 nogo: 1.6340 field: 1.6380 7.62 (military) go: 1.6350 nogo: 1.6405 field: 1.6455 I want them to fit into a short action bolt Remington 673 guide gun. Going back to the original image, the shells and bullets have been well worked over by time and looking at the bullet tips, each one has a different size glob of lead for a tip. So much for consistency. Maybe a tumbling may help to at least remove some of the tarnishing and smooth out the tips a bit. 
Slightly, but there is still the blobs of lead for tips and by weighing a quarter of them, I have a swing of 1.2 grains from the lowest to the highest in weight. I did weigh out a box of Hornaday Vmax once and got a swing of .5 grains. I’d like something close to that and to also even out the tips a bit at the same time. To achieve it I’ll use a meplat (pronounced me-play but most say me-plat) trimmer. This one is made by Sinclair. It’s inexpensive and you can switch the bodies out for different calibers. You can do both loaded rounds or just the bullets with it. There are much better ones available but they reflect that in price. I hardly ever use it but it’s there when I do need one such as now. I always try and express the down side to products I use but try and come up with simple homegrown solutions to them as in the case of my case length trimmer from the first post. The biggest issue most have with it is that when you first begin to trim the tip, esp just bullets, they wobble a bit. I simply use the shown clamp and hence, no wobble. After trimming, it’s recommended that you use a scotch brite pad to remove any burring, I use 1500 sand paper. Also, its only meant to even out the tip face by a thousandth of an inch or so, not knocking off the amounts I intend to do. The cutter head is adjustable for length as the bullet is stopped from entering beyond the ogive (o-jive). That’s the point at which the curve tip ends and the straight body begins to be it’s true caliber (diameter). I know this is long winded but it all comes together later. By flattening the tip slightly, you do create more drag but that is not much of a concern vs the tips in their present state plus its short distance flight. You could go in the opposite direction by using special dies that create a point but we don’t have those. Here's an illustration expressing before and after meplat trimming; 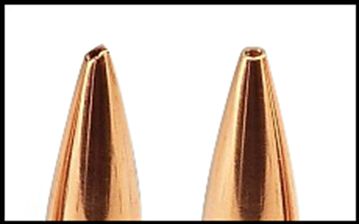
As a side note: Above I mentioned short distance flight. All bullets hit the ground the same time ignoring things like friction, sight offset, earth curvature and such. How they arc and distance traveled within that time is caused by its velocity. Hold your rifle level and fire while dropping a marble at the same height and both should hit the ground at the same time. Back to the subject, I’m not saying to trim all your bullets, they should be fine as is but I’m just showing one extreme case where you may want to consider it, or use them as is, or just throw them in the trash bucket, your choice. After trimming the tips (they’ll show up in later images) I re-weighed half the lot and got a swing of .6 grains. Not bad and with uniform tips. Yes, I have better things to do but I want to be as thorough as I can be writing this (within reason). With that said and using the above components, I went ahead and assembled one round, and prepped three other shells following the instructions given by the die manufacture (Lee in this case) exactly. From sizing through trimming to bullet seating sans priming and charging. I measured the case length and the overall length (OAL) and everything was as close to perfect as I could get (not really, but close enough). Lubing. Its important to lube bottle necks both inside the neck and on the body but not on the outside of the neck or shoulders. Lube on the shoulders may cause denting. Think hydraulics, a little pressure plus liquid. I used Lee resizing lube for the inside with a q-tip and Imperial sizing wax on the body. There are many options and I switch from time to time. I only ran three though I lube in groups of ten or so. 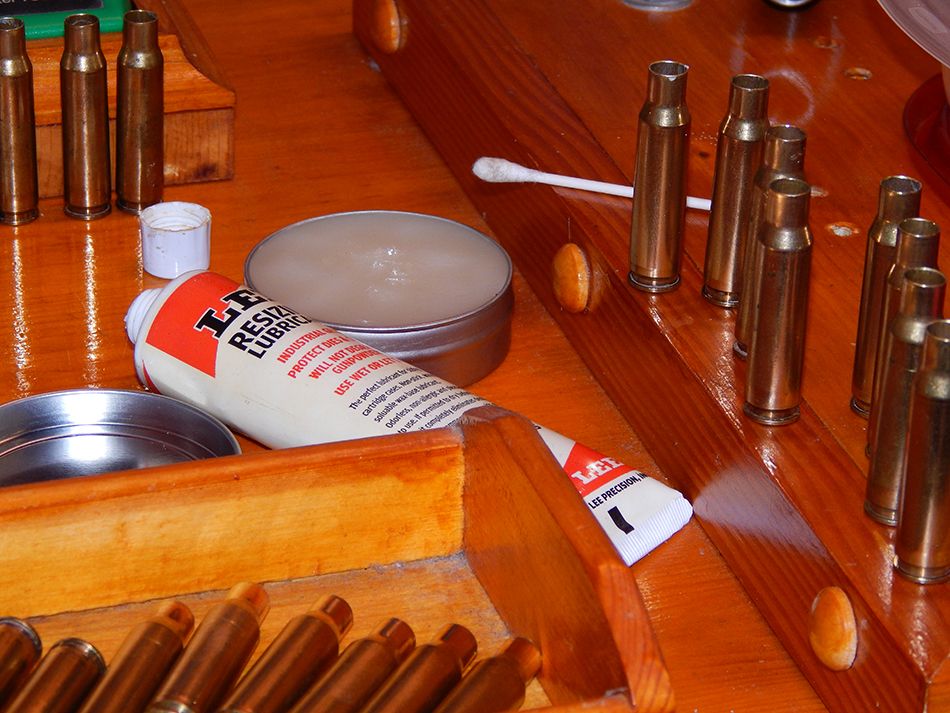
I then set my die to the manufacturers recommendation of screwing it down and touching the shell holder plus another quarter turn rotation. 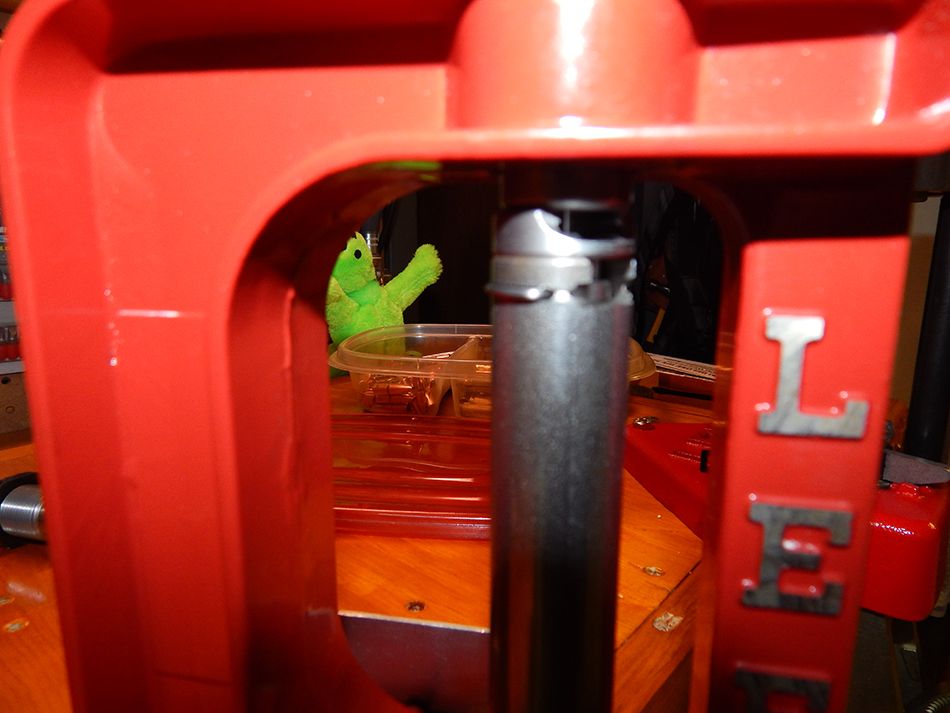
The next step is to trim to size and chamfer the cut. How I go about that is the same as in the first writeup with one change in the order that I do bottle necks vs straight wall that I’ll explain later. This image is after I redid my steps but this is as good a place as any to put it. The final length was 2.0085”, a touch short of 2.015 which is spec but I used a lee case trimmer to set my cutter length (explained in the first post) to and I always find them to be just a hair short. 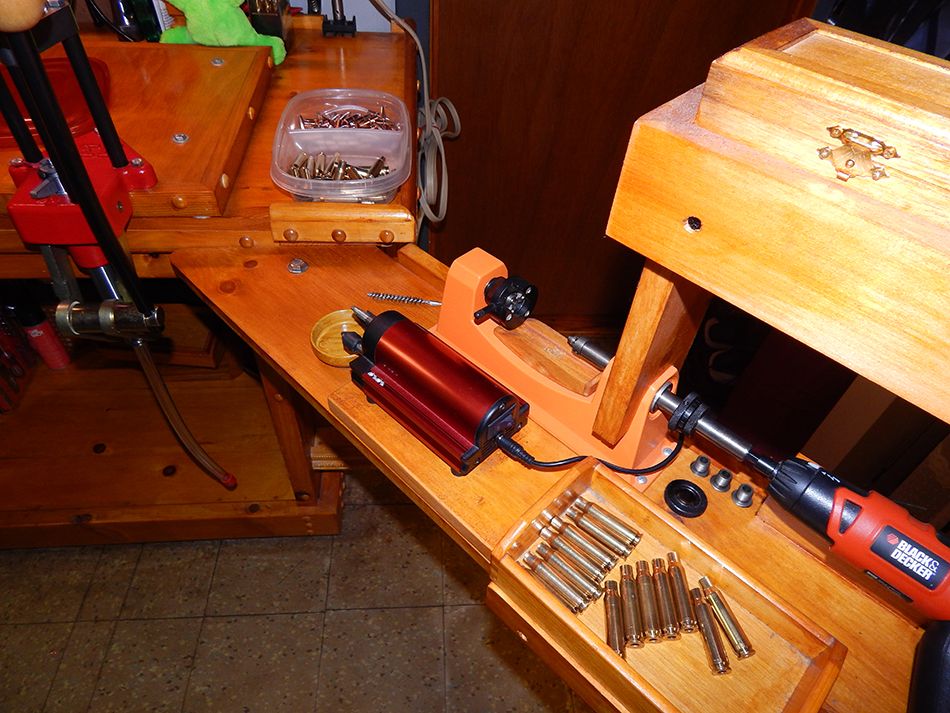
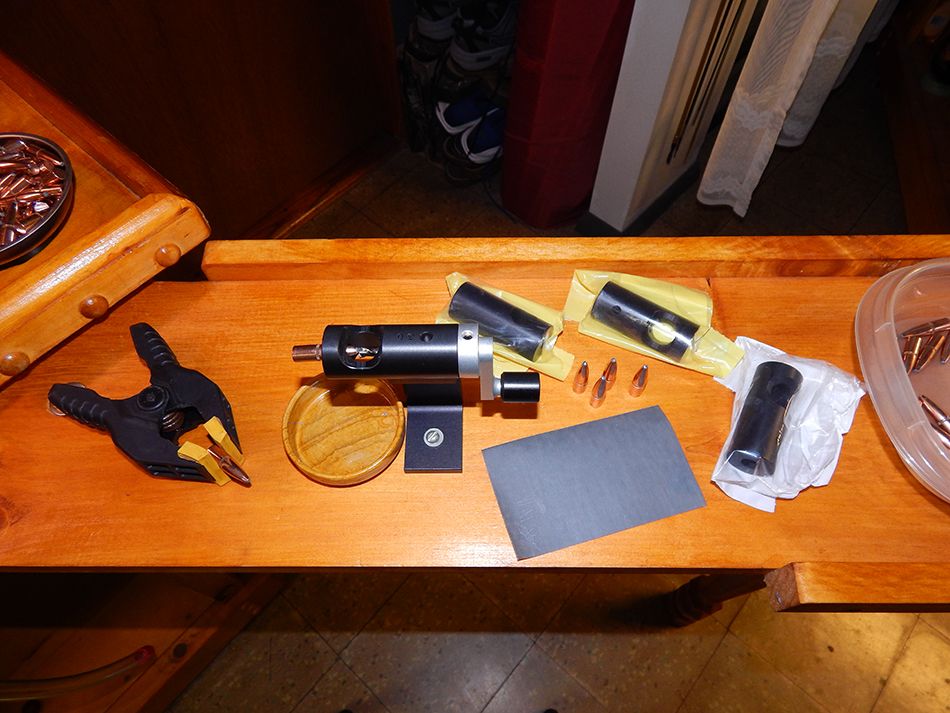
As another side note: Lee has started making a press mounted trimmer. It seems interesting but I've not seen anything on them yet but I thought I'd link it as an FYI: http://leeprecision.com/news/new-products-for-2013.html From here they go back into the tumbler with corn cob media for a final cleaning and to remove any lube. The next to steps I omitted but I set them up just to illustrate them. The first is a ram prime. I said in the first thread that I like to use a ram prime for larger shells so I thought I’d provide an image of one for those who don’t know what that is. It comes with both small and large primer components. 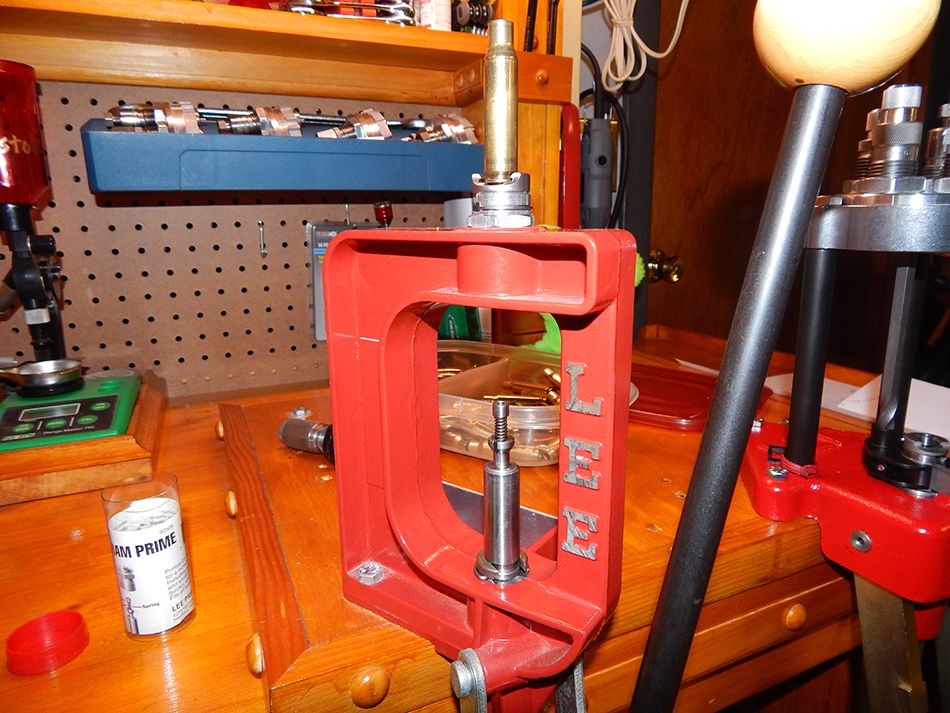
I guess here is as good a place as any to insert bullet and powder selections. As for powder, I like Varget for .223’s and 308’s. It gives good performance and a nice range of min to max loadings. Others prefer, well, other powders. When I’m working up a rifle load, I’ll start with the manufactures minimum + .5 grains and work it up in +1 grain intervals to a max of -.5 grains from their max load. You may find a few “sweet spots” of opening and closing of groupings from the various amounts of powder and your barrels harmonics along with bullet selection. From there I’ll select the best one and ladder it back and forth in .2 grain intervals to finalize it from there. Groupings vs zeroing: When I’m working up a load, I don’t really care about where they are hitting the paper as long as their hitting it. I can always adjust for zero later so don’t be to concerned about that. Go for the groupings. It’s what I try and explain to new shooters in their first attempts at target shooting also. (A small deviation) While I’m at it, MOA (Minute of Angle). This pops up from time to time. What it refers to is high school geometry on a sphere, 360 degrees, 60 minutes per degree, 60 seconds per minute. If you can picture yourself at the point of a V where the lines meet and one end of the V is one target impact and at the other is a second impact. If you measure from the centers and the target is 100 yards out, what you get is your MOA. Say its a 2 inch spread, then you have a 2 MOA. At 100 yards 1 MOA is approximately 1.047” or 1” for practical usage. As the target gets further out along the axis of the V say at two hundred yards and you measure the impact spread and it’s 4”s, you still have a 2MOA as it’s still based on the same angle at 100 yards. At 50 yards with a 1” spread it’s again 2 MOA. Sub MOA simply means under an inch spread at 100 yards. With a scope. If your clicks are say rated at 1/2 MOA, it means it will move the image 1/2 inch, up, down, left or right, at 100 yards with each click. If your at 50 yards it will move the image 1/4” and 1 inch at 200 yards. So say your at the 50 and your left 4 inches, you’ll need to click 16 as opposed to 8 clicks at the hundred for a 4 inch movement. One final thing on adjustments. If you want a back pocket method of saving a few rounds zeroing using a bench rest. Sight in on your target and take your shot. Where you sighted in is called your point of aim (POA). Where your bullet hit is called your point of impact (POI). Use the same POA and without moving the rifle, adjust your sights or scope until its on the POI. You should only need a slight tweek from there. (End of my deviation) Bullet selection is really up to the individual with a few considerations such as barrel twist vs weight for stabilization and type of firearm for types of tips. For instance, I general stick with the 90-100 grain FMJ for my PPK/S as thats what it was originally designed for or (with exception to Hornadays FTX) round or flat nose bullets for levers. My Ar’s have a 1:9 twist so I like to stay in the 55-65 grain weight. There are a number of on-line calculators that you can use to see what you should “expect” with your combinations. Heres Winchesters though geared for their own products it gives a decent graphical image of what I mean. 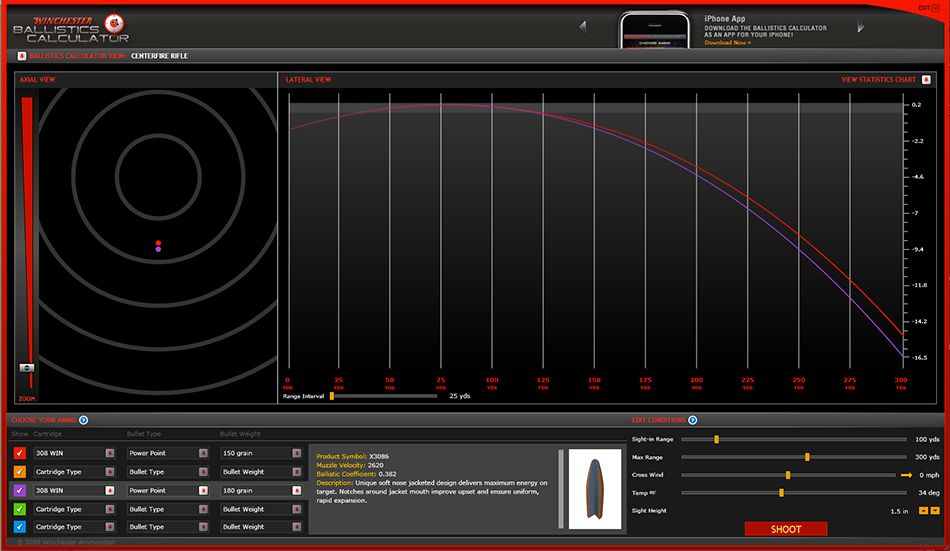
I wanted to see a 180 soft point (as its Winchester, I used Silvertips as a base) vs a 165 grain (my normal for 308s). The 673 is not scoped. It never will be nor the other two 673’s. They really aren’t made for that so I want to develop a cartridge that will perform well out to about 175 yards with open sights, by well I mean not much hold over or under from my zero yardage which I placed at 100 yards. I also used velocities that I obtained from Hodgdon’s web site for 165 & 180 grain soft points using Varget for another web-site. These two are the results for the highest and lowest velocities obtained from Hodgdon's website for the 180's: 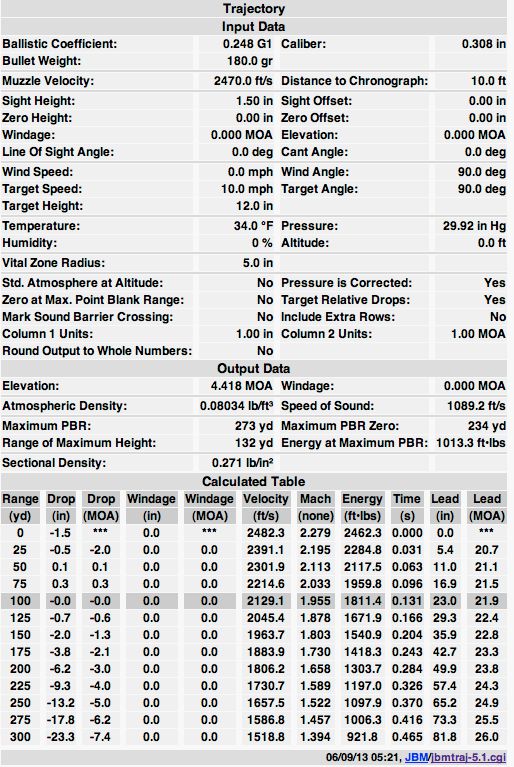
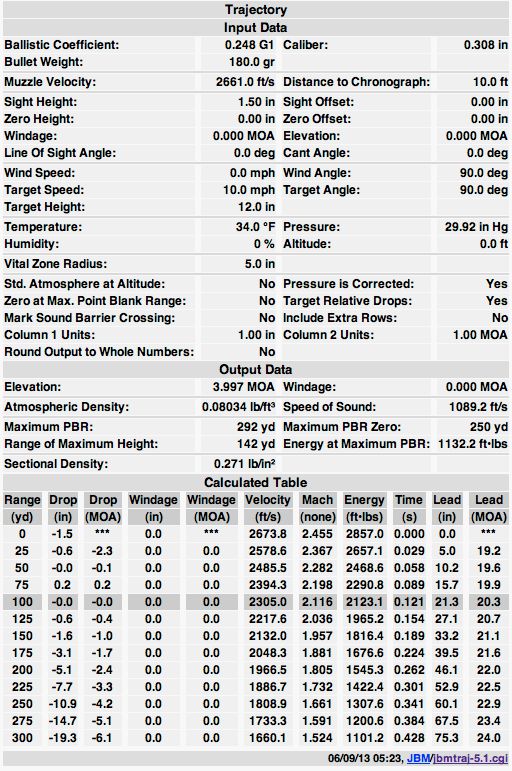
As a note: When you see a “C” after the charge (as in the max load of the 180) it means compressed. There is more powder in the case so that when you fully seat the bullet, you will compress the powder. In some cases it’s okay to do so. Varget will allow you to compress it somewhat without a pressure spike. 
In reality, at such close ranges, the differences are negligible between 165’s and 180’s. How I charge the cartridge. I use a universal rifle charging die on the press. It’s supposed to go on an automatic charger but I like using it this way with a funnel as the funnel fits perfectly and the shell doesn’t wobble as its locked in. From here they would go into a rack for bullet seating. 
Next I sat the bullet again following the instructions. The reason you do an extra 1/4 turn by the way is to remove any bending from the press or what it’s mounted on or the slight lifting of the turret on a turret press from the pressures you exert on the lever, not as an adjustment for length or depth. Its here in the instructions that you may find why the extra quarter turn, not in the beginning where it should be placed. 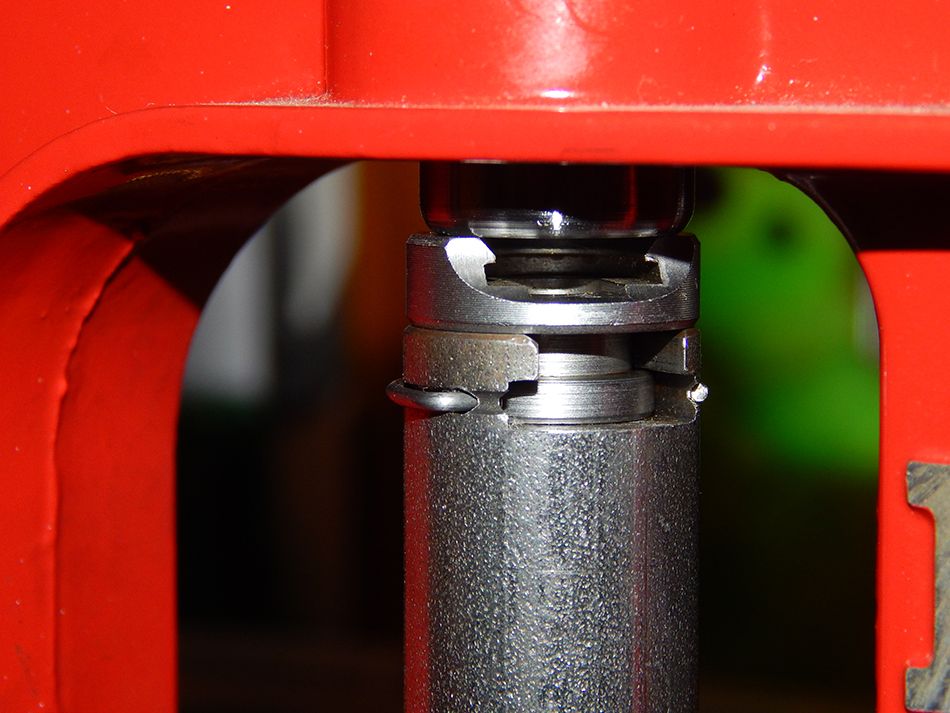
I set it so that the overall length was 2.810” which again is max listed OAL for .308 Winchester. And then finally a factory crimp setting per instructions. (I’ll mention in the following on my habit of double stroking sizing but I want to wait to the end on how I seat the bullet) 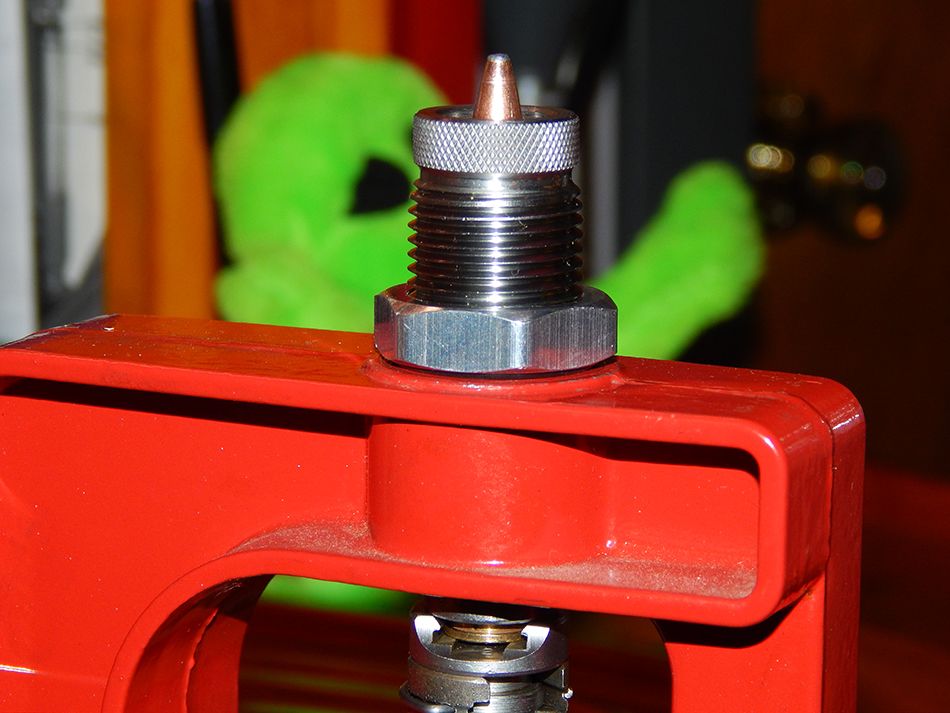
Bored yet? I know, standard stuff. I placed it in the box magazine and attempted to chamber the dummy (no charge or primer) but the bolt won’t close. In truth, I didn’t think it would. Heres a shot of the two factory rounds and the aforementioned failure (center). 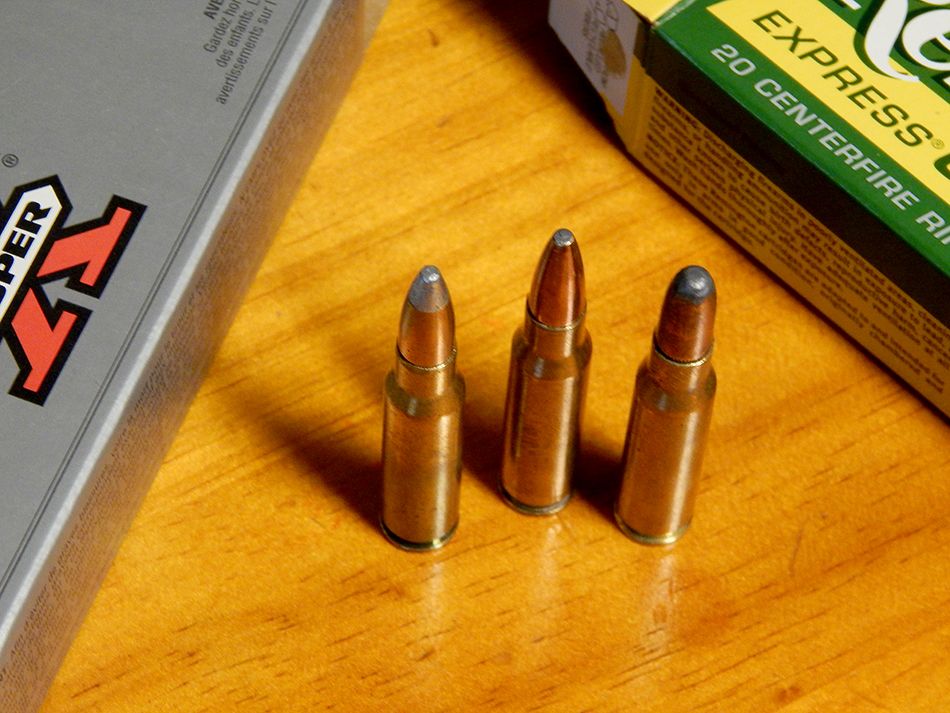
The two factory rounds fit wonderfully and the bolt closed smoothly so I guess my chamber is within spec (you can use go, no-go and field gauges if you think otherwise to check it). Their measurements were close to mine so what went wrong? First lesson, make a couple dummies and check them before making a few hundred or thousand. Besides not closing, by giving the failure a roll across a mirror, I’m getting a wobble. It’s how old buggers like myself used to check concentricity. That’s for later on also. Back to square one but now I need my bullet back. 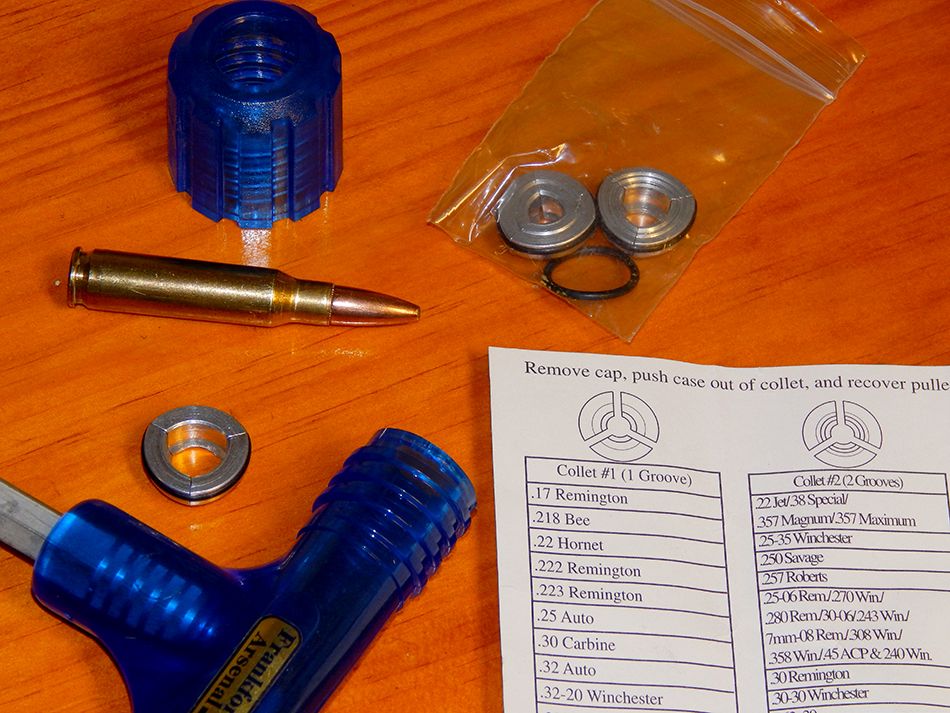
This is a simple kinetic bullet puller by Frankford Arsenal. It comes with different size collets for different size cartridges and a chart stating which one to use for which caliber. The collets are designated by 1, 2 or 3 rings. You simply place the cartridge (it wont set it off) into the collet as shown and hit it a few times much like a hammer on a solid surface. The only negative thing I have to say about it is the collets are a pain to assemble with the o-ring so go slow putting into the collet and removing the cartridge from it. 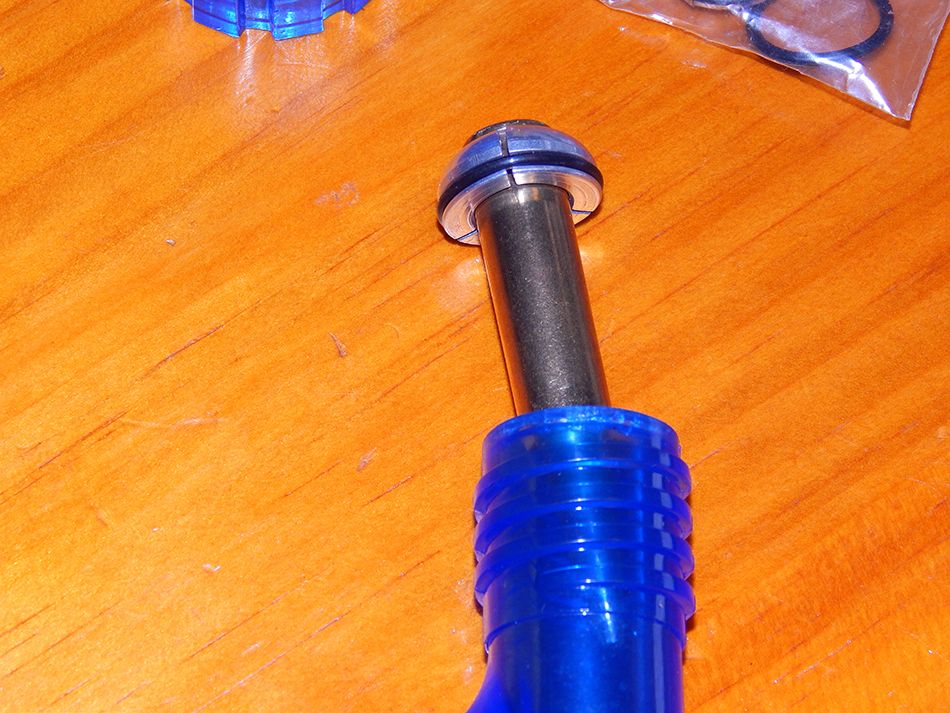

So, back to the beginning. All of the above was just to get to this point but I think I already threw out a bunch of stuff like curing some bullet issues, testing a dummy round or two before moving forward to check your method and bullet pulling. I guess I should say I’m using a single stage press as I normally do for bottle necks so to set the stage 
Its an older lee single stage. It’s good enough for me and I get the results I need or desire with it. If you read the first post I did end up switching the turret press out for the one I had sitting around. Lee changed their presses out back in 2006 or around then and the older models won’t accept the newer parts as is. I’ll need to take the automatics off for a bit more room. As a side note, the little green man has always been there but I moved him out of the way the last time. He cheers me on as I sit here doing this thinking to hell with it, I should go mow the lawn, so thank him if you get a glimmer here. I said previously that I’m using Lee dies so I may as well start there. On the bottle neck ones (as opposed to my straight wall) I usually pick up an extra decapping rod and give it a quick polishing using the 1500 sandpaper and some mothers billet polish just to smooth them out a bit and then switch out the original. Before reassembling, I’ll put a touch of shotgun choke anti-seize on the threads in case I have to reassemble later say for a broken rod or general cleaning. You may want to have a spare on hand, it happens. 
Though both are Lee, look closely at the tips. A bit different. That will come into play later. One of the reasons my first attempt failed was because I followed the directions and didn’t fall back on experience or in my case, habit. On bottle necks, I always double stroke. By that I set the die per instruction, lube the shell, size the shell, drop the lever, rotate it 1/4 to 1/2 turn and size again. This is where that tip comes into play. Most shells are punched through to make the hole for the primer ignition. This leaves cratering on the inside and may prevent the die from fully seating for correct sizing. Another thing I do is I clean the cratering out with a Lyman pocket cleaner. I used it in the first posting and I said above I do a switch with trimming. On bottle necks I clean out the cratering before I size and I also use the screwdriver handle that comes with it as opposed to the trio. It’s easier to use with long shells this way. Where the failure occurred was at the shoulders, as I thought it would. I know this because I checked it with a Hornaday Headspace gauge which is misleading by name. I’ll get into that lightly in a moment. Here is a fourth casing being cleaned out with the pocket cleaner along with the other three that won’t fit at this point (no, all that didn’t come from one case, though it was just few more besides this one). 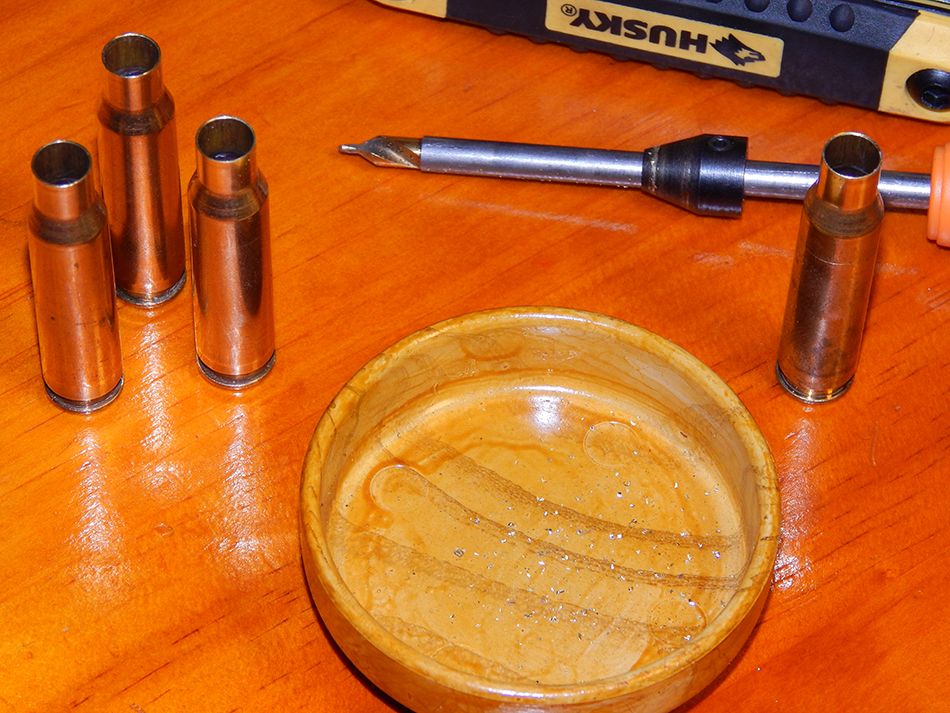
Here is the measure I got with the Hornaday gauge from one of the original three 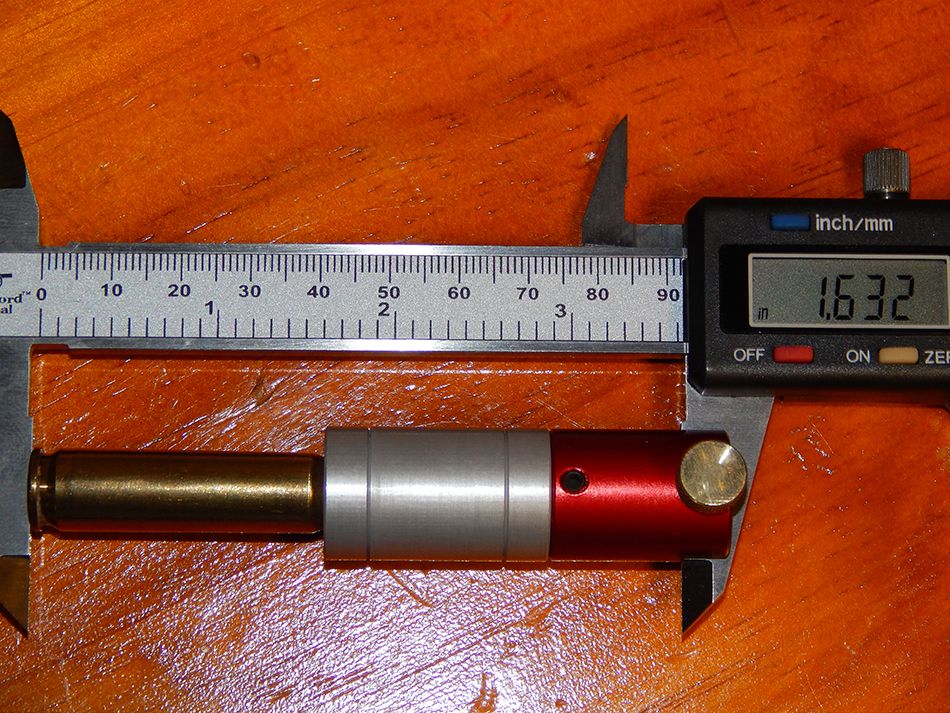
This is misleading. As headspace for a 308 is 1.634 and measures from “approximately” that datum line (again more later) so it "appeared" to be correct. I placed the now cleaned out fourth shell into the resizing die (doing as the instructions say) and one of the original three for a double stroke and here is the result for both 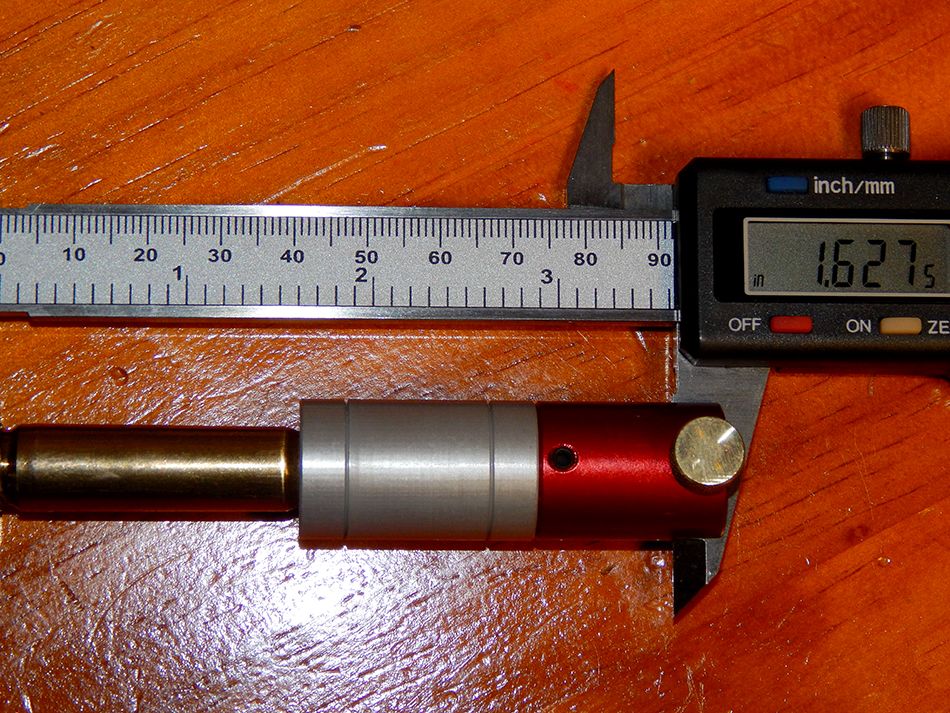
I also placed a Silvertip 180 and one of the Core-lokts into the gauge and got a 1.627 reading on those also. I placed one of the remaining originals into a Wilson case gauge and it failed there also. 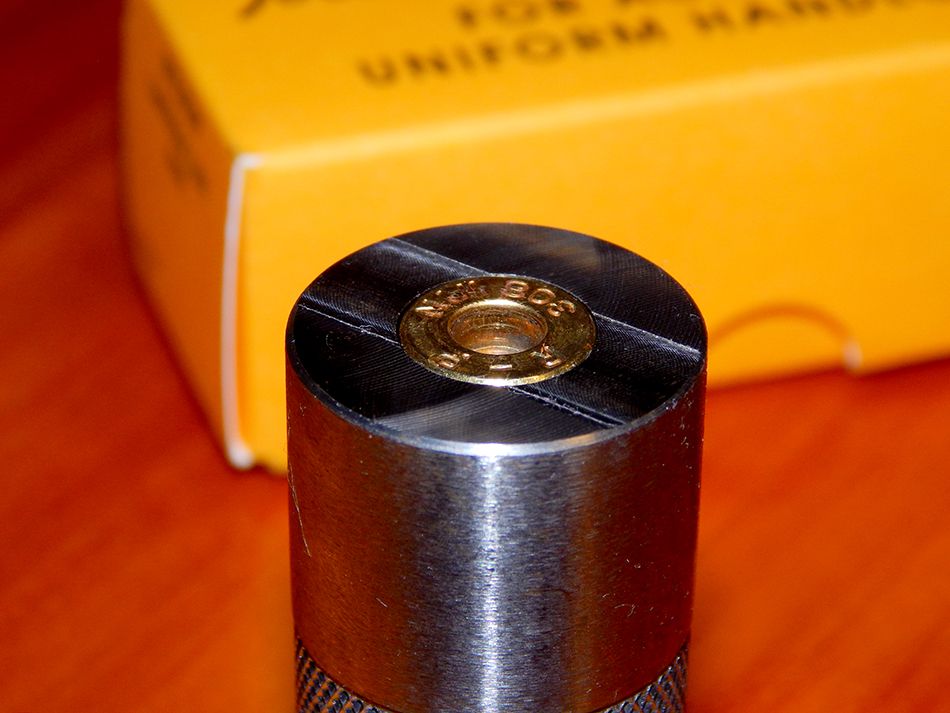
How you use the Wilson is you place the shell (shell only on rifle cartridges) into it unless you lift it of the table top. If the case head is below the top surface but above the cut out then it’s within Sammi (Sporting Arms and Ammunition Manufacturers’ Institute) spec. This one is raised above. Here is the fourth shell in the gauge and it’s fine. 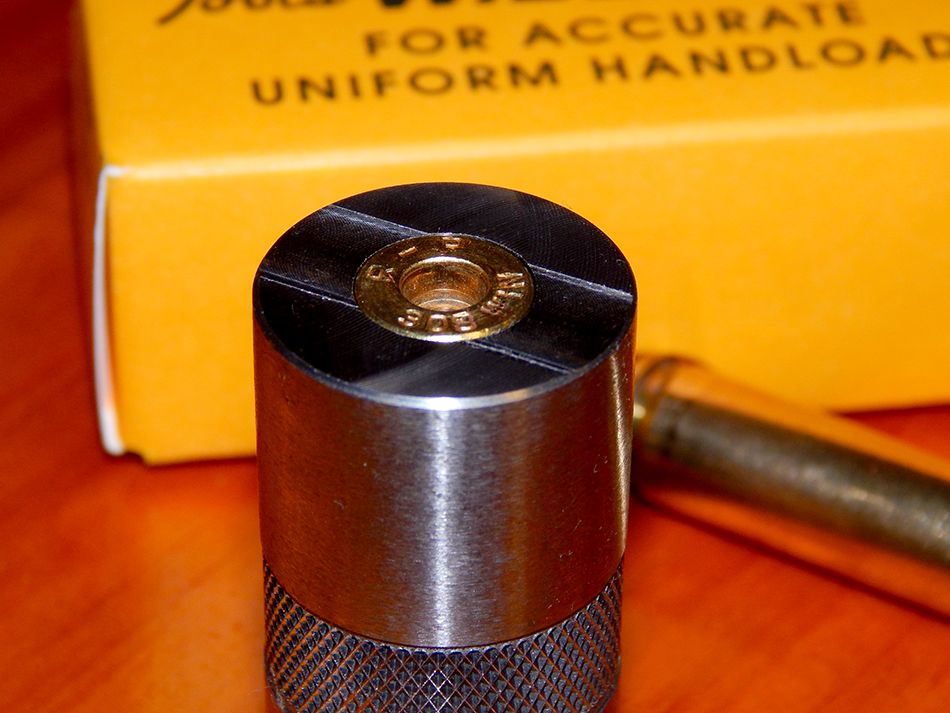
Some shell manufactures drill the holes like Lapua, a very well made component in and of itself. We don’t have them so grin and bear it. On headspace, (in reference to my comment on the gauge) without getting into it, it’s really defined as the space between the head (which is actually the bottom, where the primer is) and the bolt face. For our proposes, lets just consider it how much space our cartridge has room for growth both forwards and backwards. Just to illustrate and not to getting into specifics, headspace is also measured differently on different cartridges depending on rimmed, rimless, belted and so on. 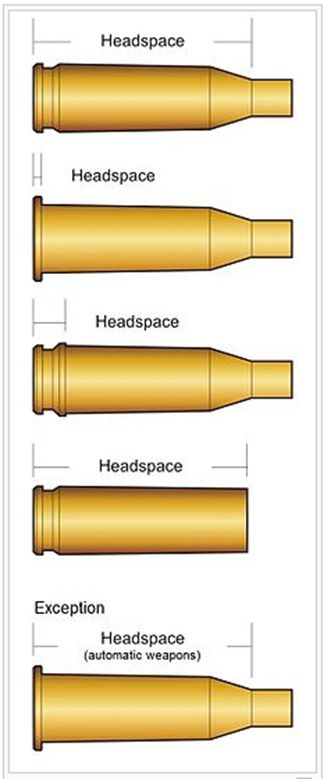
A better name for the gauge is a comparator. I use it simply to compare cartridge casings for before and after firings, or to check my reloads against a factory round as I did here and so on. What about just screwing the die down further to shorten the shoulders? Nope. I could raise it to lengthen but it won’t be fully resized. 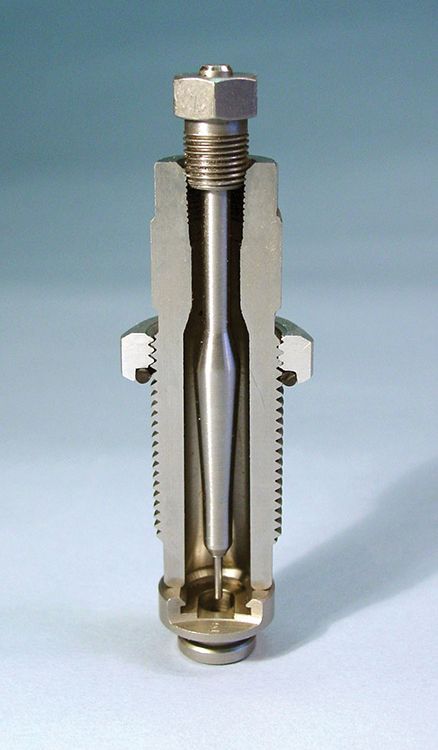
As you can see, there is no adjustment for shorting the shoulders except maybe shaving some steel off the bottom of the die but that extra brass has to go some place and it will flow up into the neck, extending that which can cause higher pressures without proper trimming and thin the brass. As with anything firearms, say one thing and it leads into many offshoots. I’m trying to stay focused but will drift a bit for a short explanation. I took the fourth shell and set a bullet into it to the same OAL length as the dummy and it chambered exactly like the factory rounds. To extend this just a bit more. As this is a bolt action, I can make a specific round for it by adjusting the length for whats referred to as jump. Also, I mentioned at the beginning I would say something about how I seat bullets and skimmed something on concentrics. I’ll start with the center one as it’s most relevant. On how I seat bullets. As with my habit of double stroking sizing, I also do bullet seating in two parts when it comes to rifles. I’ll begin by placing the bullet in as straight as I can on the shell and slowly seat it about a third of the way down. Then I’ll drop the lever and turn the shell about a third of a revolution and then slowly seat the bullet fully. I found this to be the best method to avoid getting what’s referred to as runout. I’ll get to that part last as I need to do the next part first in order to have an extreme example. My limitation on total OAL is really the size of the box magazine that comes with this rifle (unless I want to use it as a single shot, which I won’t as I like my extractor) and the position of its feed ramp and to be sure I’ve enough bullet in the shell for proper neck tension. Jump is the distance that the bullet makes from its starting point to actually making contact with the lands. The lands are the higher points left in the barrel after reaming. The groves are the lower sections that have been cut away for the twist. Twist rate is one revolution per X inches of barrel length. say a 1:9 is 1 revolution per 9 inches of barrel length. The twist rate comes into play with your bullet weight selection and stabilization. On that note, you’ll want to select bullets that are appropriate for your barrels twist rate vs bullet weight. See what I mean about how one thing leads into another? Back to jump. If you scroll back up to the image showing the two original rounds and the failed dummy, you’ll see three different shaped bullets. The dummy has the longest, sharpest tip of the three meaning it would have the longest jump space before hitting the lands if all three were identical in OAL. As with anything else, there are older ways of doing things vs newer. You could use a marker and “paint” the tip of the bullet setting it long, chamber slowly, see if you have markings. Seat slightly lower, repaint, rechamber, repeat until well you get the idea or you can use something mechanical. I like the Hornaday OAL gauges. 
The gauges are the two red rods, one straight, one curved. The straight one is used for firearms like bolts that you can go straight into the breech. The curved one is for those that you can’t say a lever that won’t break down easy without a tech manual (think puma 92 or for many a Ruger .22). You’ll also want a Hornaday modified case for your specific caliber (s). There are a number of websites that will show you how to make one but they are only about $5.00 each so not worth it for me. I also like to use it in conjunction with the bullet comparators as no two bullets are exactly the same. Hornadays numbering system on the bullet comparators is lack-luster at best. They don’t explain it anywhere so as a heads up the first number(s) before the dash is the index number 1, 2, 3,....,14. The second two numbers are the caliber in my case I needed the comparator with 8-30 on the side. 12-45 is for 458’s and so on. There are calibers listed on the back for the calibers you can use but no simple cross-reference until you figure it out. The instructions are simple on set up. Just place the correct comparator into the body (which is the same one as the headspace gage so you can use it for both if you wish to save about $15.00. Hornaday sells the set with or without the body) and tighten the set screw. Place the body onto your caliper and tighten the thumb screw, then zero out your caliper (if you want) to it. 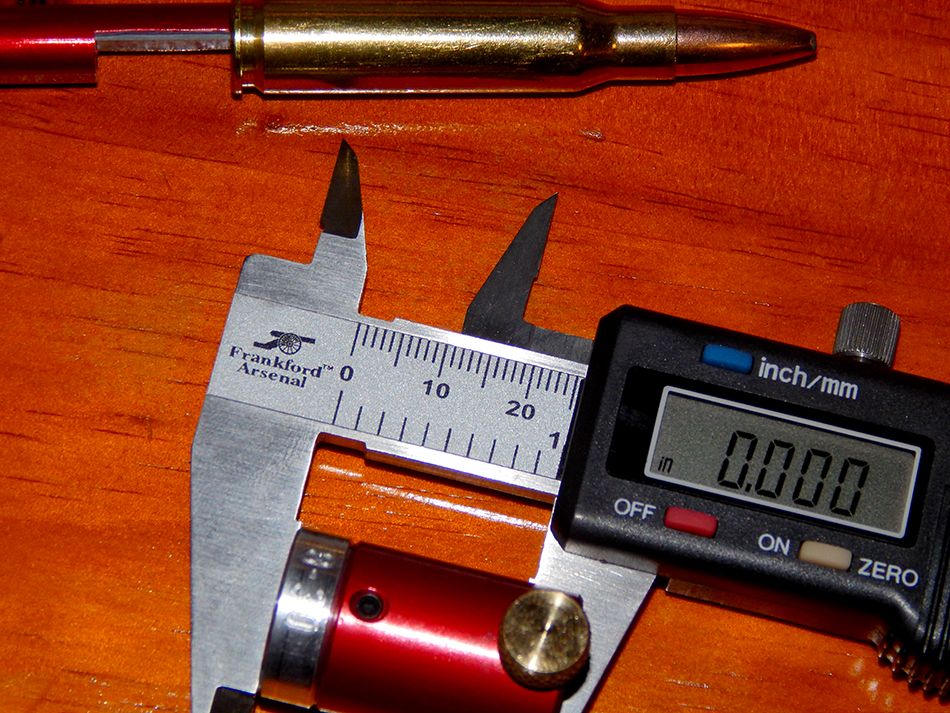
How you use the OAL gauge is to simply screw the modified shell onto the end of the rod, loosen the thumb screw to allow you to seat a bullet to a low depth, insert a bullet into the neck (which has been slightly expanded by Hornaday and to do so with only finger pressure) and tighten the thumbscrew so the bullet wont fall in. I use the dowels to help push the assembly back out as the bullets usually like to stick to the lands. As another side note: You should have a good collection of hardwood dowels on hand. I bring these to the range with me along with a number of odds and ends I keep in a tool box as a just in case. A cleaning rod would work also but I prefer dowels. I tryout about 5-10 different bullets from a given lot depending on the amount and measure them about 3 times each. The one I select has the shortest measure and I consider it my max length for all. Anyway, this is the bullet set short in the case ready to insert. 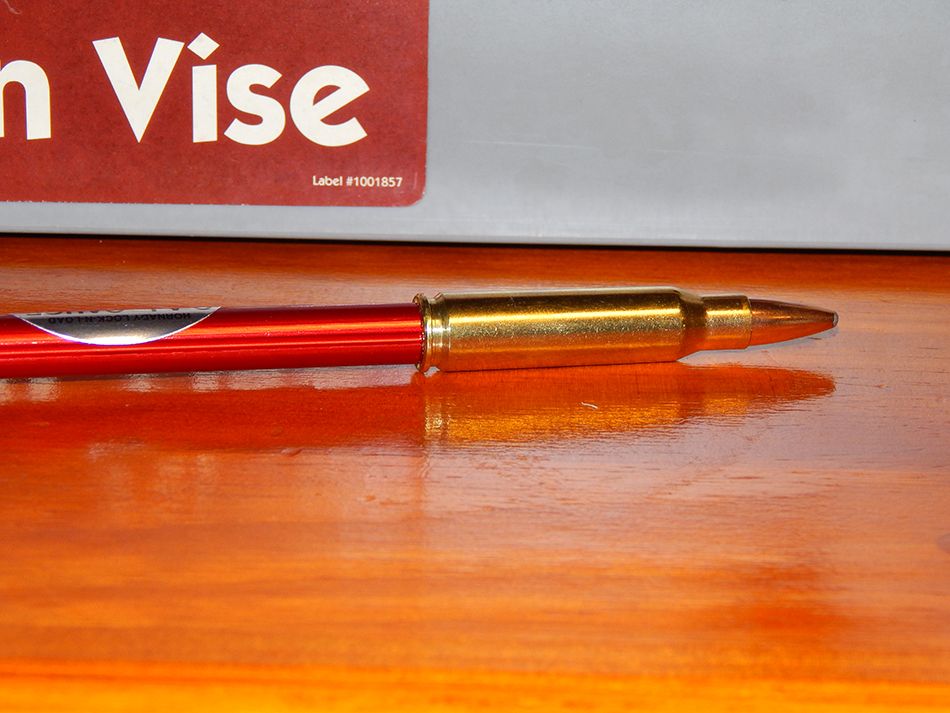
At this point I put the best fitting dowel in about half way down the barrel. Then you insert the gauge with the attached shell and bullet into the chamber until it stops. Next loosen the thumbscrew and gentle push the bullet forward until you feel it touch the lands and tighten the thumbscrew down. Use the dowel to push it all back out or your bullet may stay behind. Here is the assemblage after withdrawing it. The comparator has a cutout that you can use to get around the calipers arm. 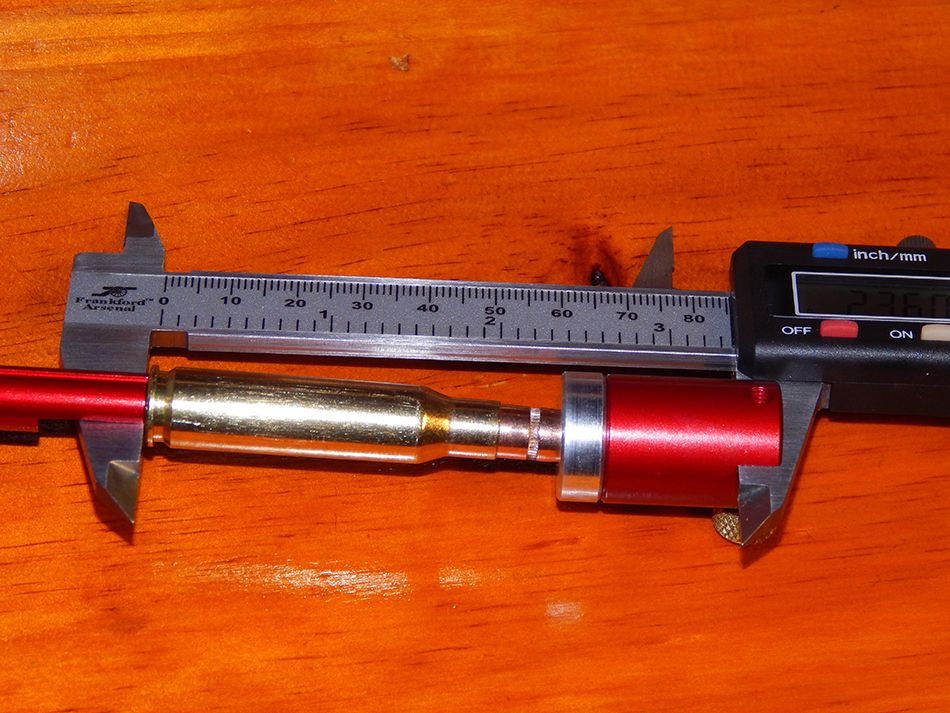
This is the smallest length that I measured with consideration to using the bullet comparator. 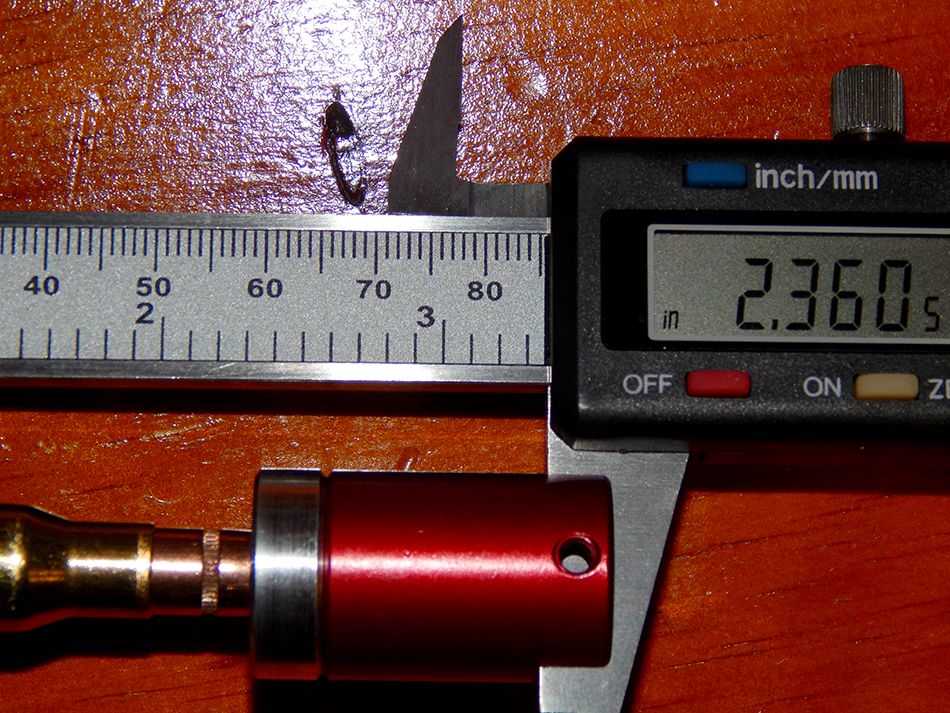
I then measured the OAL as is and it came to 2.909 inches to touch the lands. max measure to lands as test to close bolt.jpg Hornaday recommends backing this measure off by .020 inches for surety of chambering, especially for hunting purposes. I think thats a bit generous and competition shooters may go only .001-.002”. I backed it off by .015” and set the seating die to a final OAL of 2.894”. Now to test it. It went as I thought it would. It chambered fine but its to long for the box magazine and it overlaps the feed ramp by about an 1/8th of an inch. That’s the bad news, the good news is we now have an extreme example to test the runout with. I said in the beginning that when I rolled the original test dummy across a mirror I noticed a wobble of the tip to tip reflection meaning that by just seating the bullet as instructed and I got a perceived runout. Probably not much but at least 5 thousandths for my old eyes to notice. Thats how we used to check roll-your-owns. You could take some out with a block of wood with the right size hole and tug or push it a bit ... again, you get it. Runout is not really something of itself but is a measure of concentricity. How straight the whole cartridge is along a central axis. If something is out of alignment, the neck, bullet and so on, you’ll see it on a mirror when you roll it. I’m fairly confident in my methods though they are my way. As I said in the first thread, it’s the way I’m comfortable with but it’s not the only way. I thought I’d throw out a couple tips and clear some of the issues that I see here from time to time. This is a bit risky also considering all the stuff I’ve done to these components along the way to exhibit a bit of bravado. Also, I noticed this seemed to be a Hornaday thread (which I believe are many of the old Stoney Point designs, could be wrong there). The last one was mostly Lee. Well, one more Hornaday. 
This is Hornadays concentricity gauge. It’s “okay” for loaded rounds weather reloads or factories or even just dummies like I’ve built here and gives you a way to correct runout somewhat. Sinclair also makes their version which you can use to test throughout your process. Anyway, the gauge will give you readings in thousandths. A good readout is within 2-3 thousandths, better as the movement approaches a zero difference. I don’t bother moving the dial face to line the low point to it, I just read the numbers and subtract. Low point 
High point 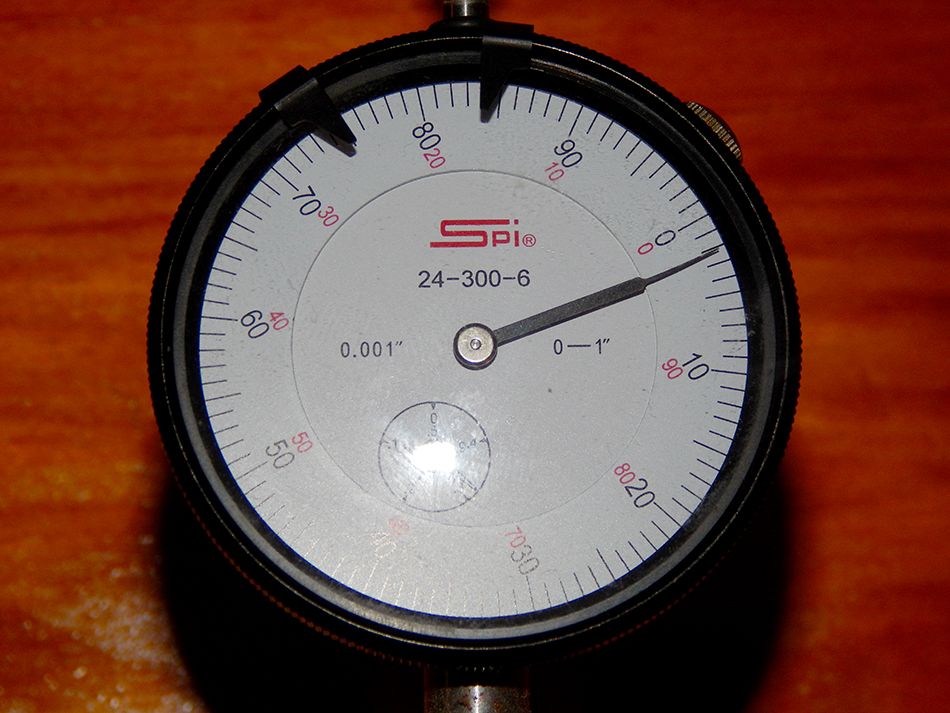
Looks like less than one 1 thousanths to me. Peace T. 
|
|
|
|
|
[Last Edit: eracer]
[#1]
I am a new reloader, and I not only subscribed to this thread, I saved the web page in its entirety.
Beautifully done, and I thank you. |
|
|
|
AZ, USA
|
[#2]
Thank you for your efforts!
|
|
|
|
[#3]
I'm setting the toggle to keep this thread out of the archives.
Well done.
|
|
|
|
USA
|
[Last Edit: Fantastique]
[#4]
He taught me all I know.
Excellent job, Ro...errr...Taipan. |
|
|
|
[#5]
Excellent. Now, we have at least two woodworkers on board to create beautiful accessory fixtures for the proximity probe chronograph mentioned in an earler thread.
Thanks for the photo-essay. I am shipping the URL of this thread to a friend who just bought one of those kinetic bullet pullers. |
|
|
|
|
[#6]
I just came back to read this and the pictures are dead?
|
|
|
|
|
[#7]
Originally Posted By MRW: I just came back to read this and the pictures are dead? Check again the first of Nov, when OP's bandwidth starts over. It's what happens with a popular post.
|
|
|
|
|
[#8]
Originally Posted By dryflash3:
Looks like he is over his bandwidth for this month. Check again the first of Nov, when OP's bandwidth starts over. It's what happens with a popular post. Originally Posted By dryflash3:
Originally Posted By MRW:
I just came back to read this and the pictures are dead? Check again the first of Nov, when OP's bandwidth starts over. It's what happens with a popular post. Dryflash is correct. My bandwidth is used up for now. It went south when I wrote an extension to this post. The explanation is in it as a pickup quote from Photobucket. http://www.ar15.com/forums/t_6_42/409193_An_extension__yet_again__to_my_style_for_newer_reloaders_.html |
|
|
|
|
[#9]
Bump?
|
|
|
|
|
[#10]
Originally Posted By MRW: Bump? No reason to bump this thread. Just save a bookmark to this thread and you are GTG. |
|
|
|
|
[#11]
yes, but I was hoping for renewed discussion. I can't say too much myself, but I would like to listen to other people talk about this
|
|
|
|
MN, USA
|
[#12]
No reason to bump this thread. IDK, if he hadn't some of us would never had known about it? |
|
|
|
[Last Edit: dryflash3]
[#13]
Ever notice this forum has 9 pages?
All of the toggled threads are on the last 2-3 pages of this forum. Unfortunately members can't see the "toggled" icon that I see. A site bug I have brought up to Goatboy (Admin for this site, he wrote all the code, that's why Arfcom does not look like other forums) several times, but he has bigger fish to fry I'm thinking. All you have to do is click on those pages and look. It's fine to comment in one of those threads, and it brings it back to page 1. |
|
|
|
|
[#14]
Nice write up OP,{beer}
I have to ask, do you anneal your brass, and do you use neck bushings and a mandrel die instead of a basic die with a button? How often do you run into more than .003" of run out in your necks after all sizing work is done? Have you ever checked your fired cases on the neck before resizing them? I realize this is for beginners just getting started, but I find that if they have a better understanding of what's going on, they can better understand and can better manage to put out quality ammo...Regardless, very Nic e job, and I love you reloading bench, could use to be bigger, but damn it looks nice.. 
|
|
|
|
|
[#15]
Jesus, talk about rising from the dead. I saw this one come to the top of my subscribed threads.
No, I don't anneal my brass. No also to using neck bushing dies. Oddly, your next question also corresponds to the previous one. As I stated (I think somewhere in there, it's been 10 years), I don't run my brass up in a single draw down but by raising it a couple times and rotating it each time. Knocks most of the run-out I may get away. I also don't seat my bullets with one draw either. The corresponding part is that from my readings, you may get more occurrences of run-out using a bushing die. I think it still covers many of the aspects and terminologies that gets bandied about that gets somewhat confusing for beginners. Feel free to add to this as any information is a positive thing and again, as it's 10 years old there have been a number of new products since its conception. My bench is in two parts and also has extensions that attaches to it with simply a bolt if needed. The second half is my cleaning bench which is on rolling castors that can lock and butts up to my reloading bench either straight on or at a 90 to double its size. There is also a mini model that I made that is both a combined reloading station and workbench that is also on castors that can be added to the other two for a couple more feet or to build a U shape work area. |
|
|
|
|
[#16]
Originally Posted By Taipan01: Jesus, talk about rising from the dead. I saw this one come to the top of my subscribed threads. No, I don't anneal my brass. No also to using neck bushing dies. Oddly, your next question also corresponds to the previous one. As I stated (I think somewhere in there, it's been 10 years), I don't run my brass up in a single draw down but by raising it a couple times and rotating it each time. Knocks most of the run-out I may get away. I also don't seat my bullets with one draw either. The corresponding part is that from my readings, you may get more occurrences of run-out using a bushing die. I think it still covers many of the aspects and terminologies that gets bandied about that gets somewhat confusing for beginners. Feel free to add to this as any information is a positive thing and again, as it's 10 years old there have been a number of new products since its conception. My bench is in two parts and also has extensions that attaches to it with simply a bolt if needed. The second half is my cleaning bench which is on rolling castors that can lock and butts up to my reloading bench either straight on or at a 90 to double its size. There is also a mini model that I made that is both a combined reloading station and workbench that is also on castors that can be added to the other two for a couple more feet or to build a U shape work area. Sorry OP, didn't mean for it to sound harsh... What you have is good already, my comments, and where I found improvements centered on the neck...I asked about the bushing and mandrel because once I started checking run out on the actual neck offered cases I realized ion your chamber was done properly, your brass will likely always come out of the chamber perfectly concentric on the outside...I found when using a standard die with a button 2 things happened, necks were getting overworked sizing them down quite a bit further than needed, and the process of pulling the button out of the brass to size it for bullet seating, often pulled the neck out of concentricity.. I found annealing helped with getting a more consistent neck and shoulder from case to case....Once I moved a bushing die and a mandrel die, and added in annealing, I found brass formed better and didn't spring back abad as when sizing with out annealing..I never used a button with the bushing, just sized the bushing right for .002" of tension.. problem was now the outside of the neck was very consistent but the inside wasn't until the bullet was seated..So I then used a bushing to give me.003" of tension, then used a mandrel die to bring the inside round and to .002" of tension..The mandrel doesn't screw with concentricity because its sizing as it goes into the case, not pulling the necks it does as it is drawn out of the neck on normal die...Everything I do on brass after the initial stuff is done is to absolutely make the brass as exactly the same as possible, from shoulder bump tonic tension to trim length..By doing thatI feel my ammo performs much more consistently...
|
|
|
|
|
[#17]
I didn't consider it was harsh and you contributed to the thread which is important as things change over time so thank you for doing so.
|
|
|
|
|
[#18]
All good man...
|
|
|
|
 Win a FREE Membership!
Sign up for the ARFCOM weekly newsletter and be entered to win a free ARFCOM membership. One new winner* is announced every week!
You will receive an email every Friday morning featuring the latest chatter from the hottest topics, breaking news surrounding legislation, as well as exclusive deals only available to ARFCOM email subscribers.

AR15.COM is the world's largest firearm community and is a gathering place for firearm enthusiasts of all types.
From hunters and military members, to competition shooters and general firearm enthusiasts, we welcome anyone who values and respects the way of the firearm.

Subscribe to our monthly Newsletter to receive firearm news, product discounts from your favorite Industry Partners, and more.
Copyright © 1996-2024 AR15.COM LLC. All Rights Reserved.
Any use of this content without express written consent is prohibited.
AR15.Com reserves the right to overwrite or replace any affiliate, commercial, or monetizable links, posted by users, with our own.


