|
Posted: 8/8/2013 8:38:13 PM EDT
To prevent another thread from getting side tracked, it was suggested to start a thread on annealing. So here we go.
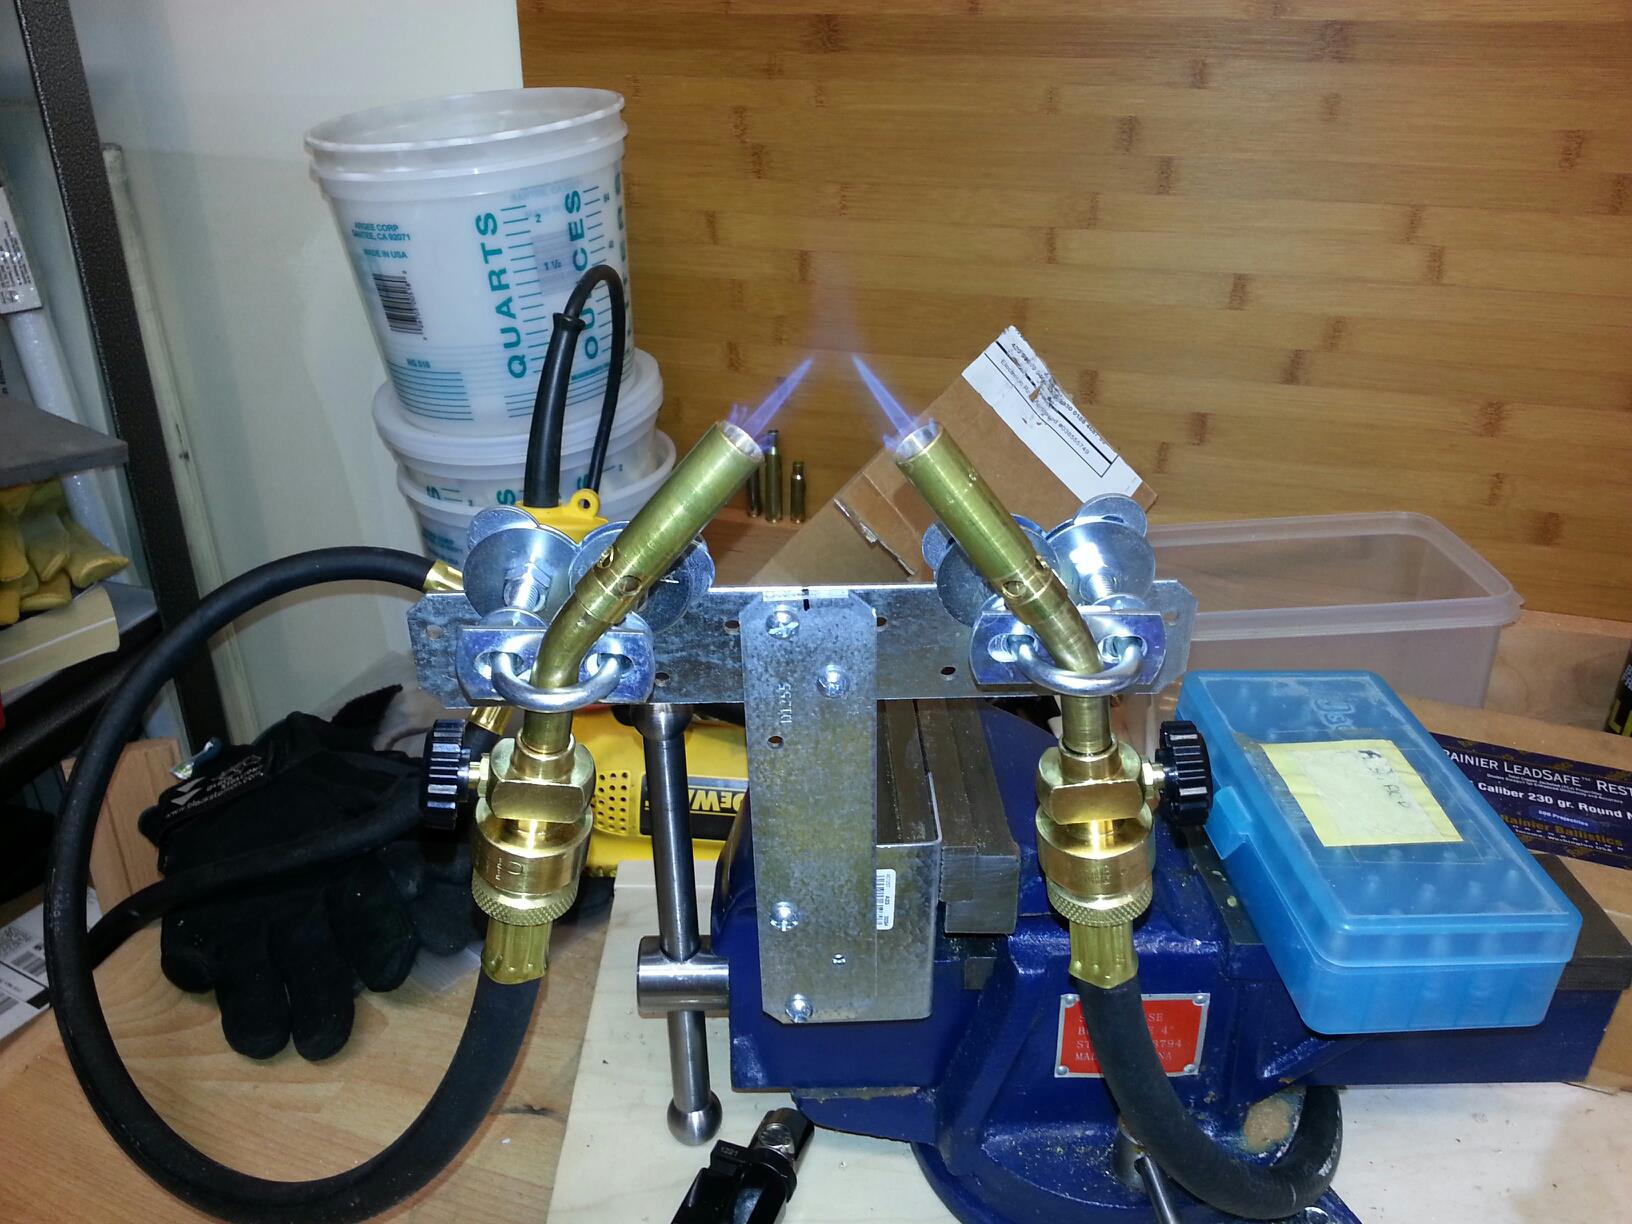
This was second or third annealing setup, with the first being much less "advanced". Parts are from Home Depot. Two of the least expensive Bernz-o-matic propane torches. Some hurricane strapping(?) A U-bolt clamps, washers, and screws. The washers help to space the U-Bolts holding the torches so they are square with the horizontal strap. The torches can be slid closer together or farther apart to fit different sized brass. The hose setup was built by a local propane supply shop. I want to say 18" to the T and then 5 feet to the tank. I use a 10lb propane cylinder instead of the small disposable cylinders. I read that the larger cylinde will not only last longer, but be more uniform in pressure and this flame than the 1LB cylinders. You will want a decently sized bench clamp to hold everything. Don't waste your money on MAPP gas because you only gain about 100F over propane. Propane burns hot enough for annealing purposes. 300 BLK Brass V7 by Coug91, on Flickr This setup cost about $100 to build: $25 for the torches, $50 for the hose setup, and about $25 for the miscellaneous parts to build the torch clamp setup. It worked fine, but I got tired of holding the driver with the socket, watching each case as it's in the flames, so I upgraded to a Bench Source machine. More to follow. |
|
|
|
[#1]
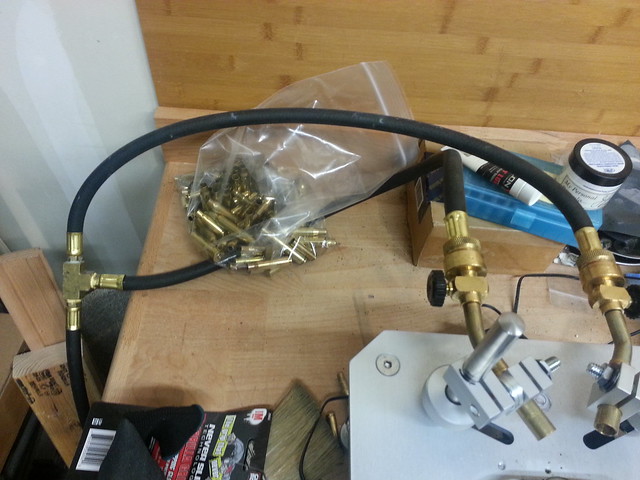
Pic of hose setup.
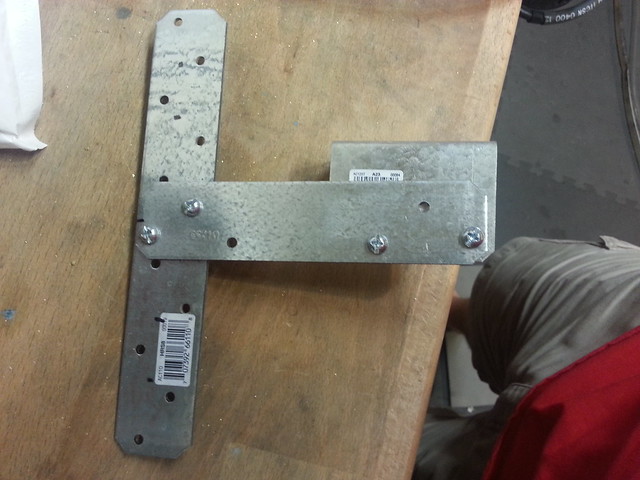
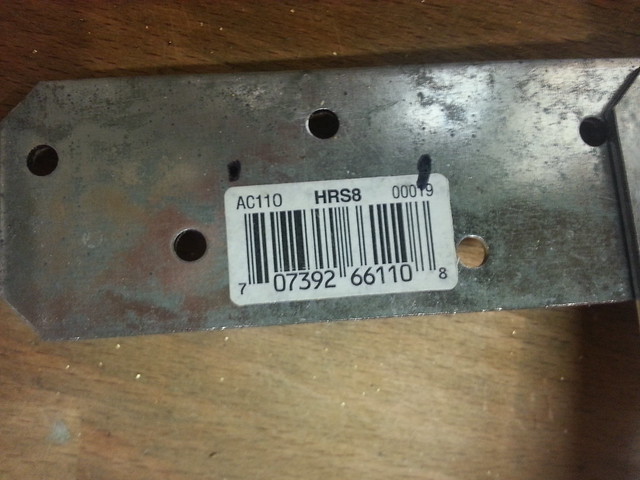
Ideally, the hose feeding the torch on the left should have been a little shorter than the one on the right. Frame Parts & pieces More parts & pieces |
|
|
|
[#2]
Awesome how-to! Very informative.
|
|
|
|
[#3]
Well done.
|
|
|
|
[#4]
Great idea making this thread, coug91
I recently got into reloading .223 and started out with 100 pieces of LC brass that I had. I noticed by the 4th firing that I was getting some soot around the necks that I hadn't had in previous firings at the same charge weight. I'm assuming this is because the cases are getting brittle and not sealing off the pressure. What I'd like to see is some of other people's methods of annealing. ie: Temperature (if measured) Time held at that temperature Heat source Water quenched or not And anything else relevant to the process. I have another 800 pieces put aside for reloading, but am reluctant to experiment on them unless I absolutely have to. |
|
|
|
[#5]
To add a few more details.
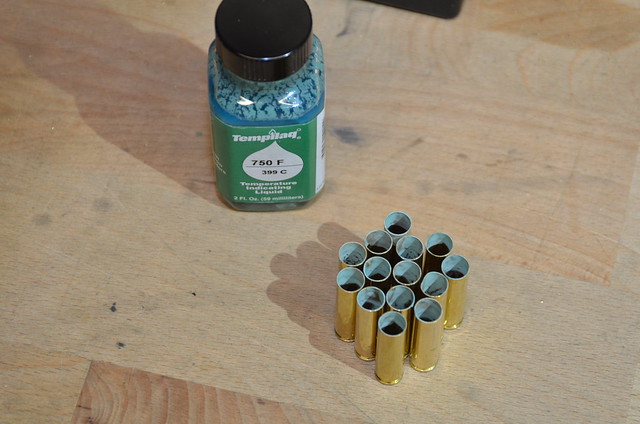
I use Tmpilaq 750F as my indicator and adjust time in the flame so that the Tempilaq has just melted as the case comes out of the flames.
For 300BLK and 223/556, that is about 3 seconds in the flames. Bear in mind I'm using 2 flames, with the tips of the flames about 1/4" from the case. One flame is pointed just above center if the case neck, and the second flame is just above the shoulder. I use a water drop to cool the 300BLK brass. Some people don't. I do because the case is small, bass is a ood conductor of heat. The heat of annealing has to go somewhere and I don't want it going to the case head. I've done a couple thousand pieces of 308 and 30-06 and dropped these in water, too. Ideally, I'd have one of these dorm room sized refrigerators with a hole in the top and drop into a box in that. Maybe after I win powerball. |
|
|
|
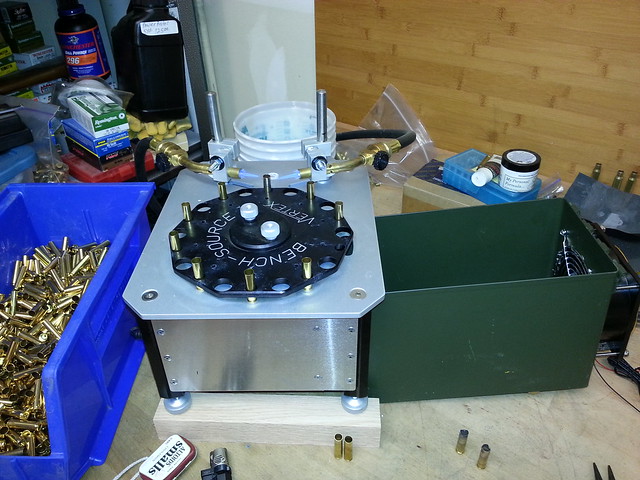
[#6]
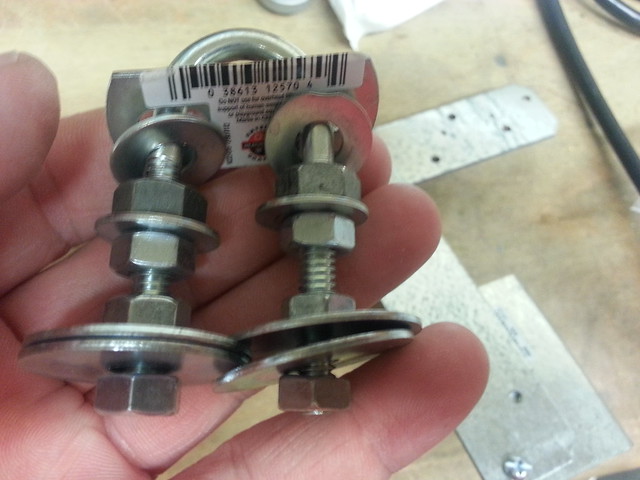
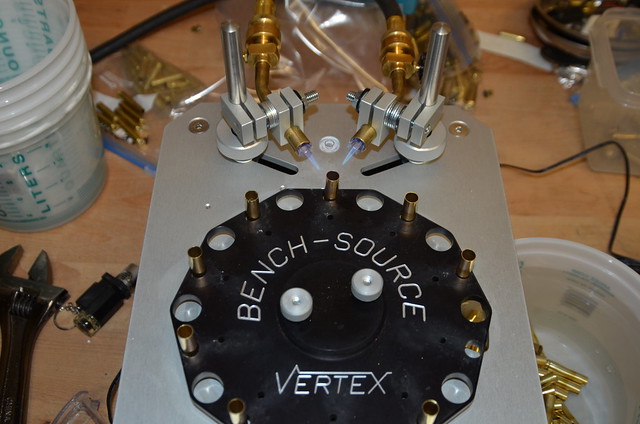
The 300BLK case is short, so I had to modify my Bench Source annealer's mounting clamps to get the torches low enough they direct the flame slightly upward and at the brass.
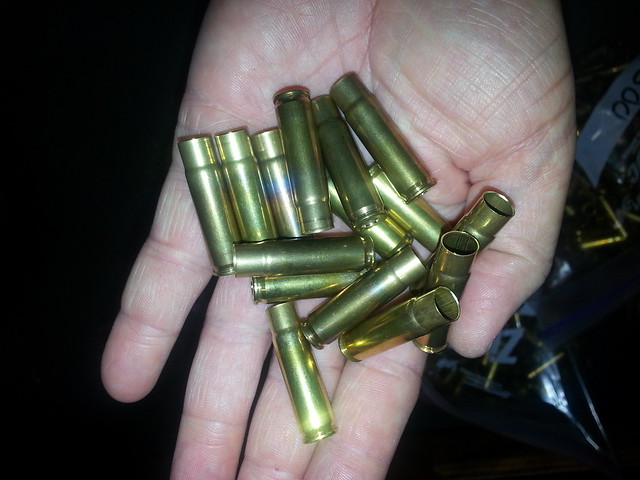
I added several washers and replaced the nice machined aluminum knobs with simple nuts. 750F Tempilaq applied to the inside of the case mouth. Discoloration from annealing is there, but faint. If you rinse with Lemishine after annealing, the citric acid further removes the oxidation from annealing. |
|
|
|
[#7]
I have a poor mans set up. A 1/4 inch long socket and socket extender chucked up in a drill. I turn out the light in the garage and watch for the slightest pink and chuck it straight into hot water. The socket is 1/4 inch with a nut in the bottom to rsise expose the 300 blackout case just to the top of the case. I think the socket protects areas I don't want heated. It's just as fast as the annealer machine. The drill is held steady on a box elevated above the propane tank which sits on my table saw. I just rotate it into the flame and then tip it to drop the case into water. Pretty simple. Takes about 5 seconds with one torch
|
|
|
|
[#8]
That's cool and all... but I just hold my brass in my hand with a Nomex flight glove.
 I'm crazy cheap. It works good. I'm crazy cheap. It works good.
|
|
|
|
[#9]
Quoted: I have a poor mans set up. A 1/4 inch long socket and socket extender chucked up in a drill. I turn out the light in the garage and watch for the slightest pink and chuck it straight into hot water. The socket is 1/4 inch with a nut in the bottom to rsise expose the 300 blackout case just to the top of the case. I think the socket protects areas I don't want heated. It's just as fast as the annealer machine. The drill is held steady on a box elevated above the propane tank which sits on my table saw. I just rotate it into the flame and then tip it to drop the case into water. Pretty simple. Takes about 5 seconds with one torch This is how I started annealing. First with 1 torch, then I added a second torch, with a piece of cardboard under each cylinder to get the tips of the flames to where I wanted them. I did that for several thousand pieces of brass.. like close to 18K before I bought the Bench Source machine. I was to the point that I hated annealing and was seriously considering stopping. I talked with a friend, a long time wild catter and bench rest shooter, who convinced me that the 300BLK needed to be annealed if I was going to make good brass. I'll post a pic of the driver/socket setup I used. Still have it for when the zombies attack. 5 seconds sounds about right for 1 torch. |
|
|
|
[#10]
Quoted: That's cool and all... but I just hold my brass in my hand with a Nomex flight glove. I'm crazy cheap. It works good.He did that once. I'll never forget the look on his face when the heat got to his finger tips.
|
|
|
|
[#11]
I like the torch set up using the bigger tank. How is the torch head attached to the hose? Does the hose have a male end that the torch head screws on or is there an adapter to fit the female hose to the female torch head?
|
|
|
|
[#12]
Quoted: I like the torch set up using the bigger tank. How is the torch head attached to the hose? Does the hose have a male end that the torch head screws on or is there an adapter to fit the female hose to the female torch head? I can fill the tank for $3 and it lasts and lasts.
|
|
|
|
[#13]
Quoted:
The hose was custom built with a male tank coupling at the tank end,4' of hose, a T, and then two 18" pieces, each with a male disposable tank coupling. Because it's propane, you can just buy the parts, at least I couldn't locate them locally. So I called a propane delivery company and described what I needed. The guy I talked with said that was easy to build. He had it done in 15 minutes while I waited. I can fill the tank for $3 and it lasts and lasts. Quoted:
Quoted:
I like the torch set up using the bigger tank. How is the torch head attached to the hose? Does the hose have a male end that the torch head screws on or is there an adapter to fit the female hose to the female torch head? I can fill the tank for $3 and it lasts and lasts. What size tank? Around here a 20Lb tank takes $20.00 |
|
|
|
[#14]
10LB tank. I usually think it's emptier than it really is. It truly is amazing how long the tank feeds the torches. Seems like I went thru a lot of the disposable cylinders before I had the hose setup made.
|
|
|
|
[#15]
Quoted:
I have a poor mans set up. A 1/4 inch long socket and socket extender chucked up in a drill. I turn out the light in the garage and watch for the slightest pink and chuck it straight into hot water. The socket is 1/4 inch with a nut in the bottom to rsise expose the 300 blackout case just to the top of the case. I think the socket protects areas I don't want heated. It's just as fast as the annealer machine. The drill is held steady on a box elevated above the propane tank which sits on my table saw. I just rotate it into the flame and then tip it to drop the case into water. Pretty simple. Takes about 5 seconds with one torch I use the same set up, and only anneal my hard won 6.5 X 55 AI , 6mm Rem & a small amount of .308 for my bolt guns. I'd like a faster, more efficient set up so that I could anneal the hundreds of carefully prepped LC for my precision AR, and moar .308 for the M14s, although I wonder if it's worth the bother since 5-6 laps through the autos and they're pretty beat. |
|
|
|
[#16]
How often are you guys annealing your cases?
|
|
|
|
[#17]
For those of you looking for a cheaper solution to the dual hoses attached to a single 5 gallon propane tank, lowes has Bernzomatic type 1 appliance hoses. Pick up a couple of those and a 1/4 t splitter and you can make your own. Remove the type I connection from both hoses and attach those to the ends of the T connector and the type 1 propane connection in the middle. Use 1/4 male to male fittings- you need two
16 bucks for each hose an a couple of buck for a T splitter. Much cheaper than going to a propane specialist 


|
|
|
|
[#18]
Quoted: For those of you looking for a cheaper solution to the dual hoses attached to a single 5 gallon propane tank, lowes has Bernzomatic type 1 appliance hoses. Pick up a cole of those and a 1/4 t splitter and you can make your own. Remove the type I connection from both hoses and attach those to the ends of the T connector and the type 1 propane connection in the middle. Use 1/4 male to male fittings- you need two 16 bucks for each hose an a couple of buck for a T splitter. Much cheaper than going to a propane specialist http://i263.photobucket.com/albums/ii127/freedell/null_zps54c3dcfa.jpg http://i263.photobucket.com/albums/ii127/freedell/null_zps50772df2.jpg http://i263.photobucket.com/albums/ii127/freedell/null_zps40020b2f.jpg http://i263.photobucket.com/albums/ii127/freedell/null_zps69096e0d.jpg |
|
|
|
[#19]
Just finished my poor mans annealer. Thanks to the Coug91 for the ideas. I spent some time at lowes this afternoon. Spent about 40 bucks on materials.
Enjoy. It's height adjustable for 223, 300, and 308. Much better than the drill and socket method. The annealer is made of a duct gate and some sort of cap for duct work. I'm still playing with the heat level of the torches to get the time down. 
YouTube video [youtube]http://youtu.be/oK2Rg02GgsE[/youtube] http://youtu.be/oK2Rg02GgsE EDIT: (heating time was extended for the purpose of the video. I would reduce it to 3 seconds) http://www.lowes.com/pd_36432-85334-GVL0113-A_0__?Ntt=36432&UserSearch=36432&productId=3714148&rpp=32 http://www.lowes.com/pd_31814-85334-GVL0110-A_0__?Ntt=31814&UserSearch=31814&productId=3714118&rpp=32 http://www.lowes.com/pd_215895-37672-11026.0_0__?Ntt=215895&UserSearch=215895&productId=3128227&rpp=32 Platform is a chunk of hard maple I use for wood turning. Just something sturdy |
|
|
|
[#20]
That's pretty slick. Looks like you're going 4 to 5 seconds, so the necks are glowing cherry red. I think you're over heating the brass in the video. Tempilaq would help to gauge your time in the flames. I use the 750F stuff.
|
|
|
|
[#21]
I'll give it a try. I was overdoing it for the video. I normally turn out the lights to see the glow better
|
|
|
|
[#22]
Quoted: The hose was custom built with a male tank coupling at the tank end,4' of hose, a T, and then two 18" pieces, each with a male disposable tank coupling. Because it's propane, you can just buy the parts, at least I couldn't locate them locally. So I called a propane delivery company and described what I needed. The guy I talked with said that was easy to build. He had it done in 15 minutes while I waited. Quoted: Quoted: I like the torch set up using the bigger tank. How is the torch head attached to the hose? Does the hose have a male end that the torch head screws on or is there an adapter to fit the female hose to the female torch head? I can fill the tank for $3 and it lasts and lasts. Did this guy supply the torches also? |
|
|
|
[#23]
No. Home Depot. The $12 Bernzomatic ones.
I started with the $40 self igniting swirl flame. The simple pencil flame torches work better.
|
|
|
|
[#24]
Interesting.....
|
|
|
|
[#25]
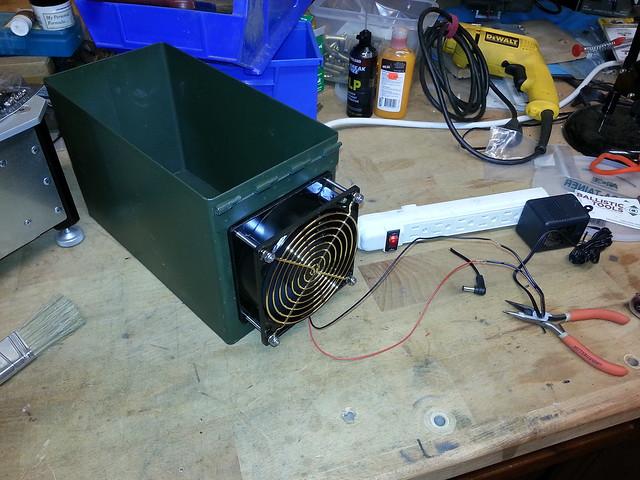
In honor of Furlough Friday... Air conditioned ammo can.
The 300BLK is small enough that it cools fairly rapidly, and barely sizzles when it drops into water. Air has a greater capability to transfer heat than water, so I just had to find a fan that can move enough air. Seems to work, but I could add a second fan perpendicular to the first and at the end closest to the annealer. Will see how this works. |
|
|
|
[#26]
Quoted:
In honor of Furlough Friday... Air conditioned ammo can. [email=mailto:http://www.flickr.com/photos/92572368@N08/10090989705/]http://farm4.staticflickr.com/3801/10090989705_992fac3389_z.jpg[/email] Untitled by Coug91, on Flickr [email=mailto:http://www.flickr.com/photos/92572368@N08/10091068943/]http://farm8.staticflickr.com/7290/10091068943_8a96e20ece_z.jpg[/email] Untitled by Coug91, on Flickr The 300BLK is small enough that it cools fairly rapidly, and barely sizzles when it drops into water. Air has a greater capability to transfer heat than water, so I just had to find a fan that can move enough air. Seems to work, but I could add a second fan perpendicular to the first and at the end closest to the annealer. Will see how this works. Nothing better than open flame and gunpowder next to it. Also you are wrong about air being a better conductor than water or capability as you put it. Solids, liquids then gas in that order for heat conductors. |
|
|
|
[#27]
Quoted: Nothing better than open flame and gunpowder next to it. Also you are wrong about air being a better conductor than water or capability as you put it. Solids, liquids then gas in that order for heat conductors. Quoted: Quoted: In honor of Furlough Friday... Air conditioned ammo can. [email=mailto:http://www.flickr.com/photos/92572368@N08/10090989705/]http://farm4.staticflickr.com/3801/10090989705_992fac3389_z.jpg[/email] Untitled by Coug91, on Flickr [email=mailto:http://www.flickr.com/photos/92572368@N08/10091068943/]http://farm8.staticflickr.com/7290/10091068943_8a96e20ece_z.jpg[/email] Untitled by Coug91, on Flickr The 300BLK is small enough that it cools fairly rapidly, and barely sizzles when it drops into water. Air has a greater capability to transfer heat than water, so I just had to find a fan that can move enough air. Seems to work, but I could add a second fan perpendicular to the first and at the end closest to the annealer. Will see how this works. Nothing better than open flame and gunpowder next to it. Also you are wrong about air being a better conductor than water or capability as you put it. Solids, liquids then gas in that order for heat conductors. The powder jugs are closed, and it would take a direct flame to melt through the plastic. Not gonna happen, but thanks for the reminder. If water is a better conductor, care to explain why the Continental AV1790 was air cooled rather than water cooled? Does not moving air conduct more heat than standing water?
Continental AV-1790: 1,790 cubic inch V12. Air cooled. To get the same amount of cooling out of a liquid cooling system, the radiator would have had to have been 64 sqft... or was it 64 feet square? That was a long time ago. |
|
|
|
[#28]
Quoted:
Welcome to ARFCOM. The powder jugs are closed, and it would take a direct flame to melt through the plastic. Not gonna happen, but thanks for the reminder. If water is a better conductor, care to explain why the Continental AV1790 was air cooled rather than water cooled? Does not moving air conduct more heat than standing water?
Continental AV-1790: 1,790 cubic inch V12. Air cooled. To get the same amount of cooling out of a liquid cooling system, the radiator would have had to have been 64 sqft... or was it 64 feet square? That was a long time ago. Quoted:
Quoted:
Quoted:
In honor of Furlough Friday... Air conditioned ammo can. [email=mailto:http://www.flickr.com/photos/92572368@N08/10090989705/]http://farm4.staticflickr.com/3801/10090989705_992fac3389_z.jpg[/email] Untitled by Coug91, on Flickr [email=mailto:http://www.flickr.com/photos/92572368@N08/10091068943/]http://farm8.staticflickr.com/7290/10091068943_8a96e20ece_z.jpg[/email] Untitled by Coug91, on Flickr The 300BLK is small enough that it cools fairly rapidly, and barely sizzles when it drops into water. Air has a greater capability to transfer heat than water, so I just had to find a fan that can move enough air. Seems to work, but I could add a second fan perpendicular to the first and at the end closest to the annealer. Will see how this works. Nothing better than open flame and gunpowder next to it. Also you are wrong about air being a better conductor than water or capability as you put it. Solids, liquids then gas in that order for heat conductors. The powder jugs are closed, and it would take a direct flame to melt through the plastic. Not gonna happen, but thanks for the reminder. If water is a better conductor, care to explain why the Continental AV1790 was air cooled rather than water cooled? Does not moving air conduct more heat than standing water?
Continental AV-1790: 1,790 cubic inch V12. Air cooled. To get the same amount of cooling out of a liquid cooling system, the radiator would have had to have been 64 sqft... or was it 64 feet square? That was a long time ago. Liquid cooling is much more efficient than air cooling. Aviation powerplants are an exceptional breed. One only needs to look at motorcycle engines from the past 35 years. At the end of the air cooled 125cc motocross era in the late '70s and early '80s it was common to have to install new piston rings every 30-45 minutes of run time. With the advent of liquid cooled MX engines the ring life was extended to ten or more hours and power levels rose greatly. None of this was new knowledge at that time though, as roadracing bikes had been liquid cooled since the early '70s. Another example is with flame hardening medium to high carbon steel. The heated steel must be subjected to a liquid quenchant in order to draw the carbon to the surface and cause the metal to be hardened. If air is the only quenchant then the steel will simply be annealed. Posted Via AR15.Com Mobile |
|
|
|
[#29]
Consider hypothermia. You can freeze to death in 40°F water in minutes, but survive for hours in open air.
ETA - GREAT thread, OP. I don't reload enough to have a setup like yours - yet. |
|
|
|
[#30]
Quoted:
>snip< If water is a better conductor, care to explain why the Continental AV1790 was air cooled rather than water cooled? Does not moving air conduct more heat than standing water?>snip< Weight savings. Moving air is a poor conductor of heat if under pressure. You need to release more air than you let into the cowling and then direct that moving air using baffles. That's the reason for cowl flaps, you want to pull the air over the parts not blow on them. |
|
|
|
[#31]
The reason I did the air box is time. If I'm processing a small batch of (<1K pieces) brass I don't want to have to wait for it to dry. By the time I'm done shutting down - disconnecting the propane bottle and cooling down the annealer - I'm ready to lube and size. No need to wait until the next evening to proceed. Yes, I could do the hot water rinse and bowling ball shake or bake it, but this works.
|
|
|
|
[#32]
Please try to stay on topic. Annealing, not what medium cools better.
|
|
|
|
[#33]
Thought I would share pics of my annealing machine I made. I got the idea from watching video of the Giraud machine running. I just had to figure out how it works inside.
Bought little gear motor from McMaster Carr. Everything else is steel or nylon. http://<ahttp://i1273.photobucket.com/albums/y420/dodgeboy700/IMG_0609_zpse864a67e.jpg</a>" /> http://<ahttp://i1273.photobucket.com/albums/y420/dodgeboy700/IMG_0608_zps5ee4360b.jpg</a>" /> |
|
|
|
[#34]
So when are one of you industrious guys going to make an induction annealer? I do not want fumes and open flames inside my reloading area!

www.youtube.com/watch?v=Ira3dmlclQ4 |
|
|
|
[#35]
Quoted: Thought I would share pics of my annealing machine I made. I got the idea from watching video of the Giraud machine running. I just had to figure out how it works inside. Bought little gear motor from McMaster Carr. Everything else is steel or nylon. http://<a href=http://i1273.photobucket.com/albums/y420/dodgeboy700/IMG_0609_zpse864a67e.jpg</a>" /> http://<a href=http://i1273.photobucket.com/albums/y420/dodgeboy700/IMG_0608_zps5ee4360b.jpg</a>" /> I love the ingenuity of the people of ARFCOM.
|
|
|
|
[#36]
So when are one of you industrious guys going to make an induction annealer? I do not want fumes and open flames inside my reloading area!
I am not the best electrician or I would do that. I don't have open flames near my gunpowder |
|
|
|
[#37]
That's pretty slick. Propane is way cheaper than MAPP gas. My understanding is MAPP only gains about 100F over propane... and that's if you add O2 to get to a neutral flame.
I love the ingenuity of the people of ARFCOM. I use propane most of the time, but I have tried Mapp |
|
|
|
[#38]
Hey Delirious1, how is your annealer adjustable? I assume the that the torches can raise and lower quickly for different sizes using the slot on the vertical piece as depicted in the picture.
|
|
|
|
[#39]
Quoted:
Hey Delirious1, how is your annealer adjustable? I assume the that the torches can raise and lower quickly for different sizes using the slot on the vertical piece as depicted in the picture. Pretty easily really. the U bolts can be loosened to reposition the tourches. Either wider a part or up or down some. The threaded rod at the bottom that goes into the wood, if you turn the block over, the nut on bottom is recessed and can be loosened and the Rod can be unscrewed and raised. I'll try to get some pics up of the bottom of the wood when I get home. |
|
|
|
[#40]
I tried annealing once with the torch and socket/drill method, I think I overdid it though, brass seemed soft but I didn't have anything to gauge it on it was my first time and I had no on-site guidance. I'd like to try again...what's a good time in the flame...3 seconds? I'm kinda colorblind so I try to not use that as a point of reference.
|
|
|
|
[#41]
Quoted: I tried annealing once with the torch and socket/drill method, I think I overdid it though, brass seemed soft but I didn't have anything to gauge it on it was my first time and I had no on-site guidance. I'd like to try again...what's a good time in the flame...3 seconds? I'm kinda colorblind so I try to not use that as a point of reference. Put a drop inside case neck and let dry, heat until it melts, and that case is done. That's the secret to annealing. |
|
|
|
[#42]
Quoted: I tried annealing once with the torch and socket/drill method, I think I overdid it though, brass seemed soft but I didn't have anything to gauge it on it was my first time and I had no on-site guidance. I'd like to try again...what's a good time in the flame...3 seconds? I'm kinda colorblind so I try to not use that as a point of reference. Tempilaq is your friend. Use the Tempilaq to find out how long it takes in your flame, then use that time to anneal. |
|
|
|
[#43]
muchos gracias guys I'll look in to that product.
|
|
|
|
[#44]
Quoted:
The only thing you are lacking is http://www.midwayusa.com/product/988733/tempilaq-temperature-indicator-750-degree-2-oz. Put a drop inside case neck and let dry, heat until it melts, and that case is done. That's the secret to annealing. Quoted:
Quoted:
I tried annealing once with the torch and socket/drill method, I think I overdid it though, brass seemed soft but I didn't have anything to gauge it on it was my first time and I had no on-site guidance. I'd like to try again...what's a good time in the flame...3 seconds? I'm kinda colorblind so I try to not use that as a point of reference. Put a drop inside case neck and let dry, heat until it melts, and that case is done. That's the secret to annealing. Hey flash! Why the inside and not outside? Whats the difference? |
|
|
|
[#45]
Quoted: Hey flash! Why the inside and not outside? Whats the difference? Quoted: Quoted: Quoted: I tried annealing once with the torch and socket/drill method, I think I overdid it though, brass seemed soft but I didn't have anything to gauge it on it was my first time and I had no on-site guidance. I'd like to try again...what's a good time in the flame...3 seconds? I'm kinda colorblind so I try to not use that as a point of reference. Put a drop inside case neck and let dry, heat until it melts, and that case is done. That's the secret to annealing. Hey flash! Why the inside and not outside? Whats the difference? |
|
|
|
[#46]
Quoted:
If you put it on the outside the flame will melt it instead of the temp of the case mouth. The idea is to heat he case mouth/neck thoroughly, not just the surface, to anneal the brass. Quoted:
Quoted:
Quoted:
Quoted:
I tried annealing once with the torch and socket/drill method, I think I overdid it though, brass seemed soft but I didn't have anything to gauge it on it was my first time and I had no on-site guidance. I'd like to try again...what's a good time in the flame...3 seconds? I'm kinda colorblind so I try to not use that as a point of reference. Put a drop inside case neck and let dry, heat until it melts, and that case is done. That's the secret to annealing. Hey flash! Why the inside and not outside? Whats the difference? Got it!! Thanks |
|
|
|
[#47]
Quoted: Hey flash! Why the inside and not outside? Whats the difference? Quoted: Quoted: Quoted: I tried annealing once with the torch and socket/drill method, I think I overdid it though, brass seemed soft but I didn't have anything to gauge it on it was my first time and I had no on-site guidance. I'd like to try again...what's a good time in the flame...3 seconds? I'm kinda colorblind so I try to not use that as a point of reference. Put a drop inside case neck and let dry, heat until it melts, and that case is done. That's the secret to annealing. Hey flash! Why the inside and not outside? Whats the difference? When it melts it turns dark, why would you want that on the outside? When you do your first case, you will understand. |
|
|
|
[#48]
Quoted:
When it melts it turns dark, why would you want that on the outside? When you do your first case, you will understand. Quoted:
Quoted:
Quoted:
Quoted:
I tried annealing once with the torch and socket/drill method, I think I overdid it though, brass seemed soft but I didn't have anything to gauge it on it was my first time and I had no on-site guidance. I'd like to try again...what's a good time in the flame...3 seconds? I'm kinda colorblind so I try to not use that as a point of reference. Put a drop inside case neck and let dry, heat until it melts, and that case is done. That's the secret to annealing. Hey flash! Why the inside and not outside? Whats the difference? When it melts it turns dark, why would you want that on the outside? When you do your first case, you will understand. HAHAHA i take it you understood as well the first time? LOL |
|
|
|
[#49]
Quoted: HAHAHA i take it you understood as well the first time? LOL Quoted: Quoted: Quoted: Quoted: Quoted: I tried annealing once with the torch and socket/drill method, I think I overdid it though, brass seemed soft but I didn't have anything to gauge it on it was my first time and I had no on-site guidance. I'd like to try again...what's a good time in the flame...3 seconds? I'm kinda colorblind so I try to not use that as a point of reference. Put a drop inside case neck and let dry, heat until it melts, and that case is done. That's the secret to annealing. Hey flash! Why the inside and not outside? Whats the difference? When it melts it turns dark, why would you want that on the outside? When you do your first case, you will understand. HAHAHA i take it you understood as well the first time? LOL Just followed instructions, and all the pics show it on the inside of the mouth. Never occurred to me to put it on the outside. But a valid question I suppose. |
|
|
 Win a FREE Membership!
Sign up for the ARFCOM weekly newsletter and be entered to win a free ARFCOM membership. One new winner* is announced every week!
You will receive an email every Friday morning featuring the latest chatter from the hottest topics, breaking news surrounding legislation, as well as exclusive deals only available to ARFCOM email subscribers.

AR15.COM is the world's largest firearm community and is a gathering place for firearm enthusiasts of all types.
From hunters and military members, to competition shooters and general firearm enthusiasts, we welcome anyone who values and respects the way of the firearm.

Subscribe to our monthly Newsletter to receive firearm news, product discounts from your favorite Industry Partners, and more.
Copyright © 1996-2024 AR15.COM LLC. All Rights Reserved.
Any use of this content without express written consent is prohibited.
AR15.Com reserves the right to overwrite or replace any affiliate, commercial, or monetizable links, posted by users, with our own.