|
Posted: 3/21/2010 11:46:02 PM EDT
[Last Edit: dryflash3]
I picked up a Redding PM at the funshow a couple of months ago.
I've done a couple of mods on it and just finished the powder baffle. AeroE has a how to on this at the top of the page. He got me started and this is what I ended up with. 
Had a piece of copper to use. Lay out pattern and cut out. Holes in end drilled with 1/2 inch drill bit and blended in with a file. 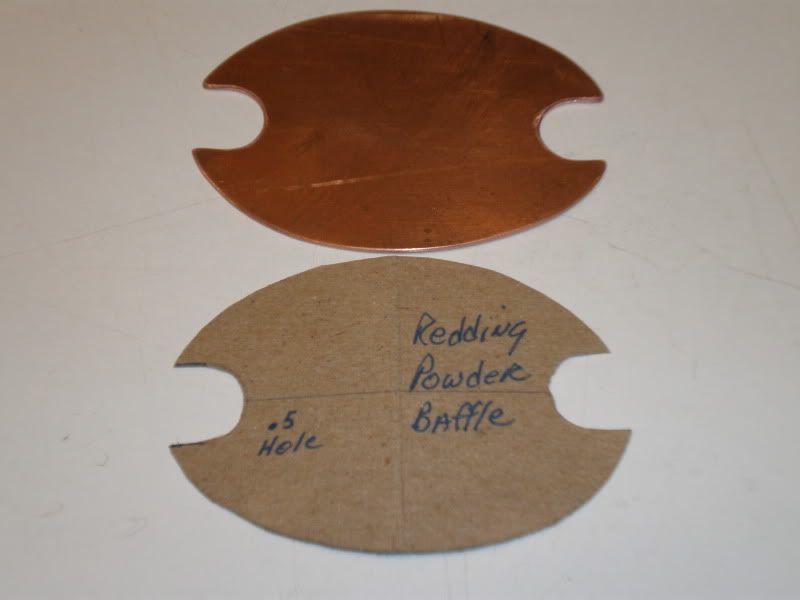
Cut out and smoothed all edges with a file then used 220 grit sandpaper. Sharp edges would scratch the inside of the powder hopper. 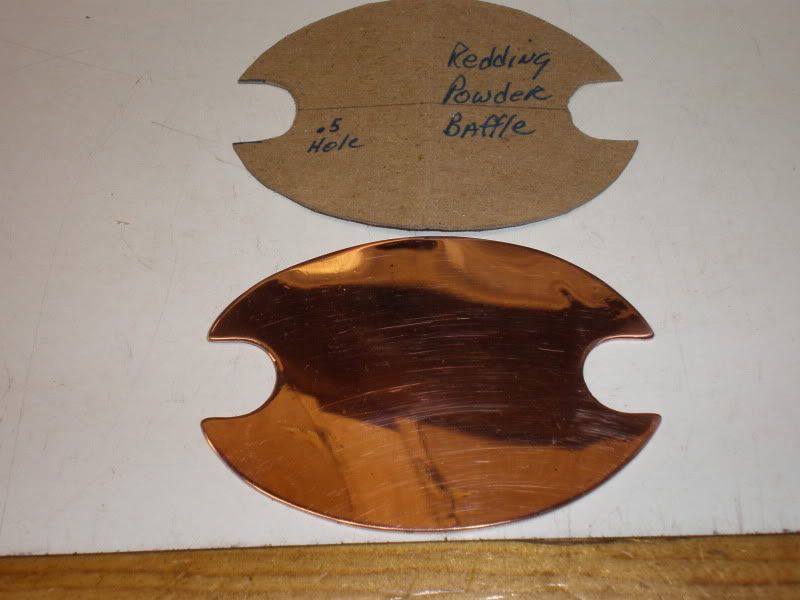
Polished on the buffing wheel and edges polished also. I do like my bling. 
Carefully bend baffle in the middle. Just slightly less than a 90 degree angle. Has to fit in hopper, but not be loose. 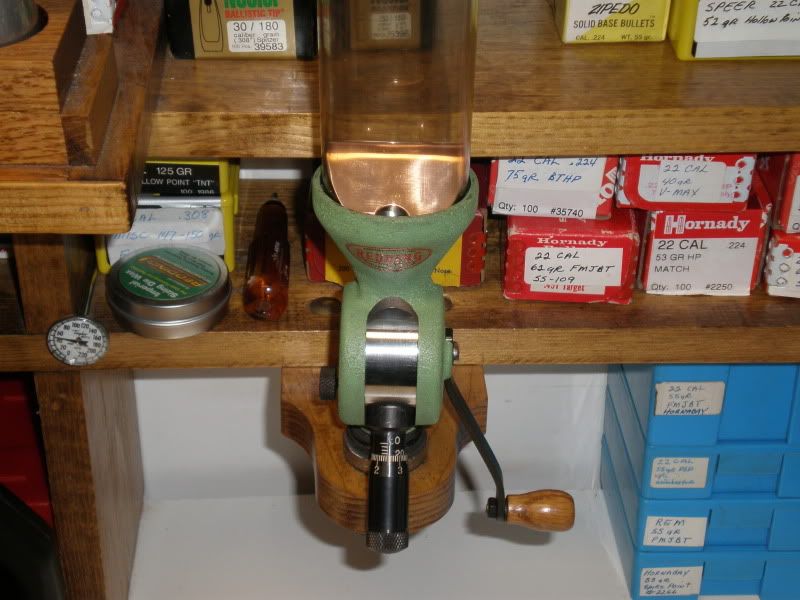
Ready for use. 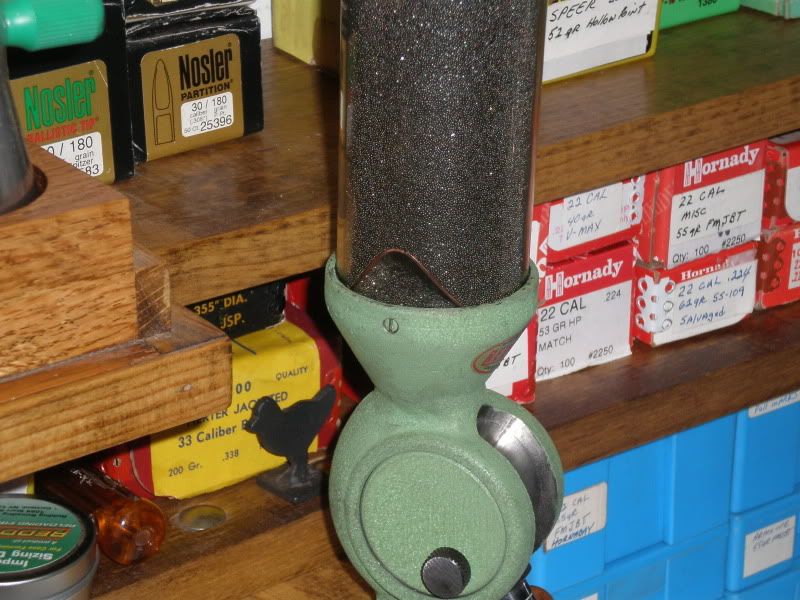
Filled with Tac. Didn't notice any measuring difference with Tac. Tac measures perfect without a baffle. Next time I load Re-15, that will be a good test. ETA, Throws Re-15 + or - .1 gr, I was real happy with this much improvement. 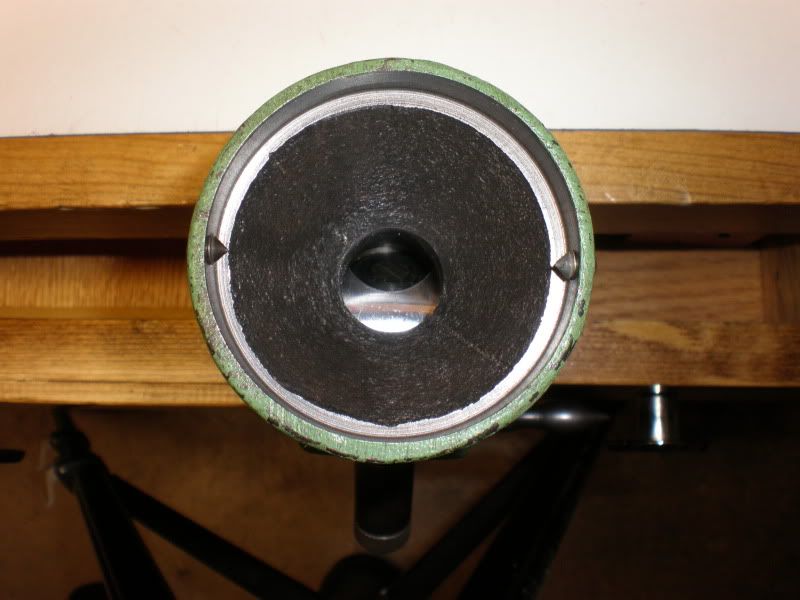
edit, The before pic. not in my origional post. 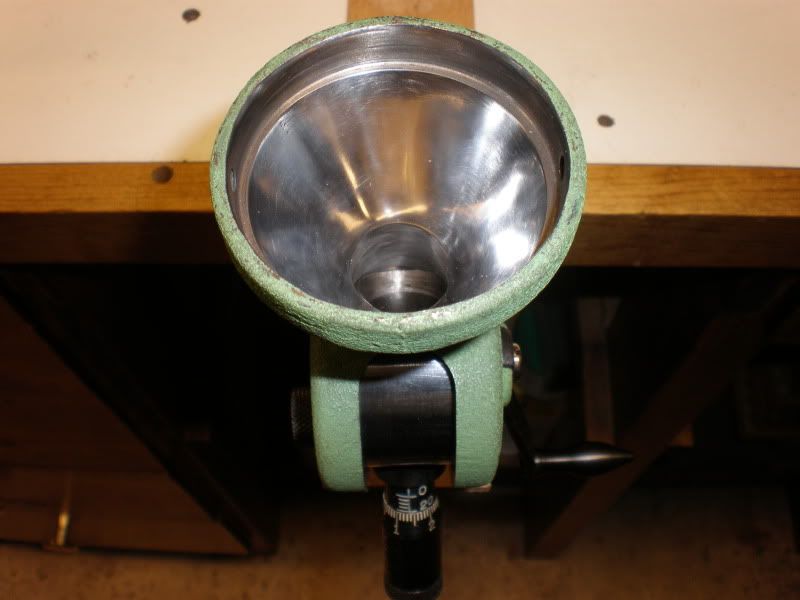
Polished the inside. About 4-5 hours work. A lot easier to polish a Dillon measure. This mod makes a difference with extruded powders. Don't bother if all you use is ball powder. 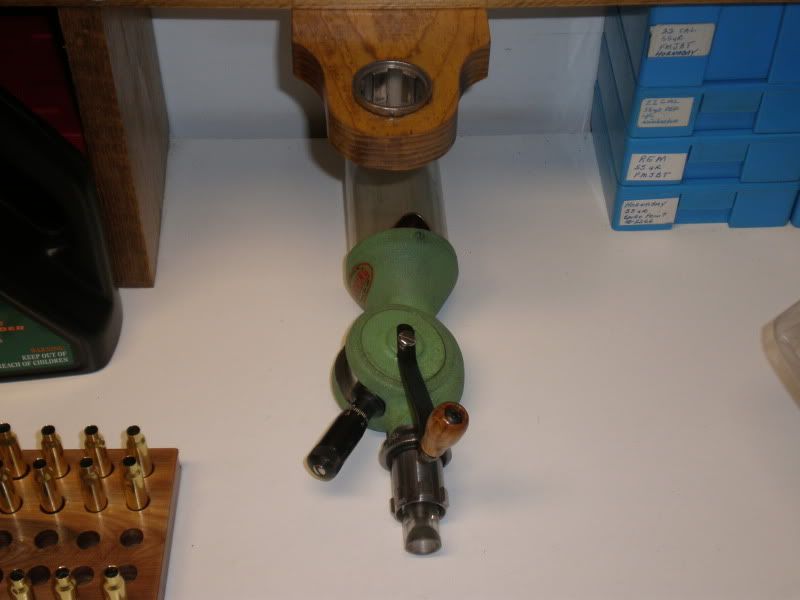
Installed a lock and load bushing on the measure. Real fast to mount / remove for dumping powder. The 1 x 4 that has the female bushing was drilled slightly smaller than the threads and the bushing screwed into the wood. Yes, you can do light threads in wood. Just go slow and thread the bushing in straight. 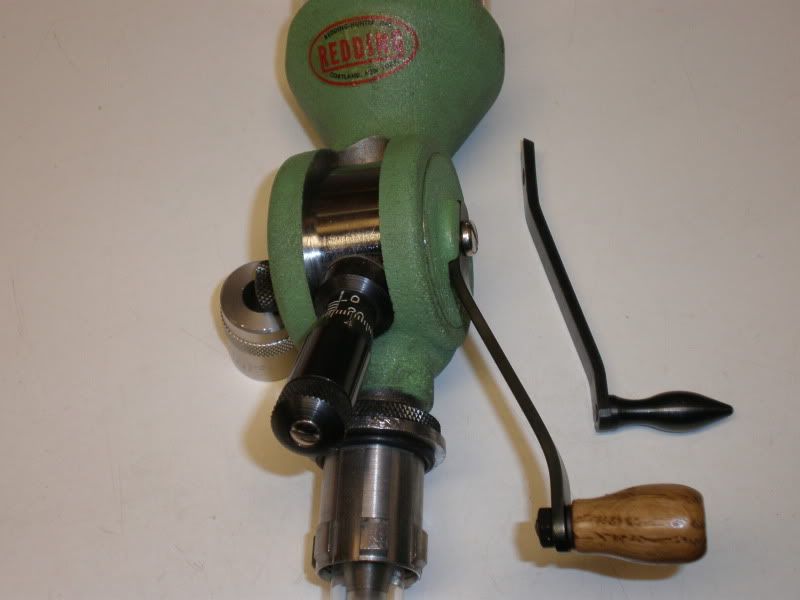
Made a new charging handle. Longer, bent farther from measure, and a wood knob that rotates. Orginal handle shown next to measure. |
|
|
|
|
[#1]
nice work DF!
|
|
|
|
LA, USA
|
[#2]
Mine came with a powder baffle(3BR) but I like the handle(where did you get the wood knob) and if you want you can polish the inside of mine as well since you done such a good job on yours.
|
|
|
NC, USA
|
[#3]
Can the 3BR be used in a press? Like case activated or does it have to manually be cycled? I want the consistency of the Redding PM but don't want to have to pull the handle every time.
|
|
|
GA, USA
|
[#4]
yes dillon makes a deal for it to be case activated.
|
|
|
IL, USA
|
[#5]
That's some great work there. Since I'm getting into precision rifle loads this year, I'm looking at some nice powder droppers. Thanks for the ideas! |
|
|
|
[#6]
|
|
|
|
|
[#7]
Originally Posted By EWP:
Mine came with a powder baffle(3BR) but I like the handle(where did you get the wood knob) and if you want you can polish the inside of mine as well since you done such a good job on yours. I made the wood knob from a piece of 1 inch red oak dowel. |
|
|
|
|
[#8]
Originally Posted By hokeyplyr48:
Can the 3BR be used in a press? Like case activated or does it have to manually be cycled? I want the consistency of the Redding PM but don't want to have to pull the handle every time. On their site, Dillon sells adaptors to use other powder measures on their presses. |
|
|
|
|
[#9]
How did you go about polishing the inside? Did you disassemble the PM?
|
|
|
|
|
[Last Edit: dryflash3]
[#10]
Yes, took it completely apart.
Using an air powdered drill motor, started with round grinding stones, then went to a round course 40 grit wheel. Once the surface was smooth, used finer grit sanding wheels until I got to 220 grit. Then made my own sanding wheel in 400 grit, finished with polishing compound on a home made buffing wheel. I couldn't find what I wanted in the grits I wanted so I made my own. This is a project where "It helps if your handy". |
|
|
|
|
[#11]
I like the color of the copper baffle, it just looks right.
|
|
|
|
|
[#12]
My other choice was brass, copper won out. Thanks for the inspiration.
|
|
|
|
|
[#13]
hey DF, got any pics of before?... just to get a feel for what's involved should I order a Redding PM. As stated the Dillon PM's take a few minutes.
|
|
|
|
|
[#14]
Dryflash thanks, that answers my question. I was wondering if you did that by hand or if power tools were involved.
|
|
|
|
NM, USA
|
[#15]
Excellent mods! I've been wanting to polish my Uniflow measures, but I haven't figured out how the plastic hopper comes out without breaking. Can't tell if they are glued or screwed. I did make baffles though out of alum. license plate blanks...not as "classy colored" as yours.
|
|
|
|
[#16]
Originally Posted By GWhis:
Excellent mods! I've been wanting to polish my Uniflow measures, but I haven't figured out how the plastic hopper comes out without breaking. Can't tell if they are glued or screwed. I did make baffles though out of alum. license plate blanks...not as "classy colored" as yours. The Uniflow reservoirs have to be broken out. I converted mine to the removable bottle adapter sold by Sinclair. However, I didn't bother to tap the measure body for the adapter, I bonded it with clear silicone sealant. In 10 years I have re-bonded one time, and that was after a ham handed user I was teaching wrenched it loose. The Sinclair adapter is pretty nice, and serves double duty as a baffle, although I recommend a baffle as shown here on top anyway. The top side of the adapter has a cone shape that someone, some time, determined was the "best" shape - probably wrote an article about for Precision Shooting, too, but that was before my time. |
|
|
|
NM, USA
|
[#17]
Originally Posted By AeroE:
Originally Posted By GWhis:
Excellent mods! I've been wanting to polish my Uniflow measures, but I haven't figured out how the plastic hopper comes out without breaking. Can't tell if they are glued or screwed. I did make baffles though out of alum. license plate blanks...not as "classy colored" as yours. The Uniflow reservoirs have to be broken out. I converted mine to the removable bottle adapter sold by Sinclair. However, I didn't bother to tap the measure body for the adapter, I bonded it with clear silicone sealant. In 10 years I have re-bonded one time, and that was after a ham handed user I was teaching wrenched it loose. The Sinclair adapter is pretty nice, and serves double duty as a baffle, although I recommend a baffle as shown here on top anyway. The top side of the adapter has a cone shape that someone, some time, determined was the "best" shape - probably wrote an article about for Precision Shooting, too, but that was before my time. Thanks, for the info. I'll have to visit the Sinclair site today! |
|
|
NH, USA
|
[#18]
That is sweeeeet!
I can just imagine the pimped out presses this will inspire! Great work. |
|
|
|
[#19]
Originally Posted By -edgecrusher-:
hey DF, got any pics of before?... just to get a feel for what's involved should I order a Redding PM. As stated the Dillon PM's take a few minutes. As soon as I started the polishing process I realized I didn't take a "before" pic. Ya got me. 
What you start with is a raw cast iron casting. Very rough. That's why I started with a stone wheel. Have to get it evened out before polishing can begin. |
|
|
|
|
[#20]
I've noticed charge weights are different when hopper is 100% vs 25% full. I just keep my hopper full. H322 is the only powder I've found so far that hopper level doesn't effect charge weight. That's a clever and easy to make baffle. Nicely done. It would surely allow you to run hopper at any level with uniform charge weights. Great post. Thanks.
|
|
|
|
|
[#21]
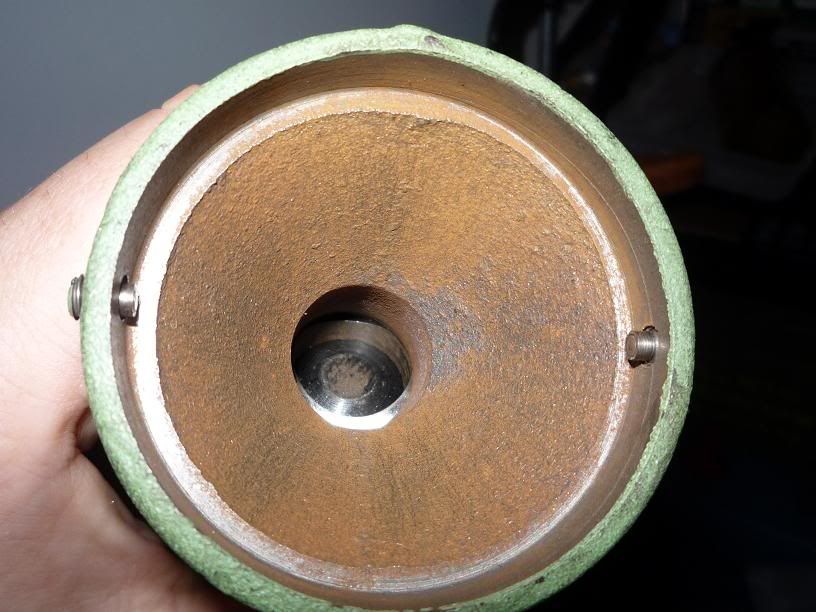
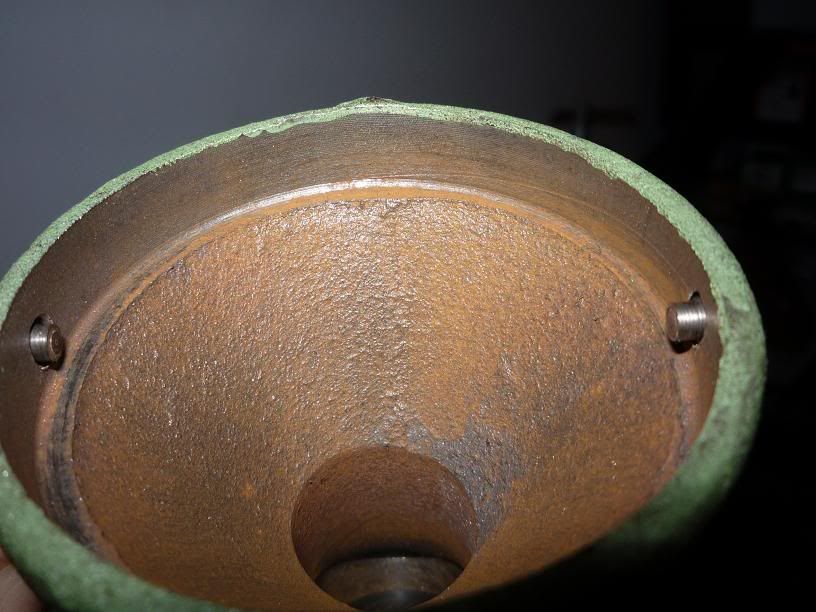
Ok here is a stock one, and please I know it is rusty! This thing is older than me and was free just like all of my other equipment! lol
|
|
|
|
|
[#22]
|
|
|
|
|
[#23]
Originally Posted By stanprophet09: Ok here is a stock one, and please I know it is rusty! This thing is older than me and was free just like all of my other equipment! lol http://i938.photobucket.com/albums/ad224/stanprophet/reloading/pm.jpg http://i938.photobucket.com/albums/ad224/stanprophet/reloading/pm2.jpg i do not know why, but anytime someone posts a photobucket pic i cannot view it i have to quote the poster and then copy and paste the address for the pic....must have ad-blocked photobucket or something? that is rusty,thanks for posting it! |
|
|
|
|
[#24]
Originally Posted By -edgecrusher-:
Originally Posted By stanprophet09:
Ok here is a stock one, and please I know it is rusty! This thing is older than me and was free just like all of my other equipment! lol http://i938.photobucket.com/albums/ad224/stanprophet/reloading/pm.jpg http://i938.photobucket.com/albums/ad224/stanprophet/reloading/pm2.jpg i do not know why, but anytime someone posts a photobucket pic i cannot view it
i have to quote the poster and then copy and paste the address for the pic....must have ad-blocked photobucket or something? that is rusty,thanks for posting it! That's OK, It was free and now I have the motivation to clean it up and polish it, I also need to replace the reservoir and the powder drop tube. |
|
|
|
|
[#25]
Originally Posted By stanprophet09:
Originally Posted By -edgecrusher-:
Originally Posted By stanprophet09:
Ok here is a stock one, and please I know it is rusty! This thing is older than me and was free just like all of my other equipment! lol http://i938.photobucket.com/albums/ad224/stanprophet/reloading/pm.jpg http://i938.photobucket.com/albums/ad224/stanprophet/reloading/pm2.jpg i do not know why, but anytime someone posts a photobucket pic i cannot view it
i have to quote the poster and then copy and paste the address for the pic....must have ad-blocked photobucket or something? that is rusty,thanks for posting it! That's OK, It was free and now I have the motivation to clean it up and polish it, I also need to replace the reservoir and the powder drop tube. Thanks for posting those pics. Don't worry the rust will buff out.............. Couldn't resist. 
|
|
|
|
OR, USA
|
[#26]
Hey DF,
I got my BR 30 back from Redding today. They got it right this time. I looked into the drum and the cup fits perfect. Thanks for you help. I'm totally jealous, your set up is awesome! Yak |
|
|
|
[#27]
Yours can be the same, just takes time.
|
|
|
|
|
[#28]
Great writeup.
|
|
|
|
|
[#29]
Thanks, I mentioned in the first post that loading Re-15 would be the test for my tuning mods.
Well I have loaded with Re-15 since then and the PM performed great. Was loading 26.5 grs of Re-15 in a 223 case. After setting PM and confirming charge, started throwing charges into cases. Measured the first 20, then every 5th case. Weight was spot on or plus one tenth or plus two tenths. I was surprised to never find a light charge. Surprised but pleased. I was happy with this as the max powder charge I have worked up to was 27.0 grs with this load. .1 or .2 grs is not much with a 26.5 gr charge. |
|
|
|
IA, USA
|
[Last Edit: river_rat]
[#30]
Looks just like an RCBS baffle except the slot is a bit longer on the RCBS. Bought the first one for my Uniflow and make them from tin flashing for my Hornady measures.
|
|
|
MI, USA
|
[#31]
good info here........thanks mods for sharing this
|
|
|
|
[#32]
Polishing for stick powders does pay handsome dividends.
The Dillon's polish like a dream. I've done a couple RCBS Uniflows, though––and it is rough sledding. I saved a lot of time by cutting with sandpaper... 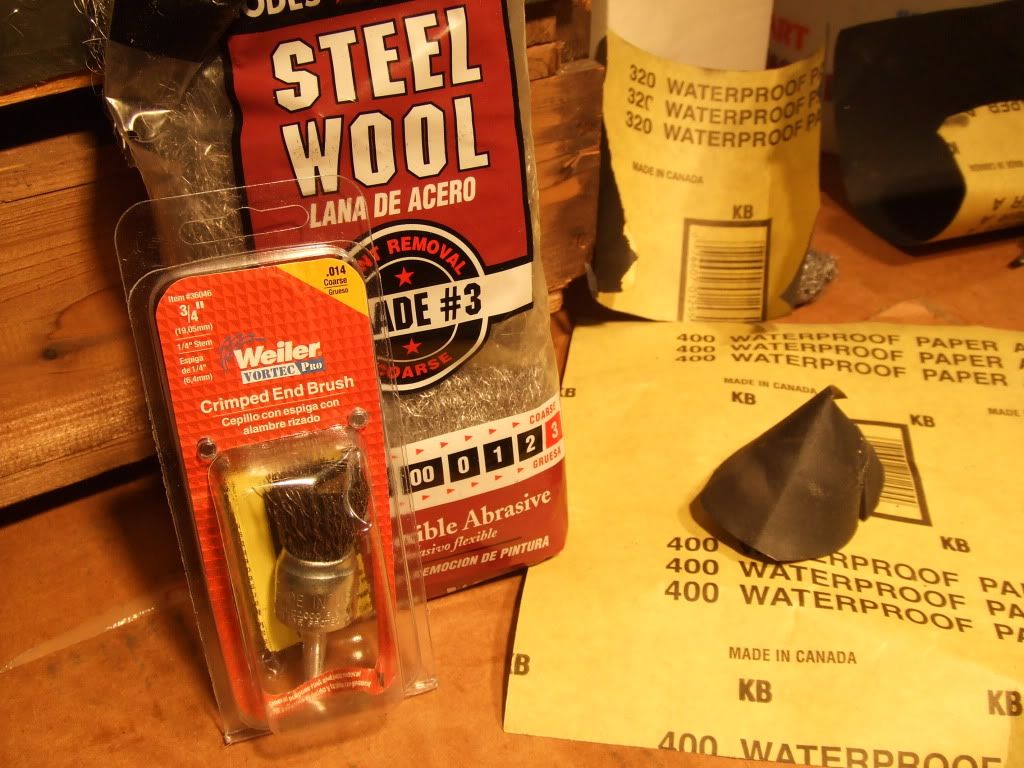
Electric drill drives the wire brush>>drives the bisquit of coarse stee wool>>drives the cone of abrasive paper––coarse to cut faster, use successively finer grits to smooth out swirl marks. 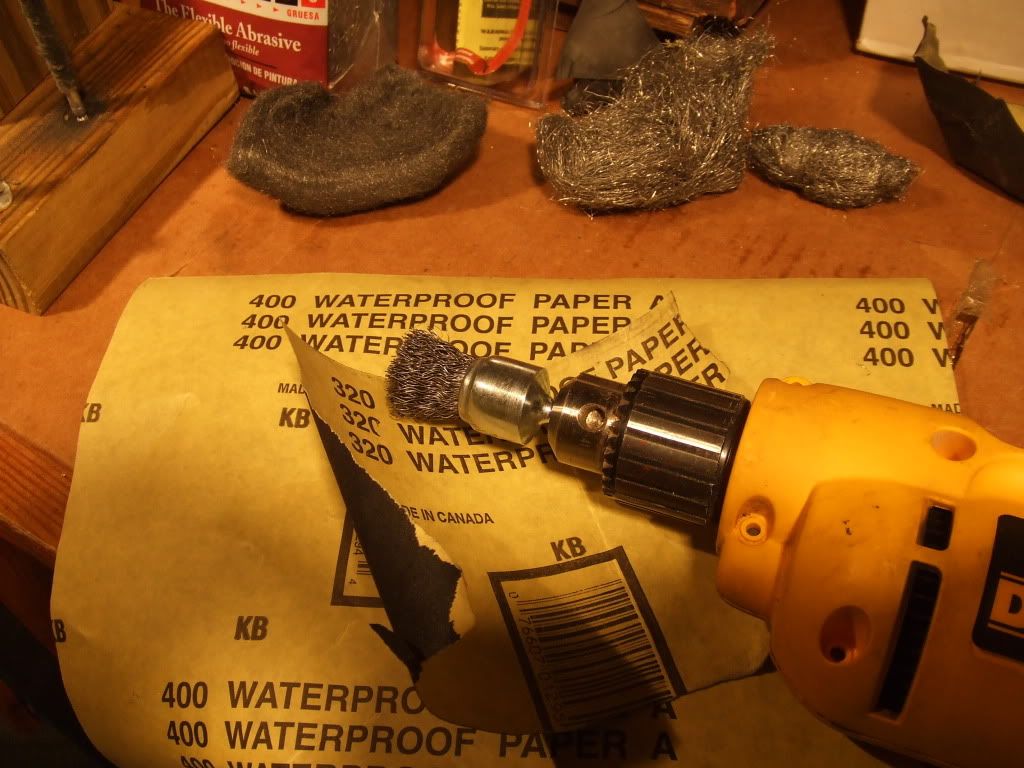
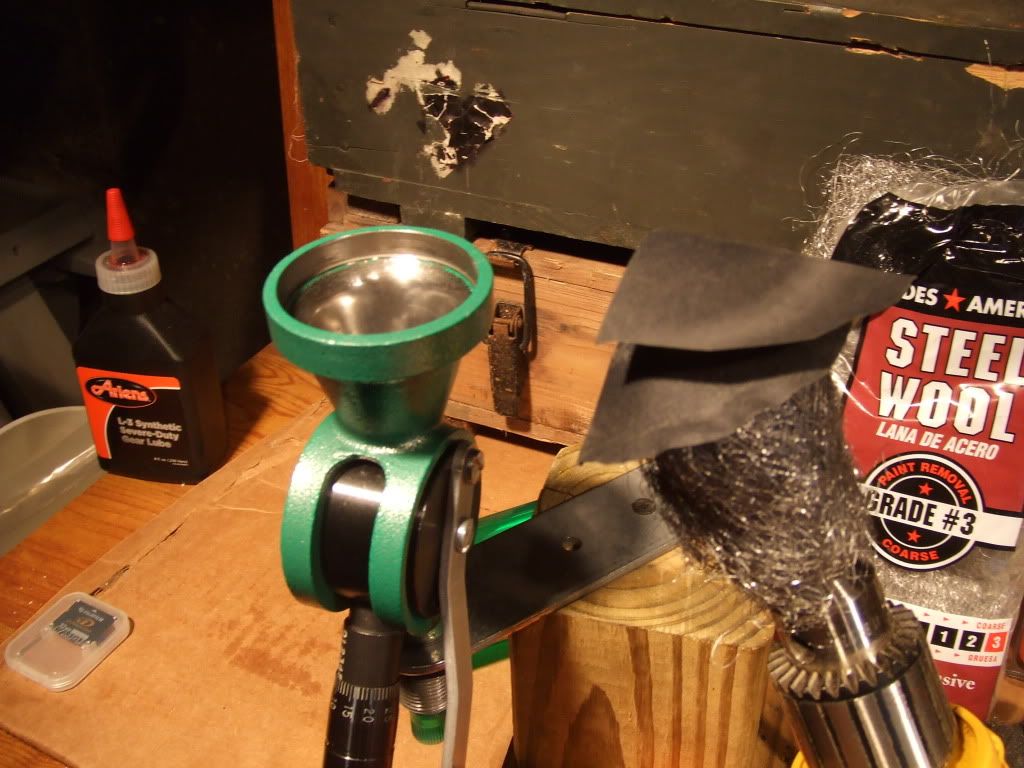
Saves a lot of time smoothing out the rougher casting marks––time that you can then put into polishing the surface to a mirror finish. |
|
|
|
|
[#33]
DF3 why do you do this to me?
Ugh....another project.
|
|
|
|
MI, USA
|
[#34]
I found two CH powder measures, both old and NIB,gotta be from the 60's 0r 70's. but the michigan humidity and dampness took their toll on the steel parts. just some light rust..did not take much to clean them up. but of interest, inside one of the PM's the factory had overspray in it
 now its smooth as a whislte and working great. now its smooth as a whislte and working great.
not my pic but this is the model 
is this a copy of the redding or is it the other way around? I like it better than my RCBS drop,which seems to work fine though but not as accurate"so far" as the old CH is with stick powders. it will be interesting to see how the baffle works on both of them now. |
|
|
|
[#35]
Originally Posted By Eight_Ring: Polishing for stick powders does pay handsome dividends. The Dillon's polish like a dream. I've done a couple RCBS Uniflows, though––and it is rough sledding. I saved a lot of time by cutting with sandpaper... http://i1097.photobucket.com/albums/g359/Warm_Garand/Modding%20RCBS%20Uniflow/WhatYouNeed.jpg Electric drill drives the wire brush>>drives the bisquit of coarse stee wool>>drives the cone of abrasive paper––coarse to cut faster, use successively finer grits to smooth out swirl marks. http://i1097.photobucket.com/albums/g359/Warm_Garand/Modding%20RCBS%20Uniflow/WireBrushDriver.jpg http://i1097.photobucket.com/albums/g359/Warm_Garand/Hornady%20Flex%20Drive/AbrasiveCone.jpg Saves a lot of time smoothing out the rougher casting marks––time that you can then put into polishing the surface to a mirror finish. Please follow up with info on removing the hopper and reinstalling it after polishing. |
|
|
|
|
[#36]
Originally Posted By dryflash3:
Originally Posted By Eight_Ring:
Polishing for stick powders does pay handsome dividends. The Dillon's polish like a dream. I've done a couple RCBS Uniflows, though––and it is rough sledding. I saved a lot of time by cutting with sandpaper... http://i1097.photobucket.com/albums/g359/Warm_Garand/Modding%20RCBS%20Uniflow/WhatYouNeed.jpg Electric drill drives the wire brush>>drives the bisquit of coarse stee wool>>drives the cone of abrasive paper––coarse to cut faster, use successively finer grits to smooth out swirl marks. http://i1097.photobucket.com/albums/g359/Warm_Garand/Modding%20RCBS%20Uniflow/WireBrushDriver.jpg http://i1097.photobucket.com/albums/g359/Warm_Garand/Hornady%20Flex%20Drive/AbrasiveCone.jpg Saves a lot of time smoothing out the rougher casting marks––time that you can then put into polishing the surface to a mirror finish. Please follow up with info on removing the hopper and reinstalling it after polishing. Dryflash–– I'm not sure how the Uniflow was constructed in the past, but both of the new ones I have modded recently were simple press-fit hoppers––and yeah, they were snug, but there were no screws or adhesives of any kind. Don't bother trying to turn it––just wiggle it back and forth, holding at the very top for best leverage and walk it out. That ought to get it. |
|
|
|
|
[#37]
Originally Posted By dryflash3:
Originally Posted By hokeyplyr48:
Can the 3BR be used in a press? Like case activated or does it have to manually be cycled? I want the consistency of the Redding PM but don't want to have to pull the handle every time. On their site, Dillon sells adaptors to use other powder measures on their presses. These adapters are just to use a different measure, not to make it case activated, right? |
|
|
|
|
[#38]
Originally Posted By Eight_Ring: The older one I have seems to be glued in somehow.Originally Posted By dryflash3: Originally Posted By Eight_Ring: Polishing for stick powders does pay handsome dividends. The Dillon's polish like a dream. I've done a couple RCBS Uniflows, though––and it is rough sledding. I saved a lot of time by cutting with sandpaper... http://i1097.photobucket.com/albums/g359/Warm_Garand/Modding%20RCBS%20Uniflow/WhatYouNeed.jpg Electric drill drives the wire brush>>drives the bisquit of coarse stee wool>>drives the cone of abrasive paper––coarse to cut faster, use successively finer grits to smooth out swirl marks. http://i1097.photobucket.com/albums/g359/Warm_Garand/Modding%20RCBS%20Uniflow/WireBrushDriver.jpg http://i1097.photobucket.com/albums/g359/Warm_Garand/Hornady%20Flex%20Drive/AbrasiveCone.jpg Saves a lot of time smoothing out the rougher casting marks––time that you can then put into polishing the surface to a mirror finish. Please follow up with info on removing the hopper and reinstalling it after polishing. Dryflash–– I'm not sure how the Uniflow was constructed in the past, but both of the new ones I have modded recently were simple press-fit hoppers––and yeah, they were snug, but there were no screws or adhesives of any kind. Don't bother trying to turn it––just wiggle it back and forth, holding at the very top for best leverage and walk it out. That ought to get it. Posts in the past said you have to break the hopper to remove it. Which is why I asked. Thanks for the answer.
|
|
|
|
|
[#39]
tag
|
|
|
|
|
[#40]
How did you come up with the patter for the baffle?
|
|
|
|
|
[#41]
Originally Posted By ycastane: How did you come up with the patter for the baffle? Trial and error. Make a cardboard template first, then transfer to metal. Hint, fold cardboard in half and cut out. Then both sides will be the same.
|
|
|
|
|
[Last Edit: GWhis]
[#42]
Would you mind measuring and posting the inside diameter of your Redding hopper with calipers? The following PDF is one made for the Uniflow on Autocad that can be printed out on an inkjet set with properties to print 1 to 1. It can be stretched or reduced to fit any other diameter in only a second or two inside Autocad.
https://workspaces.acrobat.com/app.html#d=sDgvCeCU62GWbpdZ8TV8Yg (the link has to be paged down to see the drawing, but if you download the PDA there, it prints in the center of an 8.5x11 page.) |
|
|
|
|
[#43]
Inside diameter of the powder hopper is 2.00 inches.
|
|
|
|
|
[#44]
Originally Posted By dryflash3:
The older one I have seems to be glued in somehow. Posts in the past said you have to break the hopper to remove it. Which is why I asked. Thanks for the answer. Originally Posted By dryflash3:
Originally Posted By Eight_Ring:
Originally Posted By dryflash3:
Originally Posted By Eight_Ring:
Polishing for stick powders does pay handsome dividends. The Dillon's polish like a dream. I've done a couple RCBS Uniflows, though––and it is rough sledding. I saved a lot of time by cutting with sandpaper... http://i1097.photobucket.com/albums/g359/Warm_Garand/Modding%20RCBS%20Uniflow/WhatYouNeed.jpg Electric drill drives the wire brush>>drives the bisquit of coarse stee wool>>drives the cone of abrasive paper––coarse to cut faster, use successively finer grits to smooth out swirl marks. http://i1097.photobucket.com/albums/g359/Warm_Garand/Modding%20RCBS%20Uniflow/WireBrushDriver.jpg http://i1097.photobucket.com/albums/g359/Warm_Garand/Hornady%20Flex%20Drive/AbrasiveCone.jpg Saves a lot of time smoothing out the rougher casting marks––time that you can then put into polishing the surface to a mirror finish. Please follow up with info on removing the hopper and reinstalling it after polishing. Dryflash–– I'm not sure how the Uniflow was constructed in the past, but both of the new ones I have modded recently were simple press-fit hoppers––and yeah, they were snug, but there were no screws or adhesives of any kind. Don't bother trying to turn it––just wiggle it back and forth, holding at the very top for best leverage and walk it out. That ought to get it. Posts in the past said you have to break the hopper to remove it. Which is why I asked. Thanks for the answer. I have several Uniflows, a couple from the early 70s. None of them have been glued in any way, all press fit. They are VERY snug. |
|
|
|
|
[Last Edit: GWhis]
[#45]
I copied the Uniflow pattern....reduced it to 2" Diameter minus another .050" in diameter to allow a .025" gap all around. The result is the PDF below which includes both Uniflow and Redding patterns. The same can be done for any diameter hopper obviously. Took about 5 minutes to modify the file.
When you click the link below....page the resulting page down a little to see the drawings....there is a download button to download it to your computer. Then just print it out....should be to 1 to 1 scale. https://workspaces.acrobat.com/?d=6sJBzO4Xos1ClkxtbuC4EQ SRT_312, Uniflow hoppers don't have to be broken out after all. RCBS has a new video that shows a very simple way to remove the hopper on a Uniflow. Give me a minute and I'll find the link and post it in this post. http://www.youtube.com/watch?v=5EF_aPMj6sY&feature=c4-overview&list=UUeUrWazeD2BY1bjtuq5sjSQ |
|
|
|
|
[#46]
Originally Posted By GWhis:
I copied the Uniflow pattern....reduced it to 2" Diameter minus another .050" in diameter to allow a .025" gap all around. The result is the PDF below which includes both Uniflow and Redding patterns. The same can be done for any diameter hopper obviously. Took about 5 minutes to modify the file. When you click the link below....page the resulting page down a little to see the drawings....there is a download butten to download it to your computer. Then just print it out....should be to 1 to 1 scale. https://workspaces.acrobat.com/?d=6sJBzO4Xos1ClkxtbuC4EQ SRT_312, RCBS has a fairly new video that shows a very simple way to remove the hopper on a Uniflow. Give me a minute and I'll find the link and post it in this post. http://www.youtube.com/watch?v=5EF_aPMj6sY&feature=c4-overview&list=UUeUrWazeD2BY1bjtuq5sjSQ Thanks for the video. Pretty slick way to get the hopper off. I use a small rubber mallet to reinstall them, and it goes pretty easily. |
|
|
|
|
[#47]
Originally Posted By GWhis:
I copied the Uniflow pattern....reduced it to 2" Diameter minus another .050" in diameter to allow a .025" gap all around. The result is the PDF below which includes both Uniflow and Redding patterns. The same can be done for any diameter hopper obviously. Took about 5 minutes to modify the file. When you click the link below....page the resulting page down a little to see the drawings....there is a download button to download it to your computer. Then just print it out....should be to 1 to 1 scale. https://workspaces.acrobat.com/?d=6sJBzO4Xos1ClkxtbuC4EQ SRT_312, Uniflow hoppers don't have to be broken out after all. RCBS has a new video that shows a very simple way to remove the hopper on a Uniflow. Give me a minute and I'll find the link and post it in this post. http://www.youtube.com/watch?v=5EF_aPMj6sY&feature=c4-overview&list=UUeUrWazeD2BY1bjtuq5sjSQ Thanks for both video and pdf. Definitely easier with the pdf to get the ball rolling. |
|
|
|
AZ, USA
|
[#48]
Copper theives are going to break in and steal your baffle.
|
|
|
|
[#49]
Originally Posted By ycastane: Thanks for both video and pdf. Definitely easier with the pdf to get the ball rolling. Originally Posted By ycastane: Originally Posted By GWhis: I copied the Uniflow pattern....reduced it to 2" Diameter minus another .050" in diameter to allow a .025" gap all around. The result is the PDF below which includes both Uniflow and Redding patterns. The same can be done for any diameter hopper obviously. Took about 5 minutes to modify the file. When you click the link below....page the resulting page down a little to see the drawings....there is a download button to download it to your computer. Then just print it out....should be to 1 to 1 scale. https://workspaces.acrobat.com/?d=6sJBzO4Xos1ClkxtbuC4EQ SRT_312, Uniflow hoppers don't have to be broken out after all. RCBS has a new video that shows a very simple way to remove the hopper on a Uniflow. Give me a minute and I'll find the link and post it in this post. http://www.youtube.com/watch?v=5EF_aPMj6sY&feature=c4-overview&list=UUeUrWazeD2BY1bjtuq5sjSQ Thanks for both video and pdf. Definitely easier with the pdf to get the ball rolling. |
|
|
|
USA
|
[Last Edit: Happy2shoot]
[#50]
Originally Posted By Eight_Ring:
Electric drill drives the wire brush>>drives the bisquit of coarse stee wool>>drives the cone of abrasive paper––coarse to cut faster, use successively finer grits to smooth out swirl marks. Found a shortcut! Homedepot brand Husky 2in surface prep kit. Couldn't find a picture of the exact one I purchased at Homedepot but this is very close. 
To get deeper in the powder bowl trim the outer edge of the rubber back-plate (bottom right object) a half centimeter. I think it took me about 15 minutes to smooth out 2 Hornady powder measures. |
|
|
 Win a FREE Membership!
Sign up for the ARFCOM weekly newsletter and be entered to win a free ARFCOM membership. One new winner* is announced every week!
You will receive an email every Friday morning featuring the latest chatter from the hottest topics, breaking news surrounding legislation, as well as exclusive deals only available to ARFCOM email subscribers.

AR15.COM is the world's largest firearm community and is a gathering place for firearm enthusiasts of all types.
From hunters and military members, to competition shooters and general firearm enthusiasts, we welcome anyone who values and respects the way of the firearm.

Subscribe to our monthly Newsletter to receive firearm news, product discounts from your favorite Industry Partners, and more.
Copyright © 1996-2024 AR15.COM LLC. All Rights Reserved.
Any use of this content without express written consent is prohibited.
AR15.Com reserves the right to overwrite or replace any affiliate, commercial, or monetizable links, posted by users, with our own.


