|
[#1]
please keep this going, and PLEASE PM me your website info.
|
|
|
|
[#2]
This is really fascinating to me as I've never seen what all is entailed in making fine knives like these.
Thank you very much for sharing. |
|
|
|
[#3]
Long day today. Took 39 pictures so this will be a pretty extensive series of posts. This portion is the most intensive of anything I have posted yet. The primary material on the guards has been fitted. Now I need to cut and fit the spacers. His helps to break up the guard and makes it more appealing.
First I use the smaller guard plate to scribe onto the Phosphor Bronze. 
Now the stainless. 
I use a high speed cutting wheel to cut these pieces to size. I am not worried about precision here. You will see why later. Next they need to be center punched. 
Then drilled 
I use a jewelers saw to cut the center out of the plate. 
|
|
|
|
[#4]

Center cut. Here also I am not too concerned about super precise cuts. 
All cut. I will file each one to fit snug but still not too worried about perfection. 
Stacked ready for the next step. 
Now they need to be clamped together to drill 2 1/16" holes 
|
|
|
|
[#5]
Working with 303 stainless is easier than working with 304 but still can be gummy. Sure enough I broke off the drill bit in the guard. It does not really make a difference here as it will be fully covered. So I re-drilled the hole in a different position. This is actually good but not required. I had to change the drill to a carbide to prevent further problems. The hole goes through the first 4 layers but only 3/4 through the last one.


The pins allow for perfect alignment of the guard pieces. They can be removed from the blade and will return to the exact position each time. Re-installed on the blade. 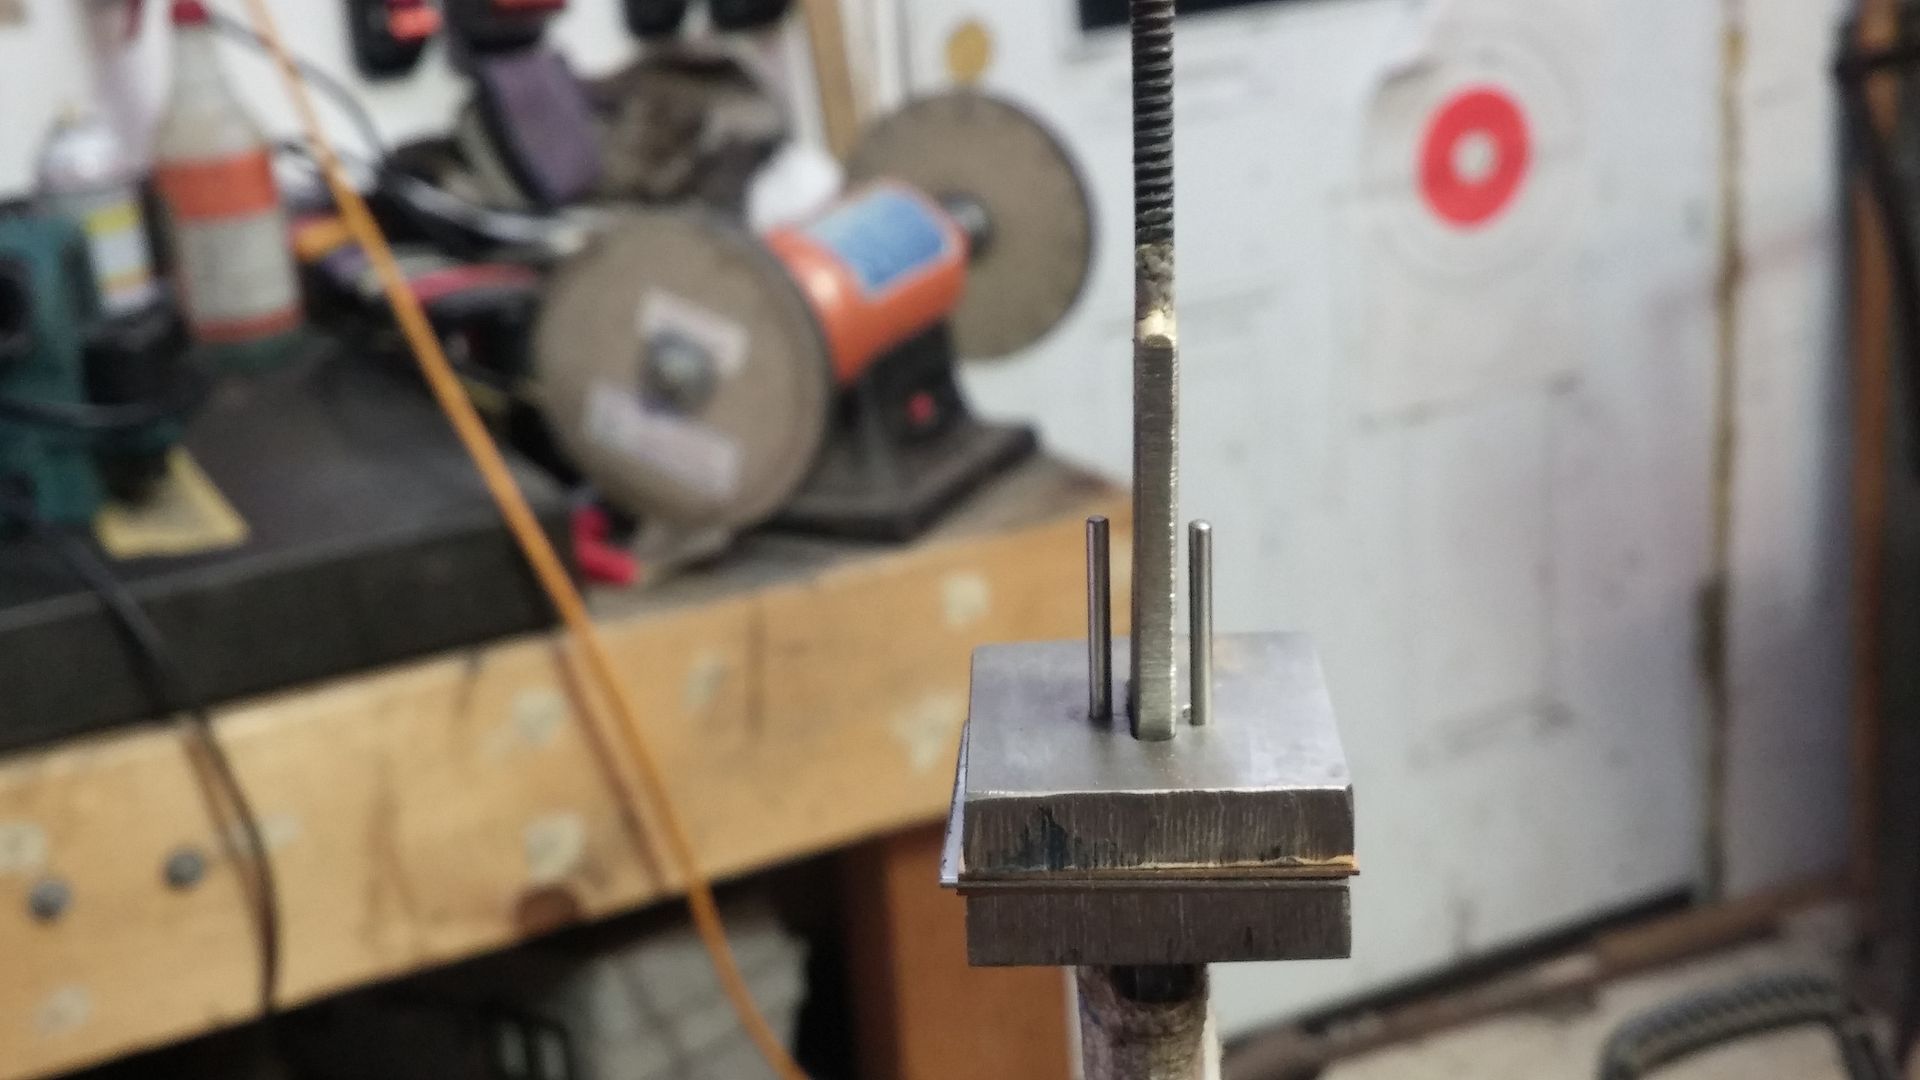
And my high end handle material... 
This handle is used only while I shape the guard. It allows me to hold it all together while I work on all the pieces together. And guards shaped on the belt and disc grinders. 
|
|
|
|
[#6]
|
|
|
|
[#7]
And finished fit up.


Now onto the REAL handles. I cut this handle material more to shape than usual as it had enough on the block for 3 or 4 knives. I then outline the tang on the side and mark the top and bottom on the front of the blade. 
|
|
|
|
[#8]
These 2 tangs are under 3/16" thick so I use a 3/16 endmill in my milling machine. I line up the lines on the side of the block and set depth.

I mill out the slot to accept the tang but the endmill will not go all the way through. I rotate the block making sure the face remains forward. This keeps the hole perfectly aligned forward to back. I line up the endmill with the tracing and drill the hole that meets up with the previous hole I drilled. 
Now a very important step. Making sure the DRO is zeroed!!!! 
I do not remove or move the block until the next step is complete. I insert a 5/16 endmill to drill the final hole. This is actually a counterbore with a flat bottom the is centered around the 3/16 hole. This is why I needed to set the DRO. Now I can set it up and move back to the same point. 
Then drill the hole 
|
|
|
|
[#9]
All done with this step. Now do the next one.

So what about the pins?? I put the block on and press the impression into the face. 
I then drill holes corresponding to the pins. These also do not need to be perfect. Again you will see why later. 
I make a tapped rod that will act as a large nut to hold this all together. This pushes against the bottom of the 5/16 hole creating tension. 
Both finished. 
|
|
|
|
[#10]
Time to put things together but I still want to be able to take them apart. This is acraglas resist from Brownelles. Paint it on the tang and let dry. The tang needs to taper from front to back so it can be withdrawn and not bind.

Mix up the Acraglas 4 parts A and 1 part B. This is with brown dye for the walnut. 
Glued and cleaned for initial set up. 
I decided to try and salvage the remaining Acraglas. I just added a little black dye and it worked great. 
I added just enough Acraglas, hopefully, to create a repeatable bedding. It takes 24 hours to set up and I set them against the wall tip down. This helps to keep the Acraglas where it needs to be. 
If all goes well we will see a completion tomorrow. Thanks for hanging in with me. |
|
|
|
[#11]
You, sir, are a master craftsman
|
|
|
|
[#12]
This thread is extraordinary! You truly are a craftsman!
|
|
|
|
[#13]
damn dude!
|
|
|
|
[#14]
Bad ass.
|
|
|
|
[#15]
I'd say "OUTSTANDING", but that falls quite short.
Simply amazing. |
|
|
|
[#16]
Well we have come to the end. This next few posts will be the finale. I was able to finish up all the blades I was working on. So lets get started. Yesterday I glued up the knives for a temporary hold.
I need to take them apart again before I begin shaping the handle. 
The black handle did not give me a perfect glue up but it will work fine. 
The walnut handle glued up great. 
Re-assembled and now I will set up to grind the handles. First I want to talk a little about the biggest problem with using natural handle material. IT MOVES. I will swell or shrink with changes in humidity. I hate walking up and picking up a nice looking knife and feeling the sharp edges on the guard caused by shrinking handle material. Though I came up with this next procedure myself, I did not invent it. After I started doing it I found that many had already been doing it for years and I just had not noticed. At least I had not noticed consciously. We solve the problem of shrinking handle material by creating what is called an Heirloom fit. This is where the handle material is slightly proud of the guard material. First I use pinstripe tape to set the height of the handle material. 
Pinstripe tape is very precise on its thickness. It is about .005". I start with 3 wraps around the guard making sure I stop at the same point I started at. 
|
|
|
|
[#17]
Just a little insight as to what goes into the building as far as cost goes.

I will get 2 handles out of this block but it still stings a little laying that kind of $$ out speculating it will sell. Now off to the grinder. One nice thing about the way I put it together is it holds even without the pommel nut. I can take it out and grind things close and still be able to put it back in and hold things together. 
And rough ground handles. 
From here I go with hand finishing. You can see here I can scuff the pinstripe tape bringing the handle material to a predetermined and even height. 
Once I get things to where I like them and the handle fit and it sanded to 800 grit or higher I begin the final glue-up. I fill the handle with Acraglas and make sure it gets between all the layers. 
|
|
|
|
[#18]
I like seeing the Acraglas oozing from all the joints. That means the handle is full and there will be no moisture intrusion.

I do a god cleaning of the Acraglas but I need to keep an eye on it as it keeps oozing. Now I need to let things start to set up. On to the walnut handled knife. After glue up. 
Last thing I do before final sharpening is my makers mark. In the Panto Graph 
And my mark 
|
|
|
|
[#19]
A little added detail


And the finished knives. 

I wish I could capture the iridescence of the wood on the black handled knife. It is gorgeous!! Here are my backpackers knives. They weigh in at 3oz. 
Well guys it has been fun. I hope you all have a better idea of what goes into making a custom knife. It can be done differently and faster. This is how I do it and find it works best for me. I will be happy to answer any questions. Thanks for hanging in there. I know it takes much more time than most think. Have a great day. I need to go make some more dust. . |
|
|
|
[#20]
 There is so much craftsmanship that goes into these knives! You are very talented, thank you for taking the time to post all this for us. There is so much craftsmanship that goes into these knives! You are very talented, thank you for taking the time to post all this for us.
I especially like the pattern in the damascus on the walnut handled knife. Its amazing. |
|
|
|
[#21]
This thread is full of awesome, nice work!
|
|
|
|
[#22]
Awesome thread! Thanks for taking the time to share.
|
|
|
|
[#23]
 
|
|
|
|
[#24]
Very cool, thanks for sharing it with us.
|
|
|
|
[#25]
Great Thread OP, and Awesome work!
|
|
|
|
[#26]
Amazing work! Thank you for taking the time to share.
|
|
|
|
[#27]
Excellent work.
|
|
|
|
[#28]
Thank you for sharing, your work is impeccable and you produce some amazing stuff with those skills.
|
|
|
|
[#29]
Thanks for posting. It's great to see the process of a true master at work.
Anymore pics of that black handled meteor knife? |
|
|
|
[#30]
No, I took it to a show last weekend and it sold. The buyer will be bringing it to my next show and I will get some better pictures.
|
|
|
|
[#31]
Quoted:
No, I took it to a show last weekend and it sold. The buyer will be bringing it to my next show and I will get some better pictures. How do you even put a price on something like that. Do you ever get attached to your creations? |
|
|
|
[#32]
Putting a price on these is the hardest part. If I were to charge $50/hour , like some advisors recomend, my knives would start about 1k and go up from there. I just cannot justify that for what I consider a user.
I try and recoup my costs and additional based upon type of knife and what they are going for on the market. My prices are on the low end. However I feel my quality is closer to the higher side. It just depends on how long I want to sit on any of my creations. If I get attached to one of my creations and it is an order I just get over it. If it is not an order I may use it for a while then sell it later. I do have several of my firsts. I would not want them out there anyway. Some are pretty rough. |
|
|
|
[#33]
You sir are a national treasure.
Well done. |
|
|
|
[#34]
Thank you for sharing. I hope to start making blades in the near future and your thread is really motivational.
|
|
|
 Win a FREE Membership!
Sign up for the ARFCOM weekly newsletter and be entered to win a free ARFCOM membership. One new winner* is announced every week!
You will receive an email every Friday morning featuring the latest chatter from the hottest topics, breaking news surrounding legislation, as well as exclusive deals only available to ARFCOM email subscribers.

AR15.COM is the world's largest firearm community and is a gathering place for firearm enthusiasts of all types.
From hunters and military members, to competition shooters and general firearm enthusiasts, we welcome anyone who values and respects the way of the firearm.

Subscribe to our monthly Newsletter to receive firearm news, product discounts from your favorite Industry Partners, and more.
Copyright © 1996-2024 AR15.COM LLC. All Rights Reserved.
Any use of this content without express written consent is prohibited.
AR15.Com reserves the right to overwrite or replace any affiliate, commercial, or monetizable links, posted by users, with our own.


