|
[#1]
Reserved for parts list, cost, links & other info.
Carbon Steel tube, Alum ends, direct thread on Tax stamp, $200 required. Break to can adapter (thread protector D-Cell), $19.99 Required. http://sdtacticalarms-com.3dcartstores.com/D-cell-Maglite-Rear-Thread-Protector-non-anodized-and-anodized_p_15.html 8.375" Steel tube D-Cell, $30.99 required if not using a donor flashlight for a tube. http://sdtacticalarms-com.3dcartstores.com/SOLVENT-TRAP-TUBES_p_47.html SS D-Cell Spacer and blast tube, $10.00 required. http://sdtacticalarms-com.3dcartstores.com/Stainless-D-Aluminum-C-and-D-PVC-Pipe_p_41.html Freeze Plugs 381-3179, $11 for a 12 pack at Napa required. http://www.napaonline.com/Catalog/CatalogItemDetail.aspx/Expansion-Plug-1-350-34-300-mm/_/R-SEP3813179_0186397517 End Cap, $19.99 Aluminum D Cell. http://sdtacticalarms-com.3dcartstores.com/End-Caps_p_50.html Total Estimated total for Steel tube with Aluminum ends, direct thread on build parts: $92.96 + Tax stamp $200 = $292.96 Total 
Carbon Steel Parts list Tax stamp, $200 required. Muzzle Break, $56.99 not required. You can use an adapter that threads directly to the barrel. http://sdtacticalarms-com.3dcartstores.com/SDTA-Muzzle-Break_p_65.html Break to can adapter (thread protector D-Cell), $34.99 Required. http://sdtacticalarms-com.3dcartstores.com/Carbon-steel-Rear-thread-protector-D-cell_p_70.html 8.375" Steel tube D-Cell, $30.99 required if not using a donor flashlight for a tube. http://sdtacticalarms-com.3dcartstores.com/SOLVENT-TRAP-TUBES_p_47.html SS D-Cell Spacer and blast tube, $10.00 required. http://sdtacticalarms-com.3dcartstores.com/Stainless-D-Aluminum-C-and-D-PVC-Pipe_p_41.html Freeze Plugs 381-3179, $11 for a 12 pack at Napa required. http://www.napaonline.com/Catalog/CatalogItemDetail.aspx/Expansion-Plug-1-350-34-300-mm/_/R-SEP3813179_0186397517 End Cap, $34.99 Carbon Steel D Cell. http://sdtacticalarms-com.3dcartstores.com/End-Caps_p_50.html Total Estimated total for Steel build parts: $178.96 + Tax stamp $200 = $378.96 Total 
Titanium build Tax stamp, $200 required. Muzzle Break, $56.99 not required. You can use an adapter that threads directly to the barrel. http://sdtacticalarms-com.3dcartstores.com/SDTA-Muzzle-Break_p_65.html Break to can adapter (thread protector D-Cell), $19.99 Required add the option to the break selection. http://sdtacticalarms-com.3dcartstores.com/SDTA-Muzzle-Break_p_65.html 8" Titanium tube D-Cell, $69.99 required if not using a donor flashlight for a tube. http://sdtacticalarms-com.3dcartstores.com/SOLVENT-TRAP-TUBES_p_47.html SS D-Cell Spacer and blast tube, $10.00 required. http://sdtacticalarms-com.3dcartstores.com/Stainless-D-Aluminum-C-and-D-PVC-Pipe_p_41.html Freeze Plugs 381-3179, $11 for a 12 pack at Napa required. End Cap, $19.99 Aluminium D Cell. http://sdtacticalarms-com.3dcartstores.com/End-Caps_p_50.html Total Estimated total for Titanium Build parts: $187.96 + Tax stamp $200 = $397.96 Total 
Purchased tools Depending on the style you want to do, there are different methods. The most basic method is not angling the baffles at all. You just use the centering tool and a drill to drill the middle to the desired caliber. I will be testing non angle baffles, 45 deg angled baffles and 60 degree baffles. I may test different combinations of the baffles as well, along with different spacing arrangements. Center Tool $19.99, required. http://sdtacticalarms-com.3dcartstores.com/Centering-Tools_c_17.html Puller tip 45 degree, required if adding an angle to baffles. If you don't have a puller to use the tip off of, there are replacement tips online for $10-$15. 60 Degree tip, required if wanting this angle on your baffles. It is recommend you start with 45 then use the 60 to prevent distorting the baffle. $11.83 http://www.amazon.com/dp/B00012YFKI/ref=sr_ph?ie=UTF8&qid=1416935804&sr=1&keywords=grizzly+mt2 Puller tip that is close to 60 degrees. just another example of something you can use. $6.07. http://www.toolup.com/proto_j4012t_puller-tip-detachable-sta.aspx And then there is a complete setup for the guy that will be making multiple baffles. I was going to produce something like this, but for the price it's good enough. My only concern is that it appears to be a 45 degree angle and not a 60. $110, http://www.ebay.com/itm/221612690113?_trksid=p2060778.m2763.l2649&ssPageName=STRK%3AMEBIDX%3AIT Baffles: There are two brands of baffles that I have found will fit. This is the one I linked to above. 
This part number is stronger and slightly longer in the depth. They also fit tighter in the tube, and require just a slight bit of pressure to push down the tube. These may create a better seal, but either will work just fine. 
|
|
|
|
[#2]
Reserved for write up.
Step 1: E-File form 1, and pay $200 tax. Step 2: Impatiently wait for your approved stamp... This stamp took 41 days to be approved. Step 2.b: Order the parts and pieces (see list above post). Step 3: Form Baffles. There are many methods for this, I tried most of them. My preferred method that results in the most consistent baffles was using the tool and die to form the angle. I was able to do this with a vice, but was pretty tough to do. It felt like any second the vice handle was about to break. Using a 6 ton hydraulic press made the job much easier. 
Place a freeze plug on to the tool. 
Then place the sleeve over the tool, and insert the die into the sleeve. 

Place the whole tool into a vice and crank it down until you can't move it anymore. 
Check the angle to make sure you depressed it enough. Here is a before and after photo. 
Using a press makes the job much easier, follow the same process as above but place the tool under the press instead of in the vice. 

Press the die into the tool, until it reaches max depth. I measure with my calipers the die to sleeve difference to make sure they are all pressed to the same depth. 
Remove the sleeve and the die, and inspect. Sometimes depending on the plug brand, they may be slightly stuck onto the die body. A slight tap of a hammer frees them easily. 
Your finished dented/formed baffle ready to be drilled. 
Alternative forming process This method is for if you don't buy the forming tool I recommend. This method you will need a centering tool (not pictured) from SDTA $20. In this example I'm using a 23mm craftsman socket, a 45deg flaring tool center bit, and the 60 deg lathe bit. First step in this method is to drill your starting hole with the centering tool. This gives the forming bit a spot to center off. 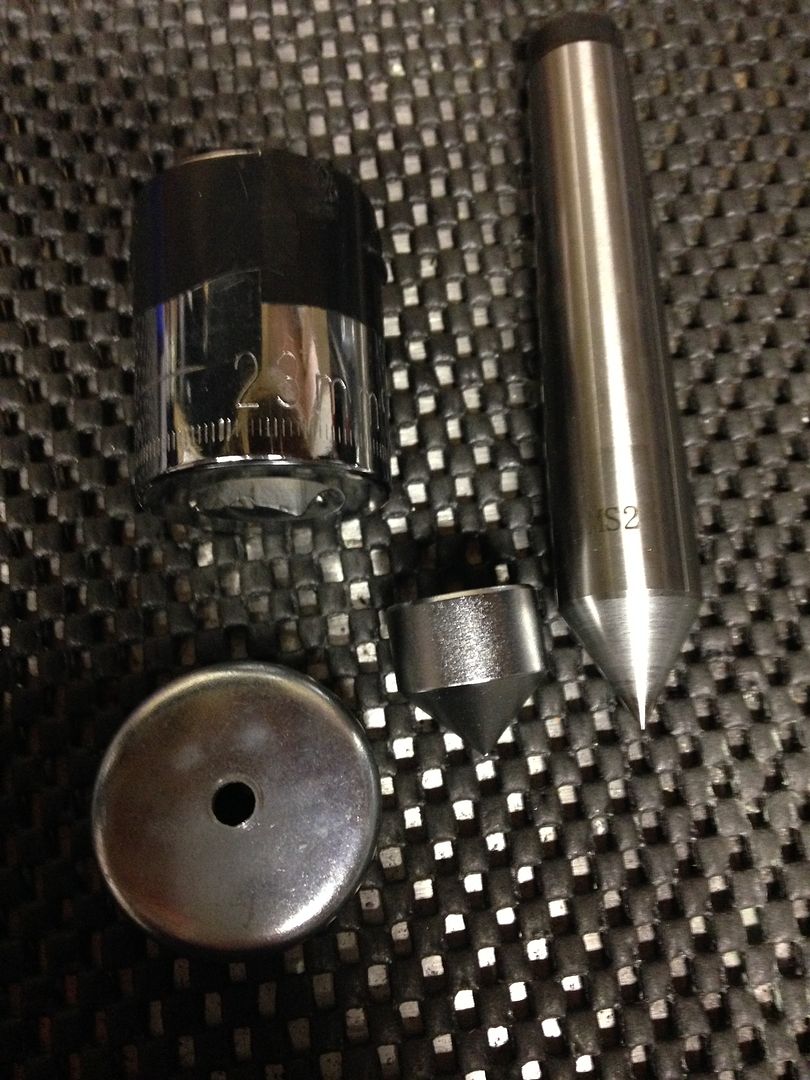
The plug fits over the socket pretty good, but depending on brand it may be slightly loose. If so a wrap or two of tape will make it tight. Place the plug over the socket, and align the forming bit in the center and place in the vice. Before cranking down, make sure the everything is square. 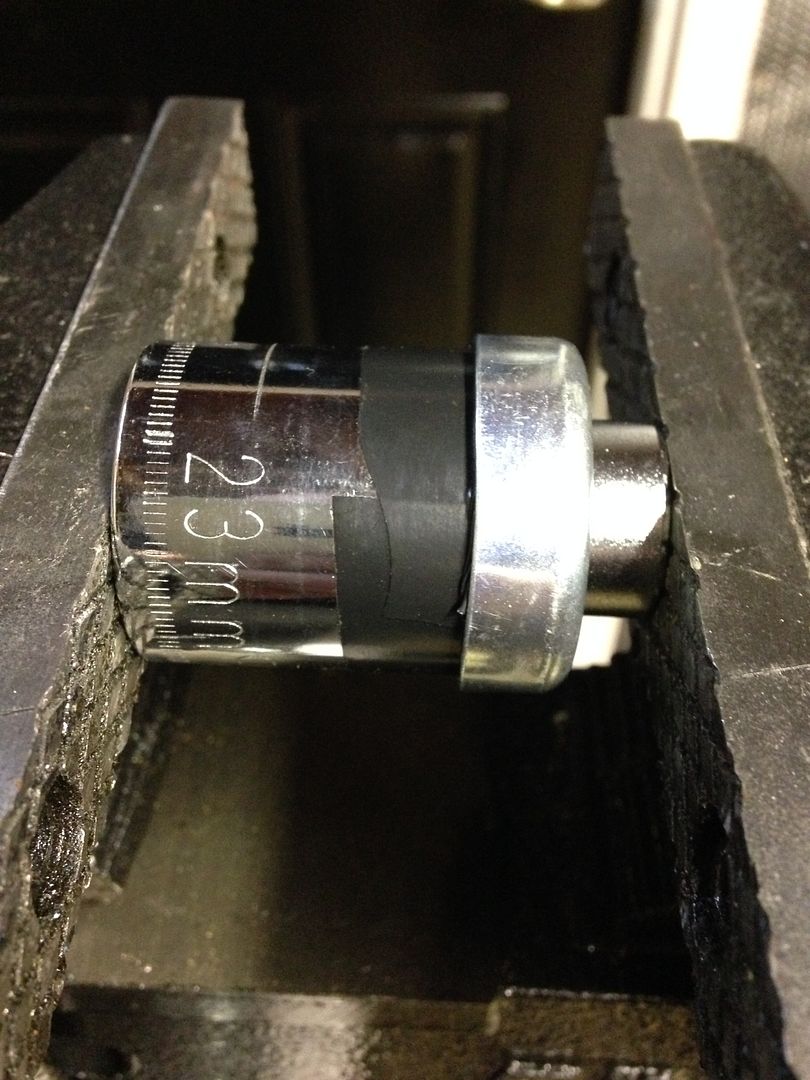
Tighten down until the bit is touching the plug completely. If you are planing to use the 60 deg angle you will form the 45 deg first, then step up to the 60deg. Follow the same process as above with the 60 deg bit. 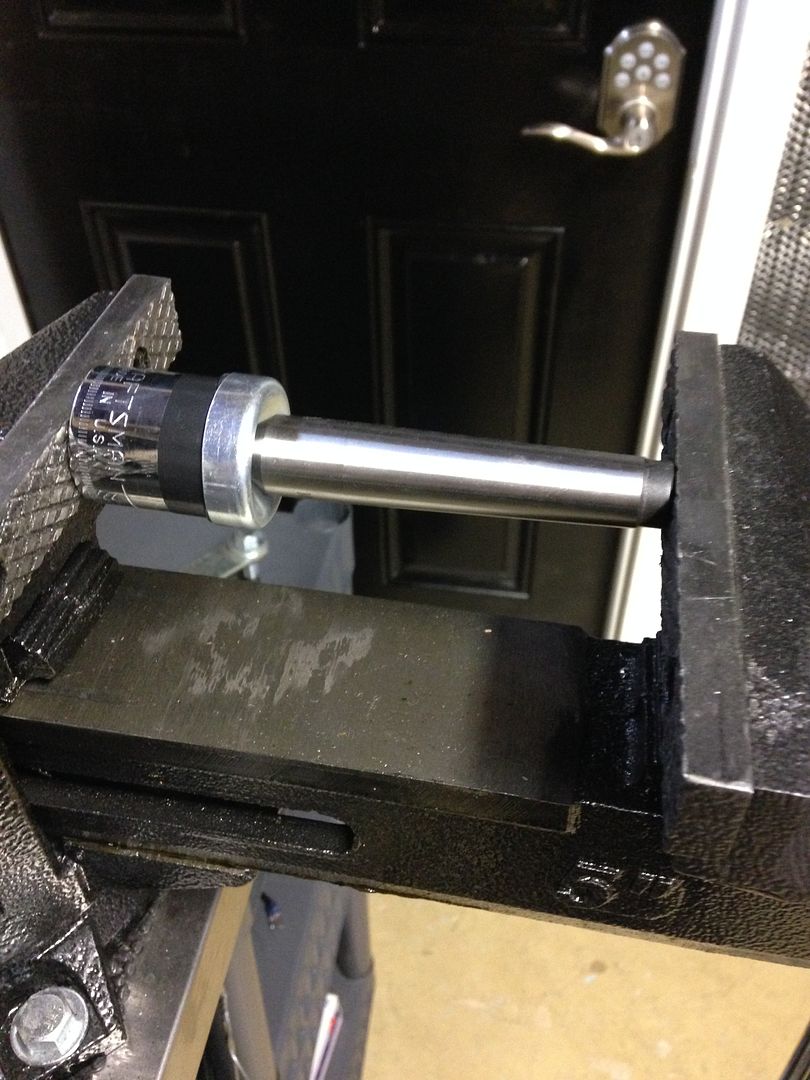
The center hole will grow as you are forming, you want to make sure this does not get bigger than your desired final hole size. I recommend making it smaller than that size and use a drill but to give you the final size. Here is a socket formed baffle. 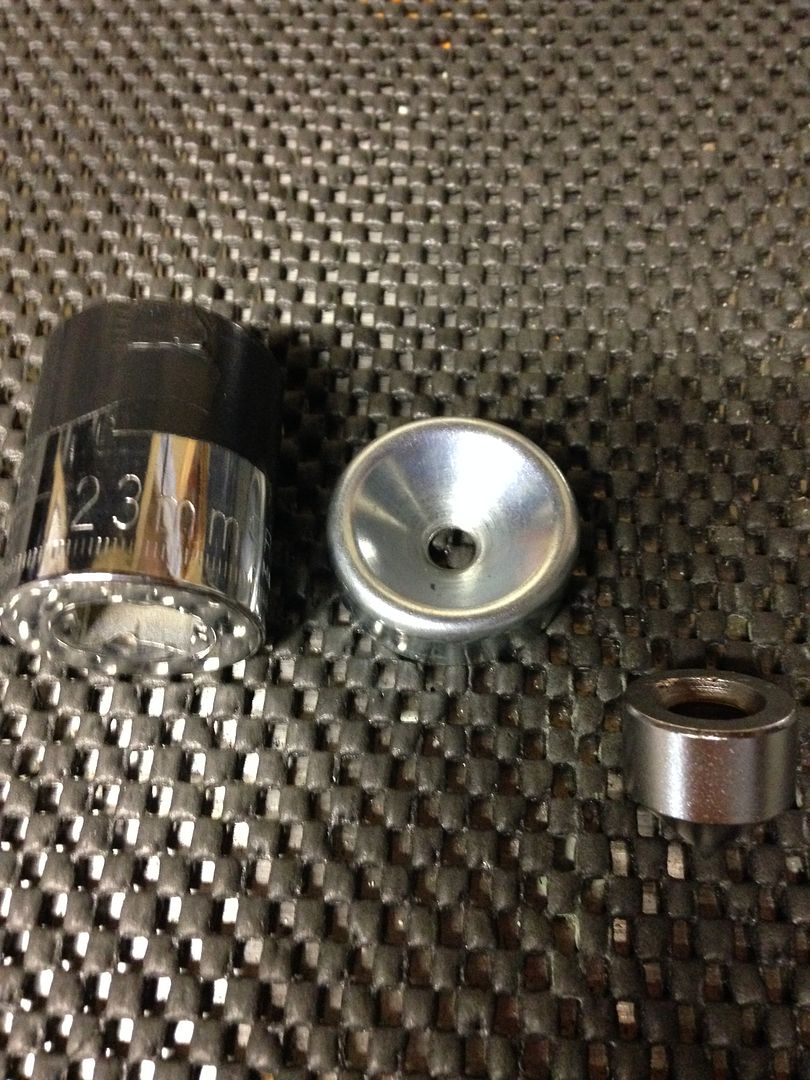
Step 4 Drilling baffle holes If using the baffle forming tool, you DO NOT drill prior to forming. Form the plug and then drill it. See this picture of two plugs, the plug on the left was formed and then drilled. The one on the right was drilled and then formed. The hole will grow as you form, I believe it is better to form and then drill for consistency and plug thickness. 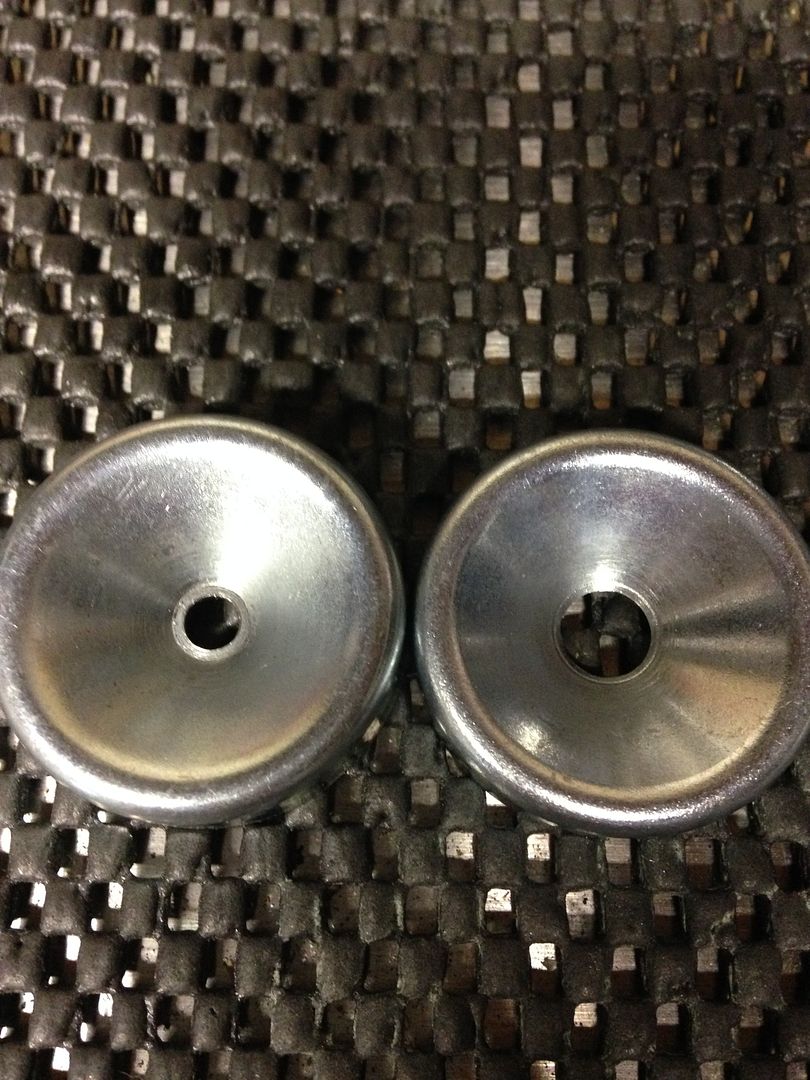
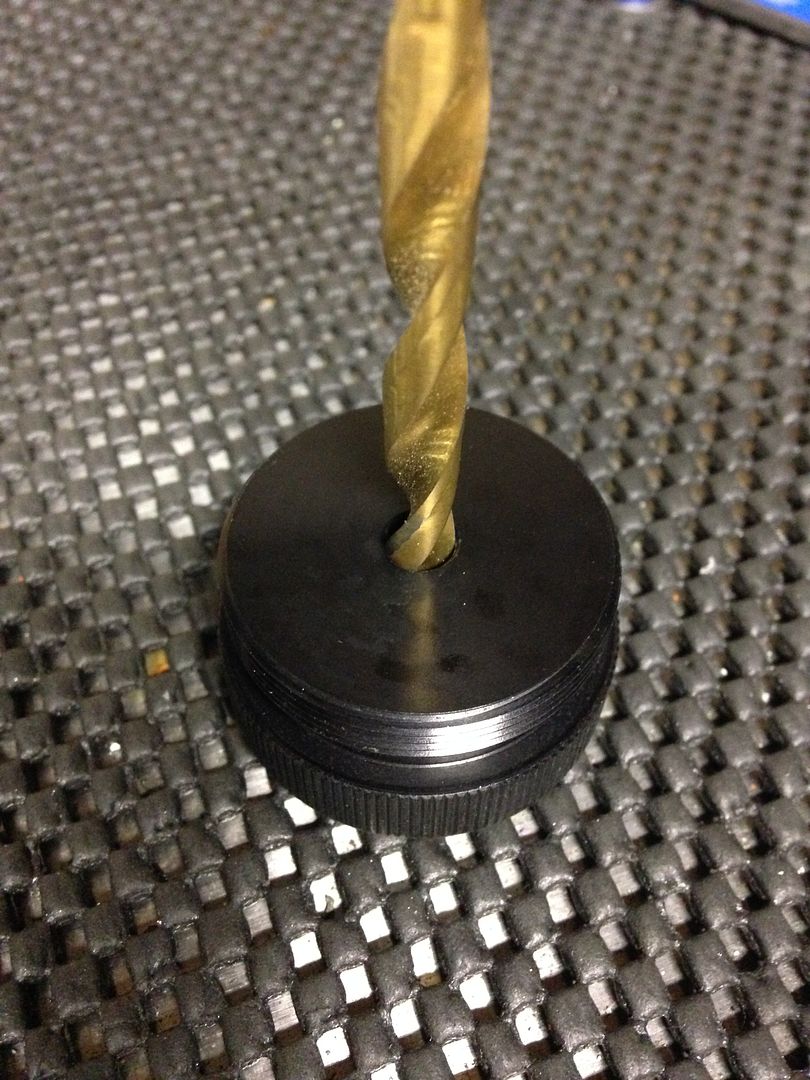
While the tool is in the forming tool, drill your center hole. 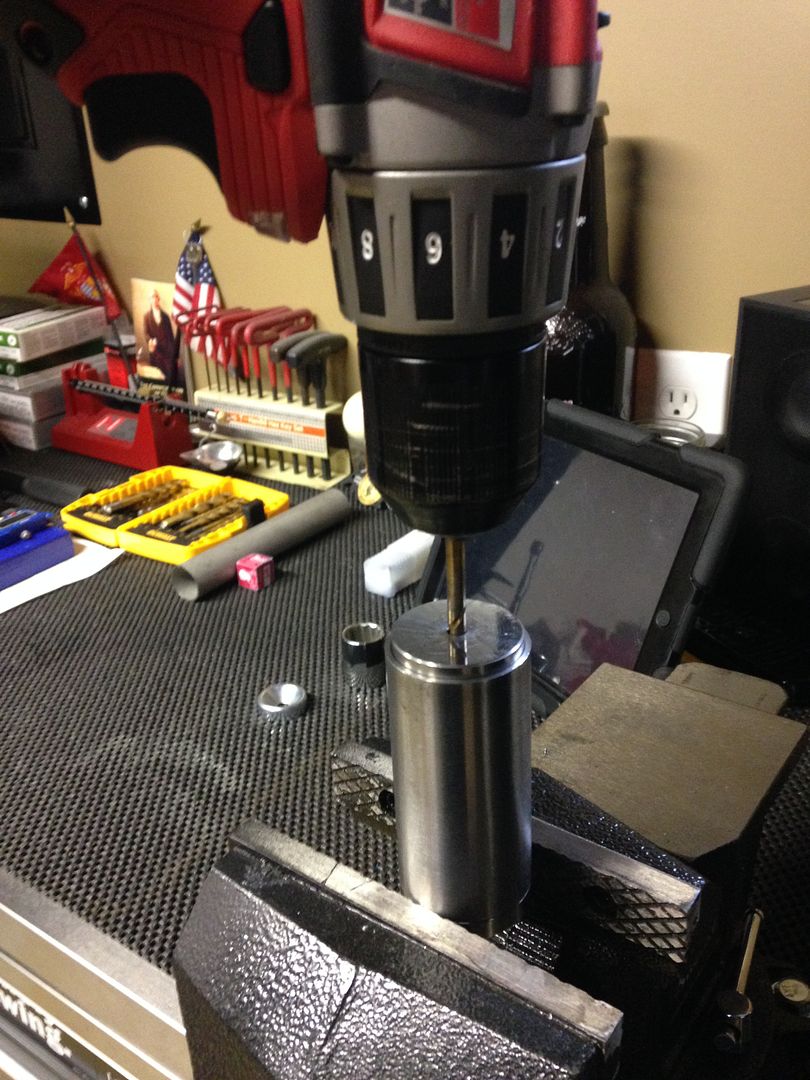
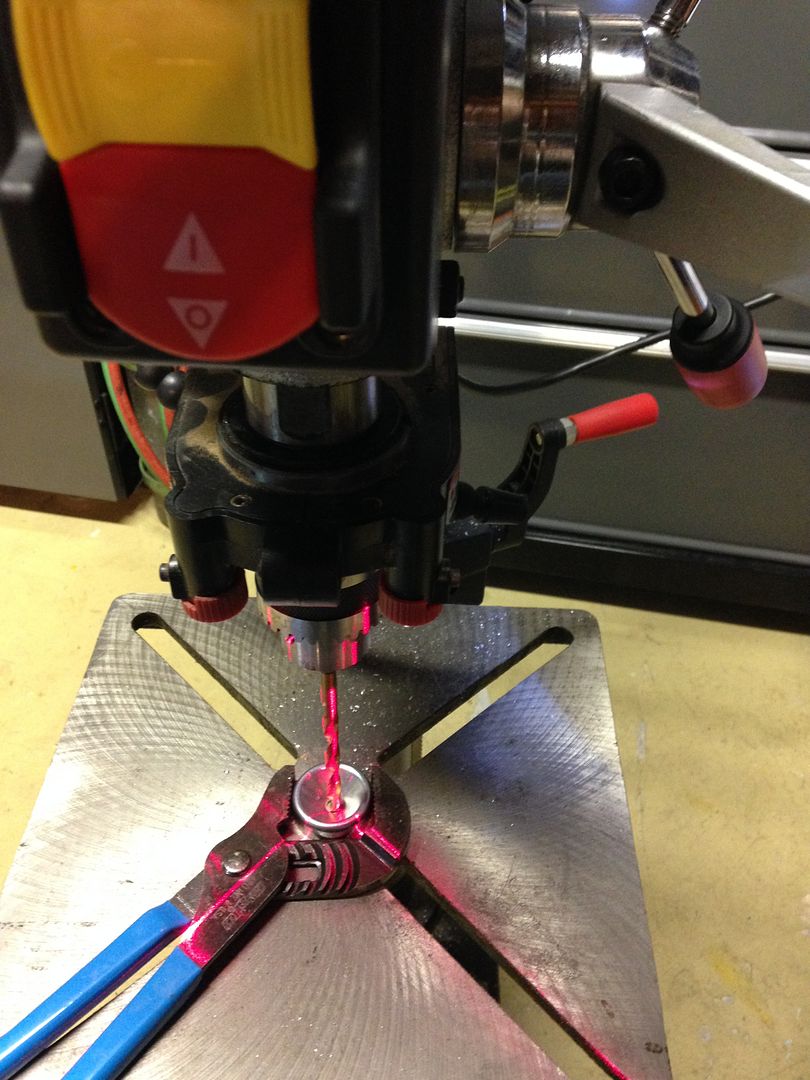
After drilling your center hole with the tool, you now just have to increase to the desired caliber size. For this 30 caliber can .371 would be the size we are looking for. A 3/8 drill bit is .375, you can either order the .371 bit or use what you have. Going slightly bigger is safer and easier, but it will decrease the effectiveness slightly. I used a drill press to complete the holes. It's important to slowly step up to the final size. This prevents you from getting off center, and gives a cleaner hole. My centering tool uses a 3/16 bit. I slowly stepped up a bit size at a time. Using the drill press and a pair of channel locks, line the center up, the drill bit will center off the smaller size hole. 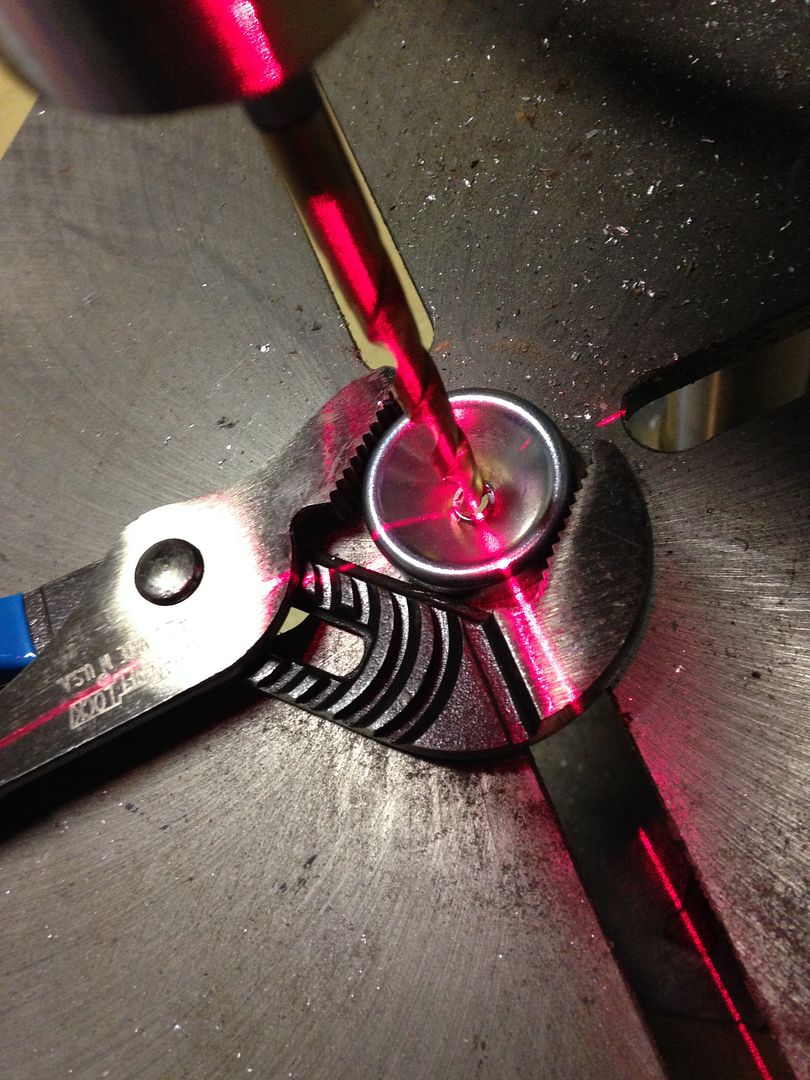
After you get to your desired size, check to make sure they are centered and if anything looks off, destroy it. Freeze plugs are cheap, blowing up your can up is not. Inspect the hole and clean any burrs off. 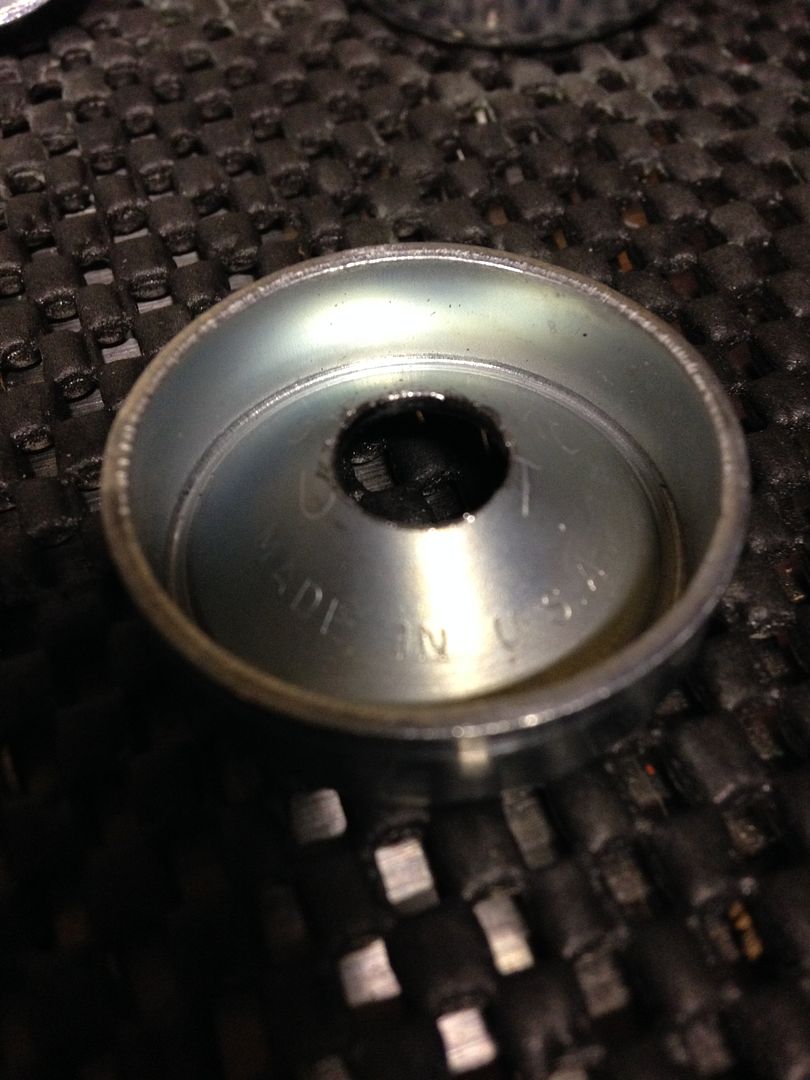
Step 5 End cap After you have all your plugs done and cleaned up, and everything looks good it's time to drill the end cap. When you buy this from SDTA it will come center marked and the hole is started. 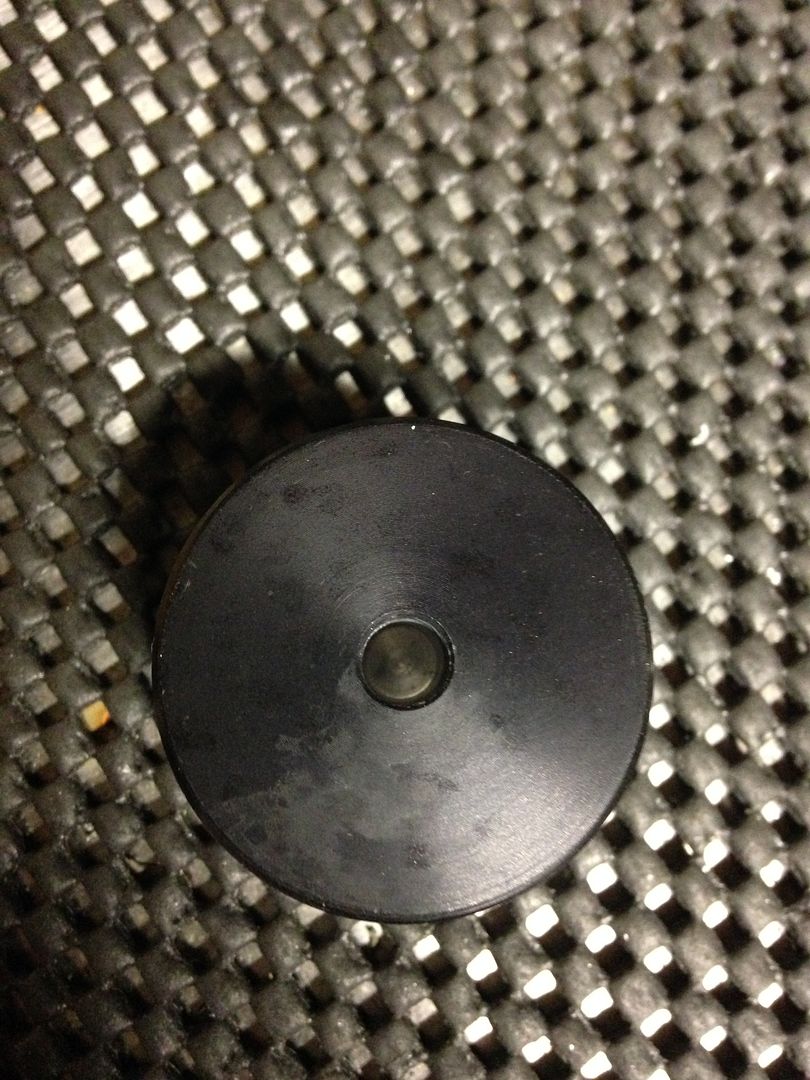
First step is to drill the hole they started the rest of the way. This is done just like the plugs on the drill press. Slowly step up the drill bit size until you get to your desired size. When finished you should have a nice end cap with a clean center hole. 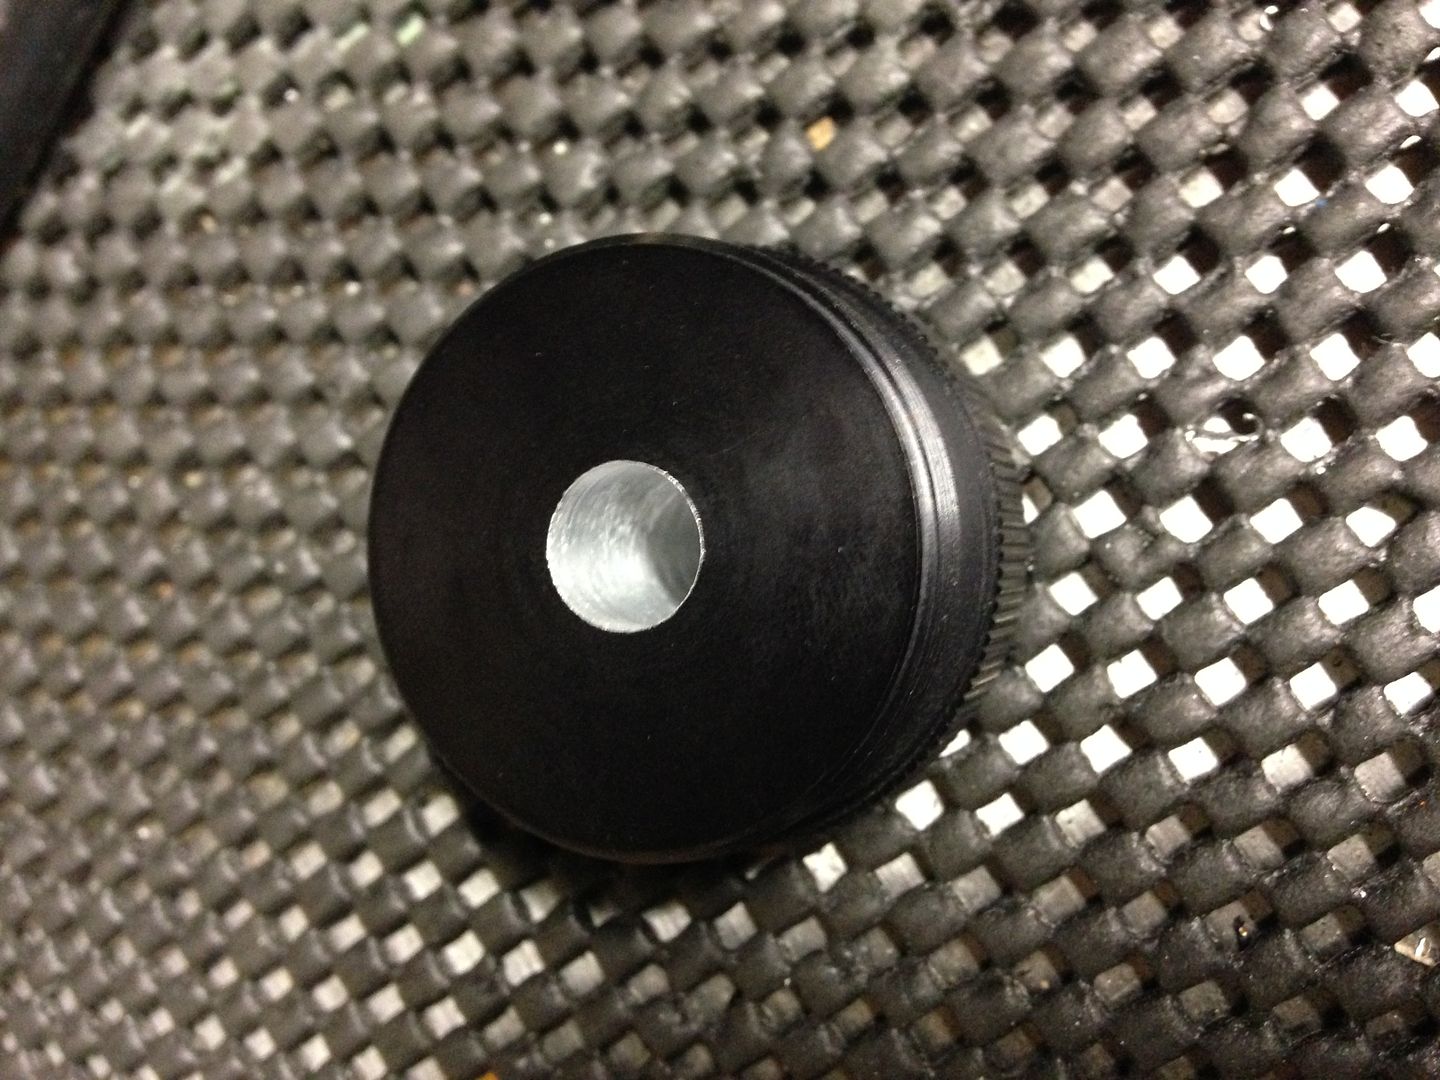
Do another inspection of all your baffles and end cap. Everything should be nice and centered, clean with no metal burrs. 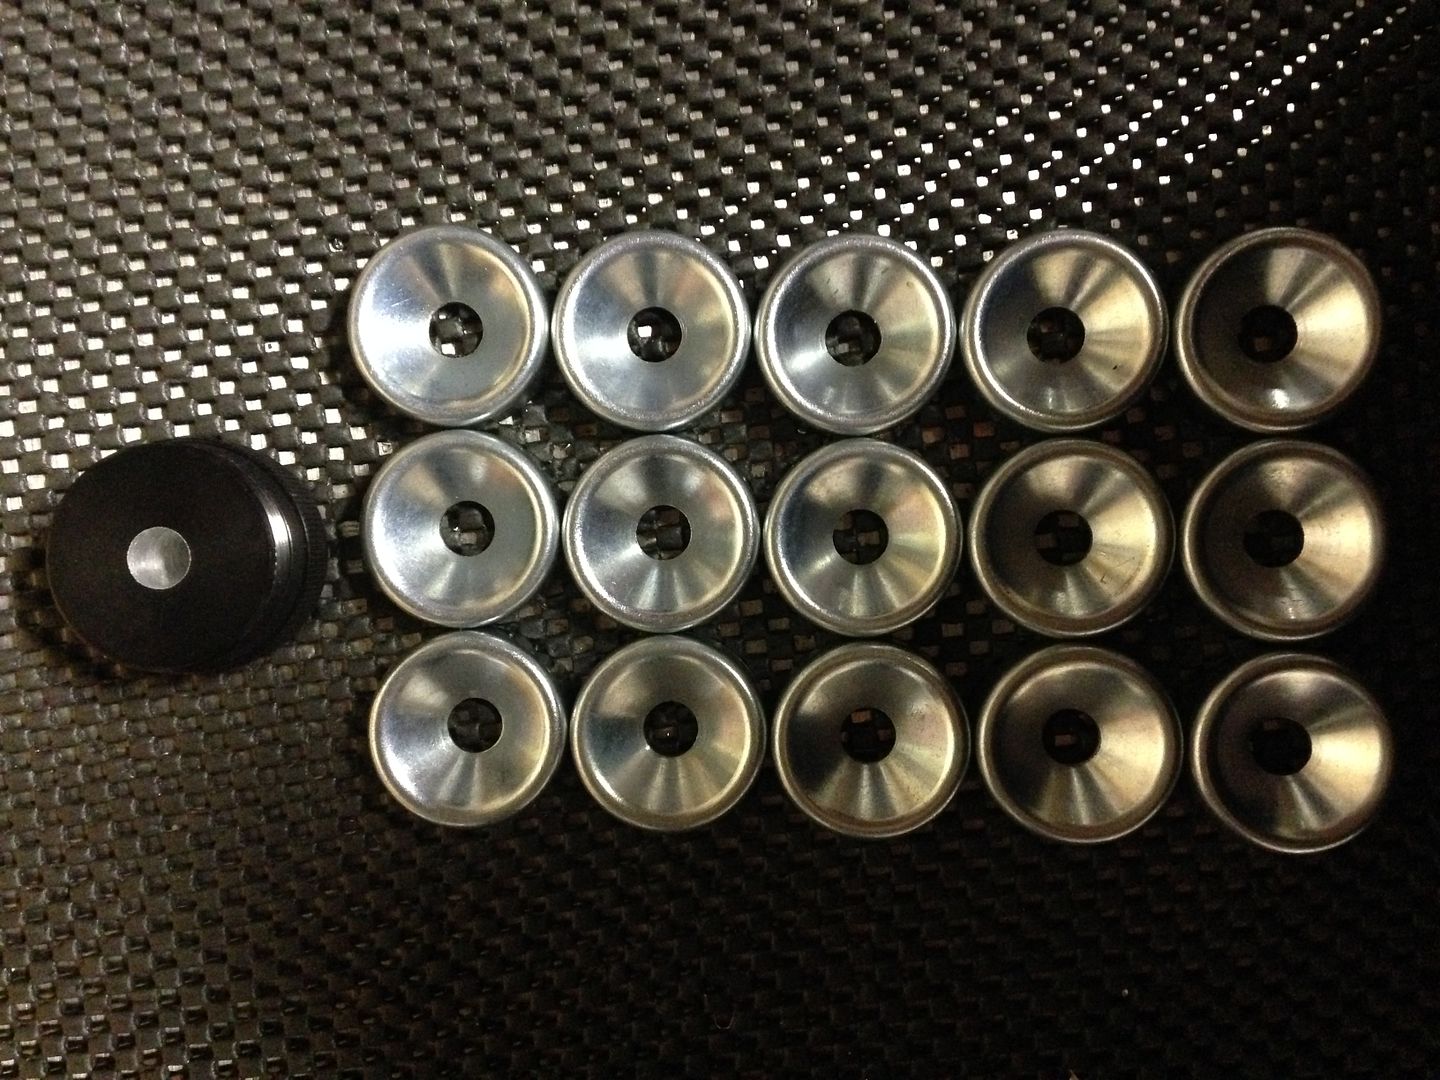
Step 6 Assembly Someone on another forum recommends the use of the high temp o-rings to help seal the suppressor and add resistance to the ends cap. I placed one on the end cap and tightened it down. After finishing the build it was pointed out that the oring should fit inside the tube. It does not on mine. I called SDTA where my parts came from and they do not recommend using them, so I removed them from my build. 
Next install the baffles in the configuration of your choice. 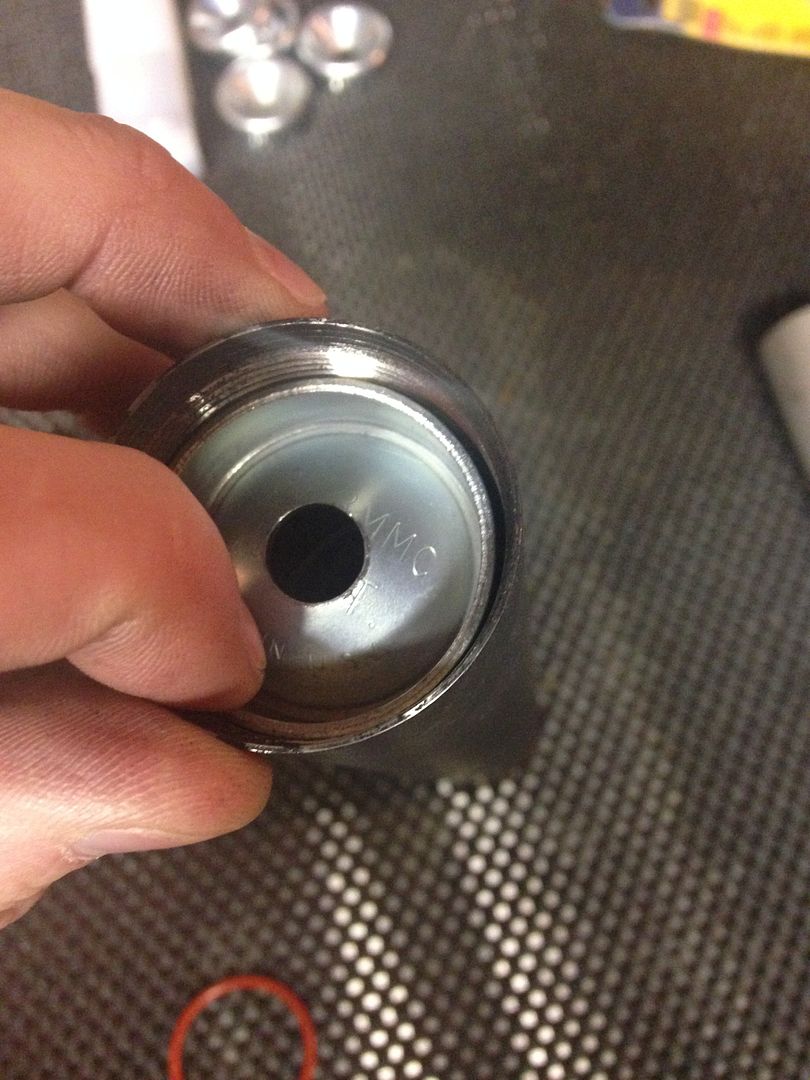
Push them down and make sure they are fully in place. 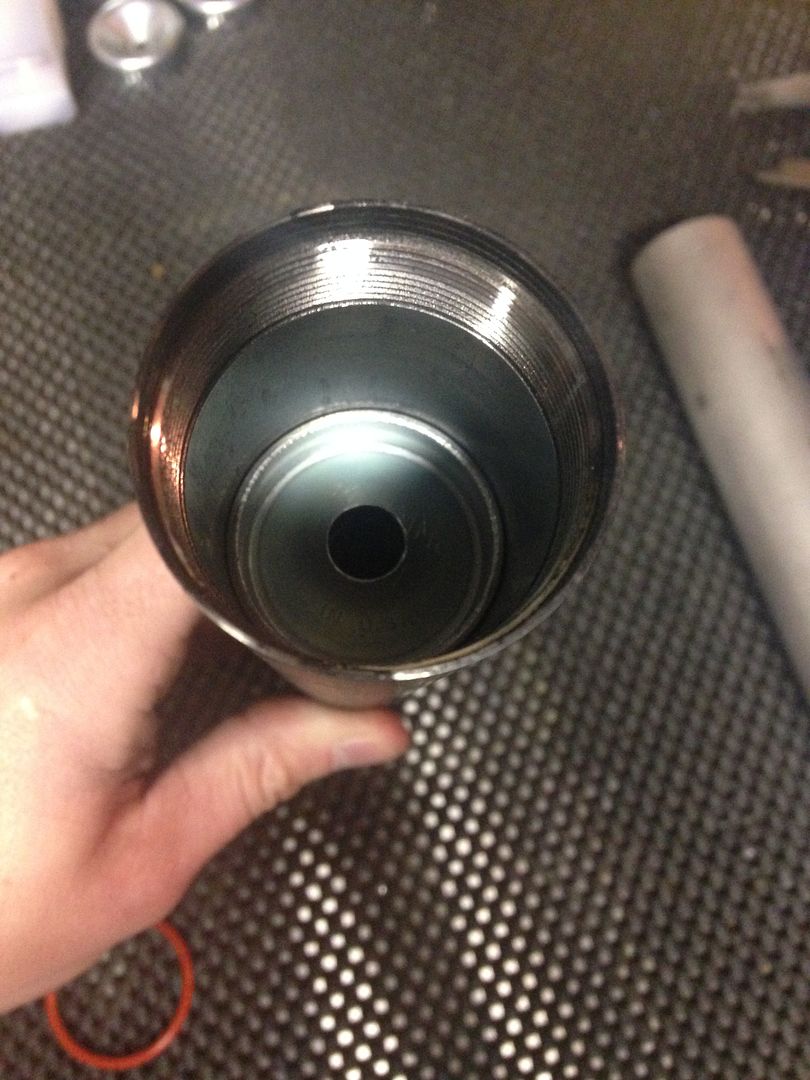
Step 7 Blast chamber spacer The blast chamber needs to be at least the length of your break that the adapter doesn't cover. Install the end cap onto the adapter and measure the length. 
If your internal measurement (we will do this next) is not at least this long, you will need to remove a baffle or two. Next measure the distance from the top of the tube, to the first baffle. 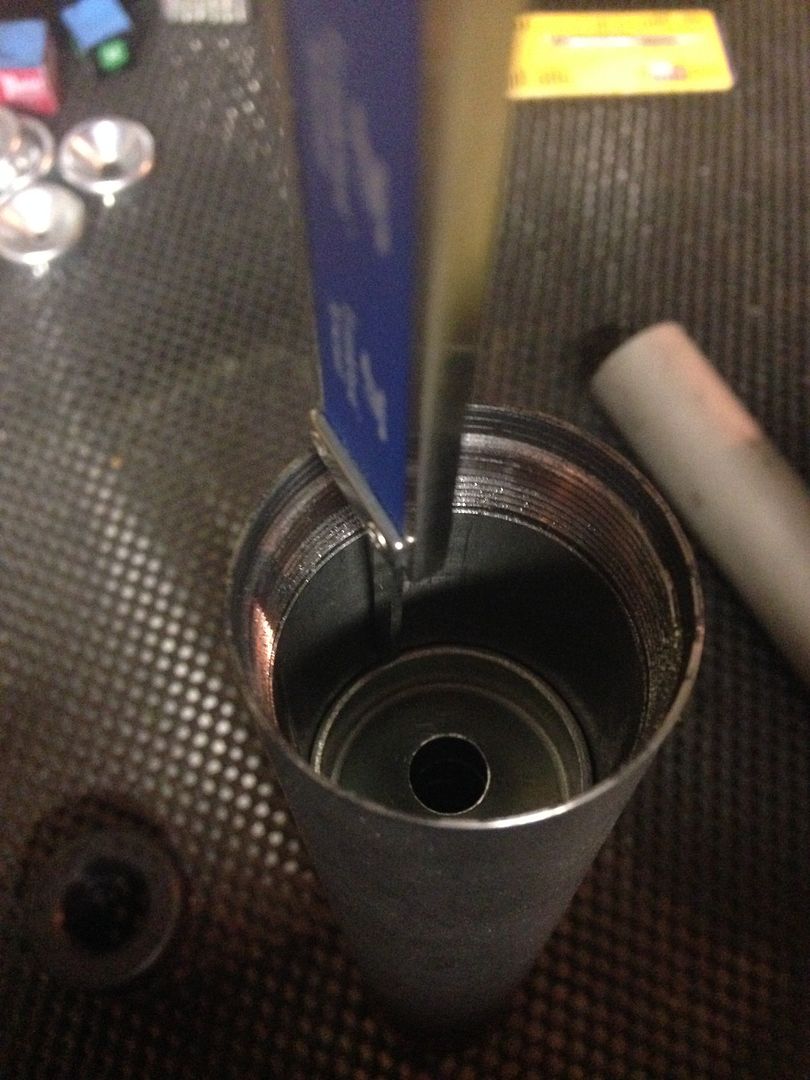
Then measure the distance between the face of the end cap and the o-ring. 
Subtract the two measurements and that is the length of your blast chamber spacer. There are many ways to cut the spacer, just make sure you have a nice clean square cut. 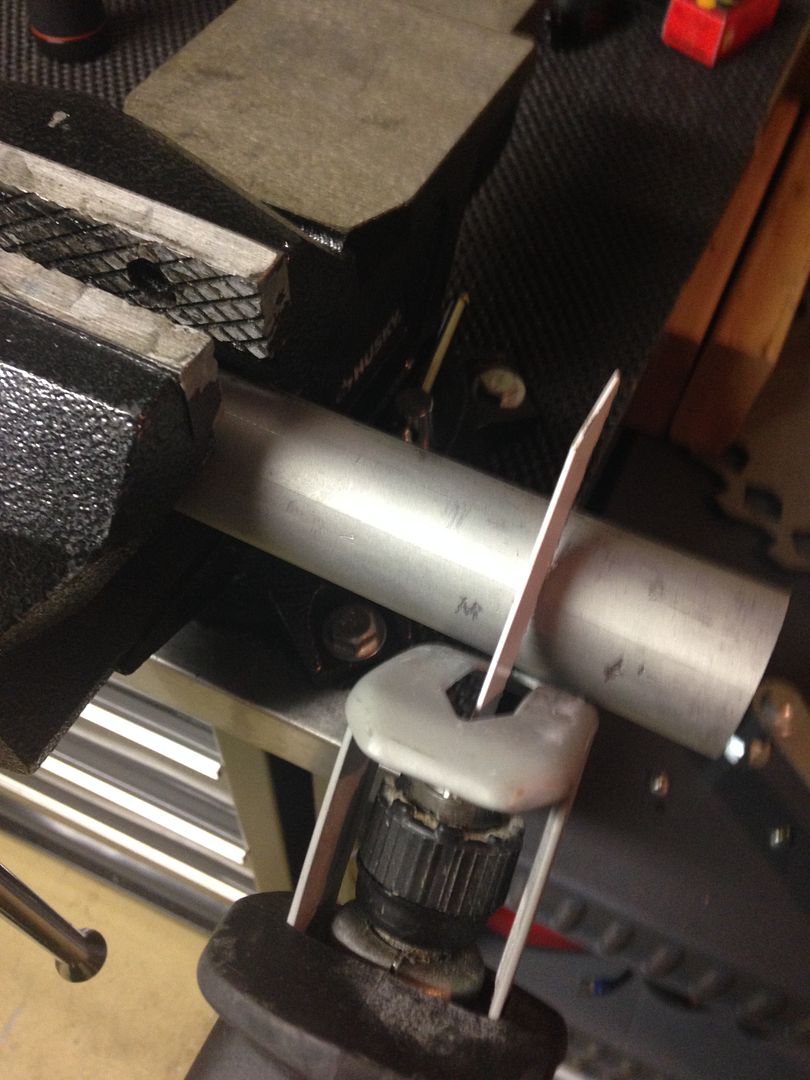
Step 8 final assembly Place your blast chamber spacer in the tube, and then the end cap. Tighten it down and make sure everything is tight and compacted inside. 
Make sure there is no movement of the internal parts, and you can see through the can with no obstructions. If you have a bore rod, stick it in to check the alignment. 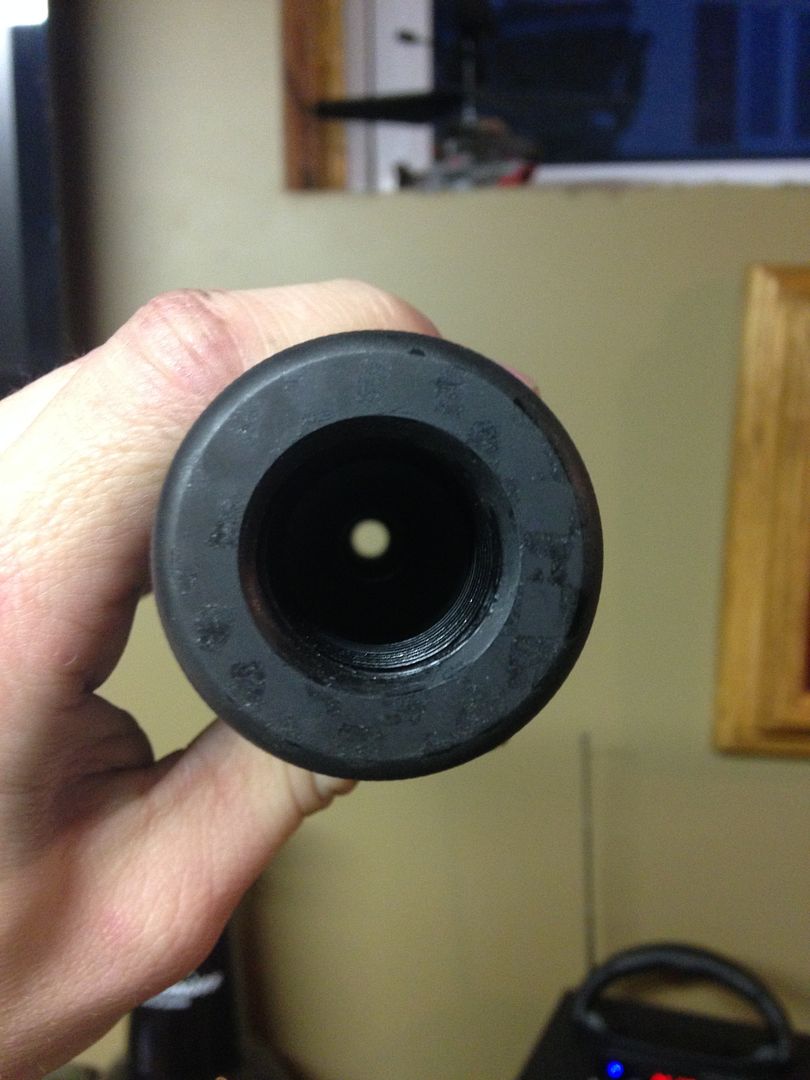
Step 9 coating You can finish your can with what ever you choose. I'm using high temp header paint. I have already coated the can prior to assembly, following the instructions on the paint can. 
Step 10 Engraving Your Form 1 suppressor needs to be properly marked per the ATF. Some guys do their own since it doesn't cost anything. You can engrave it or stamp it, but it needs to be .003 deep. You should have the trust name, city and state, model, serial, and caliber all as they appear on your paperwork for the approved stamp. Since I have a titanium tube, and I'm not very good at engraving I decided to have mine done by a professional. A local jewelry shop quoted me $50, online places are $35-$50 plus shipping. Follow all laws on proper placement, script type, etc. |
|
|
|
[#3]
Reserved for results

|
|
|
|
[#4]
Thank you. IMO this thread needs to be stickied. This is the best "how to" without all the other discussion.
|
|
|
|
[#5]
Nice, how much does it weigh?
|
|
|
|
[#6]
For guys that are only building one suppressor, it might be cool to "Rent-a-Tool" on that forming tool and pass around the savings. So that you're whole budget isn't blown a tool that cost more than the can.

|
|
|
|
[#7]
Another thread I need to keep an eye on. Got clearance from the tower to get my stamp, so this is very helpful. Great write up!
|
|
|
|
[#8]
Quoted:
Nice, how much does it weigh? +1 and what are the overall dimensions? |
|
|
|
[#9]
Subbed.. I've been contemplating this for a while, especially for tinker factor.
|
|
|
|
[#10]
Great write up OP! I like how it didnt turn into I wish I bought a lathe thread. What Orings did you use? Im so trying to talk the other half into letting me do this.
|
|
|
|
[#11]
Awesome write up.
|
|
|
|
[#12]
Quoted:
Nice, how much does it weigh? I updated the results post to show the weight. I will get the overall length tonight. |
|
|
|
[#13]
Wish I had half the skill you do.
That's fantastic. |
|
|
|
[#14]
Quoted:
+1 and what are the overall dimensions? Quoted:
Quoted:
Nice, how much does it weigh? +1 and what are the overall dimensions? Overall length is right at 9". |
|
|
|
[#15]
Quoted:
I updated the results post to show the weight. I will get the overall length tonight. Quoted:
Quoted:
Nice, how much does it weigh? I updated the results post to show the weight. I will get the overall length tonight. Can you estimate what the weight of the build would be with the Ti tube instead of the carbon steel? I'm waffling between spending the extra money on the Ti or dealing with some extra ounces on the carbon steel. |
|
|
|
[#16]
Quoted:
Reserved for results In its current configuration, 1 ss blast chamber and 15 freeze plug baffles with aluminum ends came in weighing more than I expected with the Titanium tube 21.8oz or 1lb 5.8oz. I looked at removing a few baffles and replacing with spacers, but the spacer material weighs over twice then the baffles so there would be no weight savings. <a href="http://s296.photobucket.com/user/WeberSteve/media/299AB9AC-C3E0-41D4-B97F-CCC84B4CD9AC_zpsek8mcfmd.jpg.html" target="_blank">http://i296.photobucket.com/albums/mm198/WeberSteve/299AB9AC-C3E0-41D4-B97F-CCC84B4CD9AC_zpsek8mcfmd.jpg</a> <a href="http://s296.photobucket.com/user/WeberSteve/media/5AAD4AE7-5D03-40E7-AADD-DF1512F038A9_zpss64m8n0y.jpg.html" target="_blank">http://i296.photobucket.com/albums/mm198/WeberSteve/5AAD4AE7-5D03-40E7-AADD-DF1512F038A9_zpss64m8n0y.jpg</a> Steel spacers (.05" thick) weight almost half the weight of a freeze plug for the same length taken up. Each freeze plug weights .76oz before drilling the center hole, so removing 1 freeze plug and replacing it with a spacer is equal to 1/3oz savings, going with Titanium or aluminum will yield an even larger savings. |
|
|
|
[#17]
How long is your titanium tube (tube itself)?
You are killing yourself weight wise with all those freeze plugs. Also, can you do me a favor and weigh a 16.9oz bottle of water. |
|
|
|
[#18]
Wow, nice work. This is almost exactly what I plan on doing once I get around to doing my form 1 only I was going to try to find a way around using the baffle forming tool. Maybe I will go together with some friends and get one, it appears to make it much easier.
That does seem excessive on the number of baffles, but what do I know? Thanks for the pics! |
|
|
|
[#19]
Quoted:
Can you estimate what the weight of the build would be with the Ti tube instead of the carbon steel? I'm waffling between spending the extra money on the Ti or dealing with some extra ounces on the carbon steel. Quoted:
Quoted:
Quoted:
Nice, how much does it weigh? I updated the results post to show the weight. I will get the overall length tonight. Can you estimate what the weight of the build would be with the Ti tube instead of the carbon steel? I'm waffling between spending the extra money on the Ti or dealing with some extra ounces on the carbon steel. I'm using the Ti tube. |
|
|
|
[#20]
Going off of your pictures, it doesn't look like you are screwing the endcaps in all the way.
|
|
|
|
[#21]
Quoted:
Steel spacers (.05" thick) weight almost half the weight of a freeze plug for the same length taken up. Each freeze plug weights .76oz before drilling the center hole, so removing 1 freeze plug and replacing it with a spacer is equal to 1/3oz savings, going with Titanium or aluminum will yield an even larger savings. Quoted:
Quoted:
Reserved for results In its current configuration, 1 ss blast chamber and 15 freeze plug baffles with aluminum ends came in weighing more than I expected with the Titanium tube 21.8oz or 1lb 5.8oz. I looked at removing a few baffles and replacing with spacers, but the spacer material weighs over twice then the baffles so there would be no weight savings. <a href="http://s296.photobucket.com/user/WeberSteve/media/299AB9AC-C3E0-41D4-B97F-CCC84B4CD9AC_zpsek8mcfmd.jpg.html" target="_blank">http://i296.photobucket.com/albums/mm198/WeberSteve/299AB9AC-C3E0-41D4-B97F-CCC84B4CD9AC_zpsek8mcfmd.jpg</a> <a href="http://s296.photobucket.com/user/WeberSteve/media/5AAD4AE7-5D03-40E7-AADD-DF1512F038A9_zpss64m8n0y.jpg.html" target="_blank">http://i296.photobucket.com/albums/mm198/WeberSteve/5AAD4AE7-5D03-40E7-AADD-DF1512F038A9_zpss64m8n0y.jpg</a> Steel spacers (.05" thick) weight almost half the weight of a freeze plug for the same length taken up. Each freeze plug weights .76oz before drilling the center hole, so removing 1 freeze plug and replacing it with a spacer is equal to 1/3oz savings, going with Titanium or aluminum will yield an even larger savings. SS spacer material weighs 1.5oz per width of the freeze plugs, that's double the weight of s freeze plug. I may need to go with a reduced wall thickness for spacer material to reduce the weight. I'm using the SS spacer material from SDTA. |
|
|
|
[#22]
Quoted:
Going off of your pictures, it doesn't look like you are screwing the endcaps in all the way. They are, O ring is fully compressed. |
|
|
|
[#23]
|
|
|
|
[#24]
Quoted:
They are, O ring is fully compressed. Quoted:
Quoted:
Going off of your pictures, it doesn't look like you are screwing the endcaps in all the way. They are, O ring is fully compressed. Do your endcaps not have the relief after the threads? Maybe your orings are a bit too big. I personally would want metal/metal contact when screwed on. |
|
|
|
[#25]
Quoted:
Do your endcaps not have the relief after the threads? Maybe your orings are a bit too big. I personally would want metal/metal contact when screwed on. Quoted:
Quoted:
Quoted:
Going off of your pictures, it doesn't look like you are screwing the endcaps in all the way. They are, O ring is fully compressed. Do your endcaps not have the relief after the threads? Maybe your orings are a bit too big. I personally would want metal/metal contact when screwed on. Not sure on the relief, but no metal to metal, oring is compressed in between. Same orings from the other thread. |
|
|
|
[#26]
I have the same orings too. Maybe he changed the endcap design? You got the aluminum right?

|
|
|
|
[#27]
Yeah, only difference is I'm using the SDTA brake.
|
|
|
|
[#28]
When you get home, take out a freeze plug, and screw them on all teh way. The orings should go right into the tube, I see you painted them so that might make it a bit more difficult, but those orings should slip right inside. (unless you get them wet with oil, they suck it up and expand)
|
|
|
|
[#29]
The endcaps should screw in all the way, flush if that is the right wording. As it sits now you either are not tightening them enough, the orings will squish in(dab of oil on them) or the innards of your can are to long.
Empty the can, remove the orings, if the caps screw in all the way then your gtg and need to adjust the innards or ask your hubby to screw the ends on, if not something is fuky. |
|
|
|
[#30]
Weber I shot you an IM. Not sure if you received it.
|
|
|
|
[#31]
Quoted:
Weber I shot you an IM. Not sure if you received it. I did a few, but can't read them right now. Shooting pool in a tournament and only have my phone, and can't push the small buttons to get there. I'll check them and get back to everyone tomorrow. |
|
|
|
[#32]
Quoted:
I'm using the Ti tube. Quoted:
Quoted:
Quoted:
Quoted:
Nice, how much does it weigh? I updated the results post to show the weight. I will get the overall length tonight. Can you estimate what the weight of the build would be with the Ti tube instead of the carbon steel? I'm waffling between spending the extra money on the Ti or dealing with some extra ounces on the carbon steel. I'm using the Ti tube. Sorry, missed that. I thought you were using a steel one. |
|
|
|
[#33]
I tried to install new orings on the end caps and screw them on. They still did not slip into the tube and only compressed, to the point that they would not come off, and I had to secure the tube in the vice and use a wrench to get the cap back off.
I called SDTA and they do not recommend using an o-ring and do not use them in their builds. So, I will be removing them from mine and adjusting the spacer accordingly. |
|
|
|
[#34]
a relief cut is the very small area between where the treads end and the rest of the cap begins.
Exerated view as most are not this big but it sites what I mean. 
|
|
|
|
[#35]
I was able to find some thinner wall spacer material that weighs less than the freeze plug baffles. I think I got the wrong size from them.
|
|
|
|
[#36]
The spacer material that SD sells is not very friendly. Its VERY THICK and heavy. It reduces the ID and thus kills the internal volume while adding unnecessary weight. Its not BAD....but there way better options. If you need spacer material turned down, just let me know. I can help you out with that.
|
|
|
|
[#37]
Quoted:
SS spacer material weighs 1.5oz per width of the freeze plugs, that's double the weight of s freeze plug. I may need to go with a reduced wall thickness for spacer material to reduce the weight. I'm using the SS spacer material from SDTA. Yup. One way for you to save weight is to start drilling weight reduction holes all over the spacers and FP walls. Or just go with Ti spacers. http://i296.photobucket.com/albums/mm198/WeberSteve/CF91D963-14FA-47A8-9FE7-F2C5420C31AB_zpsyk1t6vpw.jpg Your endcap looks normal, and just like mine. In theory your o-ring problem isn't that bad as long as you torque your encaps enough AND have all the threads in. But I agree with others that it should be tucked inside the tubes. It isn't meant to show like that. I would start grinding those a spacer down slowly and torque it all the way in. The o-rings are actually slightly over sized. So it may look like it is pinching, but it will slip in as your force it. BTW, those are NICELY done cones. Good job. |
|
|
|
[#38]
Quoted:
The spacer material that SD sells is not very friendly. Its VERY THICK and heavy. It reduces the ID and thus kills the internal volume while adding unnecessary weight. Its not BAD....but there way better options. If you need spacer material turned down, just let me know. I can help you out with that. You could use aluminim tube as spacer material, couldn't you? SD only sells PVC and stainless in the D-tube size, but doesn't recommend PVC for anything other than .22 builds. I would think an aluminum spacer would be fine in a carbon steel tube, if you can find it in the appropriate size. |
|
|
|
[#39]
Quoted:
You could use aluminim tube as spacer material, couldn't you? SD only sells PVC and stainless in the D-tube size, but doesn't recommend PVC for anything other than .22 builds. I would think an aluminum spacer would be fine in a carbon steel tube, if you can find it in the appropriate size. Absolutely.....the tube doesn't need any more strength. Aluminum spacer saves weight and can increase volume if you get the right stuff. I like the 1.375" OD .065" wall. Even turned down to 1.350" it makes an excellent spacer in the Apogee and or SD tubes. |
|
|
|
[#40]
Quoted:
You could use aluminim tube as spacer material, couldn't you? SD only sells PVC and stainless in the D-tube size, but doesn't recommend PVC for anything other than .22 builds. I would think an aluminum spacer would be fine in a carbon steel tube, if you can find it in the appropriate size. Quoted:
Quoted:
The spacer material that SD sells is not very friendly. Its VERY THICK and heavy. It reduces the ID and thus kills the internal volume while adding unnecessary weight. Its not BAD....but there way better options. If you need spacer material turned down, just let me know. I can help you out with that. You could use aluminim tube as spacer material, couldn't you? SD only sells PVC and stainless in the D-tube size, but doesn't recommend PVC for anything other than .22 builds. I would think an aluminum spacer would be fine in a carbon steel tube, if you can find it in the appropriate size. The spacer material I have linked works perfectly, and keeps weight down. |
|
|
|
[#41]
Quoted:
The spacer material I have linked works perfectly, and keeps weight down. Yes it does.....that is perfect. I wasn't saying the aluminum is preferred to the TI you listed, just that it was acceptable as far as strength goes. I used aluminum in the last couple tubes because I had it on hand, however if I had my choice it would be TI every time. |
|
|
|
[#42]
Quoted:
Yes it does.....that is perfect. I wasn't saying the aluminum is preferred to the TI you listed, just that it was acceptable as far as strength goes. I used aluminum in the last couple tubes because I had it on hand, however if I had my choice it would be TI every time. Quoted:
Quoted:
The spacer material I have linked works perfectly, and keeps weight down. Yes it does.....that is perfect. I wasn't saying the aluminum is preferred to the TI you listed, just that it was acceptable as far as strength goes. I used aluminum in the last couple tubes because I had it on hand, however if I had my choice it would be TI every time. I guess my point is, is that I would want the stronger stuff in the blast chamber, and if you get it for that, you have a lot extra for the spacers. No need to over think it |
|
|
|
[#43]
Quoted:
I guess my point is, is that I would want the stronger stuff in the blast chamber, and if you get it for that, you have a lot extra for the spacers. No need to over think it Quoted:
Quoted:
Quoted:
The spacer material I have linked works perfectly, and keeps weight down. Yes it does.....that is perfect. I wasn't saying the aluminum is preferred to the TI you listed, just that it was acceptable as far as strength goes. I used aluminum in the last couple tubes because I had it on hand, however if I had my choice it would be TI every time. I guess my point is, is that I would want the stronger stuff in the blast chamber, and if you get it for that, you have a lot extra for the spacers. No need to over think it Are you talking about this link? That's stainless, not Ti. |
|
|
|
[#44]
Awesome write up. I've got to try this
|
|
|
|
[#45]
The Ti will be 2-3x as much, and will make the suppressor heat up even faster
|
|
|
|
[#46]
Quoted:
Awesome write up. I've got to try this He wasnt lying about thinking he was about to break his vice. I just tried forming a freeze plug and bent my vice handle. I'm gunna build a simple rectangular press frame for a bottle jack tomorrow. I'll some pics if it's ok with the op, and you guys wanna see it. |
|
|
|
[#47]
Quoted:
He want lying about thinking he was about to break his vice. I just tried forming a freeze plug and bent my vice handle. I'm gunna build a simple rectangular press frame for a bottle jack tomorrow. I'll some pics if it's ok with the op, and you guys wanna see it. Quoted:
Quoted:
Awesome write up. I've got to try this He want lying about thinking he was about to break his vice. I just tried forming a freeze plug and bent my vice handle. I'm gunna build a simple rectangular press frame for a bottle jack tomorrow. I'll some pics if it's ok with the op, and you guys wanna see it. Sure. |
|
|
|
[#48]
Didn't work, my homemade press borked up the holes on the freeze plugs, couldn't keep everything centered. Got one that turned out pretty good and the proceeded to get it stuck in the sd tube after messing up the threads. So I've got a bunch of borked up freeze plugs, and a trashed tube. I'm going to cut and crush all the bad parts and wait till I can get a jig like the ebay one. If anyone has a line on one send me a pm.
|
|
|
|
[#49]
Quoted:
Didn't work, my homemade press borked up the holes on the freeze plugs, couldn't keep everything centered. Got one that turned out pretty good and the proceeded to get it stuck in the sd tube after messing up the threads. So I've got a bunch of borked up freeze plugs, and a trashed tube. I'm going to cut and crush all the bad parts and wait till I can get a jig like the ebay one. If anyone has a line on one send me a pm. Send the guy on eBay a message, tell him I sent you. Ask for a good deal and tell him your situation that you tried. |
|
|
|
[#50]
Quoted:
Send the guy on eBay a message, tell him I sent you. Ask for a good deal and tell him your situation that you tried. Quoted:
Quoted:
Didn't work, my homemade press borked up the holes on the freeze plugs, couldn't keep everything centered. Got one that turned out pretty good and the proceeded to get it stuck in the sd tube after messing up the threads. So I've got a bunch of borked up freeze plugs, and a trashed tube. I'm going to cut and crush all the bad parts and wait till I can get a jig like the ebay one. If anyone has a line on one send me a pm. Send the guy on eBay a message, tell him I sent you. Ask for a good deal and tell him your situation that you tried. Done, thanks. |
|
|
 Win a FREE Membership!
Sign up for the ARFCOM weekly newsletter and be entered to win a free ARFCOM membership. One new winner* is announced every week!
You will receive an email every Friday morning featuring the latest chatter from the hottest topics, breaking news surrounding legislation, as well as exclusive deals only available to ARFCOM email subscribers.

AR15.COM is the world's largest firearm community and is a gathering place for firearm enthusiasts of all types.
From hunters and military members, to competition shooters and general firearm enthusiasts, we welcome anyone who values and respects the way of the firearm.

Subscribe to our monthly Newsletter to receive firearm news, product discounts from your favorite Industry Partners, and more.
Copyright © 1996-2024 AR15.COM LLC. All Rights Reserved.
Any use of this content without express written consent is prohibited.
AR15.Com reserves the right to overwrite or replace any affiliate, commercial, or monetizable links, posted by users, with our own.


