|
[Last Edit: newARbuilder]
[#1]
that looks awesome, I normally like the black rifles, but that... that's sexy right there. How did you fill in the Weatherby writing?
|
||
|
|
|
[#2]
Thanks. It was almost a shame to refinish it. It had a beautiful factory blue but the owners brother got deer blood on it.  Doing the lettering is quite easy. After I bake the gun blue finish I reheat the barrel to around 125 degrees and spray whatever I want to do in the gold (brass color actually) and let it air dry for 20-30 minutes. Then I just take a rag with thinner and wipe the over spray off. I hold the rag tight over my finger tip. If the letters aren't deep it's almost impossible to do this as the rag will wipe the finish out of the letters. Then I bake the part again for another hour. |
|||
|
|
OK, USA
|
[#3]
I do...but I've been called retarded before  About 15 coats of Krylon...various and assorted colors under the OD green |
|
|
|
VA, USA
|
[#4]
I will probably get s#it for posting this but o well:
This Glock 19 was auctioned off at the Northern Virginia Friends of NRA banquet this past Friday. It turned out to be the most exciting item of the night with 5 people bidding on it and the proceeds went to the NRA Foundation.  In case you were wondering its Duracoat Lady Pink and the pictures were taken before the clear coat. |
|
|
|
[#5]
How much did you pay for it? 
|
||
|
|
VA, USA
|
[#6]
See what I am talking about!  |
||
|
|
OH, USA
|
[#7]
+1 on what is this color? |
||
|
|
|
[#8]
Sorry for the late reply just saw the post now. I used duracoat advanced tiger stripe brown. You'll have to call them to order the color, it normally comes with one of kits. No special technique, just degrease the stock like any other part and spray. Like everyone says prep is the key. I usually set the compressor pressure to about 30-35 and use a 12 to 1 mix with paint and hardener. I usually put about 3 coats on and wait several hours between coats if not over night. once painted let parts set at least 24 hrs before putting everything back together and then let it sit in the safe a few weeks to fully harden before beating it up. The one down side of duracoat is the cure time, duracoat does make camo jobs and touch ups a lot easier though. |
|||
|
|
|
[Last Edit: Montana3gunner]
[#9]
Currahee - here's the finished project. See my earlier post for colors/finish on stocks and mag extension. My goal was a camo that would look good at a 3 gun match (in kind of a WWII desert camo kind of way) but also be a good duck/goose camo in these parts.
The receiver (first layers) is Norrells flat brown and tan, and Duracoat desert beige and mint. I wanted to experiment with layering the two products. If it doesn't work, I'm ok with re-doing it. The Norrells flat tan came out very similar to the DC dark earth. The bolt and trigger are Norrells brown and tan only. The first pic is the tactical setup. The barrel is Norrells only as I use this barrel for 3 gun matches and it gets very HOT. In addition to the brown and tan, I mixed tan with white to lighten it and try to match it to the DC desert beige..as you can see I did a crappy job matching, the barrel is darker and more brown that the other parts.  Here is the hunting setup - same colors as the receiver. 
|
|
|
|
|
[#10]
WOW!! You did a great job. Post some pics. after you burn a few through that barrel. |
||
|
|
|
[#11]
Well here is one of my latest ventures.
Before  After (I just thought the 1st one looked cool)   |
|
|
|
AL, USA
|
[#12]
Shotgun looks great and should be a very effective camo pattern...how about some pics outside? Again, great job. BTW - what kind of templates did you use...Bulldog, duracoat, homemade? |
|
|
|
|
[#13]
real nice. |
||
|
|
|
[Last Edit: Montana3gunner]
[#14]
Tested and Bjwar - thanks! I used Bulldog Flectar (sp?) templates...I think they work pretty good.
Tested - are you kidding me...your latest project looks positively BAD-ASS! Looking at the picture with the fire, that reminds me of my attempts to try to preheat my gun and spray Norrells!! (only caught my cardboard spray box on fire twice).
|
||
|
|
NU, CAN
|
[#15]
Here's my SigArms Blue Star .223 rifle that got an OD GREEN paintjob ... my leupold scope/rings to match ... hope you like ... armacoat.net did the work in Canada ... these pics do NOT do the rifle justice ... damn thing was so ugly with the SMURF blue paint on it ... shameful ... HAHAHA ... so I had to have her painted ... http://img.photobucket.com/albums/v478/Otokiak/SigArms6-1.jpg
http://img.photobucket.com/albums/v478/Otokiak/SigArms4.jpg http://img.photobucket.com/albums/v478/Otokiak/SigArms7.jpg |
|
|
|
[#16]
Here's an HS Precision I just finished for a friend:
    |
|
|
|
|
[#17]
Here is a recent one in Norrells OD and Socom Black

|
|
|
|
|
[#18]
This is currently in my garage waiting for the first coat of rattle can tan to dry. I'll post pics once its complete.
CMMG 14.5" midlength in a CMT upper Stag lower w/CMT LPK 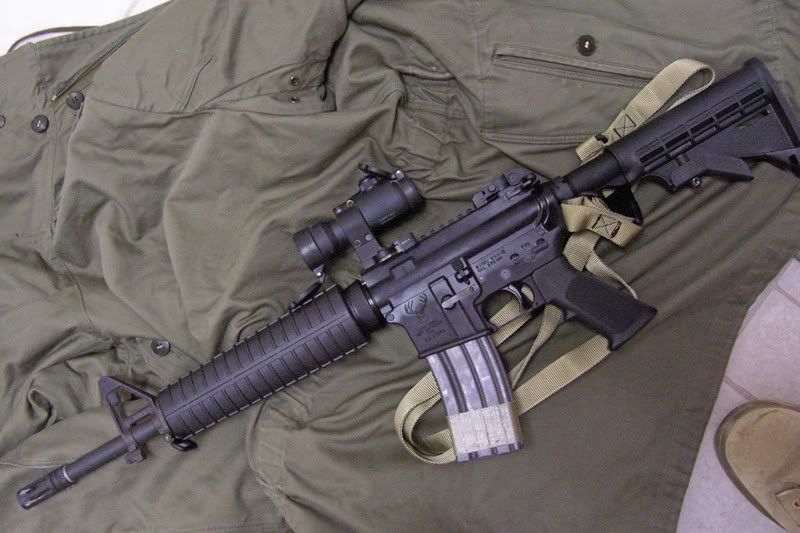
|
|
|
|
|
[#19]
very sweet............. |
||
|
|
|
[Last Edit: jollyroger]
[#20]
Ok, here it is. There are a few things I'll probably change to give it a better camo job. It was kinda dark in my garage so I didnt notice some of the things until I got inside with good light. Didnt do the Aimpoint since I might not be keeping it on this gun (waiting for the Meopta).
I'll definitely be changing this up a bit to get more dark areas to break up all that tan **EDIT** Ok, the first pics I posted were enough to make me go straight back out and make it look better. Here are the new pics, I added a bit more green so that it didnt look so yellow. 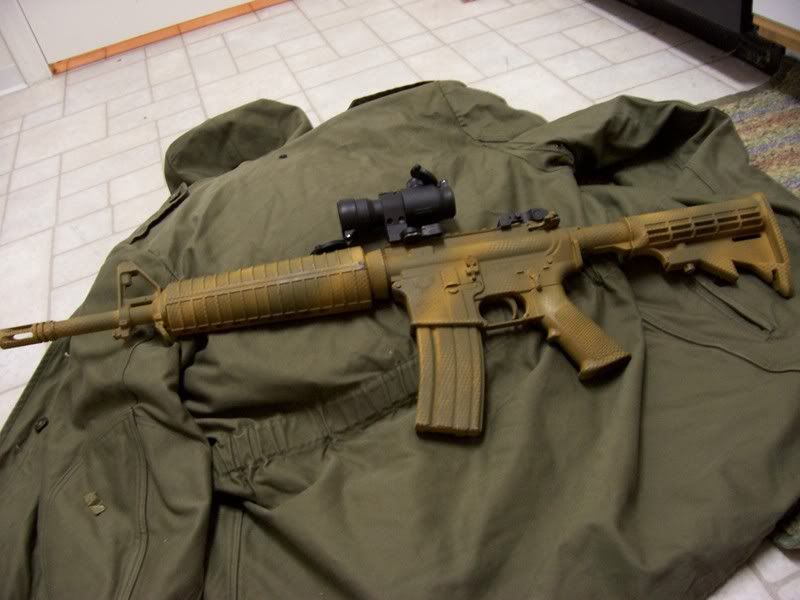 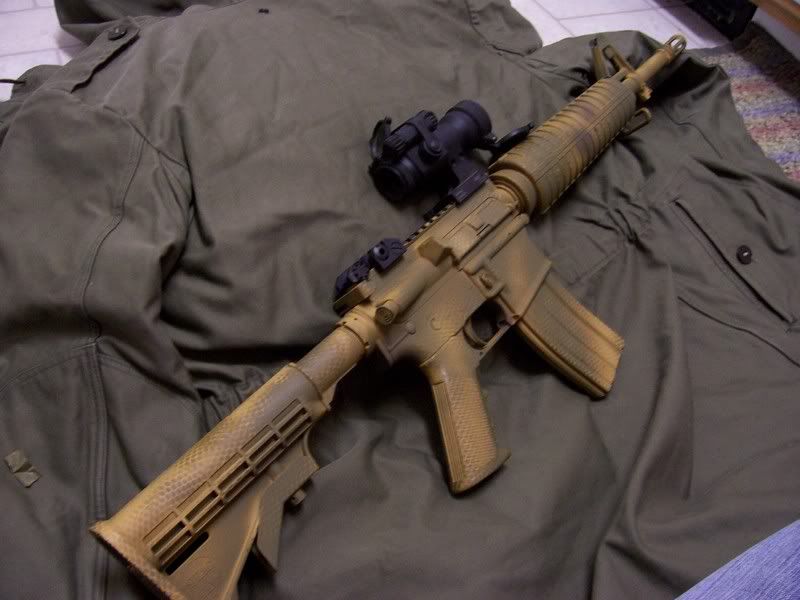 |
|
|
|
MD, USA
|
[Last Edit: bigk23surf]
[#21]
My 16" Carbine
http://www.boomspeed.com/bigk23surf/gun8.jpg http://www.boomspeed.com/bigk23surf/Gun4.JPG The dark color is Dark Earth and the lighter is Desert Sand. I used Bulldog arms stencils. Let me know what you guys think. |
|
|
|
[Last Edit: Striker]
[#22]
bigk23surf the ar looks great.
Here is a 700 I finished today. I didn't do the stock, just the metal. OD green and flat black. 
|
|
|
|
IN, USA
|
[Last Edit: mrrick]
[#23]
     Norrells, but have not shot it to heat up the finish, but soon! |
|
|
|
[Last Edit: Noxspector]
[#24]
Circa 1991 I decided that I needed to put together one of these AR-15 type rifles. So I purchased a kit without the lower from Nessards and one of the $59 Essential Arms Cast Lowers to put together. I had dreams of competing in the DCM/Hi-power matches that some of my friends were shooting. Well, I managed to scrape together enough cash to put the gun together, but never managed to really compete in the matches. So my AR was relegated to the occasional outing with friends.
Fast foreward until a few weeks ago when I had decided to "Pull the Trigger" and get started with this refinishing thing. I had contemplated what I should do for my first project, as I didn't know how it would turn out. Well I finally came to the decission that for my first project that was spurred on by this form, I should naturally do redo my first AR. It had been showing the signs of being well used over the years. Well I decided to go foreward using Brownell's Moly Coating with an air-brush, as I get a discount from Brownells and I had an airbrush that had never been used. I also decided that I wanted to retire the Pre-ban lower as it might find it's way to a good home somewhere else. I also wanted a good excuse to try one of the new Esential Arms Forged Lowers that are being made now. When I ordered the lower(s) from Essential, I found the conversation very rewarding and learned much about the companies history. I ordered three lowers (2 in hard coat black and 1 in regular black) I recommend the paying the extra $2 for the hard coat. At the same time, I decided that I would switch out the rear stock as it has some pretty decent dings in it and I was to impatient to work them out. I may still use it if I get around to making it prettier. I find the older one is heavier and helps balance out the 20" H-bar. After learning MUCH during the process, I am nearing completion. I still want to either rework the original stock or darken up the new stock, but I was getting impatient to see what the finished rifle might look like. I am reserving this post for final photos when I'mdone with the rifle. However, I thought I would post two quick shots I got before I lost the sunlight. -------------------------------------------------------------------------------------------------------------------------------------------------- Brownell's OD and Flat Black Molycoat applied using Harbor Freight Air-Brush. The Bayonet was the very first thing I've coated. It was cheaper than the rifle.  
|
|
|
|
|
[#25]
looks good, did you coat the pivot pins in black? most are kinda gray. |
||
|
|
IN, USA
|
[#26]
yes, I coated all pins, levers ect. just not any fiberglass parts or Eotech. I wanted everything to match since I whent so far with it.
|
|
|
IL, USA
|
[#27]
I was wondering if you could tell me what kind of rifle is this and if this is a aftermarket stock who manufactures it. |
|
|
|
|
[#28]
its a blaser, not sure what model. cool link world.guns.ru/sniper/sn26-e.htm |
|||
|
|
|
[#29]
Here's my Rem700PSS I refinished yesterday with DuraCoat.
 
|
|
|
|
|
[#30]
You did a great job if I do say so. What template did you use? |
||
|
|
|
[#31]
No template, blue masking tape a thin sharpie marker and an exacto knife. I placed the masking tape on a plastic cutting board, drew the shapes on, cut them out with the exacto and put them on the rifle. Worked out pretty well and cheap!
|
|
|
|
|
[#32]
f ing sweet...
|
|
|
|
|
[#33]

|
|
|
|
|
[Last Edit: Striker]
[#34]
Something a bit different. When the owner said he wanted them done in flat od green I thought..eeewwwww. but I really like the look.
We did the front sight, back sight, trigger and all the internal parts in gun kotes high moly flat black at the owners request. They now have the best sight picture of any model 10 I've shot. 
|
|
|
|
|
[#35]
SKS
   It's not totally done yet. I work on it as I finish other ones and have extra paints. It is my test gun. |
|
|
|
AL, USA
|
[#36]
Looks really good...sometimes the best camo jobs are the ones where you aren't trying so hard. |
|
|
|
|
[#37]
+1. Tested..what did you use for mesh? |
|||
|
|
|
[#38]
best in the thread IMO.... 
|
||
|
|
NM, USA
|
[Last Edit: bonepickerx]
[#39]
This is my first attempt at Duracoat. Used Stone, Desert Mirage Lizard, will finish with Sniper Green and flat black.
 Finished the Duracoat paint job. The frigging rubber pistol grips suck! Need a better adhesive for the templates, plus the template cost is ridiculous. 
|
|
|
|
[Last Edit: Striker]
[#40]
ETA..here is a vintage Colt from the same customer. I tried my best to convince him to let me do it in gun blue but he wanted it flat black. The original finish was in bad shape.  The shiny spots are oil. |
|||
|
|
|
[#41]
Thanks, I got it from a friend of mine. I think that it was a camo. fish net type of thing. |
||||
|
|
|
[#42]
fish net pantyhose? |
||
|
|
|
[#43]
It's an OD netting that snipers use for C&C. Looks like a real fishnet from a sporting store more than pantyhose.
In retorspect I would have secured the netting completely around the weapon and then painted it. It would also be nice if you had an extra hand to help hold it. You have to very careful when pulling the net off or it will smear the paint. Also want to hold it very steady and close to the surface if you want crisp lines. |
|
|
|
|
[#44]
Man, I like the way that mesh looks! |
||
|
|
AR, USA
|
[#45]
I look forward to seeing it finished with the green and black. |
|
|
|
|
[Last Edit: chapperjoe]
[#46]
I dunno, I'm not much of a blue fan except when its completely uniform and perfect. that's why these flat finishes on old guns just tickle me pink. the uniformity of the finish lets you appreciate the function and form itself, which is gorgeous. Like the 1911's on teh cover of hte 1st edition of sweeneys 1911 book (pictured here next to a 1911 I had....
 a good finish means there's nothing to distract you from the form itself, and the FORM and FUNCTION of the guns like teh 1911 and the revolvers you are posting are what make them beautiful. (that might've sounded a little artsy fartsy, but whatever....  ) )
|
|
|
|
NM, USA
|
[#47]
I will be posting a finished picture soon! |
||
|
|
GA, USA
|
[Last Edit: Lawman734]
[#48]
Here's my buddy's Savage that I recently refinished for him in Woodland using Bulldog Arms templates.
Overall, I'd say not bad for the first camo job (I've done a number of single color finishes before), there were a few things I learned that I would now do different-but it wasn't nearly as hard as I thought it would be. 
|
|
|
|
[#49]
That looks fantastic lawman.
|
|
|
|
USA
|
[Last Edit: RoverG79]
[#50]
Here is my Bushmaster lower and LMT upper I refinished in Duricoat Semigloss HK Black. I did the lower, rail, foregrip, buttstock, and the EOTECH hood and batt comparment. I think it looks good for my first time.
http://img473.imageshack.us/img473/7123/bushmasterww6.jpg |
|
|
 Win a FREE Membership!
Sign up for the ARFCOM weekly newsletter and be entered to win a free ARFCOM membership. One new winner* is announced every week!
You will receive an email every Friday morning featuring the latest chatter from the hottest topics, breaking news surrounding legislation, as well as exclusive deals only available to ARFCOM email subscribers.

AR15.COM is the world's largest firearm community and is a gathering place for firearm enthusiasts of all types.
From hunters and military members, to competition shooters and general firearm enthusiasts, we welcome anyone who values and respects the way of the firearm.

Subscribe to our monthly Newsletter to receive firearm news, product discounts from your favorite Industry Partners, and more.
Copyright © 1996-2024 AR15.COM LLC. All Rights Reserved.
Any use of this content without express written consent is prohibited.
AR15.Com reserves the right to overwrite or replace any affiliate, commercial, or monetizable links, posted by users, with our own.


