|
[#1]
I run the Surefire DSF-870......great light setup.
My only complaint is that I would like a little larger area for hand placement, but I stippled it and am now pleased with it. |
|
|
|
[#2]
I got the old 628 forend light on my 870P. All it needs is good LED upgrade, like a CREE or a Malkoff M61. I put a CREE on mine and it works beautifully.

|
|
|
|
[#3]
Those older model Surefires are good lights and can be picked up used for a good price.
Nothing wrong with upgrading to an LED light, but keep in mind that LED don't work in smoke and fog anywhere near as good as an incandescent. I went with the new DSF because I was mounting on a 14" SBS......the older lights are longer than the barrel! Surefire has a lifetime warranty and have never let me down. No worries buying a used Surefire product. |
|
|
|
[#4]
628 here also. I replaced the incandescent head with a P60 LED head a while back. "Works fine lasts long time"...
|
|
|
|
[#5]
I back those suggestions... I've compared a new Surefire 617 200lumen to an old Surefire with aftermarket 400 lumen cree upgrade. I sold the new Surefire and kept the old one as it was much brighter and only cost me $80 + $20 for the cree. I upgraded my P6 as well. To me the less to think about the better. The new DSF Surefire has more than one switch to think about. I was an early distributor for Surefire and they always had great products and service. |
|
|
|
[#6]
Where did you get the Cree upgrade from? I would to upgrade a couple of older weapon lights.
Thanks Quoted:
I back those suggestions... I've compared a new Surefire 617 200lumen to an old Surefire with aftermarket 400 lumen cree upgrade. I sold the new Surefire and kept the old one as it was much brighter and only cost me $80 + $20 for the cree. I upgraded my P6 as well. To me the less to think about the better. The new DSF Surefire has more than one switch to think about. I was an early distributor for Surefire and they always had great products and service. |
|
|
|
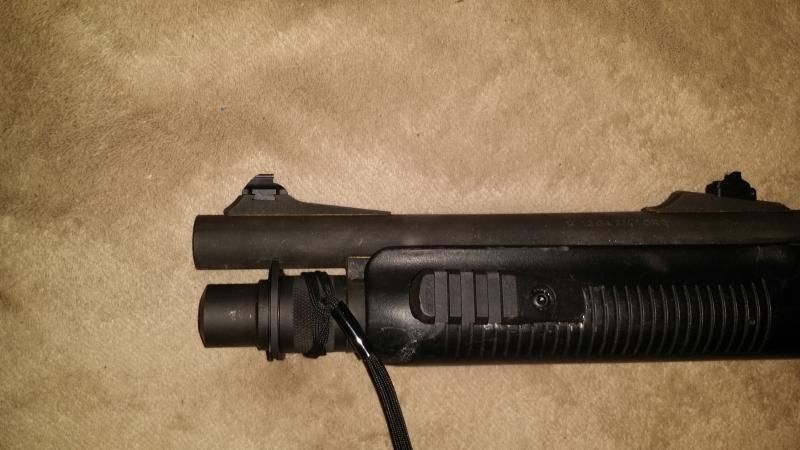
[#7]
I was looking at the Surefire DSF for my Mossberg, but I read that its switching is software-based (as opposed to the mechanical switch of the older Surefire lights) and therefore is always drawing some power from the batteries, whether it's "on" or not. Some people have complained about quick battery drainage due to this.
Right now I'm just using a Surefire 6P with a Malkoff head mounted to a Magpul MOE handguard, but if I decide to go with a dedicated forend light, I'll probably seek out an older Surefire model. |
|
|
|
[#8]
Quoted:
I was looking at the Surefire DSF for my Mossberg, but I read that its switching is software-based (as opposed to the mechanical switch of the older Surefire lights) and therefore is always drawing some power from the batteries, whether it's "on" or not. Some people have complained about quick battery drainage due to this. Right now I'm just using a Surefire 6P with a Malkoff head mounted to a Magpul MOE handguard, but if I decide to go with a dedicated forend light, I'll probably seek out an older Surefire model. I tried to use one on a Mossberg but the gripping area was so short it beat my finger to a pulp no matter what I did. I've also heard the issues concerning battery drain. |
|
|
|
[#9]
The original DSF models had problems with battery drain, which Surefire corrected. I believe the way to tell if you have the newer "upgraded" DSF is via the number on the light head. I'm waiting on a callback from a buddy at Surefire to verify how to tell if you have the newer version.
|
|
|
|
[#10]
Ok....verified.
If you have a Surefire DSF with a serial number on the light head, then you have a newer version. In the newer, serial numbered versions, the battery issue has been "fixed". |
|
|
|
[#11]
eBay - CREE XM-L2 U2 LED 1-Mode 3.7-18V P60 SMO Lamp/Bulb for Surefire® from a USA seller. The seller I bought the 1200 lumen model which is more like 400 or so.
I picked up the Surefire on eBay too... Quoted:
Where did you get the Cree upgrade from? I would to upgrade a couple of older weapon lights. Thanks Quoted:
Where did you get the Cree upgrade from? I would to upgrade a couple of older weapon lights. Thanks Quoted:
I back those suggestions... I've compared a new Surefire 617 200lumen to an old Surefire with aftermarket 400 lumen cree upgrade. I sold the new Surefire and kept the old one as it was much brighter and only cost me $80 + $20 for the cree. I upgraded my P6 as well. To me the less to think about the better. The new DSF Surefire has more than one switch to think about. I was an early distributor for Surefire and they always had great products and service. |
|
|
|
[#12]
You don't have to think about the switches on the DSF. Set them and forget them, then just use the pressure pad as normal. I don't monkey with the switches.
|
|
|
|
[#13]
Quoted:
I tried to use one on a Mossberg but the gripping area was so short it beat my finger to a pulp no matter what I did. I've also heard the issues concerning battery drain. Good to know. I haven't gotten to mess with one "in real life", so this saves me some trouble. Thanks! |
|
|
|
[#14]
Quoted:
Ok....verified. If you have a Surefire DSF with a serial number on the light head, then you have a newer version. In the newer, serial numbered versions, the battery issue has been "fixed". Excellent. Your post is the first one that I'd seen saying that the issue has been fixed. I Googled around a bit to see if I could find any confirmation. I found one post on another forum* saying that Surefire was saying that the drainage problem was due to a problem / design issue with the lamp assembly. That the "fixed" ones exhibit a serial number on the head seems to support that as the culprit, I guess. The nice thing is, that's an easy fix (replace the lamp assembly). * http://www.combat-shotgun.com/viewtopic.php?f=51&t=752&sid=f88e0d1f7d0cca640fa406027faed8d7 |
|
|
|
[#15]
Surefire makes great products and their shotgun forends are no exception. I would buy the new style for the brighter light, and more importantly, the momentary/constant switches on either side. I sold my older 618 because it was too fat for my medium sized hands. To reach the momentary pad on the right side, I had to roll my hand underneath. I did not care for this.
That said, I have two 870s set up now for the Inforce WML.One is on a Magpul forend, and the other is on a modified factory forend that I installed a Magpul cantilever picatinny rail. I can take the light on and off quickly and only have to move my thumb to activate the switch. It also lights the front sight nicely from the 9:00 position. I can see that running the new Surefire alot could hurt your fingers. I just took a 3 day class with my 14" 870 and my strong hand middle finger that sits against the back of the trigger guard is pretty sore from the recoil, even though it just rests aginst the guard. 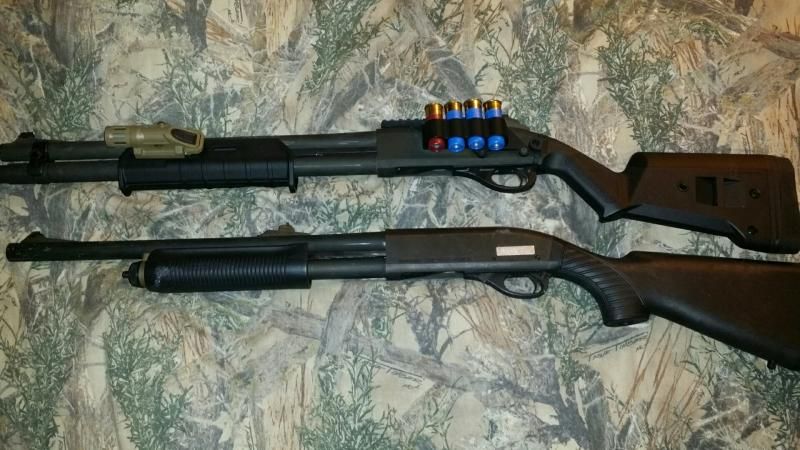
|
|
|
|
[#16]
Could you post a tutorial or at the least how you attached the rail to your foreend, that would be great.
Quoted:
Excellent. Your post is the first one that I'd seen saying that the issue has been fixed. I Googled around a bit to see if I could find any confirmation. I found one post on another forum* saying that Surefire was saying that the drainage problem was due to a problem / design issue with the lamp assembly. That the "fixed" ones exhibit a serial number on the head seems to support that as the culprit, I guess. The nice thing is, that's an easy fix (replace the lamp assembly). * http://www.combat-shotgun.com/viewtopic.php?f=51&t=752&sid=f88e0d1f7d0cca640fa406027faed8d7 Quoted:
Quoted:
Ok....verified. If you have a Surefire DSF with a serial number on the light head, then you have a newer version. In the newer, serial numbered versions, the battery issue has been "fixed". Excellent. Your post is the first one that I'd seen saying that the issue has been fixed. I Googled around a bit to see if I could find any confirmation. I found one post on another forum* saying that Surefire was saying that the drainage problem was due to a problem / design issue with the lamp assembly. That the "fixed" ones exhibit a serial number on the head seems to support that as the culprit, I guess. The nice thing is, that's an easy fix (replace the lamp assembly). * http://www.combat-shotgun.com/viewtopic.php?f=51&t=752&sid=f88e0d1f7d0cca640fa406027faed8d7 |
|
|
|
[#17]
Quoted:
Could you post a tutorial or at the least how you attached the rail to your foreend, that would be great. I put it in the same location as the rail on my Magpul forend. I made a template by pressing the two posts on the back of the Magpul cantilever picatiny rail section through a sheet of computer paper. Rubbing around the edge of the rail leaves a mark on the paper that you can cut out. Then, I laid the template in the correct spot and traced it with a silver Sharpie. Now, with a sanding drum on a Dremel, start to grind a flat spot for the rail and check progress and fit frequently. It doesnt have to be perfectly flat, but the rail should sit down in the relieved area. I got it so my rail actually snapped in to place. Drill three holes; two for the posts and the center one for the bolt. The front post is round so a slightly oversized hole is easy to drill. The rear post is oval and requires a hole longer than it is tall. The oval rear hole was a little low causing the rail to angle upward. I had to hog out the hole to get the rail horizontal on the forend. this won't matter because JB Weld will fill it in. Drill the hole for the bolt just smaller than the bolt itself and it will cut the threads when you screw it in. Once it fits to your liking, stuff a paper towel into the tube to keep the epoxy from running out the back, fill the relieved area with JB Weld, snap the rail into place, and install the bolt to snug (I cut the threads first before the JB Weld went in). I ran it for three days at at a shotgun class last week. Without the light I didn't notice the rail at all and with the WML installed it is very easy to access the switch with my thumb. It worked great for the low light shoot . Here is the Dremel work just before installing the rail. 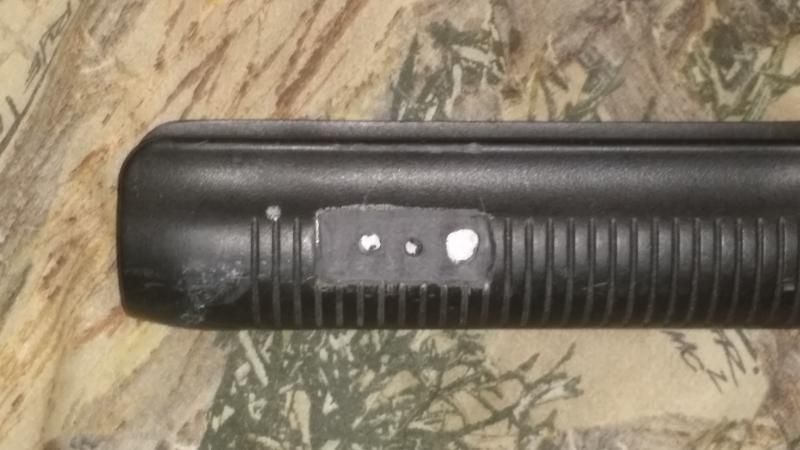
|
|
|
|
[#18]
Thank you. Great job.
Quoted:
I put it in the same location as the rail on my Magpul forend. I made a template by pressing the two posts on the back of the Magpul cantilever picatiny rail section through a sheet of computer paper. Rubbing around the edge of the rail leaves a mark on the paper that you can cut out. Then, I laid the template in the correct spot and traced it with a silver Sharpie. Now, with a sanding drum on a Dremel, start to grind a flat spot for the rail and check progress and fit frequently. It doesnt have to be perfectly flat, but the rail should sit down in the relieved area. I got it so my rail actually snapped in to place. Drill three holes; two for the posts and the center one for the bolt. The front post is round so a slightly oversized hole is easy to drill. The rear post is oval and requires a hole longer than it is tall. The oval rear hole was a little low causing the rail to angle upward. I had to hog out the hole to get the rail horizontal on the forend. this won't matter because JB Weld will fill it in. Drill the hole for the bolt just smaller than the bolt itself and it will cut the threads when you screw it in. Once it fits to your liking, stuff a paper towel into the tube to keep the epoxy from running out the back, fill the relieved area with JB Weld, snap the rail into place, and install the bolt to snug (I cut the threads first before the JB Weld went in). I ran it for three days at at a shotgun class last week. Without the light I didn't notice the rail at all and with the WML installed it is very easy to access the switch with my thumb. It worked great for the low light shoot . Here is the Dremel work just before installing the rail. http://i66.photobucket.com/albums/h264/DWood13/20141021_133238_zps698951b3.jpg Quoted:
Quoted:
Could you post a tutorial or at the least how you attached the rail to your foreend, that would be great. I put it in the same location as the rail on my Magpul forend. I made a template by pressing the two posts on the back of the Magpul cantilever picatiny rail section through a sheet of computer paper. Rubbing around the edge of the rail leaves a mark on the paper that you can cut out. Then, I laid the template in the correct spot and traced it with a silver Sharpie. Now, with a sanding drum on a Dremel, start to grind a flat spot for the rail and check progress and fit frequently. It doesnt have to be perfectly flat, but the rail should sit down in the relieved area. I got it so my rail actually snapped in to place. Drill three holes; two for the posts and the center one for the bolt. The front post is round so a slightly oversized hole is easy to drill. The rear post is oval and requires a hole longer than it is tall. The oval rear hole was a little low causing the rail to angle upward. I had to hog out the hole to get the rail horizontal on the forend. this won't matter because JB Weld will fill it in. Drill the hole for the bolt just smaller than the bolt itself and it will cut the threads when you screw it in. Once it fits to your liking, stuff a paper towel into the tube to keep the epoxy from running out the back, fill the relieved area with JB Weld, snap the rail into place, and install the bolt to snug (I cut the threads first before the JB Weld went in). I ran it for three days at at a shotgun class last week. Without the light I didn't notice the rail at all and with the WML installed it is very easy to access the switch with my thumb. It worked great for the low light shoot . Here is the Dremel work just before installing the rail. http://i66.photobucket.com/albums/h264/DWood13/20141021_133238_zps698951b3.jpg |
|
|
|
[#19]
OP, did you decide yet? Surefire?
Here is the back (sorry, can't find a bigger picture on the Internet) of the cantilever rail section. I didn't use the oval back plate which is used on the Magpul forend. 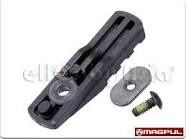
And the side. I chose this rail for the sloped area as a thumb index when not running the WML, rather than a regular rail section. It is very easy to attach it to a factory forend. 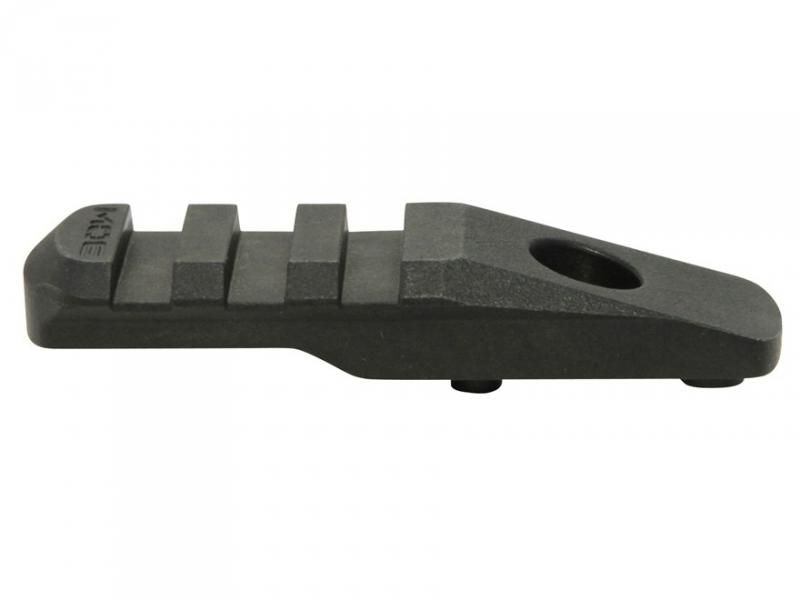
|
|
|
 Win a FREE Membership!
Sign up for the ARFCOM weekly newsletter and be entered to win a free ARFCOM membership. One new winner* is announced every week!
You will receive an email every Friday morning featuring the latest chatter from the hottest topics, breaking news surrounding legislation, as well as exclusive deals only available to ARFCOM email subscribers.

AR15.COM is the world's largest firearm community and is a gathering place for firearm enthusiasts of all types.
From hunters and military members, to competition shooters and general firearm enthusiasts, we welcome anyone who values and respects the way of the firearm.

Subscribe to our monthly Newsletter to receive firearm news, product discounts from your favorite Industry Partners, and more.
Copyright © 1996-2024 AR15.COM LLC. All Rights Reserved.
Any use of this content without express written consent is prohibited.
AR15.Com reserves the right to overwrite or replace any affiliate, commercial, or monetizable links, posted by users, with our own.


